Go Back
- 2 cups sushi rice - 2 ½ cups water - 1 teaspoon salt - 1 tablespoon rice vinegar - 1 tablespoon sugar - 1 chicken breast, cooked and shredded - 2 tablespoons soy sauce - 1 teaspoon sesame oil - 1 green onion, finely chopped - 1 sheet nori (seaweed), cut into strips - Optional: sesame seeds for garnish Sushi rice is sticky and perfect for shaping. It holds the onigiri together. Water cooks the rice to the right texture. Salt adds flavor to the rice. Rice vinegar gives the rice a slight tang. Sugar balances the vinegar's taste. Cooked chicken is the filling. It brings protein and heartiness. Soy sauce gives the chicken a savory boost. Sesame oil adds richness and a nutty taste. Green onion provides a fresh crunch. Nori is the seaweed that wraps the onigiri. It adds flavor and makes it easy to hold. Sesame seeds are optional but add a nice crunch. Choose sushi rice that is short-grain for the best texture. Look for rice that is clean and shiny. Use fresh chicken breast for the best taste. If possible, buy organic or free-range chicken. Check soy sauce for quality; go for low-sodium if you prefer. Fresh green onions should be bright and firm. Pick nori that is dark and crisp for the best flavor. When selecting sesame seeds, choose light-colored ones for a fresher taste. {{ingredient_image_1}} Start by rinsing the sushi rice under cold water. Rinsing removes excess starch. This step ensures fluffy rice. Keep rinsing until the water runs clear. In a rice cooker or pot, add the rinsed rice and water. Add salt for flavor. Cook according to the rice cooker instructions. If using a pot, bring it to a boil. Cover, reduce heat, and simmer for about 18 minutes. The water should be absorbed when done. Mix rice vinegar and sugar in a small bowl. Stir until the sugar dissolves. Once the rice is cooked, transfer it to a large bowl. Gently fold in the vinegar mixture using a wooden paddle or spatula. Let it cool slightly. In a bowl, combine shredded chicken, soy sauce, sesame oil, and chopped green onion. Mix well until the chicken is coated in sauce. This adds a savory flavor to your filling. Wet your hands slightly to prevent sticking. Take about 1/3 cup of rice and flatten it in your palm. Place a spoonful of the chicken mixture in the center. Carefully fold the rice around the filling. Shape it into a triangle or oval. Repeat until all rice and filling are used. Cut a strip of nori and wrap it around the base of each onigiri. Wrapping adds flavor and makes it easier to hold. If you like, sprinkle sesame seeds on top for extra crunch. To shape onigiri, start with wet hands. This keeps the rice from sticking. Take about 1/3 cup of rice and press it into a disc. Place a spoonful of chicken in the center. Fold the rice around the filling. You can form a triangle or oval shape. Press gently but firmly. This makes sure your onigiri holds together. To keep rice from sticking, rinse it first. Wash sushi rice under cold water until clear. This removes extra starch. When forming the onigiri, wet your hands. This simple trick helps the rice slide easily. If you find the rice is still sticky, add a little more water to your hands. Serve your chicken onigiri with soy sauce for dipping. You can add pickled vegetables on the side. They give a nice crunch and flavor. For a fun twist, try serving with a salad. A simple cucumber salad pairs well. You can even serve your onigiri for lunch with fruit. They make a great snack or picnic food too! Pro Tips Rinse the Rice: Always rinse sushi rice thoroughly to remove excess starch, which helps achieve the perfect sticky texture for onigiri. Cool the Rice: Let the seasoned rice cool slightly before shaping to prevent burns and ensure it holds together better when forming onigiri. Moisten Your Hands: Lightly wet your hands while shaping the onigiri to prevent the rice from sticking, making it easier to form perfect shapes. Customize the Filling: Feel free to experiment with different fillings such as tuna, pickled vegetables, or tofu to create unique flavor combinations. {{image_2}} You can change the filling in your chicken onigiri to keep things fun. Try using cooked shrimp, tuna, or even teriyaki beef. Each option adds a new flavor. Mix and match your favorites. You can also use leftovers, like roast chicken or grilled veggies. If you want a meat-free meal, there are great fillings for vegetarians and vegans. Use cooked mushrooms, avocado, or tofu. You can also add pickled vegetables for a tangy kick. These options are tasty and full of nutrients. Just make sure to use vegan-friendly sauces. Adding extra flavors can make your onigiri even better. Use a dash of chili oil for heat. You can also mix in herbs like cilantro or mint for freshness. Try sprinkling furikake on top for a savory twist. It adds color and crunch. These small changes can make a big difference in taste. You can store leftover onigiri in an airtight container. Keep them in the fridge for up to two days. If you want to enjoy them later, wrap each onigiri in plastic wrap. This helps keep them fresh and prevents them from drying out. To freeze onigiri, first, let them cool completely. Then, wrap each one tightly in plastic wrap. Place the wrapped onigiri in a freezer bag. You can freeze them for up to one month. Make sure to label the bag with the date to track freshness. To reheat frozen onigiri, take them out of the freezer. Let them thaw in the fridge overnight. You can also reheat them in the microwave. Place onigiri on a microwave-safe plate. Cover with a damp paper towel to keep them moist. Heat for about 30 seconds, checking for warmth. If needed, add more time in short bursts. Enjoy the flavors as if they were fresh! The best rice for onigiri is sushi rice. This rice is sticky and holds shape well. It has a short grain that keeps the onigiri together. Look for good quality sushi rice at your local store. Yes, you can make onigiri without nori. If you don’t like nori, skip it. The onigiri will still taste great. You can serve it plain or add sesame seeds for crunch. Onigiri last about 1 to 2 days in the fridge. Store them in an airtight container. To keep them fresh, wrap them in plastic wrap. They taste best when eaten fresh. Yes, you can use different proteins for the filling. Try tuna, salmon, or tofu. Each protein adds a unique flavor. Be creative and mix flavors that you enjoy. Serve onigiri as a snack or lunch. They are great for picnics or bento boxes. You can add pickled vegetables or a side salad for a complete meal. Enjoy your tasty onigiri with friends or family! Making onigiri is fun and satisfying. We covered the key ingredients, preparation steps, and tips for success. I shared ways to create perfect shapes and enhance flavors with various fillings. Don't forget the storage tips to save leftovers for later. Onigiri is a tasty dish you can customize. With practice, you'll impress everyone with your skills. Enjoy making and sharing this delicious Japanese snack!

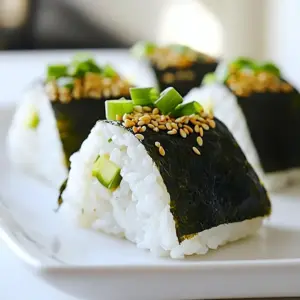
Savory Chicken Onigiri Delight

Enjoy these savory chicken onigiri as a delicious snack, lunch option, or picnic treat!
Course Main Course
Cuisine Japanese
Servings 4
Calories 300 kcal

Ingredients
  

  • 2 cups sushi rice
  • 2.5 cups water
  • 1 teaspoon salt
  • 1 tablespoon rice vinegar
  • 1 tablespoon sugar
  • 1 chicken breast cooked and shredded
  • 2 tablespoons soy sauce
  • 1 teaspoon sesame oil
  • 1 green onion finely chopped
  • 1 sheet nori (seaweed), cut into strips
  • to taste sesame seeds for garnish

Instructions
 

  • Prepare the Rice: Begin by rinsing the sushi rice under cold water until the water runs clear. This removes excess starch and helps achieve a perfect texture.
  • Cook the Rice: In a rice cooker or pot, combine the rinsed rice and water. Add salt. Cook according to the rice cooker instructions or bring to a boil, cover, reduce heat, and simmer for about 18 minutes, or until the water is absorbed.
  • Season the Rice: In a small bowl, mix rice vinegar and sugar until dissolved. Once the rice is cooked, transfer it to a large bowl and gently fold in the vinegar mixture using a wooden paddle or spatula. Allow it to cool slightly.
  • Prepare the Chicken Filling: In a bowl, mix the shredded chicken with soy sauce, sesame oil, and chopped green onion. Ensure the chicken is well-coated with the sauce.
  • Form the Onigiri: With slightly wet hands (to prevent sticking), take about 1/3 cup of rice and flatten it into a small disc in your palm. Place a spoonful of the chicken mixture in the center. Carefully fold the rice around the filling, shaping it into a triangle or oval form. Repeat until all the rice and filling are used.
  • Wrap with Nori: Take a strip of nori and wrap it around the base of each onigiri. This adds flavor and makes it easier to hold. If desired, sprinkle with sesame seeds for extra crunch.

Notes

Optional: sesame seeds for garnish.
Keyword chicken, onigiri, snack