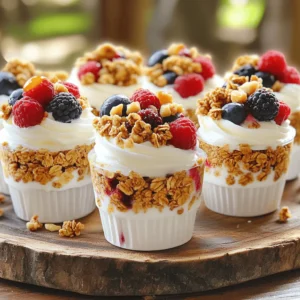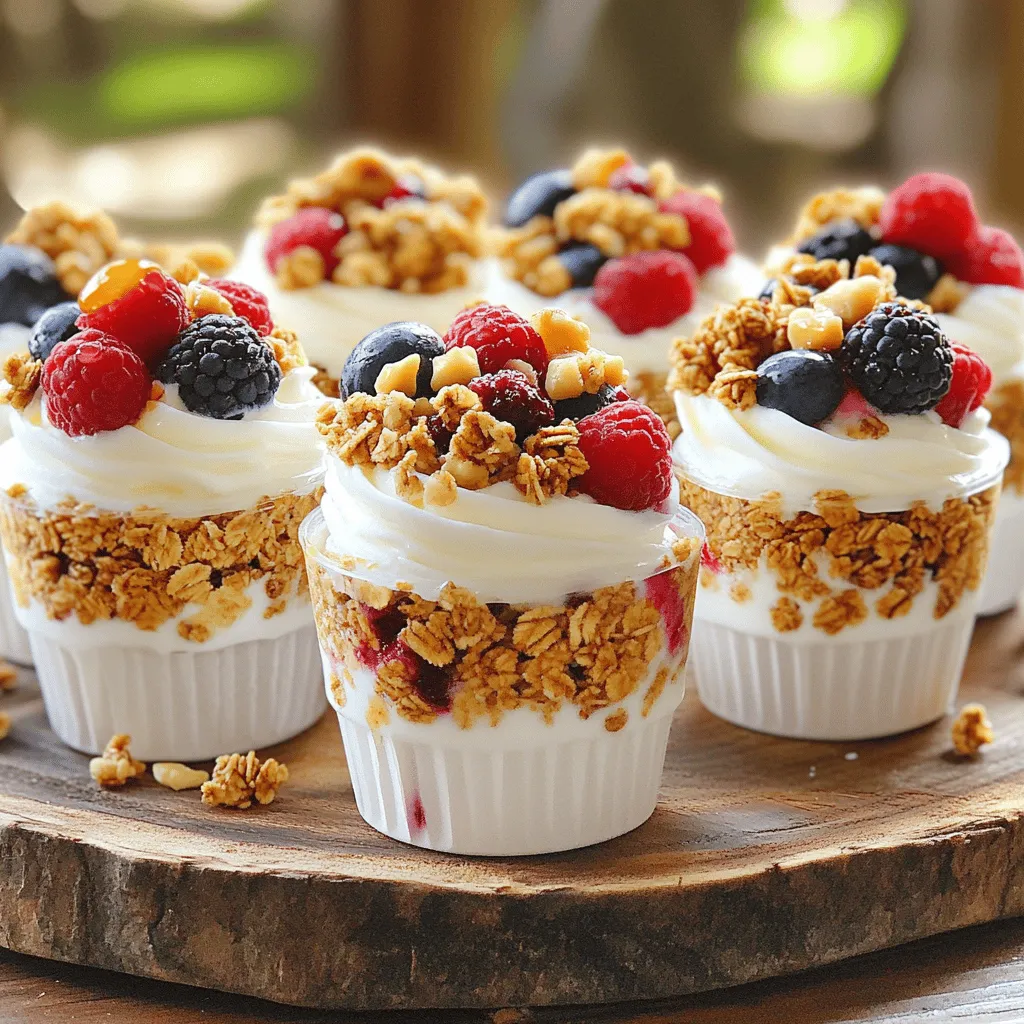
Are you ready for a delicious, creamy treat that you can make at home? Frozen Yogurt Granola Cups are not just tasty; they’re also a healthy snack option! With just a few simple ingredients like Greek yogurt and your favorite granola, you can create a fun dessert. In this post, I’ll guide you through the steps to make these delightful cups, share tips for perfecting them, and explore fun variations. Let’s dive in!
Ingredients
List of Ingredients
– 2 cups Greek yogurt (plain or flavored)
– 1 cup granola (your choice of flavor)
– 1/4 cup honey or maple syrup
– 1/2 cup mixed berries (fresh or frozen)
– 1/4 cup chopped nuts (e.g., almonds, walnuts)
– 1/4 teaspoon vanilla extract
– A pinch of salt
When making Frozen Yogurt Granola Cups, using quality ingredients is key. Greek yogurt forms a creamy and rich base. You can choose plain or flavored yogurt based on your taste. Next, pick a granola that you love. This adds crunch and flavor. Honey or maple syrup sweetens the mix, balancing the tang of yogurt.
Mixed berries bring freshness and a pop of color. They can be fresh or frozen, making this recipe flexible for any season. Chopped nuts add a nice crunch and are great for texture. Vanilla extract enhances the flavor, giving a warm touch. Finally, a pinch of salt rounds out the taste, making it oh-so-delicious!
Nutritional Information
Each serving of these Frozen Yogurt Granola Cups is not just tasty but healthy too! You can expect around 150 calories per cup, depending on your yogurt and granola choices. Greek yogurt is packed with protein, which helps keep you full. It also has probiotics for gut health.
Berries are rich in antioxidants and vitamins, boosting your immune system. Nuts provide healthy fats and protein, making these cups a great snack or dessert. These ingredients work together to create a treat that is both satisfying and beneficial for your body.
For more detailed nutritional facts, check the Full Recipe.
Step-by-Step Instructions
Preparation Steps
To make these Frozen Yogurt Granola Cups, start by mixing the yogurt. In a large bowl, combine:
– 2 cups Greek yogurt (plain or flavored)
– 1/4 cup honey or maple syrup
– 1/4 teaspoon vanilla extract
– A pinch of salt
Stir these ingredients together until you have a smooth, creamy mix. This step is key for a tasty base.
Next, grab a muffin tin and line it with paper or silicone cupcake liners. This makes it easy to remove the cups later.
Now, fill each liner about one-third full with the yogurt mix. After that, add a layer of granola on top. Use about 1/2 cup of granola in total. Press the granola down gently, so it sticks.
Top off each cup with more yogurt mix until they are almost full. Finally, scatter mixed berries and chopped nuts on top. Use about 1/2 cup of mixed berries and 1/4 cup of chopped nuts for extra flavor and texture.
Freezing Instructions
Once you have layered all the cups, it’s time to freeze. Place the muffin tin in the freezer. Let the cups freeze for at least 4 hours. This gives them enough time to set solid.
To check if they are ready, poke one with a fork. If it’s firm, they are good to go.
Serving Suggestions
When you are ready to enjoy, carefully remove the cups from the muffin tin. Peel off the liners gently.
For a fun presentation, arrange the cups on a platter. You can garnish with extra berries or a drizzle of honey.
These cups pair well with fresh juice or a light herbal tea. They also make a great dessert after a meal.
Tips & Tricks
Perfecting the Recipe
When making Frozen Yogurt Granola Cups, avoid common mistakes. One issue is overfilling the cups. Leave space for toppings and freezing expansion. Another mistake is not mixing ingredients well. This can lead to uneven flavors. Adjust sweetness to fit your taste. Start with less honey or maple syrup, then add more if needed.
Improving Texture
To make your cups creamier, try using full-fat Greek yogurt. It adds a rich taste and smoothness. For crunchier cups, use a thicker layer of granola. You can also mix in some oats for added texture. Layering is key. Start with yogurt, then granola, followed by more yogurt. This keeps everything from sinking.
Flavor Enhancements
Want to boost flavor? Try adding spices like cinnamon or cocoa powder. They add warmth and depth. You can also mix in some nut butter for creaminess. Experiment with different fruits too. Try bananas or mangoes for a tropical twist. The options are endless!

Variations
Alternative Ingredients
You can switch things up with different ingredients. For a vegan version, try dairy-free yogurt. It works well and tastes great. You can also choose various types of granola. Look for flavors like chocolate, honey, or even nutty blends.
Toppings are fun too! Use fresh fruits like bananas, peaches, or even mango. You can try different nuts or seeds for crunch. Each choice brings a new taste to your cups.
Seasonal Variations
Seasonal fruits make this treat even better. In fall, add pumpkin spice or apples. In summer, use berries like strawberries or blueberries for a refreshing twist. You can also customize these cups for holidays. Add festive sprinkles or themed toppings for a special touch.
For birthdays or parties, think about flavors like cookies and cream or mint chocolate. Your guests will love the creativity!
Size and Serving Adjustments
You can make these cups in any size you like. For smaller treats, use mini muffin tins. They are perfect for parties or snacks. If you want bigger portions, use larger molds.
Adjust the layers to suit your needs. More yogurt for creaminess or extra granola for crunch will make your cups unique. Play around and find what works best for you!
Storage Info
Proper Freezing Techniques
To keep your Frozen Yogurt Granola Cups fresh, follow these tips:
– Use airtight containers or freezer bags for storage.
– Label containers with the date to track freshness.
– Leave some space in the container for expansion as they freeze.
These steps help maintain the quality of your cups. Avoid using containers that are too large, as they can lead to freezer burn.
Storing Leftovers
Your Frozen Yogurt Granola Cups can last up to one month in the freezer. To keep them fresh:
– Always seal them tightly in an airtight container.
– If you see any ice crystals, it’s time to eat them or toss them.
Keeping them well-stored ensures you enjoy their creamy goodness later.
Thawing Tips
When you’re ready to enjoy your Frozen Yogurt Granola Cups, thaw them properly. Here are the best methods:
– Fridge Method: Place them in the fridge for about 30 minutes before serving. They will soften nicely.
– Microwave Method: Use the defrost setting on your microwave for 10-15 seconds. Check often to avoid melting.
These methods help you serve them at the right texture and flavor. Enjoy your tasty treat!
FAQs
How long do Frozen Yogurt Granola Cups last in the freezer?
Frozen Yogurt Granola Cups can last in the freezer for up to one month. To keep them fresh, store them in an airtight container. This helps prevent freezer burn and keeps the flavors intact. If you notice any ice crystals forming, it may mean they are losing quality. Always label your container with the date to track freshness.
Can I use different flavors of yogurt?
Yes, you can use different flavors of yogurt! This recipe is very flexible. You can try vanilla, strawberry, or even chocolate yogurt. Each flavor adds a unique taste. Using flavored yogurt can change the overall profile of your cups. Experiment with what you love most. You may find a new favorite combination.
What can I substitute for granola?
If you want to substitute granola, there are many options. You can use crushed cereal or oats for a different texture. Nuts and seeds work well, too. For a gluten-free option, look for gluten-free granola. You can also skip the granola entirely and layer in your favorite fruits instead. This way, you can create a tasty treat that suits your needs.
These Frozen Yogurt Granola Cups are easy to make and fun to enjoy. We covered key ingredients, health benefits, and steps to create perfect cups. Remember, you can customize flavors and toppings for any occasion. Don’t forget to use proper freezing techniques to keep them fresh. With these tips and ideas, you can create a tasty treat everyone will love. Enjoy making and sharing your unique versions! Your creativity can turn these cups into a delightful choice for snacks or desserts any time.