STIRRED RECIPES
Where every dish begins with a stir! 🍲✨
BEST CATEGORIES
TRENDING
![- 2 cups all-purpose flour - 1/2 cup unsalted butter, chilled and cubed - 1/4 cup granulated sugar - 3 medium-sized apples (such as Granny Smith), peeled, cored, and diced - 1 teaspoon lemon juice - 1 teaspoon ground cinnamon - 1/4 teaspoon ground nutmeg - 1/4 cup brown sugar - 1 tablespoon cornstarch - Egg wash (1 egg beaten with 1 tablespoon water) - Green candy leaves or fresh mint for garnish When making pumpkin shaped mini apple pies, the right ingredients matter. The base of the pie is a simple yet rich dough. You need all-purpose flour, unsalted butter, and a bit of sugar for sweetness. This mix gives the crust a flaky texture. Next, we have our apples. I love using Granny Smith apples for their tartness. Their flavor balances out the sugar and spices perfectly. Don't forget the lemon juice! It brightens the apple filling, making it fresh and zesty. Spices add warmth and depth. Ground cinnamon and nutmeg are must-haves. They fill your kitchen with a cozy aroma while baking. Brown sugar adds a hint of caramel sweetness to the filling. For the assembly, a simple egg wash gives a golden finish. Top with green candy leaves or mint for a fun touch. These small details make your mini pies pop! Check out the full recipe for more details on each step. - Combine 2 cups of flour, 1/4 cup sugar, and 1/4 teaspoon salt in a bowl. - Add 1/2 cup of chilled, cubed butter. Mix until it looks like coarse crumbs. - Gradually pour in 1/4 cup of ice water, mixing until the dough comes together. - Toss 3 diced apples with 1 teaspoon lemon juice, 1 teaspoon cinnamon, and 1/4 teaspoon nutmeg. - Add 1/4 cup brown sugar and 1 tablespoon cornstarch to the apples. - Let this mixture sit for about 10 minutes to create a rich flavor. - Roll out the dough to 1/8 inch thick on a floured surface. - Use a pumpkin-shaped cookie cutter to cut out shapes. You need two pieces per pie. - Place half of the cutouts on a parchment-lined baking sheet. - Spoon a small amount of apple filling onto each cutout. - Brush the edges with an egg wash made from 1 beaten egg and 1 tablespoon water. - Cover with the second cutout and gently press to seal. Crimp edges with a fork. - Preheat your oven to 375°F (190°C). - Place the assembled pies on a baking sheet. - Bake for 20-25 minutes, until the pies turn golden brown. For the full recipe, click here. To get the best dough, keep your butter cold. Cold butter makes the crust flaky. When you mix it with the flour, it creates small pockets. These pockets help the dough rise as it bakes. Chilling the dough before rolling is key too. Wrap it in plastic and rest it in the fridge for at least 30 minutes. This step keeps the shape when you cut it. Use different apple types to boost flavor. Each apple brings a unique sweetness. I love using Granny Smith for their tartness. You can also mix in Honeycrisp for a sweeter touch. After mixing the apples with spices and sugars, let it sit. Resting helps the flavors blend together. This step enhances the taste and makes your filling pop. Get creative with decoration! Use extra dough scraps to make fun shapes. You can form little leaves or stars to add to your pies. For extra sweetness, drizzle icing on top after baking. A simple glaze made with powdered sugar and milk works great. It adds a nice shine and taste to your pumpkin-shaped mini apple pies. For the final touch, add green candy leaves or fresh mint. This brings your dessert to life! For the full recipe, check out the [Full Recipe]. {{image_2}} You can make your mini apple pies even more tasty. Try adding caramel or raisins to the apple filling for a sweet twist. Both add a rich flavor that blends well with apples. You can also experiment with spices like ginger or clove. These spices give your pies a warm and cozy taste. Just a little goes a long way. Want a healthier pie? You can use whole wheat flour instead of all-purpose flour. This switch gives your crust more fiber and nutrients. If you want to cut calories, try a sugar substitute. There are many options available that still taste great in the filling. While pumpkin shapes are fun, you can create mini pies in other seasonal shapes too. Think leaves or acorns for fall! If you want more to share, try making larger pies. You can use the same filling and crust techniques, just adjust the baking time. Larger pies can be great for gatherings or family dinners. After baking, allow your mini apple pies to cool. Place them in an airtight container. This keeps them fresh and tasty. For the best flavor, eat them within 2-3 days. After this, they may lose some of their charm. To freeze the mini pies, let them cool completely. Wrap each pie in plastic wrap. Then, place them in a freezer bag or container. This method helps avoid freezer burn. They can stay frozen for up to three months. When ready to enjoy, take them out and let them defrost overnight in the fridge. This keeps the texture nice. To reheat your mini pies, place them in a preheated oven at 350°F (175°C). Bake for about 10-15 minutes. This warms them through and keeps the crust crispy. Avoid the microwave if you want the crust to stay flaky. The oven is the best option for that perfect bite. Yes, you can make the dough ahead of time. Just follow these steps: - Mix the dry ingredients and butter as usual. - Add ice water to form the dough. - Wrap it tightly in plastic wrap. - Store it in the fridge for up to two days. This makes it easy to assemble your mini pies later! If you don’t have a pumpkin cookie cutter, don’t worry! Here are some fun options: - Use a regular round cutter and add a stem with dough scraps. - Cut out apple shapes or even leaves for a fall theme. - Use a knife to create pumpkin shapes by hand. Let your creativity shine! To check if the mini pies are done, look for these signs: - The crust should be golden brown. - You may see the filling bubbling up through the vents. - If the edges are crispy and firm, they are ready to enjoy. Trust your eyes and your nose for the best results! Pumpkin-shaped mini apple pies are fun and tasty. This blog post showed you how to make them step by step. You learned about the key ingredients, from flour to apples, and important tips for perfecting the dough. You also saw cool variations and storage ideas. Try these mini pies to impress friends and family. Simple changes can make them your own. Enjoy baking these delicious treats and sharing them with others!](https://stirredrecipes.com/wp-content/uploads/2025/08/19b485dd-4242-4254-82af-3b7a396bab5a.webp)


![- 1 cup orzo pasta - 2 boneless, skinless chicken breasts (about 1 pound) - 2 cups low-sodium chicken broth - 1 tablespoon olive oil - 1 medium onion, chopped - 2 cloves garlic, minced - 1 cup cherry tomatoes, halved - 1 cup fresh spinach - 1 teaspoon dried oregano - 1 teaspoon smoked paprika - Salt and pepper to taste - ¼ cup feta cheese, crumbled (optional) - Fresh parsley for garnish When you make High Protein Chicken Orzo, you need fresh and quality ingredients. Start with orzo pasta as your base. This tiny pasta cooks quickly and pairs well with chicken. Next, the chicken breasts provide protein. Choose boneless and skinless for easy cooking. They will turn juicy and tender with the right seasoning. Chicken broth adds flavor and helps the orzo cook perfectly. I use low-sodium broth to control salt levels. For vegetables, you'll want to add color and nutrients. Olive oil helps cook the onion and garlic, building a tasty base. Fresh spinach and cherry tomatoes bring brightness and health benefits. Seasoning is key. Dried oregano and smoked paprika add depth. Don't forget to taste and adjust salt and pepper to your liking. Lastly, if you love cheese, a sprinkle of feta adds creaminess. Fresh parsley as a garnish makes your dish pop. These ingredients come together for a meal that's quick, easy, and full of flavor. For the complete recipe, check out [Full Recipe]. First, bring the chicken broth to a simmer in a medium saucepan. This step adds great flavor to the orzo. Next, add the orzo and cook it based on the package instructions, usually around 8 to 10 minutes. You want it to be al dente. Once done, drain the orzo and set it aside for later. Take the chicken breasts and season them well. Sprinkle salt, pepper, oregano, and smoked paprika on both sides. These spices pack a punch of flavor. Heat a skillet over medium-high heat and add a tablespoon of olive oil. Cook the chicken for about 6 to 7 minutes on each side. You want it to be golden brown and fully cooked. Once done, remove it from the skillet and let it rest for a few minutes before slicing. In the same skillet, lower the heat to medium. Add the chopped onion and sauté it for about 3 to 4 minutes until it is soft and translucent. Then, add minced garlic and sauté for another minute. Next, stir in the halved cherry tomatoes and fresh spinach. Cook everything until the tomatoes soften and the spinach wilts, which takes about 2 to 3 minutes. Now, it’s time to bring everything together. Add the cooked orzo to the skillet with the vegetable mixture. Toss them to mix well. Slice the rested chicken and place it on top of the orzo. If you want, sprinkle some crumbled feta cheese over the dish. This adds a nice creamy touch. Taste the dish and adjust seasoning with salt and pepper if needed. Finish by garnishing with chopped parsley before serving. Enjoy your high protein chicken orzo! You can find the full recipe [here](#). - Ensure chicken is properly seasoned for maximum flavor. Use salt, pepper, oregano, and smoked paprika. - Monitor cooking times to avoid overcooking orzo and chicken. Cook orzo until al dente. Chicken should reach an internal temperature of 165°F. - Experiment with additional spices or herbs. Try basil, thyme, or red pepper flakes for a kick. - Consider marinating chicken beforehand for added flavor. A simple mix of olive oil, lemon, and herbs works great. - Chicken and orzo are high in protein. Chicken offers about 26 grams, while orzo adds another 7 grams per cup. - The dish provides nutritional advantages with included vegetables. Spinach and tomatoes add vitamins A and C, plus fiber. {{image_2}} You can switch chicken for turkey, shrimp, or tofu. Each option offers a new taste. Turkey gives a mild flavor. Shrimp adds a seafood twist, while tofu provides a plant-based choice. You might also try chickpeas or beans for a hearty, plant-based version. These choices keep the dish high in protein and fun. Feel free to mix in seasonal vegetables. Zucchini and bell peppers work great. They add crunch and color. You can also add leafy greens like kale or arugula. These greens boost nutrition and flavor. They make the dish even more vibrant and healthy. Pair your orzo with a fresh side salad or some crusty bread. These sides complement the meal perfectly. You can also make this dish for meal prep. It’s great for family dinners too. Each portion stays tasty in the fridge for a few days. Enjoy your flavorful and quick meal! To keep your High Protein Chicken Orzo fresh, store it in an airtight container. Make sure it cools down to room temperature first. This will help avoid condensation and sogginess. You can safely eat the leftovers within three to four days. If the dish smells off or looks strange, it's best to toss it. If you want to save some for later, freezing works well. Divide the orzo into portions and place them in freezer-safe bags. Remove as much air as possible before sealing. This helps to prevent freezer burn. The dish can last up to three months in the freezer. When you're ready to eat, thaw it in the fridge overnight for best results. Reheating requires care to keep the texture nice. For best results, use the stovetop. Heat it gently in a pan over low heat, adding a splash of broth or water to moisten. If you prefer to use a microwave, cover it loosely and heat in short bursts, stirring in between. This helps heat evenly without drying it out. It takes about 30 minutes to make High Protein Chicken Orzo. You will need 10 minutes to prep and about 20 minutes to cook. This quick meal is great for busy days. Yes, you can make this dish ahead of time. Store it in an airtight container in the fridge. It stays fresh for up to three days. When you are ready to eat, simply reheat it in the microwave or on the stove. Absolutely! High Protein Chicken Orzo is perfect for meal prepping. You can portion it into individual containers. This way, you have easy lunches or dinners ready for the week. Just remember to cool the dish before storing. You can serve this dish with a side salad, steamed veggies, or garlic bread. A light white wine or sparkling water pairs well too. Feel free to explore different sides to make your meal even better. This blog post covered making a tasty High Protein Chicken Orzo. You learned about key ingredients, from orzo to vegetables. Each step showed how to cook and combine everything perfectly. We discussed tips to enhance flavor and suggested healthy variations. Storing tips help keep your dish fresh for later meals. Enjoying this recipe can be easy and fun. Try it with friends or family for a tasty meal! Cooking can bring joy, and I hope you feel inspired.](https://stirredrecipes.com/wp-content/uploads/2025/06/99ad66e7-be7a-4103-b809-c961b40caf57.webp)
NEW RECIPES

Two Ingredient Donuts Quick and Easy Recipe
Craving donuts but short on time? You’re in the right place! With just two simple ingredients—self-rising flour and plain Greek yogurt—you can create delicious homemade

Chicken Parmesan Stuffed Zucchini Boats Easy Recipe
Are you ready to elevate dinner with a twist on a classic dish? These Chicken Parmesan Stuffed Zucchini Boats combine fresh, garden flavors with cheesy
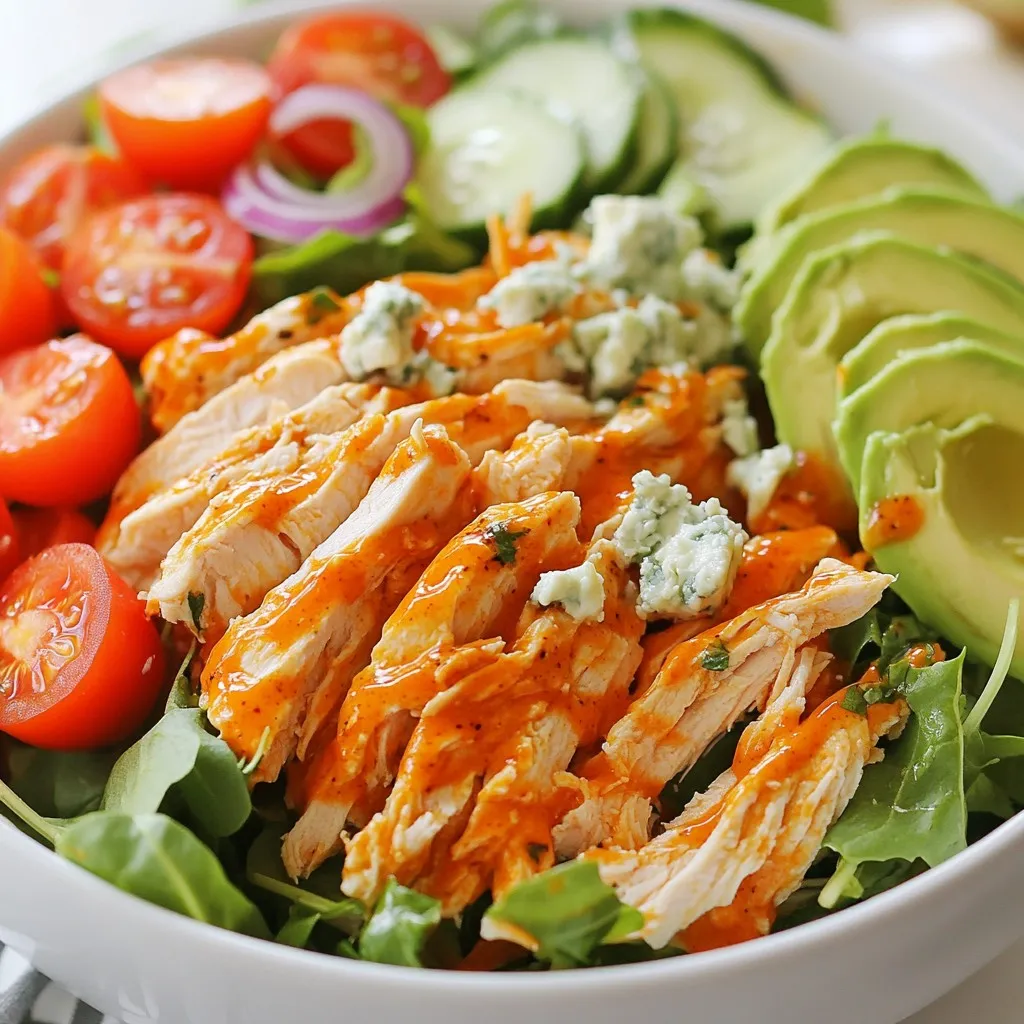
Buffalo Chicken Salad Flavorful and Wholesome Meal
Are you ready to dig into a bowl of Buffalo Chicken Salad that’s both flavorful and wholesome? This scrumptious meal combines tender chicken with zesty

Low-Carb Breakfast Burrito Bowl Simple and Tasty Meal
Start your day off right with my Low-Carb Breakfast Burrito Bowl—it’s nutritious, simple, and full of flavor! This recipe uses easy ingredients like riced cauliflower
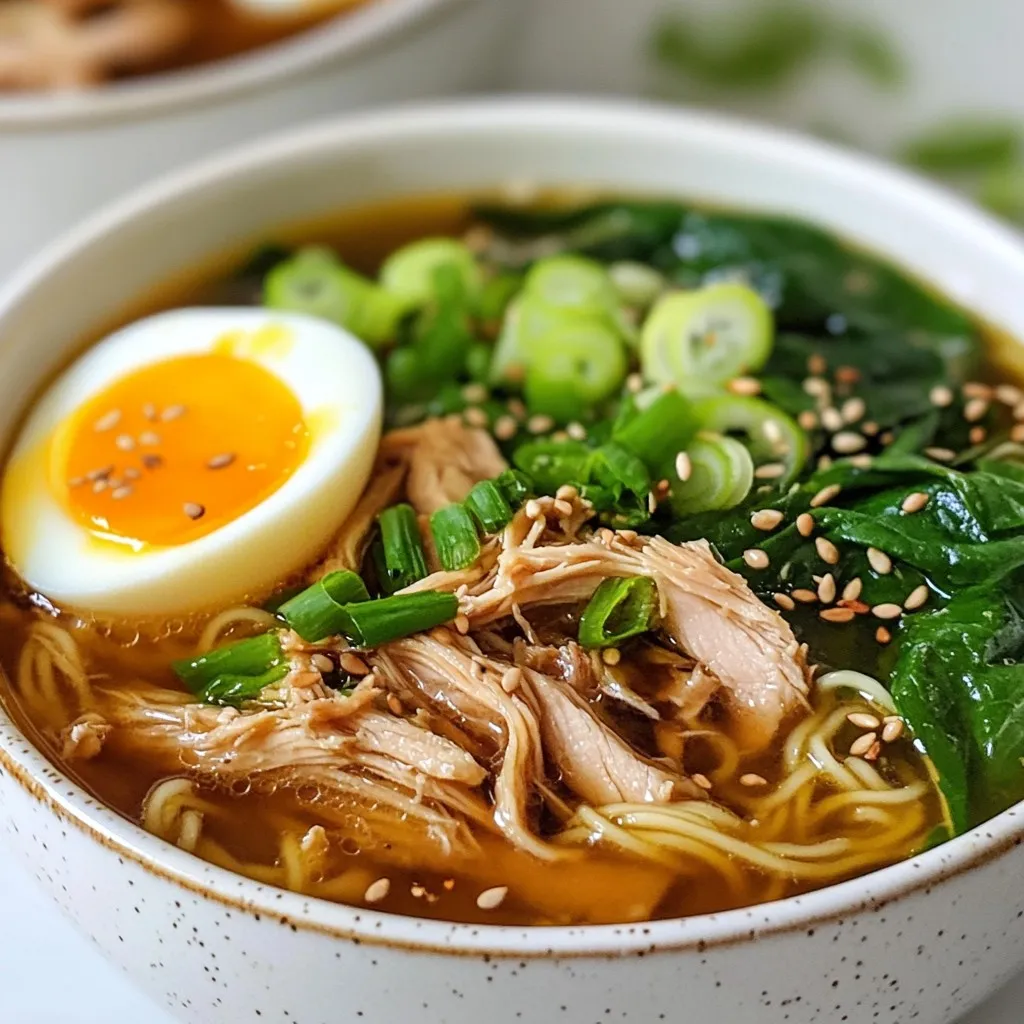
Easy Chicken Ramen Flavorful and Quick Recipe Guide
Are you craving a warm, soothing bowl of ramen but short on time? You’ll love this Easy Chicken Ramen recipe! Packed with flavor and ready

White Chicken Enchiladas Flavorful Comfort Dish
Are you ready to elevate your dinner routine? White chicken enchiladas are a warm and delicious dish that everyone loves. With creamy cheese, tender chicken,
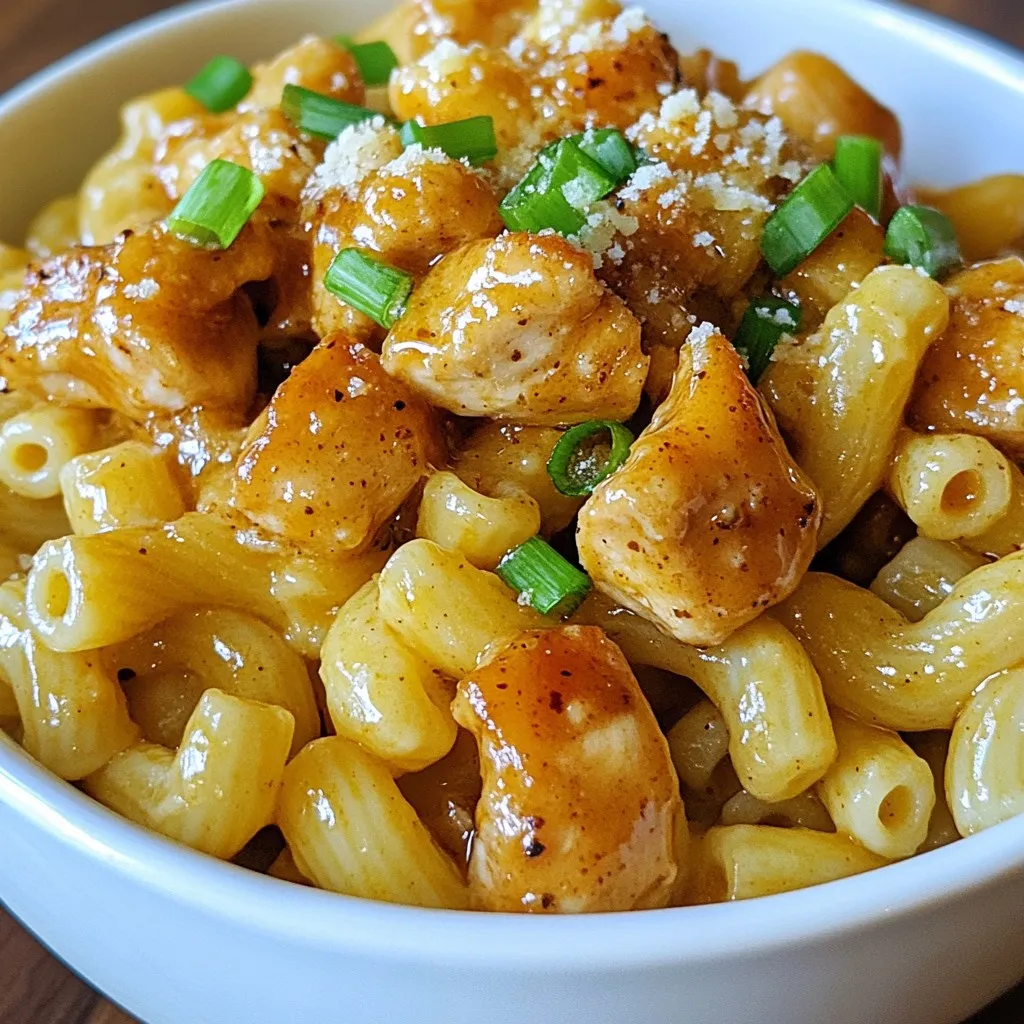
Honey Garlic Butter Chicken Mac Easy Family Meal
Are you ready to impress your family with a tasty meal? My Honey Garlic Butter Chicken Mac is a quick, easy dinner that everyone will
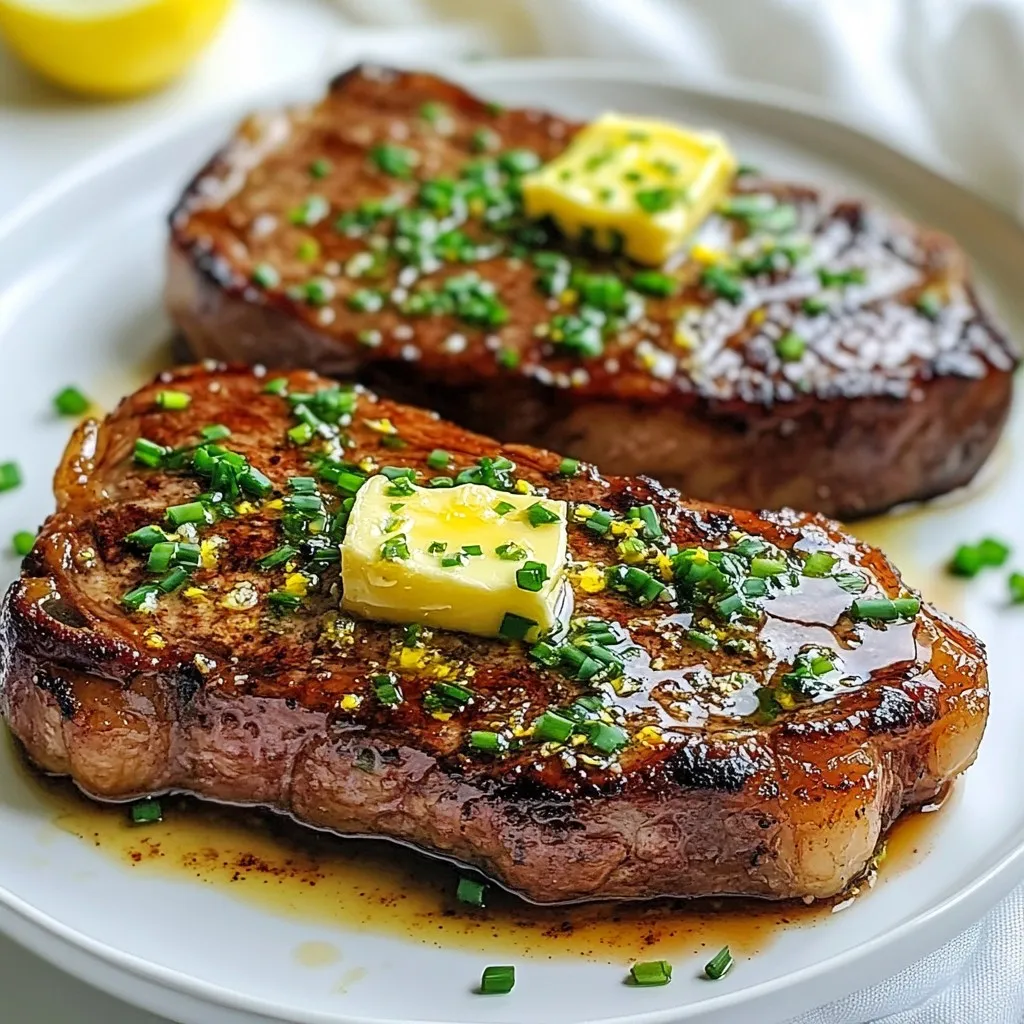
Cowboy Butter Steak Savory Flavor Explosion
Get ready to take your steak night to the next level with Cowboy Butter Steak. This dish combines juicy ribeye steaks with a rich, zesty