Salads

Easy Cucumber Caprese Salad Refreshing Summer Treat
Looking for a cool, refreshing dish this summer? Try my Easy Cucumber Caprese Salad! This vibrant mix of crisp cucumbers, juicy cherry tomatoes, and creamy
![- 2 cups cooked chicken, shredded - 1 cup cream cheese, softened - 1 cup sharp cheddar cheese, shredded - 1/2 cup jalapeños, diced (fresh or pickled) - 1/4 cup green onions, chopped - 1/2 cup mayonnaise - 1 tablespoon lime juice - 1 teaspoon garlic powder - Salt and pepper to taste - Lettuce leaves for serving When I make Jalapeño Popper Chicken Salad, I focus on fresh ingredients. The base starts with two cups of shredded chicken. I prefer using cooked chicken, as it blends well. Next, I add one cup of softened cream cheese. This gives the salad a creamy texture. Then, I mix in one cup of sharp cheddar cheese. The cheese adds great flavor and richness. For some extra kick, I include half a cup of diced jalapeños. You can use fresh or pickled, depending on your taste. If you want more spice, add more jalapeños. I also chop a quarter cup of green onions. They give a nice crunch and freshness to the dish. Finally, I mix in half a cup of mayonnaise. This keeps everything together and adds creaminess. Next, I add seasonings. I pour in one tablespoon of lime juice for a zesty touch. Then, I sprinkle in one teaspoon of garlic powder. Salt and pepper round out the flavors. I serve this salad on crisp lettuce leaves. The lettuce adds a nice crunch. You can also find the [Full Recipe] for more details. - Combine cream cheese and mayonnaise in a mixing bowl. - Ensure the mixture is well blended for best texture. This step sets the creamy base for our salad. The cream cheese adds richness, while the mayonnaise gives it a light touch. Mix them until smooth. You want it to be fluffy and easy to stir. - Incorporate shredded chicken and cheddar cheese. - Mix in jalapeños and green onions. Now, it’s time to add the star ingredients. The shredded chicken makes this salad hearty. The sharp cheddar adds a nice bite. Adding jalapeños brings in that spicy kick. You can use fresh or pickled ones based on your taste. Finally, the green onions add a fresh crunch. - Add lime juice and garlic powder, season with salt and pepper. - Refrigerate for at least 30 minutes before serving. Zesty lime juice brightens up the flavors. Garlic powder gives it depth. Don’t forget to taste and adjust your seasoning! After mixing everything, cover it with plastic wrap. Let it chill in the fridge for at least 30 minutes. This helps the flavors meld beautifully. For the full recipe, check out the detailed instructions. - Adjust jalapeño quantity for desired spice level. If you like more heat, add more jalapeños. If you prefer it mild, use fewer. This salad is all about your taste. - Letting the salad chill for longer can enhance flavors. I recommend chilling it for at least one hour. This step helps all the ingredients mix well and creates a tasty dish. - Serve on a large platter with lime wedges and green onions. This adds a pop of color and freshness to the dish. - Use colorful lettuce leaves for an attractive display. Try using red or green leaves to make your salad look vibrant. - Large mixing bowl. A big bowl helps you mix all the ingredients well without spilling. - Spatula or mixing spoon. This tool is key for combining everything smoothly. - Plastic wrap for chilling. Cover your salad to keep it fresh while it chills in the fridge. For the complete recipe, check the [Full Recipe]. {{image_2}} You can change up the protein in this dish. Using rotisserie chicken makes it quick and easy. Just shred it and mix it in. If you prefer a plant-based option, try tofu or chickpeas. Both work well and add great texture. Tofu gives a nice bite, while chickpeas add a hearty feel. Cheese is the star of this salad. You can try pepper jack for an extra kick. Mozzarella adds a milder taste and a nice stretch. If you are dairy-free, vegan cheese options are available. Look for brands that melt well to keep the creamy feel of the salad. The dressing can change the whole flavor profile. Swap Greek yogurt for mayonnaise to make it lighter. This adds a tangy taste and extra creaminess. For a fun twist, add ranch dressing. It brings a familiar flavor that many love. You can mix and match these ideas to make your perfect salad. For the full recipe, click here: [Full Recipe]. To keep your Jalapeño Popper Chicken Salad fresh, store it in an airtight container in the refrigerator. This will help maintain its flavor and texture. The salad stays good for about 3 to 4 days. Always check for any off smells or changes in texture before eating leftovers. Can you freeze Jalapeño Popper Chicken Salad? It's best not to freeze it. Freezing can change the texture of the cream cheese and mayonnaise. If you have to freeze it, use a freezer-safe container. When you’re ready to eat it, thaw it in the fridge overnight. This slow thaw helps keep some texture. For leftovers, serve the salad chilled. If you want it warm, gently heat it in a pan over low heat. Stir it often to keep the texture and flavor intact. Avoid using the microwave, as it can make the salad watery. Enjoy your meal as is, or serve it on fresh lettuce leaves for a great crunch! Jalapeño Popper Chicken Salad lasts about 3 to 4 days in the fridge. Store it in an airtight container to keep it fresh. Look for signs of spoilage like a sour smell or changes in color. If you notice either, it’s best to throw it out. Yes, you can make this salad up to a day in advance. Making it early allows the flavors to mix well. Just remember to keep it covered in the fridge until you are ready to serve. This salad pairs well with several sides. You can serve it with tortilla chips for a crunchy bite. A fresh fruit salad adds sweetness, balancing the spicy flavors. You might also enjoy it with a light soup for a full meal. Yes, Jalapeño Popper Chicken Salad can be gluten-free. Just ensure that your mayonnaise and other ingredients do not contain gluten. If you want to serve it with bread, choose gluten-free options to keep the meal safe for those avoiding gluten. For the complete recipe, check out the [Full Recipe]. Jalapeño Popper Chicken Salad combines yummy flavors, simple steps, and easy tips for a great dish. We covered the main ingredients, how to prepare the salad, and fun variations. You can boost flavor or change proteins based on your taste. Remember, chilling the salad makes it taste even better. This salad is perfect for quick meals or gatherings. Enjoy creating your delicious version of this fun dish!](https://stirredrecipes.com/wp-content/uploads/2025/06/821f0bb1-04fb-45ad-9de0-9501ea0f0584.webp)
Jalapeño Popper Chicken Salad Flavorful and Fresh Dish
Craving a dish that packs a punch in flavor and freshness? Look no further than Jalapeño Popper Chicken Salad! With creamy cheese, tender chicken, and
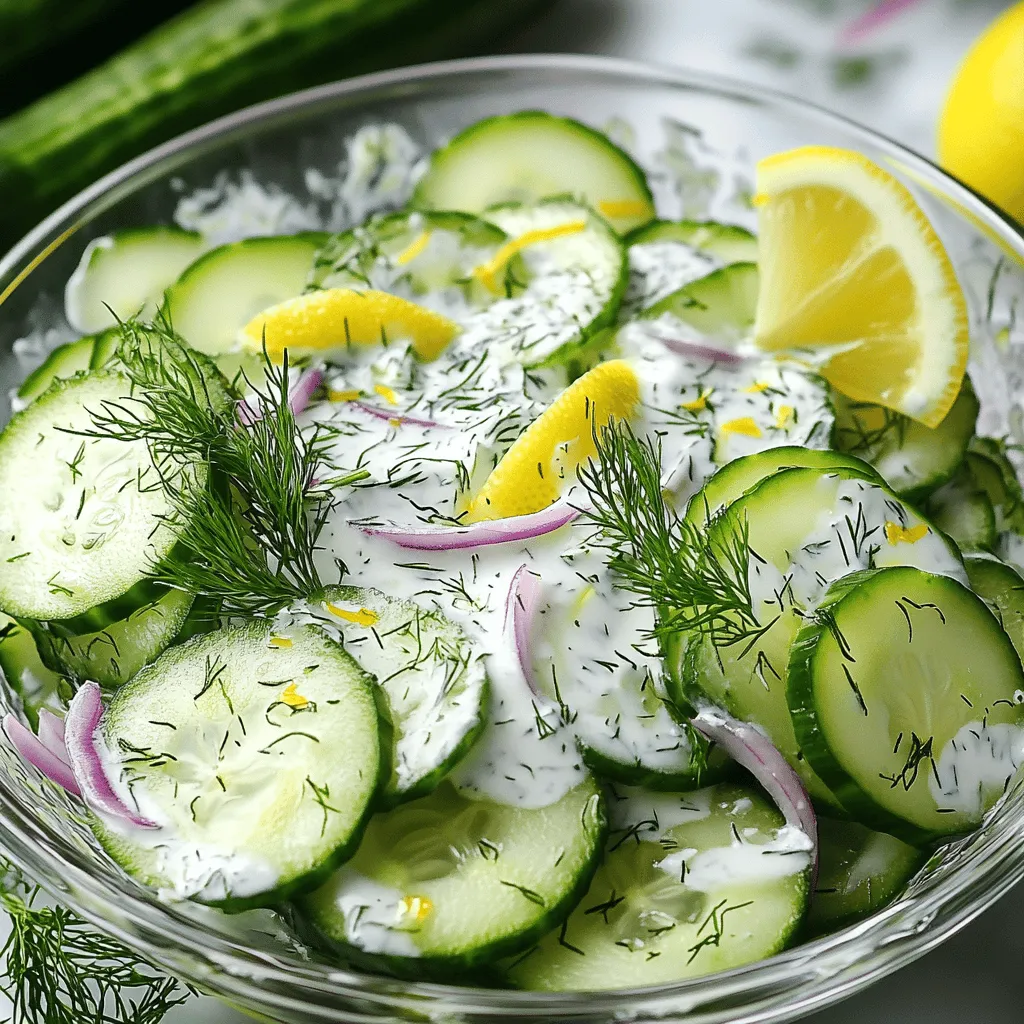
Cucumber Dill Salad Fresh and Flavorful Delight
If you’re looking for a crisp, refreshing dish, look no further! Cucumber Dill Salad is a garden-fresh delight, perfect for warm days or any meal.
![For quick and easy summer meals, you need simple items. Here’s what to gather for a delicious dish: - 1 cup quinoa, rinsed - 2 cups vegetable broth - 1 can (15 oz) chickpeas, drained and rinsed - 1 cup cherry tomatoes, halved - 1 cucumber, diced - 1/4 red onion, finely chopped - 1/4 cup parsley, chopped - 1/4 cup feta cheese, crumbled (optional) - Juice of 2 lemons - 3 tablespoons olive oil - 1 teaspoon cumin - Salt and pepper to taste These ingredients come together quickly. You can whip up a fresh meal in no time. Using fresh ingredients makes a big difference. Look for seasonal produce to brighten your dish. When you choose ripe, local veggies, you get more flavor. Fresh herbs also add a punch. They take your meal from good to great. For instance, parsley gives a nice finish to the quinoa salad. Don’t be afraid to change things up! You can add extra items to suit your taste. Here are some fun options: - Grilled chicken for added protein - Avocado for creaminess - Nuts for crunch These add-ins let you personalize your meal. Mix and match to find what you love. Want to try something unique? Consider adding spicy ingredients for a kick! Explore the [Full Recipe] for more ideas and inspiration. To make Zesty Quinoa and Chickpea Salad, follow these steps closely: 1. Cook the Quinoa: In a medium pot, mix 1 cup of rinsed quinoa with 2 cups of vegetable broth. Bring to a boil. Then, turn the heat down low, cover, and let it simmer for 15 minutes. The quinoa will be fluffy and the broth should be gone. 2. Make the Dressing: In a small bowl, whisk together the juice of 2 lemons, 3 tablespoons of olive oil, 1 teaspoon of cumin, salt, and pepper. 3. Combine Ingredients: In a big bowl, mix the cooked quinoa, 1 can of drained chickpeas, 1 cup of halved cherry tomatoes, 1 diced cucumber, 1/4 chopped red onion, and 1/4 cup of chopped parsley. 4. Dress the Salad: Pour the dressing over the salad. Gently toss everything together. 5. Serve: If you like, sprinkle 1/4 cup of crumbled feta cheese on top before serving. This dish is fresh, tasty, and perfect for summer. You can find the full recipe above. For other summer meals, keep it simple. Here are quick steps for each: - Grilled Peach and Arugula Salad: Grill peach halves until they show marks. Toss arugula with grilled peaches and drizzle with a mix of honey, balsamic vinegar, and olive oil. - Creamy Avocado and Lime Pasta: Cook pasta, then blend ripe avocados, garlic, lime juice, and basil. Mix with pasta and enjoy. - Spicy Cucumber and Mango Salsa: Dice cucumber, mango, red bell pepper, and red onion. Combine with lime juice and cilantro. Let it sit to enhance flavors. To achieve the best texture and flavor in your summer meals: - Choose Fresh Ingredients: Always use fresh, seasonal produce. This makes a big difference in taste. - Don’t Overcook: Be careful not to overcook vegetables. They should stay crisp and vibrant. - Tweak the Seasoning: Taste your dishes as you cook. Adjust salt, pepper, and spices to suit your palate. - Let Flavors Blend: Allow salads and salsas to rest for a few minutes after mixing. This helps the flavors come together. These tips can help elevate your summer meals, making them more delightful. Enjoy your cooking journey! To make summer cooking easy, I focus on quick methods. Grilling adds great flavor. It also cooks meals fast. Roasting vegetables brings out their natural sweetness. Steaming keeps them bright and crisp. These techniques work well with fresh ingredients. Adding herbs and spices can change a dish. Fresh herbs like basil or cilantro bring brightness. A splash of citrus, like lemon or lime, adds zest. Consider using flavored oils, such as garlic or chili oil, for extra depth. Don't forget to season with salt and pepper to taste. Meal prep can save time during the week. Cook grains like quinoa or rice in advance. Chop veggies and store them in the fridge. Make dressings ahead, too. You can mix them right before serving. This way, you can quickly assemble meals without stress. For a refreshing dish, try the Zesty Quinoa and Chickpea Salad [Full Recipe]. {{image_2}} You can easily adjust the ingredients to fit many diets. If you want a vegan option, swap the feta cheese in the Zesty Quinoa and Chickpea Salad for avocado. This keeps it creamy and adds healthy fats. For a gluten-free meal, use quinoa or rice pasta instead of regular pasta in the Creamy Avocado and Lime Pasta. These swaps let you enjoy great meals while staying true to your diet. Adding unique flavors can make classic dishes exciting. In the Grilled Peach and Arugula Salad, try using burrata cheese instead of goat cheese. It adds a rich, creamy texture that pairs well with the grilled peaches. For the Spicy Cucumber and Mango Salsa, toss in some diced pineapple for an extra sweet twist. This fruit addition brings a new level of freshness to the salsa. You can swap traditional ingredients for healthier options. For example, use whole wheat pasta in the Creamy Avocado and Lime Pasta. This adds fiber and helps you feel full longer. Instead of using regular olive oil, try extra virgin olive oil for a richer flavor in any salad dressing. It also provides more healthy fats. Making these simple changes can boost the health factor of your meals without losing taste. Storing leftovers correctly keeps your meals fresh and safe. First, let the food cool down to room temperature. This step helps avoid condensation in your storage containers. I like to use airtight containers to keep moisture in and air out. Label each container with the date, so you know when to eat it. Most summer meals stay good for three to four days in the fridge. To keep summer meals fresh, store them in the fridge right after cooking. Avoid leaving food out for more than two hours. If you plan to eat a meal later, separate it into smaller portions. This method cools the food faster and helps it stay fresh longer. Use fresh herbs or citrus zest before serving to brighten up flavors. Freezing is a great way to save meals for future use. Choose meals that freeze well, like soups or stews. Cool the food completely before putting it in freezer bags. Squeeze out as much air as possible to prevent freezer burn. Label the bags with the meal name and date. Most meals last up to three months in the freezer. When you're ready to eat, thaw in the fridge overnight before reheating. For a great summer meal, try the Zesty Quinoa and Chickpea Salad. This dish is not only fresh but also easy to store. Enjoy every bite! [Full Recipe] You can easily make these meals vegan by swapping out animal products. For instance, in the Zesty Quinoa and Chickpea Salad, leave out the feta cheese. Use a vegan cheese alternative or just skip it. For the Creamy Avocado and Lime Pasta, you can omit the Parmesan cheese or switch to a plant-based version. When using meat, replace it with tofu, tempeh, or legumes. Incorporate more vegetables to keep the dish hearty and satisfying. Always check sauces for hidden animal products like fish sauce or dairy. Side dishes can add variety to your meal. Here are some simple options: - Garlic bread pairs well with pasta dishes. - A light green salad complements any main dish. - Grilled veggies are great alongside any protein. - Roasted potatoes or sweet potatoes offer a nice contrast in texture. - Fresh fruit salads provide a sweet finish. These sides are quick to prepare and will enhance your dining experience. Yes, you can prepare these meals ahead of time. Many of these dishes taste even better after sitting for a while, as flavors meld together. - Zesty Quinoa and Chickpea Salad can be made a day in advance. Store it in the fridge, and add dressing just before serving. - Grilled Peach and Arugula Salad can have the peaches grilled ahead of time. Toss together right before serving for freshness. - Creamy Avocado and Lime Pasta is best made fresh, but you can prepare the sauce ahead. Just mix it with hot pasta when you are ready to serve. Being organized helps you enjoy your summer meals more. In this post, we covered tasty ingredients for your summer meals. You learned how to choose fresh items, follow simple steps, and customize recipes. I also shared key tips for cooking and storing food. Remember, you can mix and match ingredients to fit your taste and dietary needs. With these skills, you can enjoy fresh, fun meals all summer long. Now, get cooking and enjoy wholesome flavors!](https://stirredrecipes.com/wp-content/uploads/2025/06/5b3b6754-25ec-424d-98bf-cbc2d6e01137.webp)
30 Fresh and Light Summer Meals for Your Table
Looking for fresh, light meals this summer? You’ve come to the right place! I’ll share 30 tasty recipes that are easy to prepare and perfect
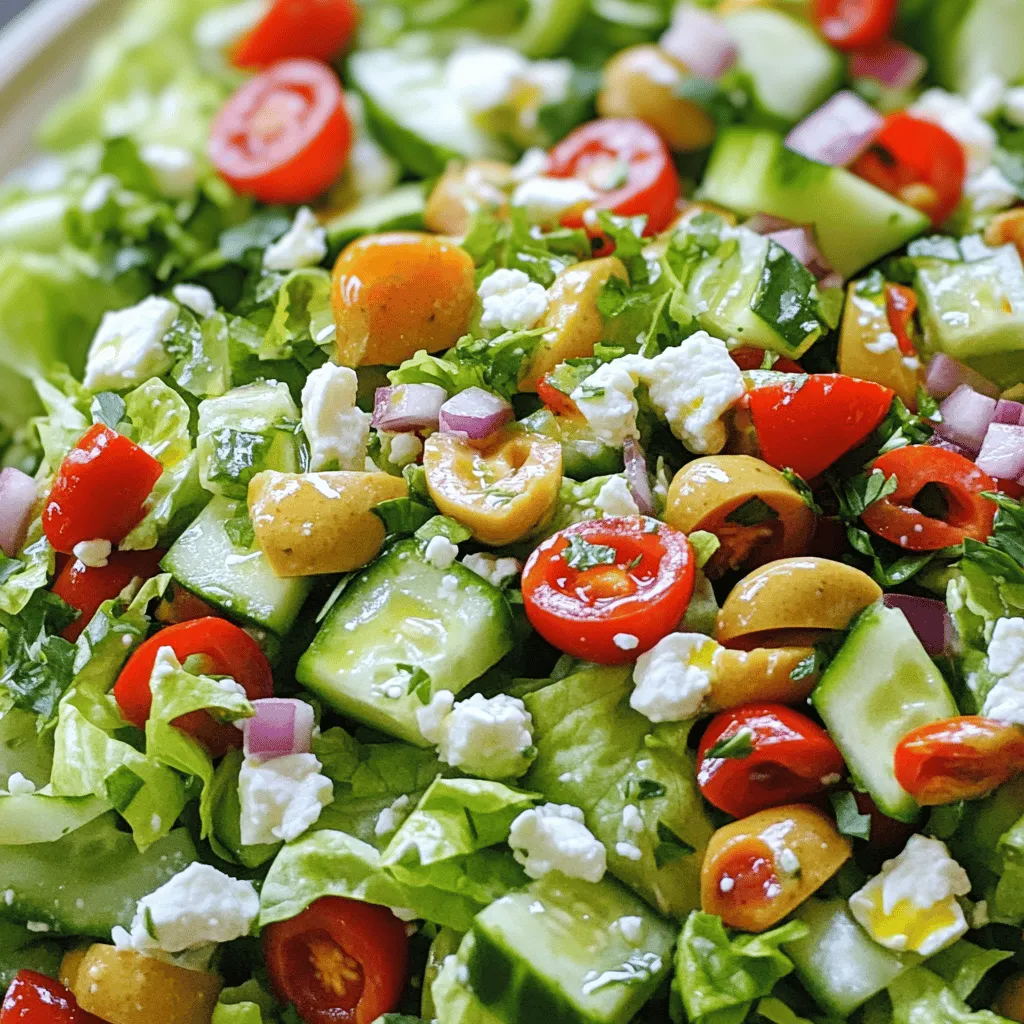
Famous La Scala Chopped Salad Fresh and Flavorful Dish
Welcome to the world of the Famous La Scala Chopped Salad! This fresh and colorful dish bursts with flavor and is perfect for any meal.
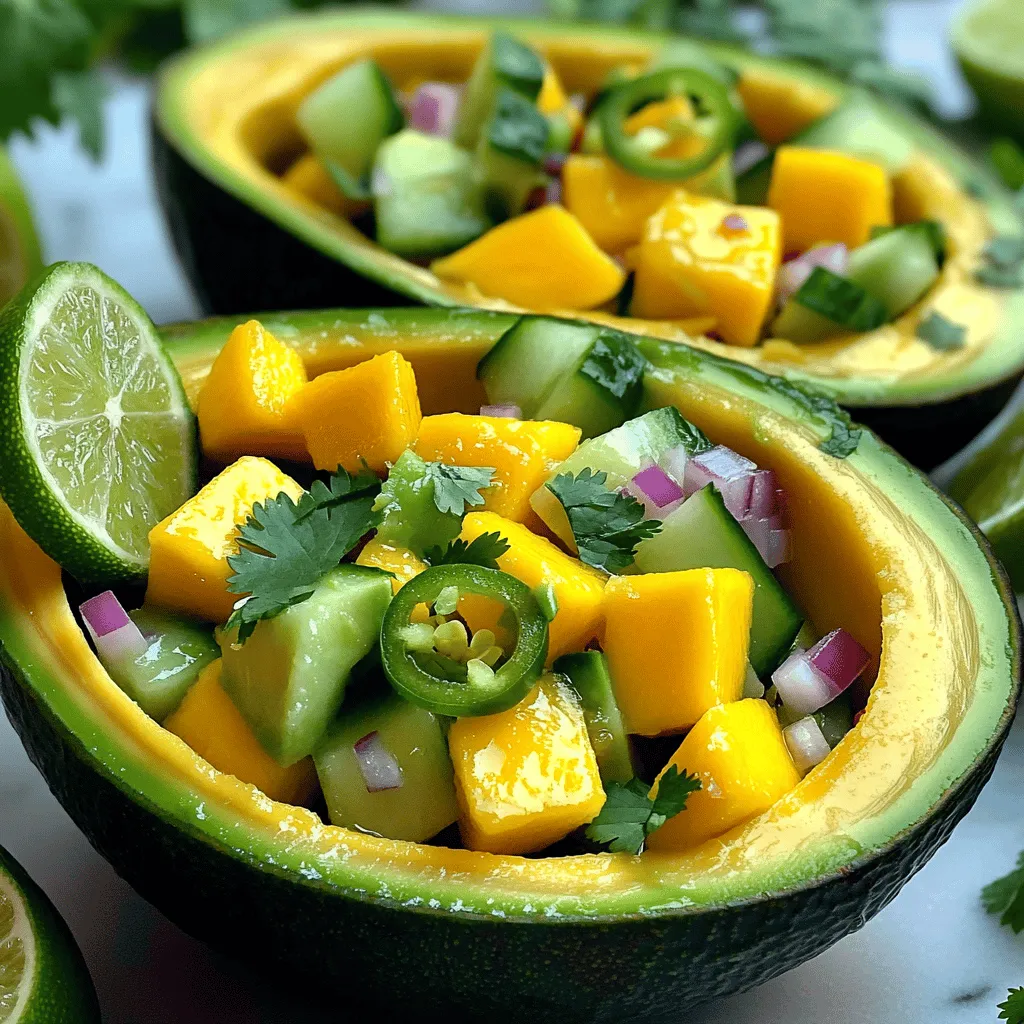
Mango Salad Fresh and Flavorful Summer Dish
Looking for a fresh and tasty dish to brighten your summer? This Mango Salad is packed with vibrant flavors and healthy ingredients. You’ll love its
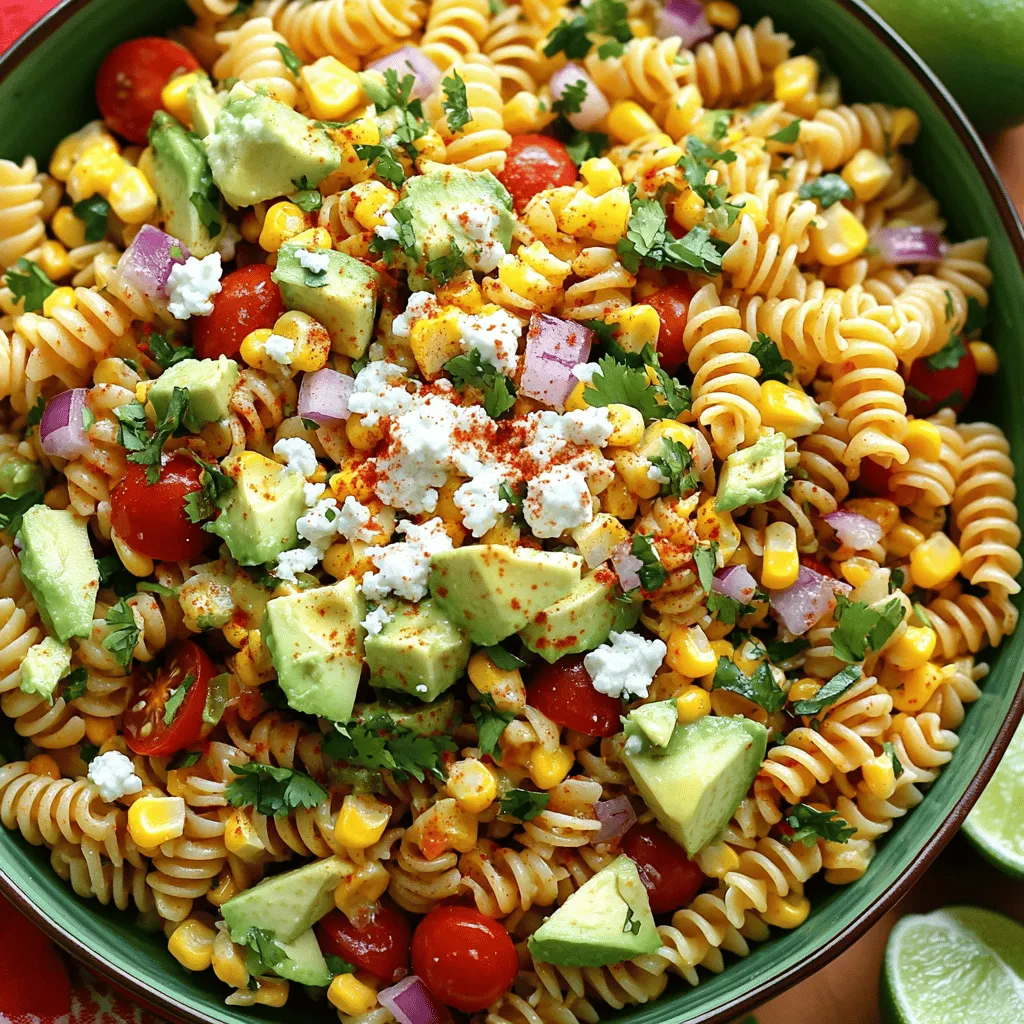
Tasty Mexican Street Corn Pasta Salad Delightful Dish
Craving a fresh twist on a classic pasta dish? My Tasty Mexican Street Corn Pasta Salad is just the answer! This vibrant salad combines sweet
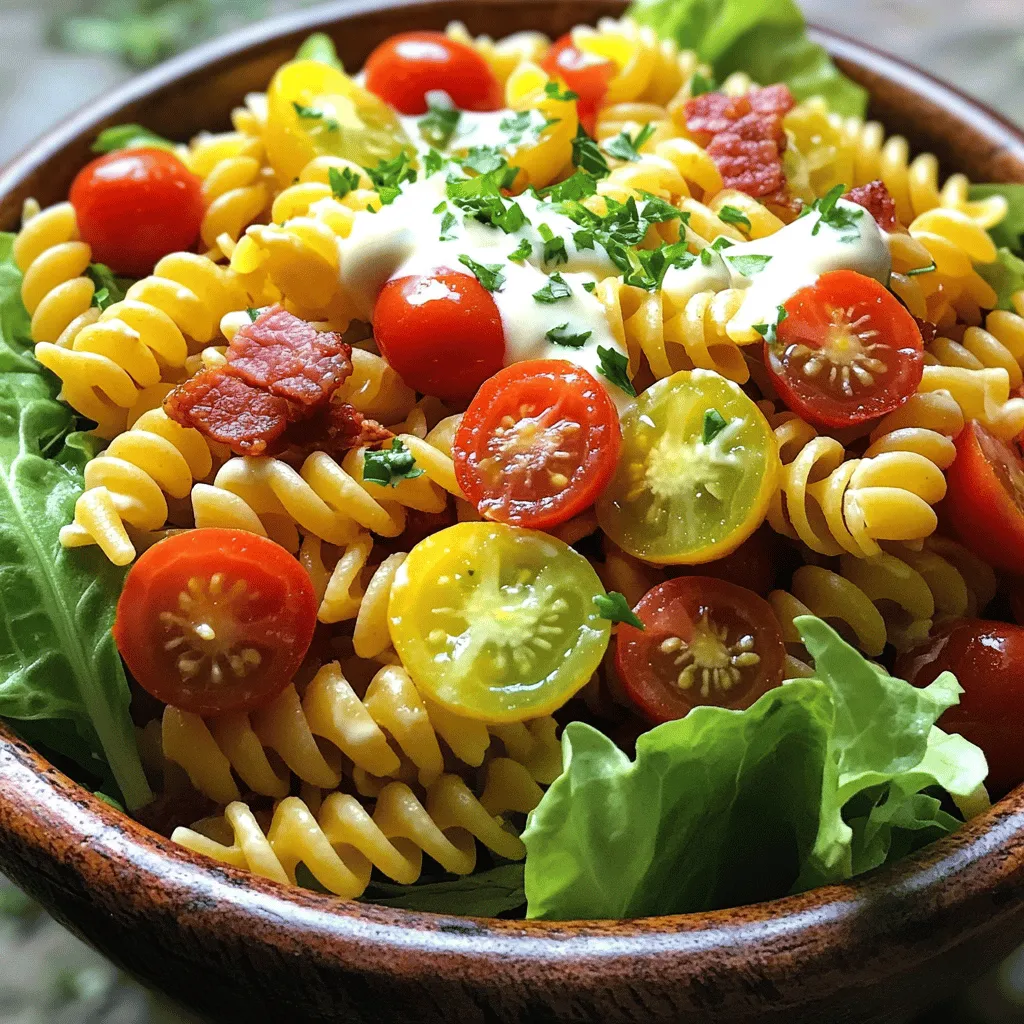
BLT Pasta Salad Tasty and Easy Summer Dish
Looking for a fresh and fun dish this summer? My BLT Pasta Salad is the answer! It’s quick to make, tasty, and perfect for gatherings
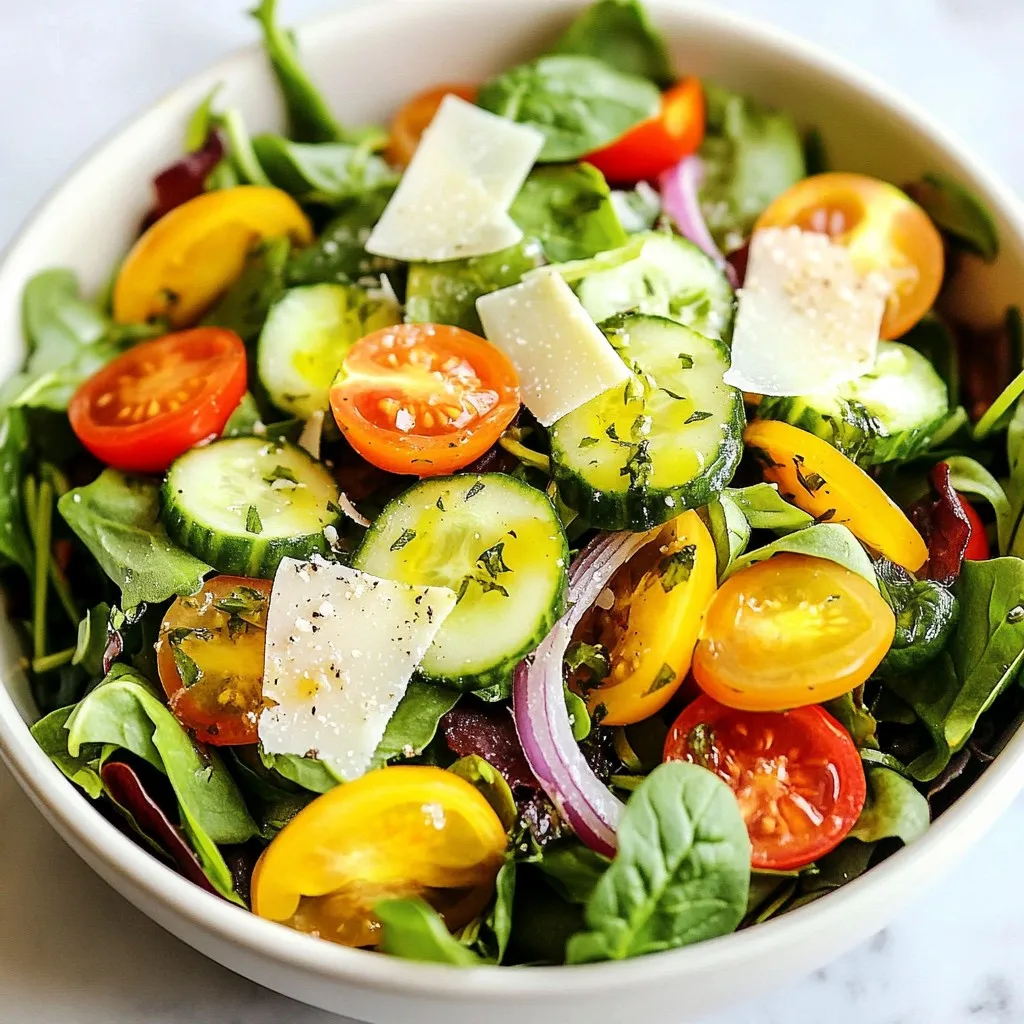
Minute Lemon Parmesan Salad Fresh and Flavorful Mix
Looking for a quick and tasty salad that packs a punch? The Minute Lemon Parmesan Salad is your answer! With fresh greens, juicy tomatoes, and
![- Strawberries - Pineapple - Kiwi - Blueberries - Grapes - Orange I love using vibrant fruits in my salads. They add color and flavor. For this fruit salad, I pick fresh strawberries, juicy pineapple, and tangy kiwi. Blueberries bring sweetness, while grapes add crunch. Don't forget the orange for a zesty twist! - Honey - Fresh mint - Lime juice To enhance the salad, I add some sweetness and freshness. Honey drizzles on top, giving a nice glaze. Fresh mint leaves add a refreshing touch. A splash of lime juice brightens everything up. - Caloric content per serving - Vitamins and minerals provided This salad is not just tasty; it's healthy too! Each serving has about 100 calories. It packs vitamins C and A, plus antioxidants. These nutrients help keep you strong and healthy. You get fiber from the fruits, which is great for digestion. So, this fruity fiesta salad is both a treat and a boost for your body! Check the [Full Recipe] for more details. Mixing the fruits First, grab a large mixing bowl. Add 1 cup of strawberries, hulled and quartered. Next, toss in 1 cup of diced pineapple. Then, slice 1 cup of kiwi and add it to the bowl. Don’t forget 1 cup of blueberries and 1 cup of halved grapes. Finally, include 1 orange, segmented. Mix all these fruits gently with a spatula. This ensures even distribution of flavors. Making the honey-lime dressing In a small bowl, whisk together 2 tablespoons of honey and the juice of 1 lime. Add in 1 tablespoon of fresh mint, finely chopped. Mix until everything is well combined. This dressing adds a sweet and tangy flavor to your fruit salad. Combining everything together Drizzle the honey-lime dressing over your mixed fruits. Gently toss the fruit salad again using a spatula. Make sure every fruit is coated with the dressing. Let the salad sit for about 10 minutes. This allows the flavors to meld together, making it even tastier. Presentation tips Serve the fruit salad in individual bowls. You can also use clear cups for a fun look. Garnish with some extra mint leaves for color. This makes the salad look fresh and inviting. Recommended serving temperature Enjoy the fruit salad chilled or at room temperature. Both ways bring out the best flavors. If you want a refreshing treat, chill it in the fridge for a bit before serving. Prep time breakdown Preparation takes about 15 minutes. You can chop and mix the fruits quickly. Making the dressing is also easy and fast. Total time summary In total, you will need about 25 minutes. This includes prep time and letting the salad sit. You can whip this up in no time for a delicious side dish or snack. To make a great fruit salad, start with the best fruits. Here’s how to choose ripe ones: - Strawberries: Look for bright red color with no white spots. They should feel firm but not hard. - Kiwi: Choose kiwis that give slightly when you press them. Avoid ones that feel very soft. - Pineapples: Pick a pineapple with a sweet smell at the base. The leaves should be green and fresh. - Orange segments: Select firm oranges with a smooth skin. They should feel heavy for their size. To make your salad pop, try these additions: - Spices: A pinch of cinnamon or nutmeg can add warmth. - Zest: Grate some lime or orange peel for a fresh twist. - Dressings: Instead of honey-lime, mix in yogurt or a splash of coconut milk for creaminess. Having the right tools makes prep easier. Here are my top picks: - Cutting board: A sturdy one helps you chop fruits safely. - Sharp knife: A good knife makes slicing easy and quick. - Mixing bowl: Use a large bowl to toss all your fruits together. - Spatula: A silicone spatula is perfect for gently mixing without bruising the fruit. These tips can help you create the best fruity fiesta salad. For the complete recipe, check out the [Full Recipe]. Enjoy your fruit salad! {{image_2}} You can change your fruit salad with the seasons. In spring, add fresh strawberries and peaches. Summer is perfect for juicy watermelon and ripe cherries. In fall, think about apples and pears. Winter offers sweet citrus like oranges and grapefruits. Mixing tropical options like pineapple and mango with berries creates a fun flavor twist. This makes each bite exciting! If you want a vegan option, skip the honey and use agave syrup instead. You can also use a low-sugar sweetener. If you need a low-carb option, try berries like strawberries and blueberries. Feel free to swap fruits you don’t like. Don't enjoy kiwi? Replace it with banana. This salad can fit any diet. How you serve your fruit salad can make it special. Instead of a bowl, use clear cups for a nice touch. This lets guests see the colors. You can also use skewers to make fun fruit kabobs. Arrange the fruit on a platter for a beautiful display. These ideas make your fruit salad look great and more inviting! For the Full Recipe, be sure to check the details in the earlier section. To keep your fruit salad fresh, put it in an airtight container. This helps keep air out. Place the container in the fridge right away. To avoid browning, use fruits like apples or bananas only when serving. If you mix these fruits, add lemon juice to slow down browning. Store your salad for later, but eat it within a few days for the best taste. Your fruit salad can stay fresh in the fridge for about 3 to 5 days. After that, the fruits may start to lose their crunch and flavor. Signs that the salad has gone bad include a sour smell, slimy texture, or excessive liquid. If you see any of these signs, it is best to throw it away. Can you freeze fruit salad? It’s not the best idea. Freezing can change the texture of the fruits. If you do want to freeze fruits, do it separately. Freeze berries, grapes, and pineapples on a tray first. Once frozen, put them in a bag. This way, you can use them later in smoothies or desserts. You can use many fruits for a fruit salad. I love mixing sweet and tart fruits. Some popular options are: - Strawberries - Pineapple - Kiwi - Blueberries - Grapes - Orange These fruits add great color and flavor. They also bring different textures, making the salad fun to eat. You can mix your favorites or try new ones. Seasonal fruits can add a nice twist too. Yes, you can use canned fruit, but there are pros and cons. Canned fruit is easy to find and save time. It has a longer shelf life too. However, fresh fruit usually tastes better and has a better texture. Canned fruit can be mushy and syrupy. If you choose canned fruit, look for ones without added sugar. Rinse them well to reduce syrup. To keep your fruit salad fresh, start with the right fruits. Use firm fruits like grapes and apples. Avoid overripe fruits, as they can make the salad mushy. Here are some tips: - Drain any extra liquid from canned fruit. - Mix the dressing just before serving. - Serve it in a chilled bowl to keep it cool. Following these steps can help keep your salad crisp and tasty. For a delightful blend, check out the Full Recipe for a Fruity Fiesta Salad. In this article, we covered how to make a delicious fruit salad using fresh ingredients. We shared tips on selecting ripe fruits, creating a honey-lime dressing, and suggested variations for dietary needs. Remember, fresh fruit offers great flavor and nutrition. Store leftovers properly to maintain quality. Using this guide, you can create a vibrant fruit salad that is both tasty and healthy. Enjoy the process and get creative with your ingredients!](https://stirredrecipes.com/wp-content/uploads/2025/06/47e9f578-3654-4c29-ba84-374c448b4014.webp)
Easy Fruit Salad Recipe Quick and Simple Delight
Looking for a quick and simple treat? My Easy Fruit Salad Recipe is your answer! With fresh fruits like strawberries, kiwi, and grapes, this dish