Salads
![- Ripe heirloom tomatoes - Fresh mozzarella cheese - Fresh basil leaves - Balsamic glaze - Extra virgin olive oil - Salt and freshly cracked black pepper To make a great Caprese salad, you need fresh and simple ingredients. First, ripe heirloom tomatoes are key. They are sweet and juicy. Their colors make the salad pop. Next, you need fresh mozzarella cheese. Look for soft, creamy cheese that melts in your mouth. Fresh basil leaves add a bright flavor. They smell amazing and taste even better. Balsamic glaze gives the salad a rich, sweet touch. It drizzles beautifully and adds depth. Extra virgin olive oil is a must for drizzling too. It makes everything taste better. Lastly, don’t forget salt and freshly cracked black pepper. They bring out the flavors in each bite. For the full recipe, refer to the Caprese Salad with Balsamic Kiss. This dish is not only tasty but also very easy to prepare. You will love how vibrant it looks and how fresh it tastes! To make a great Caprese salad, start with the tomatoes. Use ripe heirloom tomatoes. Slice them into thick rounds, about half an inch. This keeps them juicy and flavorful. Next, take fresh mozzarella cheese. Slice this too, aiming for the same thickness as the tomatoes. Now it's time to layer the salad. On a large platter, arrange the tomato slices first. Add a slice of mozzarella on top of each tomato. Place a basil leaf between them. Keep repeating this until you’ve used all your ingredients. This pattern makes for a beautiful display. Next, focus on drizzling. Take extra virgin olive oil and drizzle it lightly over the salad. Use a spoon or small container for control. This oil adds richness and depth to the flavors. Now, it’s time for the balsamic glaze. Carefully drizzle it over the entire salad. Try to create patterns as you drizzle. This adds visual appeal and enhances the taste. After drizzling, sprinkle salt and freshly cracked black pepper over the salad. These simple seasonings bring out the best flavors in the ingredients. If you want a cooler taste, chill the salad. Let it sit in the fridge for about 10-15 minutes. This helps all the flavors meld together. Enjoy your fresh Caprese salad! For the full recipe, check out the detailed instructions above. Choose ripe heirloom tomatoes for the best flavor. Look for ones that feel heavy and firm. They should have a rich color and a slight give when pressed. Quality mozzarella is key too. Fresh mozzarella should be soft and moist. It should not feel rubbery or dry. Pairing these ingredients makes your salad shine. Serve your Caprese salad on a rustic wooden platter. This adds a natural touch. You can also use a white plate to make the colors pop. For garnishing, add extra basil leaves on top. A light drizzle of balsamic glaze enhances the look. You want it to appear fresh and inviting. Consider adding optional ingredients for extra flavor. You can use avocados for creaminess. Slices of ripe peaches or nectarines add sweetness. A sprinkle of crushed red pepper flakes gives a nice kick. Fresh herbs like oregano or thyme can brighten the dish. Each addition can create a unique twist on this classic salad. For the full recipe, refer to the Caprese Salad with Balsamic Kiss. {{image_2}} If you can't find fresh mozzarella, try burrata cheese. Burrata adds a creamy texture that tastes wonderful. You can also use goat cheese for a tangy twist. For balsamic glaze, you can use regular balsamic vinegar. Just reduce it in a pan until it thickens. This will give you a similar flavor. To keep your Caprese salad fresh, use seasonal ingredients. In summer, add ripe peaches or strawberries for sweetness. In fall, try roasted butternut squash for a warm flavor. These additions bring new tastes and colors to your dish. They make it even more appealing and delicious. You can spice up your Caprese salad by adding herbs. Try fresh oregano or thyme for a different aroma. If you like heat, sprinkle in some red pepper flakes. They add a nice kick. For a zesty touch, squeeze fresh lemon juice over the top. These adjustments let you create a unique dish every time. For the complete recipe, check out the [Full Recipe]. To keep your Caprese salad fresh, store it in an airtight container. First, separate the layers of tomatoes, mozzarella, and basil. This helps keep everything crisp. Place a paper towel inside to absorb excess moisture. This way, the salad stays tasty longer. - Heirloom tomatoes: Last about 3-5 days in the fridge. - Fresh mozzarella: Stays good for about 5-7 days once opened. - Basil leaves: Keep them fresh for about 2-3 days in the fridge. - Balsamic glaze: Can last for months if stored properly. - Olive oil: Should be used within 1-2 months once opened. Reheating isn't needed for this salad. Instead, if your leftovers look a bit sad, you can refresh them. Add a drizzle of balsamic glaze or a splash of olive oil. Toss in some fresh basil leaves too. This will revive the flavors and keep the salad enjoyable. What is the origin of Caprese Salad? Caprese Salad comes from Italy, specifically the island of Capri. This dish showcases fresh, local ingredients. It highlights the bright flavors of tomatoes, mozzarella, and basil. The simplicity of the dish is what makes it special. Enjoying it in warm weather is a must! Can I make this salad in advance? You can prepare parts of the salad ahead of time. Slice the tomatoes and mozzarella in advance. However, wait to add the basil and drizzle the balsamic glaze until just before serving. This keeps the salad fresh and vibrant. What pairs well with Caprese Salad? Caprese Salad goes well with many dishes. Serve it with grilled chicken or fish for a light meal. You can also enjoy it with crusty bread or bruschetta. A chilled glass of white wine complements this dish perfectly. Is there a vegan alternative for mozzarella? Yes, you can use vegan cheese made from nuts or soy. Look for brands that mimic the taste and texture of mozzarella. Another option is using avocado slices for creaminess. These alternatives still provide a delicious taste in your Caprese Salad. For the full recipe, check out the Caprese Salad with Balsamic Kiss ! In this blog post, we explored the delicious world of Caprese Salad. We discussed key ingredients like heirloom tomatoes, fresh mozzarella, and basil. You learned step-by-step how to prepare and layer this dish, along with tips for drizzling oil and balsamic glaze. We also covered how to enhance flavors and presented variations to keep things fresh. Finally, we touched on storage and answered common questions. With these insights, you can now create a vibrant Caprese Salad that impresses. Enjoy your cooking and share your tasty creations!](https://stirredrecipes.com/wp-content/uploads/2025/07/0bd1e665-0f4c-4051-ace4-1f8505f7a908.webp)
Caprese Salad with Balsamic Glaze Fresh and Tasty Dish
Looking to whip up a fresh and delicious dish? Let’s dive into the vibrant world of Caprese Salad with Balsamic Glaze! This no-cook delight features
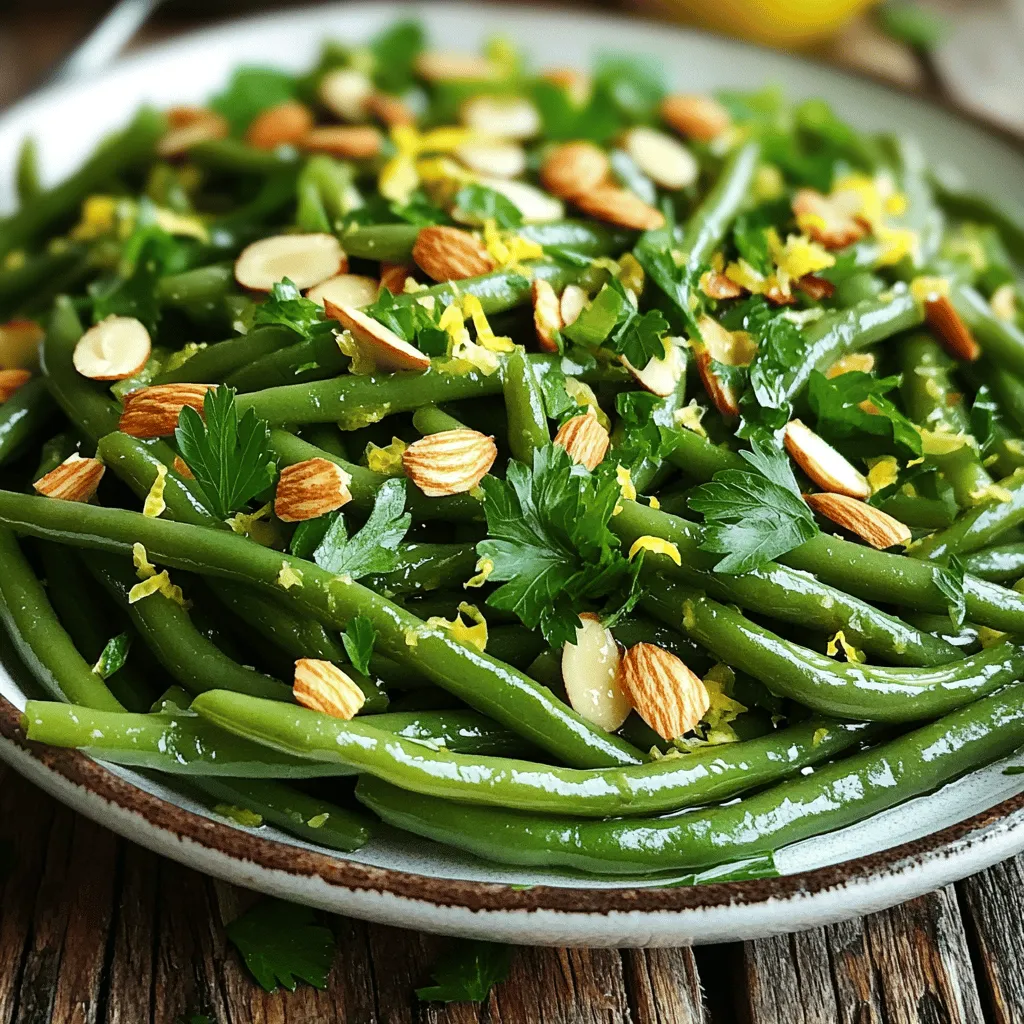
Make Fantastic Gluten-Free Green Beans Recipe Now
Are you ready to transform ordinary green beans into a fantastic gluten-free side dish? This simple recipe packs flavor and crunch, thanks to fresh ingredients
![- Fresh Orange Juice - Lemon Juice - Dijon Mustard - Honey or Agave Syrup - Extra Virgin Olive Oil - Salt and Pepper - Fresh Oregano (Optional) To make a great vinaigrette, you need fresh and simple ingredients. Start with fresh orange juice, about 1/4 cup. This gives your dressing a bright and sweet flavor. Next, add 2 tablespoons of lemon juice for some tang. The Dijon mustard, which is 1 tablespoon, adds a nice kick. For sweetness, use 1 teaspoon of honey or agave syrup. I often choose agave syrup when I want a vegan option. Next is the extra virgin olive oil. You will need 1/2 cup. This creates a rich base for your dressing. Don't forget salt and pepper to taste. They bring everything together. If you want to add a fresh touch, include 1 teaspoon of minced fresh oregano. This is optional but gives a nice herbal flavor. With these ingredients, you can make a zesty citrus vinaigrette that’s perfect for any salad. Check the Full Recipe for more details on how to combine these flavors. Whisking Liquid Ingredients Start by gathering your ingredients. You need fresh orange juice, lemon juice, Dijon mustard, and honey. In a medium bowl, whisk these together until they blend well. This step is key for a balanced flavor. Emulsifying with Olive Oil Next, it’s time to add the olive oil. Slowly drizzle 1/2 cup of extra virgin olive oil into the bowl. Keep whisking as you pour. This helps the oil mix in smoothly. You want a creamy texture that feels rich and satisfying. Seasoning and Flavor Adjustments Now, season your vinaigrette. Add salt and pepper to taste. If you like, mix in some minced fresh oregano for an extra flavor boost. Taste it! If it needs more sweetness, add a little honey. For more tang, squeeze in some lemon juice. Refrigeration Time After mixing, transfer your vinaigrette to a jar with a tight lid. Place it in the fridge for at least 30 minutes. This waiting time is important. It lets the flavors blend together, making it taste even better. Visual Presentation Tips When you’re ready to serve, think about how it looks. Pour the vinaigrette into a decorative bottle or jar. A sprig of fresh oregano on top adds a nice touch. Drizzle it over a vibrant mixed greens salad. This makes your dish pop with color and freshness. Enjoy making your homemade vinaigrette salad dressing! Check out the Full Recipe for more details. To make your vinaigrette truly shine, focus on two main areas: sweetness and acidity. Sweetness balances the tartness of the vinegar or citrus. If your vinaigrette tastes too sour, add a bit more honey or agave syrup. Start with a small amount, then taste. Keep adjusting until it hits the spot for you. Acidity brings brightness to your dish. If you prefer a tangier flavor, increase the lemon juice. Just like sweetness, balance is key here. Trust your taste buds. Emulsification is the secret to a smooth vinaigrette. This means mixing oil and water-based ingredients until they blend well. While whisking, slowly add the olive oil to the bowl. The oil should gradually mix in, creating a creamy texture. If you add the oil too fast, it will separate. Now that your vinaigrette is ready, it’s time to pair it with some tasty dishes. It works great with all types of salads. Try it on mixed greens, spinach, or even a hearty grain salad. The freshness of the vinaigrette brightens every bite. You can also drizzle it over roasted vegetables. It adds a burst of flavor to carrots, zucchini, or bell peppers. Just a little can turn simple veggies into a star dish. Feel free to explore the [Full Recipe] for more details and tips on making your vinaigrette! {{image_2}} You can make your vinaigrette even more fun by adding different flavors. One great way is to infuse herbs. Fresh herbs like basil, thyme, or parsley can elevate your dressing. Just chop them finely and mix them into your vinaigrette. This change adds a burst of flavor to your salads. Another option is experimenting with citrus. While we use orange juice in the base recipe, you can try lime or grapefruit juice. Each brings a unique zestiness that can brighten your dishes. Mix and match juices to find your favorite combination. Add a twist of lemon zest for an extra punch. If you want a vegan option, it's easy to switch out honey. Use agave syrup instead. It gives the same sweetness without animal products. This adjustment keeps your vinaigrette light and fresh. For those who need gluten-free options, you're in luck! This vinaigrette is already gluten-free. Just ensure your mustard is also gluten-free. Check the label to be safe. This way, everyone can enjoy your homemade dressing without worry. To see how these variations come together, check out the Full Recipe for Zesty Citrus Vinaigrette. Enjoy crafting your own unique dressing! To keep your vinaigrette fresh, use a clean jar with a tight lid. A glass jar works best. It allows you to see the vinaigrette's color and texture. Avoid plastic containers, as they can absorb flavors. After making your vinaigrette, pour it into the jar and seal it tightly. Store it in the fridge for optimal taste. Homemade vinaigrette can last about one week in the fridge. The fresh juice and herbs can make it spoil faster. Always check for any signs of spoilage before using it. Look for changes in smell or color. If it smells sour or off, toss it out. If you see mold or separation, do not use it. Freshness is key, so make small batches to enjoy it at its best. How long can I store homemade vinaigrette? You can keep homemade vinaigrette for about one week. Store it in the fridge. Make sure it’s in a sealed jar. The flavors will get better over time. Can I use other types of vinegar in the recipe? Yes, you can use different vinegars. Try balsamic, red wine, or apple cider vinegar. Each will change the taste. Experiment to find your favorite. What to do if the vinaigrette separates? If your vinaigrette separates, just give it a good shake. The oil and vinegar will mix again. You can also whisk it quickly to re-emulsify. Is homemade vinaigrette healthier than store-bought? Homemade vinaigrette is usually healthier. You control the ingredients and avoid preservatives. Fresh ingredients mean better taste and nutrition. Can I make vinaigrette in advance? Yes, you can make it ahead of time. Just store it in the fridge. Allow it to sit for at least 30 minutes after making for the best flavor. What salads pair well with vinaigrette? Vinaigrette works great with many salads. Try it on mixed greens, spinach, or even pasta salads. It adds a fresh touch to any dish. How can I use vinaigrette beyond salads? You can use vinaigrette in many ways. Drizzle it over roasted veggies or grilled chicken. It can also be a tasty marinade for meats. Check out the Full Recipe for more ideas! This blog post showed you how to make a simple vinaigrette. We covered key ingredients like orange juice and Dijon mustard. I shared step-by-step instructions to help you mix it right. You learned tips for perfecting your flavor and options for variations. I also covered storage techniques and answered common questions. Homemade vinaigrette adds freshness to meals. With practice, you can create your unique twists. Enjoy your tasty creations!](https://stirredrecipes.com/wp-content/uploads/2025/07/cc73a46b-21bc-4eac-9ed1-1e2029ffcc31.webp)
Homemade Vinaigrette Salad Dressing Simple and Fresh
Tired of store-bought dressings filled with preservatives? You can easily make homemade vinaigrette salad dressing that’s fresh and flavorful! Using simple ingredients like orange juice,
![To make a fresh and tasty zucchini salad, gather these key ingredients: - 2 medium zucchinis, spiralized or thinly sliced - 1 cup cherry tomatoes, halved - 1/4 cup red onion, finely sliced - 1/2 cup cucumber, diced - 1/4 cup fresh parsley, chopped - 1/4 cup fresh mint, chopped - 3 tablespoons lemon juice - 2 tablespoons olive oil - 1 tablespoon honey or maple syrup - Salt and pepper to taste - Optional: Feta cheese crumbles for garnish These ingredients work together to create a bright and zesty flavor. The fresh herbs add a lovely aroma while the lemon juice gives a nice tang. You can change some ingredients to fit your needs: - For vegan options: Skip the honey and use maple syrup. - For gluten-free diners: This salad is already gluten-free. - For fewer carbs: Reduce the amount of cucumber. - For added crunch: Include bell peppers or radishes. These swaps keep the salad tasty while catering to different diets. When choosing zucchinis, look for these signs of freshness: - Bright green color with no blemishes. - Firm texture without soft spots. - Small to medium size for better flavor. Select zucchinis that feel heavy for their size. Fresh zucchinis make a big difference in your salad's taste and texture. To prepare zucchini for your salad, start with two medium zucchinis. You can spiralize them into noodles or slice them thinly into half-moons. I love using a spiralizer; it gives the salad a fun texture. If you don’t have one, don’t worry. Thin slices work just as well. Once your zucchini is ready, set it aside. This is the base of your refreshing salad. Next, grab a large mixing bowl. Add the prepared zucchini, one cup of halved cherry tomatoes, and half a cup of diced cucumber. Then, toss in a quarter cup of finely sliced red onion. Each of these ingredients brings a burst of flavor. Mix them well to combine. You want every bite to have a little bit of each ingredient. This colorful mix looks great and tastes even better! For the dressing, take a smaller bowl. Whisk together three tablespoons of lemon juice, two tablespoons of olive oil, and one tablespoon of honey or maple syrup. This mix adds a zesty kick to the salad. Don't forget to add salt and pepper to taste. Once everything is well combined, pour the dressing over the salad mixture. Gently toss until all the ingredients are coated. The dressing ties all the flavors together. After that, add a quarter cup each of chopped fresh parsley and mint. Toss again to mix in those lovely herbs. If you want, add feta cheese crumbles on top before serving. This step adds a nice creamy touch. For the full recipe, check out the details above. To boost the taste of your zucchini salad, consider these simple tips: - Use fresh herbs. Fresh parsley and mint add a bright flavor. - Add citrus zest. A bit of lemon zest enhances the lemon juice's brightness. - Season well. Don’t skimp on salt and pepper! They bring out the flavor. - Let it marinate. Allow the salad to sit for a few minutes before serving. This lets the flavors blend. For a beautiful presentation, try these ideas: - Use a large bowl or platter. This allows all the colors to shine. - Garnish with herbs. Extra parsley and mint on top make it pop. - Add feta cheese. Crumbled feta adds creaminess and a salty kick. - Serve with lemon wedges. They look nice and add freshness. Avoid these common pitfalls when making your salad: - Overdressing. Too much dressing can make the salad soggy. - Slicing zucchinis too thick. Thin slices or spiralizing keep them crisp. - Skipping the seasoning. Without salt and pepper, the salad lacks flavor. - Not tasting before serving. Always taste and adjust seasonings to your liking. For the full experience, try out the [Full Recipe]. It will guide you through making this zesty dish! {{image_2}} You can make a vegan zucchini salad easily. Just skip the feta cheese. Instead, use avocado for creaminess. You can also add nuts or seeds for crunch. Try sunflower seeds or walnuts. They bring protein and flavor. You can also mix in more veggies like bell peppers or carrots. This gives your salad more color and taste. If you are on a keto diet, focus on low-carb ingredients. Keep the salad base of zucchini, tomatoes, and herbs. You can add olives or avocado for healthy fats. If you want more flavor, add a splash of balsamic vinegar. Just make sure it fits your carb count. This will keep your salad fresh and tasty while staying on track. To make your salad more filling, add protein. Grilled chicken or shrimp works great. Cook the chicken or shrimp and slice them before adding. For a vegan option, use tofu. Press and cube the tofu, then pan-fry it until golden. Mix the protein into the salad right before serving. This will make it a full meal. For the full recipe, you can refer back to the Zesty Herbal Zucchini Salad. To keep your zucchini salad fresh, store it in an airtight container. This helps prevent exposure to air and keeps the flavors intact. If you have added feta cheese, keep it separate until serving. This way, the cheese stays fresh and doesn’t make the salad soggy. You can keep zucchini salad in the fridge for about 2 to 3 days. After that, the veggies may lose their crunch. Always check for any signs of spoilage before eating. If it looks or smells off, it’s better to toss it. Freezing zucchini salad is not the best option. The texture of zucchini changes when frozen. However, if you want to freeze it, separate the dressing from the salad. Place the salad in a freezer-safe bag or container without the dressing. You can freeze it for up to 2 months. To eat, thaw it in the fridge and mix in fresh dressing before serving. For the complete recipe and more tips, check out the Full Recipe. Yes, you can use many types of vinegar. Balsamic, red wine, or apple cider vinegar work well. Each type adds a unique flavor. Balsamic gives a sweet touch. Red wine adds sharpness. Apple cider brings a bit of tang. Feel free to experiment with what you like! Zucchini is very versatile. You can add bell peppers, radishes, or carrots. All these bring different colors and textures. Try adding corn for sweetness or kale for crunch. You can even mix in some broccoli or peas for a fresh twist. The key is to balance flavors and textures. Absolutely! Zucchini Salad is perfect for meal prep. It stores well in the fridge for a few days. Just keep the dressing separate until you’re ready to eat. This way, the veggies stay crisp. You can make a big batch and enjoy it all week. It’s a great way to eat healthy on busy days. Try it out with the Full Recipe! This blog post covered how to make a zesty herbal zucchini salad. We explored key ingredients and some alternatives for your diet. I shared tips for picking fresh zucchinis and how to prepare them. You learned how to mix the salad and create a simple dressing. We went over ways to enhance flavor and serve it nicely. I also discussed variations to try and how to store leftovers. Enjoy making this delicious salad, and remember to experiment with flavors your way!](https://stirredrecipes.com/wp-content/uploads/2025/07/e53b4046-48fd-47d8-a871-bb9d6b36ded4.webp)
Zucchini Salad Fresh and Flavorful Summer Dish
Summer is the perfect time for a fresh, zesty zucchini salad. This dish bursts with flavor and is simple to make. I’ll show you how
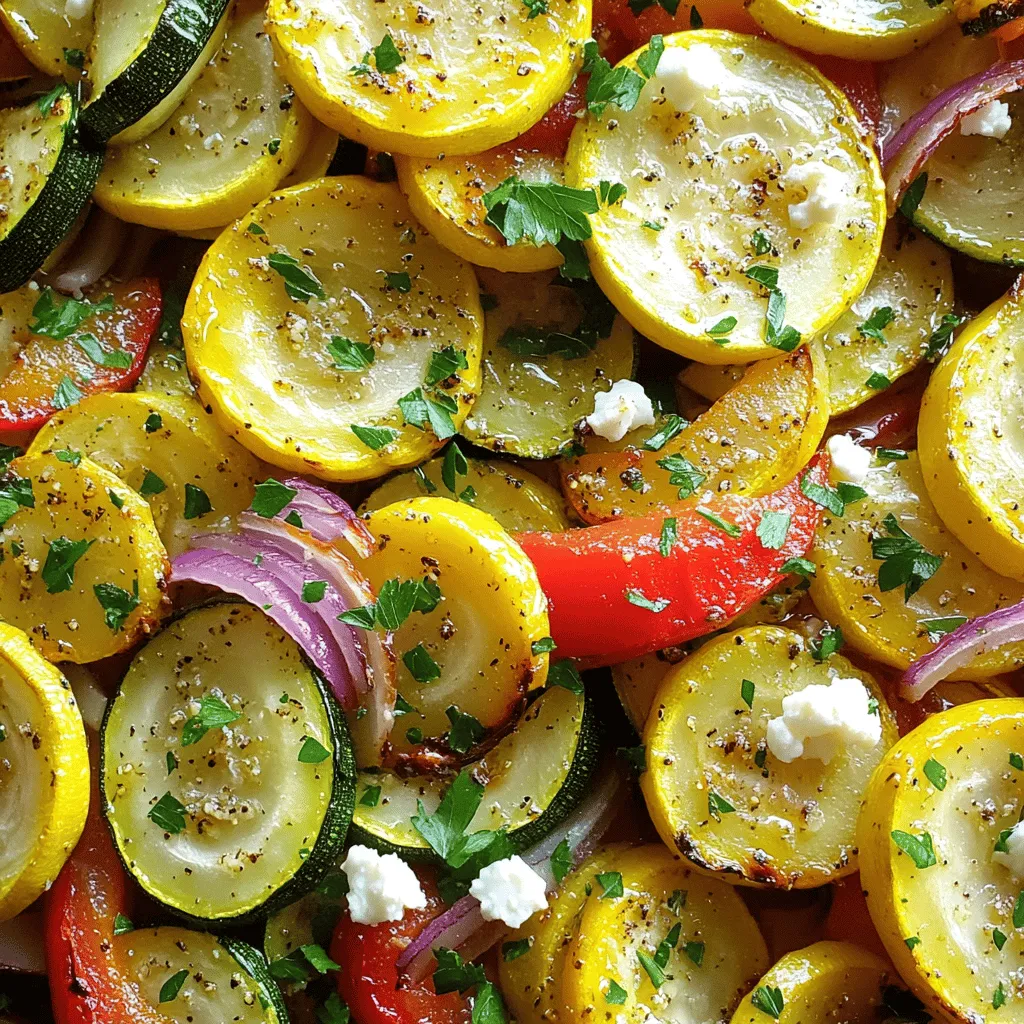
Easy Roasted Zucchini and Squash Simple and Tasty Side
Are you looking for a simple, tasty side dish? Look no further! Easy roasted zucchini and squash are packed with flavor and nutrition. With just
![- 1 medium butternut squash, peeled and cubed - 2 tablespoons olive oil - ½ cup dried cranberries - ½ cup walnuts, roughly chopped - 2 cups fresh spinach or mixed greens - ¼ cup feta cheese, crumbled - 3 tablespoons balsamic vinegar - 1 tablespoon maple syrup - 1 teaspoon Dijon mustard - Salt and pepper to taste The key to this salad is the butternut squash. It gives a sweet flavor and a nice texture. When you choose your squash, look for one that feels heavy and has smooth skin. The olive oil helps roast the squash, making it tender and golden brown. Dried cranberries add a burst of tartness. They pair well with the creamy feta cheese. The walnuts provide a nice crunch that balances the softness of the squash. You can swap the spinach for mixed greens if you prefer. For the dressing, balsamic vinegar brings a tangy flavor. Maple syrup adds sweetness to the glaze. Dijon mustard gives it a kick. Salt and pepper are essential for bringing out all the flavors. For the full recipe, check the earlier section. Preheating the oven Start by preheating your oven to 400°F (200°C). This heat is perfect for roasting the squash. Preparing the butternut squash Next, peel and cube one medium butternut squash. Make sure the pieces are about the same size. This helps them cook evenly. In a large bowl, toss the squash with two tablespoons of olive oil, salt, and pepper. Coat each piece well. Making the cranberry glaze In a small saucepan, mix ¼ cup of balsamic vinegar, 1 tablespoon of maple syrup, and 1 teaspoon of Dijon mustard. Heat this over medium heat. Stir often and let it simmer for about five minutes. It should thicken slightly. Roasting the squash Spread the coated squash on a lined baking sheet. Place it in the preheated oven. Roast for 25-30 minutes. Remember to flip the pieces halfway through. They should be tender and caramelized when done. Assembling the salad Once the squash is roasted, let it cool for a few minutes. In a large salad bowl, combine the roasted squash, ½ cup of dried cranberries, ½ cup of roughly chopped walnuts, and 2 cups of fresh spinach or mixed greens. Crumble ¼ cup of feta cheese on top. Drizzling the glaze Finally, drizzle the cranberry glaze over your salad. Gently toss everything together. Make sure all the ingredients get coated. Serve the salad warm or at room temperature for the best flavors. For the complete recipe, check the [Full Recipe]. For the best roasted butternut squash, set your oven to 400°F (200°C). This temperature helps caramelize the squash perfectly. To ensure even caramelization, cut the squash into uniform cubes. This way, all pieces cook at the same rate. Spread the cubes out on the baking sheet. Avoid crowding them; this lets the heat circulate. Flip the squash halfway through roasting. This helps achieve that lovely golden color on all sides. When picking butternut squash, look for firm and heavy ones. They should have a smooth skin and no blemishes. A good squash feels heavy for its size, which means it's full of flavor. If you want a different taste, try goat cheese instead of feta. It adds a creamy and tangy touch. For a dairy-free option, use avocado or a nut-based cheese. Both options work well in this salad. For the full recipe, check out the complete instructions above. {{image_2}} You can change this salad with seasonal items. In fall, add roasted apples or pears. They give a sweet and juicy bite. In winter, try adding pomegranate seeds for a burst of color and flavor. The seeds add a nice crunch too. For vegan diets, replace feta cheese with avocado or tofu. This switch keeps it creamy and tasty. For gluten-free needs, make sure your balsamic vinegar has no gluten. Most brands are safe, but check labels. These swaps keep everyone happy at the table. To store leftovers, place the salad in an airtight container. This keeps the flavors fresh. If you have extra glaze, store it in a separate container. It helps maintain the salad's crispness. Use the salad within three days for the best taste. You can reheat this salad in the microwave or oven. If using the microwave, warm it for a short time. This keeps the squash soft but may wilt the greens. Oven reheating keeps the salad's texture better. Preheat the oven to 350°F (175°C) and heat for about 10 minutes. Enjoy the salad warm or at room temperature. For detailed steps, check the Full Recipe. Can I substitute fresh cranberries? Yes, you can use fresh cranberries. They will add a tart flavor. Just chop them up and mix them in. You might want to add a bit more maple syrup for sweetness. How do I make this salad in advance? You can prepare the butternut squash ahead of time. Roast it and store it in the fridge. Mix the salad just before serving for best taste. Keep the cranberry glaze separate until ready to serve. What can I serve with this salad? This salad pairs well with roasted chicken or fish. It also goes great with a warm grain bowl. You can even serve it as a side at a holiday meal. Calorie count per serving Each serving has about 250 calories. This number can change based on the amount of feta or walnuts you add. Health benefits of key ingredients - Butternut squash is high in vitamins A and C. - Cranberries are great for urinary health and rich in antioxidants. - Walnuts offer healthy fats and protein. - Spinach is packed with iron and vitamins. This salad is not just tasty; it’s good for you too! Enjoy the full recipe for a delightful meal. This blog post covered how to make a delicious butternut squash salad. We explored key ingredients like butternut squash, olive oil, and cranberries. I gave easy steps for preparation, cooking, and tips for perfect roasting. We also discussed variations and how to store leftovers properly. In closing, this salad not only tastes great but is healthy too. Try different ingredients to make it your own. Enjoy experimenting in the kitchen!](https://stirredrecipes.com/wp-content/uploads/2025/07/70185da8-76a1-4e59-bdf2-614622800200.webp)
Cranberry-Glazed Roasted Butternut Squash Salad Delight
Looking for a fresh and tasty salad that impresses? Try my Cranberry-Glazed Roasted Butternut Squash Salad Delight! It’s packed with sweet, roasted squash, crunchy walnuts,
![- Ripe peaches - Feta cheese - Mixed greens - Red onion - Walnuts For this salad, you need ripe peaches. They should feel soft but not mushy. Feta cheese brings a salty creaminess that balances the sweet peaches. Use mixed greens like arugula, spinach, and romaine for a fresh base. Thinly slice red onion for a slight kick. Toasted walnuts add a nice crunch and nutty flavor. - Balsamic glaze - Olive oil - Salt and pepper These pantry staples enhance your salad. Balsamic glaze adds sweetness and depth. A drizzle of olive oil keeps it rich and smooth. Season with salt and pepper to bring out all the flavors. - Additional nuts - Fresh herbs - Alternative dressings You can customize your salad. Add more nuts like pecans or almonds for extra crunch. Fresh herbs like basil or mint can brighten the dish. Try different dressings, too, if you want to switch it up. This Simple Peach Feta Salad is all about fresh flavors and your personal touch. Check the Full Recipe for more details. Start with your mixed greens. Wash them well and spin them dry. This step keeps the salad crisp. Use a mix of arugula, spinach, and romaine for great flavor. Next, slice the peaches. Choose ripe peaches for sweetness. Cut them into thin wedges. This way, they blend nicely with the greens. Now, grab a large salad bowl. Combine the mixed greens and peach slices in the bowl. Add crumbled feta cheese and thinly sliced red onion. This mix creates a colorful and tasty dish. When it’s time to toss the salad, do it gently. Use two large spoons to lift and turn the ingredients. This keeps the peaches and feta intact. Toasting walnuts is key for flavor. It brings out their nutty richness. Heat a small skillet over medium heat. Add the walnuts and stir them for 3-5 minutes. You’ll know they’re ready when they smell great and turn golden brown. Let the walnuts cool before adding them to the salad. This adds a nice crunch and depth to your dish. For the full recipe, check the [Full Recipe]. When picking peaches, look for ripe ones. Ripe peaches feel slightly soft and smell sweet. If they are too soft, they may be overripe. Overripe peaches can be mushy and lose flavor. You want peaches that are in season. Late summer is the best time for juicy, fresh peaches. This salad shines with a mix of sweet and salty. The peaches are sweet while feta adds saltiness. You can also add herbs like mint or basil for freshness. A sprinkle of black pepper gives a nice kick too. For extra depth, consider using a touch of chili flakes. Pair this salad with grilled chicken or fish for a complete meal. It also goes well with crusty bread or a light soup. To make it pretty, serve in a clear bowl. Layer the greens, and then add the peaches and feta on top. Drizzle the dressing last for a beautiful finish. For the full recipe, check out the details above! {{image_2}} You can switch fruits based on what’s fresh. In summer, use juicy peaches. In fall, swap for apples or pears. You can also add protein like grilled chicken or shrimp. This makes the salad a full meal. For a vegan version, skip the feta. Use avocado for creaminess instead. For gluten-free options, check your balsamic glaze. Some brands add gluten. Choose one that’s safe for you. Try different dressings to change the taste. A honey mustard or lemon vinaigrette works well. You can also add spices like black pepper or fresh herbs like basil. Zest from a lemon or lime adds a nice zing, too. Want to try the full experience? Check out the Full Recipe for more details! To store leftover salad, place it in an airtight container. This keeps the salad fresh longer. If you have extra dressing, store it separately. Avoid mixing it with the salad to prevent sogginess. Keep the salad in the fridge right after serving. You should serve leftover salad cold. If you prefer, let it sit at room temperature for a few minutes. Just remember, do not heat it in the microwave. The freshness of the peaches and greens is best enjoyed cold. The salad lasts about 2-3 days in the fridge. After this time, check for spoilage. Signs include brown or slimy greens and mushy peaches. If you see any of these signs, toss the salad out. Enjoy your Simple Peach Feta Salad while it’s fresh! For the full recipe, check out the section earlier in this article. Yes, you can prepare parts ahead of time. You can wash and dry the mixed greens a day before. Store them in a sealed container with a paper towel. This keeps them crisp. Slice the peaches just before serving. They can brown quickly. You can also crumble the feta and toast the walnuts in advance. Mix everything just before serving for the best taste. If you don’t have feta, you can try goat cheese. It has a creamy texture and tangy taste. Another option is ricotta, which is milder. You might also like using blue cheese for a stronger flavor. Each cheese will change the salad's taste. Choose based on your preference. To ripen peaches fast, place them in a paper bag. The bag traps ethylene gas and speeds up ripening. You can also add an apple or banana to the bag. These fruits release more ethylene. Keep the bag at room temperature. Check daily until they are soft. Enjoy your ripe peaches in the Simple Peach Feta Salad! This blog post covered how to create a Simple Peach Feta Salad. We discussed fresh ingredients like ripe peaches, feta cheese, and walnuts. I shared tips for perfect prep and assembly. You learned about storage, variations, and flavor twists, too. This salad is easy to make, refreshing, and fits many diets. Enjoy experimenting with flavors and fresh ingredients. Your perfect salad awaits!](https://stirredrecipes.com/wp-content/uploads/2025/07/821fbaee-1218-448d-a504-36e56f0e5faa.webp)
Simple Peach Feta Salad Quick and Fresh Delight
Craving a refreshing dish that bursts with flavor? You’ll love my Simple Peach Feta Salad! This delightful recipe combines juicy peaches, creamy feta, and crunchy

Peach Cobbler Cheesecake Fruit Salad Refreshing Treat
If you’re craving a sweet and refreshing treat, you’ll love this Peach Cobbler Cheesecake Fruit Salad. It combines juicy peaches and mixed berries with a
![- 2 ripe peaches, sliced - 1 ball of burrata cheese - 4 cups mixed arugula and baby spinach - 1/4 cup balsamic glaze - 1/4 cup toasted pine nuts - 1 tablespoon olive oil - Fresh basil leaves for garnish - Salt and pepper to taste Choosing ripe peaches: Look for peaches that feel slightly soft to the touch. They should have a sweet aroma. The color should be a warm yellow or golden, with no green spots. Finding fresh burrata cheese: Choose burrata with a soft, creamy center. It should feel moist and not dry. Always check the date on the package for freshness. - Bowls for mixing - Serving platter - Knife and cutting board - Prepare the greens: Start by washing 4 cups of mixed arugula and baby spinach. In a large bowl, drizzle 1 tablespoon of olive oil over the greens. Season with salt and pepper to taste. Toss gently, so each leaf gets a light coat. This step adds flavor and helps the greens shine. - Slice the peaches: Take 2 ripe peaches and place them on a cutting board. Carefully cut each peach in half, removing the pit. Then, slice each half into thin wedges. The slices should be thick enough to hold their shape but thin enough to blend well with the other ingredients. - Assemble the salad layers: On a large serving platter, spread the dressed greens evenly. Next, layer the sliced peaches on top of the greens. Make sure to cover the greens well for a colorful presentation. - Adding burrata and toasted pine nuts: Tear 1 ball of burrata cheese into pieces and distribute them over the salad. Place the pieces among the peaches for a beautiful look. Then, sprinkle 1/4 cup of toasted pine nuts on top. This adds a delightful crunch and rich flavor. - Drizzling with balsamic glaze: Take 1/4 cup of balsamic glaze and drizzle it over the salad in a zigzag pattern. This step not only enhances the taste but also makes the dish visually appealing. - Garnishing with fresh basil: Finally, add fresh basil leaves on top of the salad. They not only bring a pop of green but also add a lovely aroma. - Serving suggestions for visual appeal: To impress your guests, serve the salad on a wooden or marble board. This rustic look adds charm. - Enhancing flavors with additional ingredients: Consider adding a drizzle of extra olive oil before serving. This adds shine and richness to the salad. You can also mix in some fresh herbs like mint for a unique twist. For a detailed look at the full recipe, check out the [Full Recipe]. To make the Peach Burrata Salad shine, balance is key. The sweet peaches, creamy burrata, and tangy balsamic glaze should dance on your palate. Aim for equal parts sweet, creamy, and tangy. This mix makes each bite exciting. Letting the salad rest for 10 minutes helps the flavors blend. This time allows the sweet peaches to soak in the olive oil and balsamic. You'll notice a change in taste that elevates the dish. Pair this salad with light entrées for a complete meal. Grilled chicken or fish complements the salad well. You can also serve it as a side dish at gatherings. The bright colors make it a showstopper. For a light lunch, enjoy it with a crusty baguette. The bread complements the creamy burrata. You can also add a glass of chilled white wine. If you need a vegan or dairy-free option, swap the burrata. Use a plant-based cheese that mimics its creaminess. You can also try avocado for a rich texture. For lower sugar options, skip the balsamic glaze. Instead, use a splash of lemon juice. This keeps the salad fresh and bright without added sweetness. This Peach Burrata Salad is versatile and easy to customize. You can find the full recipe to explore these ideas further. {{image_2}} You can change this salad with seasonal fruits. Try adding figs for a sweet twist. Strawberries also bring a nice berry flavor. Each fruit adds its own special taste. You can also swap the greens. Use kale or mixed baby greens instead of arugula and spinach. Different nuts like walnuts or almonds bring new textures and tastes too. Herbs and spices can boost the taste of your salad. Fresh mint or thyme adds freshness. Try a pinch of chili flakes for a little heat. You can also mix up the dressings. A citrus vinaigrette adds a bright touch. Or, use a creamy dressing for richness. Each choice builds new flavor layers. If you want a different texture, try ricotta or feta. Ricotta is creamy and light, while feta gives a salty bite. There are also great plant-based cheeses if you prefer dairy-free options. These alternatives can make the salad fit many diets. Each cheese choice brings its own flavor profile, making your salad unique. For the full recipe of Peach Burrata Salad, check out the detailed steps above. To store leftover Peach Burrata Salad, place it in an airtight container. Make sure to keep the salad in the fridge. This helps keep the flavors fresh. Avoid adding the balsamic glaze until you're ready to eat. This keeps the greens crisp. Use glass or plastic containers with tight seals. These types work best for keeping the salad fresh. If you have extra burrata, store that separately. This helps avoid sogginess. The salad lasts in the fridge for about three days. The key ingredients have different shelf lives. Peaches can stay fresh for up to five days. Burrata cheese is best used within two days once opened. Arugula and spinach last about three days as well. Signs the salad has expired include a sour smell or slimy greens. If the peaches look brown or mushy, it’s time to toss them. Always trust your senses when checking for freshness. You can get creative with leftover salad components. Try adding the greens to a wrap or sandwich. Mix the leftover peaches into yogurt or oatmeal. This adds a sweet twist to your breakfast. You can also blend the salad into a smoothie. Just toss everything in and blend until smooth. If you have extra burrata, use it on pasta or pizza. This adds a rich flavor to your dishes. Yes, you can prepare this salad ahead of time. To keep it fresh, follow these tips: - Prep the greens: Wash and dry the arugula and spinach early. Store them in a sealed container with a paper towel to absorb moisture. - Slice the peaches: Wait until just before serving to slice the peaches. This keeps them from browning. - Assemble just before eating: Layer the salad right before serving. This keeps the burrata creamy and the greens crisp. - Dressing: Keep the balsamic glaze separate until you serve the salad. This prevents sogginess. If you don’t have burrata, try these creamy alternatives: - Fresh mozzarella: It has a similar texture and taste. - Ricotta cheese: This gives a creamy feel but with a different flavor. - Feta cheese: This adds a tangy twist, though it is crumbly. - Cream cheese: It works if you want a richer taste. Selecting ripe peaches is key to this salad. Look for these traits: - Color: Choose peaches that have a deep golden hue. - Feel: Gently press the peach; it should yield slightly. - Fragrance: A sweet, fruity scent means it's ripe and juicy. - Smooth skin: Avoid peaches with wrinkles or blemishes. You can use these dressings to enhance your salad: - Homemade balsamic dressing: Mix balsamic vinegar with olive oil, salt, and pepper. - Lemon vinaigrette: Combine fresh lemon juice with olive oil for a zesty kick. - Honey mustard dressing: This adds sweetness and a bit of spice. - Store-bought options: Look for light vinaigrettes or creamy dressings that balance the flavors. For the full recipe, check out the Peach Burrata Delight! We explored how to make a refreshing Peach Burrata Salad with simple, tasty ingredients. Choosing ripe peaches and fresh burrata is key. After mixing the greens and assembling your salad, let the flavors blend for the best taste. Don't hesitate to try variations like figs or different cheeses. Remember, storing leftovers properly helps maintain freshness. This salad is a great choice for a light meal. Enjoy your delicious creation and share it with friends to impress them!](https://stirredrecipes.com/wp-content/uploads/2025/06/57de436a-7587-454b-988d-79c4955f9b45.webp)
Peach Burrata Salad Fresh and Flavorful Delight
Get ready to refresh your summer meals with my Peach Burrata Salad! This dish combines juicy peaches, creamy burrata, and fresh greens for an explosion
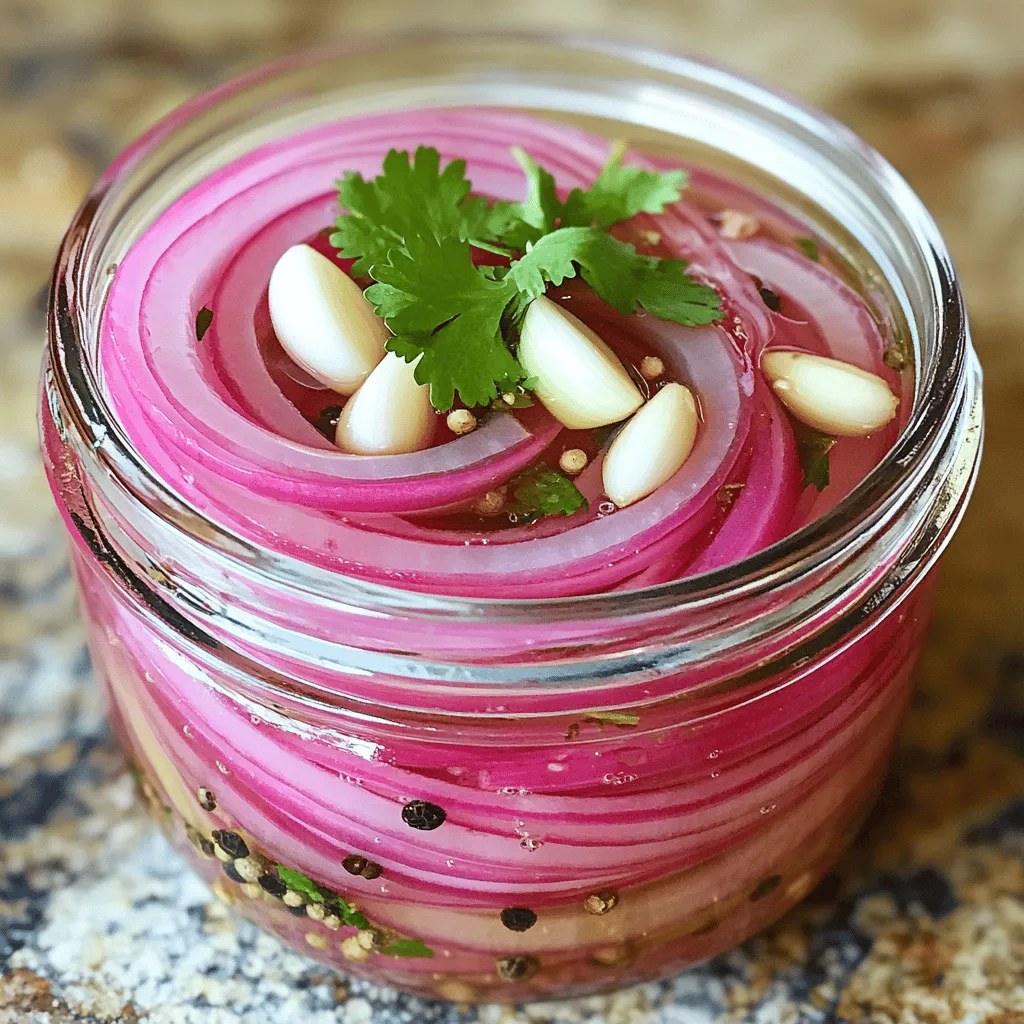
Quick Pickled Red Onions Simple and Flavorful Recipe
Are you ready to add a burst of flavor to your meals? Quick pickled red onions are simple to make and enhance any dish. In