Dinner
![- 1 pound ground beef - 1 cup long-grain white rice - 1 medium onion, diced - 2 cloves garlic, minced - 1 bell pepper (red or green), diced - 1 can (14.5 oz) diced tomatoes, undrained - 2 cups beef broth - 1 teaspoon cumin - 1 teaspoon smoked paprika - 1/2 teaspoon dried oregano - Salt and pepper to taste - 1 cup corn (frozen or canned) - 1 tablespoon olive oil - Fresh parsley or cilantro for garnish In this recipe, I use simple and fresh ingredients. Ground beef is my main protein. It provides great flavor and keeps the dish hearty. The rice makes the meal filling and pairs well with the beef. I always add an onion, diced small, to bring sweetness and depth. Garlic gives a nice aroma and taste. A bell pepper, whether red or green, adds color and crunch. The diced tomatoes help keep the dish moist and flavorful. For seasonings, I use cumin and smoked paprika. They add warmth and a smoky flavor. Dried oregano brings a hint of earthiness. I season with salt and pepper to enhance all the flavors. Beef broth is key for cooking the rice and adding richness. Frozen or canned corn brings a sweet pop of flavor. Lastly, a drizzle of olive oil helps everything cook evenly. This recipe is versatile. You can adjust the ingredients based on what you have at home. For the full recipe, check out the [Full Recipe]. - Heat 1 tablespoon of olive oil in a large skillet over medium-high heat. - Add 1 pound of ground beef. - Cook until the beef is browned, about 5-7 minutes. - Break the meat apart with a spatula as it cooks. - Drain any excess fat if needed. - Add 1 medium diced onion, 1 diced bell pepper, and 2 minced garlic cloves to the skillet. - Sauté for 3-4 minutes. - Cook until the vegetables soften and the onion turns clear. - Stir in 1 cup of long-grain white rice. - Add 1 teaspoon of cumin, 1 teaspoon of smoked paprika, and 1/2 teaspoon of dried oregano. - Mix well to coat the rice with the spices. - Season with salt and pepper to taste. - Pour in 1 can of diced tomatoes (14.5 oz) and 1 cup of corn. - Then, add 2 cups of beef broth to the skillet. - Bring the mixture to a boil over high heat. - Once boiling, reduce the heat to low. - Cover the skillet with a lid. - Let it simmer for 20-25 minutes. - Stir occasionally until the rice is tender and the liquid is absorbed. - Once cooked, remove the skillet from the heat. - Fluff the rice with a fork gently. - Let it sit for a few minutes. - Garnish with fresh parsley or cilantro before serving. For the full recipe, check out the details above. Enjoy your savory ground beef and rice skillet! - Make sure the beef is well-browned for great flavor. This step builds a rich taste. - Use low-sodium broth for a healthier option. It helps control salt while keeping the dish tasty. - Stir occasionally to prevent sticking. This keeps the rice and beef from clumping. - Adjust the cooking time based on the rice type. Brown rice takes longer than white rice. - Pair your skillet dish with a side salad or crusty bread. This adds freshness and texture. - Top with shredded cheese for extra flavor. Melted cheese can make each bite more delightful. For more details, check the Full Recipe. {{image_2}} You can switch up the meat in this dish. Ground turkey or chicken works well. Both options keep it light and tasty. For a vegetarian choice, use lentils. Cooked lentils add a great texture. They soak up flavors just like beef. Adding vegetables makes this meal even better. Toss in peas, carrots, or spinach for color and nutrients. You can also swap the bell pepper for zucchini or mushrooms. These changes add different flavors and textures. Feel free to get creative with what you have! If you like heat, this dish can easily spice up. Add jalapeño or crushed red pepper flakes for a kick. Use spicy sausage instead of ground beef for a bold taste. These options will warm you up and make every bite exciting. For the full recipe, check out the details above! Store any leftovers in an airtight container. This keeps the food fresh and safe. It will last well for about 3-4 days in the fridge. Make sure to cool it down before putting it away. You can freeze the skillet in portions for quick meals. This makes it easy to grab a meal later. Just thaw it overnight in the refrigerator before reheating. This way, it stays tasty and safe. When you are ready to eat, reheat on the stove or in the microwave. To keep it moist, add a splash of broth. This helps bring back the flavor and texture. Enjoy your delicious meal again! Typically, this dish lasts 3-4 days when stored properly. Make sure to keep it in an airtight container. This helps keep the flavors fresh and safe to eat. Yes, you can make this recipe ahead of time. Cook it fully and let it cool. Then store it in the fridge. This way, you have quick meals ready for busy days. I recommend using long-grain white rice. It cooks evenly and stays fluffy, which makes it perfect for this dish. Other rice types may become sticky and mushy. Yes, it can be gluten-free. Just use gluten-free beef broth and check all other ingredients. Always read labels to ensure they meet your dietary needs. For the full recipe, check out the earlier section. This recipe for Ground Beef and Rice Skillet blends simplicity and flavor. We covered the main ingredients, seasonings, and easy steps to create this meal. Remember, you can customize it using different proteins and veggies. Store your leftovers well for busy days. Whether you're enjoying it fresh or reheated, this dish brings comfort to any table. Try it out, and make it your own!](https://stirredrecipes.com/wp-content/uploads/2025/06/bd4431be-ad92-4271-8409-5402216373ac.webp)
Ground Beef and Rice Skillet Simple and Savory Meal
Looking for a quick and tasty dinner idea? The Ground Beef and Rice Skillet is your answer! This simple dish packs a lot of flavor
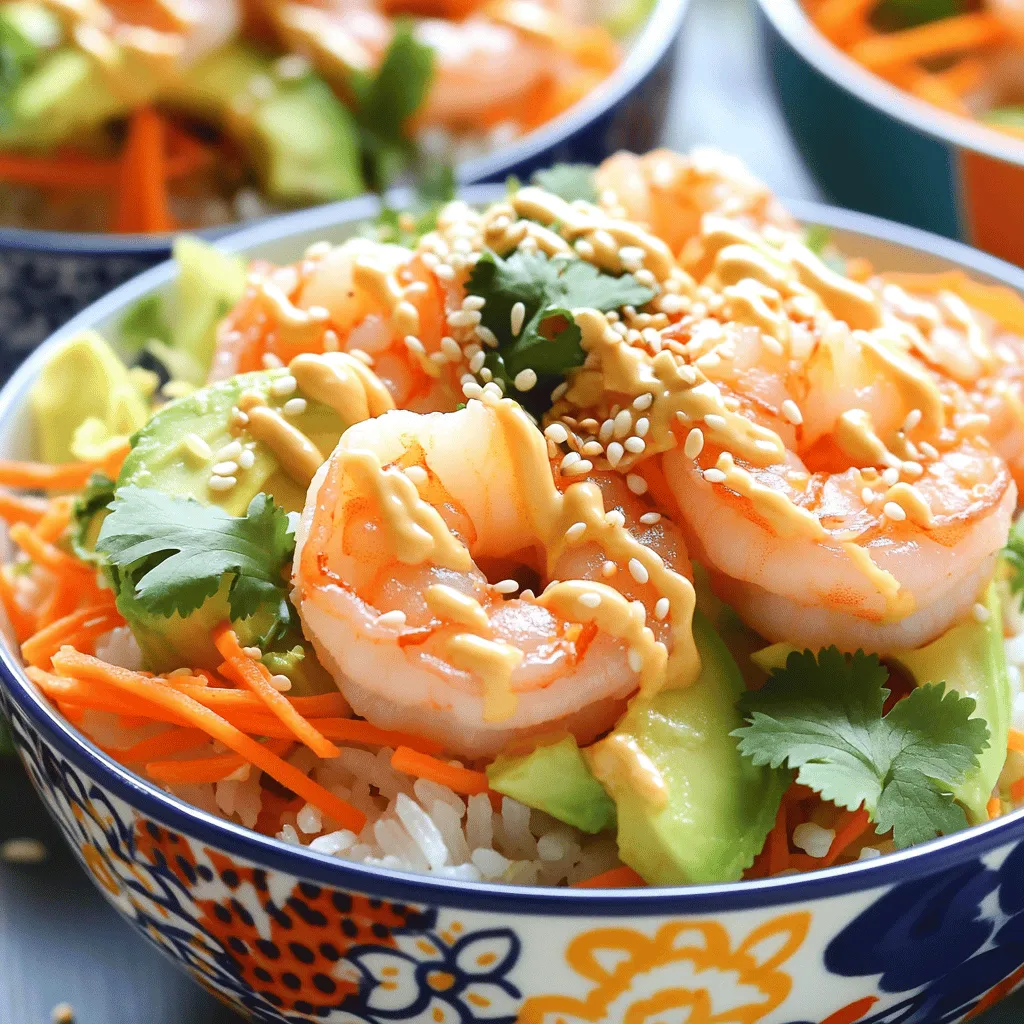
Shrimp Rice Bowls with Spicy Mayo Tasty and Simple Dish
If you’re craving a quick, flavorful meal, shrimp rice bowls with spicy mayo are a perfect choice! These bowls are easy to make and packed
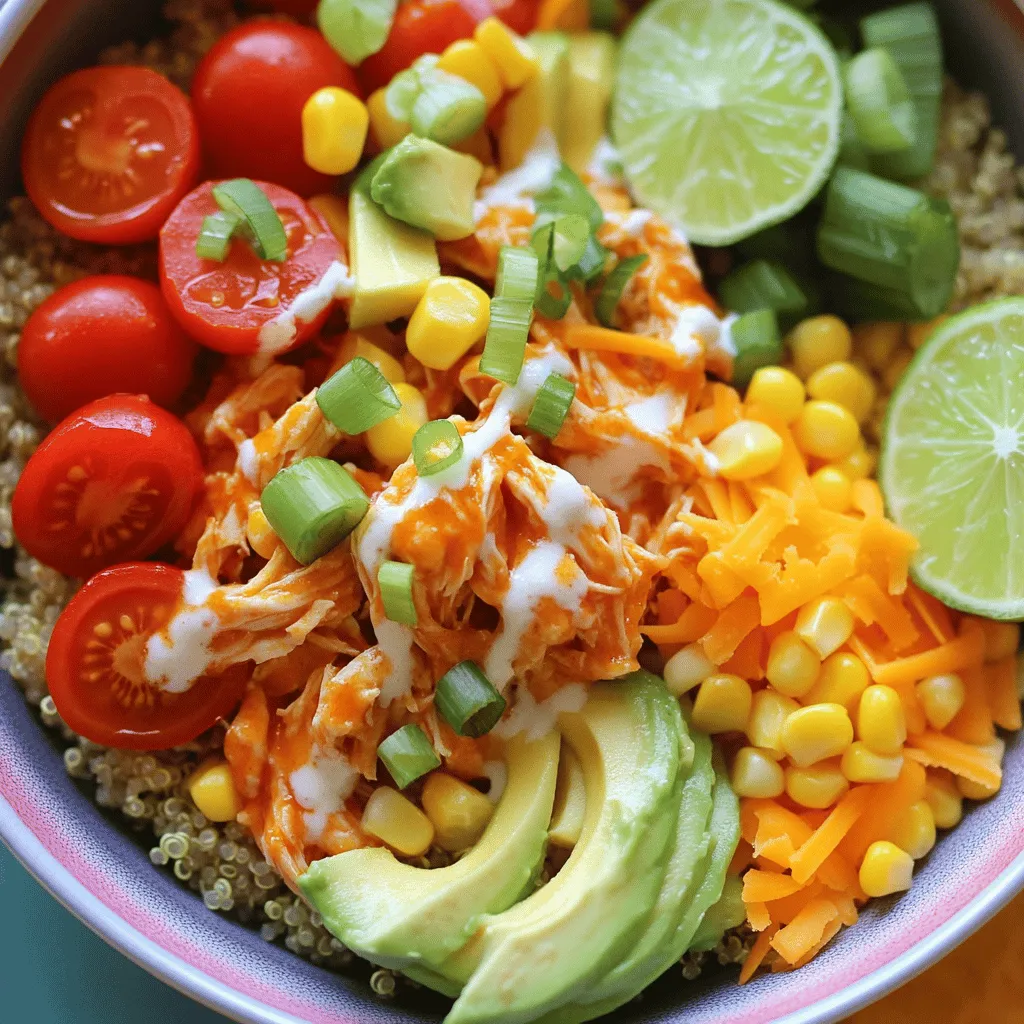
Easy Buffalo Chicken Bowls Quick and Tasty Meal
Who doesn’t love a quick, tasty meal? These Easy Buffalo Chicken Bowls are packed with flavor and simple to make. You can whip them up
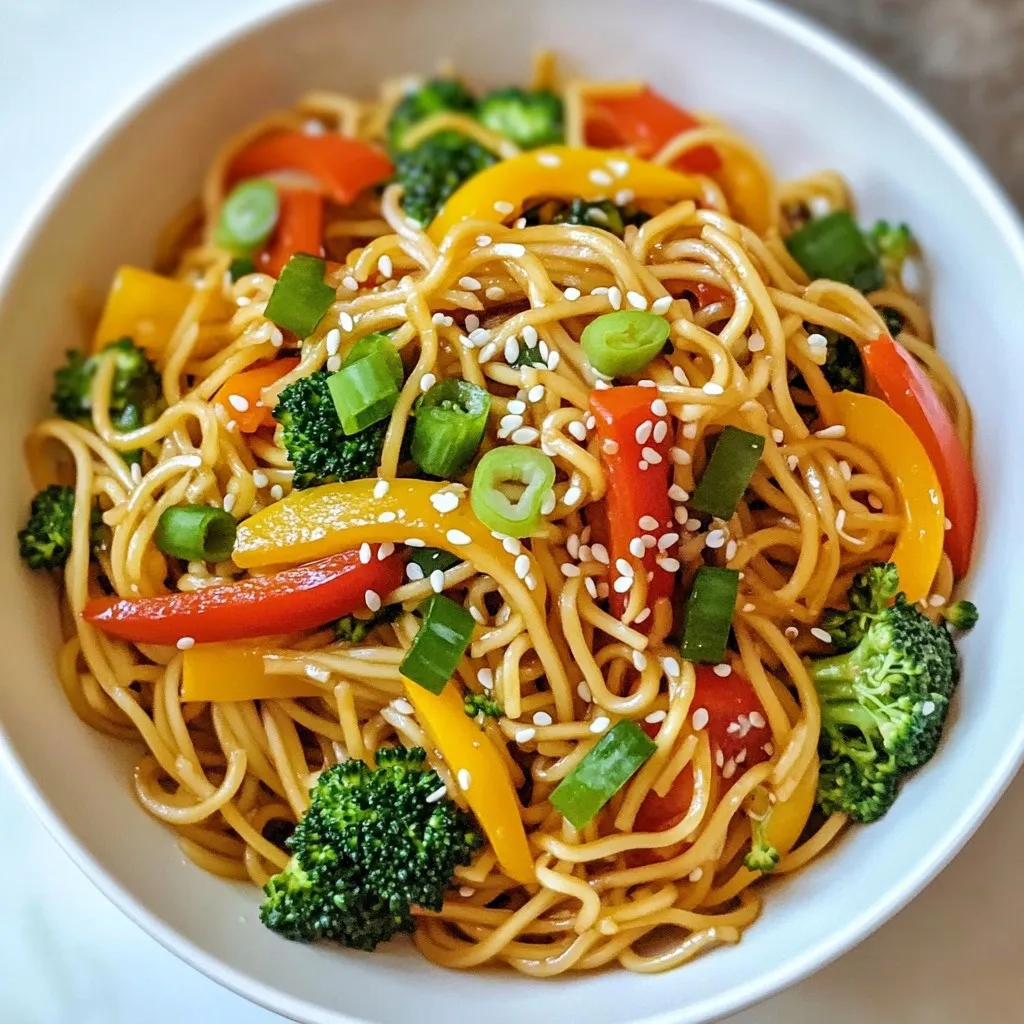
Minute Pan-Fried Noodles Quick and Tasty Recipe
If you need a quick and tasty meal, Minute Pan-Fried Noodles are a perfect choice! This easy recipe comes together in just a few minutes

Slow Cooker Garlic Butter Beef Bites & Potatoes Recipe
If you’re craving a cozy meal that’s packed with flavor, look no further! My Slow Cooker Garlic Butter Beef Bites & Potatoes recipe is here
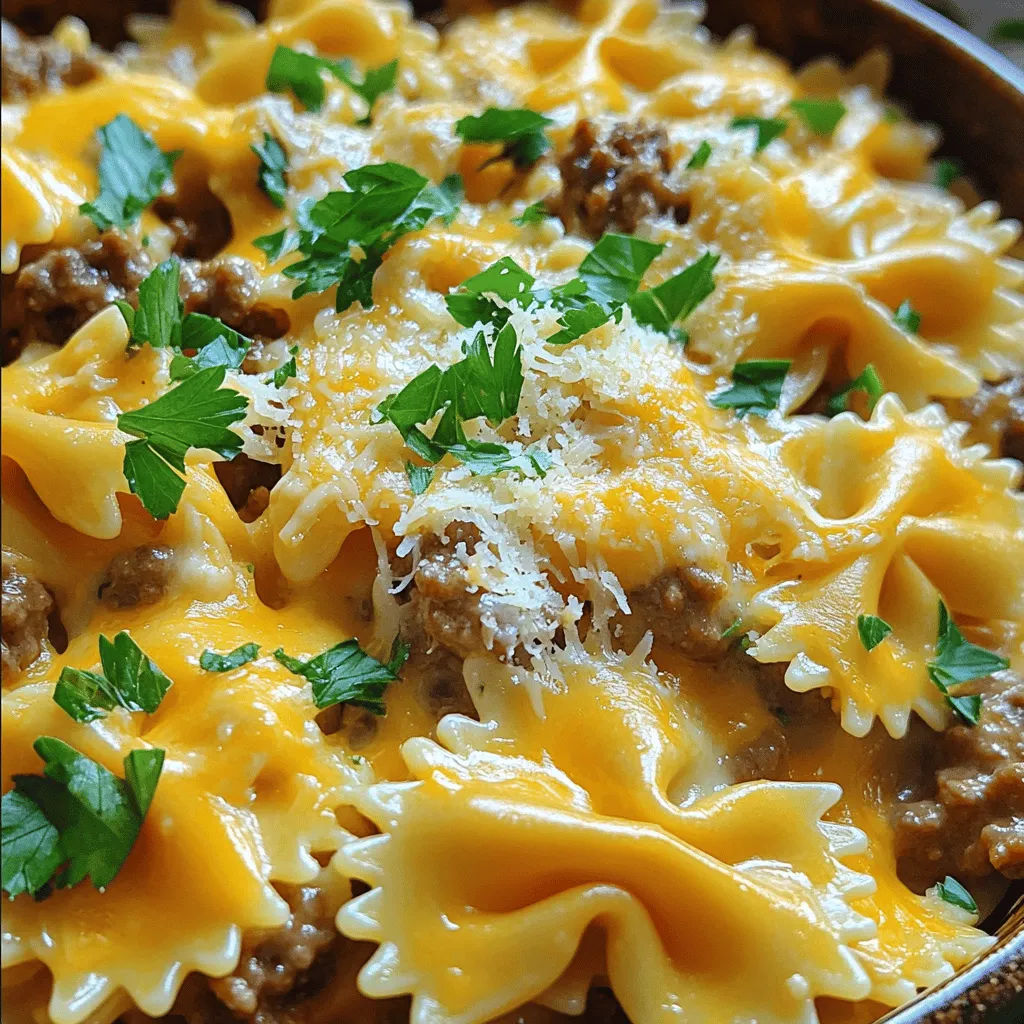
Cheesy Beef and Bowtie Pasta in Garlic Butter Delight
Get ready to dive into a delicious dish that will wow your taste buds! My Cheesy Beef and Bowtie Pasta in Garlic Butter Delight is
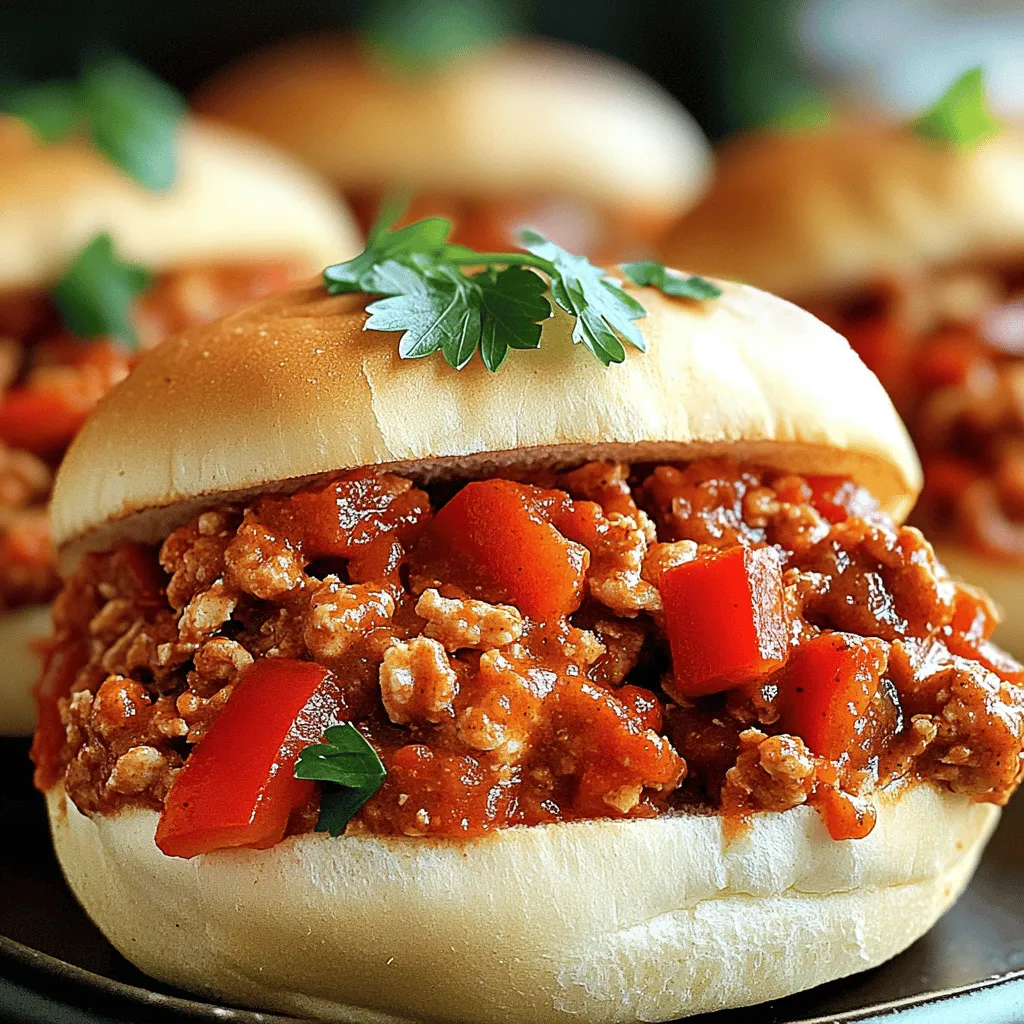
Delicious Cajun Chicken Sloppy Joes Tasty Twist
Are you ready to spice up your dinner routine? My Delicious Cajun Chicken Sloppy Joes recipe adds a flavorful twist to a classic favorite. Using
![To make a delicious salmon sushi bake, you need these key ingredients: - Rice and seasonings - 2 cups sushi rice - 2 1/2 cups water - 1/2 cup rice vinegar - 2 tablespoons sugar - 1 teaspoon salt - Salmon and cream cheese components - 1 pound cooked salmon, flaked - 1/2 cup cream cheese, softened - 1/4 cup mayonnaise - 1 tablespoon sriracha (adjust to taste) - 1/2 cup green onions, finely chopped - Toppings and garnishes - 1/2 cup shredded nori (seaweed) - Avocado slices (for garnish) - Sesame seeds (for garnish) Using fresh ingredients makes a big difference. This recipe is easy, fun, and packed with flavor. You can find the full recipe to guide you through the steps. Enjoy cooking! To start, rinse your sushi rice. This step is key. Rinse it under cold water until the water runs clear. This removes extra starch and helps the rice cook well. Measure 2 cups of rice and 2 ½ cups of water. Place them in a saucepan. Next, bring the rice and water to a boil. Once boiling, cover the pan and lower the heat. Cook for about 18 to 20 minutes. The rice should absorb all the water. When done, transfer the rice to a large bowl and let it cool slightly. Now, let’s make the salmon mixture. In a separate mixing bowl, combine the flaked salmon, softened cream cheese, mayonnaise, sriracha, and chopped green onions. You want a creamy and smooth texture. Mix everything well. This mixture should be easy to spread but thick enough to hold its shape. Preheat your oven to 350°F (175°C). Grab a greased 9x13 inch baking dish. First, spread the seasoned sushi rice evenly on the bottom. Then, layer the salmon mixture on top of the rice. Spread it out evenly so every bite has flavor. Next, sprinkle shredded nori on top of the salmon layer. This adds a nice crunch. Bake in the preheated oven for 20 to 25 minutes. Look for a golden and creamy top. Once it’s ready, remove it from the oven. Let it cool for a few minutes before serving. Enjoy this easy and delicious meal! You can find the full recipe [here]. To get the best texture for your sushi rice, use short-grain rice. It sticks well and holds the shape. Rinse the rice under cold water until the water runs clear. This step removes extra starch and keeps the rice from being gummy. After rinsing, measure 2 cups of rice and 2 1/2 cups of water. Cook the rice in a saucepan, bringing it to a boil first. Cover and lower the heat, cooking for 18-20 minutes. Once done, let it sit for 10 minutes to steam. You can adjust the seasoning to match your taste. A mix of rice vinegar, sugar, and salt adds a nice tang. For a little extra kick, add more sriracha to the salmon mixture. You can also try mixing in some lime juice for a fresh twist. Consider adding ingredients like diced jalapeños or a sprinkle of togarashi, a Japanese spice blend. These will give your dish more depth and flavor. Pair your salmon sushi bake with simple side dishes. A fresh cucumber salad or miso soup works great. For a fun twist, serve it with seaweed salad. When presenting at gatherings, cut the bake into small squares. Arrange them on a beautiful platter. Garnish with avocado slices and sesame seeds to make it pop. This not only looks nice but also adds extra taste. For detailed steps, refer to the Full Recipe. {{image_2}} You can switch up the fish in your sushi bake. Try using cooked shrimp or crab. Both options add unique flavors and textures. If you prefer more fish variety, tuna works well too. It gives a different taste and pairs nicely with the cream cheese. If you want a vegetarian version, consider using roasted vegetables. Grilled zucchini, bell peppers, or mushrooms are great choices. You can also use tofu for added protein. Just make sure to season them well. To add some heat, try spicy variations. You can increase the sriracha or add jalapeños to the salmon mix. This will give your sushi bake a nice kick. Another option is to sprinkle some chili flakes on top before baking. You can also play with toppings and mix-ins. Try adding mango or cucumber for a fresh twist. Chopped herbs like cilantro or basil can add brightness to the dish. Get creative and find what flavors you love best! For individual servings, use small ramekins. This makes it easy for everyone to enjoy their own portion. You can layer the rice and salmon mixture in each ramekin. Bake them just like the larger dish. For creative plating ideas, use a large platter. Cut the sushi bake into squares and arrange them in a fun pattern. Garnish with avocado slices and sesame seeds for a pop of color. You can also serve with extra sriracha on the side for dipping. For the complete recipe, check out the Full Recipe section! To store leftover salmon sushi bake, let it cool first. Place it in an airtight container. This keeps it fresh for up to three days. Always cover it tightly to prevent drying out. Label the container with the date. This helps you track how long it has been stored. When reheating, I suggest using the oven. Preheat it to 350°F (175°C). Place the sushi bake in an oven-safe dish. Cover it with foil to keep moisture in. Heat for about 15-20 minutes until warm. Check to ensure it is heated through. This way, you avoid a dry texture. You can also use a microwave. Heat it in short bursts of 30 seconds. Stir between each burst. This helps it heat evenly without drying out. If you want to freeze salmon sushi bake, first let it cool completely. Cut it into portions for easy thawing later. Wrap each piece tightly in plastic wrap. Then place them in a freezer-safe bag. Make sure to remove as much air as possible. This keeps the quality intact. To thaw, move the sushi bake to the fridge overnight. Reheat it in the oven for best results. Enjoy your delicious meal even after freezing! Making Salmon Sushi Bake takes about 55 minutes. You need 30 minutes for prep and 25 minutes for cooking. Start by rinsing the rice, then cook it. While the rice cooks, you can prepare the salmon mixture. This way, you save time. After baking, let it cool slightly before serving. You can use raw salmon, but be careful. Raw salmon needs to be sushi-grade to be safe. This type of salmon is fresh and safe to eat raw. Using raw salmon gives a different flavor. It will be softer and richer. If you prefer cooked salmon, stick with the recipe. If you want a substitute for cream cheese, try Greek yogurt or cashew cream. Greek yogurt is lower in calories and still creamy. Cashew cream is great for a dairy-free option. Blend soaked cashews with water until smooth. Both options work well in the salmon mixture. You can enjoy a tasty dish without cream cheese! We covered how to make a delicious Salmon Sushi Bake. You learned about the key ingredients, careful cooking steps, and tips to enhance flavor and presentation. I shared different seafood options for variety and how to store and reheat your bake for maximum freshness. Now, you can enjoy this dish with confidence. Dive into your kitchen and impress everyone with your skills! Cooking can be simple and rewarding.](https://stirredrecipes.com/wp-content/uploads/2025/06/298d55b8-5072-4dc2-9c12-db53d882a060.webp)
Salmon Sushi Bake Simple and Flavorful Recipe
Are you ready to enjoy a delicious twist on traditional sushi? In this Salmon Sushi Bake Simple and Flavorful Recipe, you’ll learn how to easily
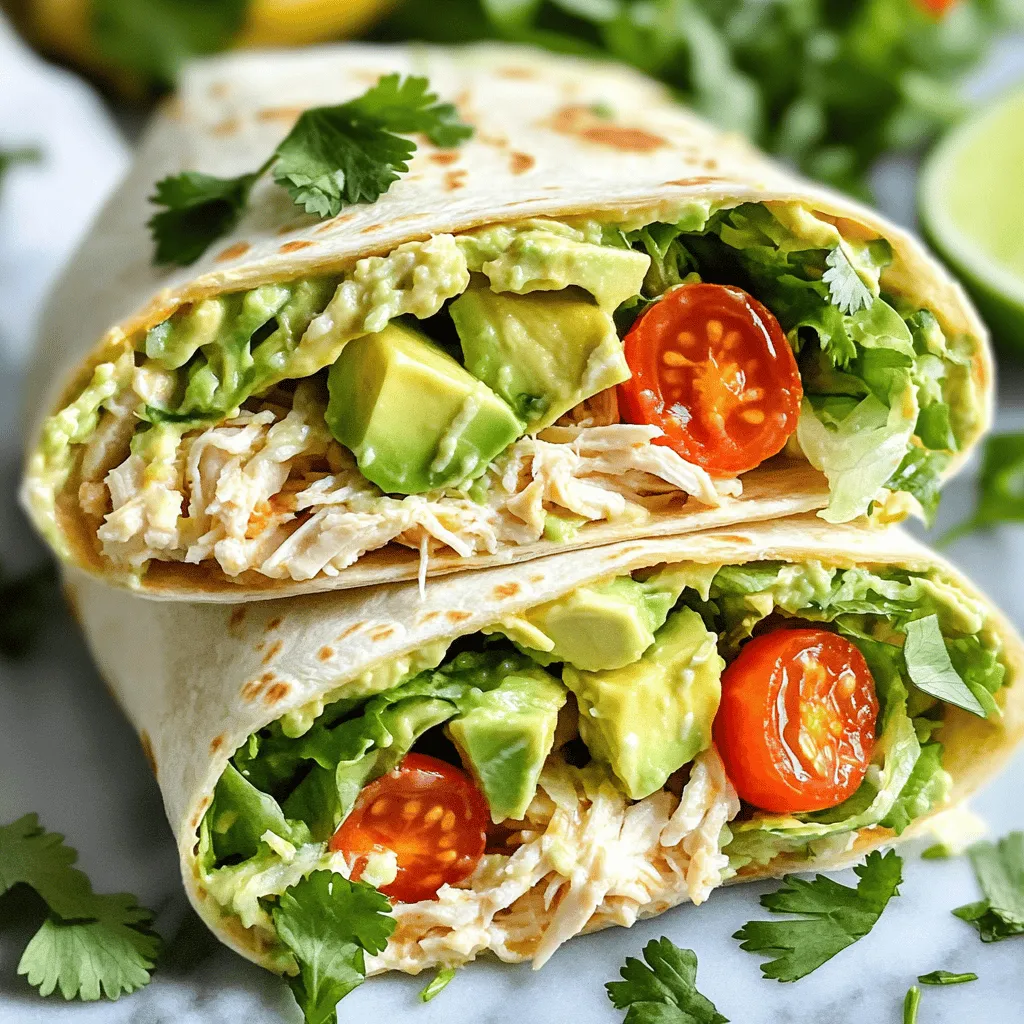
Savory Chicken Avocado Ranch Burritos Recipe
Are you ready to spice up your mealtime with a quick and tasty dish? My Savory Chicken Avocado Ranch Burritos are simple to make and
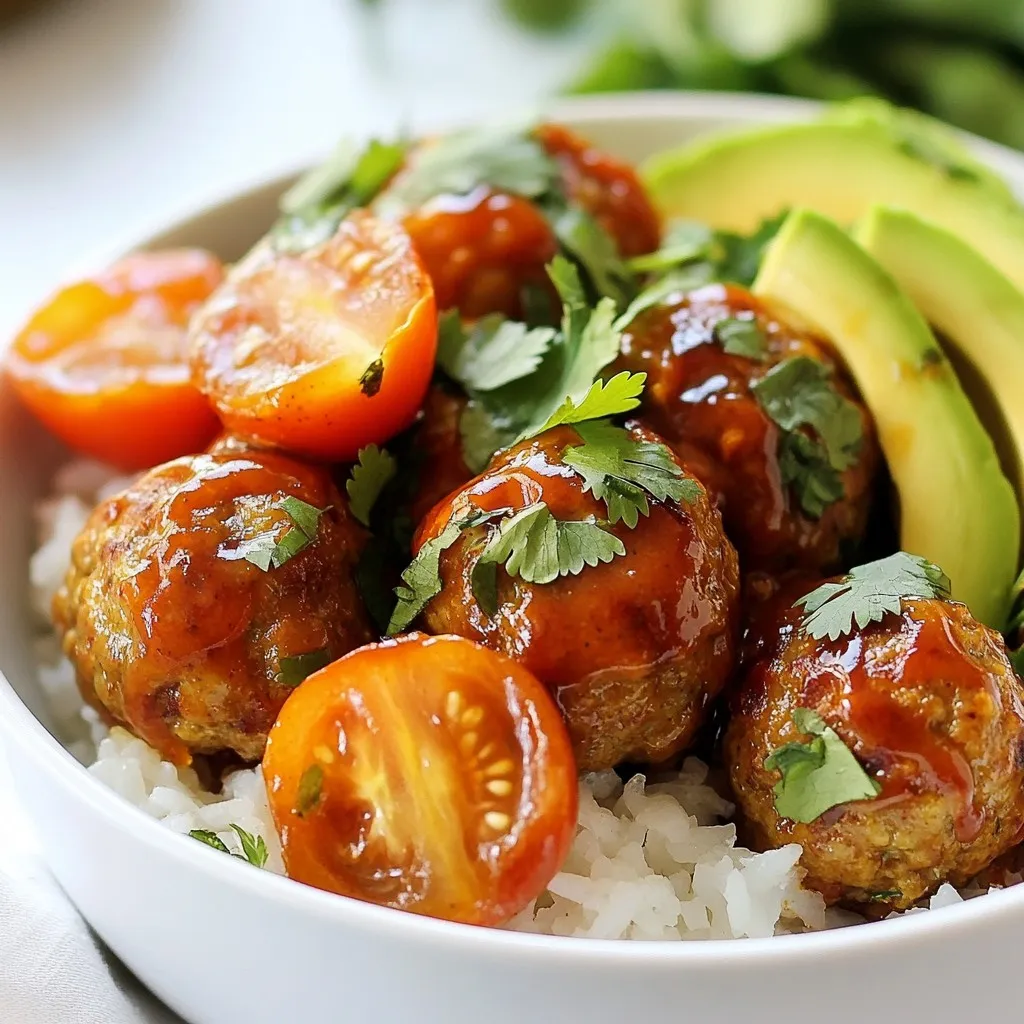
Barbecue Meatball Bowls Flavorful and Easy Meal
Craving a quick, tasty meal that impresses? Look no further! Barbecue Meatball Bowls combine juicy meatballs, flavorful barbecue sauce, and fresh toppings. Perfect for busy