Dinner
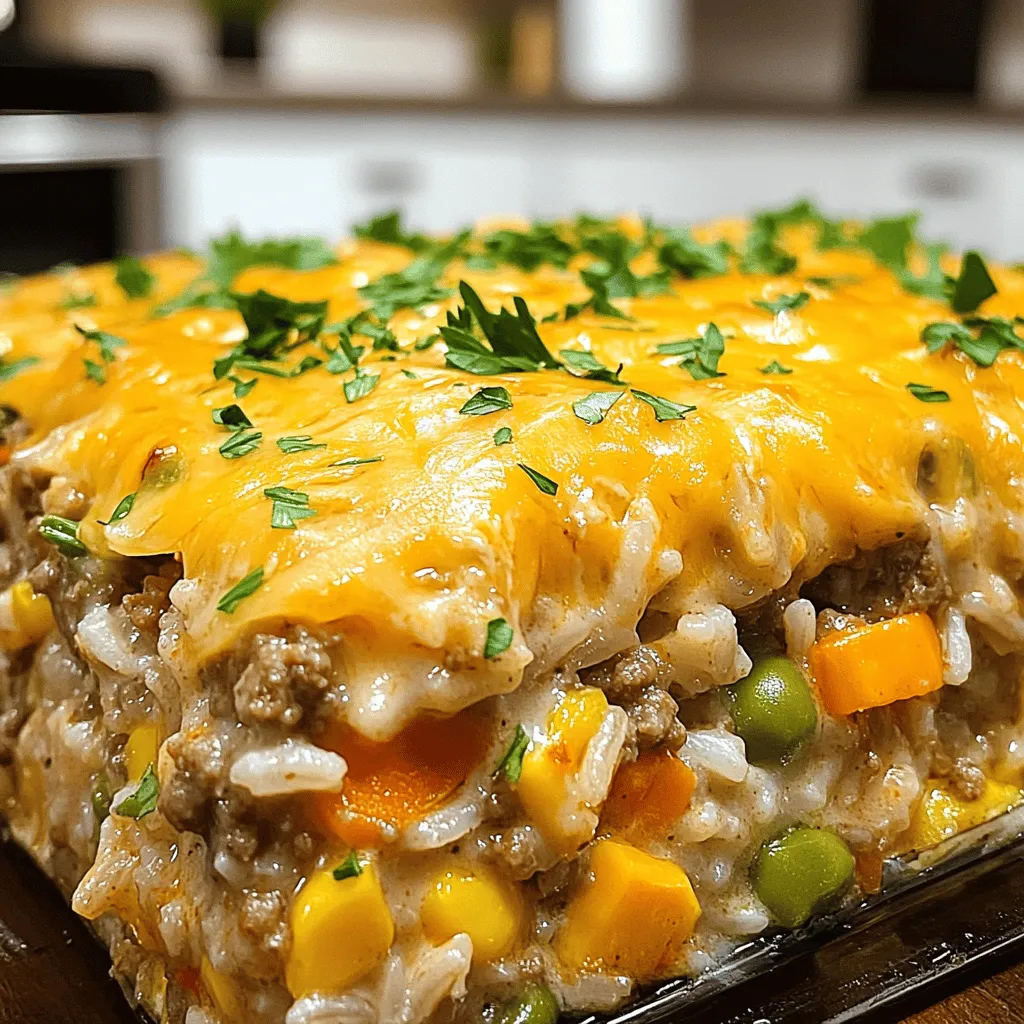
Cheesy Ranch Ground Beef and Rice Casserole Delight
Looking for a dish that’s cozy, cheesy, and packed with flavor? You’ll love this Cheesy Ranch Ground Beef and Rice Casserole Delight! It mixes ground
Korean Ground Beef Bowl Quick and Tasty Recipe
Are you looking for a quick and tasty meal that packs a flavor punch? Look no further! My Korean Ground Beef Bowl is not only
 for detailed steps and tips. To make the best Cajun seasoning, mix these spices: - 1 tablespoon paprika - 1 teaspoon cayenne pepper - 1 teaspoon garlic powder - 1 teaspoon onion powder - 1 teaspoon dried oregano - 1 teaspoon dried thyme - 1 teaspoon black pepper - 1 teaspoon salt This mix gives you a bold flavor. You can adjust the cayenne for more heat. Keep it sealed in a jar for later use. The key to juicy chicken is not overcooking it. Cook the chicken breasts until they reach an internal temperature of 165°F. Here are tips to keep it tender: - Let the chicken rest after cooking. This helps the juices stay inside. - Use a meat thermometer for perfect doneness. - Marinate the chicken for at least 30 minutes before cooking. This adds flavor and moisture. For a smooth sauce, start with the right amount of chicken broth. If the sauce is too thick, add reserved pasta water. If it’s too thin, let it simmer longer. Here are some flavor tips: - Taste the sauce often. Adjust salt and pepper as needed. - A splash of lemon juice can brighten the flavors. - Add more honey if you prefer a sweeter sauce. For the full recipe, check the complete instructions to nail this dish! {{image_2}} You can use any pasta you like. Fettuccine is great, but penne or spaghetti works too. If you want a fun twist, try using whole wheat or gluten-free pasta. Each type gives a unique taste and texture to the dish. Just be sure to cook it according to the package instructions. This way, your pasta will be perfect every time. Adjusting the heat level is easy. If you want more spice, add extra Cajun seasoning or a dash of hot sauce. You can also mix in red pepper flakes for an extra kick. If you prefer less heat, use less Cajun seasoning. Another option is to add a touch of cream or more honey to balance the flavors. This keeps it flavorful without the burn. Adding veggies is a smart idea. You can toss in spinach, zucchini, or broccoli for extra nutrients. Just sauté them with the onions and peppers. This not only boosts the health of the dish but also adds color. For a fresh taste, you can add cherry tomatoes or peas right before serving. These small changes make your meal even better. Try out these variations to make your Spicy Cajun Honey Butter Chicken & Pasta your own. For the complete recipe, check out the Full Recipe section. To keep your Spicy Cajun Honey Butter Chicken & Pasta fresh, store it in an airtight container. Make sure it cools down to room temperature first. This helps avoid condensation, which can make the dish soggy. Place the container in the fridge as soon as possible. Enjoy your leftovers within 3 to 4 days for the best taste and safety. If you want to save for later, freezing is a great option. Divide the dish into smaller portions. This makes it easier to thaw only what you need. Use freezer-safe containers or heavy-duty freezer bags. Label them with the date. The dish can stay fresh for up to 3 months. For best taste, aim to eat it within 1 to 2 months. When you’re ready to eat your leftovers, take them out of the fridge or freezer. If frozen, thaw in the fridge overnight. To reheat, use a skillet over medium heat. Add a splash of water or chicken broth to keep it moist. Stir often until it’s hot. You can also use the microwave, but cover it to keep moisture in. Enjoy your meal just like the first time! For the full recipe, check back at the beginning of the article. You can pair this dish with a fresh salad. A simple green salad with a light vinaigrette works well. You might also enjoy garlic bread on the side. It’s great for soaking up the sauce. Roasted vegetables add color and nutrition, too. Yes, you can! Use tofu or chickpeas instead of chicken. These options soak up the sauce nicely. For pasta, choose a variety that is egg-free. You can also add more veggies, like zucchini or mushrooms, for extra flavor. Leftovers will stay fresh for up to three days in the fridge. Store them in an airtight container. Reheat gently on the stove or in the microwave. Adding a splash of water can help keep the pasta moist. Absolutely! Shrimp or fish can work well in this dish. You can also try turkey or pork. Just adjust the cooking time based on the protein you choose. Make sure it is cooked through before serving. Yes, you can make this dish gluten-free. Use gluten-free pasta for the recipe. Check the Cajun seasoning for gluten-free ingredients. You can also use cornstarch to thicken the sauce if needed. This keeps all the flavors intact! For the full recipe, check out the details above. To make Spicy Cajun Honey Butter Chicken & Pasta, I shared key ingredients, step-by-step cooking, and helpful tips. You can adjust flavors and even switch ingredients for variety. Proper storage keeps leftovers fresh so you can enjoy this dish later. Remember, it's easy to make this dish fit your taste. Try new pasta shapes or add your favorite veggies. With a bit of practice, you will create a meal everyone loves. Enjoy cooking, and have fun experimenting!](https://stirredrecipes.com/wp-content/uploads/2025/06/f9d11b59-ba4b-4200-b645-bef4b7b2c3ab.webp)
Spicy Cajun Honey Butter Chicken & Pasta Delight
Get ready for a flavor blast with my Spicy Cajun Honey Butter Chicken & Pasta Delight! This dish mixes bold Cajun spices with sweet honey
![- 4 boneless, skinless chicken thighs - 8 oz egg noodles - 2 cups chicken broth - 3 cloves garlic, minced - 1 teaspoon dried Italian herbs - Salt and pepper to taste - 1 cup cherry tomatoes, halved - 1 cup spinach - 3 tablespoons butter - 2 tablespoons olive oil In this recipe, the main ingredients shine. The chicken thighs offer rich flavor and moisture. Egg noodles bring a comforting texture that pairs well. Chicken broth adds depth to the dish. The garlic gives a lovely aroma and taste. Italian herbs bring warmth and a hint of earthiness. Salt and pepper balance the flavors. For the vegetables, cherry tomatoes add sweetness. Spinach brings a fresh note and vibrant color. Butter makes everything creamy and delicious, while olive oil helps with cooking. Using fresh ingredients elevates this dish. It makes each bite flavorful and satisfying. You can find the full recipe above to guide you through the cooking process. 1. First, heat the olive oil in a large skillet over medium heat. 2. While the oil warms up, season the chicken thighs with salt, pepper, and Italian herbs. 3. Once the oil is hot, add the chicken thighs to the skillet. 4. Sear the chicken for about 5-7 minutes on each side until golden brown. 5. After cooking, take the chicken out and set it aside on a plate. 6. In the same skillet, add the minced garlic and halved cherry tomatoes. 7. Sauté them for 2-3 minutes until the tomatoes soften and release their juices. 1. Next, pour in the chicken broth and bring it to a simmer. 2. Add the egg noodles to the skillet, making sure they are submerged in the broth. 3. Cook the noodles according to package instructions, usually about 7-9 minutes. 4. Stir them occasionally to keep them from sticking together. 1. When the noodles are nearly done, return the cooked chicken to the skillet. 2. Add the spinach and stir everything together. 3. Cook for another 2-3 minutes until the spinach wilts and the chicken heats through. 4. Finally, add the butter to the skillet. 5. Stir to coat the noodles in the melted butter and season to taste with salt and pepper. This recipe is a delight! For the full recipe, check the prior section. How to properly sear chicken: To sear chicken well, start with a hot pan. Use olive oil and let it heat. Season the chicken thighs with salt, pepper, and herbs. Place the chicken in the pan without crowding it. Cook for 5-7 minutes on each side. Look for that golden brown color. This adds flavor and keeps the meat juicy. Ensuring noodles are perfectly cooked: Cook egg noodles in chicken broth for great taste. Stir them often to prevent sticking. Follow the package instructions for timing. Taste a noodle to check if it is tender but firm. This gives you the best texture for your dish. Suggestions for herbs and spices: Enhance your dish by adding different herbs. Fresh basil or thyme can brighten the flavors. Try adding a pinch of red pepper flakes for a little heat. Mix and match herbs to find what you love best. Adding acidity with lemon: A squeeze of lemon juice adds a nice zing. It brightens the dish and balances the richness. Add it just before serving for the best effect. You can also serve lemon wedges on the side. Best serving techniques: Serve the chicken and noodles on a large platter. This makes the meal look inviting. Layer the noodles first and place the chicken on top. This way, the chicken stays moist. Garnishing ideas for visual appeal: Garnish your dish with freshly chopped parsley. It adds color and freshness. You can also sprinkle some grated cheese on top. This gives a nice contrast and extra flavor to the meal. Check the [Full Recipe] for more details to help you create this delightful dish! {{image_2}} You can switch up the chicken in this dish. Try turkey thighs or even tofu for a plant-based twist. Both options add great flavor and texture. When it comes to noodles, egg noodles are classic. However, you can also use whole wheat noodles or even rice noodles. Each type adds its own touch to the meal. To make this dish richer, add cheese or cream. A sprinkle of Parmesan or a dollop of sour cream creates a creamy texture. These additions take the flavor to a new level! If you enjoy spice, think about adding peppers or chili flakes. They bring heat and depth that complement the chicken and noodles. Just add a little at a time to find your perfect level of spice. To make this dish gluten-free, try gluten-free noodles. They cook well in the broth and keep the dish tasty. You can also use quinoa for a different texture. For a low-carb option, zoodles are a great choice. They are made from zucchini and cook quickly. This swap keeps the dish light and refreshing without losing flavor. For the full recipe, check out the detailed steps above! To keep your one-pan chicken with buttered noodles fresh, choose good storage containers. Glass or BPA-free plastic containers work best. Make sure to let the dish cool before sealing it. This helps prevent condensation inside the container. Store your leftovers in the fridge for up to three days. For longer storage, you can freeze the dish. Just make sure to wrap it well. Use freezer-safe bags or containers. To enjoy your leftovers, the best method is to reheat on the stove. Place the chicken and noodles in a skillet over low heat. Add a splash of chicken broth to keep it moist. Stir often until heated through. You can also use a microwave if you’re in a hurry. Just cover the dish with a microwave-safe lid or wrap. Heat in short bursts, stirring in between. Common mistakes when reheating include using high heat or not adding moisture. Both can lead to dry chicken and noodles. Avoid these pitfalls for the best taste. In the fridge, your dish lasts about three days. After that, it’s best to check for signs of spoilage. Look for a change in color or smell. If it smells off or looks unusual, it’s time to toss it. If you freeze it, the dish will last up to three months. Just remember to label your containers with the date. This way, you know when to use it. Can I use chicken breast instead of thighs? Yes, you can use chicken breast. It may cook faster, so watch the time. Chicken thighs add more flavor and stay moist, but breasts work well too. Just slice them into even pieces for even cooking. How can I make this dish in advance? You can prepare the chicken and noodles ahead of time. Cook them, then let them cool. Store them in separate containers. When ready to eat, just warm them up in a skillet. This dish tastes great even after a day in the fridge. Can I use frozen noodles for this recipe? Yes, you can use frozen noodles. Just add them directly to the broth and increase the cooking time. Check the package for exact times to ensure they cook well. Fresh noodles work great too, but frozen will save time. What can I substitute for chicken broth? You can use vegetable broth or water with added spices. This keeps the dish tasty. If you want more flavor, try using mushroom broth. It will add a nice touch without using chicken. What side dishes pair well with this meal? You can serve a fresh salad or steamed veggies. Garlic bread or roasted potatoes also make great sides. Try to keep it simple, so the main dish shines. Is it suitable for meal prep? Yes, this dish is great for meal prep. It stores well in the fridge for up to four days. Just reheat and enjoy! You can also freeze it for later use. This makes it a perfect choice for busy weeks. For the complete cooking steps, check out the Full Recipe. This recipe for One-Pan Chicken with Buttered Noodles is easy and tasty. We covered smart ingredients, clear steps, and cooking tips. You can tweak it with different proteins and noodles to fit your needs. Also, remember the best ways to store and reheat your meal. With simple flavor boosts and quick serving ideas, you can impress anyone at your table. Now, grab your ingredients and try this dish. Enjoy the fun of cooking and sharing a delicious meal with others!](https://stirredrecipes.com/wp-content/uploads/2025/06/961ee278-6bcf-45ff-9cc9-559acb761919.webp)
One-Pan Chicken with Buttered Noodles Delightful Meal
Looking for a simple yet delicious meal? One-Pan Chicken with Buttered Noodles is your answer! This dish is quick to prepare and full of flavor.
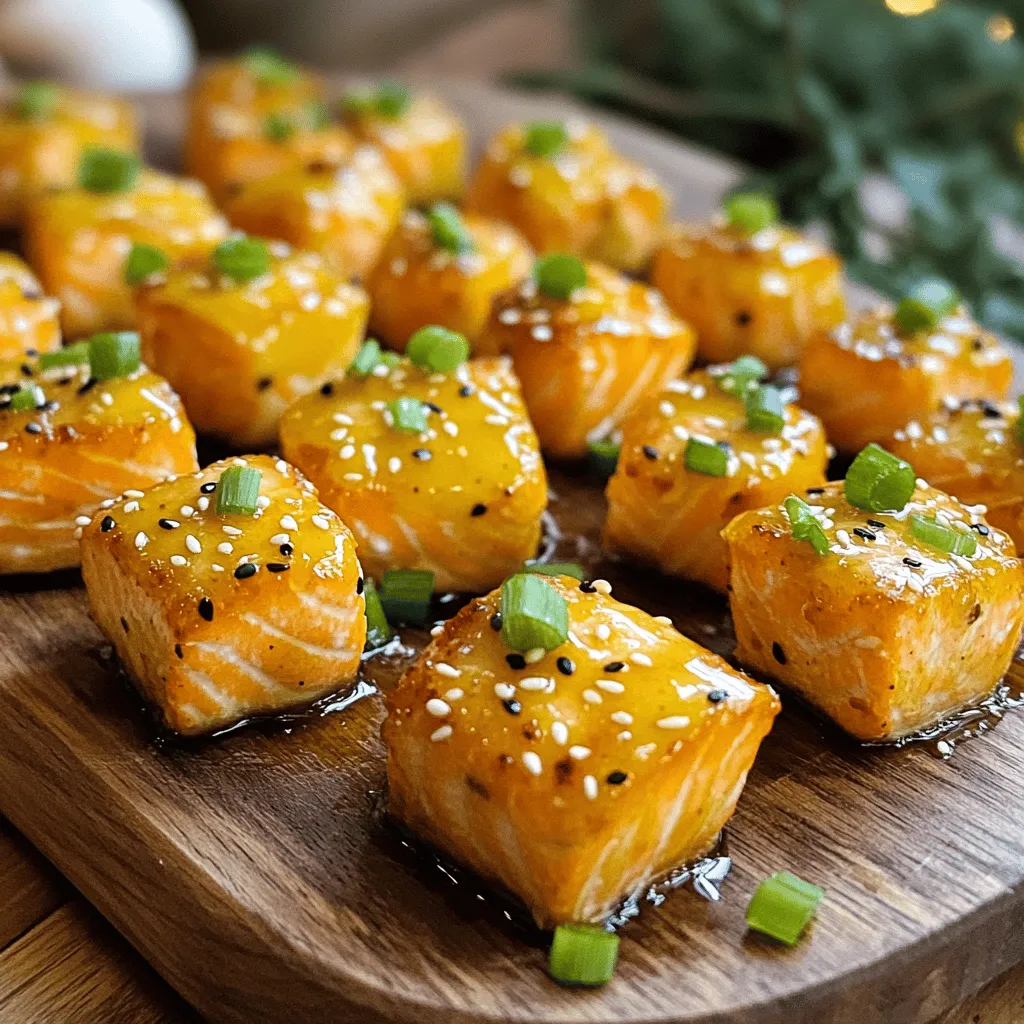
Cozy Winter Dinners: Tasty Honey Garlic Salmon Bites
When the winter chill sets in, you crave warmth and comfort in every bite. That’s why I’m excited to share my tasty Honey Garlic Salmon
![To make your Honey Chipotle Chicken Bowls, gather these items: - 2 chicken breasts, boneless and skinless - 1 tablespoon olive oil - 2 tablespoons honey - 1 tablespoon chipotle sauce (adjust to taste) - 1 teaspoon smoked paprika - 1 teaspoon garlic powder - 1 teaspoon onion powder - Salt and pepper to taste - 1 cup quinoa or brown rice, cooked - 1 cup black beans, rinsed and drained - 1 cup corn (fresh, frozen, or canned) - 1 avocado, sliced - ½ cup cherry tomatoes, halved - Fresh cilantro, chopped, for garnish - Lime wedges, for serving You can add more flavors to your bowls with these: - Sliced jalapeños for heat - Diced red onion for crunch - Cotija cheese for creaminess - Sour cream for a tangy finish - Hot sauce for extra spice If you have food needs, here are some swaps: - Use tofu or tempeh instead of chicken for a vegetarian option. - Swap quinoa for brown rice if you prefer. - Use low-sodium black beans for less salt. - Replace honey with agave syrup for a vegan option. - Choose a gluten-free grain like millet instead of quinoa or rice. These ingredients create a tasty and colorful meal. You can find the full recipe above to guide you step by step. To start, gather your ingredients. You need honey, chipotle sauce, smoked paprika, garlic powder, onion powder, salt, and pepper. In a small bowl, mix these ingredients together. This mix creates a sweet and spicy marinade. Next, take the chicken breasts and put them in a resealable bag. Pour the marinade over the chicken. Ensure it is well-coated. Seal the bag and place it in the fridge. Let it marinate for at least 30 minutes. For more flavor, you can marinate it for up to 2 hours. When you are ready to cook, preheat your grill or grill pan. Get it to a medium-high heat. If your grill is not non-stick, add a bit of olive oil. Now, take the chicken out of the marinade. Allow any extra marinade to drip off. Place the chicken on the grill. Cook it for about 6-7 minutes on each side. You want it cooked through with nice grill marks. When done, remove it and let it rest for a few minutes. After resting, slice the chicken into strips. Now it’s time to build your bowl. Start with a base of cooked quinoa or brown rice. This will give you a hearty foundation. Next, add the black beans and corn on top. Then, place the sliced avocado and halved cherry tomatoes. Now, it’s time to add the star of the dish—the sliced grilled chicken. Finish off the bowl by garnishing it with fresh cilantro. Serve with lime wedges on the side. Squeeze some lime juice over the top for extra flavor. Enjoy your meal! You can find the full recipe for these Honey Chipotle Chicken Bowls [Full Recipe]. Grilling gives chicken a smoky taste. You can also bake it for a juicy result. If you don’t have a grill, use a stovetop grill pan. Just heat it on medium-high. Cook the chicken for 6-7 minutes on each side. This way, it cooks evenly. Always check that it reaches 165°F for safety. To boost the flavor, use fresh herbs. Cilantro adds a zesty touch. Lime juice brightens the dish. You can also try adding spices like cumin or cayenne. If you want more heat, add extra chipotle sauce. Mixing different textures makes the bowl interesting. Crunchy veggies like bell peppers add a nice bite. A well-presented bowl looks more appealing. Start with a base of quinoa or rice. Layer the beans, corn, and avocado artfully. Slice the chicken and fan it out on top. Add cherry tomatoes for color. Finish with a sprinkle of cilantro. Serve lime wedges on the side for a fresh squeeze. This makes each bite flavorful and fun. For the full recipe, check the details above. {{image_2}} You can make this dish vegetarian by swapping chicken for tofu or tempeh. Both options soak up flavors well. To prepare, cut tofu into cubes and press it to remove excess water. Marinate it just like the chicken. Grill or sauté until golden and crispy. Serve it over quinoa or rice with the same toppings. You can also use grilled vegetables like zucchini or bell peppers. They add great taste and texture. This recipe is easy to modify for a gluten-free diet. Quinoa and brown rice are both gluten-free grains. Ensure your chipotle sauce is gluten-free as well. Many brands offer gluten-free versions. If you're using canned corn, check the label to avoid any hidden gluten. By sticking to these grains and checking labels, you can enjoy a safe, tasty meal. Not a fan of too much spice? You can adjust the heat in this dish. Use less chipotle sauce for a milder flavor. Alternatively, try a sweet chili sauce for a unique twist. If you want more heat, add fresh jalapeños or a pinch of cayenne pepper. Experiment with different flavors to find what works best for you. After you make your Honey Chipotle Chicken Bowls, store them in an airtight container. This keeps the flavors fresh and prevents spoilage. You can store the bowls in the fridge for up to three days. If you separate the chicken and toppings, they will stay fresh longer. You can freeze the chicken and other components for later use. Just place them in a freezer-safe container or bag. Be sure to remove as much air as possible before sealing. The chicken can last up to three months in the freezer. However, avoid freezing the avocado and fresh veggies, as they don’t freeze well. To reheat, take the chicken and grain base out of the fridge. You can warm them in the microwave for about one to two minutes. If you prefer, heat them on the stove over low heat. Just add a splash of water to keep everything moist. For the best taste, add fresh toppings after reheating. Enjoy your meal! You can find the Full Recipe for these tasty Honey Chipotle Chicken Bowls in the article. You can marinate the chicken for at least 30 minutes. If you want more flavor, marinate it for up to 2 hours. This lets the chicken soak up all the tasty spices and honey. Just keep it in the fridge while it marinates. Yes, you can make these bowls in advance. Cook the chicken, quinoa, and veggies. Store them in separate containers. When ready to eat, just combine them. This saves time on busy nights. If you don’t have chipotle sauce, use sriracha for heat. You can also use barbecue sauce for a sweet twist. Adjust the amount to match your taste. Both options will still give you a tasty meal. For a milder flavor, try a bit of smoked paprika or hot sauce. For the full recipe, check out the detailed instructions above! This guide covered all you need to know for honey chipotle chicken bowls. We explored key ingredients, tasty variations, and tips for the best flavors. You can customize to fit dietary needs, too. Remember, cooking is about fun and creativity. Enjoy your meals, share with friends, and try different twists. Your next hearty bowl could impress everyone at the table. Don't forget to experiment and make it your own!](https://stirredrecipes.com/wp-content/uploads/2025/06/d2f82a49-2e66-44de-955f-2d2a16431530.webp)
Honey Chipotle Chicken Bowls Flavorful and Easy Meal
Looking for a simple, tasty meal that wow’s everyone? Honey Chipotle Chicken Bowls are perfect for you. They combine smoky chipotle spice with sweet honey
![- 1 lb ground beef - 1 tablespoon onion powder - 1 tablespoon garlic powder - 1 teaspoon paprika - Salt and pepper to taste - 4 large flour tortillas - 1 cup lettuce, shredded - 1 cup cheddar cheese, shredded - 1/2 cup pickles, sliced - 1/2 cup Big Mac sauce (mix: 1/2 cup mayo, 2 tablespoons ketchup, 1 tablespoon mustard, 1 tablespoon finely chopped onions, 1 tablespoon sweet relish, salt to taste) - Optional: additional toppings, such as diced tomatoes or extra onions To make the Big Mac sauce, you need: - 1/2 cup mayo - 2 tablespoons ketchup - 1 tablespoon mustard - 1 tablespoon finely chopped onions - 1 tablespoon sweet relish - Salt to taste Mix these together in a bowl. This sauce gives your wraps that special Big Mac flavor. You can customize your wraps! Here are some toppings to consider: - Diced tomatoes - Extra onions - Avocado slices - Jalapeños for some heat Feel free to mix and match. Adding your favorite toppings can make each wrap unique and delicious. First, take 1 pound of ground beef. In a large bowl, mix it with 1 tablespoon of onion powder, 1 tablespoon of garlic powder, 1 teaspoon of paprika, and a pinch of salt and pepper. This makes the beef flavorful. Next, heat a skillet over medium heat. Add the seasoned beef and cook it. Use a spatula to break it apart as it cooks. This takes about 7 to 10 minutes. Once it is brown and cooked through, drain any extra fat. Set it aside for later. Now, let’s make the Big Mac sauce. In a separate bowl, combine 1/2 cup of mayo, 2 tablespoons of ketchup, 1 tablespoon of mustard, 1 tablespoon of finely chopped onions, and 1 tablespoon of sweet relish. Mix these ingredients well until smooth. This sauce gives the wrap its classic taste. Grab a large flour tortilla. Spread about 2 to 3 tablespoons of the Big Mac sauce in the center. Now, take about 1/4 cup of your cooked ground beef and layer it on top. Add some shredded lettuce, followed by a sprinkle of cheddar cheese and a few sliced pickles. If you want, you can also add diced tomatoes or more onions for extra flavor. To wrap it up, fold the sides of the tortilla inward. Then, roll it up from the bottom to the top. Repeat this process for the other tortillas. If you like, you can toast the wraps in a skillet for 2 to 3 minutes on each side until they are golden brown. This step adds a nice crunch. Enjoy your Homemade Big Mac Wraps! For the complete recipe, check the [Full Recipe]. To make a perfect wrap, you need to focus on folding. Start by placing the filling in the center of the tortilla. Leave space on the sides. Fold the sides inward first. Then, roll it from the bottom up. This helps keep everything inside. You want to hold it tight, but not too tight. If it feels too loose, the filling may spill out. Practice makes perfect, so don’t worry if your first one isn’t great. Want to kick up the taste? Try adding extra spices to the beef. A pinch of cayenne pepper can add heat. You can also mix in some barbecue sauce for a sweet twist. If you love crunch, add sliced jalapeños or diced tomatoes. Fresh herbs like cilantro or parsley can brighten up the flavor too. Don't be afraid to get creative with toppings. Your taste buds will thank you! Toasting the wraps can make a big difference. Heat a skillet over medium heat. Place the wrap seam side down in the skillet. Cook for 2-3 minutes until golden brown. Flip it gently and toast the other side. Toasting adds a nice crunch and warms up the filling. For an even crispier wrap, use a panini press if you have one. It’s like making a sandwich, but even better! {{image_2}} You can make your wraps healthier by choosing leaner proteins. Ground turkey or chicken works great. If you want to cut carbs, use lettuce leaves instead of tortillas. They add crunch and freshness. You can also try whole wheat tortillas for extra fiber. For a vegetarian twist, swap the beef for black beans or lentils. Both options give you great texture and protein. You can also use grilled vegetables like zucchini or bell peppers. For sauce, mix Greek yogurt with a bit of ketchup and relish for a creamy alternative. To spice things up, consider adding unique ingredients. Try jalapeños or sriracha for heat. You can also use different cheeses like pepper jack for a kick. For a regional twist, add guacamole or salsa. The fun is in mixing flavors to make it your own! For the full recipe, check out the detailed instructions above. To keep your homemade Big Mac wraps fresh, store them in an airtight container. Wrap each one in plastic wrap or aluminum foil. This prevents them from drying out. Place the container in the fridge. They stay good for up to three days. If you have extra Big Mac sauce, store it separately. This keeps the wraps from getting soggy. When you're ready to enjoy your leftovers, there are a few ways to reheat them. You can use a skillet for the best results. Heat it over medium heat and add a little oil. Place the wrap in the skillet for about 3-4 minutes on each side. This helps keep the wrap crispy. If you're short on time, you can use the microwave. Heat for 30 seconds, then check. If it's not warm enough, heat in 15-second bursts until hot. The microwave won't give you the same crispiness, but it works in a pinch. If you want to save your wraps for later, freezing is a great option. Wrap each Big Mac wrap tightly in plastic wrap. Then, place them in a freezer-safe bag. Make sure to remove as much air as possible. They can last up to three months in the freezer. When you're ready to eat, let them thaw in the fridge overnight. Reheat them using the skillet method for the best taste. Enjoy your Big Mac wraps any time! Yes, you can use different tortillas! If you want a gluten-free option, look for corn tortillas or gluten-free wraps. These work great and still hold up well. You can also use whole wheat tortillas for a healthier twist. Just ensure the size is large enough to wrap your filling. To make this recipe dairy-free, swap out the cheddar cheese for a dairy-free cheese alternative. Many brands offer great options that melt well. For the Big Mac sauce, use a dairy-free mayo. This keeps the tasty flavor without any dairy. You can serve these wraps with a variety of sides. Try crispy sweet potato fries or a fresh salad. You can also pair them with dipping sauces like extra Big Mac sauce or a tangy BBQ sauce. These sides add fun and flavor to your meal! You’ve learned how to make delicious Big Mac wraps from scratch. We covered ingredients, step-by-step instructions, and tips to improve flavor. You can customize your wraps based on your tastes or dietary needs. Remember to store leftovers properly for later enjoyment. With this recipe and your creativity, you can enjoy a tasty meal anytime. So gather your ingredients and start wrapping! You’ll impress everyone with your cooking skills.](https://stirredrecipes.com/wp-content/uploads/2025/06/a0d41c3a-5b6a-40c8-b06a-445c5ba4e835.webp)
Homemade Big Mac Wraps Delicious and Easy Recipe
Craving a Big Mac but want a healthier twist? Let’s make Homemade Big Mac Wraps! This easy recipe brings the classic flavors right to your
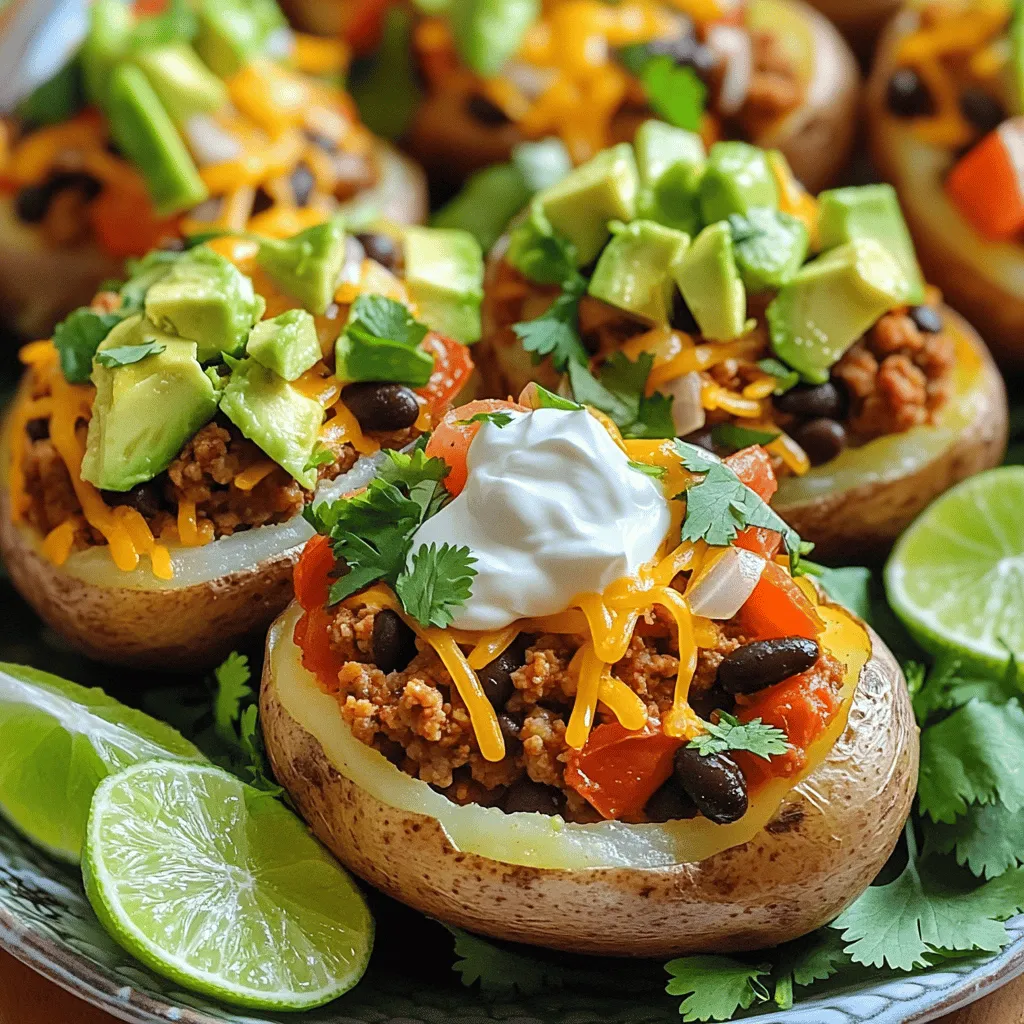
Taco Potatoes Filling that Delivers Flavorful Delight
Do you want a tasty twist on a classic dish? Taco Potatoes deliver flavor in a fun way! Imagine fluffy potatoes filled with seasoned meat,
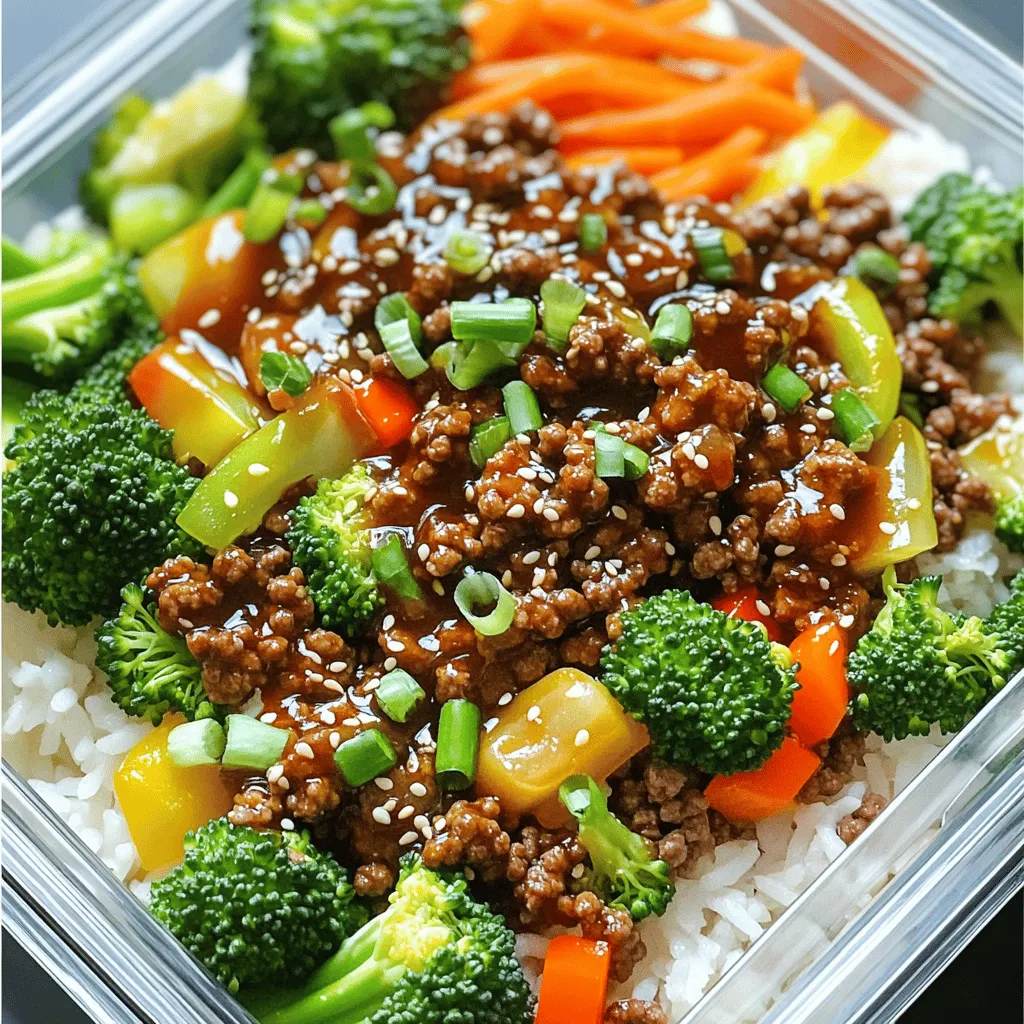
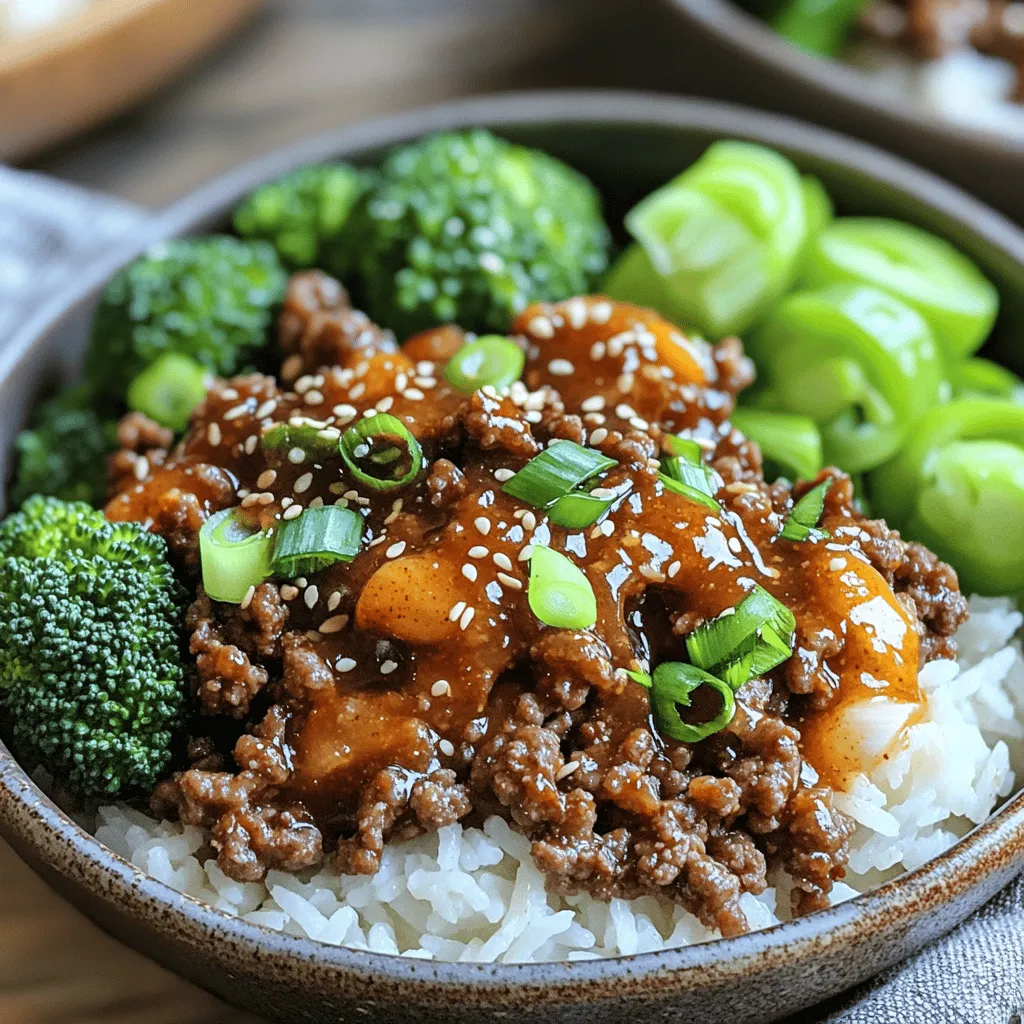
Meal Prep Ground Beef Teriyaki Simple and Savory Dish
Are you ready to whip up a flavorful meal that’s both easy and fun? My Meal Prep Ground Beef Teriyaki is the perfect dish for
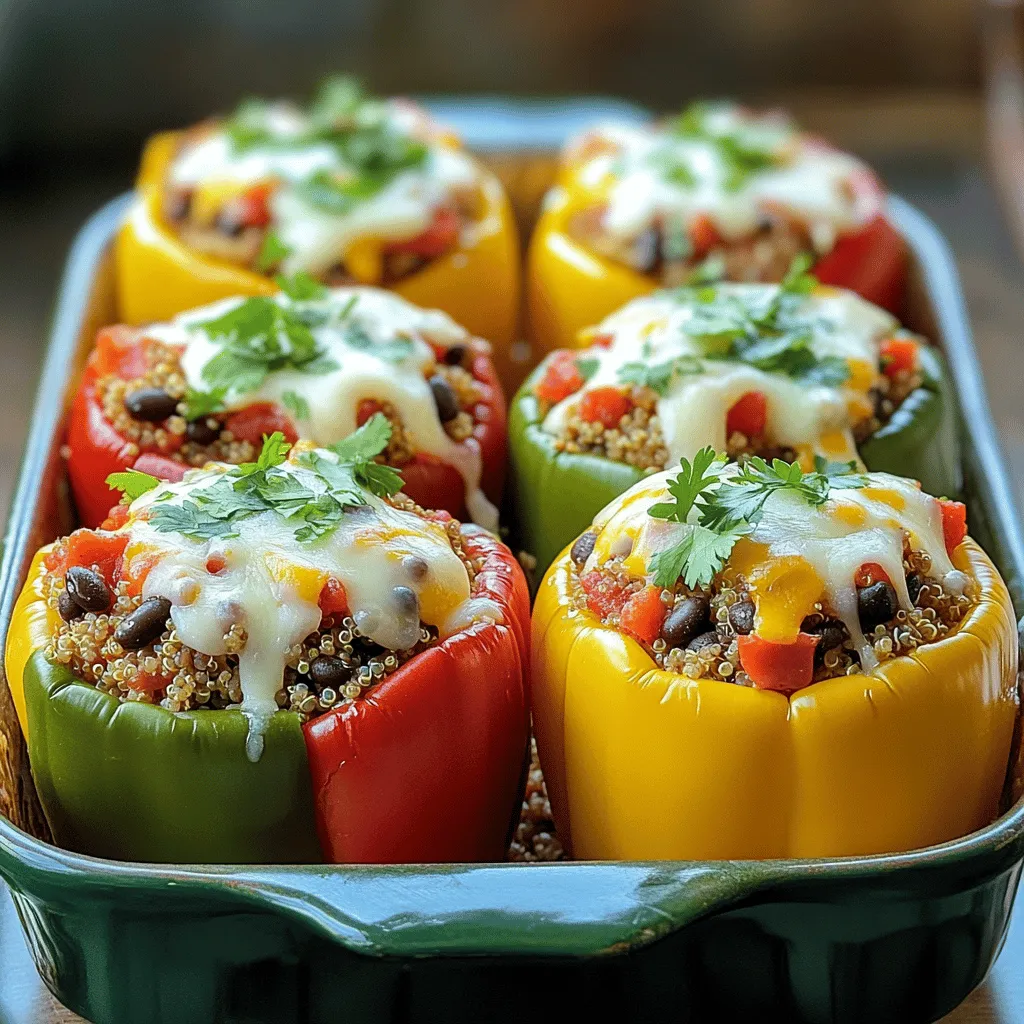
Unstuffed Peppers Recipe Easy and Flavorful Dish
Are you ready to delight your taste buds with a dish that’s both simple and packed with flavor? My unstuffed peppers recipe transforms traditional stuffed