Dinner

- 8 oz spaghetti or linguine - 3 tablespoons honey - 4 cloves garlic, minced - 1 tablespoon soy sauce - 1 tablespoon olive oil The main ingredients for Sticky Honey Garlic Pasta Skillet are simple yet full of flavor. I love using spaghetti or linguine for this dish. They soak up the sauce well. The honey adds sweetness, while the garlic brings a lovely aroma. Soy sauce adds depth, and olive oil helps everything blend. - 1/2 teaspoon crushed red pepper flakes - 1/4 cup green onions, sliced (for garnish) - 1/4 cup sesame seeds (toasted, for garnish) - Salt and pepper to taste Optional ingredients can elevate this dish even more. Crushed red pepper flakes add a nice kick. Green onions bring freshness, while toasted sesame seeds add crunch. A pinch of salt and pepper can enhance the overall taste. Feel free to mix and match these ingredients to suit your family’s taste. For the full recipe, you can check [Full Recipe]. To start, boil a pot of water. Add salt to the water; this helps flavor the pasta. Put in 8 oz of spaghetti or linguine. Cook it according to the package time. Stir it a few times to prevent sticking. When done, drain the pasta in a colander. Save 1/2 cup of the pasta water for later. For perfect pasta, look for a slight bite, or "al dente." This texture keeps the pasta firm and tasty. Under-cook it just a bit, as it will cook a bit more when mixed with the sauce. Now it's time for the sauce. Heat 1 tablespoon of olive oil in a large skillet over medium heat. Add 4 minced garlic cloves. Sauté the garlic for 1-2 minutes until it smells amazing. Be careful not to burn it; burnt garlic tastes bitter. In a separate bowl, whisk together 3 tablespoons of honey and 1 tablespoon of soy sauce. If you like a kick, add in 1/2 teaspoon of crushed red pepper flakes. Mix it well until all ingredients are combined. Pour this mixture into the skillet with the garlic. Let it simmer for 1-2 minutes, allowing the flavors to blend. Now, it’s time to mix everything. Add the drained pasta to the skillet. Toss it well to coat every strand in the sticky honey garlic sauce. If you find the sauce is too thick, add a bit of the reserved pasta water slowly. This helps adjust the sauce to your liking. Finally, season with salt and pepper to taste. Toss the pasta again to make sure all flavors combine well. Your Sticky Honey Garlic Pasta Skillet is now ready to enjoy! For a full experience, check out the Full Recipe. Avoiding burnt garlic: To keep garlic from burning, use medium heat. Stir it often. When garlic turns golden, it is ready. If it burns, it tastes bitter. That will ruin your dish. Ensuring the sauce coats the pasta evenly: When mixing the pasta and sauce, be gentle. Use tongs to toss the pasta. If the sauce is too thick, add reserved pasta water. This helps it coat all the noodles. Adding more heat with red pepper flakes: If you like spice, add red pepper flakes. Start with a pinch. You can always add more later. This will give the dish a nice kick. Suggestions for additional herbs and seasonings: Try adding fresh basil or parsley. They add fresh flavors and colors. A splash of lime juice can brighten the dish. You can also try soy sauce variations for more depth. Garnishing ideas with green onions and sesame seeds: Top your pasta with green onions for a fresh crunch. Toasted sesame seeds add a nutty flavor. This makes your dish look and taste gourmet. Pairing with side dishes or proteins: Serve this pasta with a simple salad or garlic bread. Grilled chicken or shrimp also works well. These add protein and make the meal more filling. For the full recipe, check out the main section. {{image_2}} You can add protein to make this dish heartier. Shrimp, chicken, or tofu work great. Just cook the shrimp for about 3-4 minutes until they are pink. For chicken, cut it into bite-sized pieces and cook for about 5-7 minutes. If you use tofu, sauté it until golden brown, which takes about 5-6 minutes. Make sure to season your protein well to match the sweet and garlicky sauce. Seasonal veggies can make your pasta even better. Bell peppers, spinach, or snap peas are all good choices. Chop your vegetables into small pieces. Sauté them in the skillet with the garlic for about 2-3 minutes before adding the pasta. This keeps them crisp and bright. You can mix and match based on what’s fresh at the market. If you need a gluten-free option, try using gluten-free pasta. Options like brown rice pasta or chickpea pasta are great. Just be sure to check the cooking times, as they can vary. Gluten-free pasta may cook faster or slower than regular pasta. Adjust the cooking time based on the package instructions for the best texture. For a detailed recipe, check out the Full Recipe. To store leftovers, let the sticky honey garlic pasta cool down. Place it in an airtight container. This helps keep it fresh. You can store it in the fridge for up to three days. If you want to enjoy it later, remember to heat it well. You can freeze portions of this dish for later. Use freezer-safe containers or bags. Make sure to remove as much air as possible. Sticky honey garlic pasta lasts up to three months in the freezer. When you want to eat it, let it thaw overnight in the fridge. Reheat it on the stove over low heat. You might need to add a splash of water to keep it moist. Leftovers can be fun! You can turn them into a pasta salad. Just mix in fresh veggies and a splash of lemon juice. Another idea is to use it as a filling for wraps. Spread it onto a tortilla, add greens, and roll it up. You can even turn it into a bake. Layer it with cheese and bake until it’s bubbly. Sticky honey garlic pasta is tasty no matter how you use it! It takes about 10 minutes to prep this dish. The total cooking time is around 20 minutes. So, you can have a tasty meal ready in just half an hour! Yes, you can. Cook the pasta and sauce and store them separately. Keep them in the fridge for up to three days. When you're ready to eat, just reheat them together in a skillet. This makes it easy for busy nights! This pasta pairs well with many sides! You might enjoy a crisp salad for freshness. Steamed veggies add color and nutrients. Some garlic bread can bring extra flavor too! For protein, grilled chicken or shrimp fits nicely with the dish. This blog post outlines how to make Sticky Honey Garlic Pasta. You learned about the key ingredients and simple steps to follow. I shared tips for cooking and flavor enhancing. You can even add proteins or veggies for variety. Remember, storing leftovers properly ensures this dish stays tasty. Experiment with it and enjoy your culinary creativity!
Sticky Honey Garlic Pasta Skillet Savory Family Meal
Looking for a delicious, quick meal that the whole family will love? Let me introduce you to my Sticky Honey Garlic Pasta Skillet. With just
To make delicious chicken stuffed poblano peppers, gather the following ingredients: - 4 large poblano peppers - 1 lb cooked chicken breast, shredded - 1 cup quinoa, rinsed - 2 cups chicken broth - 1 cup black beans, drained and rinsed - 1 cup corn kernels (fresh or frozen) - 1 cup diced tomatoes (canned or fresh) - 1 cup shredded cheddar cheese - 1 teaspoon cumin - 1 teaspoon smoked paprika - Salt and pepper to taste - Fresh cilantro, chopped (for garnish) - 2 tablespoons olive oil - Lime wedges (for serving) These ingredients create a great blend of flavors and textures. The poblanos offer mild heat, while the chicken and quinoa provide protein. The mix of beans and corn adds fiber and sweetness. Don't forget the spices; they elevate the dish. Fresh cilantro and lime juice at the end brighten every bite. You can find the full recipe for cooking this amazing dish in the recipe section. - Preheat the oven to 375°F (190°C). - Cook quinoa in chicken broth. Bring the broth to a boil, then lower the heat. Cover and let it simmer for about 15 minutes. This makes the quinoa fluffy and tasty. - Cut slits and remove seeds from the peppers. Take care to keep the tops on if you like. This keeps them nice for serving. - Combine chicken, quinoa, beans, corn, tomatoes, cheese, and spices. Mix all these ingredients in a large bowl. Make sure they blend well. The spices add great flavor. - Fill the peppers with the mixture and pack gently. Press the filling down to make sure it fits well. This way, every bite will be full of flavor. - Bake covered for 25 minutes, then uncover to melt cheese. After 25 minutes, take the foil off and sprinkle more cheese on top. Bake for an extra 10-15 minutes until the cheese is melted and bubbly. These steps will lead you to a delicious meal. For the complete recipe, check the [Full Recipe]. Enjoy your cooking! - Ensure quinoa is fully cooked for the right texture. This makes it light and fluffy. - Go for fresh ingredients for better flavor. Fresh veggies and herbs enhance the taste. - Use a vibrant platter and fresh garnishes. A colorful display makes the dish more inviting. - Add lime wedges to the side. They brighten the plate and offer a zesty kick. - Customize the heat with peppers or spices. If you like it spicy, add jalapeños or hot sauce. - For less heat, remove seeds from the peppers. This helps control the spice level for everyone. {{image_2}} You can switch up the protein in your stuffed peppers. Use turkey or beef instead of chicken. This change keeps the dish tasty and adds a different flavor. Change the cheese, too. Try pepper jack for a spicy kick. It melts well and adds a creamy texture. If you want a meat-free option, replace chicken with lentils or mushrooms. Lentils offer great protein, and mushrooms add a savory depth. Both options still give you a hearty filling. You can mix in extra veggies for more color and nutrients. You don’t have to bake the peppers if you want a twist. Try grilling or smoking them for a unique flavor. Grilling brings out a smoky taste that pairs well with the filling. Smoking adds a rich essence to the dish. Both methods create a fun outdoor cooking experience. For the full recipe, don’t forget to check out the full recipe. To keep your chicken stuffed poblano peppers fresh, place them in an airtight container. This helps maintain their flavor and texture. Store them in the fridge for up to three days. When you're ready to enjoy them, you can easily reheat them. If you want to save some for later, freeze the cooked peppers. Wrap each pepper tightly in plastic wrap and place them in a freezer bag. This keeps them safe from freezer burn. They can last up to three months in the freezer. When you're ready to eat, just thaw in the fridge overnight before reheating. For the best taste, reheat stuffed peppers in the oven. Preheat your oven to 350°F (175°C). Place the peppers in a baking dish and cover with foil. Bake for about 20 minutes until warm. You can also reheat them in the microwave. Just place them on a microwave-safe plate and heat in short bursts until hot. Enjoy every bite of your delicious stuffed peppers! Yes, you can prep and bake later or store overnight. This makes it easy for busy days. Just make sure to cover the dish with foil to keep everything fresh. When you’re ready, bake it as directed for a quick meal. Pair with rice, salad, or a side of guacamole. These sides add great texture and flavor. A light salad can balance the spice of the peppers. Guacamole adds creaminess that complements the dish well. Look for tender peppers and melted cheese for doneness. The peppers should be soft, and the cheese should be bubbly and golden. If the cheese is not melted, bake for a few extra minutes. Yes, grilling adds a unique flavor to the dish. The smoky taste enhances the peppers. Just make sure to keep an eye on them to avoid burning. Grilled peppers also have a nice char that many love. Substitute with other chili peppers like Anaheim or bell peppers. They work well in this recipe. Adjust cooking times based on the size of the peppers you choose. Just make sure to keep the filling flavors intact for a tasty meal. In this blog post, we explored how to make stuffed poblano peppers. We covered ingredients, step-by-step instructions, and helpful tips. You can easily customize this dish with different proteins or spices. Remember to use fresh ingredients for better flavor and texture. Enjoy leftovers or freeze them for later. With these tips, your stuffed peppers will impress anyone at your table. Now, it’s time to gather your ingredients and get cooking!
The Best Recipe for Chicken Stuffed Poblano Peppers Delight
Are you ready to elevate your dinner game? My recipe for Chicken Stuffed Poblano Peppers is sure to impress! These colorful peppers are filled with
To make crispy mashed potatoes stuffed with cheese and beef, you need some key items. Here’s the list of ingredients: - 4 large russet potatoes - 1 cup shredded cheddar cheese - 1 cup ground beef - 1 small onion, finely chopped - 2 garlic cloves, minced - 1/2 teaspoon paprika - 1/2 teaspoon black pepper - 1 teaspoon salt - 1/4 cup sour cream - 1/4 cup green onions, chopped (for garnish) - 1/2 cup breadcrumbs - Oil for frying (vegetable or canola) Each ingredient plays a vital role. The russet potatoes give a fluffy and creamy base. Cheddar cheese adds a rich flavor and gooey texture when melted. Ground beef brings heartiness, while onion and garlic enhance the overall taste. Paprika and black pepper add a hint of warmth, and sour cream contributes creaminess. Breadcrumbs provide that desired crispy outer layer. This recipe brings all these flavors together for a delightful dish. For the full recipe, check out the details provided earlier. Baking the potatoes Start by preheating your oven to 400°F (200°C). Take four large russet potatoes and pierce each one with a fork. This helps steam escape while baking. Place the potatoes directly on the oven rack. Bake them for 45 to 60 minutes, or until they feel soft. Cooling and slicing Once baked, let the potatoes cool for a few minutes. Then, slice each potato in half. Use a spoon to scoop out most of the flesh, leaving a thin layer on the skin. This creates a nice pocket for your filling. Sautéing onion and garlic In a skillet, add a drizzle of oil over medium heat. Toss in one small chopped onion and two minced garlic cloves. Sauté them until they smell great and turn translucent. This takes about 3 to 4 minutes. Cooking ground beef Next, add one cup of ground beef to the skillet. Sprinkle in half a teaspoon of paprika, half a teaspoon of black pepper, and one teaspoon of salt. Cook the beef until it turns brown, which should take about 8 to 10 minutes. Drain any fat after cooking. Mashing potatoes with sour cream Now, take the potato flesh you scooped out earlier and place it in a bowl. Add a quarter cup of sour cream. Mash the potatoes until they are smooth and creamy. Mixing in beef and cheese Combine the sautéed beef mixture with the mashed potatoes. Fold in one cup of shredded cheddar cheese, mixing well. Taste and adjust the seasoning if needed. This step-by-step guide outlines how to create the perfect filling for your crispy mashed potatoes stuffed with cheese and beef. For the full recipe, refer to the original source. To get the perfect crispy texture, follow these steps: - Use hot oil: Heat oil to about 350°F (175°C). This helps make the outside crunchy. - Fry in batches: Avoid crowding the pan. Fry a few potatoes at a time for even cooking. Adjust your seasonings for more flavor: - Taste as you go: Add salt or spices gradually. This helps you find the best balance. - Try adding spices: A pinch of cayenne or cumin gives a nice kick. Mix in herbs like thyme or rosemary for a fresh taste. Make your dish look great: - Presentation tips: Serve potatoes on a wooden board. Add a dollop of sour cream beside them. Garnish with fresh herbs for color. - Pairing ideas: Serve with a side salad or a zesty dipping sauce. A simple salsa or ranch dip works well too. These tips will help you create the best crispy mashed potatoes stuffed with cheese and beef. Check the Full Recipe to get all the details! {{image_2}} You can easily swap ground beef for plant-based meat. Use products like lentils or mushrooms. They give nice texture and flavor. For lentils, cook them until tender, then mix them with spices. If using mushrooms, sauté them to bring out their umami taste. This way, you keep your dish hearty and tasty without meat. Cheese is key to making this dish rich and gooey. Cheddar cheese is a great choice, but feel free to try others. Mozzarella melts well and adds stretch. Feta offers a tangy twist, while pepper jack adds spice. Use a mix of cheeses for a layered flavor. Just remember to adjust the amount based on how cheesy you want it! Add more fun to your filling with extra ingredients. Try diced jalapeños for heat or fresh herbs like parsley or chives for freshness. You can also mix in cooked bacon bits for a smoky flavor. Don’t shy away from creativity, as these additions elevate your crispy mashed potatoes stuffed with cheese and beef delight. For the full recipe, check the section above. Crispy mashed potatoes stuffed with cheese and beef taste great even later. Store them in an airtight container. You can keep them in the fridge for up to three days. Make sure they cool down before you store them. This keeps them from getting soggy. When ready to eat, check for any off smells before reheating. To freeze these stuffed potatoes, first, let them cool completely. Wrap each potato tightly in plastic wrap. Then, place them in a freezer bag or container. They can stay frozen for about two months. When you want to enjoy them, just thaw them in the fridge overnight. This helps keep the texture nice. For the best results, reheat your stuffed potatoes in the oven. Preheat your oven to 350°F (175°C). Place the potatoes on a baking sheet and cover them with foil. Heat them for about 15-20 minutes until warm. This keeps the outside crispy. You can also use a microwave, but the potatoes won’t be as crispy. Heat them on medium for about 2-3 minutes. If you want, you can pop them back in a hot skillet for a minute or two to regain some crunch. You can prepare the potatoes and filling a day in advance. Bake the potatoes and make the beef mixture, then store them in the fridge. When you are ready to eat, stuff the potatoes and coat them in breadcrumbs. Fry them until golden brown. If you want to reheat, place them in a preheated oven at 350°F for about 15 minutes. Yes, you can bake the stuffed potatoes instead of frying them. Preheat your oven to 375°F. Place the stuffed potatoes on a baking sheet lined with parchment paper. Bake for about 25-30 minutes until the tops are crispy and golden. This method is healthier and still gives a nice crunch. If you need a substitute for sour cream, you can use plain Greek yogurt. It gives a similar tangy flavor and creamy texture. For a dairy-free option, try using cashew cream or coconut yogurt. Both work well and keep the dish creamy. To keep the potatoes intact, leave a thicker layer of potato flesh in the skins. Make sure the filling is not too wet. Also, roll the stuffed potatoes in breadcrumbs well to create a sturdy coating. Fry them in hot oil, which helps to hold their shape. Keep an eye on the cooking time to prevent them from breaking apart. In this blog post, we covered how to make crispy mashed potatoes stuffed with cheese and beef. We talked about key ingredients, step-by-step instructions, and storage tips. You learned ways to enhance flavors and tried different variations like vegetarian options. Remember, with the right techniques and ingredients, you can create a dish that impresses everyone. Enjoy cooking these tasty stuffed potatoes and don’t be afraid to experiment with your favorite flavors!
Crispy Mashed Potatoes Stuffed with Cheese & Beef Delight
Get ready for a tasty treat! Today, I’m sharing my recipe for Crispy Mashed Potatoes Stuffed with Cheese & Beef. This dish takes comfort food
- 1 lb ground beef - 1 small onion, finely chopped - 2 cloves garlic, minced - 1 teaspoon cumin - 1 teaspoon chili powder - 1 can (15 oz) refried beans - 8 small corn tortillas - 2 cups shredded cheddar cheese - 1 can (10 oz) enchilada sauce - 1/2 cup sour cream - Fresh cilantro for garnish (optional) - Sliced jalapeños for garnish (optional) Measuring ingredients helps ensure your dish turns out great. It keeps flavors balanced and gives you the right texture. I always recommend using measuring cups and spoons for dry and wet ingredients. A kitchen scale is also useful for precise amounts, especially for meat and cheese. For gluten-free options, choose corn tortillas. They work well and taste great. For dairy-free alternatives, you can use vegan cheese and skip the sour cream. There are many tasty options that fit your needs. You can still enjoy these enchiladas! Start by gathering all your ingredients. You will need: - 1 lb ground beef - 1 small onion, finely chopped - 2 cloves garlic, minced - 1 teaspoon cumin - 1 teaspoon chili powder - 1 can (15 oz) refried beans - 8 small corn tortillas - 2 cups shredded cheddar cheese - 1 can (10 oz) enchilada sauce - 1/2 cup sour cream - Fresh cilantro for garnish (optional) - Sliced jalapeños for garnish (optional) Chop the onion and mince the garlic. Measure each ingredient carefully. This helps ensure your dish turns out just right. Prepare a large skillet on medium heat. You want it hot enough to brown the beef nicely. Add the ground beef, onion, and garlic to the skillet. Cook until the beef is browned and the onion is soft, about 5-7 minutes. Make sure to drain any excess fat after cooking. This keeps your filling from being greasy. Now, stir in the cumin and chili powder. These spices add great flavor. Mix well and cook for another minute. Remove the skillet from heat. Add the refried beans next. Mix until the beans are creamy and well combined with the beef. Take a tortilla and lay it flat. Spoon about 2-3 tablespoons of the beef mixture in the center. Sprinkle some shredded cheddar cheese on top. Roll the tortilla tightly and place it seam-side down in a greased 9x13 inch baking dish. Repeat this step with the remaining tortillas. Once all tortillas are rolled, pour the enchilada sauce over them. Make sure every tortilla is covered. This keeps them moist and flavorful while baking. Finally, sprinkle the remaining cheddar cheese on top. The cheese will melt and form a delicious crust. Now, you’re ready to bake! To get the best cheese melt, choose the right cheese. I love using sharp cheddar, but you can mix in Monterey Jack for extra creaminess. Grate your cheese fresh for the best melt. Preheat your oven to the right temperature and cover the dish with foil at first. This helps the cheese melt evenly. Timing is key for optimal texture. Bake your enchiladas covered for 20 minutes. Then, uncover and bake for another 10 minutes. This gives you that beautiful golden cheese on top. One common mistake is overfilling the tortillas. If you add too much filling, they can burst open. Stick to 2-3 tablespoons of the beef mixture for each tortilla. This keeps them neat and easy to roll. Another mistake is not covering the enchiladas with sauce. The sauce keeps them moist and adds flavor. Pour it generously over the rolled tortillas before baking. You can add extra spices or vegetables to enhance the flavor. Try adding bell peppers or corn to the beef mixture. A pinch of smoked paprika can add nice depth. For cheese combinations, mix in some pepper jack for a kick. You can also use queso blanco for a creamy texture. Don’t limit yourself; experiment with different cheeses to find your favorite blend. For the full recipe, check out the Easy Cheesy Ground Beef Enchiladas. {{image_2}} To make a vegetarian version, skip the ground beef. Use beans or vegetables instead. Black beans or pinto beans work well. Chopped bell peppers or zucchini add great flavor. You can keep the spices like cumin and chili powder for taste. This way, you enjoy the same cheesy goodness without meat. If you love heat, add jalapeños or hot sauce. Slice fresh jalapeños and sprinkle them on top. You could mix some into the meat filling too. Another great way to spice things up is with pepper jack cheese. It adds a creamy texture and a nice kick. Pair your enchiladas with tasty sides. Rice is a great option, especially when flavored with lime. A fresh salad can lighten the meal. You can also get creative with garnishes. Try adding avocado slices or a sprinkle of lime zest for extra flavor. Don't forget fresh cilantro for a pop of color! Enjoy the fun of mixing flavors! To keep your Easy Cheesy Ground Beef Enchiladas fresh, store them in the fridge. Use an airtight container. This helps prevent drying out. If you have leftover enchiladas, they can last for up to three days in the fridge. You can also freeze enchiladas for longer storage. Wrap each enchilada tightly in plastic wrap. Place them in a freezer-safe bag. This method keeps them safe for up to three months. When reheating, I recommend the oven for the best texture. Preheat the oven to 350°F (175°C). Place the enchiladas in a baking dish and cover with foil. Bake for about 20 minutes, or until heated through. If you're short on time, you can use the microwave. Place a single enchilada on a microwave-safe plate. Heat for about 1-2 minutes, checking to make sure it’s hot all the way through. In the fridge, your enchiladas will last about three days. Always check for signs of spoilage. If they smell off or look discolored, it’s best to toss them. When properly frozen, they can last for up to three months. Just remember to label your bags with the date. This way, you know when they were stored. It takes about 35 minutes to make these enchiladas. You need 15 minutes for prep and 20 minutes to cook. This quick time makes it easy for busy days. Yes, you can prepare the filling a day before. Store it in the fridge. You can also roll the enchiladas and keep them in the fridge. Just add the sauce and cheese before baking. This way, you save time when you are ready to eat. Serve the enchiladas hot from the oven. Top them with sour cream, fresh cilantro, and sliced jalapeños for extra flavor. Pair them with rice, beans, or a fresh salad for a full meal. Enjoy your delicious creation! Making easy cheesy ground beef enchiladas is simple and fun. We covered all the ingredients, including flavors and textures you can play with. Measuring ingredients ensures great results. I shared valuable tips to avoid mistakes and variations for everyone’s taste. Remember, enchiladas are a great meal for any occasion. Use these steps to create your own delicious dish. Enjoy experimenting and savoring your tasty creations!
Easy Cheesy Ground Beef Enchiladas Simple Recipe
Craving a hearty dish that’s both simple and satisfying? You’re in the right place! This recipe for Easy Cheesy Ground Beef Enchiladas will have your
- 1 lb ground beef - 1 small onion, finely chopped - 2 cloves garlic, minced - 1 teaspoon cumin - 1 teaspoon chili powder - 1/2 teaspoon paprika - 1 can (15 oz) black beans, rinsed and drained - 1 cup corn kernels (fresh or frozen) - 2 cups shredded cheese (cheddar or a Mexican blend) - 8 corn tortillas - 1 can (10 oz) enchilada sauce To make tasty ground beef enchiladas, start with these required ingredients. Ground beef gives a rich flavor and a good protein boost. Onion and garlic add depth and aroma. The spices, cumin, chili powder, and paprika, create that classic enchilada taste. Black beans and corn bring texture and sweetness. Cheese adds creaminess and helps bind everything together. Corn tortillas hold the filling and soak up the sauce, while enchilada sauce gives that final touch of flavor. - Sliced jalapeños, bell peppers - Different types of cheese - Fresh herbs and garnishes Feel free to mix things up! Sliced jalapeños and bell peppers can add heat and crunch. You can use different cheeses for a unique taste, like pepper jack for spice or Monterey Jack for mildness. Fresh herbs, like cilantro, can brighten your dish and add a pop of color. - Large skillet - Baking dish - Measuring cups and spoons Make sure to have the right tools. A large skillet is perfect for browning the beef and sautéing the onion and garlic. A baking dish will hold your rolled enchiladas as they bake. Measuring cups and spoons are essential for accurate ingredients. With these tools, you can create delicious ground beef enchiladas with ease. For the full recipe, check out the details above! - Preheat your oven to 350°F (175°C). - In a large skillet, heat a tablespoon of oil over medium heat. - Add one finely chopped onion and two minced garlic cloves. - Sauté until the onion turns soft, about 3-4 minutes. - Add one pound of ground beef to the skillet. - Break the meat apart with a spatula as it cooks. - Brown the beef for about 5-7 minutes until fully cooked. - Drain any excess fat to keep it healthy. - Stir in one teaspoon of cumin, chili powder, and paprika. - Add one can of black beans and one cup of corn. - Cook for another 3 minutes until everything is hot. - Take a corn tortilla and fill it with the beef mix. - Sprinkle some cheese on top of the filling. - Roll the tortilla tightly and place it seam-side down in a baking dish. - Repeat this step for all eight tortillas. - Pour one can of enchilada sauce over the rolled tortillas. - Make sure they are covered well with sauce. - Top with the remaining cheese for extra flavor. - Place the baking dish in the preheated oven. - Bake for 20-25 minutes until the cheese is bubbly and golden. - Let the enchiladas rest for a few minutes when done. - Serve with fresh cilantro and sour cream on the side. For the complete recipe, check the Full Recipe section. To boost the flavor of your ground beef, start with the right seasonings. I recommend using a mix of cumin, chili powder, and paprika. These spices add depth to your meat. Don't forget to taste as you go! Adjust the spices to match your preference. For enchilada sauce, choose one that has a rich flavor. Look for options that have a good mix of spices and heat. You can also make your own sauce if you want to control the ingredients. This way, you can customize it to your taste. To get that bubbly cheese on top, bake your enchiladas until the cheese is golden. This usually takes about 20-25 minutes. Keep an eye on them to prevent burning. To avoid soggy tortillas, ensure they are warm before rolling. This helps them stay intact. Also, don't soak them too long in the sauce. Instead, pour just enough sauce over the rolled enchiladas to keep them moist. For the best accompaniments, serve your enchiladas with fresh cilantro and a dollop of sour cream. These add a nice contrast to the rich flavors. When plating, stack the enchiladas neatly on a colorful plate. Drizzle extra enchilada sauce on top, and sprinkle some cheese and cilantro for a lovely look. This makes your meal not only tasty but also visually appealing. For the full recipe, check out the link provided. {{image_2}} You can make delicious vegetarian enchiladas by using lentils or mushrooms instead of ground beef. Lentils are packed with protein and fiber. They soak up flavors well, making the dish hearty. Mushrooms add a nice texture and umami taste. You can also fill your enchiladas with extra vegetables like bell peppers, spinach, or zucchini. These veggies add color and nutrients. To change up the flavor, consider adding some spicy or sweet elements. A hint of jalapeño or chipotle peppers can spice things up. If you prefer sweet, try adding corn or a touch of honey. Mixing different beans, like pinto or kidney beans, can add variety and depth. Each bean brings its own flavor and texture, making your enchiladas unique. You can cook enchiladas in a slow cooker for a hands-off meal. Simply layer your ingredients in the cooker and let them meld together over hours. This method makes the flavors richer. If you are short on time, use an Instant Pot. You can cook everything quickly and have a tasty meal ready in no time. Just follow the same assembly steps and adjust the time for pressure cooking. For the full recipe, check out the previous section of this article. To store your leftover enchiladas, first let them cool down. Place them in an airtight container. Keep the container in the refrigerator. Your enchiladas will stay fresh for up to three days. If your enchiladas have sauce, they may last a day longer. For longer storage, freezing is a great option. Wrap each enchilada in plastic wrap. Then, place them in a freezer-safe bag or container. This will keep out air and prevent freezer burn. Enchiladas can last up to three months in the freezer. To thaw, move them to the fridge overnight. For reheating, place them in a preheated oven at 350°F (175°C) for about 20 minutes. This will warm them through and keep the tortillas tender. In the fridge, enchiladas last about 3-5 days. In the freezer, they can last up to three months. Always check for signs of spoilage before eating. If you see mold or an off smell, it’s best to throw them away. To keep enchiladas crisp, use these tips: - Warm the tortillas briefly. - Dip them in hot enchilada sauce. - Keep the filling dry. - Avoid overloading with sauce. These steps help the tortillas stay firm. Soggy tortillas can ruin your meal. So, treat them right! Yes, you can prepare enchiladas ahead. Here are options for meal prep: - Assemble them the night before. - Store in the fridge, covered. - Bake them fresh in the morning. This saves time on busy nights. Just pop them in the oven when ready! To reheat enchiladas, follow these techniques: - Use an oven for even heating. - Cover with foil to retain moisture. - Heat at 350°F (175°C) for 15-20 minutes. This keeps the flavors rich and the texture intact. Absolutely! Here are some alternatives: - Ground turkey or chicken for leaner options. - Black beans for a vegetarian choice. - Shredded pork or beef for a twist. These swaps cater to different diets and taste preferences. Get creative with your ingredients! Ground beef enchiladas are simple and tasty. You need key ingredients like ground beef, spices, tortillas, and cheese. Follow the steps to prepare, cook, assemble, and bake them. With tips on flavor and texture, you can make them even better. Variations, like a vegetarian option, expand your choices. Store leftovers correctly for future meals. Now, enjoy making this dish that brings joy to the table!
Delicious Ground Beef Enchiladas Tasty and Easy Recipe
Looking for a deliciously simple dinner? You’ll love these ground beef enchiladas! I’ll guide you through every step, from gathering the right ingredients to achieving
- 4 large flour tortillas - 2 cups potatoes, peeled and diced - 1 cup shredded cheese (cheddar or Mexican blend) - 1 teaspoon garlic powder - 1 teaspoon smoked paprika - ½ teaspoon cumin - Salt and pepper to taste To make tasty Cheesy Potato Burritos, you need a few key ingredients. The flour tortillas are essential for wrapping up the filling. Use potatoes for a soft and creamy base. Choose your favorite cheese like cheddar or a Mexican blend for that gooey goodness. Spice it up with garlic powder, smoked paprika, and cumin. Don’t forget salt and pepper to enhance all the flavors. - 1 cup cooked black beans, rinsed and drained - ½ cup sour cream - ¼ cup green onions, sliced - Salsa (for serving) You can add some black beans for extra protein and flavor. Sour cream brings a creamy touch that pairs well with the burrito. Top it with green onions for a fresh crunch. Serve with salsa on the side for a zesty kick. - Alternatives for cheese: Use dairy-free cheese for a vegan option. - Gluten-free tortilla options: Try corn tortillas or gluten-free wraps. - Vegetarian vs. vegan variations: Skip the cheese and sour cream for a vegan dish. If you need to swap ingredients, there are great options. For cheese, look for dairy-free alternatives if you want a vegan meal. If you need a gluten-free option, corn tortillas work well. For a vegetarian dish, just leave out the cheese and sour cream, and you still get a great burrito. {{ingredient_image_1}} - Boiling potatoes: Start by peeling and dicing 2 cups of potatoes. Place them in a large pot of salted water. Boil until fork-tender, about 10-12 minutes. Drain the potatoes and set them aside. - Seasoning the potatoes: In a large skillet, heat 2 tablespoons of olive oil over medium heat. Add the drained potatoes. Sprinkle in 1 teaspoon of garlic powder, 1 teaspoon of smoked paprika, and ½ teaspoon of cumin. Add salt and pepper to taste. Cook for 5 minutes, stirring gently. This step adds great flavor to the potatoes. - Combining ingredients in a skillet: Next, add 1 cup of rinsed black beans to the skillet. Mix everything well and stir for another 2-3 minutes until heated through. - Melting cheese into the mixture: Remove the skillet from heat. Fold in 1 cup of shredded cheese, either cheddar or a Mexican blend. The heat from the mixture will melt the cheese perfectly. - Laying out tortillas: Take 4 large flour tortillas and lay them flat on a clean surface. - Adding filling and folding techniques: Spoon a generous amount of the cheesy potato and bean mixture into the center of each tortilla. Add a dollop of sour cream and sprinkle some sliced green onions on top. Fold in the sides of the tortilla and roll it up tightly to enclose the filling. Repeat this with the remaining tortillas. - Pan-frying for crispiness: For a crispy finish, heat a non-stick skillet over medium heat. Place the burritos seam side down. Cook for 2-3 minutes on each side until they are golden and crispy. - Oven baking alternative: If you prefer, you can bake them in the oven. Preheat your oven to 400°F (200°C). Place the burritos on a baking sheet and bake for about 15 minutes until golden. To make delicious burritos, ensure even cooking. Start by boiling the potatoes until they are fork-tender. This takes about 10 to 12 minutes. After boiling, drain them well. Heat olive oil in a skillet and add the potatoes. Stir gently to get a nice crisp on the potatoes. This helps them stay firm in the burrito. Adding spices can really boost the flavor. I use garlic powder, smoked paprika, and cumin in my mix. These spices give a warm and smoky taste. You can also add hot sauce for a kick. For cheese melting, I fold in the shredded cheese after removing the skillet from heat. The heat from the potatoes melts the cheese perfectly. This keeps the cheese gooey and tasty. You can make the filling ahead of time. Just store it in the fridge for up to three days. This makes it easy to assemble burritos later. If you want to freeze burritos, wrap each one in foil or plastic wrap. They last well in the freezer for about three months. When you're ready to eat, just reheat them in an oven or microwave. This keeps them tasty and warm! Pro Tips Perfect Potato Texture: Ensure your potatoes are fork-tender but not mushy for the best texture in your burritos. Cheese Melting Point: Add the cheese off the heat to prevent it from becoming rubbery; the residual heat will melt it perfectly. Tortilla Wrapping Technique: To prevent tearing, warm the tortillas briefly in a dry skillet before filling them. Flavor Boost: Experiment with different spices or herbs like cilantro or chili powder to customize the flavor of your filling. {{image_2}} You can easily make this dish vegetarian or vegan. To replace cheese, try using vegan cheese. It melts well and adds a nice flavor. For sour cream, use a dairy-free version made from cashews or coconut. You can also add more vegetables to the filling. Bell peppers, corn, or spinach work great. These veggies add color, crunch, and nutrients. If you want to add protein, chicken or beef can make the burrito heartier. Cook and shred the meat before mixing it with the potato filling. For a plant-based option, add lentils or tofu. Cooked lentils blend well with potatoes. Tofu can be crumbled and seasoned to match the flavors of the dish. For those who love a kick, try spicy options. You can add diced jalapeños or a splash of hot sauce. This will give your burrito a nice heat. Southwest seasonings can also change the flavor. Use spices like chili powder or taco seasoning for a bold taste. These variations help you enjoy this dish in different ways. To store leftovers, let the burritos cool. Place them in a sealed container. You can keep them in the fridge. The recommended shelf life is about 3 to 4 days. For freezing, wrap each burrito tightly in foil or plastic wrap. This keeps them fresh. You can store them in a freezer-safe bag. They last for about 2 to 3 months. To reheat frozen burritos, remove the wrap. Heat them in the oven at 350°F for about 20-25 minutes. You can also microwave them for 2-3 minutes. These burritos pair well with side dishes like rice or a fresh salad. For dipping sauces, salsa is a perfect choice. You can also try guacamole or sour cream. Enjoy your meal with these tasty additions! To keep your burritos from getting soggy, make sure to cool the filling before wrapping. Use a dry tortilla to hold the moisture better. You can also lightly toast the tortilla in a pan before adding the filling. This adds a crunchy layer and helps seal the edges. Yes, you can make Cheesy Potato Burritos in advance. Prepare the filling, let it cool, and store it in the fridge. You can fill and wrap the burritos right before you eat. This makes it easy to enjoy a quick meal later. Absolutely! Cheesy Potato Burritos are great for meal prepping. You can prepare the filling and freeze it. Wrap the burritos individually in foil or plastic wrap. They will stay fresh for a few weeks in the freezer. The best way to reheat burritos is to use an oven. Preheat it to 350°F (175°C). Wrap the burrito in foil and heat for 15-20 minutes. This keeps the tortilla soft and the filling warm. You can also use a microwave if you’re in a hurry. Yes, you can add other ingredients to the filling. Feel free to mix in vegetables like bell peppers or corn. You can also add proteins like chicken or beef. Just make sure to adjust the seasonings to match the new flavors. Cheesy Potato Burritos are fun and easy to make. We covered essential and optional ingredients, plus neat tricks to make them shine. You can personalize your burritos with various flavors and proteins to suit your taste. Remember, meal prep makes cooking easier later. Store extras in the fridge or freezer. With all these tips, your burritos will be a hit. Now it’s time to roll up your sleeves and enjoy making your tasty creations!
Cheesy Potato Burritos Tasty and Simple Recipe
Looking for a tasty and simple meal? Cheesy Potato Burritos are your answer! With just a few easy ingredients, you’ll create the ultimate comfort food
To make the Cheddar Ranch Beef & Corn Pasta Bake, you will need these simple ingredients: - 12 oz. elbow macaroni - 1 lb ground beef - 1 cup frozen corn - 1 packet ranch seasoning mix - 2 cups shredded cheddar cheese (divided) - 1 can (14.5 oz) diced tomatoes with green chilies (drained) - 1 cup sour cream - 1 cup milk - 1 tablespoon olive oil - Salt and pepper to taste - Fresh parsley (for garnish, optional) These ingredients come together to create a dish that is both hearty and full of flavor. The ranch seasoning brings a nice twist, while the cheddar cheese adds a rich creaminess. I enjoy using elbow macaroni because it holds the sauce well. You can find all these items at your local grocery store. For the full recipe, check out the instructions later in the article. - Preheat your oven to 350°F (175°C). - Cook 12 oz. elbow macaroni until al dente, then drain it. - Heat 1 tablespoon of olive oil in a skillet. - Add 1 lb of ground beef and cook until browned. - Break the beef apart with a spatula as it cooks. - Drain any excess fat. - Stir in 1 packet of ranch seasoning mix, 1 cup of frozen corn, and 1 can of drained diced tomatoes. - Cook for 5 more minutes until heated through. - In a large bowl, mix the cooked macaroni with the beef mixture. - Add 1 cup of sour cream and 1 cup of milk. - Stir well until everything is combined. - Fold in 1.5 cups of shredded cheddar cheese. - Season with salt and pepper to taste. - Pour the mixture into a greased 9x13 inch baking dish. - Spread it out evenly and top with the remaining 0.5 cups of cheddar cheese. - Bake for 25-30 minutes until the cheese is bubbly and golden. This recipe is a delightful blend of flavors and textures, creating a meal that everyone will love. For full details, check the Full Recipe. To avoid overcooking the macaroni, cook it until it's al dente. This means it should still be firm when bitten. Drain the pasta right away and rinse it with cold water to stop the cooking. This will keep your pasta from becoming mushy in the bake. For even browning of the beef, start with a hot skillet. Use medium heat and break the beef apart as it cooks. Stir it often to ensure every bit gets cooked well. This helps keep the meat juicy and flavorful. The best types of cheddar for melting are sharp or medium cheddar. They add great flavor and melt nicely. If you want a creamier texture, try using a blend of cheddar and Monterey Jack. For cheese lovers, consider substitutions like gouda or fontina. These cheeses add a unique taste and melt beautifully. You can also mix different types for a fun flavor twist. To enhance flavor, add spices like garlic powder or smoked paprika. These spices give a nice kick without overwhelming the dish. A sprinkle of cayenne pepper can also add a subtle heat. Adjusting ranch seasoning is easy. Start with half a packet, then taste. If you want more flavor, add more ranch seasoning gradually. This method lets you control the taste to suit your liking. {{image_2}} You can easily swap the ground beef for ground turkey or chicken. These options keep the dish light while still being tasty. They work well with ranch seasoning, too. If you're looking for vegetarian options, use plant-based meat substitutes. They can mimic the texture of beef and soak up the flavors well. Adding more vegetables can boost the dish's nutrition. Consider bell peppers, zucchini, or spinach. These add color and taste. When you add extra veggies, balance the flavors. Use a pinch of spice to enhance the taste. A little chili powder can add warmth without being too spicy. While cheddar cheese is a classic choice, you can mix it up. Try mozzarella for a stretchy texture. For a sharp flavor, use gouda or pepper jack. Mixing cheeses can add depth to the dish. Combine different types to see what you like best. Explore these variations to make the Cheddar Ranch Beef & Corn Pasta Bake your own. For the full recipe, check the earlier section. To store leftovers, cool the dish to room temperature. Place the pasta bake in an airtight container. It will stay fresh for up to three days in the fridge. To keep the taste and texture, cover the dish tightly. Avoid leaving it out for too long to prevent spoilage. To freeze the pasta bake, let it cool completely. Transfer it to a freezer-safe container. Seal it well to prevent freezer burn. It can last for up to three months in the freezer. When ready to eat, thaw it in the fridge overnight. Reheat in the oven at 350°F (175°C) until warm. This keeps the cheese melty and the pasta soft. In the fridge, this dish lasts for about three days. If frozen, it can keep well for three months. Always check for signs of spoilage before consuming. If it smells off or shows signs of freezer burn, it’s best to toss it. Yes, you can make this dish ahead. Just follow these tips: - Cook the pasta and beef mixture. - Combine them and add other ingredients. - Cover and store in the fridge for up to 24 hours. - When ready, bake it straight from the fridge. This saves time and makes meal prep easy. Absolutely! There are many gluten-free pasta options. - Look for corn or rice pasta. - These work well and taste great. - Just cook them according to package instructions. This way, everyone can enjoy this meal without worry. To reheat leftovers, use these methods: - Microwave on low for 1-2 minutes. - Stir halfway through for even heating. - You can also bake at 350°F for 15-20 minutes. This keeps the texture nice and cheesy. Yes, you can substitute ranch seasoning. - Try using Italian seasoning for a twist. - For a homemade option, mix dried herbs like dill, parsley, and garlic powder. This adds a new flavor while keeping it tasty. Experiment and find what you love best! This blog post covered a delicious recipe for Cheddar Ranch Beef & Corn Pasta Bake. You learned about the key ingredients, step-by-step instructions, and helpful tips to make the dish great. We talked about variations to customize your pasta bake and how to store leftovers properly. This meal is simple and tasty, perfect for family dinners. Try it out and enjoy a comforting dish that can easily fit your tastes and needs. Happy cooking!
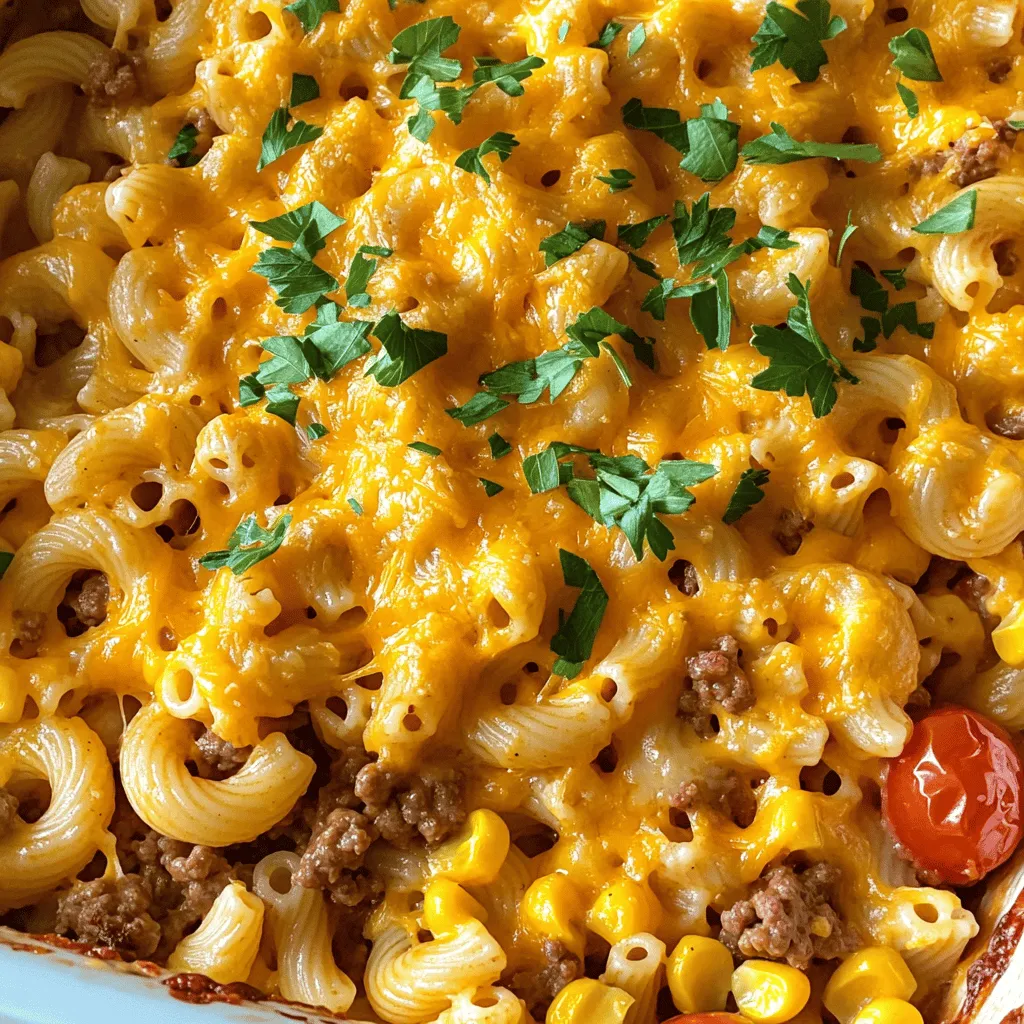
Cheddar Ranch Beef & Corn Pasta Bake Delightful Meal
Are you ready to dive into a dish that combines comfort and flavor? My Cheddar Ranch Beef & Corn Pasta Bake is the perfect meal
For a tasty Healthy Zucchini Beef Stir-Fry, start with these key items: - 1 lb (450g) lean beef sirloin, sliced thinly - 2 medium zucchinis, sliced into half-moons - 1 red bell pepper, julienned - 1 cup broccoli florets These main ingredients offer a mix of protein and vegetables. Lean beef sirloin gives you flavor without too much fat. Zucchini adds moisture and a light crunch. The red bell pepper adds sweetness, and broccoli packs in nutrients. Flavor is key in this dish. Here’s what you need: - 3 tablespoons soy sauce (low sodium) - 2 tablespoons oyster sauce (or hoisin for a vegan option) - 3 cloves garlic, minced - 1 tablespoon fresh ginger, minced Soy sauce and oyster sauce provide umami taste. Garlic and ginger add depth and warmth. These seasonings work together to take your stir-fry to the next level. To finish your stir-fry, use these garnishes: - Green onions, sliced - Sesame seeds These garnishes add color and a nice crunch. They make the dish look great and enhance the flavor. Enjoy your meal by adding these simple touches. For the complete recipe with instructions, check out the [Full Recipe]. Marinating the beef To make your beef tender and full of flavor, marinate it first. In a bowl, mix the sliced beef with one tablespoon of soy sauce, a pinch of salt, and pepper. Let it sit while you prepare the veggies. This step enhances the beef's taste and keeps it juicy. Slicing techniques Slice the beef as thinly as you can. This helps it cook quickly and evenly. Use a sharp knife and cut against the grain. This method makes the beef more tender when you eat it. Cutting zucchinis and bell peppers For the zucchinis, slice them into half-moons. Aim for pieces about a quarter-inch thick. This size cooks fast and keeps a nice crunch. For the red bell pepper, julienne it into thin strips. This adds color and sweetness to your dish. Preparing broccoli florets Take a head of broccoli and break it into small florets. Each floret should be bite-sized. This ensures they cook evenly and blend well with the other veggies. Set all your prepared veggies aside for quick access. Heating the pan effectively Use a large skillet or wok for stir-frying. Heat vegetable oil over medium-high heat. When the oil shimmers, it’s ready. This step is key for getting a good sear on the beef and vegetables. Timing for perfect cooking Add the marinated beef to the pan in a single layer. Don't stir it right away. Let it sear for one to two minutes. This browning adds a nice flavor. After that, stir-fry for another two to three minutes until fully cooked. Remove the beef and set it aside. Now, add minced garlic and ginger to the hot pan. Stir quickly for about 30 seconds to release the flavors. Then, toss in the zucchinis, bell pepper, and broccoli. Stir-fry for four to five minutes until the veggies are tender-crisp. Finally, return the beef to the pan, add the rest of the soy sauce and oyster sauce, and mix everything well. Cook for another two minutes to heat it all through. This step-by-step method will give you a tasty and colorful Healthy Zucchini Beef Stir-Fry. For the complete instructions, check out the Full Recipe. - Best stir-frying practices: Start with a hot pan. Heat the oil until it shimmers. This helps sear the beef quickly. Cook the beef in a single layer to get that nice brown crust. Don’t overcrowd the pan; this keeps everything cooking evenly. - Maintaining vegetable crispness: Stir-fry your veggies over high heat. This helps them stay bright and crunchy. Add them after the beef to avoid overcooking. A quick 4-5 minutes is all you need for tender-crisp vegetables. - Adding spices for extra flavor: Consider adding chili flakes for heat or cumin for warmth. You can also use fresh herbs like basil or cilantro for a fresh twist. They brighten up the dish and add layers of flavor. - Alternatives to soy and oyster sauce: If you’re looking for a soy-free option, try coconut aminos. It has a similar taste but is less salty. For a vegan twist, use hoisin sauce instead of oyster sauce for that sweet and savory balance. - Preparing ingredients in advance: Chop your vegetables and slice the beef a day ahead. Store them in airtight containers in the fridge. This makes cooking quick and easy on busy nights. - Making ahead and reheating: You can make this stir-fry a day in advance. Store it in the fridge, and reheat in a pan over medium heat. Add a splash of water or broth to keep it moist. For the complete cooking process, check out the Full Recipe. {{image_2}} You can switch up the protein in this dish easily. Chicken works great in stir-fry. Just cut it into thin strips like you did with the beef. If you prefer a meat-free meal, try tofu. Firm tofu absorbs flavors well and adds a nice texture. You can use vegetarian or vegan options, too. For a truly plant-based dish, you can skip the meat and use more vegetables. Add chickpeas or tempeh for protein. These options keep the meal healthy while making it satisfying. Feel free to mix in other vegetables. Carrots, snap peas, or mushrooms fit well in this dish. You can also use leafy greens like kale or spinach. They add color and nutrients. Consider seasonal ingredients for freshness. In the summer, add bell peppers or cherry tomatoes. In the fall, try squash or sweet potatoes. These swaps can change the flavor and keep things exciting. Serving this stir-fry is easy. You can serve it over rice or noodles. White or brown rice complements the dish well. Noodles, like soba or rice noodles, add a fun twist. You can also add fresh herbs for extra flavor. Chopped cilantro or basil adds brightness. For a crunchy element, sprinkle some crushed peanuts or cashews on top. For the full recipe, check out the detailed instructions and enjoy your cooking! To keep your Healthy Zucchini Beef Stir-Fry fresh, store leftovers in an airtight container. Let the dish cool down to room temperature first. This helps prevent moisture build-up. Place it in the fridge within two hours of cooking. Use the stir-fry within three to four days for the best taste. Yes, you can freeze stir-fry! It works well if you want to save some for later. Cool the stir-fry completely before freezing. Transfer it to a freezer-safe container or bag, removing as much air as possible. This keeps it tasty. When you're ready to eat it, thaw the stir-fry in the fridge overnight. Reheat it in a skillet over medium heat until hot, stirring often. In the fridge, the stir-fry lasts about three to four days. Look for signs of spoilage, like a sour smell or discoloration. If you see any, it's best to throw it away. Always trust your senses. If it doesn’t smell or look right, don’t eat it. Enjoy your stir-fry while it’s fresh for the best flavor! For the full recipe, check out the tasty details! Zucchini is low in calories and high in water. This makes it great for hydration. It contains vitamins A and C, which help your skin and eyes. Zucchini also provides fiber, which aids digestion. Eating zucchini can help you feel full while eating fewer calories. Plus, it has antioxidants that may protect your body from damage. Yes, you can easily make this stir-fry gluten-free. Use tamari instead of soy sauce for a gluten-free option. You can also skip oyster sauce or use a gluten-free alternative. Always check labels to ensure no hidden gluten. This way, you can enjoy the dish without worry. To add heat to your stir-fry, you can use red pepper flakes or fresh chili. Adding these while cooking will give the dish a nice kick. You can also use spicy sauce, like sriracha, to mix in at the end. Start with a small amount and taste as you go. Adjust the heat to your liking! For more flavor, consider adding a dash of hot sesame oil. If you want to learn more about preparing this dish, check out the Full Recipe. In this article, we explored making a healthy zucchini beef stir-fry. We covered key ingredients like lean beef and fresh vegetables. You learned about marinating beef, cutting techniques, and the stir-frying process. I also shared tips to keep veggies crisp and ways to prep meals in advance. Remember, you can swap proteins and vegetables to fit your taste. Enjoy experimenting with flavors and storage tips for freshness. By following these steps, you’ll create a tasty dish that’s fun to make and share.
Healthy Zucchini Beef Stir-Fry Flavorful Meal Idea
Are you ready to spice up your dinner routine? This Healthy Zucchini Beef Stir-Fry is tasty, quick, and packed with fresh veggies. Made with lean
- 1 cup jasmine rice - 2 cups chicken broth - 1 lb diced chicken thighs - 1 tablespoon olive oil - 1 teaspoon chili powder - 1 teaspoon cumin - 1 cup corn kernels (fresh or frozen) - ½ cup diced red onion - 1 diced red bell pepper - ½ cup chopped cilantro - 1 sliced avocado - 1 lime, juiced - ½ cup crumbled Cotija cheese - 1 tablespoon mayonnaise - 1 tablespoon chipotle sauce for spice When I make this Street Corn Chicken Rice Bowl, I gather these ingredients first. The jasmine rice gives the bowl a nice base. Chicken broth adds flavor to the rice. Diced chicken thighs cook up juicy and tender. Olive oil keeps everything from sticking. For spices, I use chili powder and cumin. They create a warm, zesty taste. The fresh ingredients bring color and crunch. Corn kernels add sweetness. Red onion and red bell pepper add a nice bite. I love adding cilantro and avocado for brightness. The lime juice adds tang, and Cotija cheese gives a creamy touch. If you want more flavor, mayonnaise and chipotle sauce can spice things up. This recipe is simple and full of flavor, making it a family favorite. Check out the Full Recipe for more details. To make fluffy jasmine rice, start with chicken broth. Use two cups of broth for one cup of rice. Bring the broth to a boil in a medium pot. Once boiling, add the rice and stir. Lower the heat and cover the pot. Let it simmer for 15 to 20 minutes. Check if the rice is tender and the liquid is gone. Fluff the rice with a fork for the best texture. Use boneless, skinless chicken thighs for great flavor. Heat olive oil in a large skillet over medium heat. Add the diced chicken to the hot oil. Sprinkle chili powder, cumin, salt, and pepper on the chicken. Stir occasionally and cook for about 7 to 10 minutes. You want the chicken to turn golden brown. This adds flavor and looks nice in the bowl. When the chicken is nearly done, it’s time to add the veggies. Toss in corn, diced red onion, and red bell pepper. Cook everything for an additional 5 to 7 minutes. This makes the vegetables tender and blends the flavors. Now, it’s time to build your rice bowl. Start with a generous scoop of rice at the bottom. Add the chicken and vegetable mix on top. Finish with sliced avocado, chopped cilantro, and Cotija cheese. Drizzle lime juice over the top for a fresh taste. If you like it creamy, add a mix of mayonnaise and chipotle sauce. For the full recipe, check out the detailed instructions provided above. - How to avoid mushy rice: Use the right rice-to-broth ratio. I like 1 cup of rice to 2 cups of broth. Bring the broth to a boil before adding the rice. Once you add the rice, reduce the heat. Cover the pot tightly and let it steam for about 15-20 minutes. This keeps the rice fluffy. - Ensuring chicken is tender: Cut the chicken into small pieces for quick cooking. Use medium heat and cook it for 7-10 minutes. Stir often to avoid burning. The chicken should be golden brown and not dry. - Suggestions for additional spices and herbs: Try adding smoked paprika or garlic powder for extra flavor. Fresh herbs, like parsley or basil, can also brighten the dish. A pinch of cayenne can give it a nice kick if you like heat. - Ways to add extra creaminess: For a creamy touch, mix mayonnaise with chipotle sauce. This adds flavor and richness. You could also use sour cream or Greek yogurt as a topping. - Recommended side dishes: A fresh salad pairs well with this dish. You can also serve tortilla chips with salsa for a crunchy side. - Perfect drinks to accompany the meal: A cold limeade is refreshing. You could also enjoy a light beer or sparkling water for a nice contrast. For the full recipe, check out the Street Corn Chicken Rice Bowl! {{image_2}} You can change the protein in your Street Corn Chicken Rice Bowl. Shrimp and tofu work great! For shrimp, cook it for about 3-4 minutes until pink. If you choose tofu, use firm tofu and sauté it for 5-7 minutes until golden. This keeps your dish quick and tasty, so everyone can enjoy it. To make a vegetarian version, skip the chicken and use black beans or chickpeas. This adds protein while keeping it plant-based. You can also add more veggies like zucchini or mushrooms. Season these options with the same spices. This keeps the flavors bold and bright, perfect for all diets. Explore local flavors by adding spices from your area. For example, if you love heat, add some cayenne or jalapeños. You can also try using corn tortillas instead of rice for a twist. Incorporating local ingredients makes the dish unique to you. Each bite can tell a story of your culture and taste. Store leftover Street Corn Chicken Rice Bowl in an airtight container. This keeps it fresh and tasty. In the fridge, it lasts up to three days. For longer shelf life, freeze it in a freezer-safe container. It can stay good for about three months in the freezer. To reheat, the best way is to use a microwave. Place the rice bowl in a microwave-safe dish. Cover it with a damp paper towel to keep moisture in. Heat for about one to two minutes. Stir halfway to ensure even warming. If you want the rice to stay moist, add a splash of chicken broth or water before heating. This helps prevent it from drying out. For meal prep, make the rice and chicken ahead of time. You can store each in separate containers. This way, you can mix them when ready to eat. Choose clear containers so you can see the food inside. Try to use glass or BPA-free plastic. These options are safe and keep food fresh longer. It takes about 55 minutes in total. Here’s the breakdown: - Prep time: 15 minutes - Cook time: 40 minutes Yes, you can! This dish is perfect for meal prep. Cook the rice and chicken, then store them separately. Keep them in the fridge for about three days. You can also freeze the chicken mixture for up to three months. Just thaw before reheating. If you need a substitute for Cotija cheese, try feta cheese. It has a similar crumbly texture. You can also use queso fresco or even goat cheese. For vegan options, try cashew cheese or nutritional yeast. The spice level depends on how you prepare it. The chili powder gives it a mild kick. If you want more heat, add chipotle sauce. You can also skip the spices if you prefer a milder taste. Adjust the spice to fit your liking. In this blog post, we explored a delicious street corn chicken rice bowl. We covered the main and fresh ingredients, along with optional add-ons. You learned step-by-step instructions on how to prepare the rice, cook the chicken, and combine everything. We shared tips to enhance flavor and presented fun variations. Finally, we discussed proper storage and reheating methods. This dish is simple, tasty, and perfect for any meal. Enjoy making it your own!
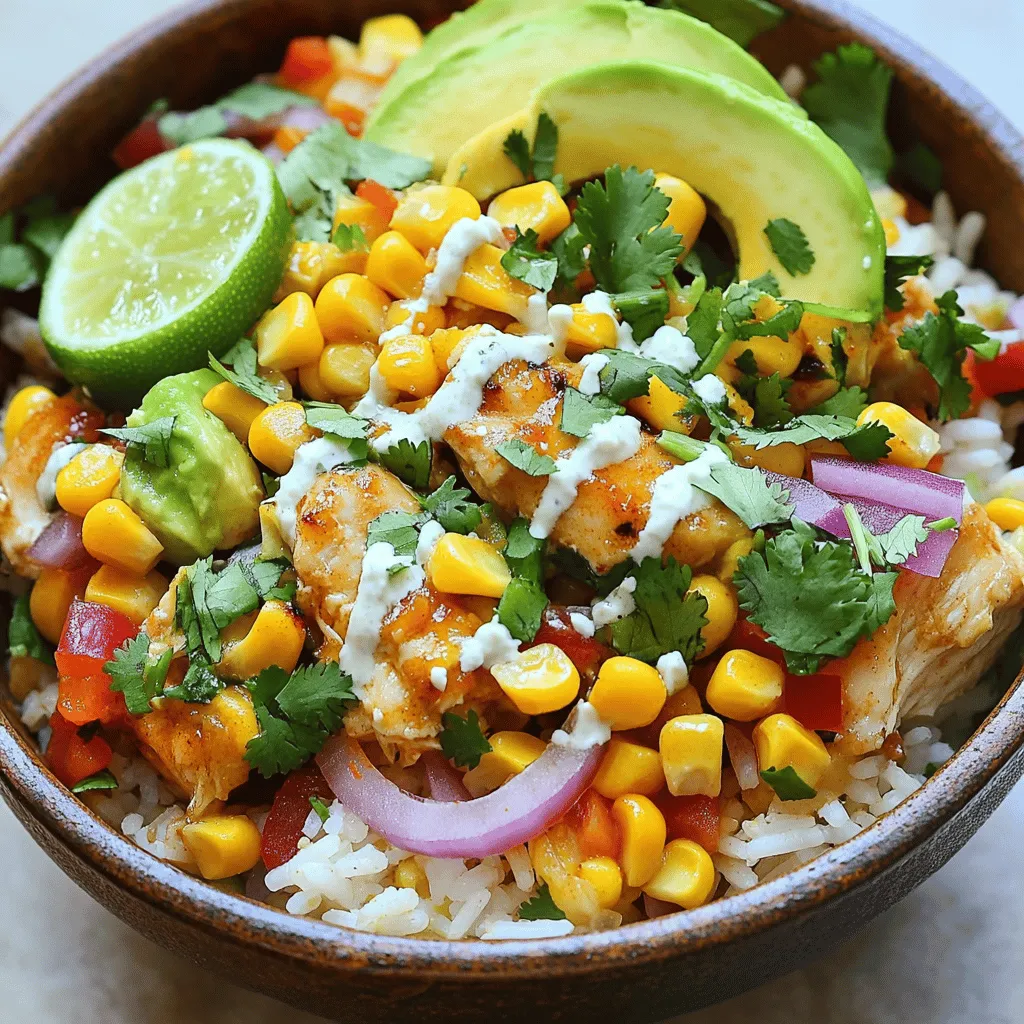
Street Corn Chicken Rice Bowl Simple and Tasty Recipe
If you’re craving a dish that’s both simple and full of flavor, the Street Corn Chicken Rice Bowl is your answer! Packed with juicy chicken,
To make these cheesy potato burritos, gather the following items: - 2 large russet potatoes, peeled and diced - 1 tablespoon olive oil - 1 teaspoon cumin - 1 teaspoon smoked paprika - Salt and pepper to taste - 1 cup shredded cheddar cheese - 1/2 cup sour cream - 4 large flour tortillas - 1 cup black beans, rinsed and drained - 1/2 cup corn kernels (fresh, frozen, or canned) - Optional: diced jalapeños, chopped cilantro for garnish You can switch some ingredients if you need to: - For russet potatoes, use Yukon gold or sweet potatoes. - Swap olive oil for butter or avocado oil if you prefer. - Use any cheese you like instead of cheddar, like Monterey Jack or pepper jack. - Replace black beans with pinto beans or lentils for variety. - If you want a dairy-free option, use a plant-based sour cream. Using good-quality ingredients makes a big difference: - Choose fresh, firm potatoes for the best texture. - Look for high-quality olive oil for better flavor. - Use real cheddar cheese, not pre-shredded for a creamier melt. - Opt for organic black beans and corn for fresher taste and fewer additives. These thoughtful choices will lead to burritos that taste amazing. You can find the full recipe to see how to combine these ingredients for a delicious meal. First, we need to cook the potatoes. Boil a large pot of water. Add the diced russet potatoes and cook for about 10 to 15 minutes. You want them tender. Once done, drain them well and put them back in the pot. Next, add olive oil, cumin, smoked paprika, salt, and pepper. Mash the potatoes gently with a fork. Mix in the cheddar cheese until it melts. This gives the filling a creamy texture. Now, let’s prepare the tortillas. Warm them in a skillet for about 30 seconds on each side. This makes them soft and easy to fold. To get great-tasting potatoes, pick fresh russet potatoes. They have a fluffy texture when cooked. Make sure you cut them into even pieces. This helps them cook evenly. Don't rush the cooking process. Test a piece with a fork. If it goes in easily, they are ready. Remember, a little seasoning goes a long way. Adjust salt and pepper to your taste. Take a warm tortilla and add a generous scoop of the cheesy potato mix in the center. Next, layer on a tablespoon of black beans and corn. If you like heat, add diced jalapeños now. Fold the sides of the tortilla over the filling. Then roll it up tightly from the bottom. Make sure to keep the filling inside. Finally, heat a non-stick skillet over medium heat. Place the burritos seam-side down for about 2 to 3 minutes on each side. You want them golden brown and crispy. Now you have a delicious burrito ready to enjoy! For the full recipe, check the top of this article. When making cheesy potato burritos, keep these tips in mind. First, avoid overcooking the potatoes. They should be soft but not mushy. If they are too soft, they will not hold together well. Second, don’t skimp on seasoning. The cumin and smoked paprika add great flavor. If you forget these, your burritos may taste bland. Lastly, be careful not to overfill the tortillas. If they're too full, they won't roll properly and may spill out. To boost the flavor of your cheesy potato burritos, consider these ideas. Use fresh herbs like cilantro for a bright taste. Add a squeeze of lime juice for zest. If you like heat, add jalapeños or hot sauce. Mix in cooked onions or garlic for depth. You can also try different cheeses like pepper jack for a spicy twist. These tricks will elevate your burritos to a new level. Making cheesy potato burritos ahead of time is easy. You can prepare the filling and store it in the fridge for up to two days. Just remember to cool it before storing. When ready to eat, warm the filling and assemble the burritos. If you want to freeze them, roll the burritos tightly in plastic wrap. They will last for about three months in the freezer. Heat them directly from frozen, cooking a few extra minutes to ensure they are hot all the way through. This way, you can enjoy a tasty meal anytime. For the full recipe, check the earlier section. {{image_2}} You can easily swap ingredients to fit your needs. If you're dairy-free, use vegan cheese and sour cream. For gluten-free options, choose corn tortillas instead of flour. If you want a healthier twist, replace potatoes with sweet potatoes. They add a nice touch of sweetness. You can cook these burritos using several methods. The air fryer makes them crispy and quick. Just set it to 375°F and cook for 10-12 minutes. If you prefer the oven, preheat it to 400°F. Bake the burritos for about 20 minutes until golden. Both methods keep the filling warm and cheesy. Mix up the fillings for fun flavors. You can add cooked ground meat or shredded chicken for protein. If you like veggies, toss in sautéed bell peppers or spinach. For a Tex-Mex flair, try adding pico de gallo or guacamole. The possibilities are endless! These variations let you customize Cheesy Potato Burritos to fit your taste. You can find the full recipe above to get started! To keep your burritos fresh, wrap them tightly in plastic wrap. Place them in an airtight container. Store the burritos in the fridge. They will stay good for up to three days. If you have a lot, you might want to label them. That way, you know when they were made. When you are ready to eat, take a burrito out of the fridge. Unwrap it and place it on a plate. You can reheat it in the microwave for about one to two minutes. If you prefer a crispy outside, use a skillet. Heat the skillet over medium heat and cook for about two to three minutes on each side. This way, your burrito will be warm and crispy. If you want to save burritos for later, freezing is a great option. Wrap each burrito in plastic wrap first. Then, place them in a freezer bag or container. Squeeze out any air before sealing. They can last in the freezer for up to three months. When you are ready to eat, thaw them overnight in the fridge. Then, reheat as mentioned above. This method keeps your cheesy potato burritos tasty and ready for quick meals. For the complete process, refer to the Full Recipe. Cheesy Potato Burritos are warm, soft tortillas filled with creamy, cheesy potatoes. They also include black beans and corn for extra flavor. The spices like cumin and smoked paprika add a nice touch. You can enjoy them as a quick meal or a cozy snack. Yes, you can easily make these burritos vegetarian by omitting the sour cream or using a dairy-free option. For vegan burritos, swap the cheddar cheese for a vegan cheese alternative. You can also use cashew cream in place of sour cream. This way, everyone can enjoy them. I love to serve Cheesy Potato Burritos with a dollop of sour cream on the side. Fresh salsa or guacamole also pairs well. You can sprinkle some chopped cilantro on top for a fresh touch. Serve them warm on a colorful plate to make them look appealing. To add spice, you can include diced jalapeños in the filling. Another option is to add a dash of hot sauce before rolling them up. You can also serve them with spicy salsa or add some red pepper flakes. Adjust the heat to fit your taste. In this blog post, we explored how to make delicious cheesy potato burritos. We covered key ingredients and offered helpful substitutions. You learned step-by-step cooking methods and tips for perfect burritos. I shared common mistakes to avoid and ways to enhance flavor. Finally, we discussed storage options and answered your top questions. Now, you have the tools to create tasty burritos that fit your needs. Enjoy your cooking adventure!
Cheesy Potato Burritos That Deliver Comfort Fast
Looking for a quick, tasty meal that warms your heart? Cheesy potato burritos are the perfect choice! They’re packed with comforting flavors and easy to