Dinner

- 4 boneless, skinless chicken breasts - 4 ounces cream cheese, softened - 1 cup shredded cheddar cheese - 2 jalapeños, finely chopped (seeds removed for less heat) - 1 teaspoon garlic powder - 1 teaspoon smoked paprika - 1 teaspoon onion powder - Salt and pepper to taste The main ingredients create a creamy, spicy filling. The chicken is the star, holding all the flavors inside. Cream cheese gives a rich texture, while cheddar adds sharpness. Jalapeños bring the heat, but you can adjust them to your taste. Garlic powder enhances flavor without overpowering. Smoked paprika adds a nice depth. Salt and pepper round out the mix. - 1 cup breadcrumbs (optional for extra crunch) - Olive oil for grilling If you want a crunch, add breadcrumbs. They make the outside crispy and golden. Olive oil helps with grilling. It prevents sticking and adds flavor. Using these optional ingredients can elevate your dish. Make sure to sprinkle breadcrumbs on top during the last minutes of grilling for that perfect texture. For the full recipe, check out the details above. To start, grab a mixing bowl. This is where the magic happens. Combine the softened cream cheese with the shredded cheddar cheese. You want a smooth mix, so stir well. Next, add the chopped jalapeños. If you like heat, keep some seeds in. If you prefer it milder, remove them. Then, sprinkle in garlic powder, smoked paprika, onion powder, salt, and pepper. Blend everything until it is well mixed. This filling is rich and creamy. Now it’s time for the chicken. Take each chicken breast and place it on a cutting board. With a sharp knife, create a pocket by slicing it horizontally. Be careful not to cut all the way through. You want enough space for the filling. Once you have the pockets, it’s time to stuff them. Use a generous amount of the jalapeño popper filling and pack it inside. If needed, use toothpicks to secure the opening. This keeps all that cheesy goodness from spilling out while grilling. Before grilling, preheat your grill to medium-high heat, around 375°F. This helps the chicken cook evenly. While the grill heats, drizzle some olive oil over the stuffed chicken breasts. This adds flavor and helps with browning. Season the outside with salt, pepper, and a bit more smoked paprika. This step enhances the taste and gives a nice color. Place the stuffed chicken on the grill. Grill for about 6 to 7 minutes on each side. Keep an eye on the time to avoid overcooking. You want the internal temperature to reach 165°F. A meat thermometer is your best friend here. If you added breadcrumbs, sprinkle them on top during the last few minutes. This gives a nice, crispy layer. After grilling, let the chicken rest for about 5 minutes. This helps the juices stay inside. Finally, remove toothpicks and slice to reveal the tasty filling. Enjoy your Jalapeño Popper Grilled Chicken! For the full recipe, check out the details above. To make the best Jalapeño Popper Grilled Chicken, keep the grill at the right heat. Aim for medium-high heat, around 375°F. This helps cook the chicken evenly. If the grill is too hot, the outside cooks too fast, and the inside stays raw. Avoid overcooking by using a meat thermometer. Cook until the internal temperature reaches 165°F. Remove the chicken from the grill as soon as it hits that mark. Let it rest for five minutes to keep it juicy. Marinating the chicken can add even more taste. Try a simple mix of olive oil, lime juice, and garlic. This will add a fresh zing to your dish. Let it marinate for at least 30 minutes before grilling. You can also play with spices. Adding cumin or cayenne pepper can give it a nice kick. Experiment with your favorite flavors to make this dish your own. For sides, consider pairing the chicken with a fresh salad or corn on the cob. Both add a nice crunch and balance the creamy filling. You can also serve it with rice for a hearty meal. When presenting the dish, slice the chicken to show off the cheesy filling. Arrange it on a colorful plate with some fresh herbs. This makes it look as good as it tastes. For the full recipe, visit the recipe link above. {{image_2}} You can change the cheese in this dish to suit your taste. Try using mozzarella or pepper jack cheese. Each choice brings a new flavor. You can also mix cheeses for a fun twist. Adding vegetables can also enhance your dish. Chopped bell peppers or spinach can add color and taste. You might even add spices for extra kick. A sprinkle of chili powder or cumin can bring warmth. You don’t have to grill this chicken if you prefer other methods. You can make an oven-baked version for a more hands-off approach. Preheat your oven to 375°F. Place the stuffed chicken in a baking dish. Bake for about 25-30 minutes or until the chicken is cooked through. Another option is using an air fryer. This method gives you crispy chicken without deep frying. Set your air fryer to 375°F and cook for about 15-20 minutes. Check for doneness with a meat thermometer to ensure it reaches 165°F. These variations help you enjoy Jalapeno Popper Grilled Chicken in many ways. The full recipe offers a great starting point for your culinary adventure! After you enjoy your Jalapeno Popper Grilled Chicken, store any leftovers in the fridge. Place the chicken in an airtight container. This keeps it fresh and prevents odors from mixing. It’s best to eat the leftovers within three days. To cool the chicken fast, let it sit at room temperature for about 30 minutes before putting it in the fridge. To freeze stuffed chicken, let it cool completely first. Wrap each piece tightly in plastic wrap. Then, place them in a freezer bag or container. This helps avoid freezer burn. You can freeze the chicken for up to three months. To reheat frozen chicken, thaw it in the fridge overnight. This keeps it safe. Then, heat it in the oven or on the grill until it reaches 165°F. This ensures it's hot and safe to eat. Enjoy your flavorful meals any day! For the full recipe, check this out. How long to grill chicken? Grill the chicken for about 6-7 minutes on each side. This timing ensures the chicken reaches a safe internal temperature of 165°F. Always check with a meat thermometer for accuracy. Can I make this recipe ahead of time? Yes, you can prepare the filling and stuff the chicken ahead of time. Just store them in the fridge until you are ready to grill. This makes it easy for a quick meal later on. Gluten-free options To make this dish gluten-free, skip the breadcrumbs. The chicken still tastes great without them. You can also use gluten-free breadcrumbs if you want that extra crunch. Dairy-free alternatives You can swap the cream cheese for a dairy-free version made from nuts or soy. For the cheddar, look for plant-based cheese. Both options give you a creamy filling without the dairy. What to do if chicken is dry? If your chicken turns out dry, it may have cooked too long. Next time, reduce the grilling time or use a meat thermometer. You can also brush the chicken with olive oil before grilling to keep it moist. Fixing a messy filling If the filling leaks out during grilling, try using less filling next time. You can also secure the pocket better with toothpicks. If it happens, just scoop the filling back in when serving. It will still taste delicious! For the full recipe, check out the details above. This blog post showed how to create tasty jalapeño popper grilled chicken. We covered the main ingredients and optional extras for crunch, along with step-by-step instructions for preparation and grilling. I shared tips for flavor and serving, plus variations and storage info. With these insights, you can make this dish your own. Enjoy grilling and impressing your friends with a flavorful meal!
Jalapeno Popper Grilled Chicken Flavorful and Easy Meal
Are you ready to spice up your dinner routine? This Jalapeno Popper Grilled Chicken is the perfect blend of juicy chicken, creamy cheese, and a
You need these simple ingredients for this dish: - 1 pound ground beef - 8 ounces shell pasta - 1 medium onion, diced - 2 cloves garlic, minced - 1 cup beef broth - 1 cup heavy cream - 1 cup shredded cheddar cheese - 1 teaspoon Italian seasoning - Salt and pepper to taste - Fresh parsley, chopped (for garnish) You can swap some items if you need to. For ground beef, try ground turkey or chicken. If you want a lighter option, use half-and-half instead of heavy cream. You can also use vegetable broth instead of beef broth for a vegetarian twist. If you do not have cheddar cheese, mozzarella or gouda can work well, too. Finally, fresh herbs like basil or thyme can replace Italian seasoning. Each serving provides about: - Calories: 550 - Protein: 28g - Carbohydrates: 45g - Fat: 30g - Fiber: 2g This meal gives you energy and keeps you full. You can enjoy it guilt-free by knowing it has a good mix of protein and carbs. First, take a large pot and fill it with water. Bring it to a boil. Add a pinch of salt to the water. Once it boils, add the shell pasta. Cook it until it is al dente, which usually takes about 7-9 minutes. Stir the pasta often to keep it from sticking. When it's done, drain the pasta in a colander. Set it aside for later. Now, use the same pot for the beef. Over medium heat, add the ground beef. Break it up with a spatula as it cooks. This should take about 5-7 minutes until it turns brown. Next, add the diced onion and minced garlic to the pot. Cook this mix for another 3-4 minutes. You want the onion to be soft and see-through. The smell will be amazing! Pour in the beef broth and stir. Let it simmer for about 3 minutes. This helps to reduce the broth a little. Lower the heat, then add the heavy cream and Italian seasoning. Mix it until it is smooth. Slowly add the shredded cheddar cheese, stirring until it melts. Season with salt and pepper to taste. Finally, gently fold in the cooked shell pasta. Make sure each shell is covered with the creamy beef sauce. Let it sit for a couple of minutes to thicken. You now have a delicious meal ready to serve! For the full recipe, check out the details above. To make your sauce creamy, use heavy cream. This gives it a rich texture. Stir the cream in after cooking the beef. Add the cheese slowly while mixing. This helps melt it evenly. If the sauce is too thick, add a splash of beef broth. This keeps it smooth and velvety. When cooking ground beef, use medium heat. This prevents the meat from burning. Break the meat into small pieces as it cooks. This helps it brown evenly. Make sure to drain any excess fat after browning. This step keeps your dish from becoming greasy. Serve Creamy Beef and Shells in shallow bowls. Top each bowl with chopped parsley for color. You can add extra cheese on top for a fun twist. Pair this dish with a simple salad or garlic bread. This adds freshness and crunch to your meal. {{image_2}} You can easily make a vegetarian version of this dish. Replace the ground beef with a plant-based option. Crumbled tofu or lentils work well. Use the same cooking steps to keep the flavors rich. You can still enjoy the creamy sauce with your choice of pasta. This version keeps the comfort but adds a healthy twist. Cheese adds a lot to this dish. You can use different kinds for unique flavors. Try mozzarella for a mild taste or pepper jack for a spicy kick. Cream cheese can also create a thicker texture. Mixing cheeses gives you a fun blend. Each choice changes the dish, so feel free to experiment. Adding veggies boosts the nutrition of Creamy Beef and Shells. Spinach, mushrooms, or bell peppers fit nicely. You can sauté these with the onions for added flavor. Try adding a cup of frozen peas at the end for color. This way, you make the dish healthier while keeping it tasty. You can store Creamy Beef and Shells in an airtight container. Make sure it cools down first. Keep it in the fridge for up to three days. Label the container with the date. This helps you remember when you made it. To reheat, place the leftovers in a pot. Add a splash of beef broth or cream to prevent drying. Heat it on medium until warm. Stir often to keep it creamy. You can also use the microwave. Just cover it to keep moisture in. Heat in 30-second bursts, stirring in between. You can freeze Creamy Beef and Shells for up to three months. Use a freezer-safe container or bag. Leave some space at the top, as it may expand. Thaw in the fridge overnight before reheating. This keeps the texture nice when you enjoy it later. You can use milk mixed with butter. For each cup of heavy cream, use 3/4 cup milk and 1/4 cup melted butter. This mix gives a creamy texture. You may also try coconut cream for a dairy-free option. It adds a nice flavor too. You can store Creamy Beef and Shells in the fridge for 3-4 days. Make sure to keep it in an airtight container. This helps keep the flavors fresh. If you want to store it longer, freeze it for up to 3 months. Just thaw it overnight in the fridge before reheating. Yes, you can make this recipe gluten-free. Just swap out the shell pasta for gluten-free pasta. There are many good options made from rice or corn. Be sure to check the labels for gluten-free certification. The rest of the recipe works well with gluten-free ingredients. This blog post covered everything you need for Creamy Beef and Shells. We explored the ingredients, from the complete list to tasty substitutions. You learned how to prepare the shell pasta and cook beef with aromatics. I shared tips for a creamy sauce and easy storage methods for leftovers. In the end, you can enjoy this dish however you like. Whether you want it vegetarian or with extra cheese, the options are endless. Happy cooking!
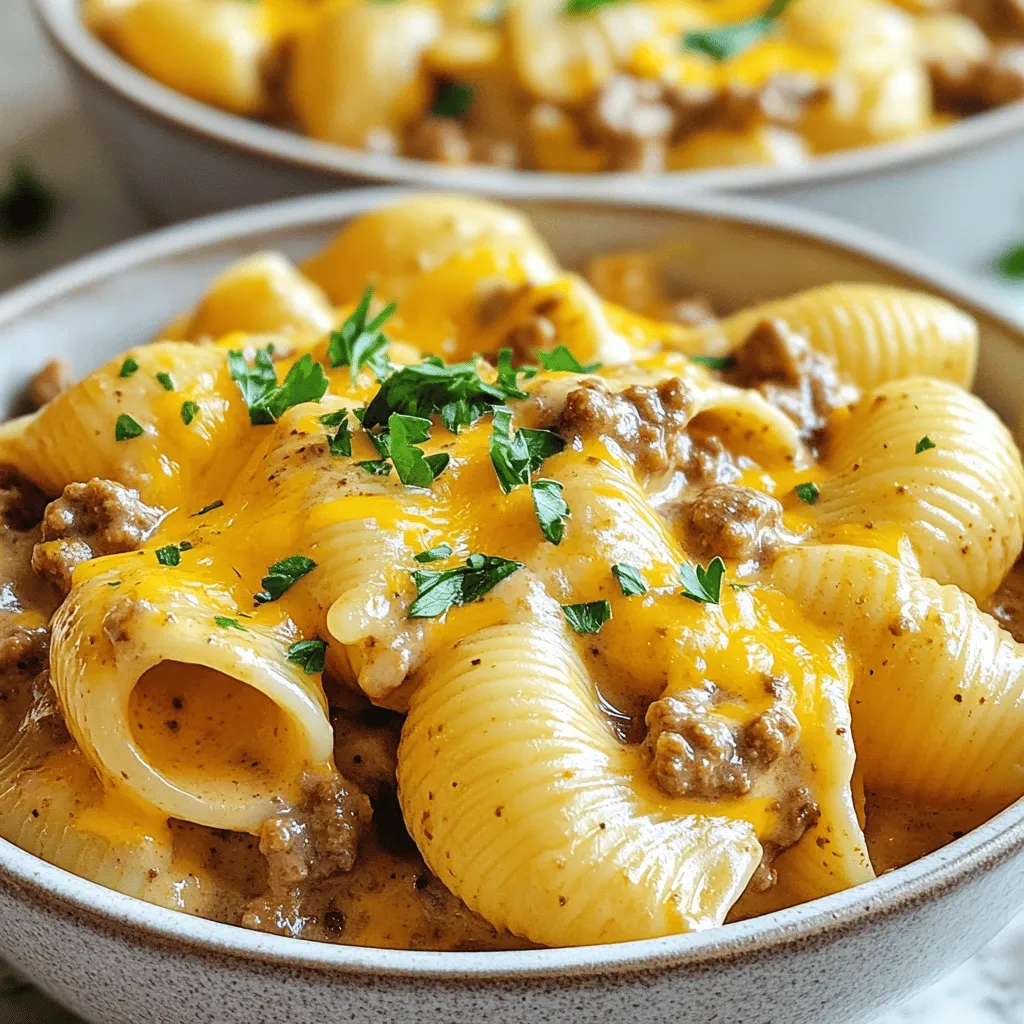
Creamy Beef and Shells Simple Comfort Food Recipe
Are you ready for a cozy meal that warms your soul? This Creamy Beef and Shells recipe is simple and satisfying. With just a few
- 1 cup orzo pasta - 2 boneless, skinless chicken breasts (about 1 pound) - 2 cups low-sodium chicken broth - 1 tablespoon olive oil - 1 medium onion, chopped - 2 cloves garlic, minced - 1 cup cherry tomatoes, halved - 1 cup fresh spinach - 1 teaspoon dried oregano - 1 teaspoon smoked paprika - Salt and pepper to taste - ¼ cup feta cheese, crumbled (optional) - Fresh parsley for garnish When you make High Protein Chicken Orzo, you need fresh and quality ingredients. Start with orzo pasta as your base. This tiny pasta cooks quickly and pairs well with chicken. Next, the chicken breasts provide protein. Choose boneless and skinless for easy cooking. They will turn juicy and tender with the right seasoning. Chicken broth adds flavor and helps the orzo cook perfectly. I use low-sodium broth to control salt levels. For vegetables, you'll want to add color and nutrients. Olive oil helps cook the onion and garlic, building a tasty base. Fresh spinach and cherry tomatoes bring brightness and health benefits. Seasoning is key. Dried oregano and smoked paprika add depth. Don't forget to taste and adjust salt and pepper to your liking. Lastly, if you love cheese, a sprinkle of feta adds creaminess. Fresh parsley as a garnish makes your dish pop. These ingredients come together for a meal that's quick, easy, and full of flavor. For the complete recipe, check out [Full Recipe]. First, bring the chicken broth to a simmer in a medium saucepan. This step adds great flavor to the orzo. Next, add the orzo and cook it based on the package instructions, usually around 8 to 10 minutes. You want it to be al dente. Once done, drain the orzo and set it aside for later. Take the chicken breasts and season them well. Sprinkle salt, pepper, oregano, and smoked paprika on both sides. These spices pack a punch of flavor. Heat a skillet over medium-high heat and add a tablespoon of olive oil. Cook the chicken for about 6 to 7 minutes on each side. You want it to be golden brown and fully cooked. Once done, remove it from the skillet and let it rest for a few minutes before slicing. In the same skillet, lower the heat to medium. Add the chopped onion and sauté it for about 3 to 4 minutes until it is soft and translucent. Then, add minced garlic and sauté for another minute. Next, stir in the halved cherry tomatoes and fresh spinach. Cook everything until the tomatoes soften and the spinach wilts, which takes about 2 to 3 minutes. Now, it’s time to bring everything together. Add the cooked orzo to the skillet with the vegetable mixture. Toss them to mix well. Slice the rested chicken and place it on top of the orzo. If you want, sprinkle some crumbled feta cheese over the dish. This adds a nice creamy touch. Taste the dish and adjust seasoning with salt and pepper if needed. Finish by garnishing with chopped parsley before serving. Enjoy your high protein chicken orzo! You can find the full recipe [here](#). - Ensure chicken is properly seasoned for maximum flavor. Use salt, pepper, oregano, and smoked paprika. - Monitor cooking times to avoid overcooking orzo and chicken. Cook orzo until al dente. Chicken should reach an internal temperature of 165°F. - Experiment with additional spices or herbs. Try basil, thyme, or red pepper flakes for a kick. - Consider marinating chicken beforehand for added flavor. A simple mix of olive oil, lemon, and herbs works great. - Chicken and orzo are high in protein. Chicken offers about 26 grams, while orzo adds another 7 grams per cup. - The dish provides nutritional advantages with included vegetables. Spinach and tomatoes add vitamins A and C, plus fiber. {{image_2}} You can switch chicken for turkey, shrimp, or tofu. Each option offers a new taste. Turkey gives a mild flavor. Shrimp adds a seafood twist, while tofu provides a plant-based choice. You might also try chickpeas or beans for a hearty, plant-based version. These choices keep the dish high in protein and fun. Feel free to mix in seasonal vegetables. Zucchini and bell peppers work great. They add crunch and color. You can also add leafy greens like kale or arugula. These greens boost nutrition and flavor. They make the dish even more vibrant and healthy. Pair your orzo with a fresh side salad or some crusty bread. These sides complement the meal perfectly. You can also make this dish for meal prep. It’s great for family dinners too. Each portion stays tasty in the fridge for a few days. Enjoy your flavorful and quick meal! To keep your High Protein Chicken Orzo fresh, store it in an airtight container. Make sure it cools down to room temperature first. This will help avoid condensation and sogginess. You can safely eat the leftovers within three to four days. If the dish smells off or looks strange, it's best to toss it. If you want to save some for later, freezing works well. Divide the orzo into portions and place them in freezer-safe bags. Remove as much air as possible before sealing. This helps to prevent freezer burn. The dish can last up to three months in the freezer. When you're ready to eat, thaw it in the fridge overnight for best results. Reheating requires care to keep the texture nice. For best results, use the stovetop. Heat it gently in a pan over low heat, adding a splash of broth or water to moisten. If you prefer to use a microwave, cover it loosely and heat in short bursts, stirring in between. This helps heat evenly without drying it out. It takes about 30 minutes to make High Protein Chicken Orzo. You will need 10 minutes to prep and about 20 minutes to cook. This quick meal is great for busy days. Yes, you can make this dish ahead of time. Store it in an airtight container in the fridge. It stays fresh for up to three days. When you are ready to eat, simply reheat it in the microwave or on the stove. Absolutely! High Protein Chicken Orzo is perfect for meal prepping. You can portion it into individual containers. This way, you have easy lunches or dinners ready for the week. Just remember to cool the dish before storing. You can serve this dish with a side salad, steamed veggies, or garlic bread. A light white wine or sparkling water pairs well too. Feel free to explore different sides to make your meal even better. This blog post covered making a tasty High Protein Chicken Orzo. You learned about key ingredients, from orzo to vegetables. Each step showed how to cook and combine everything perfectly. We discussed tips to enhance flavor and suggested healthy variations. Storing tips help keep your dish fresh for later meals. Enjoying this recipe can be easy and fun. Try it with friends or family for a tasty meal! Cooking can bring joy, and I hope you feel inspired.
High Protein Chicken Orzo Flavorful and Quick Meal
Looking for a quick and tasty meal? My High Protein Chicken Orzo is here to save your dinner plans. With tender chicken, nutritious orzo, and
To make these tasty short ribs, gather these key ingredients: - 3 lbs beef short ribs, trimmed - 2 tablespoons olive oil - 1 large onion, chopped - 4 cloves garlic, minced - 2 cups beef broth - 1 cup low-sodium soy sauce - 2 tablespoons brown sugar - 2 tablespoons apple cider vinegar - 1 teaspoon ground ginger - 1 teaspoon black pepper - 1 teaspoon smoked paprika - 2 carrots, sliced - 2 stalks celery, chopped - Fresh parsley for garnish These ingredients work together to create a rich flavor. The beef short ribs are the star, giving you that melt-in-your-mouth taste. You can add some optional ingredients for even more flavor. Try: - 1 teaspoon chili flakes for some heat - 1 bay leaf for depth - 1 tablespoon Worcestershire sauce for richness These extras can bring out new flavors. Feel free to mix and match based on your taste. Seasoning is key to great ribs. I recommend these spices: - Salt - Black pepper - Smoked paprika - Ground ginger These seasonings add layers of taste to your dish. They help to make the short ribs even more delicious. If you like more spice, feel free to add your favorites. For the full recipe, check the details above. Enjoy cooking! Start by heating olive oil in a large skillet over medium-high heat. While the oil warms, pat the beef short ribs dry. This helps them sear better. Season the ribs with salt and black pepper. Add the ribs to the skillet and sear them for 3-4 minutes on each side. You want a nice brown crust. Once browned, take the ribs out and set them aside. In the same skillet, add the chopped onion. Sauté until it turns translucent, about 5 minutes. Then, add the minced garlic. Cook for one more minute until you smell the garlic. This step builds flavor for the dish. In a bowl, mix together the beef broth, low-sodium soy sauce, brown sugar, apple cider vinegar, ground ginger, and smoked paprika. Stir until the brown sugar dissolves completely. This sauce will add depth to the ribs. Now, take your crockpot and layer the seared ribs at the bottom. On top of the ribs, add the sautéed onion and garlic mix. Next, place the sliced carrots and chopped celery over everything. Finally, pour the sauce mixture all over the ingredients in your crockpot. Cover the crockpot and set it to cook. If you choose low heat, let it cook for 8 hours. If you prefer high heat, it will take about 4 hours. The ribs are done when they are tender and pull apart easily. When the cooking time is up, carefully take the ribs out of the crockpot. Place them on a serving platter. If you want, skim off excess fat from the sauce. Spoon the sauce over the ribs for added flavor. Finish by sprinkling fresh parsley on top. Serve with mashed potatoes or crusty bread. Enjoy your meal! You can find the full recipe in the section above. To get super tender ribs, cook them low and slow. The low heat breaks down the tough collagen in the meat. This makes it fall-off-the-bone tender. Using a crockpot helps with this. Set it to low and let the magic happen for about eight hours. When time is up, the meat should easily pull apart with a fork. Check for tenderness before serving, as every cut can vary. Marinades add depth to your ribs. A simple mix of soy sauce, brown sugar, and apple cider vinegar works well. Let the meat soak for a few hours or overnight if you have time. This gives the meat more flavor. You can also add spices like ground ginger for a kick. If you want to get fancy, try adding some fresh herbs to your marinade for extra aroma. If you're short on time, here are some tips. Prep the night before by seasoning and searing the ribs. After that, store them in the fridge overnight. In the morning, just layer everything in the crockpot and turn it on. You can also chop the veggies ahead of time. This way, you can have a hearty meal waiting for you when you get home. For the full recipe, check out the details in this article. {{image_2}} You can cook beef short ribs in many ways. If you want a faster option, try the oven. Preheat it to 300°F. Sear the ribs as usual, then place them in a Dutch oven. Add your sauce and cover. Cook for about 2.5 to 3 hours. This method gives you tender, juicy ribs too. Another option is using an Instant Pot. Sear the ribs first, then add the sauce and pressure cook for 45 minutes. This speeds up the cooking while keeping flavors rich. You can easily change the flavor profile of your dish. If you love heat, add some chili flakes or sriracha to the sauce. For a sweeter taste, try adding more brown sugar or honey. If you're a fan of herbs, sprinkle some rosemary or thyme into the mix. You can even swap soy sauce for teriyaki sauce to give a different twist. Experimenting makes cooking fun and personal. Beef short ribs pair well with many sides. Mashed potatoes are always a hit. They soak up the sauce beautifully. Another great option is creamy polenta; it adds a nice texture. Roasted vegetables, like carrots or Brussels sprouts, add color and nutrition. For a lighter option, serve a fresh salad with a tangy vinaigrette. These sides complement the rich flavors of the ribs, making for a balanced meal. For the full recipe, check out Super Tender Crockpot Beef Short Ribs. To store your beef short ribs, let them cool first. Place the ribs in an airtight container. Make sure to add some of the sauce for moisture. You can keep them in the fridge for up to three days. If you want to enjoy them later, freezing is a great option. For freezing, pack the ribs and sauce in a freezer-safe container. Leave some space at the top, as the sauce may expand. Label the container with the date. You can freeze them for up to three months. When ready to eat, thaw in the fridge overnight before reheating. To reheat the ribs, place them in a pot on low heat. Add a splash of beef broth or water to keep them moist. Cover and heat slowly until warmed through. You can also use the microwave, but do it in short bursts to avoid drying them out. Enjoy your tender, flavorful ribs just as they were made! The best cut for short ribs is the beef short rib itself. This cut comes from the chuck section of the cow. It has a good amount of fat and connective tissue. This makes the meat tender and full of flavor when cooked low and slow. Yes, you can cook the ribs on high heat. However, cooking on low heat is better for tenderness. Cooking on low for 8 hours allows the fat to break down. This makes the ribs soft and juicy. If you are short on time, cook them on high for about 4 hours. Beef short ribs are done when they are tender and easily pull apart with a fork. You can also check the internal temperature. It should reach about 190°F to 205°F. This is the range where collagen breaks down and makes the meat tender. Several side dishes pair well with beef short ribs. Here are a few favorites: - Mashed potatoes - Crusty French bread - Roasted vegetables - Creamy polenta - Coleslaw These sides help soak up the delicious sauce and balance the rich flavors. Absolutely! You can make this recipe ahead of time. Cook the short ribs, then let them cool. Store them in the fridge for up to 3 days. You can also freeze them for up to 3 months. Reheat them gently on the stove or in the crockpot for the best results. For the full recipe, check the main article. In this post, we explored the best ingredients for making tender crockpot beef short ribs. We discussed key steps, tips for great results, and possible variations to suit your taste. Remember, every part counts, from searing the ribs to balancing flavors. Use marinades and cooking hints to enhance your dish. With these tips, you can impress anyone with your cooking. Enjoy this meal with your favorite sides for a complete experience. Happy cooking, and may your beef short ribs always be tender and delicious!
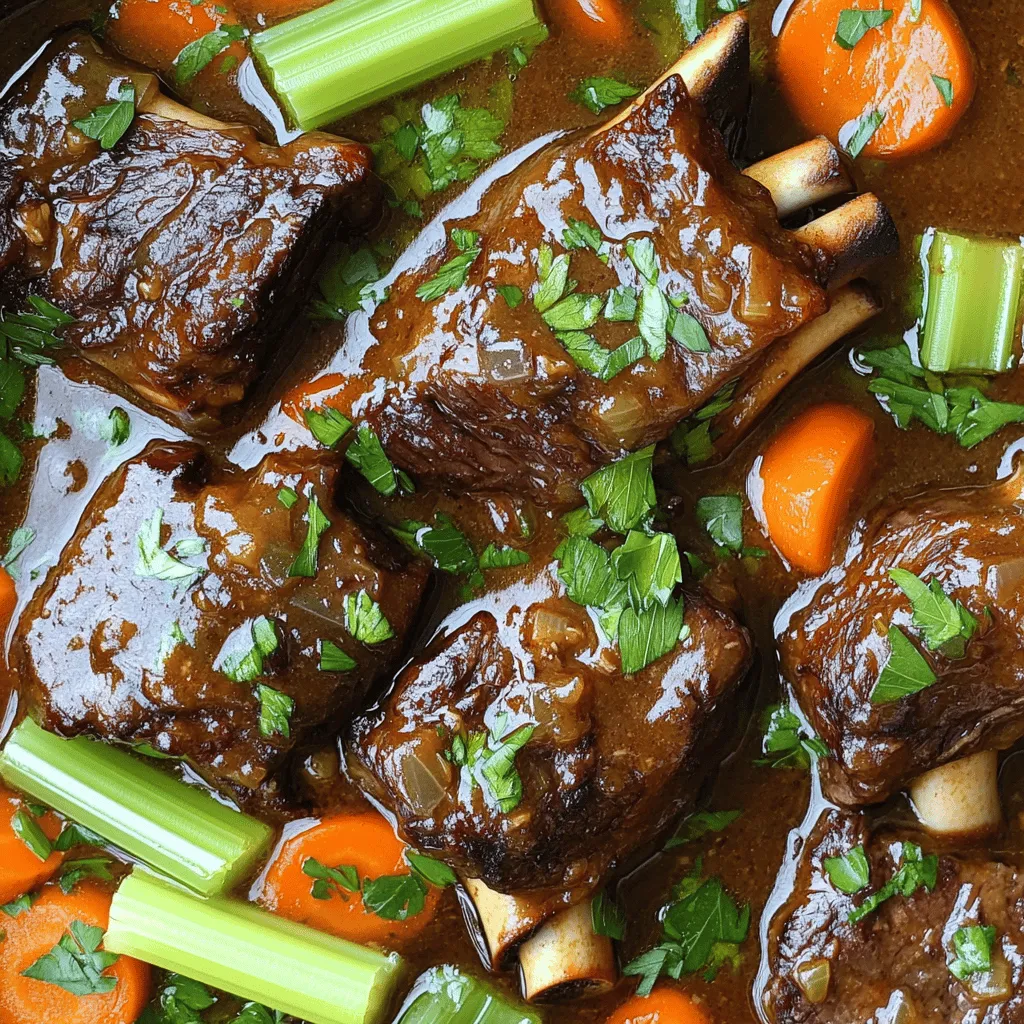
Super Tender Crockpot Beef Short Ribs Recipe Now
Are you ready to treat yourself to a meal that’s both easy to make and incredibly delicious? My Super Tender Crockpot Beef Short Ribs recipe
For these tasty fish taco bowls, you need a few key ingredients: - 1 lb white fish fillets (like cod or tilapia) - 2 tablespoons olive oil - 1 teaspoon chili powder - 1 teaspoon cumin - 1 teaspoon garlic powder - 1 teaspoon onion powder - Salt and pepper to taste - 1 medium avocado, diced - 1 cup shredded cabbage (green or purple, or both) - 1/2 cup cherry tomatoes, halved - 1/4 cup fresh cilantro, chopped - 2 tablespoons lime juice - 1/2 cup crema or Greek yogurt (for serving) These ingredients work together to create a fresh and flavorful meal. The fish brings protein and healthy fats. Cabbage adds crunch, while avocado adds creaminess. Lime juice brightens the dish, making every bite refreshing. To kick up the flavor, you can add: - Sliced jalapeños for heat - Extra lime wedges for more zing - A sprinkle of queso fresco for creaminess - Sliced radishes for extra crunch These optional ingredients allow you to customize your bowls. Add more heat or creaminess based on your taste. Play with flavors to make your bowl unique. These low carb fish taco bowls are not only delicious but healthy too. Each serving has about: - Calories: 350 - Protein: 30g - Carbohydrates: 15g - Fats: 20g This meal is light but filling. It fits well into low-carb diets while providing nutrients. You can enjoy a great meal without guilt. Remember, you can find the full recipe in the section above. Start by heating your grill or skillet to medium. Take one pound of white fish fillets, like cod or tilapia. Drizzle two tablespoons of olive oil over the fish. This helps the spices stick. Season both sides with one teaspoon of chili powder, cumin, garlic powder, onion powder, salt, and pepper. Mix these spices well. Now, place the fillets on the hot grill or skillet. Cook for about three to four minutes on each side. You want the fish to be opaque and flaky. When it’s done, remove it from heat. Let it rest for a minute. After that, break it into chunks. While the fish cooks, prepare the bowl base. In a large bowl, mix one cup of shredded cabbage, one diced avocado, and half a cup of halved cherry tomatoes. Add a quarter cup of chopped cilantro. Drizzle two tablespoons of lime juice over this mixture. Toss gently to combine. Now, it's time to build your taco bowl. Divide the cabbage mixture into serving bowls. Top each bowl with the chunks of grilled fish. For a rich finish, add a dollop of crema or Greek yogurt on top. If you like heat, sprinkle sliced jalapeños as well. Enjoy your low carb fish taco bowls right away! For a complete guide, check the Full Recipe. To make your low carb fish taco bowls shine, focus on seasoning. Use fresh lime juice to brighten flavors. Don’t skip the chili powder and cumin—they add depth. For a burst of flavor, add fresh herbs like cilantro. You could also mix in diced jalapeños for heat. Feel free to play with toppings, like avocado and cherry tomatoes. One common mistake is overcooking the fish. Cook until the fish is opaque and flakes easily. Also, don’t forget to season both sides of the fillets. Skipping this step can leave your dish bland. Lastly, avoid soggy veggies; use fresh cabbage and serve immediately. This keeps everything crisp and vibrant. I recommend using a good non-stick skillet or a grill. This keeps the fish from sticking and makes flipping easy. A sharp knife helps with dicing veggies and herbs. Use a large bowl for mixing the cabbage and other toppings. A fish spatula is perfect for handling delicate fish fillets without falling apart. For more detailed steps, check the full recipe. {{image_2}} If you want a vegetarian option, try using grilled zucchini or portobello mushrooms. Both add great texture and flavor. You can also use chickpeas for a protein boost. Just season them with the same spices. Toss them in olive oil and roast for a crispy finish. You won't miss the fish at all. While I love cod and tilapia, you can try other fish too. Salmon gives a rich taste. Mahi-mahi offers a firm texture that holds up well. You might also enjoy shrimp for a fun twist. Just adjust the cooking time based on the fish you choose. Toppings can change your taco bowl game. Try adding pickled red onions for tang. Fresh mango salsa adds sweetness and color. You can also use radishes for crunch. Serve with cauliflower rice or a side salad for extra veggies. Don't forget a squeeze of lime for that burst of freshness. For the full recipe, check out the Low Carb Fish Taco Bowls section. Store any leftover fish taco bowls in an airtight container. Keep them in the fridge. They stay fresh for about two days. Make sure to separate the fish from the veggies. This helps keep the cabbage crunchy. When you're ready to eat, reheat the fish gently. Use a skillet over low heat. You can also microwave it for about 30 seconds. Add a splash of water to help steam it. This keeps the fish moist. Avoid reheating too long, or it will dry out. You can freeze the fish if you have extra. Place it in a freezer-safe bag. Make sure to remove as much air as possible. It can last up to three months. However, I do not recommend freezing the veggies. They won't taste fresh after thawing. When you're ready to eat, thaw the fish overnight in the fridge. This keeps it safe and flavorful. For the best taste, enjoy your low carb fish taco bowls fresh. For the full recipe, see above! The best fish for low carb taco bowls includes cod and tilapia. Both fish are mild and flaky. They soak up spices well and grill nicely. You can also use halibut or mahi-mahi for a different taste. These options keep your meal light and flavorful. Yes, you can make parts of this recipe ahead of time. Cook the fish and store it in the fridge for up to two days. Prepare the cabbage mix and toppings earlier too. Just keep them separate until you are ready to serve. This way, you save time on busy days. Great low-carb toppings for your fish taco bowls include: - Sliced avocado - Shredded cabbage - Cherry tomatoes - Fresh cilantro - Lime wedges - Jalapeños for some spice These toppings add color and flavor. They also help keep your meal healthy and low in carbs. For a creamy touch, try crema or Greek yogurt. You can find the full recipe [here](#). In this article, we covered key ingredients for low-carb fish taco bowls and how to make them. You learned how to prepare fish, cook it well, and assemble your bowl. I shared tips to enhance flavor and avoid common mistakes. You also found variations for vegetarian options, different fish choices, and various toppings. Lastly, we discussed how to store and reheat your leftovers. Low-carb fish taco bowls are tasty and easy to make. Enjoy your cooking!
Low Carb Fish Taco Bowls Flavorful and Quick Meal
Looking for a quick, tasty meal that won’t ruin your diet? My Low Carb Fish Taco Bowls are just what you need! Packed with flavor
- 2 chicken sausages, sliced into rounds - 1 cup bell peppers (red, yellow, green), cut into strips - 1 cup zucchini, sliced into half-moons - 1 small red onion, cut into wedges - 2 tablespoons olive oil - 1 teaspoon garlic powder - 1 teaspoon Italian seasoning - Salt and pepper to taste - Fresh parsley, chopped (for garnish) When making this dish, choose fresh ingredients. Fresh vegetables add color and flavor. Look for vibrant bell peppers and firm zucchini. This makes your meal more appealing. You can swap chicken sausage for turkey or veggie sausage. These options work well too. For veggies, feel free to mix it up. Use broccoli, asparagus, or carrots based on your taste. To pick fresh vegetables, look for bright colors and no spots. For chicken sausages, choose ones with simple ingredients. Avoid those with too many additives. They taste better and are often healthier. How to preheat the air fryer To start, set your air fryer to 400°F (200°C). Let it preheat for about 3 minutes. This step is key to getting your chicken sausage and veggies crispy. Preparing the vegetables and sausages Next, slice the two chicken sausages into rounds. Grab a large bowl and add the sausage. Then, cut your bell peppers into strips. Toss in 1 cup of bell peppers, 1 cup of zucchini sliced into half-moons, and 1 small red onion cut into wedges. Now, drizzle 2 tablespoons of olive oil over the mixture. Sprinkle in 1 teaspoon of garlic powder, 1 teaspoon of Italian seasoning, and add salt and pepper to taste. Mix everything well so the sausages and veggies get coated evenly. Layering the mixture in the air fryer basket Take the seasoned mixture and place it in the air fryer basket. Make sure you layer it in a single layer. This helps everything cook evenly and crisp up nicely. Ideal cooking time and temperature Cook your mixture at 400°F (200°C) for about 8 to 10 minutes. Shake the basket halfway through. This ensures all sides of the sausage and veggies get that lovely crispiness. Checking for doneness When the time is up, check that the sausages are heated through. The veggies should be tender and slightly charred. This means they are ready to enjoy. Garnishing tips with fresh parsley Remove the basket from the air fryer. Before serving, chop some fresh parsley and sprinkle it on top. This adds a nice touch and fresh flavor to your dish. For the full recipe, you can refer to the [Full Recipe]. - Air fryer placement tips: Place the air fryer on a flat, stable surface. Ensure there’s space around it for airflow. Avoid overcrowding the basket to allow heat to circulate. This will help your sausage and veggies get that desired crunch. - How to prevent sticking: Use a light spray of oil on the basket. This keeps your food from sticking. Tossing the veggies and sausage in olive oil before cooking also adds flavor and helps achieve that crispy texture. - Adding spices for a flavor boost: Enhance your dish with spices like paprika, cumin, or chili powder. A pinch of cayenne can add heat. Always taste as you go, adjusting to your preference. - Homemade seasoning blends: Mix your own seasoning blend. Combine dried herbs like oregano, thyme, and rosemary. This adds depth and makes your dish unique. A little creativity goes a long way in flavor. - Scaling the recipe for batch cooking: You can double or triple the recipe easily. Just make sure to cook in batches. This way, everything cooks evenly and stays crispy. - Reheating tips for leftovers: To reheat, pop the leftovers back in the air fryer. Set it to 350°F (175°C) for about 5 minutes. This restores the crispy texture without making the food soggy. {{image_2}} You can switch up the protein in this dish. Using turkey sausage is a great choice. Turkey sausage is leaner and still tasty. It cooks in about the same time as chicken sausage. If you want a plant-based twist, try vegetarian sausages. They come in many flavors. They add a nice texture and taste, too. Another option is to use tofu or tempeh. - Tofu: Press it first to remove water. Then cut it into cubes. Toss it with the veggies and seasonings. - Tempeh: This protein has a nutty flavor. Slice it and season it like the sausages. The veggies you choose can change the dish’s flavor. Seasonal vegetables work best. In the summer, use fresh corn or cherry tomatoes. In the fall, try squash or Brussels sprouts. You can also use frozen veggies. They are quick and easy to prepare. Just make sure to thaw them first. This helps them cook evenly. - Broccoli, green beans, or carrots are great frozen options. - Mix and match your favorites for a colorful plate. This dish pairs well with many sides. A simple green salad adds freshness. You could also serve it with rice or quinoa for a filling meal. For drinks, a light white wine complements the flavors well. If you prefer non-alcoholic options, try sparkling water with a slice of lemon. Don’t forget to check the Full Recipe for more tips! Store your leftovers in an airtight container. This keeps the chicken sausage and veggies fresh. Place them in the fridge within two hours after cooking. They can stay good for up to three days. If you want to keep them longer, consider freezing them. Portion the dish into freezer-safe bags. Press out as much air as possible before sealing. This helps prevent freezer burn. To reheat, using the air fryer works best. Set it to 350°F (175°C) for about five minutes. This method helps keep the food crispy. Microwaving is also an option, but it may make the veggies soggy. If you want to use the oven, preheat it to 350°F (175°C). Bake for about 10-15 minutes until heated through. The dish lasts about three days in the fridge. If frozen, it can last up to three months. Always check for spoilage before eating. Signs include an off smell or changes in color. If you see mold, discard it right away. Enjoy your meal with peace of mind by storing it properly! For the full recipe, check out the link. You can cook chicken sausages in an air fryer for about 8 to 10 minutes. This timing works well at 400°F (200°C). Make sure to check if they are heated through. The sausages should be firm and golden. Yes, you can use other types of sausages. For pork or beef sausages, you may need 10 to 12 minutes. Cook them at the same temperature, 400°F (200°C). Always check for doneness, as times may vary based on the sausage type. Many vegetables work great in an air fryer. I recommend these: - Bell peppers - Zucchini - Red onion - Broccoli - Carrots - Asparagus These veggies cook quickly and get nice and crispy. You can mix and match based on your taste. Always cut them into even pieces for best cooking. For the full recipe, check out the details above. In this blog post, we explored making a delicious air fryer dish with chicken sausages and fresh veggies. We covered ingredient lists, substitutions, and tips for freshness. The step-by-step instructions make cooking easy, while our tips help you achieve crispy results. Lastly, we discussed variations, storage tips, and answered common questions. Remember, you can mix and match ingredients to suit your taste. Enjoy your cooking adventure, and have fun experimenting!
10 Minute Air Fryer Chicken Sausage and Veggies Delight
Craving a quick, delicious meal? Look no further! In just 10 minutes, you can whip up a mouthwatering dish of air fryer chicken sausage and
- 1 lb sirloin steak, cut into bite-sized cubes - 1 lb baby potatoes, halved - 4 tablespoons unsalted butter - 4 cloves garlic, minced - 2 tablespoons fresh rosemary, chopped (or 1 tablespoon dried) - 1 teaspoon paprika - Salt and pepper to taste - 2 tablespoons olive oil - Fresh parsley, chopped (for garnish) The key to a great Garlic Butter Steak and Potatoes Skillet lies in using fresh, high-quality ingredients. The sirloin steak gives a rich flavor and tender texture. Baby potatoes add a nice bite and creamy taste when cooked. Unsalted butter enhances the dish with its rich, buttery goodness, while garlic infuses the meal with a savory aroma. Using fresh rosemary brightens the flavors and adds a hint of earthiness. Paprika gives a mild, smoky kick that complements the steak perfectly. Salt and pepper are essential for enhancing all the flavors in the dish. The olive oil helps in searing the steak and cooking the potatoes evenly. To finish, fresh parsley adds a pop of color and freshness. The combination of these ingredients brings this dish to life. You can find the Full Recipe for detailed cooking steps and tips to make this dish shine. Start by halving your baby potatoes. This helps them cook evenly. Heat 1 tablespoon of olive oil in a large skillet over medium heat. Add the halved potatoes and season them with salt and pepper. Cook for about 10 to 12 minutes. Stir them every few minutes. You want them to turn golden brown and fork-tender. Once done, take them out of the skillet and set them aside. Next, let’s cook the steak. In the same skillet, add another tablespoon of olive oil and heat it to medium-high. Toss in your cubed sirloin steak. Season it with salt, pepper, and paprika. Sear the steak for about 4 to 5 minutes. Flip it occasionally for even cooking. Cook it until it reaches your desired doneness. Once cooked, remove the steak from the skillet and set it aside. Now, it’s time for the garlic butter sauce. Lower the heat back to medium and add the butter to the skillet. Once it melts, add in the minced garlic and chopped rosemary. Stir constantly for about 1 to 2 minutes. Watch the garlic closely; you don’t want it to burn. You’re aiming for a fragrant, buttery mixture that coats your steak and potatoes nicely. Finally, let’s combine everything. Return the cooked potatoes and steak to the skillet. Toss them in the garlic butter sauce. Make sure every piece is well coated. Cook everything together for an additional 2 to 3 minutes. This helps the flavors mix beautifully. Serve it hot, and don’t forget to add fresh parsley on top for a pop of color. Enjoy your Garlic Butter Steak and Potatoes Skillet! For the complete steps, check the Full Recipe. To cook your steak just right, timing matters. For a 1-inch thick steak, aim for: - Medium-rare: About 4-5 minutes per side. - Medium: About 5-6 minutes per side. - Well-done: About 7-8 minutes per side. After cooking, let your steak rest for 5 minutes. This allows the juices to settle. A rested steak stays juicy and tasty. If you can't find baby potatoes, try these options: - Regular potatoes: Cut them into smaller pieces. - Sweet potatoes: They add a nice sweetness. To ensure even cooking, cut your potatoes into similar sizes. This helps them cook at the same rate. Stir them often for a golden finish. Add more depth to your dish with herbs or spices. Try: - Thyme: It pairs well with steak. - Oregano: Gives a nice earthy flavor. For garnishes, fresh parsley brightens your dish. You can also serve with a side salad or crusty bread for a complete meal. For the full recipe, check out the detailed instructions. {{image_2}} You can swap the sirloin steak for chicken or shrimp. This change offers new tastes and textures. For chicken, use breast or thighs. Cut them into bite-sized pieces. Cook them until they reach an internal temperature of 165°F. For shrimp, use large, peeled shrimp. They need only about 2-3 minutes to cook. Adjust your cooking time to keep the proteins juicy and tender. You can use the oven instead of the skillet. Oven-baking gives a different flavor and texture. Preheat your oven to 400°F. Spread the potatoes on a baking sheet. Toss them with olive oil, salt, and pepper. Bake for about 25-30 minutes until golden. For the steak, you can also grill it. Grilling adds a smoky taste. If you want to grill the potatoes, try par-cooking them first. This way, they get soft inside and crispy outside. You can add seasonal vegetables for freshness. In spring, try asparagus or green beans. In fall, use squash or Brussels sprouts. Just chop them into similar sizes as the potatoes. Roast or sauté them until tender. For holiday meals, add festive spices. Consider using sage or thyme to match the season. These changes will make your dish feel special for any occasion. For the full recipe, check the detailed steps above to create your perfect meal. To store your Garlic Butter Steak and Potatoes Skillet, first let it cool. Transfer it to an airtight container. This keeps it fresh for up to three days. I find that the flavors develop even more when stored overnight. When you want to reheat it, use a skillet. Heat it over medium heat. Add a bit of water or broth to keep it moist. Stir occasionally until warm. If you want to freeze this dish, first let it cool completely. Place it in a freezer-safe container. It will last for up to three months. For the best taste, freeze it without the garnish. When you are ready to eat, thaw it overnight in the fridge. Reheat in a skillet over low heat. Add a splash of water or broth to help it reheat evenly. This way, you keep the flavors nice and fresh. Using frozen potatoes is fine, but fresh ones are better. Frozen potatoes can lose some texture during cooking. They may also take longer to cook. If you use frozen potatoes, make sure to thaw them first. This helps them cook evenly and keeps them from being mushy. Rosemary adds a great flavor, but you can use other herbs. Thyme or oregano works well in this dish. If you want a stronger flavor, try fresh sage. Each herb brings its own twist to the dish. You can test the steak with a meat thermometer. For medium-rare, aim for 130°F to 135°F. Press the steak with your finger; it should feel firm but have some give. If you're unsure, cut into the steak to check the color inside. This dish pairs well with a simple salad or steamed veggies. Roasted asparagus or green beans add great color and flavor. You can also serve it with crusty bread to soak up the garlic butter. You can find the Full Recipe on our website. It has all the steps you need to make this tasty meal. In this post, we explored a simple and tasty recipe for garlic butter steak and potatoes. I shared the key ingredients, step-by-step instructions, and cooking tips to make your meal perfect. Remember, resting your steak is vital for great flavor. Feel free to adapt the recipe with different proteins or seasonal veggies. Finally, proper storage ensures your leftovers stay fresh and delicious. Cooking can be easy and fun, so get started and enjoy your meal!
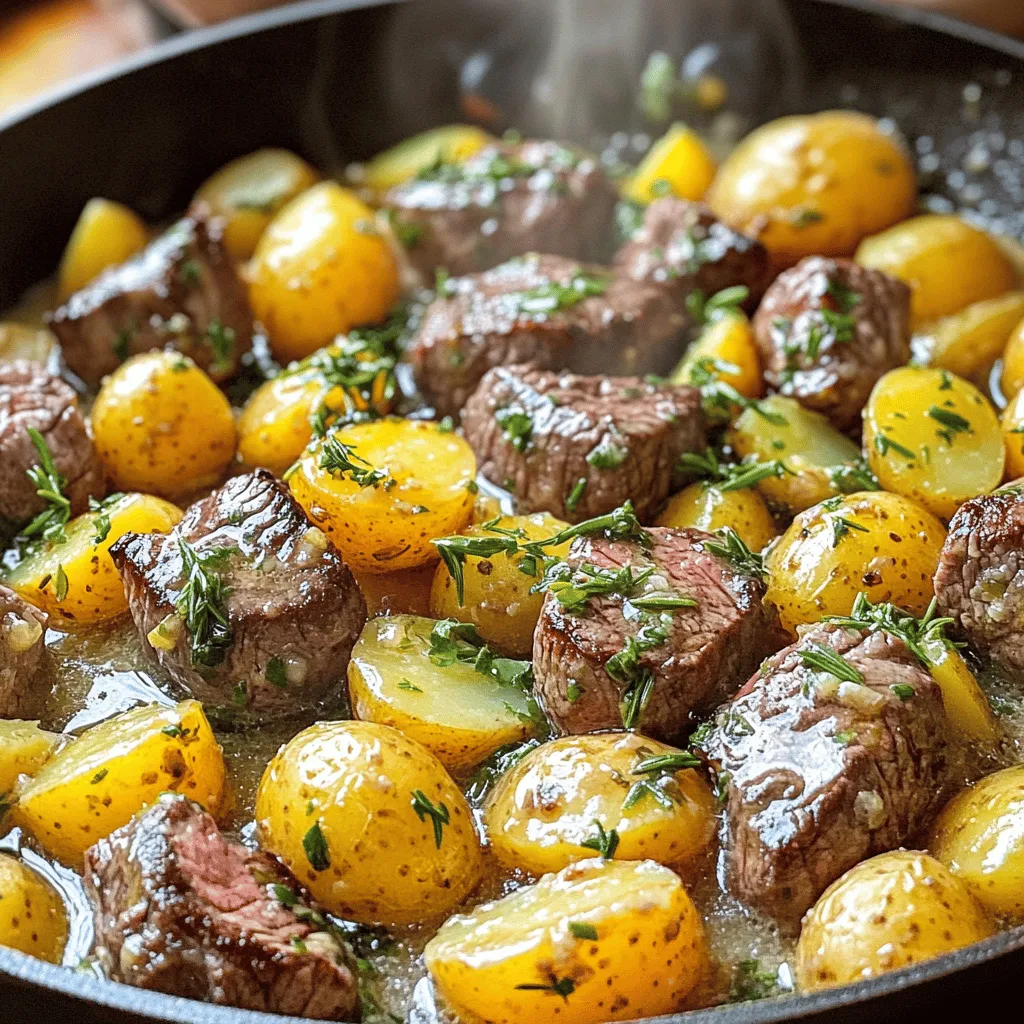
Garlic Butter Steak and Potatoes Skillet Delight
Ready to savor a dish that’s both simple and delicious? In this article, I’ll show you how to make Garlic Butter Steak and Potatoes Skillet
For this creamy Parmesan spinach mushroom pasta, you need a few key items. Here’s what to gather: - 8 oz fettuccine or spaghetti - 2 tablespoons olive oil - 1 small onion, finely diced - 2 cloves garlic, minced - 8 oz mushrooms, sliced (cremini or button) - 4 cups fresh spinach These ingredients create a base full of flavor and texture. The pasta is the heart of the dish. The olive oil, onion, garlic, mushrooms, and spinach bring depth to each bite. Next, let’s talk about the creamy goodness: - 1 cup heavy cream - 1 cup grated Parmesan cheese Heavy cream offers richness, while the Parmesan adds a salty, nutty flavor. Together, they create a luscious sauce that clings to the pasta. Don’t forget to season and add a pop of color: - Salt and pepper to taste - 1 teaspoon Italian seasoning - Fresh parsley, chopped, for garnish These seasonings elevate the dish. The salt and pepper enhance flavors, while Italian seasoning adds warmth. Fresh parsley brings brightness and a lovely finish. For the complete recipe, check out the Full Recipe section. 1. Bringing water to a boil: Start by filling a large pot with water. Make sure to add a good amount of salt. This salt helps flavor the pasta. Place the pot on high heat and wait for it to boil. 2. Cooking pasta to al dente: Once boiling, add your fettuccine or spaghetti. Cook it according to the package instructions. You want it to be al dente, which means it should be firm but cooked through. When done, reserve 1/2 cup of the pasta water, then drain the pasta and set it aside. 1. Heating olive oil: Grab a large skillet and place it on medium heat. Pour in the olive oil and let it warm up. 2. Cooking onion, garlic, and mushrooms: Add the diced onion to the skillet. Sauté it for about 3 to 4 minutes until it softens. Then, stir in the minced garlic and sliced mushrooms. Cook these for around 5 to 7 minutes until the mushrooms turn golden brown. 1. Adding spinach and heavy cream: Mix in the fresh spinach and let it wilt down. This should take about 2 to 3 minutes. Then, lower the heat and pour in the heavy cream, stirring to combine everything. 2. Incorporating Parmesan cheese: Gradually add the grated Parmesan cheese while stirring continuously. Keep stirring until the cheese melts and the sauce becomes smooth. 1. Tossing pasta with sauce: Now, add the cooked pasta to the skillet. Gently toss it with the creamy sauce, making sure every piece of pasta is coated. 2. Adjusting consistency with pasta water: If the sauce is too thick, add a little of the reserved pasta water. Do this slowly until you reach the desired consistency. 3. Final seasoning and presentation: Finally, season the dish with salt, pepper, and Italian seasoning to taste. Give it one last stir. Serve the pasta in bowls and sprinkle with chopped fresh parsley for a pop of color. For the complete process, refer to the Full Recipe. Enjoy your creamy, delicious dish! To get the best texture, cook pasta until al dente. This means it should be firm yet tender. I recommend checking the package for cooking times. For fettuccine or spaghetti, it usually takes about 8 to 10 minutes. Remember to taste it a minute before the time is up. To avoid sticky pasta, make sure to stir while it cooks. This keeps the noodles from clumping together. Also, rinse cooked pasta in cool water briefly if you won't add it to the sauce right away. For a creamy sauce, balance the cream-to-cheese ratio. I use one cup of cream and one cup of Parmesan. This mix gives the sauce a rich flavor. If you prefer thicker sauce, add more cheese. If you want it lighter, use less cream. Taste as you go to find your sweet spot. You can adjust flavors to your liking. Some might like more garlic or a touch of lemon juice. Experimenting with spices adds a fun twist. When storing leftovers, let the pasta cool completely first. Place it in an airtight container. This helps keep it fresh for about three days in the fridge. For reheating, the best method is to use a skillet. Add a splash of water or cream to keep it moist. Heat over low heat, stirring often. This way, your creamy pasta stays delicious and creamy. For more tips, refer to the Full Recipe. {{image_2}} You can easily make this dish vegan. Use plant-based cream instead of heavy cream. For cheese, try cashew cheese or nutritional yeast. You still get that creamy texture and rich flavor. This makes it a great option for those avoiding animal products. Want to make this dish heartier? Add some protein! You can use cooked chicken, shrimp, or even tofu. Just cook the protein separately and mix it in during the last step. This adds flavor and makes the meal more filling. To elevate your pasta, try adding extra herbs and spices. Fresh basil, oregano, or thyme can bring new life to the dish. A pinch of red pepper flakes adds a nice kick. You can always experiment with your favorite flavors. The goal is to make the dish uniquely yours. For more guidance, refer to the Full Recipe. To keep your leftover creamy Parmesan spinach mushroom pasta fresh, refrigerate it. Place the pasta in an airtight container. Make sure it cools down first. It will stay good for about 3 to 5 days in the fridge. When you are ready to eat, check for any signs of spoilage. If it looks or smells off, throw it away. For longer storage, you can freeze the pasta. First, let it cool completely. Then, transfer it to a freezer-safe container. You can also use freezer bags for easier storage. Try to remove as much air as possible. This way, it will stay good for about 2 to 3 months. When you want to enjoy it again, just thaw it overnight in the fridge. Reheating creamy pasta can be tricky. The best method is to use the stove. Place the pasta in a pan over low heat. Add a splash of milk or cream to keep it creamy. Stir it often to avoid sticking. You can also use a microwave. Just cover it with a damp paper towel and heat in short bursts. Stir in between to heat evenly. Enjoy your meal with the same delicious flavors as before. You can use several options to replace heavy cream. Whole milk is one choice. It adds some creaminess but is lighter. You can also blend silken tofu for a vegan twist. Another idea is to mix equal parts of milk and Greek yogurt. This adds richness and protein. To achieve a creamy texture, heat your substitute gently. Stir it in after cooking your vegetables. This way, you keep the flavors bright and fresh. Yes, you can prep this dish ahead of time. Cook the pasta and store it separately. Keep the sauce in the fridge for up to three days. When you are ready to eat, heat the sauce on low. Add the pasta and stir until warm. For best results, do not freeze the sauce. Freezing may change the texture. Fettuccine or spaghetti works well for this creamy dish. Both types hold sauce nicely. If you prefer gluten-free pasta, use a blend made from brown rice or chickpeas. These options give a great taste and texture. You can also try whole-grain pasta for added fiber. It’s a healthy choice that pairs well with the sauce. For the complete recipe of Creamy Parmesan Spinach Mushroom Pasta, check out the [Full Recipe]. This blog post showed you how to make a delicious creamy Parmesan spinach mushroom pasta. You learned about key ingredients like pasta, cream, and spices. You got step-by-step cooking instructions and useful tips for perfect texture and flavors. Plus, I shared ways to store leftovers and variations, like adding protein or making it vegan. With the right ingredients and simple steps, you can create a tasty meal at home. Enjoy experimenting with this recipe and make it your own!
Creamy Parmesan Spinach Mushroom Pasta Delightful Meal
Get ready to treat your taste buds with my Creamy Parmesan Spinach Mushroom Pasta. This delightful meal balances rich flavors and fresh ingredients. In just
To make this tasty dish, gather these main ingredients: - 1 lb ground beef - 8 oz elbow macaroni - 1 small onion, diced - 2 cloves garlic, minced - 1 packet taco seasoning (or homemade) - 1 can (15 oz) diced tomatoes with green chiles - 2 cups beef broth - 1 cup corn (canned or frozen) - 1 cup shredded cheddar cheese - 2 tablespoons olive oil - Salt and pepper to taste These ingredients blend well. The ground beef gives it depth. The elbow macaroni adds a nice bite. Taco seasoning brings a great flavor. Tomatoes and corn add freshness and texture. To make your dish pop, consider these optional garnishes: - Fresh cilantro, chopped - Sour cream - Sliced jalapeños - Avocado slices These garnishes add color and flavor. They also let each person customize their meal. A dollop of sour cream can cool the spice. Fresh cilantro adds a bright note. Here are some tools you will need: - Large skillet - Wooden spoon or spatula - Measuring cups and spoons - Knife and cutting board Having the right tools makes cooking easier. A large skillet helps cook everything evenly. A good knife is key for chopping onions and garlic. A wooden spoon helps mix without scratching your skillet. {{ingredient_image_1}} 1. Gather all your ingredients. This makes cooking easier and faster. 2. Dice the onion and mince the garlic. Set them aside for later. 3. If you use frozen corn, let it thaw. Canned corn is ready to go. 4. Measure out the beef broth and taco seasoning. This keeps things organized. 1. Heat 2 tablespoons of olive oil in a large skillet over medium heat. 2. Add the diced onion and minced garlic. Sauté for 3-4 minutes until soft. 3. Add 1 pound of ground beef. Break it up with a spoon and cook. 4. Cook until the beef is browned, about 5-7 minutes. Drain any excess fat. 5. Stir in the taco seasoning. Cook for 1-2 minutes to blend flavors well. 6. Pour in one can of diced tomatoes with green chiles and beef broth. 7. Bring the mixture to a simmer. This helps blend all the flavors. 8. Add 8 oz of elbow macaroni. Stir well and cover the skillet. 9. Simmer for 10-12 minutes, stirring occasionally. This cooks the pasta. 10. When the pasta is al dente, mix in 1 cup of corn and 1 cup of shredded cheddar cheese. 11. Stir until the cheese melts and everything is combined. 12. Season with salt and pepper to taste. Adjust as you like. 13. Remove from heat. Garnish with chopped cilantro for a fresh touch. Serve the Beef Taco Pasta Skillet hot. It’s great on its own or with a side salad. You can also top it with more cheese, sour cream, or avocado. Enjoy! To make your Beef Taco Pasta Skillet shine, use quality taco seasoning. You can buy it or make your own. Mixing spices like cumin, chili powder, and paprika gives great flavor. When you sauté the onion and garlic, let them cook until soft. This adds a deep taste to your dish. Don't rush this step. Use fresh diced tomatoes with green chiles for extra zest. The liquid from the tomatoes adds depth. Adding cheese at the end makes everything creamy and rich. Stir it in until it melts for a lovely texture. Start by preparing all your ingredients before cooking. Chop the onion and garlic, measure the broth, and set everything out. This makes cooking smoother. When browning the beef, break it into small pieces for even cooking. If you see too much grease, carefully drain it. Always taste your dish as you go. This helps you adjust the seasoning. Keep an eye on the pasta. Stir it often to prevent sticking. If it seems dry, add a splash of broth. One common mistake is not cooking the pasta long enough. It should be al dente, not mushy. Another mistake is not using enough seasoning. Taste your dish and add salt and pepper as needed. Make sure to stir in the cheese well to avoid clumps. Don’t skip the cilantro at the end. It adds a fresh taste that brightens the dish. Finally, avoid overcrowding the skillet. If it feels too full, cook in batches for better results. Pro Tips Use Lean Ground Beef: Opt for 80/20 lean-to-fat ratio ground beef to keep the dish flavorful without being overly greasy. Homemade Taco Seasoning: For a fresher taste, consider making your own taco seasoning using chili powder, cumin, garlic powder, and paprika. Adjust Pasta Cooking Time: Keep an eye on the pasta as it cooks; you want it al dente to prevent it from becoming mushy when mixed with the sauce. Add Extra Veggies: Enhance nutrition by incorporating bell peppers, zucchini, or spinach into the skillet along with the onions and garlic. {{image_2}} You can swap out ingredients to fit your taste. Instead of ground beef, try ground turkey or chicken. Both options give a lighter flavor. If you want a richer taste, use chorizo. For the cheese, feel free to use Monterey Jack or pepper jack. They melt beautifully and add a nice kick. You can also replace elbow macaroni with penne or rotini. Each pasta shape offers a fun twist to the dish. For a vegetarian version, skip the beef and add black beans or lentils. Both are great protein sources. You can also add more veggies. Chopped bell peppers, zucchini, or mushrooms work well. Use vegetable broth instead of beef broth to keep the flavor rich. This way, you still enjoy a hearty meal without meat. While elbow macaroni shines in this dish, many pasta types fit well. Try fusilli for a fun spiral shape. Shells can hold onto the sauce nicely, too. Even spaghetti can work in a pinch. Just break it into smaller pieces before cooking. Each type brings its unique texture, making the meal exciting every time. To store leftovers, let the beef taco pasta cool down first. Place it in an airtight container. I like to use glass containers, as they keep food fresh. You can keep it in the fridge for up to three days. If you want to keep it longer, consider freezing it. To freeze beef taco pasta, pack it in freezer-safe bags or containers. Make sure to remove as much air as possible. Label the bags with the date. You can freeze it for up to three months. When ready to eat, thaw it in the fridge overnight before reheating. When reheating, you have a few options. You can use the microwave or the stovetop. If using the microwave, heat it in short bursts, stirring in between. For the stovetop, add a splash of beef broth to keep it moist. Heat on low until warm. Enjoy the great flavors again! You can use ground turkey or chicken instead of ground beef. They are leaner options and still give great flavor. For a plant-based choice, try lentils or black beans. Both add protein and texture. When using beans, adjust the cooking time since they are already cooked. Yes, you can make this dish ahead of time. Cook it fully and let it cool down. Once cool, store it in an airtight container. It stays fresh in the fridge for about three days. When ready to eat, reheat it on the stove or in the microwave until hot. To change the spice level, use mild taco seasoning for less heat. You can also add fresh peppers or jalapeños for a kick. For milder flavors, skip the diced tomatoes with chiles. Taste the dish during cooking, and adjust the spices to suit your taste. You’ve learned how to make a tasty Beef Taco Pasta Skillet. I covered the main ingredients, kitchen tools, and detailed steps for prep and cooking. You got tips for flavor and common mistakes to avoid. I also shared fun variations and storage info. This dish is simple and satisfying. Don’t hesitate to try new ingredients or make it your own. Enjoy every bite!
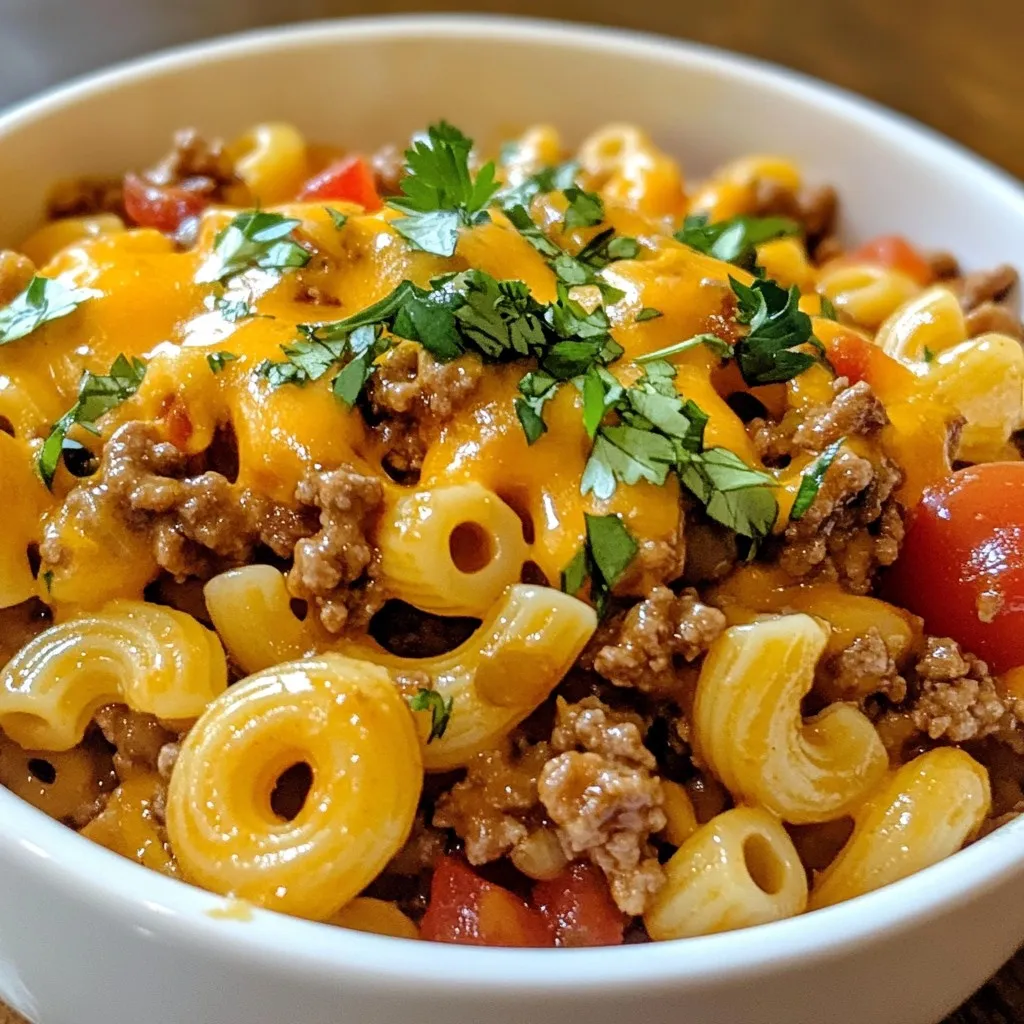
Beef Taco Pasta Skillet One-Pan Recipe Delight
If you’re craving a quick, tasty meal, then this Beef Taco Pasta Skillet is for you! In one pan, you can whip up a hearty
- 1 pound ground beef - 1/2 cup breadcrumbs - 1/4 cup grated Parmesan cheese - 1/4 cup chopped parsley - 1 small onion, finely chopped - 2 cloves garlic, minced - 1 tablespoon Worcestershire sauce - 1 egg, beaten - Salt and pepper to taste - 1 cup beef broth - 1 cup sliced onions (for the sauce) - 1 tablespoon olive oil - 1 teaspoon thyme - 1/2 cup shredded Gruyère cheese - Chopped chives for garnish To make French onion meatballs, gather these ingredients. Start with the main ones for the meatballs. The ground beef gives the meatballs their rich flavor. Breadcrumbs help keep them light. Parmesan cheese adds a nice salty touch. Finally, chopped parsley brightens the dish. Next, use the additional ingredients. The finely chopped onion and minced garlic boost the flavor. Worcestershire sauce adds a bit of umami. The beaten egg helps bind everything together. Don’t forget salt and pepper; they are key for taste. For the sauce, you will need beef broth and sliced onions. These turn into a sweet and savory base. Olive oil helps caramelize the onions, making them soft and golden. Thyme adds a lovely herb note. Gruyère cheese melts into the sauce, creating a creamy texture. Lastly, chopped chives give a fresh finish. For the full recipe, check the details above. Enjoy creating this tasty dish! - Preheat your oven to 400°F (200°C). - In a large bowl, mix together: - 1 pound ground beef - 1/2 cup breadcrumbs - 1/4 cup grated Parmesan cheese - 1/4 cup chopped parsley - 1 small onion, finely chopped - 2 cloves garlic, minced - 1 tablespoon Worcestershire sauce - 1 egg, beaten - Salt and pepper to taste until well combined. - Shape the mixture into meatballs, about 1 inch in diameter. - Place them on a baking sheet lined with parchment paper. - Bake for 20 minutes or until browned and cooked through. - Heat 1 tablespoon olive oil in a skillet over medium heat. - Add 1 cup sliced onions and sauté until golden and soft, about 10-15 minutes. - Add 1 cup beef broth and 1 teaspoon thyme to the skillet. - Stir and let it simmer for 5 minutes. - Transfer baked meatballs to the skillet with onion sauce. - Toss gently to coat the meatballs in the sauce. For the full recipe, check out the comprehensive details above. - Ensure even cooking by placing meatballs at equal distances on the baking sheet. - Use a meat thermometer to check doneness; aim for 160°F internal temperature. - Avoid overmixing your meatball ingredients. This keeps them tender and juicy. - Do not skip browning the onions. This step adds rich, sweet flavor to your dish. - Pair these meatballs with crusty bread for a satisfying meal. They also taste great over mashed potatoes. - For a beautiful presentation, garnish with extra cheese and fresh herbs. This adds color and taste. For the full recipe, follow the steps carefully for the best results! {{image_2}} You can boost the taste of your French onion meatballs. Try adding spices like smoked paprika or Italian seasoning. These spices bring a deeper flavor. You can also mix in green onions or roasted red peppers. This adds a nice crunch and color. If you want a lighter option, use ground turkey or chicken. These meats are leaner but still tasty. For a gluten-friendly choice, use gluten-free breadcrumbs. This makes the dish suitable for more people. You can cook these meatballs in a slow cooker. This method makes it easy to prepare your meal all day. Just toss the meatballs in and let them cook. Another option is grilling. Grilling gives a smoky flavor. Just adjust the sauce timing to match the cooking method. For the full recipe, check out the detailed steps provided. Store leftovers in an airtight container for up to 3 days. This keeps them fresh. When you want to eat them again, reheat in the oven or skillet. This method helps keep the meatballs moist and tasty. You can freeze the meatballs before or after cooking. This makes for easy future meals. Place them in freezer-safe bags. Be sure to label the bags with the date, and use them within 3 months for the best taste. To thaw frozen meatballs, put them in the refrigerator overnight. If you need them fast, use the microwave. Just remember to reheat thoroughly before serving. This way, you ensure that each bite is warm and delicious. - Follow the detailed steps listed in the main recipe provided. - Yes, alternatives like turkey, chicken, or pork can work well. - Consider serving with bread, mashed potatoes, or a fresh salad. - Ensure proper binding with breadcrumbs and egg; avoid overmixing. - Yes, pre-cooked meatballs can be stored or frozen for convenience. - While it adds classic flavor, you can substitute with mozzarella or cheddar. In this guide, we explored how to make French Onion Meatballs. You learned about essential ingredients, detailed cooking steps, and helpful tips. We also covered variations and storage methods to keep your meal fresh. Remember, small tweaks can enhance flavor or adjust for diets. These meatballs are tasty and convenient, making them an excellent choice for any meal. With the right preparation, you can enjoy them any day! Happy cooking!
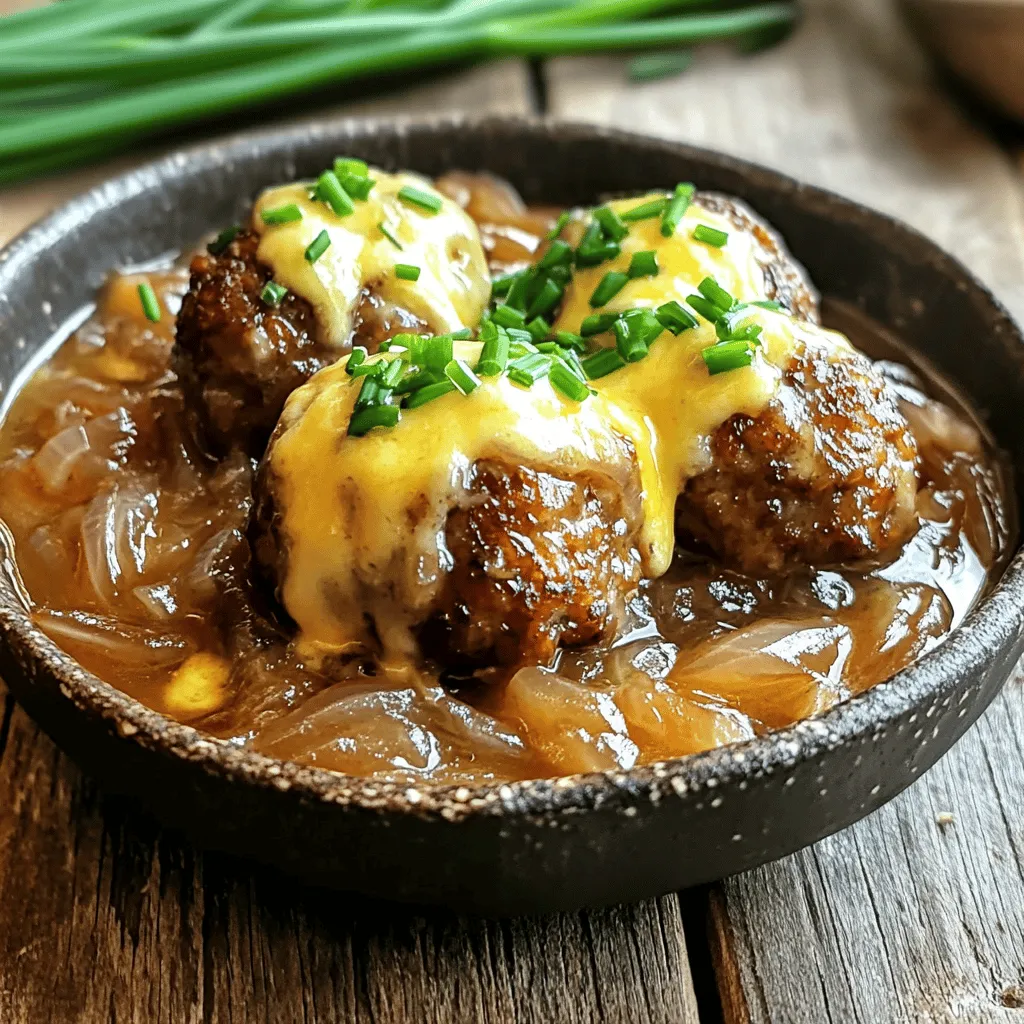
French Onion Meatballs Tasty and Savory Delight
Craving a dish that’s both tasty and comforting? Dive into my French Onion Meatballs recipe, where rich flavors meet savory goodness. Imagine tender meatballs smothered