Dinner

To make Addictive Dan Dan Noodles, you need some key ingredients: - 200g fresh Chinese noodles - 150g ground chicken or beef - 2 tablespoons sesame paste (or peanut butter) These noodles form the base of the dish. Fresh noodles offer the best taste and texture. You can use either ground chicken or beef, depending on your preference. The sesame paste adds a rich, nutty flavor that elevates the dish. To boost the flavor, you'll want these items: - 2 tablespoons soy sauce - 1 tablespoon chili oil (adjust to taste) - 2 cloves garlic, minced - 1 tablespoon ginger, grated Soy sauce gives a salty depth. Chili oil adds heat and a touch of spice. Garlic and ginger bring freshness and warmth to the mix, making the dish truly addictive. For the final touch, gather these ingredients: - 2 spring onions, sliced - 1 teaspoon Sichuan peppercorns, toasted and crushed - 1 cup chicken or vegetable broth - 1 tablespoon rice vinegar - 1 tablespoon chopped cilantro (for garnish) - Salt and pepper to taste Spring onions add crunch and color. Sichuan peppercorns contribute a unique flavor. Broth and rice vinegar balance the dish, while cilantro brings a fresh finish. For the full recipe, check the details above! First, you need to cook the fresh Chinese noodles. Follow the package instructions closely. You want them to be soft but not mushy. Once cooked, drain the noodles and set them aside in a bowl. This step is simple but key for a great dish. Next, heat a splash of oil in a large skillet over medium heat. Add your choice of ground chicken or beef. Sauté the meat until it's browned and cooked through, which usually takes about five to seven minutes. Season with salt and pepper. Once done, carefully remove the meat from the skillet and set it aside. This ensures your meat stays juicy and flavorful. In the same skillet, add a little more oil if necessary. Now, toss in minced garlic, grated ginger, and crushed Sichuan peppercorns. Sauté these for about 30 seconds until your kitchen fills with a wonderful aroma. Next, stir in the sesame paste, soy sauce, chili oil, rice vinegar, and broth. Bring this mixture to a gentle simmer. Let it thicken for about three to four minutes, stirring constantly. Adjust the seasoning as needed. This sauce is where all the magic happens. Now, it’s time to add the cooked noodles to the sauce. Gently toss them in the skillet, ensuring each noodle is well-coated. Heat them through for a minute or two. This step melds all the flavors together, making every bite delicious. Finally, plate your noodles in deep bowls. Top them with the sautéed meat, sliced spring onions, and chopped cilantro. This not only adds color but also fresh flavor. For a bit of spice, you can drizzle more chili oil on top. Enjoy your bowl of Addictive Dan Dan Noodles! To get the best taste from your Dan Dan noodles, choose the right brands. I recommend using high-quality soy sauce, like Kikkoman or Lee Kum Kee. For sesame paste, try to find one that is pure, without fillers. Adjust the chili oil to your liking. If you want more heat, add extra chili oil or fresh chilies. Timing is key in cooking. When sautéing garlic and ginger, make sure not to burn them. I usually sauté them for about 30 seconds until fragrant. When cooking the meat, ensure it is browned well. This adds a rich depth of flavor to your dish. Stir frequently and keep the heat medium for best results. Selecting the right bowl is important. Use deep bowls that can hold the sauce well. For garnishing, sprinkle chopped cilantro on top. This adds a fresh touch. Drizzle extra chili oil over the dish for a pop of color and flavor. It makes the dish look even more inviting! {{image_2}} You can change the protein in Dan Dan noodles for new flavors. If you want a vegetarian dish, try using tofu. Tofu absorbs flavors well, making it a great choice. Just cube the tofu and sauté it until golden. This gives it a nice texture and taste. For a seafood twist, you can use shrimp. Shrimp cooks quickly and adds a fresh flavor. Just peel and devein the shrimp, then sauté them until pink. This change will surprise your guests and make the dish unique. If you need a gluten-free version, don't worry! You can use rice noodles instead of Chinese noodles. They are easy to find and cook quickly. Just boil them until soft and follow the rest of the recipe as usual. Make sure to choose gluten-free soy sauce for your sauce. Many brands offer this option. It keeps the dish flavorful without any gluten. You can adjust the spice level to fit your taste. If you want more heat, add extra chili oil. Start with a little and taste as you go. You can always add more, but it’s hard to take it out! For a fresh kick, add chopped fresh chilies. You can use jalapeños or Thai chilies for more heat. If you prefer a milder dish, skip the chili oil or add less. You can also use your favorite hot sauce to get the right level of spice. This way, your Dan Dan noodles can be as spicy as you like! To keep your Dan Dan noodles fresh, store them in the fridge. Place the noodles and sauce in separate containers. This prevents the noodles from getting soggy. Use airtight containers to keep out air and moisture. Glass containers work well, as they don’t stain or hold odors. Label the containers with the date. Enjoy your leftovers within three days for best taste. When reheating, use a skillet over medium heat. Add a splash of water or broth to the noodles. This keeps them moist and helps revive their texture. Stir frequently to ensure even heating. You can also use a microwave. Cover the bowl with a lid or damp paper towel. Heat in short bursts, stirring in between. This way, you won't overcook the noodles. You can freeze your Dan Dan noodles for later. First, cool them completely. Place the noodles and sauce in freezer-safe bags or containers. Remove as much air as possible. This helps prevent freezer burn. To thaw, move them to the fridge overnight. For quick thawing, place the bag in a bowl of cold water. Once thawed, reheat as mentioned above. Enjoy your tasty meal anytime! Dan Dan Noodles come from China. They began in Sichuan province. The dish has a rich history tied to street food. Vendors would sell it from carts. It's famous for its bold flavors and spicy kick. Traditional recipes use minced pork and spicy sauce. Over time, many variations have emerged. This dish reflects the vibrant culture and cooking style of Sichuan cuisine. To make Dan Dan Noodles vegetarian, swap the meat for tofu. Use firm tofu, crumbled or sliced. You can also use mushrooms for a savory touch. Add more veggies, like bell peppers or carrots, for texture. For the sauce, keep the sesame paste and chili oil. You can use vegetable broth instead of chicken broth. These changes keep the dish flavorful and filling. The best Dan Dan Noodles can be found in many places. Look for authentic Chinese restaurants in your area. Popular spots often serve them as a signature dish. Some local eateries may specialize in Sichuan food. Ask friends for recommendations or check online reviews. Food blogs can also guide you to hidden gems. Yes, you can easily adjust the spice level. Start with less chili oil if you prefer mild flavors. Add more chili oil gradually to increase the heat. You can also include fresh chilies for extra spice. Taste the sauce before adding more heat. This way, you can find your perfect balance. Preparing Addictive Dan Dan Noodles takes about 25 minutes. You’ll spend 10 minutes prepping the ingredients. Cooking will take another 15 minutes. This includes boiling the noodles and making the sauce. It’s a quick and tasty meal perfect for busy nights. You can easily enjoy this dish in no time. For the full recipe, check out the section above. You now have a clear guide to making Addictive Dan Dan Noodles. We covered essential ingredients, cooking steps, and tips for great flavor. You can customize the dish with different proteins and spice levels. Store your leftovers properly to enjoy later. Feel free to explore variations to make it your own. With this knowledge, you can impress friends and family with a delicious meal. Get started, and enjoy your cooking adventure!
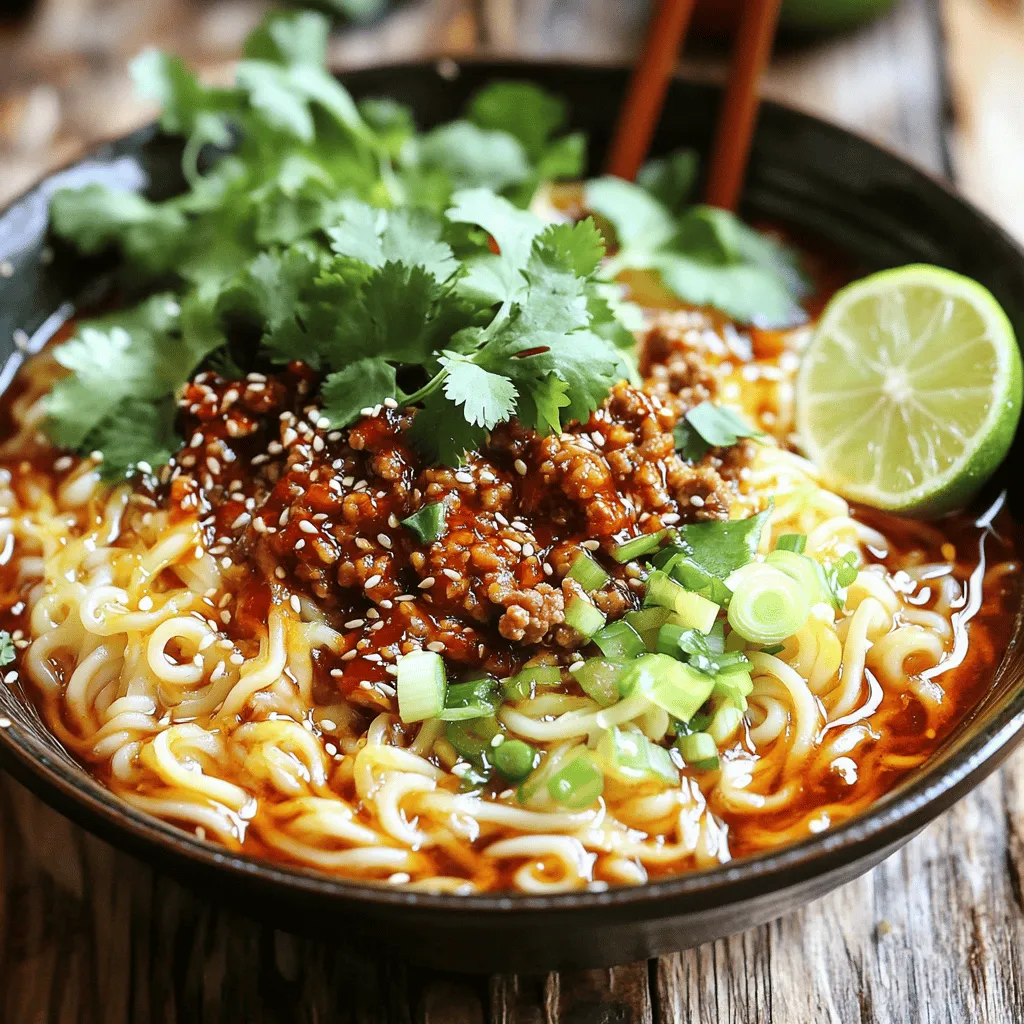
Addictive Dan Dan Noodles Simple and Flavorful Recipe
If you’re craving a dish that’s both simple and bursting with flavor, look no further than addictive Dan Dan noodles! This recipe combines fresh Chinese
- 1.5 lbs sirloin steak, cut into 1-inch cubes - 4 tablespoons unsalted butter - 6 cloves garlic, minced - 2 tablespoons fresh parsley, chopped To make garlic butter steak tips, you need fresh and high-quality ingredients. Sirloin steak is a great choice due to its flavor and tenderness. Cut it into 1-inch cubes for even cooking. The butter adds richness, while garlic gives a bold taste. Fresh parsley adds a nice color and fresh flavor. - 1 tablespoon soy sauce - 1 teaspoon smoked paprika - Salt and pepper to taste - Optional: 1 teaspoon crushed red pepper flakes for heat Seasonings make all the difference. Soy sauce enhances umami, while smoked paprika adds a hint of smokiness. Use salt and pepper to taste, adjusting to your preference. If you like heat, sprinkle in some crushed red pepper flakes. This simple blend of flavors makes every bite of garlic butter steak tips a delight. For the [Full Recipe], check out the instructions. 1. Start by patting the steak cubes dry with paper towels. This helps the meat sear better. 2. Next, season the steak cubes with salt, pepper, and smoked paprika. This brings out great flavor. If you want some heat, add crushed red pepper flakes too. 1. In a large skillet, melt 2 tablespoons of butter over medium-high heat until bubbly. This creates a tasty base. 2. Add the seasoned steak tips to the skillet in a single layer. Don’t overcrowd the pan; cook in batches if needed. 3. Sear the steak tips for 2-3 minutes on each side. You want a golden-brown crust and the right doneness. Remove them and set aside. 4. In the same skillet, lower the heat to medium. Add the remaining 2 tablespoons of butter. Once melted, stir in the minced garlic. Sauté for 30 seconds until fragrant. 1. Return the steak tips to the skillet, along with any juices from the plate. Stir to coat the steak tips in the garlic butter sauce. 2. Add the soy sauce and chopped parsley. Toss everything to combine and heat through for about 1-2 minutes. 3. Check the taste and adjust with more salt or pepper if needed. For the full recipe, see the details above. To get a perfect sear, start by drying your steak. Use paper towels to pat the cubes dry. This step removes moisture, helping to create a nice crust. A good sear adds flavor and texture. Remember, wet steak will steam, not sear. Next, avoid overcrowding the skillet. If you add too many steak tips at once, they won’t cook evenly. Instead, cook in batches. This helps each piece get that golden brown color you want. It might take a little longer, but the results are worth it. Seasoning is key to great flavor. Use salt, pepper, and smoked paprika on your steak tips. Feel free to add more spices if you like. You can also marinate the steak in soy sauce for a deeper taste. Marinating for at least 30 minutes can make a big difference. For the garlic butter, you can modify it too! Add herbs like rosemary or thyme for a fresh twist. You could even mix in some lemon zest for brightness. These changes can give your dish a new flavor profile and keep it exciting. Try different combinations to find what you like best! {{image_2}} You can use many cuts of meat for garlic butter steak tips. While sirloin steak is a favorite, other cuts work well too. Try flank steak for a rich flavor. It cooks fast and stays tender. Ribeye is another great choice. This cut has more fat, making it juicy and tasty. You can also use filet mignon if you want something extra special. Just remember to adjust the cooking time based on the cut you choose. Adding herbs and spices can elevate your garlic butter steak tips. Fresh thyme or rosemary adds a nice touch. You can also try a bit of oregano or basil for a twist. If you love heat, add cayenne or chili powder. For an even deeper flavor, marinate the steak before cooking. Use a mix of olive oil, soy sauce, and your favorite herbs. Let it soak for at least 30 minutes. This step makes the steak even more tender and flavorful. Pair your garlic butter steak tips with tasty side dishes. Creamy mashed potatoes or roasted veggies work well. You can also serve them with a fresh green salad for a lighter meal. If you want something fun, try garlic bread or rice pilaf. For drinks, a nice red wine like Cabernet Sauvignon complements the dish perfectly. Enjoy the rich flavors and make your meal special! To store leftover steak tips, place them in an airtight container. Make sure they cool down before sealing. This helps keep them fresh. Store the container in the fridge for up to three days. You can also wrap the steak tips tightly in plastic wrap. This method works well if you want to save space. When you are ready to enjoy your steak tips again, use a skillet. Heat the skillet over medium heat. Add a little butter or olive oil to keep the meat juicy. Place the steak tips in the pan and heat for about five minutes. Flip them halfway to warm evenly. You can also use the microwave, but be careful not to overcook. Heat in short bursts, checking often. If you want to keep steak tips longer, freezing is a great option. Wrap each portion tightly in plastic wrap. Then, place them in a freezer bag. Remove as much air as possible before sealing. They can last for up to three months. To thaw, place them in the fridge overnight. This keeps the texture nice when you reheat. You can easily follow the Full Recipe when you’re ready to serve again. You can tell when steak tips are done by looking for a brown crust. Use a meat thermometer for the best results. Aim for 130°F for medium-rare and 140°F for medium doneness. The meat should feel firm but springy. Let it rest for a few minutes. This helps the juices stay inside. Yes, you can use frozen steak tips. Just thaw them safely in the fridge overnight. If you're in a hurry, you can use the microwave. Be careful not to cook them. Once thawed, follow the same steps in the recipe. Make sure to pat them dry for a good sear. Garlic butter steak tips pair well with many sides. Here are some popular choices: - Garlic mashed potatoes - Grilled asparagus - Roasted vegetables - Fresh salad For wine, a nice red like Cabernet Sauvignon works great! It complements the rich flavors of the steak. Enjoy exploring these pairings! For the full recipe, check out the details above. We covered how to make delicious garlic butter steak tips. You learned about the main ingredients, cooking steps, and tips for perfecting your dish. I shared ways to vary the recipe and store leftovers. Experiment with flavors to make this dish your own. Remember, cooking is about enjoying the process and the food. Enjoy your steak tips!
Garlic Butter Steak Tips Flavorful and Easy Recipe
Are you ready to elevate your dinner game? Garlic Butter Steak Tips are flavorful, easy, and sure to impress. With just a few simple ingredients
For a delicious Blackened Cajun Chicken Alfredo, you’ll need simple yet flavorful ingredients. Here’s what you will gather: - 2 boneless, skinless chicken breasts - 2 tablespoons Cajun seasoning - 2 tablespoons olive oil - Salt and pepper to taste - 8 oz fettuccine pasta - 1 cup heavy cream - ½ cup grated Parmesan cheese - 2 tablespoons unsalted butter - 3 cloves garlic, minced - 1 cup cherry tomatoes, halved - Fresh parsley, chopped for garnish Each ingredient plays a key role in bringing the dish to life. The chicken serves as the star, while the Cajun seasoning adds a bold kick. Olive oil helps achieve that perfect sear on the chicken. Fettuccine pasta gives a nice bite, and heavy cream makes the sauce rich and creamy. Adding garlic and cherry tomatoes brightens the dish. Finally, fresh parsley gives a lovely touch of color and freshness. For the full recipe, follow the steps in detail to create this amazing dish. To start, dry the chicken breasts with a paper towel. This step helps the seasoning stick better. Next, season both sides with salt, pepper, and Cajun seasoning. Press the spices into the meat for full flavor coverage. For cooking, heat olive oil in a skillet over medium-high heat. Add the seasoned chicken breasts once the oil is hot. Cook for about 6-7 minutes on each side. The chicken should be cooked through and have a nice blackened crust. Once done, remove the chicken from the skillet and let it rest. While the chicken rests, bring a large pot of salted water to a boil. Add the fettuccine pasta and cook it according to the package instructions until it is al dente. This usually takes around 8-10 minutes. Before draining, reserve about ½ cup of the pasta water. This water will help adjust the sauce later. Once done, drain the pasta and set it aside. In the same skillet where you cooked the chicken, melt unsalted butter over medium heat. Add minced garlic and sauté it for about 1 minute. You want the garlic to become fragrant but not brown. Next, pour in the heavy cream. Let it simmer for 2-3 minutes, stirring occasionally. This step helps thicken the sauce. Stir in grated Parmesan cheese and mix until it melts and becomes smooth. If the sauce is too thick, add the reserved pasta water a little at a time until you reach your desired consistency. Now, add the cooked fettuccine to the Alfredo sauce. Toss the pasta well to coat it evenly with the creamy sauce. Fold in the halved cherry tomatoes for a fresh burst of flavor. The tomatoes add color and a slight sweetness. Slice the blackened chicken breasts into strips. Place them on top of the creamy pasta. For a pop of color and freshness, sprinkle freshly chopped parsley over the dish. Serve it immediately and enjoy this flavor-packed meal! For the full recipe, check the guide above. To make great Cajun seasoning, you can buy it pre-made or make it at home. Some good brands include McCormick and Tony Chachere’s. If you want to make your own, mix paprika, cayenne, garlic powder, onion powder, and oregano. Adjust the heat by adding more or less cayenne. If you like it mild, start with just a pinch. You can always add more later! You can add veggies for extra flavor and color. Spinach, bell peppers, or mushrooms work well. If you want a different cheese, try adding Gouda or mozzarella. They melt nicely and add a creamy texture. Mixing cheeses can make the dish even more exciting. For sides, garlic bread and a simple salad pair well. They balance the creamy pasta. If you enjoy wine, consider a crisp white. A Sauvignon Blanc or Pinot Grigio can enhance the flavors. These drinks will make your meal feel extra special. Serve your Blackened Cajun Chicken Alfredo with these tips for a perfect dinner. For the full recipe, check out the details above! {{image_2}} You can switch up the protein in this dish. Shrimp makes a great option. Just sauté shrimp until pink and toss them in. If you want to add sausage, use andouille for a spicy kick. For vegetarians, try using mushrooms or tofu. Both add texture and flavor without meat. Not a fan of traditional pasta? No problem! You can use gluten-free pasta for a lighter option. Whole wheat pasta is also a good choice for extra fiber. Other noodles like zoodles (zucchini noodles) or rice noodles work well too. They change the dish's texture and taste. Want to mix up the sauce? Adding sun-dried tomatoes can bring a sweet and tangy flavor. Spinach is a great green addition, too. For a lighter sauce, try using low-fat milk instead of cream. You can also use broth to keep the sauce rich but lighter. These variations keep your Blackened Cajun Chicken Alfredo fresh and exciting. For the full recipe, check out the detailed steps to get you started! To keep your Blackened Cajun Chicken Alfredo fresh, use these methods: - Refrigerating: Place leftovers in an airtight container. This keeps moisture in and prevents smells from other foods. It stays good for about 3-4 days in the fridge. - Freezing: If you want to save it longer, freeze it. Use a freezer-safe container or freezer bags. Be sure to remove as much air as possible. It can last 2-3 months in the freezer. When you're ready to enjoy your leftovers, follow these tips: - Methods: Use the stovetop or microwave. For the stovetop, heat a pan over low heat. Add a splash of cream or reserved pasta water to keep it creamy. Stir often. For the microwave, cover the bowl loosely with a lid. Heat in short bursts, stirring in between. - Common Mistakes: Avoid reheating on high heat. This can dry out the dish and ruin the creamy sauce. Always add a little liquid to keep it moist. To season chicken for this dish, I use Cajun seasoning. This blend adds a lot of flavor. You can make your own mix or buy it. Make sure to generously coat both sides of the chicken. Press the seasoning into the meat. This step helps the flavor stick well during cooking. A sprinkle of salt and pepper boosts the taste too. Yes, you can use different pasta types. While fettuccine is great, try penne or linguine. These shapes hold the sauce just as well. If you like a twist, use whole wheat or gluten-free pasta. The cooking time may differ, so check the package. Each pasta type will give a unique taste and texture. To add heat, use more Cajun seasoning. You can also mix in red pepper flakes. Another choice is to add diced jalapeños. For a smoky kick, try smoked paprika. Adjust the spices to fit your taste. Just remember, a little goes a long way! Yes, this recipe is great for meal prep! Cook the chicken and pasta in advance. Store them in separate containers. This way, they keep their textures and flavors. When you're ready to eat, heat the chicken and sauce. Combine everything, and you have a quick meal. You can enjoy it all week long! For the full recipe, check down below. In this blog post, we explored making Blackened Cajun Chicken Alfredo. We covered key ingredients, cooking steps, and helpful tips for perfecting the dish. Remember to adjust the spice level to your taste and feel free to try different proteins or pasta types. This meal is not just satisfying; it’s versatile for any occasion. Enjoying this creamy dish with fresh veggies or a glass of wine can elevate your dining experience. Now, gather your ingredients and start cooking!
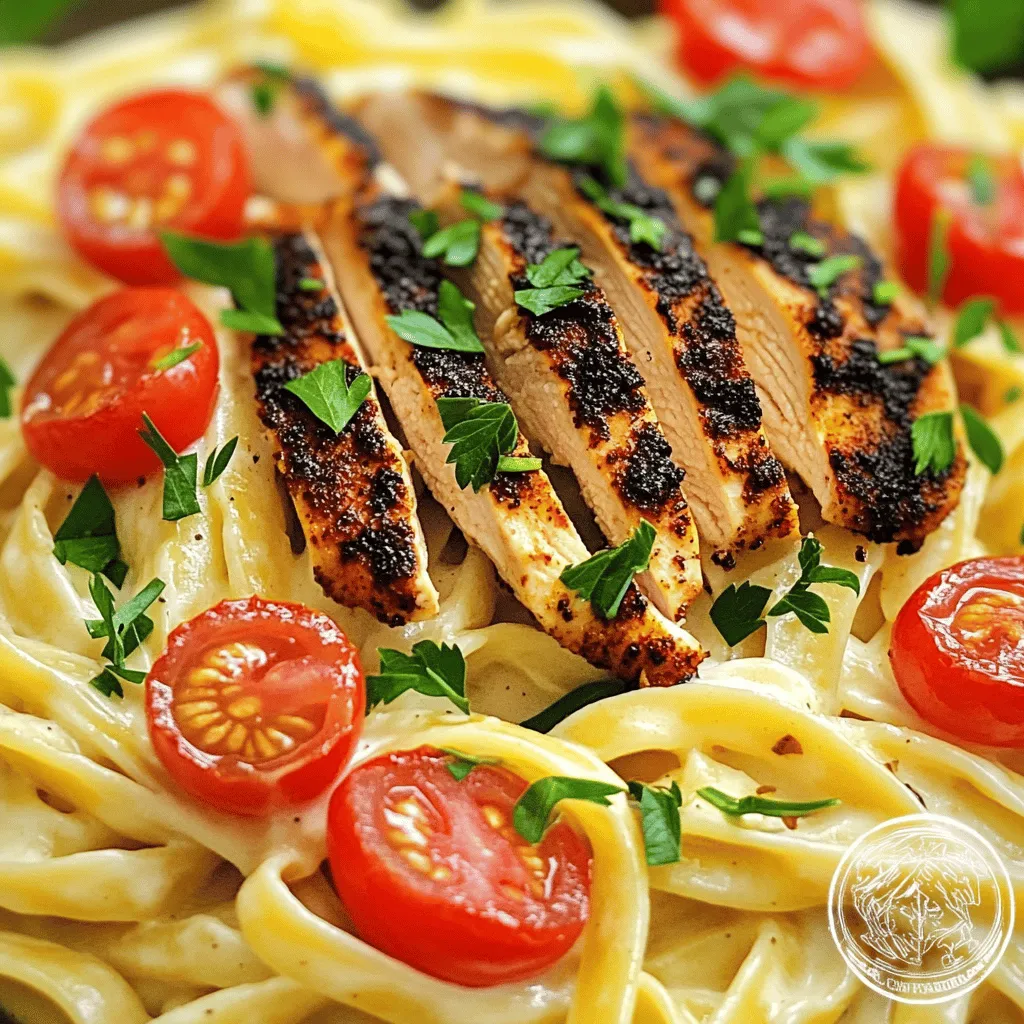
Blackened Cajun Chicken Alfredo Flavor-Packed Recipe
Craving a meal that is as bold as it is creamy? Discover how to make Blackened Cajun Chicken Alfredo, a dish that combines spice with
- 2 large chicken breasts - 1 cup plain Greek yogurt - 2 tablespoons chipotle sauce (or adobo sauce) - 4 large flour tortillas - 1 cup shredded lettuce - 1 cup diced tomatoes - 1 cup black beans, drained and rinsed - 1 cup corn kernels (fresh or frozen) - 1 cup shredded cheese (cheddar or Mexican blend) - 1 tablespoon ranch seasoning mix - 1 teaspoon garlic powder - 1 teaspoon lime juice - Salt and pepper to taste - Fresh cilantro for garnish (optional) When making my Easy Chipotle Ranch Grilled Chicken Burrito, I focus on fresh and tasty ingredients. The chicken breasts serve as the star of the dish. I love using Greek yogurt in the marinade; it makes the chicken tender and adds creaminess. The chipotle sauce gives it a nice kick. I also add ranch seasoning and garlic powder for flavor. The tortillas are essential for wrapping all the goodness inside. Fresh veggies are a must! I always use crisp lettuce and juicy tomatoes. Black beans and corn add texture and nutrition. Lastly, I sprinkle in some shredded cheese. It melts beautifully when you grill the burrito. I often use cilantro as a finishing touch for color and flavor. This combination brings the whole meal together, making it a delightful burrito experience. You can find the full recipe for this dish to try at home! To create the marinade, mix together 1 cup of plain Greek yogurt and 2 tablespoons of chipotle sauce. This gives the chicken a creamy and spicy base. Next, add 1 tablespoon of ranch seasoning and a teaspoon of garlic powder. Stir well to combine. This blend of flavors makes the chicken super tasty and moist. Take 2 large chicken breasts and coat them completely with the marinade. Make sure each piece is well covered. This step is key for flavor. Place the coated chicken in the fridge for at least 30 minutes. This marinating time allows the flavors to seep into the meat, giving you a delicious bite. Heat your grill to medium-high. This is the best temp for juicy chicken. Place the chicken on the grill and cook for about 6-7 minutes per side. Use a meat thermometer to check for doneness. The chicken should reach an internal temperature of 165°F (75°C). Once done, let it rest for a few minutes before slicing. This helps keep it juicy. Take a large flour tortilla and lay it flat. Start by adding a handful of shredded lettuce in the center. Then, layer on the sliced grilled chicken, diced tomatoes, black beans, corn, and shredded cheese. Try to keep the ingredients in the middle for easy wrapping. This ensures every bite is packed with flavor. To wrap the burrito, fold in the sides of the tortilla first. Then roll it tightly from the bottom to the top. This will help keep all the fillings inside. If you want extra flavor, you can toast the burritos on the grill for 2-3 minutes on each side. This adds a nice crispiness. After wrapping, slice them in half to serve. Adding fresh cilantro on top is a great touch. For the complete recipe, check out the Full Recipe. Marinating is key for flavor. It helps the chicken soak up all those tasty spices. Aim for at least 30 minutes. For a twist, swap Greek yogurt with buttermilk or sour cream. You can also try a spicy salsa instead of chipotle sauce. To get perfect grill marks, preheat the grill. Place the chicken on the grill and don’t move it for 3-4 minutes. Flip only when it releases easily. To keep the chicken juicy, avoid grilling too long. Use a meat thermometer to check for 165°F. Pair your burritos with crispy tortilla chips or a fresh salad. You can also serve it with guacamole or salsa. Want to customize? Add jalapeños for heat or avocado for creaminess. Try different toppings like diced onions or sour cream for added flavor. {{image_2}} For a vegetarian burrito, you can swap out the chicken. Try using grilled portobello mushrooms, which offer a meaty texture. Another great option is marinated tofu. It absorbs flavors well and adds protein. You can also use chickpeas or lentils. They are tasty and rich in protein. Adding these makes your burrito filling and satisfying. To make a vegan burrito, choose plant-based yogurt instead of Greek yogurt. Look for options made from almond or coconut. For the chipotle flavor, use a vegan chipotle sauce. The seasoning can stay the same, but check for dairy-free ranch seasoning. This keeps the taste while making it vegan-friendly. Want to add spice? Add sliced jalapeños to your burrito for heat. You can use fresh or pickled jalapeños. They give a nice kick! For a twist, try different sauces. You could use a spicy salsa or guacamole. These add creaminess and extra flavor. Don't be afraid to mix and match! To keep your burritos fresh, wrap them well. Use plastic wrap or foil. Place the wrapped burritos in a storage container. A glass or plastic airtight container works best. Store them in the fridge for up to three days. This helps maintain their flavor and texture. If you want to keep them longer, consider freezing. Wrap each burrito tightly and place them in a freezer-safe bag. They can last for up to three months in the freezer. For reheating, there are a few great methods. The oven is a top choice. Preheat it to 350°F (175°C). Place the burrito on a baking sheet. Heat for about 15-20 minutes. This makes the burrito warm and keeps it crispy. You can also use a microwave. Place the burrito on a microwave-safe plate. Cover it with a damp paper towel. Heat for one to two minutes. This method is quick but may make it soggy. To avoid sogginess, you can reheat in a skillet. Heat on medium for about 5 minutes, turning often. This keeps the texture nice. For the best taste, enjoy the burritos fresh, using the full recipe for guidance! I recommend marinating the chicken for at least 30 minutes. This time helps the flavors soak into the chicken. If you want a deeper flavor, you can marinate it for a few hours or even overnight. Just remember to keep it in the fridge during this time. Yes, you can use frozen chicken breasts. Just be sure to thaw them first. You can leave them in the fridge overnight or use the microwave for quick thawing. Fresh chicken gives a better taste, but frozen works in a pinch. There are many great sides you can serve with these burritos. Here are a few ideas: - Tortilla chips with salsa - Guacamole for dipping - A side salad with lime dressing - Mexican rice with cilantro These sides add color and flavor to your meal and make it more fun. Absolutely! You can prepare the chicken and burritos ahead of time. After wrapping them, store them in the fridge. They stay fresh for up to two days. When you are ready to eat, just grill or toast them for a warm and crispy finish. This makes meal prep easy and tasty. For the full recipe, check out the details above. You learned about making tasty burritos with grilled chicken, Greek yogurt, and chipotle sauce. I shared steps for marinating, grilling, and assembling. Plus, I included tips for variations and storage. Now, you can create burritos your way. Remember, marinating is key for flavor. Enjoy personalizing ingredients and impressing friends with your delicious meals!
Easy Chipotle Ranch Grilled Chicken Burrito Delight
Are you ready to make a meal that bursts with flavor? Dive into this Easy Chipotle Ranch Grilled Chicken Burrito Delight! This dish combines juicy
To make Spicy Brazilian Coconut Chicken, gather these items: - 4 boneless, skinless chicken thighs - 1 can (13.5 oz) coconut milk - 2 tablespoons olive oil - 3 garlic cloves, minced - 1 tablespoon ginger, grated - 1 red chili pepper, sliced (adjust based on spice preference) - 1 teaspoon smoked paprika - 1 tablespoon ground cumin - Salt and pepper to taste - Juice of 1 lime - Fresh cilantro, chopped for garnish You can change some ingredients to suit your taste. Try using chicken breasts for a leaner option. If you want less spice, remove the red chili pepper or use a milder pepper. You can also swap coconut milk for unsweetened almond milk for a lighter flavor. If you don’t have coconut milk, you can use heavy cream or yogurt. For olive oil, canola or avocado oil works well too. If fresh cilantro isn't available, parsley can make a good substitute. Always adjust salt and pepper to your liking. For the full recipe, check out the detailed instructions! For the best results, start with the chicken. Use 4 boneless, skinless chicken thighs. Place them in a large bowl. Add salt, pepper, smoked paprika, and ground cumin. Mix well so the chicken is coated with spices. This step adds great flavor. Next, gather your other ingredients. You need coconut milk, olive oil, garlic, ginger, and red chili pepper. These add depth to the dish. Mince 3 garlic cloves and grate 1 tablespoon of ginger. Slice 1 red chili pepper. Adjust the chili based on how spicy you like it. Heat 2 tablespoons of olive oil in a large skillet over medium heat. When the oil is hot, add the chicken. Sear the chicken thighs for 6-7 minutes on each side. You want them golden brown. After searing, remove the chicken and set it aside. In the same skillet, add the minced garlic, ginger, and sliced red chili pepper. Sauté these for about 2 minutes. This step fills your kitchen with a lovely aroma. Next, pour in 1 can of coconut milk. Stir well and bring it to a gentle simmer. Return the seared chicken to the skillet. Make sure it is submerged in the coconut sauce. Cover the skillet and simmer for 15-20 minutes. This helps the chicken become tender and flavorful. After cooking, squeeze the juice of 1 lime into the sauce. Stir well and taste for seasoning. Adjust if needed. For a great presentation, place the chicken on a platter. Spoon the coconut sauce over the top. Garnish with fresh chopped cilantro for added flavor and color. I also suggest serving this dish with fluffy white rice. The rice soaks up the rich coconut sauce. You can add lime wedges on the side for an extra zesty touch. This dish is not just tasty; it's a feast for the eyes too! For the full recipe, you can check out the detailed instructions above. To make the best Spicy Brazilian Coconut Chicken, start with fresh chicken thighs. They stay juicy and tender. Use good coconut milk for a rich flavor. If you can, choose a brand that has no additives. This will keep the dish clean and bright. Make sure to coat your chicken well with spices. This way, every bite bursts with flavor. Searing the chicken is key. It locks in juices and adds a nice golden color. Don’t rush this step! If you like more heat, add extra chili peppers. You can use a hotter variety like jalapeño or serrano. For less heat, remove the seeds from the chili. You can also add a pinch of cayenne for a slight kick. Taste as you go. This way, you can control the spice level to your liking. Serving matters! Place your chicken on a colorful platter. Spoon the rich coconut sauce over the top. This makes it look inviting. Serve with fluffy white rice. It soaks up the sauce and balances the spice. Add lime wedges on the side for a fresh touch. Squeeze some juice over the dish before eating. It brightens the flavors. Lastly, sprinkle chopped cilantro on top. This adds a pop of color and flavor. For the full recipe, refer to the earlier sections. {{image_2}} You can use different proteins for this dish. Chicken thighs are great, but try using chicken breasts for a leaner option. You can also swap in shrimp for a seafood twist. If you choose shrimp, cook it for just a few minutes until it turns pink. For a heartier option, consider using pork. Just make sure to adjust cooking time, as pork may take longer to cook through. If you want a vegetarian version, replace the chicken with hearty vegetables. Firm tofu works well in this dish. Press the tofu to remove excess water, then cut it into cubes. Sauté the tofu until golden before adding it to the coconut sauce. You can also use chickpeas for added protein and flavor. They will soak up the sauce nicely and add a different texture. Explore different flavors by using regional ingredients. Instead of coconut milk, try using cashew cream for a nutty twist. You could also add fresh mango for sweetness. Consider adding spices like turmeric or coriander for a unique flavor profile. If you can find them, use fresh herbs like lemongrass or kaffir lime leaves to elevate the dish. Each variation gives you a chance to discover new tastes while keeping the spirit of Spicy Brazilian Coconut Chicken. For the complete recipe, check out the [Full Recipe]. To store your Spicy Brazilian Coconut Chicken, let it cool first. Place it in an airtight container. This keeps the chicken fresh for about three to four days in the fridge. If you want to keep it longer, freeze it. Use a freezer-safe bag or container. The chicken can last up to three months in the freezer. Remember to label the container, so you know when you made it. When you're ready to enjoy leftovers, remove them from the fridge or freezer. If frozen, let it thaw in the fridge overnight. To reheat, place the chicken in a skillet on low heat. Add a splash of coconut milk to keep it moist. Heat for about 10 minutes or until warmed through. You can also use the microwave. Heat in short bursts, checking often to avoid drying it out. Meal prepping with Spicy Brazilian Coconut Chicken is easy and fun. Cook a big batch on the weekend. Portion it into containers with rice or veggies. This gives you quick lunches or dinners for the week. You can also use the chicken in salads or wraps. For variety, switch up the sides each day. Fresh cilantro adds a nice touch when you serve it. Check out the Full Recipe for more ideas. Spicy Brazilian Coconut Chicken comes from Brazil. This dish blends native ingredients like coconut and spices. It reflects Brazil's rich culture and tropical flavors. The use of coconut milk adds creaminess and depth. Many families enjoy this dish during special occasions. It showcases the warmth and diversity of Brazilian food. Yes, you can make this dish in advance. Preparing it a day before enhances the flavors. Just cook the chicken and sauce, then cool it down. Store it in an airtight container in the fridge. When ready to eat, reheat it on the stove. Make sure it's hot throughout before serving. I love serving Spicy Brazilian Coconut Chicken with fluffy white rice. The rice soaks up the delicious coconut sauce. You can also add lime wedges on the side. They give a fresh, zesty kick. Another great option is a light salad. A crunchy salad balances the meal well. For more ideas, check the Full Recipe for serving tips. This article covered everything you need for Spicy Brazilian Coconut Chicken. We explored ingredients, substitutions, and variations. You learned step-by-step instructions for preparation and cooking. We shared tips for perfecting the recipe and adjusting spice levels. Remember, cooking is an art. Try different ingredients to make it yours. Enjoy sharing this dish and impress your friends!
Spicy Brazilian Coconut Chicken Flavorful and Simple Dish
Get ready to spice up your dinner with Spicy Brazilian Coconut Chicken! This dish is not only packed with flavor but also super easy to
For these grilled ranch garlic Parmesan chicken skewers, start with: - 1.5 lbs chicken breast, cut into 1-inch cubes - 1/2 cup ranch dressing - 3 cloves garlic, minced - 1/2 cup grated Parmesan cheese - 1 tablespoon olive oil The chicken breast serves as a great base. It cooks fast and stays juicy. The ranch dressing brings flavor and moisture. Minced garlic adds a rich taste, while Parmesan gives a nice cheesy kick. Next, you need these essential seasonings: - 1 teaspoon paprika - 1 teaspoon garlic powder - 1 teaspoon onion powder - Salt and pepper to taste - Fresh parsley for garnish Paprika adds a bit of warmth and color. Garlic powder and onion powder boost the flavor. Don’t forget salt and pepper; they make everything better. Fresh parsley adds brightness when you serve the skewers. You can use bamboo or metal skewers. If you choose bamboo, soak them in water for 30 minutes. This step keeps them from burning on the grill. When you are ready, thread the marinated chicken cubes onto the skewers. Leave a little space between each piece. This helps them cook evenly. For the full recipe, check the instructions to ensure you get every detail right. Start by getting a large bowl. Add the ranch dressing, minced garlic, and grated Parmesan cheese. Pour in the olive oil. Then, add paprika, garlic powder, onion powder, salt, and pepper. Mix it all well. This marinade makes the chicken juicy and full of flavor. Next, cut the chicken breast into 1-inch cubes. Place the chicken in the bowl with the marinade. Make sure each piece is coated. Cover the bowl with plastic wrap. Let it sit in the fridge for at least 30 minutes. For more flavor, you can marinate it for up to 2 hours. After marinating, take the chicken out of the fridge. If you use bamboo skewers, soak them in water for about 30 minutes. This keeps them from burning on the grill. Now, take the marinated chicken pieces. Thread them onto the skewers. Leave a little space between each piece. This helps them cook evenly. Preheat your grill to medium-high heat. Once hot, place the skewers on the grill. Cook them for about 10 to 12 minutes. Turn the skewers often. This gives them nice grill marks. Check the chicken's internal temperature. It should reach 165°F (75°C). When done, take the skewers off the grill. Let them rest for a few minutes. This makes them juicier. Finally, garnish your skewers with freshly chopped parsley. This adds a pop of color and flavor. For the complete recipe, check the Full Recipe. To get those nice grill marks, heat your grill well. I suggest a medium-high heat. This helps the chicken sear quickly. When you place the skewers on the grill, don’t move them right away. Let them cook for 4-5 minutes before flipping. This gives them time to form those tasty marks. Marinating is key for tasty chicken. I recommend a minimum of 30 minutes in the fridge. For a richer taste, let it sit for up to 2 hours. The ranch dressing and garlic blend well during this time. They soak into the chicken and infuse it with flavor. Don’t forget to mix the marinade well before adding the chicken. To keep chicken juicy, don’t overcook it. Use a meat thermometer to check the temperature. It should reach 165°F (75°C). Also, let the skewers rest after grilling. This allows the juices to settle back into the meat. If you follow these tips, you’ll have tender, juicy chicken. For the full recipe, check out the detailed instructions above. {{image_2}} You can switch up the flavor of your chicken skewers. Try using different dressings. A honey mustard or BBQ sauce can add a sweet touch. You may also use Greek yogurt mixed with herbs. This gives a nice tang and keeps the chicken moist. Experiment with spices too. Adding cumin or chili powder can make it spicy. Adding vegetables to your skewers makes them colorful and tasty. Bell peppers, cherry tomatoes, and zucchini work well. Cut them into pieces that match your chicken size. This way, they cook evenly together. You can marinate the veggies with the chicken. They soak up the same great flavors. These skewers pair well with many sides. Serve them with a fresh salad or rice. You can also add a side of grilled corn. A dipping sauce of extra ranch or tzatziki adds more flavor. For drinks, a cold lemonade or iced tea works nicely. For complete details on making these skewers, check out the Full Recipe. After enjoying your grilled ranch garlic Parmesan chicken skewers, store leftovers in an airtight container. This keeps them fresh. Place the skewers in the fridge within two hours of cooking. They will stay good for about three to four days. Make sure to label the container with the date. This helps you track how long they have been stored. If you want to save some skewers for later, you can freeze them. Let the cooked skewers cool completely before freezing. Wrap them tightly in plastic wrap or foil. Then, place them in a freezer-safe bag. They can last up to three months in the freezer. When you’re ready to eat, just thaw them overnight in the fridge. To reheat your chicken skewers, you can use the oven or a microwave. For the oven, preheat it to 350°F (175°C). Place the skewers on a baking sheet and cover them with foil. Heat for about 10-15 minutes or until warm. If using a microwave, place the skewers on a microwave-safe plate. Heat in 30-second intervals until warm. Avoid overcooking, as this can dry out the chicken. Enjoy your delicious meal again! For the full recipe, visit the earlier section. You should marinate the chicken for at least 30 minutes. This time helps the chicken soak up the ranch flavor. For a richer taste, let it sit for up to 2 hours. Just remember, longer marination boosts the flavor even more. Yes, you can! Chicken is great, but you can also use pork, beef, or shrimp. Each meat adds its own flavor. Just adjust the cooking time based on what you choose. For beef, cook a little longer; for shrimp, cook less. The best way is to check the internal temperature. Use a meat thermometer to see if it hits 165°F (75°C). You can also look for clear juices when you cut into the chicken. If the juices run clear, it’s ready to eat! Enjoy your delicious grilled ranch garlic Parmesan chicken skewers. For the full recipe, check our earlier section. In this post, we covered how to make delicious chicken skewers, from choosing ingredients to grilling. We looked at marinades, seasonings, and tips for flavor and grill marks. You can also mix it up with veggies and different marinades. After cooking, store your leftovers correctly for later. Remember, the key to great skewers is fresh ingredients and smart cooking techniques. Enjoy your tasty creations and impress your friends at the next cookout. Cooking should be fun, so experiment and find your favorite ways!
Grilled Ranch Garlic Parmesan Chicken Skewers Delight
Get ready to impress your taste buds with Grilled Ranch Garlic Parmesan Chicken Skewers! You’ll love how quickly these juicy, flavor-packed skewers come together. Perfect
- 2 chicken thighs, boneless and skinless - 4 cups chicken broth - 2 packages of instant ramen noodles - 1 tablespoon sesame oil - 2 garlic cloves, minced - 1 inch ginger, minced - 2 tablespoons soy sauce - 1 tablespoon sriracha - 1 tablespoon miso paste - 1 cup bok choy, chopped - 1 carrot, julienned - 2 green onions, sliced - Soft-boiled egg (optional) - Sesame seeds for garnish For this Fiery Chicken Ramen, I love using fresh and vibrant ingredients. The chicken thighs give the dish a rich flavor. The chicken broth adds depth to the ramen. Instant ramen noodles are quick and easy to use. The sesame oil brings a nice nutty taste. Garlic and ginger add a zing that brightens the broth. Soy sauce gives it a savory kick. Sriracha adds heat, so adjust it based on your spice preference. Miso paste adds umami, making it more complex. Fresh bok choy and carrots provide color and crunch. Green onions offer a fresh bite. A soft-boiled egg makes it extra special. Finally, sesame seeds add a nice touch for garnish. This recipe is easy and perfect for any night. Follow my Full Recipe to make your own delicious bowl. Enjoy the bold flavors and warm comfort of this dish! *How to sauté garlic and ginger* First, get a pot and heat the sesame oil over medium heat. Add the minced garlic and ginger. Sauté for about 1 minute. You want to smell that great aroma. *Properly searing chicken thighs* Next, add the chicken thighs to the pot. Sear them for 3-4 minutes on each side. They should turn golden brown. This step adds a nice flavor to the chicken. *How to simmer chicken in broth* Once the chicken is browned, pour in the chicken broth. Bring it to a boil and then reduce the heat. Let it simmer for 15 minutes. This will fully cook the chicken and infuse the broth with flavor. *Shredding chicken for ramen* After simmering, take the chicken out of the pot. Use two forks to shred it into small pieces. Return the shredded chicken back to the pot. This makes the chicken easy to eat with noodles. *Cooking ramen noodles* Now, add the ramen noodles to the broth. Cook according to package instructions, usually 3-5 minutes. Make sure the noodles are tender but not mushy. *Incorporating vegetables and seasoning* In the last minute of cooking, stir in the chopped bok choy and julienned carrot. They add color and crunch. Finally, taste the broth and add more sriracha if you want it spicier. Serve the ramen in bowls, top with sliced green onions, and sprinkle with sesame seeds. Enjoy your fiery chicken ramen! For the full recipe, refer to the earlier sections. To enjoy your ramen just right, you can tweak the sriracha. If you want less heat, start with half a tablespoon. You can always add more later. For milder options, consider using sweet chili sauce or a dash of soy sauce. Both give flavor without too much spice. Using high-quality chicken broth makes a big difference. A rich broth adds depth and taste. You can also add spices like garlic powder or onion powder. These small changes boost the overall flavor. A hint of white pepper can add a nice kick too. To make your ramen look great, add colorful garnishes. Fresh green onions and sesame seeds add a nice touch. You can also place a soft-boiled egg on top for a pop of color. When you serve, use deep bowls to hold all the goodness. It makes the dish look even more inviting. Enjoy your Fiery Chicken Ramen! For the complete recipe, check out the Full Recipe section. {{image_2}} You can easily swap chicken for tofu or shrimp. Tofu works great for a vegetarian option. If you choose shrimp, cook it until pink and firm. You can also add different vegetables. Try mushrooms, bell peppers, or snap peas for extra crunch. They add color and flavor to your ramen. If you want to change the broth, use vegetable or beef broth. Vegetable broth gives a lighter taste, while beef broth adds richness. You can also make homemade broth from scratch. Start with bones and simmer them with vegetables and herbs. This will create a deep, savory flavor. To kick up the heat, add chili oil or chili flakes. A little goes a long way, so add slowly. You can also experiment with different hot sauces. Try a smoky sauce for depth or a tangy one for brightness. Adjust the spice level to what you enjoy most. Remember, these options let you customize your Fiery Chicken Ramen. Mix and match to find your perfect bowl. For the full recipe, check out the [Full Recipe]. To store your fiery chicken ramen, let it cool to room temperature. Use an airtight container. This keeps the flavors fresh and prevents spills. You can keep it in the fridge for up to three days. Make sure to label the container with the date. If you want to save some for later, freezing is a great choice. Place the ramen in a freezer-safe container. Be sure to leave some space for expansion. You can freeze it for up to a month. When you are ready to eat it, take it out and thaw it in the fridge overnight. When reheating, the stovetop is best. Pour the ramen into a pot and heat it slowly. Stir it gently to mix everything. If you use a microwave, put it in a bowl with a lid. Heat it in short bursts, stirring often. To make the ramen fresh again, add new green onions or extra sriracha when serving. This will bring back some of that bold flavor. The spice level of Fiery Chicken Ramen depends on how much sriracha you add. If you love heat, add more sriracha. If you prefer it milder, use less. Other factors include the type of broth and any extra spices you choose. You can also balance the heat with toppings like soft-boiled eggs or sesame seeds. This way, you can find the right spice level for your taste. Yes, you can easily make this recipe vegetarian! Swap the chicken for tofu or tempeh. Use vegetable broth instead of chicken broth. Keep the rest of the ingredients the same for a tasty plant-based version. You can also add more vegetables like mushrooms or bell peppers to enhance flavor and nutrition. Ramen pairs well with many side dishes. Some tasty options include: - Gyoza or potstickers - Edamame sprinkled with sea salt - Seaweed salad - Pickled vegetables These sides will complement your ramen and add variety to your meal. Making homemade ramen noodles is simple and fun! Here’s a quick overview: 1. Mix flour, water, and salt to form a dough. 2. Knead the dough until smooth, about 10 minutes. 3. Let it rest for 30 minutes. 4. Roll out the dough thin and cut it into noodle shapes. 5. Boil the noodles for 2-3 minutes before adding them to your broth. Fresh noodles add a delightful texture to your Fiery Chicken Ramen. Be sure to try it! In this article, we explored the essential ingredients for a delicious Fiery Chicken Ramen. We covered preparation, cooking steps, and tips for enhancing flavor and presentation. Always feel free to adjust ingredients to match your taste. Remember, ramen is versatile—try different proteins, broths, and garnishes. Whether you want spice or comfort, this dish delivers. Keep these techniques in mind for a fun and tasty cooking experience. Enjoy your ramen adventure!
Fiery Chicken Ramen Bold and Flavorful Recipe
Get ready to ignite your taste buds with my Fiery Chicken Ramen recipe! This bold and flavorful dish combines tender chicken, savory broth, and a
- 2 cups shredded cooked chicken - 1 cup Greek yogurt - 1 cup low-fat sour cream - 1 can (10 oz) green enchilada sauce - 1 cup low-fat shredded Monterey Jack cheese - 1 cup fresh spinach, chopped - 8 small whole wheat tortillas The main ingredients make this dish both tasty and light. I use shredded cooked chicken for protein. Greek yogurt adds creaminess and tang. Low-fat sour cream keeps it light but still rich. Green enchilada sauce brings spice and flavor. Low-fat shredded Monterey Jack cheese gives a nice melt. Fresh spinach adds color and nutrients. Finally, whole wheat tortillas are perfect for wrapping. - 1 teaspoon garlic powder - 1 teaspoon onion powder - Salt and pepper to taste - Fresh cilantro for garnish (optional) Seasoning is key to flavor. Garlic powder and onion powder add depth. Use salt and pepper to enhance taste. Fresh cilantro can brighten the dish, but it's optional. - Alternatives for Greek yogurt and sour cream: You can use dairy-free yogurt or cashew cream. - Low-carb tortilla options: Try almond flour or cauliflower tortillas. - Cheese substitutes: Vegan cheese or nutritional yeast work well. These substitutions let you customize the recipe. They help meet your dietary needs or preferences. You can still enjoy these enchiladas in many ways! For the full recipe, check out the complete guide. To start, shred your cooked chicken into bite-sized pieces. You can use rotisserie chicken for quick prep. Next, chop one cup of fresh spinach. Make sure it is in small pieces so it mixes well in the filling. This step adds color and nutrients to your dish. Take one whole wheat tortilla and place about ⅓ cup of your chicken mixture in the center. Roll the tortilla tightly, keeping the filling inside. Place it seam side down in a greased 9x13 inch baking dish. Repeat this step for all your tortillas until you fill the dish. Cover the dish with aluminum foil to keep the moisture in. Bake in your preheated oven at 350°F for 20 minutes. After that, remove the foil and add the rest of your cheese on top. Bake for another 10 minutes, or until the cheese is melted and bubbly. Enjoy your Skinny White Chicken Enchiladas! For the full recipe, check out the earlier section. To keep your enchiladas moist, use shredded chicken that is juicy. You can also mix in Greek yogurt with the chicken to add creaminess. When rolling tortillas, warm them first. This helps prevent tears and makes them easier to handle. A quick 10 seconds in the microwave can work wonders. To make these enchiladas even lighter, swap low-fat sour cream for plain Greek yogurt. You can also use whole wheat tortillas to add fiber. Adding more veggies is easy. Try mixing in chopped bell peppers or zucchini for extra color and nutrition. Serve these enchiladas with a fresh salad for a light meal. A side of brown rice also pairs well. For dipping sauces, try a tangy salsa or a green sauce to enhance the flavors. If you want more zing, add a squeeze of lime on top! {{image_2}} You can easily make a meatless version of these enchiladas. Use beans and vegetables instead of chicken. Black beans or pinto beans work well. Add chopped bell peppers, zucchini, or mushrooms for flavor and texture. This option is healthy and still very filling. If you love heat, try a spicy version! Add diced jalapeños to the chicken mix or use a spicy enchilada sauce. You can also sprinkle some red pepper flakes on top before baking. This will give your dish a nice kick. To make the enchiladas dairy-free, swap out the cheese and sour cream. Use cashew cream or a dairy-free yogurt instead. Nutritional yeast can add a cheesy flavor without the dairy. This way, everyone can enjoy the dish. For more details, check the Full Recipe. To keep your Skinny White Chicken Enchiladas fresh, store leftovers in an airtight container. Make sure to let them cool down before you put them in the fridge. They will stay good for up to three days. If you want to keep them fresh longer, add a layer of foil over the container. This helps prevent moisture loss and keeps the enchiladas tasty. You can also freeze these enchiladas for future meals. Wrap each enchilada tightly in plastic wrap, then place them in a freezer-safe bag. This method helps to protect them from freezer burn. When you are ready to eat, thaw them in the fridge overnight. To reheat, bake them at 350°F (175°C) for about 25 minutes. Cover them with foil for the first 15 minutes, then remove it to let the cheese bubble. If stored properly, these enchiladas can last up to three days in the fridge. In the freezer, they can last for up to three months. Always check for signs of spoilage, like strange smells or changes in texture. If you notice any, it's best to toss them. Enjoy your healthy meal! Yes, you can prepare these enchiladas ahead of time. Just follow the recipe up to the baking step. Once you fill the tortillas and place them in the dish, cover it with plastic wrap or foil. Store it in the fridge for up to 24 hours. When you're ready to bake, remove the cover and bake as directed. This makes weeknight dinners easy and quick! Yes, these enchiladas can be gluten-free! Just swap regular tortillas for gluten-free ones. Many brands offer gluten-free options made from rice or corn. Always check the label to ensure they fit your needs. To make a complete meal, serve these enchiladas with: - A fresh green salad - Mexican rice or quinoa - Black beans for extra protein - Sliced avocado or guacamole - Salsa or sour cream on the side These sides will balance the flavors and make your meal even more filling. These Skinny White Chicken Enchiladas are easy to make and delicious. You learned about the main ingredients, step-by-step instructions, and tips for the best results. You can also try variations like vegetarian or spicy options. Remember to store leftovers properly for lasting freshness. Enjoy these enchiladas with fresh sides or dips. Your meal will be tasty and healthy. Cooking is fun, and you can easily customize this dish to suit your taste. Try them today!
Skinny White Chicken Enchiladas Flavorful and Light Meal
Looking for a tasty meal that won’t weigh you down? Our Skinny White Chicken Enchiladas are just what you need! Packed with flavor and light
To make loaded burger bowls, you need a few key ingredients. Here’s what you’ll need: - 1 lb ground beef or turkey - 1 teaspoon garlic powder - 1 teaspoon onion powder - 1 teaspoon smoked paprika - Salt and pepper to taste - 4 cups mixed greens (spinach, arugula, and romaine) - 1 cup cherry tomatoes, halved - 1 cup cucumber, diced - 1/2 cup pickles, sliced - 1/2 cup shredded cheddar cheese - 1/4 cup red onion, thinly sliced - 1/4 cup ketchup (for drizzling) - 1/4 cup mustard (for drizzling) - 1 avocado, diced (optional) These ingredients blend to create a tasty and vibrant meal. The ground meat gives you protein, while the veggies add crunch and freshness. You can customize your burger bowls with fun toppings. Here are some great options: - Sliced jalapeños for heat - Fresh herbs like parsley or cilantro - Crispy bacon bits for extra flavor - Sliced olives for a briny touch - Hot sauce for spice lovers Adding these toppings makes your burger bowl even more exciting. They also let you express your own taste! Here’s what you can expect nutritionally from each serving of the loaded burger bowl: - Calories: Approximately 450 - Protein: About 30g - Carbohydrates: Roughly 25g - Fiber: Around 6g - Fat: About 25g This meal is rich in protein and offers a good balance of fats and carbs. It's hearty yet healthy, making it perfect for lunch or dinner. For the full recipe, check the section above! First, get a large mixing bowl. Add 1 pound of ground beef or turkey. Then, sprinkle in 1 teaspoon each of garlic powder, onion powder, and smoked paprika. Season with salt and pepper to taste. Mix everything together until it’s well combined. This step packs the meat with flavor. Next, heat a skillet over medium-high heat. Shape the meat mixture into small patties. You can make 4 to 6 patties, depending on how big you want them. Cook the patties in the skillet for about 4 to 5 minutes on each side. They should be well browned and cooked to your liking. Once done, remove them from the heat and let them rest for a couple of minutes. This helps keep them juicy. Now, it's time to build your burger bowls. Start by placing 4 cups of mixed greens in serving bowls. I like using spinach, arugula, and romaine for a nice mix. Next, add the cooked burger patties on top of the greens. Layer on 1 cup of halved cherry tomatoes, 1 cup of diced cucumber, and 1/2 cup of sliced pickles. Sprinkle 1/2 cup of shredded cheddar cheese and 1/4 cup of thinly sliced red onion over everything. If you want, add diced avocado for creaminess. Finally, drizzle with ketchup and mustard just before serving. This will make your bowls look and taste amazing! For the full recipe, check out the details above. To make a great burger patty, start with fresh meat. I like to use ground beef or turkey. The fat content matters; aim for 80/20 beef for juiciness. Mix in spices gently; overworking it can make the meat tough. Shape patties to around one inch thick. This helps them cook evenly. Always cook them on medium-high heat. Flip them only once to keep the juices in. Presentation plays a big role in how we enjoy food. Use clear glass bowls to show off the colors. Start with a bed of mixed greens. Layer your cooked patties on top. Then add bright cherry tomatoes and crunchy cucumbers. Don’t forget the colorful pickles and cheese. For a final touch, you can add fresh herbs like parsley. This makes the dish look vibrant and inviting. One common mistake is overcooking the patties. This can dry them out. Always check for doneness with a food thermometer. Another mistake is using too many toppings. Keep it balanced for the best taste. Also, do not skip the resting time for patties. This helps keep them juicy. Lastly, avoid soggy greens by adding them last. This keeps everything fresh and crisp. For the full recipe and more details, please check the section on Loaded Burger Bowls. {{image_2}} You can easily make a tasty burger bowl without meat. Use black beans, lentils, or chickpeas as the base. They pack flavor and protein. You could also try a veggie burger patty. These options keep the meal hearty and filling. Add your favorite toppings to make it your own. Think of fresh veggies and zesty sauces. If you're not a fan of beef, try other meats. Ground turkey works well and is leaner. Chicken is another great choice. Use shredded or ground chicken for a different flavor. For a plant-based option, grab some tofu or tempeh. Crumble it up and season well. Each protein option offers a unique taste and texture. Spice up your burger bowl with different seasonings. Swap garlic powder for fresh minced garlic for a stronger taste. Try adding cumin or chili powder for a warm kick. You can also mix in herbs like basil or oregano. Experiment with sauces, too. BBQ sauce or sriracha can add a fun twist. With these changes, you can create endless flavor profiles. For the full recipe, check out the loaded burger bowls section. To keep leftover burger bowls fresh, place them in airtight containers. Make sure to store each ingredient separately if possible. This helps preserve flavors and textures. Refrigerate the containers within two hours of serving. Leftover burger bowls can last for 3-4 days in the fridge. When you’re ready to enjoy leftovers, heat the protein first. Use a skillet over medium heat for best results. Cook until the meat is hot but not dry. You can warm the veggies in the microwave for about 30 seconds. Avoid reheating the greens, as they can wilt quickly. Meal prepping is a great way to save time. Cook the burger patties in advance and store them in the fridge. Chop the veggies and keep them in separate containers. Prepare the greens just before serving to keep them fresh. This way, you can quickly assemble your burger bowls when you’re ready to eat. For the full recipe, refer to the instructions above. Burger bowls are a fun twist on the classic burger. They have all the great burger flavors, but without the bun. Instead, you use a base of fresh greens. You can top it with cooked meat, veggies, and your favorite sauces. It’s like a salad and a burger in one dish. Yes, you can prep burger bowls in advance. Cook the meat and chop the veggies. Store them in separate containers. When you’re ready to eat, just assemble the bowls. This makes it easy for busy days. Many restaurants offer burger bowls now. Look at burger joints, salad bars, or health-focused spots. They often have unique toppings and sauces. If you don’t see it on the menu, ask the staff. They may make it for you. You can easily customize your burger bowl. Here are some ideas: - Meat Options: Use ground turkey, chicken, or plant-based meat. - Greens: Choose spinach, kale, or romaine. - Toppings: Add or skip cheese, pickles, or sauces based on your diet. - Dressings: Swap ketchup and mustard for low-calorie dressings or vinaigrettes. Experiment with flavors to find what you enjoy most. For a full recipe, check out Loaded Burger Bowls! Loaded burger bowls are fun, tasty, and easy to make. We covered the key ingredients, step-by-step cooking, and tips for a great meal. You can mix and match proteins and toppings to suit your taste. Storing and reheating them is simple, making meal prep a breeze. Remember, you can always make adjustments based on your diet or preferences. Dive in and create your own delicious burger bowl today!
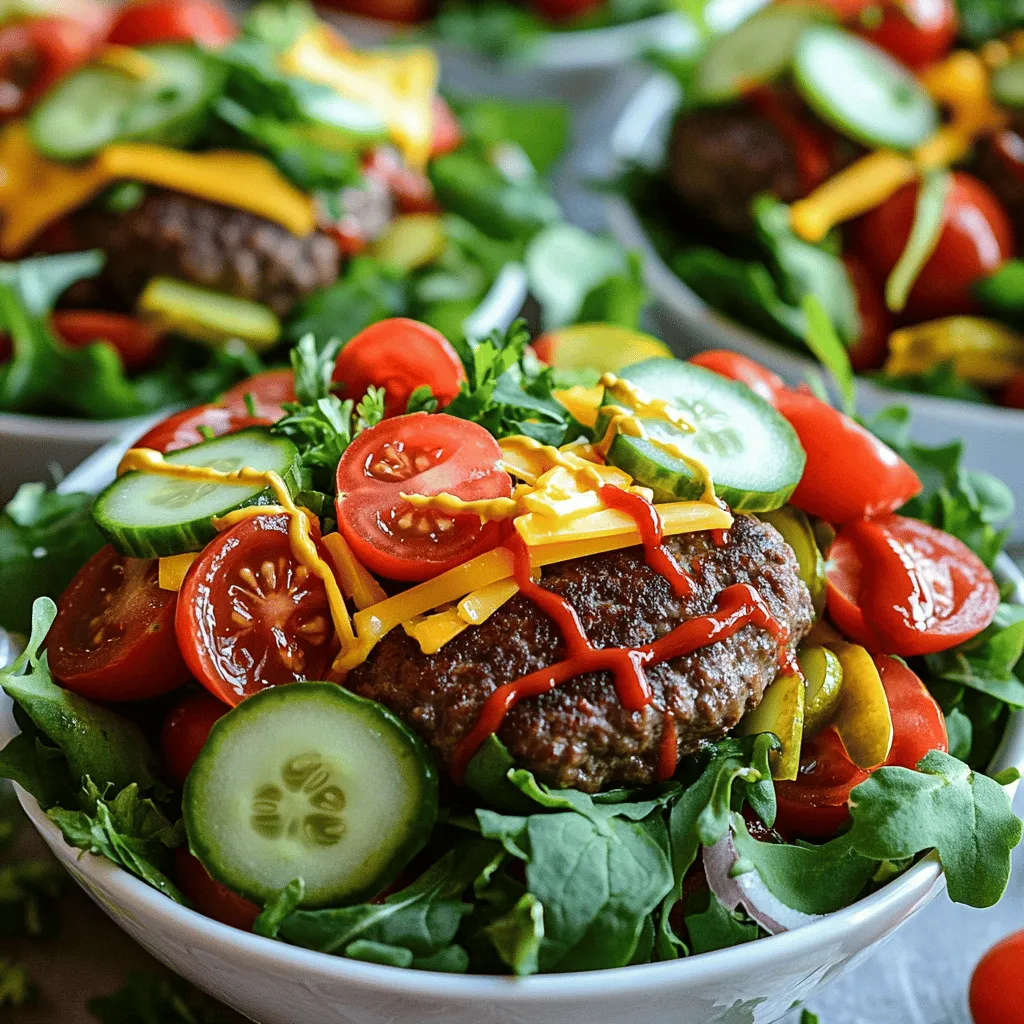
Burger Bowls Packed with Flavorful Goodness
Craving a meal that’s bursting with flavor and easy to make? Let me introduce you to burger bowls! These tasty bowls pack all your favorite
- 8 oz penne or rigatoni pasta - 1 lb beef sirloin, thinly sliced - 1 tablespoon olive oil - 1 medium onion, sliced - 1 bell pepper (red or green), sliced - 2 cloves garlic, minced - 1 teaspoon Worcestershire sauce - 1 cup heavy cream - 1 cup provolone cheese, shredded - ½ cup mozzarella cheese, shredded - Salt and pepper to taste - Fresh parsley, chopped for garnish When I cook Philly Cheese Steak Pasta, I love how simple the ingredients are. Each one plays a key role in the flavor. The beef gives a rich taste, while the cheeses create a creamy texture. The veggies add color and crunch. - You can use gluten-free pasta if you need to avoid gluten. - For cheese, try gouda or cheddar for a twist in flavor. - If you want more veggies, mushrooms or spinach work great in this dish. These options keep the dish tasty and fun. You can easily make Philly Cheese Steak Pasta your own. If you want to explore more flavors, check the Full Recipe for ideas! Cook the pasta until it is al dente. This means it should be firm but not hard. Follow the package instructions for the best results. After cooking, drain the pasta and set it aside. This way, it will be ready when you need it. Heat a large skillet over medium-high heat. Add one tablespoon of olive oil. Once the oil is hot, add the thinly sliced beef sirloin. Season it with salt and pepper. Sear the beef for about 3-4 minutes until it turns brown. After that, remove it from the skillet and set it aside. In the same skillet, add your sliced onion and bell pepper. Sauté them until they soften, which takes about 4-5 minutes. Then, add two cloves of minced garlic and cook for one more minute. Return the beef to the skillet, mixing it with the sautéed veggies. Stir in one teaspoon of Worcestershire sauce. Lower the heat and pour in one cup of heavy cream. Mix well to combine everything. Now it's time for the cheese! Gradually add one cup of shredded provolone cheese and half a cup of shredded mozzarella cheese. Stir until the cheese melts and forms a creamy sauce. Next, gently fold in the cooked pasta, making sure it gets coated in that cheesy goodness. Taste the dish and adjust the seasonings if needed. Finally, sprinkle the remaining mozzarella cheese on top. Cover the skillet for about 2-3 minutes so the cheese melts nicely. Enjoy this easy and creamy delight! For the Full Recipe, check the earlier section. To get a creamy sauce, melt cheese slowly. Start with low heat. Mix in cheese bit by bit. This makes it blend well into the sauce. If you add all the cheese at once, it may clump. To prevent sauce separation, stir often. The heavy cream helps keep it smooth. If it gets too thick, add a splash of pasta water. This adds moisture without losing flavor. Prepping your ingredients ahead saves time. Slice the onions, peppers, and beef in advance. You can also shred the cheese early. This makes cooking quick and easy. One-pot cooking is a great time-saver. Cook the pasta and sauce in the same pot. You’ll have fewer dishes to wash, and flavors mix better this way. Pair Philly cheese steak pasta with a fresh salad. A crisp Caesar or garden salad works well. It adds a nice crunch to your meal. For garnishes, sprinkle fresh parsley on top. This adds color and a hint of flavor. You might also try fresh basil or a dash of red pepper flakes for a kick. For more tips, check the Full Recipe for step-by-step guidance to make your cooking even better. {{image_2}} You can make Philly cheese steak pasta even better with veggies. I love adding mushrooms and spinach. - Mushrooms: They add a nice earthy taste. Slice them thin and sauté them before adding to the dish. - Spinach: This veggie cooks fast and adds color. Toss in fresh spinach at the end so it wilts nicely. For other veggies, try bell peppers, zucchini, or broccoli. Cook them until they are soft but still bright. This keeps the meal healthy and colorful. To boost flavor, add spices and seasonings. A pinch of garlic powder or Italian herbs can work wonders. You can also mix up the meat. If you're not a fan of beef, try chicken or turkey. For plant-based options, use mushrooms or tempeh. - Spices: Consider paprika for a smoky taste or crushed red pepper for heat. - Meat Options: Chicken or pork can give a new twist to the dish, while plant-based meats offer great taste too. You can adapt this dish to fit your diet. For low-carb or keto options, use zucchini noodles or spaghetti squash. This keeps it tasty without the carbs. If you're dairy-free, swap heavy cream for coconut milk or a nut-based cream. Use dairy-free cheese to keep it creamy. These tweaks make the dish fit for everyone while still keeping it yummy. To keep your Philly cheese steak pasta fresh, cool it to room temperature. Transfer the pasta to an airtight container. Store it in the fridge for up to three days. For longer storage, freeze it in a safe container. It can last for about three months in the freezer. Just remember to label it with the date! For reheating, warm your pasta in the microwave or on the stove. If using a microwave, heat it in 30-second intervals. Stir it well each time. On the stove, use low heat to avoid burning. Add a splash of cream or broth to keep it moist. This helps prevent dryness during reheating. Enjoy your creamy delight just like the first time! Philly Cheese Steak Pasta is a fun twist on the classic sandwich. It combines pasta with tender beef, peppers, and cheese. This dish has roots in Philadelphia, where the cheese steak first gained fame. It captures the taste of the original sandwich and makes it a hearty meal. Yes, you can make this dish ahead of time. Here are some tips to help you prep: - Cook the pasta and beef separately. This keeps them from getting mushy. - Store the beef and sauce in the fridge for up to two days. - Reheat gently before mixing with the pasta. This keeps the flavors fresh. This dish pairs well with many sides. Here are some ideas: - A simple green salad adds freshness. - Garlic bread complements the creamy sauce well. - Steamed vegetables provide a healthy balance. You can find the Full Recipe for Philly Cheese Steak Pasta with detailed cooking steps and nutritional info [here](#). This blog post covered how to make Philly Cheese Steak Pasta. We looked at ingredients, cooking steps, and tips for a great meal. I shared ways to adapt the dish for different diets and tastes. Remember, you can store leftovers and reheat them without losing flavor. Experiment with veggies and flavors for your perfect version. Enjoy your cooking adventure and impress everyone at the table with a delicious dish!
Philly Cheese Steak Pasta Easy and Creamy Delight
Craving a creamy, cheesy dish that packs a punch? You’re in the right spot! Today, I’ll show you how to whip up a delicious Philly