Dinner
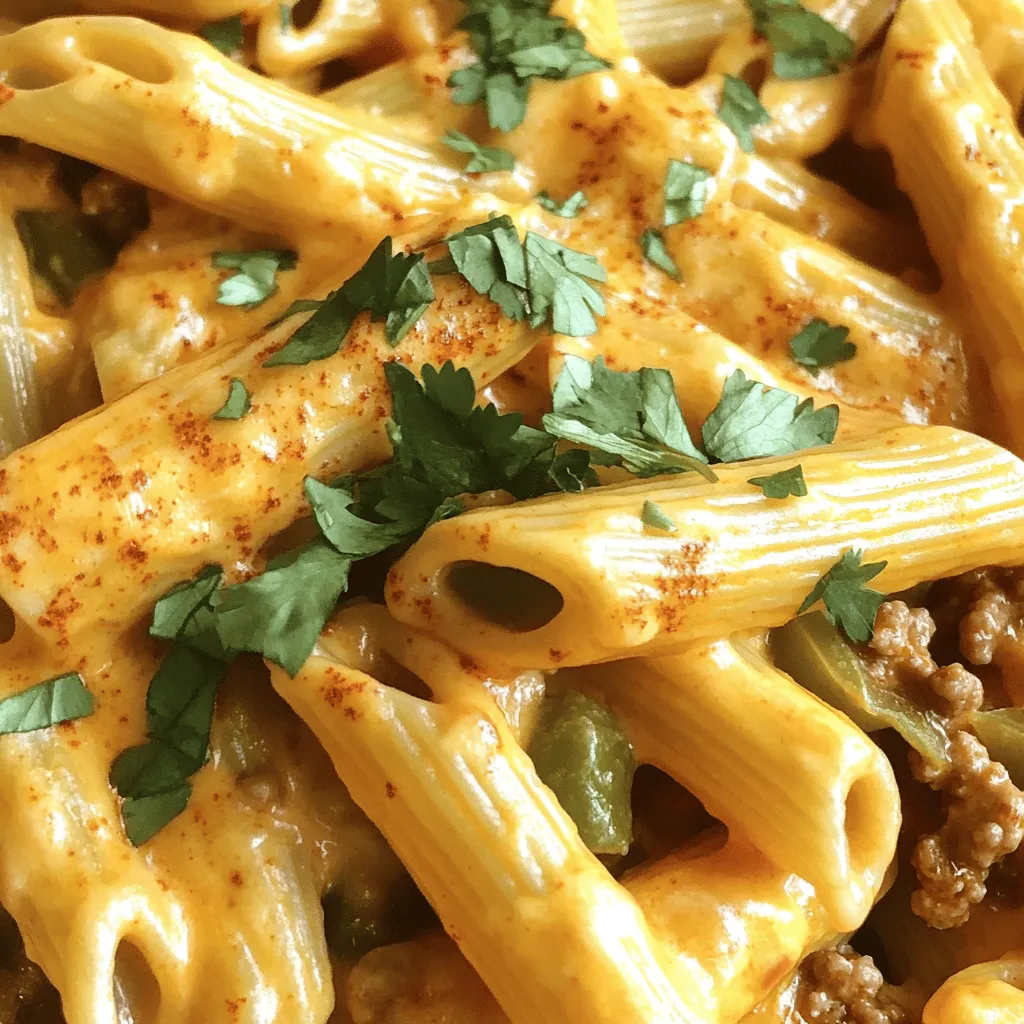
Creamy Rotel Pasta with Ground Beef Delightful Dish
Looking for a quick and satisfying meal? You’re in the right place! My Creamy Rotel Pasta with Ground Beef is a perfect blend of flavors
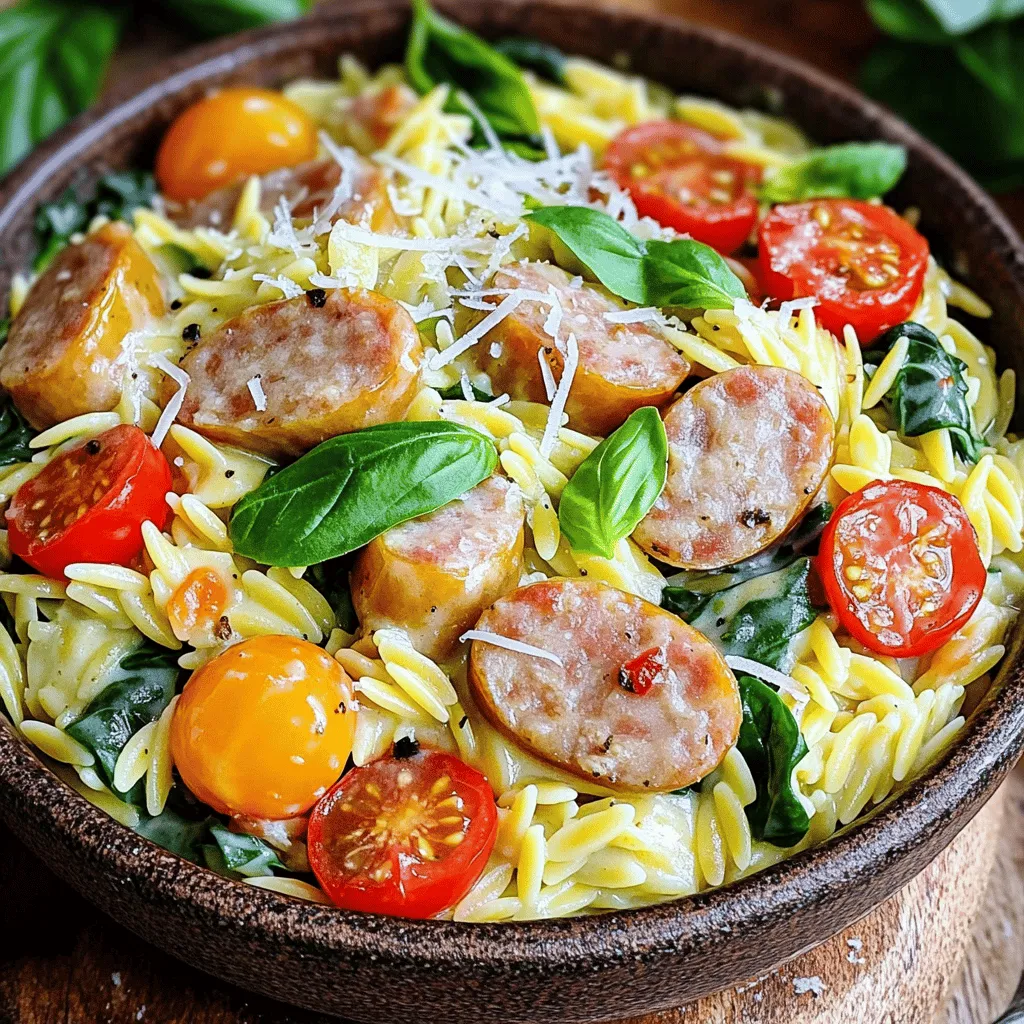
Creamy Chicken Sausage Orzo Flavorful Dinner Idea
Looking for a quick, tasty dinner idea? You’ll love Creamy Chicken Sausage Orzo! This dish combines rich flavors and creamy goodness in every bite. I’ll
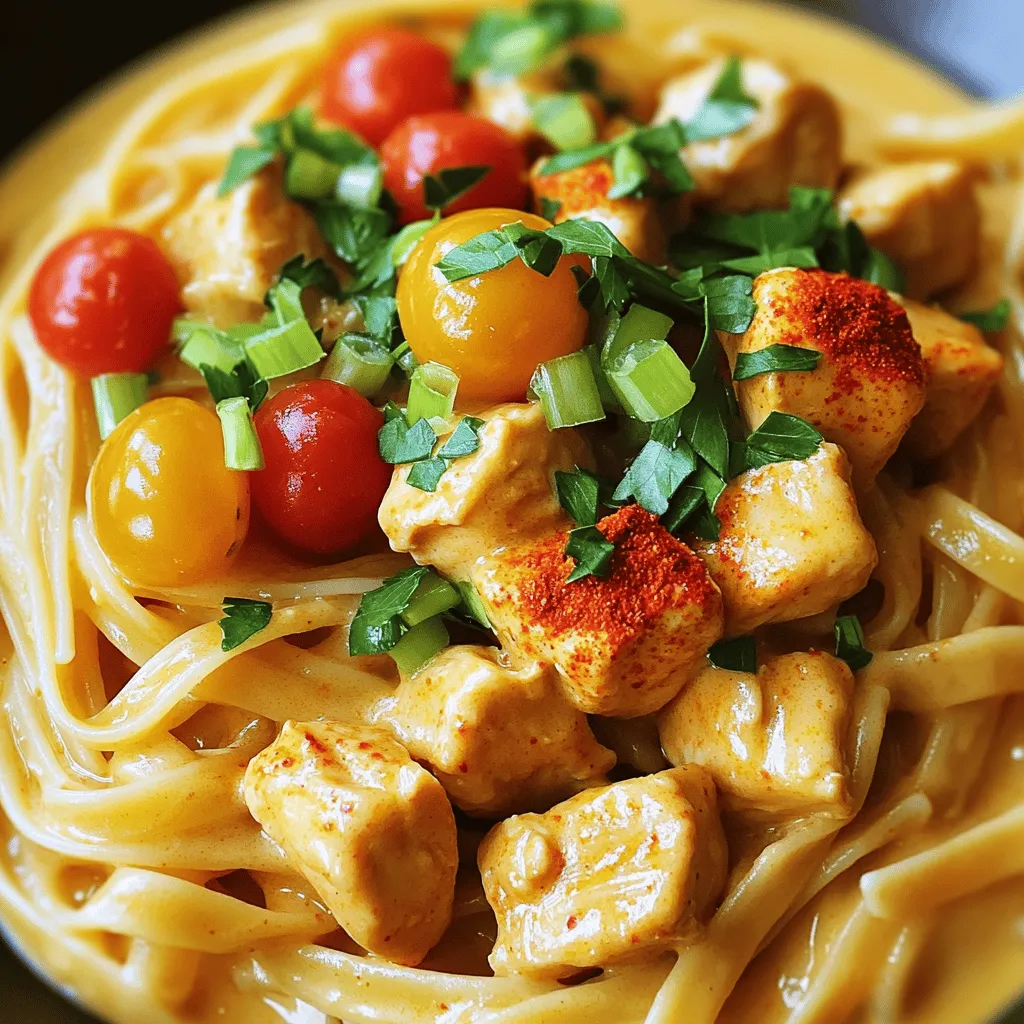
Quick Cowboy Butter Chicken Linguine Savory and Easy Dish
Ready for a meal that’s both savory and easy? My Quick Cowboy Butter Chicken Linguine hits the spot! With vibrant flavors and simple steps, this
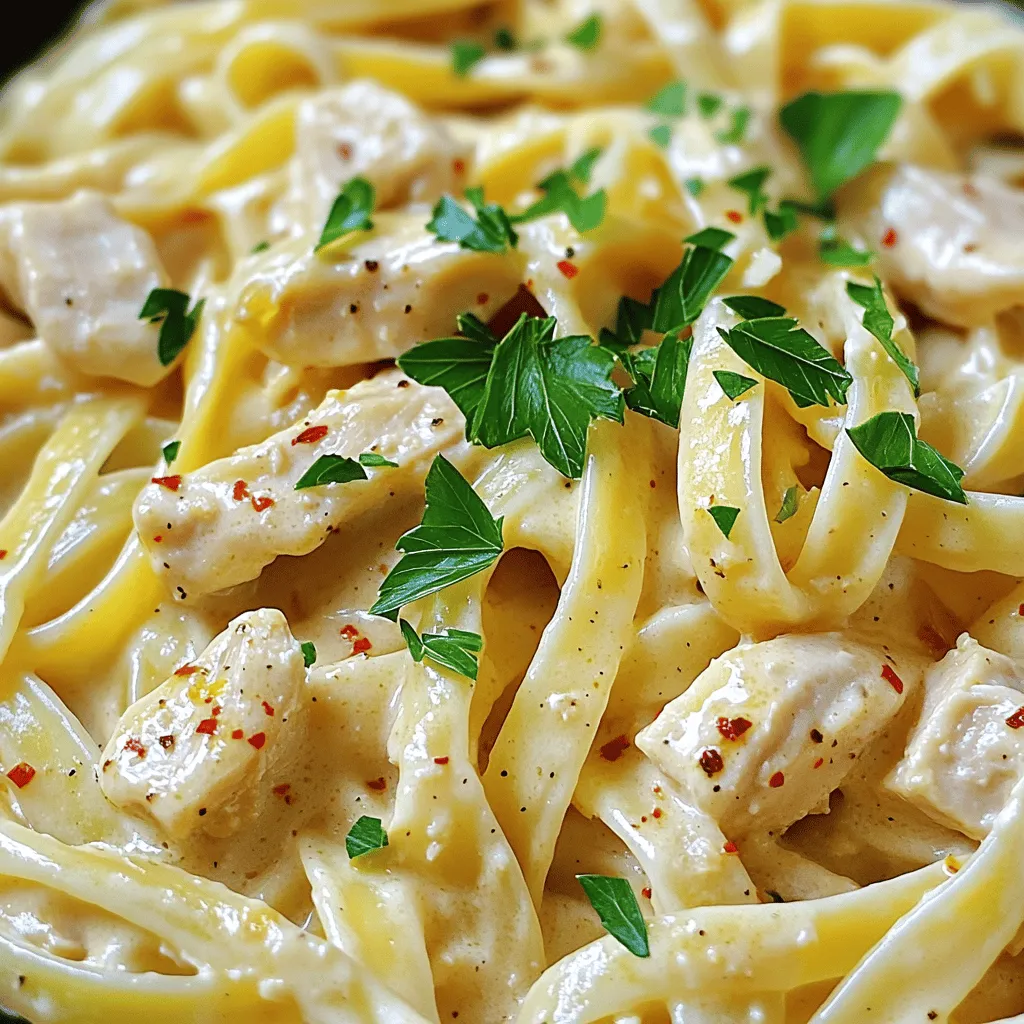
Creamy Chicken Garlic Parmesan Pasta Delightful Recipe
Are you ready to savor a rich and tasty meal? This Creamy Chicken Garlic Parmesan Pasta is your next go-to dish. Packed with flavor and
![- 4 chicken sausages - 2 medium zucchinis, sliced into half-moons - 1 pint cherry tomatoes, halved Chicken sausages are lean and flavorful. They bring a juicy taste to this dish. Use fresh chicken sausages for the best results. Zucchini adds nice texture and absorbs flavors well. The cherry tomatoes give a sweet burst when cooked, making them a great addition. - 3 cloves garlic, minced - 2 tablespoons olive oil - 1 teaspoon dried oregano - 1 teaspoon smoked paprika Garlic adds depth and aroma. Olive oil helps in roasting the vegetables and gives richness. Dried oregano provides a classic flavor, while smoked paprika adds a hint of smokiness. These ingredients work together to elevate the taste of the dish. - Salt and pepper - Fresh basil leaves for garnish Salt and pepper are essential for enhancing all flavors. Fresh basil leaves add a bright finish. You can sprinkle them on top just before serving. Feel free to adjust the seasoning to suit your taste. For the full recipe, click here. - Preheating the oven Start by preheating your oven to 400°F (200°C). This helps cook everything evenly. - Preparing vegetables Slice the zucchinis into half-moons. Halve the cherry tomatoes. Mince the garlic. Place all these in a large bowl. - Roasting in the oven Drizzle olive oil over the veggies. Add oregano, smoked paprika, salt, and pepper. Toss everything well to coat. Spread the veggies on a baking sheet. Nestle the chicken sausages among them. Bake for 25-30 minutes. Stir halfway for even cooking. - Mixing and garnishing After baking, let everything cool for a few minutes. Slice the sausages into bite-sized pieces. Mix the sausages with the roasted veggies on the baking sheet. - Transfer to serving platter Carefully transfer the mixture to a serving platter. It looks colorful and inviting. - Optional garnishes For a fresh touch, add torn basil leaves on top. They give a burst of flavor. For more details, check the Full Recipe. Choosing quality chicken sausages I always look for chicken sausages made from lean chicken breast. They should be fresh and free from fillers. Check the label for simple ingredients. Quality matters for taste! Optimal zucchini and tomato selection Choose firm zucchinis without soft spots. For tomatoes, pick plump cherry tomatoes. Their sweetness enhances the dish. Fresh veggies make a big difference in flavor. Ensuring even cooking Cut the zucchini into similar sizes. This helps them cook evenly. Spread the veggies and sausages out on the baking sheet. This allows hot air to circulate and cook everything well. Tips for perfect seasoning Don't be shy with the seasoning. Olive oil helps the spices stick. A mix of salt, pepper, oregano, and smoked paprika adds depth. Taste as you go to find your perfect balance. Pairing suggestions Serve this dish with crusty bread or a side salad. A light vinaigrette can brighten the meal. You may also enjoy it with a glass of white wine. Additional side dishes Try pairing it with quinoa or couscous. These sides soak up the delicious juices. You can also add a fresh herb salad for a tasty contrast. For the full recipe, check out the section above. {{image_2}} You can switch up the chicken sausages for other types. Pork or turkey sausages work well. They add different flavors and textures. If you want a spicy kick, try chorizo. Adding other vegetables can also change the dish. Bell peppers, onions, or spinach are great choices. They add color and taste. You can use any veggies you like. Just remember to cut them into similar sizes for even cooking. Herbs and spices can really change the taste. If you love freshness, try thyme or rosemary. For a bit of heat, add red pepper flakes. You can even mix herbs for a unique flavor. Incorporating cheese or nuts can add richness. Feta or goat cheese crumbles work nicely. They melt a bit, adding creaminess. Toasted pine nuts or walnuts also add a nice crunch. Sprinkle them on top before serving for added texture. You can grill the chicken sausages instead of baking them. This gives a smoky flavor and nice grill marks. Just cook them on medium heat until they are done. Skillet cooking is another option. Heat a bit of oil in a pan, then cook the sausages. Add the zucchinis and tomatoes halfway through. This method gives you a nice, caramelized finish. For the full recipe, check out the [Full Recipe]. To keep your chicken sausages with zucchini and tomatoes fresh, store leftovers in a sealed container. Place them in the fridge within two hours of cooking. This helps prevent bacteria growth. Use the leftovers within three to four days for the best taste and safety. For longer storage, you can freeze the dish. Allow it to cool completely before freezing. Transfer the cooled mixture to a freezer-safe container. Make sure to leave some space at the top, as liquids expand when frozen. This dish can last up to three months in the freezer. Reheating your meal properly keeps it tasty. To reheat, you can use the oven or microwave. If using the oven, preheat it to 350°F (175°C). Place the mixture in an oven-safe dish and cover it with foil. Heat for about 15-20 minutes, checking to ensure it warms evenly. In the microwave, use a microwave-safe bowl. Heat in short intervals of one to two minutes, stirring in between. This helps maintain the flavor and texture of the chicken sausages and vegetables. The shelf life of this dish depends on how you store it. In the fridge, the chicken sausages with zucchini and tomatoes last three to four days. If you freeze it, the shelf life extends to about three months. Always check for any signs of spoilage before consuming leftovers. Enjoy this full recipe to make the most of your meal prep! You should cook chicken sausages with zucchini and tomatoes for 25 to 30 minutes in the oven. This time allows the sausages to cook fully and the veggies to become tender. Always check that the sausages reach an internal temperature of 165°F (74°C) for safety. While cooking, stir the vegetables halfway through to ensure even roasting. Yes, you can prepare this recipe ahead of time. You can chop the zucchini and halve the tomatoes a day before. Store them in an airtight container in the fridge. You can also season the chicken sausages and mix them with the veggies. Cover the dish and keep it in the fridge until you are ready to cook. This dish is great for meal prep! You can divide the cooked chicken sausages and veggies into meal containers. Store them in the fridge for up to four days. To keep it fresh, let it cool before you seal the containers. You can reheat the meals in the microwave or oven when you're ready to eat. This recipe is healthy and tasty. Each serving has about 350 calories. You get lean protein from the chicken sausages, which helps build muscle. Zucchini offers fiber, while tomatoes provide vitamins A and C. This meal is balanced and full of nutrients, making it a smart choice for any meal. This blog post guides you through a simple and healthy recipe. You learned about key ingredients like chicken sausages, zucchini, and cherry tomatoes. We explored easy steps for preparation, cooking, and serving suggestions. I shared tips for selecting top ingredients and variations for extra flavor. You now know how to store leftovers properly and answered common questions. Cooking should be fun and tasty. Enjoy experimenting with this dish to suit your taste!](https://stirredrecipes.com/wp-content/uploads/2025/06/7f7b7f14-a20f-4b76-895a-daa96aaab85c.webp)
Flavorful Chicken Sausages with Zucchini and Tomatoes
Are you ready to spice up your dinner with a tasty, healthy dish? This recipe for flavorful chicken sausages with zucchini and tomatoes is easy

Hobo Casserole with Ground Beef Irresistible Comfort Dish
Are you looking for a meal that brings comfort and warmth? Hobo Casserole with Ground Beef is your answer. This hearty dish combines simple ingredients

Chicken Burrito Casserole Irresistible Comfort Dish
If you crave a cozy meal that satisfies, look no further than Chicken Burrito Casserole. With layers of tender chicken, savory rice, and gooey cheese,
![- 2 boneless, skinless chicken breasts - 1 cup buttermilk - 1 cup panko breadcrumbs - 1/2 teaspoon garlic powder - 1/2 teaspoon paprika - Salt and pepper, to taste - 4 slices ciabatta bread - 2 tablespoons olive oil - 1 cup romaine lettuce, chopped - 1/3 cup Caesar dressing - 1/4 cup grated Parmesan cheese - Lemon wedges, for serving The main ingredients create a juicy and crunchy sandwich. The chicken breasts soak in buttermilk. This step makes them tender and flavorful. Then, you coat them in a mix of panko breadcrumbs, garlic powder, and paprika. This gives the chicken a nice crunch. For the additional ingredients, ciabatta bread is perfect. It has a crisp crust and soft inside, making it great for holding fillings. Olive oil adds flavor and helps the bread toast well. The romaine lettuce adds a fresh crunch. And the Caesar dressing ties everything together with creamy goodness. Finally, the Parmesan cheese brings a rich flavor. If you want to explore a detailed recipe with step-by-step instructions, check the Full Recipe. Begin marinating the chicken in buttermilk for at least 30 minutes. This helps the chicken stay juicy and tender. You can mix in some spices to the buttermilk for extra flavor if you wish. Preheat your oven to 400°F (200°C). Line a baking sheet with parchment paper. This prevents sticking and makes cleanup easy. In a shallow bowl, mix panko breadcrumbs, garlic powder, paprika, salt, and pepper. This will be your crunchy coating. Remove the chicken from the buttermilk. Let the excess buttermilk drip off. Now coat each piece of chicken in the breadcrumb mixture. Press down gently to help the crumbs stick well. Place the breaded chicken on the prepared baking sheet. Drizzle with a little olive oil. Bake for 20 to 25 minutes. Keep an eye on it until the chicken turns golden brown. It should be cooked through and crispy. While the chicken bakes, heat a pan over medium heat. Add olive oil and toast the ciabatta bread slices until they are crispy. This adds flavor and texture to the sandwich. In a bowl, toss the chopped romaine lettuce with Caesar dressing until coated. Now it's time to build your sandwich. Place a piece of crispy chicken on each slice of toasted ciabatta. Top with the dressed lettuce and a sprinkle of grated Parmesan cheese. Close the sandwich with the other half of the ciabatta. Serve warm, and if you like, add lemon wedges on the side for a fresh twist. For the full recipe, check out the detailed instructions. To get your chicken extra crispy, use panko breadcrumbs. They create a nice crunch that makes each bite satisfying. Regular breadcrumbs can work, but panko gives a better texture. You’ll notice the difference right away, especially when you bite into that crispy coating. Marinating your chicken longer helps build flavor. I recommend at least one hour in buttermilk. If you can, let it sit overnight. The longer the chicken soaks, the juicier and tastier it will be. This step is key to making your sandwich extra special. For the dressing, you can use store-bought or make your own. Homemade Caesar dressing often tastes fresher. If you’re short on time, grab a good quality store-bought version. Look for dressings that list real ingredients. They will add great flavor to your sandwich. {{image_2}} You can add a twist to your Crispy Chicken Caesar Sandwich. Use jalapeños or spicy mayo for a heat kick. This change gives your sandwich a bold flavor. Just slice jalapeños and mix them into the dressing. If you prefer mayo, blend in hot sauce to taste. You will enjoy this spicy version if you love heat! Not everyone eats meat, and that’s okay! You can make a tasty vegetarian version. Substitute the chicken with crispy vegetables or tofu. For a crunchy bite, try battered zucchini or eggplant. If you want protein, use tofu and bake it until it’s golden. This version is just as filling and flavorful. The bread you choose can change the whole sandwich. You can experiment with different types like whole grain or sourdough. Whole grain adds a nutty flavor and extra fiber. Sourdough gives a tangy taste and a chewy texture. By mixing up the bread, you can find your perfect match for this sandwich. For the full recipe, check out the [Full Recipe]. To keep your Crispy Chicken Caesar Sandwich fresh, wrap it tightly. Use plastic wrap or foil. Store it in the fridge for up to three days. If you have extra dressing, keep it separate. This prevents the bread from getting soggy. You can freeze the cooked chicken for later use. Place the cooled chicken in an airtight container or freezer bag. Make sure to remove as much air as possible. Label the bag with the date. Use the chicken within three months for the best taste. To reheat and keep the crunch, use an oven or air fryer. Preheat the oven to 375°F (190°C). Place the chicken on a baking sheet and heat for about 10-15 minutes. If you use an air fryer, set it at 375°F (190°C) for about 5-7 minutes. This way, your chicken stays crispy and delicious. Yes, you can use frozen chicken. Just be sure to thaw it first. I recommend marinating it in buttermilk for at least 30 minutes. This helps the chicken stay juicy and tender. If you skip thawing, it might not cook evenly. Always check the chicken's internal temperature. It should reach 165°F (75°C) for safety. To keep your sandwich crispy, follow these tips: - Toast the ciabatta bread before adding any toppings. - Use panko breadcrumbs for extra crunch. - Don’t overload the sandwich with dressing. - Serve the Caesar dressing on the side for dipping. These tricks help keep the textures nice and crisp. Many side dishes work great with this sandwich. Here are a few ideas: - Sweet potato fries for a tasty crunch. - A simple Caesar salad to match the flavors. - Fresh fruit salad adds a refreshing touch. - Chips for extra crunch and snacking. These sides complement the rich flavors of the sandwich well. You now know how to make a delicious Crispy Chicken Caesar Sandwich. Start with marinating the chicken and using panko for extra crunch. Layer it with fresh romaine and Caesar dressing on toasted ciabatta. You can even explore variations like spicy or vegetarian options. Remember to store leftovers properly and reheat to keep that perfect texture. Enjoy this tasty meal anytime you crave something satisfying!](https://stirredrecipes.com/wp-content/uploads/2025/06/b6f72973-361c-4bee-8b00-632d93e7b053.webp)
Crispy Chicken Caesar Sandwich Flavorful and Simple Meal
If you crave a meal that’s both tasty and simple, the Crispy Chicken Caesar Sandwich is your answer. Juicy chicken meets crunchy bread and fresh
![To make these tasty stuffed peppers, gather these ingredients: - 4 large bell peppers (any color) - 2 cups cooked chicken, shredded - 1 cup cooked quinoa - 1 cup cherry tomatoes, halved - 1 cup feta cheese, crumbled - 1/2 cup Kalamata olives, chopped - 1/4 cup fresh parsley, chopped - 2 tablespoons olive oil - 1 teaspoon dried oregano - 1 teaspoon garlic powder - Salt and pepper to taste These ingredients blend perfectly to create a rich flavor. You can swap some ingredients to suit your taste. If you don’t have chicken, use turkey or tofu. For quinoa, rice works well too. If you want less salt, try low-sodium feta. Use any type of olives you like, such as green olives. Fresh herbs can be replaced with dried ones if needed. These changes still keep the dish delicious. When picking bell peppers, look for firm ones. They should have smooth skin and bright color. Avoid any that feel soft or have wrinkles. Press gently on the skin; it should bounce back. Smell the pepper; it should have a fresh scent. Choosing good bell peppers makes your dish taste even better! To start, choose four large bell peppers. I love using colorful peppers for a vibrant look. Slice off the tops and take out the seeds. This part is easy! Next, lightly brush the outside of each pepper with olive oil. This helps them brown nicely in the oven. Stand the peppers upright in a baking dish. This keeps them steady while you bake them. You want to make sure they can hold all that tasty filling. Now, let’s make the filling! In a large bowl, combine the cooked chicken, cooked quinoa, cherry tomatoes, feta cheese, chopped olives, and parsley. I like to add olive oil, oregano, garlic powder, salt, and pepper for great flavor. Mix everything well until it’s all combined. This filling is packed with protein and flavor. Carefully spoon this mixture into each bell pepper. Pack it gently, so it fits nicely. Next, cover the baking dish with aluminum foil. Place it in your preheated oven at 375°F (190°C). Bake for 25 minutes. After that, remove the foil and bake for another 10-15 minutes. You want the peppers to be tender and the filling hot. To get perfectly baked peppers, keep a close eye on them. You want them soft but not mushy. If they look too dark, take them out earlier. For best results, let them cool for a few minutes after baking. When serving, sprinkle a little extra feta cheese on top and drizzle with olive oil. A bit of fresh parsley adds a nice touch too. This makes each plate look fancy and inviting. For the complete recipe, check out the [Full Recipe]. To make the stuffing burst with flavor, use fresh herbs. I like to add parsley and basil. They give a bright taste. Use high-quality feta cheese for a creamy touch. Kalamata olives add a nice saltiness. Don't forget to season well with salt and pepper. Taste the mixture before stuffing. Adjust if needed. For serving, place each stuffed pepper on a plate. Drizzle with olive oil for shine. Sprinkle extra feta cheese on top. Add fresh parsley for color. You can also serve them on a bed of quinoa or salad. This will make the dish look even better. One common mistake is overcooking the peppers. This can make them mushy. Bake them just until tender. Another mistake is not seasoning the filling enough. Always taste and adjust seasoning. Lastly, don’t skip the foil while baking. It helps keep the moisture in. Follow these tips to achieve the best results with your Mediterranean Chicken Stuffed Bell Peppers. For the full recipe, check out the details above. {{image_2}} If you want a meatless option, here is what to do. Replace the chicken with black beans or lentils. These options give protein and keep the dish hearty. You can also use chickpeas for a nutty flavor. Swap the feta with crumbled tofu or a dairy-free cheese. The result is a tasty and filling meal that everyone can enjoy. Spices can transform your stuffed peppers. Try adding a pinch of cumin or smoked paprika for warmth. You can also mix in crushed red pepper for a kick. Fresh herbs like basil or mint can brighten the dish. A squeeze of lemon juice can add freshness, too. Experiment with your favorite spices to create your perfect blend. You can get creative with the fillings. Use cooked rice or couscous in place of quinoa. For a Mediterranean twist, try adding roasted vegetables like zucchini or eggplant. You can also include nuts like pine nuts for crunch. Think about adding different cheeses, such as goat cheese or mozzarella, for unique flavors. The options are endless! For a complete overview, check out the Full Recipe. Let your stuffed peppers cool before storing. This keeps them fresh and safe. Place them on a wire rack for even cooling. If you stack them too soon, they can get soggy. Avoid putting hot peppers directly in the fridge. That can raise the fridge temperature and spoil other foods. Once cool, wrap each pepper in plastic wrap or aluminum foil. You can also use an airtight container. This keeps moisture in and flavors strong. Store them in the fridge for up to four days. If you want to keep them longer, freeze them. Just remember to label the container with the date. Reheat stuffed peppers in the oven for best results. Preheat your oven to 350°F (175°C). Place the peppers in a baking dish and cover them with foil. Bake for about 20 minutes. If you like a crispy top, remove the foil for the last five minutes. You can also use a microwave. Heat on high for about two to three minutes. Check that they are hot throughout before serving. Enjoy your Mediterranean chicken stuffed bell peppers again! For the full recipe, visit the complete guide. Yes, you can! Ground turkey or beef works well. You might also try lamb for a richer taste. Just cook the meat fully before mixing it with the other ingredients. This adds flavor and keeps it safe to eat. You can keep your stuffed peppers in the fridge for up to four days. Just make sure they cool down first. Place them in an airtight container to keep them fresh. A fresh salad is a great choice. You can also serve some warm pita bread. Tzatziki sauce adds a nice touch too. These sides balance the meal and enhance the flavor. For more ideas, check the Full Recipe. Mediterranean Chicken Stuffed Bell Peppers are flavorful and fun to make. We covered all the key ingredients, cooking steps, and tips for great results. Remember to pick fresh bell peppers and avoid common mistakes for a tasty dish. Explore variations to suit your taste. Store leftovers properly to keep them fresh. Overall, this dish is a crowd-pleaser that is easy to adapt. Enjoy creating your own amazing stuffed peppers!](https://stirredrecipes.com/wp-content/uploads/2025/06/5bb756f1-c024-4f0a-be72-10a150f22279.webp)
Mediterranean Chicken Stuffed Bell Peppers Recipe
Looking for a tasty and colorful meal? My Mediterranean Chicken Stuffed Bell Peppers are a perfect choice! They’re full of flavor and packed with nutrients.

Perfectly Baked Salmon Simple and Flavorful Recipe
Looking for a simple way to enjoy perfectly baked salmon? You’re in the right place! In this article, I share a delicious recipe that highlights