Dinner

Savory Southern Tomato Pie Easy and Flavorful Recipe
Tomato pie is a tasty Southern classic. It combines fresh tomatoes, herbs, and cheese in a warm crust. In this easy recipe, I’ll guide you

Baked Orange Chicken Irresistible Flavor Every Time
Welcome to the delicious world of Baked Orange Chicken! This dish packs a punch of flavor and is easy to make. With juicy chicken coated

Quick and Easy Baked Lemon Pepper Chicken Delight
If you’re craving a tasty meal that won’t take hours to prepare, you’re in the right place! My Quick and Easy Baked Lemon Pepper Chicken
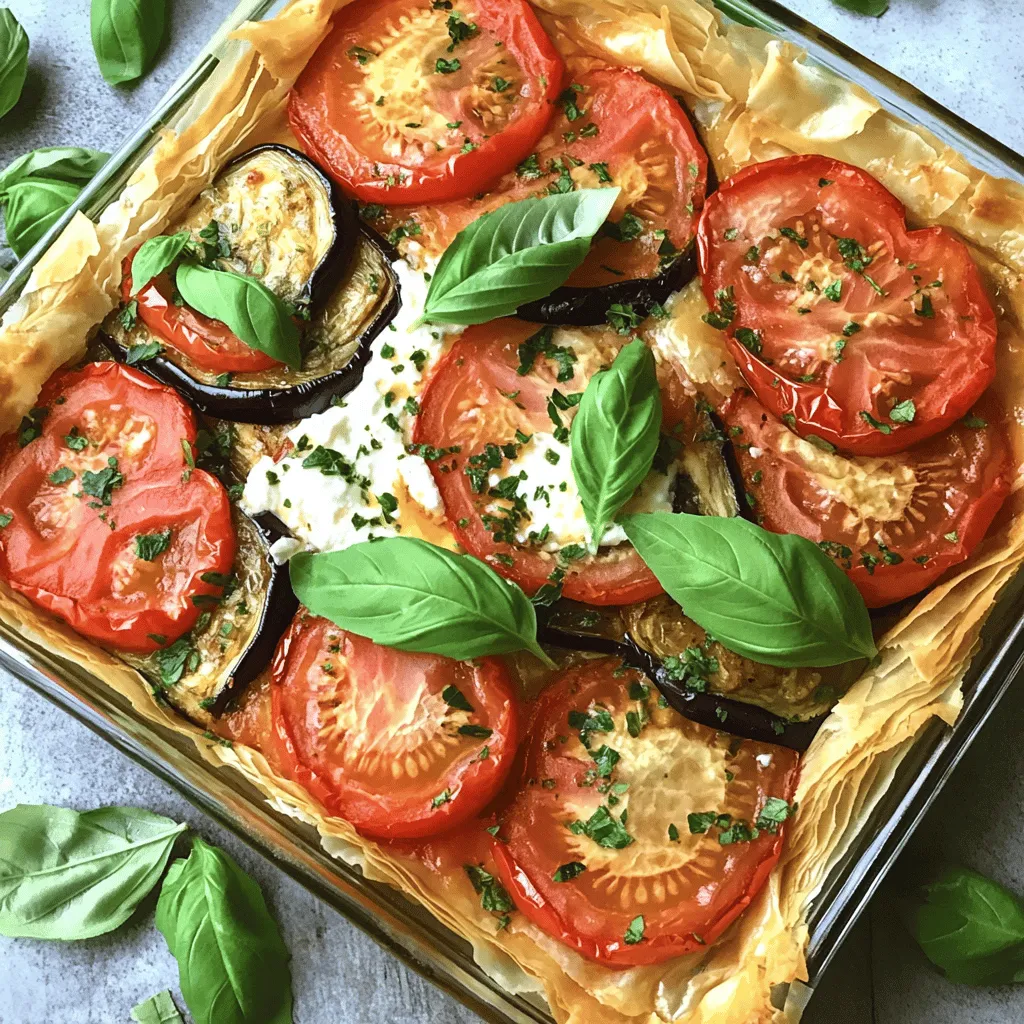
Tomato Eggplant Pie Flavorful and Simple Delight
Are you ready to dive into a dish that bursts with flavor? Tomato Eggplant Pie is a simple yet delightful way to enjoy fresh veggies.

Spiral Vegetable Tart Flavorful and Colorful Dish
Looking for a dish that’s as tasty as it is eye-catching? The Spiral Vegetable Tart is your answer. This colorful meal packs flavor and fun
![- 4 boneless, skinless chicken breasts - 4 tablespoons unsalted butter - 6 cloves garlic, minced - 1 teaspoon dried thyme - 1 teaspoon paprika - Salt and pepper to taste - 1 cup chicken broth - 2 tablespoons lemon juice - Fresh parsley, chopped for garnish To make garlic butter chicken, use these fresh ingredients. Each plays a key role in flavor. The chicken breasts are juicy and tender. The butter adds richness. Garlic gives a bold, aromatic taste. - Suggested substitutes for chicken: You can use turkey or firm tofu for a change. Both options taste great with this sauce. - Options for low-sodium broth: Use low-sodium chicken broth or vegetable broth. This keeps the dish lighter. - Dairy-free butter alternatives: Try coconut oil or vegan butter. Both work well and keep the dish creamy. When you explore alternatives, you can adjust this dish to fit your needs. Enjoy experimenting with flavors! Start by seasoning the chicken breasts. Use salt, pepper, thyme, and paprika. Make sure to season both sides well. This step builds great flavor. After seasoning, let the chicken sit for about 10 minutes. This time helps the spices soak in. In a large skillet, melt 2 tablespoons of the butter over medium-high heat. Once the butter is bubbling, add the chicken breasts. Cook them for 6-7 minutes on each side. You want them golden brown and fully cooked. Remove the chicken and set it aside. Next, reduce the heat to medium. In the same skillet, add the remaining butter. Let it melt, then add the minced garlic. Sauté for 1-2 minutes. Be careful not to burn the garlic; you want it fragrant. Now, pour in the chicken broth and lemon juice. Scrape the skillet's bottom to release any browned bits. Bring this mix to a gentle simmer. Let it cook for 3-4 minutes to reduce slightly. Return the cooked chicken to the skillet. Spoon the garlic butter sauce over the top. Let it simmer together for another 2-3 minutes. This step allows the flavors to combine nicely. Remove the skillet from heat. Garnish the chicken with freshly chopped parsley. This adds color and a fresh taste. Serve the Garlic Butter Chicken on a platter. Drizzle with the remaining garlic butter sauce. Pair it with steamed vegetables or mashed potatoes for a great meal. Enjoy! To get a great sear, heat your skillet well. A hot skillet gives a nice brown color. If the skillet is too cool, the chicken will steam, not sear. You want to hear a sizzle when the chicken hits the pan. Cook each side for about 6-7 minutes. This timing helps keep your chicken juicy. Overcooking can dry it out. Always check the chicken's internal temperature. It should reach 165°F for safety. Adding herbs boosts the flavor of garlic butter chicken. Consider using fresh thyme or rosemary. These herbs add depth. You can also try adding a pinch of crushed red pepper for heat. Lemon juice balances the dish's richness. It adds a fresh note that cuts through the butter. Use about two tablespoons for a bright taste. One mistake is overcrowding the skillet. If you add too much chicken, the heat drops. This causes the chicken to steam instead of sear. Another mistake is not scraping the bottom of the skillet. Those browned bits hold a lot of flavor. Use a wooden spoon to scrape them up when making the sauce. This simple step enhances the dish’s taste. You can find the full recipe [Full Recipe]. {{image_2}} You can easily swap chicken for shrimp or salmon. Shrimp cooks fast and takes on flavors well. Just sauté it the same way as chicken. Salmon also works great. It has rich flavors that pair nicely with garlic butter. For a vegetarian alternative, try tofu or chickpeas. These options soak up the garlic butter sauce. You can make your meal both tasty and satisfying. To change the flavor, think about adding spices. Cayenne pepper gives a nice kick. Italian seasoning adds warmth and earthiness. You can also switch up the citrus. Instead of lemon, try lime or orange. This adds a fresh twist to your dish. The different flavors keep things exciting and new. You can cook garlic butter chicken in different ways. Baking it in the oven gives you a hands-off approach. Just place the seasoned chicken in a dish, cover, and bake until done. Skillet cooking is faster and adds a nice crisp. For a slow cooker, brown the chicken first. Then, add the garlic butter sauce and let it simmer all day. This method makes the chicken tender and full of flavor. To keep your garlic butter chicken fresh, follow these tips: - Refrigeration: Let the chicken cool to room temperature. Place it in an airtight container. Store it in the fridge for up to three days. - Freezing: For longer storage, wrap the chicken tightly in plastic wrap. Then, place it in a freezer bag. It can last up to three months in the freezer. When it's time to enjoy your leftovers, you have options: - Microwave: Place the chicken on a microwave-safe plate. Cover it loosely and heat for 1-2 minutes. Check to avoid drying it out. - Stovetop: Heat a skillet over medium heat. Add a splash of chicken broth to keep the chicken moist. Heat for about 5-7 minutes, flipping once. Knowing how long your dish stays fresh is key: - Garlic butter chicken stays good in the fridge for about three days. If frozen, it can last up to three months. - Signs of spoilage: If you see mold, a strange odor, or discoloration, it’s best to throw it away. Always trust your senses! You can pair garlic butter chicken with many tasty sides. Here are some ideas: - Steamed broccoli - Mashed potatoes - Roasted carrots - Rice pilaf - Garlic bread - A fresh salad These sides add color and flavor to your meal. They balance the rich and buttery chicken well. You can also mix and match to suit your taste. Yes, you can make garlic butter chicken ahead of time. Here are some tips: - Cook the chicken and garlic sauce. - Let it cool completely. - Store it in an airtight container in the fridge for up to three days. When ready to eat, just reheat it gently on the stove. This saves time on busy days. Garlic butter chicken can be part of a healthy meal. Here’s what to consider: - Chicken is a good source of protein. - Garlic has many health benefits, like boosting immunity. - Using butter adds fat, but choose unsalted for less sodium. You can adjust the recipe to fit your dietary needs. For a lighter version, try using less butter or adding more veggies. This blog post guides you through making delicious garlic butter chicken. We covered the key ingredients and their substitutes to customize the dish. I provided clear instructions for prepping, cooking, and garnishing the meal. You also learned tips to make it perfect and explored variations for different tastes and dietary needs. In closing, this dish is simple to make and brings rich flavor to your table. You can easily adapt it to suit your style. Enjoy cooking and impressing others with your garlic butter chicken!](https://stirredrecipes.com/wp-content/uploads/2025/06/2398b560-6128-4a32-84b9-96270e349fdc.webp)
Garlic Butter Chicken Flavorful and Simple Recipe
Are you ready to impress your family with a tasty dinner? This Garlic Butter Chicken is the perfect blend of rich flavors and simple steps.
![To make the Million Dollar Baked Ziti, you need a few key items. Here’s the list of ingredients: - 1 pound ziti pasta - 2 tablespoons olive oil - 1 onion, chopped - 3 garlic cloves, minced - 1 pound ground beef or Italian sausage (or a mix) - 1 jar (24 oz) marinara sauce - 1 can (15 oz) ricotta cheese - 2 cups shredded mozzarella cheese - 1 cup grated Parmesan cheese - 1 teaspoon Italian seasoning - 1 teaspoon red pepper flakes (optional) - Salt and pepper to taste - Fresh basil leaves for garnish (optional) Each ingredient plays a big role. The ziti pasta gives the dish shape and bites. The ground beef or sausage adds a rich flavor. Marinara sauce brings a fresh, tangy taste. Ricotta cheese adds creaminess, while mozzarella and Parmesan provide that gooey, melted goodness we all love. Don’t forget the olive oil, onion, and garlic. They create a tasty base. Italian seasoning adds warmth, and red pepper flakes can spice things up. You can also add fresh basil for a burst of color and taste. Gather these items before you start. It makes cooking easier and more fun. For the complete guide, check out the Full Recipe. Preheat the Oven and Cook Pasta First, set your oven to 375°F (190°C). This heat will help the cheese melt nicely. Next, fill a large pot with water. Add salt and bring it to a boil. Once boiling, add the ziti pasta. Cook it according to the package, so it stays firm. Drain the pasta and set it aside. Sauté Vegetables and Cook the Meat In a large skillet, pour in the olive oil over medium heat. Add the chopped onion and cook for about 3-4 minutes until it is soft. Then, add the minced garlic and let it cook for one more minute. This step brings out the flavor. After that, add the ground beef or Italian sausage. Break it apart with a spatula. Cook until it's browned and fully cooked. Drain off any extra fat. Combine Sauce Ingredients Now, stir in the marinara sauce and ricotta cheese. Add the Italian seasoning and optional red pepper flakes for some heat. Season the mixture with salt and pepper. Mix everything well until it is smooth and combined. Mix Pasta with Sauce Take a large bowl and mix the cooked ziti with the sauce you just made. Stir until every piece of pasta is coated in the sauce. This step makes sure every bite is full of flavor. Layer the Ingredients in the Baking Dish Grab a greased 9x13 inch baking dish. Spread half of the pasta mixture evenly on the bottom. Next, sprinkle half of the mozzarella cheese and half of the Parmesan cheese on top. Then, add the rest of the pasta mixture. Finish by topping it with the remaining mozzarella and Parmesan cheeses. Bake the Baked Ziti Cover the baking dish with aluminum foil. Place it in the oven and bake for 25 minutes. After that, remove the foil and bake for another 15-20 minutes. This time lets the cheese bubble and turn golden. Enjoy your delicious Million Dollar Baked Ziti following this [Full Recipe]. - Ensuring Perfectly Cooked Pasta Cook the ziti pasta until it is al dente. This means it should be firm but not hard. If you cook it too long, it can turn mushy in the oven. Follow the package instructions closely. Make sure to stir the pasta as it cooks to prevent sticking. - Preventing the Dish from Being Watery To keep your baked ziti from being watery, drain excess fat from the meat after browning. Also, make sure your marinara sauce is thick. If it’s too runny, simmer it for a bit before adding it to the dish. This will help create a creamy texture. - Garnishing with Fresh Basil Fresh basil adds a pop of color and flavor. After baking, sprinkle chopped basil on top. This brightens the dish and makes it look more appealing. You can even place whole leaves around the edges for a beautiful touch. - Serving Suggestions and Sides Serve the baked ziti with a fresh salad or garlic bread. A simple green salad balances the richness of the dish. Garlic bread adds a nice crunch and flavor. You can also offer a light Italian dressing to drizzle on the salad for extra zest. You can find the full recipe earlier in this article for all the steps and details! {{image_2}} You can easily swap meats in this dish. Ground turkey or chicken works great. For a meatless option, use lentils or mushrooms. Both give a nice texture and flavor. Cheese also has room for change. For added creaminess, try using ricotta or cottage cheese. You can mix in some cream cheese for a richer taste. Vegan cheese is a solid choice too if you're dairy-free. Adding veggies boosts nutrition and flavor. Spinach, zucchini, or bell peppers fit in well. Simply sauté them with the onion and garlic for a tasty upgrade. If you want some heat, sprinkle in red pepper flakes. You can also use Italian seasoning for extra flavor. Fresh herbs like basil or oregano brighten the whole dish. For a unique twist, try adding a splash of balsamic vinegar or a hint of lemon juice. These small changes can make a big impact on flavor. For the full recipe, check the detailed instructions above. After enjoying your Million Dollar Baked Ziti, store any leftovers properly. To keep it fresh, place the cooled ziti in an airtight container. This helps prevent moisture loss and keeps flavors intact. - Best Practices for Refrigeration Store the ziti in the fridge for up to three days. Make sure the lid is secure to avoid spills. If you need to use a plate, cover it tightly with plastic wrap. - Freezing Instructions for Long-Term Storage For longer storage, freeze the baked ziti. Wrap it tightly in plastic wrap, followed by aluminum foil. This double wrapping helps prevent freezer burn. You can freeze it for up to three months. When you’re ready to eat, thaw it overnight in the fridge before reheating. Reheating your baked ziti properly helps keep it delicious. Avoid drying it out while warming it up. - Best Methods to Reheat Baked Ziti The oven is the best method. Preheat it to 350°F (175°C). Place the ziti in an oven-safe dish and cover it with foil. Bake for about 20 minutes or until hot. If using a microwave, cover it with a damp paper towel to keep moisture in. Heat in short intervals, stirring in between. - Tips for Maintaining Texture and Flavor Add a splash of marinara sauce on top before reheating. This keeps the pasta creamy and flavorful. Let it sit for a few minutes before serving. This helps the heat distribute evenly. Enjoy your tasty meal! What makes Baked Ziti "Million Dollar"? Million Dollar Baked Ziti stands out because of its rich flavors and creamy texture. The mix of ricotta, mozzarella, and Parmesan cheeses create a delightfully cheesy experience. Plus, the blend of seasonings adds depth to every bite. This dish feels fancy, making it perfect for special occasions or cozy family dinners. Can I make this recipe ahead of time? Yes, you can make this recipe ahead of time. Prepare the Baked Ziti, but do not bake it. Instead, cover the dish and store it in the fridge for up to 24 hours. When you're ready, just pop it in the oven. This saves time and makes entertaining easier. How do I adjust servings for a larger group? To serve more people, simply double the recipe. Use a larger baking dish for the increase in volume. You can also scale up the ingredients based on how many guests you have. This way, everyone can enjoy a hearty serving of baked ziti. Can I use a slow cooker for this recipe? Yes, you can absolutely use a slow cooker. Layer the ingredients in the slow cooker, just as you would in the oven. Set it on low for 4-6 hours or high for 2-3 hours. The slow cooker makes the dish even creamier, and it’s a great option for busy days. How can I make Baked Ziti spicier? To spice things up, add red pepper flakes to your sauce. You can also mix in some diced jalapeños or hot Italian sausage. Adjust the spice level to suit your taste. This adds a kick that makes the dish exciting. What to do if I don't have ziti pasta? If you don't have ziti pasta, you can use any pasta shape you like. Penne or rigatoni work well as substitutes. Just make sure to cook the pasta until it is al dente before mixing it with the sauce. This ensures it holds its shape when baked. For the full recipe, check out the [Full Recipe]. In this guide, we explored the essentials of baked ziti. We covered key ingredients like ziti pasta, meat, sauce, and cheese. You learned how to prepare and layer your dish for baking. I shared tips to ensure perfect texture and flavor, plus variations to suit your taste. Lastly, I discussed storage and reheating options. Baked ziti is simple and tasty, making it ideal for any meal. Enjoy creating your own version!](https://stirredrecipes.com/wp-content/uploads/2025/06/9f17a388-6eff-47d9-b888-ea738aa76a03.webp)
Million Dollar Baked Ziti Delightful Comfort Meal
If you’re craving a dish that’s both cozy and full of flavor, you’ve come to the right place! My Million Dollar Baked Ziti is the
![- 1 pound beef sirloin, thinly sliced - 8 ounces Velveeta cheese, cubed - 12 ounces egg noodles - 1 medium onion, diced - 2 cloves garlic, minced - 2 cups mushrooms, sliced - 1 tablespoon olive oil - 1 tablespoon Worcestershire sauce - 1 cup beef broth - 1 cup sour cream - 2 tablespoons all-purpose flour - 1 teaspoon paprika - Salt and pepper to taste - Fresh parsley for garnish To make Creamy Velveeta Beef Stroganoff, you need a few key ingredients. First, the beef sirloin gives the dish a rich flavor and tender texture. The Velveeta cheese adds creaminess that makes every bite delightful. You'll want egg noodles to soak up all the tasty sauce. Next, don't forget the veggies! Onions and garlic add depth, while mushrooms bring an earthy note to the dish. The olive oil helps you sauté these ingredients to perfection. For seasoning, Worcestershire sauce and beef broth build a savory base. Sour cream adds a tangy richness that balances everything out. A sprinkle of flour helps thicken the sauce. Finally, paprika, salt, and pepper bring it all together. You can find the complete cooking instructions in the Full Recipe. With these ingredients, you’ll cook a meal that warms hearts and satisfies bellies. Boil salted water in a large pot. Add the egg noodles. Cook them until they are al dente. This usually takes about 7-8 minutes. Drain the noodles and set them aside. This step is key for a good texture in your stroganoff. In a large skillet, heat olive oil over medium-high heat. Add the sliced beef to the hot oil. Season it with salt and pepper. Cook the beef until it is browned, which takes about 3-4 minutes. Once done, remove the beef from the skillet and set it aside. This helps keep the beef juicy. In the same skillet, add diced onions and minced garlic. Sauté them until the onions turn translucent, about 3 minutes. Next, add sliced mushrooms. Continue cooking until the mushrooms soften, which takes about 4-5 minutes. This mix brings great flavor to the dish. Sprinkle flour over the vegetables in the skillet. Stir to coat them well. Gradually add the beef broth, stirring to avoid lumps. Then, pour in Worcestershire sauce and add paprika. Bring this mixture to a simmer. This step creates a rich sauce. Add the cubed Velveeta cheese to the sauce. Stir until the cheese melts and makes the sauce creamy. Next, return the cooked beef to the skillet. Add the sour cream and mix gently until everything is well combined. This is where the magic happens. Toss the cooked noodles into the beef stroganoff mixture. Stir until all the noodles are coated with the creamy sauce. Finally, garnish with chopped parsley before serving. This adds a nice touch and freshness to your dish. Enjoy your creamy Velveeta beef stroganoff! For the full recipe, check [Full Recipe]. - Choose high-quality beef sirloin for best flavor. Good beef makes all the difference. - Consider using pre-sliced mushrooms to save time. This lets you cook faster and enjoy more. - Ensure beef is cooked in batches to avoid steaming. This keeps it juicy and tender. - Use a non-stick skillet for easier cleanup and to prevent sticking. It makes cooking less messy. - Serve with crusty bread or a side salad. Both add great texture and flavor. - Pair with a light red wine for enhanced flavor. A nice wine makes your meal special. Remember to check the Full Recipe for all the details you need! {{image_2}} You can switch the beef for ground turkey or chicken. This choice makes a lighter dish. For a vegetarian option, mushrooms are a great substitute. They add a nice texture and flavor. You will still enjoy that hearty feel without the meat. Feel free to try different types of cheese. Each kind will bring unique flavors to your meal. Cream cheese is another great choice. It gives a different creamy texture that blends well with the dish. Just remember to adjust the amount based on your taste. If you're looking for a low-carb option, use gluten-free pasta or zoodles. Zoodles are a fun way to add veggies to your meal. You can also try different pasta shapes like penne or fusilli. Each shape holds sauce differently, making every bite unique. For the full recipe, check out the main article. Store leftover creamy Velveeta beef stroganoff in airtight containers. It stays good in the fridge for up to 3 days. Make sure to let it cool before sealing. This way, it keeps the flavor and texture intact. You can freeze this dish in portions for up to 2 months. If you plan to freeze it, I suggest omitting the sour cream before freezing. This helps maintain the creamy texture when you reheat it later. To reheat, the stovetop works best. Add a splash of broth to restore creaminess. Heat gently until warm. If you use the microwave, remember to cover the bowl to prevent drying out. This keeps your stroganoff nice and moist, just like when you first made it. You can adjust the amount of Velveeta cheese or sour cream. Start with less cheese. Taste it and see if you want to add more. This way, you control the creaminess. Yes, you can use other noodles! Fettuccine, pappardelle, or even rice work well. Each option adds a unique twist. Pick your favorite for a fun meal. Traditional sides include mashed potatoes, salad, or crusty bread. These options balance the creamy dish. They also add texture to your plate. Prep time is about 15 minutes. Total cook time is 30 minutes. This makes it a quick and easy weeknight meal. You can enjoy a warm dinner in no time. Yes, you can make it ahead! However, store the beef and sauce separately from the noodles. This keeps everything fresh. When you're ready, just combine and heat! For the full recipe, check the section above. This blog post covers everything you need for a tasty Beef Stroganoff. We explored main ingredients like beef, Velveeta, and egg noodles. I shared step-by-step instructions, helpful tips, and creative variations to suit your taste. You can easily store leftovers for later enjoyment. Remember, cooking should be fun and flexible. Feel free to swap ingredients and make this dish your own. Enjoy your cooking adventures!](https://stirredrecipes.com/wp-content/uploads/2025/06/d024f0ee-388b-446c-8063-a6e897303f5c.webp)
Creamy Velveeta Beef Stroganoff Easy Weeknight Meal
Looking for an easy weeknight meal that will please the whole family? Look no further! My Creamy Velveeta Beef Stroganoff combines tender beef, rich cheese,
![To create your Cheesy Penne with Garlic Butter Ground Beef, gather the following ingredients: - 12 oz penne pasta - 1 lb ground beef - 4 tablespoons unsalted butter - 6 cloves garlic, minced - 1 teaspoon onion powder - 1 teaspoon Italian seasoning - 1/2 teaspoon red pepper flakes (optional) - 2 cups shredded mozzarella cheese - 1/2 cup grated Parmesan cheese - Salt and pepper to taste - Fresh parsley, chopped (for garnish) These ingredients work together to make a rich, cheesy dish. The penne pasta provides a great base. The ground beef adds protein and flavor. Garlic butter gives a lovely aroma and taste. This combination is sure to please. You can find the full recipe to guide you through the cooking steps. Enjoy the process and the delicious results! To cook penne pasta, fill a large pot with water. Add a pinch of salt to the water. Bring it to a boil over high heat. Once boiling, add the penne pasta. Stir it well to prevent sticking. Cook the pasta for about 9-11 minutes. You want the pasta to be al dente, which means it should be firm but not hard. Check the pasta a minute or two before the time is up. This way, you can catch it just in time. After cooking, drain the pasta in a colander and set it aside. In a large skillet, melt the butter over medium heat. You want the butter to be bubbly but not burnt. Add the minced garlic and cook it until it smells great, about 2 minutes. Be careful not to let it turn brown. Next, add the ground beef to the skillet. Break it apart with a spatula. Cook the beef until it is browned, which should take about 5-7 minutes. Stir in the onion powder, Italian seasoning, and red pepper flakes if you want a kick. Season with salt and pepper to taste for extra flavor. Now it’s time to mix everything. Lower the heat and add the cooked penne to the skillet with the beef. Toss it well to coat the pasta in the garlic butter. Next, sprinkle the shredded mozzarella cheese evenly over the top. Stir until the cheese melts and becomes creamy. Finally, add the grated Parmesan cheese on top. Give it a gentle stir one last time. Your cheesy penne with garlic butter ground beef is now ready to serve! To boost the garlic butter taste, try using fresh garlic. Fresh garlic packs a punch. You can also add a squeeze of lemon juice for a bright flavor. A touch of Worcestershire sauce adds depth. Consider mixing in spinach, mushrooms, or sun-dried tomatoes for extra flavor. For seasonings, onion powder and Italian seasoning work well. You can also add smoked paprika for a hint of smokiness. If you like heat, sprinkle in some red pepper flakes. They bring a nice kick! Taste as you go to ensure you get the flavor just right. Cooking ground beef well is key. Use medium heat to prevent burning. Break it apart while cooking. This helps it cook evenly and avoids clumps. Make sure it reaches a nice brown color for great flavor. To avoid clumpy cheese, sprinkle it gradually. Stir it in slowly as it melts. This creates a creamy texture. If you notice clumps, try lowering the heat. Stir often to ensure even melting. Following these tips will help you make a delicious Cheesy Penne with Garlic Butter Ground Beef. For the complete recipe, check out the [Full Recipe]. {{image_2}} You can add more color and nutrients by including vegetables. Spinach and bell peppers work well in this dish. They add great flavor and texture. To include spinach, add it during the last few minutes of cooking. This will help it wilt perfectly without losing its bright color. For bell peppers, chop them up and sauté them with the ground beef. This adds sweetness and crunch. Adjusting the cooking time is important when adding veggies. Since spinach cooks quickly, just a few minutes is enough. Bell peppers may need about 5 minutes to soften. Keep an eye on them so they don’t get mushy. The goal is to keep some bite while blending the flavors. Switching up your cheese can change the taste of your dish. Mozzarella is great, but consider using provolone or gouda for a fun twist. These cheeses melt well and add unique flavors. You can also try adding a bit of sharp cheddar for a different kick. Crafting a cheese blend gives you a chance to mix flavors. Use two or three types of cheese for depth. This adds richness and makes the dish extra special. Combining cheeses can also make the dish creamier, which is always a plus. To keep your cheesy penne fresh, store it in an airtight container. This helps keep moisture in and air out. Let it cool to room temperature before sealing. If you have a lot, split it into smaller portions. This way, you can enjoy it later without waste. The best containers for preserving freshness are glass or BPA-free plastic. Glass containers do not stain and are microwave safe. Plastic containers are lightweight and easy to stack. Remember to label your containers with the date. This helps you track freshness. When reheating cheesy penne, you want it warm, not dry. To avoid this, add a splash of water or milk before reheating. This keeps the pasta creamy. Stir the dish a few times while heating. You can use a microwave or an oven. For the microwave, heat it in short bursts. Start with one minute, then check and stir. For the oven, preheat to 350°F (175°C). Place the penne in an oven-safe dish, cover it with foil, and heat for about 15 minutes. This method warms the dish evenly. For more details, check the full recipe! Yes, you can use other pasta shapes. Fusilli, rigatoni, or even spaghetti work well too. Just follow the cooking time on the package for your chosen pasta. The key is to cook it al dente, so it holds up in the dish. Experimenting with different shapes can add fun to your meal. Ground turkey or chicken are great substitutes for ground beef. If you prefer a plant-based option, use lentils or mushrooms. Both add nice texture and flavor. When using lentils, try cooking them separately and then mixing them in. This keeps the dish balanced. To make this dish healthier, consider using whole wheat pasta. You can also reduce the butter and cheese. Adding more vegetables like spinach or zucchini boosts nutrition. These changes keep the flavors delicious while lowering calories. Yes, you can prep this dish ahead. Cook the pasta and beef mixture, then store it in the fridge. Just add the cheese before baking. When ready to serve, heat until warm and bubbly. This method saves time on busy nights. Absolutely! Swap the ground beef for a mix of beans, lentils, or chopped veggies. You can still use butter and cheese for flavor. If you want it vegan, replace the butter with olive oil and use vegan cheese. This version is still rich and satisfying. For the full recipe, check out [Full Recipe]. This blog post covered a delicious cheesy penne dish. You learned about the key ingredients needed, like ground beef and cheese. I shared step-by-step instructions, tips for flavor, and tasty variations. Remember, cooking is fun! Feel free to change things up with veggies or different cheeses. Enjoy your meal now and share leftovers with friends. Try all the tips and enhance your cooking skills.](https://stirredrecipes.com/wp-content/uploads/2025/06/3e477709-cc44-4812-9f59-42e3cd15f686.webp)
Cheesy Penne with Garlic Butter Ground Beef Delight
Craving a quick and tasty meal? You’re in for a treat with my Cheesy Penne with Garlic Butter Ground Beef. This dish combines rich flavors
![- 4 boneless, skinless chicken breasts - 8 oz cream cheese, softened - 1 cup shredded cheddar cheese - 1/2 cup green onions, chopped - 1 teaspoon garlic powder - 1 teaspoon onion powder - 1 teaspoon paprika - Salt and pepper to taste - 1 cup breadcrumbs (for topping) - 2 tablespoons olive oil The main ingredients in Baked Cream Cheese Chicken create a creamy and cheesy delight. Chicken breasts serve as the base, while the cream cheese and cheddar give it a rich flavor. The spices enhance the taste and make each bite special. - Additional vegetables - Different cheese varieties To make this dish even better, consider adding vegetables. Spinach or bell peppers would work well. You can also try different cheese varieties like mozzarella or pepper jack for a new flavor twist. - Mixing bowls - Baking dish - Oven thermometer You will need a few simple tools to prepare this dish. Mixing bowls help you combine the ingredients easily. A baking dish is essential for cooking the chicken. An oven thermometer ensures your oven is at the right temperature for perfect baking. For the full recipe, check out [Full Recipe]. First, preheat your oven to 375°F (190°C). This step makes sure your dish cooks evenly. While the oven heats, take a baking dish and lightly grease it. You can use non-stick spray or olive oil. This will help the chicken not stick to the dish. In a mixing bowl, combine the softened cream cheese, shredded cheddar cheese, and chopped green onions. Add garlic powder, onion powder, paprika, salt, and pepper to this mix. Use a fork or spatula to blend everything well. You want a smooth and creamy filling that combines all the flavors. Now, take your chicken breasts and place them in the greased baking dish. Season both sides with salt and pepper for great flavor. Next, use a spoon or spatula to spread the cream cheese mixture evenly over the top of each chicken breast. Make sure to cover them well for a tasty bite. Cover the baking dish with aluminum foil. Then, place it in the oven and bake for 25 minutes. This helps cook the chicken through. After this time, remove the foil. Bake for another 15-20 minutes until the chicken is cooked through. The internal temperature should reach 165°F (74°C). The topping should look golden brown. Let it rest for a few minutes before slicing. For the full details on this recipe, check the Full Recipe section. To keep the chicken moist, I recommend using a few simple steps. First, do not overcook the chicken. Use a meat thermometer to check for 165°F (74°C). You can also brine the chicken for about 30 minutes before cooking. This adds flavor and moisture. For browning the topping, use a mix of breadcrumbs and olive oil. This helps create a crispy crust. Make sure to spread the breadcrumbs evenly. You can broil the chicken for the last few minutes to get that golden-brown look. Adding herbs and spices will elevate your dish. I suggest using dried thyme or basil. Rosemary also works well. For a kick, try adding red pepper flakes. These enhance the cream cheese flavor. Feel free to get creative with toppings. You can add cooked bacon bits or sliced jalapeños. Chopped spinach mixed in the cream cheese adds color and flavor too. To plate your dish beautifully, use a colorful plate. Place the chicken in the center and fan the pieces slightly. This creates a nice effect. For garnishing, I like to sprinkle extra green onions on top. You can also add a squeeze of lemon juice for a fresh touch. Serve the chicken with steamed vegetables or a fresh salad for a balanced meal. This adds color and makes it look appealing. {{image_2}} You can make Baked Cream Cheese Chicken lighter. Swap the cream cheese for low-fat cream cheese. This keeps the dish creamy but cuts calories. You can also use Greek yogurt for a tangy twist. For breadcrumbs, choose gluten-free options if needed. Crushed cornflakes or almond flour work great too. Want to change up the taste? Try a Southwest twist. Add taco seasoning and diced jalapeños to the cream cheese mix. This adds a nice kick. If you prefer Italian flavors, mix in some Italian herbs like basil and oregano. You could even use mozzarella cheese instead of cheddar. Pair your baked chicken with tasty sides. Steamed veggies or a fresh salad complement this dish well. You can also serve it with a side of rice or quinoa for a hearty meal. Don't forget to add dips or sauces! A tangy ranch or zesty salsa can enhance the flavors. Enjoy creating your perfect meal with this Baked Cream Cheese Chicken recipe! After enjoying Baked Cream Cheese Chicken, store leftovers in the fridge. Use an airtight container to keep the chicken fresh. It will stay good for about 3 to 4 days. If you want it to taste great, try to eat it within this time frame. Always let the chicken cool before sealing it up to avoid condensation. If you want to keep it longer, freezing is a good option. Wrap the chicken tightly in plastic wrap, then place it in a freezer bag. This helps prevent freezer burn. Baked Cream Cheese Chicken can last for up to 3 months in the freezer. When you're ready to eat it, thaw it in the fridge overnight. This keeps the texture nice. To reheat, the oven is best. Preheat it to 350°F (175°C) and place the chicken in a baking dish. Cover it with foil to keep moisture in. Bake for about 20 minutes or until heated through. The microwave works too, but it might make the chicken a bit soggy. If you choose the microwave, heat in short bursts and check often. Enjoy your meal again with its creamy goodness! Can I use frozen chicken breasts? Yes, you can use frozen chicken breasts. Just be sure to thaw them first. This step is key for even cooking. You can thaw chicken in the fridge overnight or use the microwave. What can I substitute for cream cheese? If you need a substitute for cream cheese, try ricotta or Greek yogurt. These options still give a creamy texture. You might need to adjust the flavor a bit, so taste as you go. How do I know when the chicken is fully cooked? The chicken is fully cooked when its internal temperature reaches 165°F (74°C). A meat thermometer is the best tool for this. If you don’t have one, cut into the thickest part. The meat should be white and juices should run clear. Can I make this dish in advance? Yes, you can prepare it the night before. Just cover the baking dish and store it in the fridge. When you're ready to bake, let it sit at room temperature for about 30 minutes. This step helps it cook evenly. Caloric content and serving size Each serving of baked cream cheese chicken has about 400 calories. This can vary based on your cheese and breadcrumb choices. The recipe serves four, so plan accordingly for your family. Tips for making it healthier To make it healthier, you can use low-fat cream cheese. You can also add more veggies, like spinach or bell peppers, to boost nutrition. Serve it with a side salad for extra fiber! This recipe for baked cream cheese chicken features simple ingredients and easy steps. I shared tips to keep the chicken moist and ideas for tasty add-ins. You can make it healthier with substitutes or customize it with different flavors. Remember, proper storage helps maintain freshness. With the right techniques, you can create a delicious meal that impresses everyone. Enjoy exploring the variations and make this dish your own!](https://stirredrecipes.com/wp-content/uploads/2025/06/ccd0a5e1-e87b-44cf-97e0-7920ea712934.webp)
Baked Cream Cheese Chicken Flavorful Family Delight
Are you ready to impress your family with a delicious and easy meal? Baked Cream Cheese Chicken is a tasty way to make dinner time