Dinner
![- 3 medium zucchinis - 2 cups cherry tomatoes - 1 medium red onion - Balsamic vinegar - Olive oil - Dried oregano and thyme - Grated Parmesan cheese - Fresh basil leaves for garnish When I think about a simple and tasty dish, the Balsamic Zucchini Tomato Bake comes to mind. This dish shines with fresh veggies and bold flavors. The main ingredients are key. You will need three medium zucchinis, two cups of cherry tomatoes, and one medium red onion. This trio is a great base for any bake. Next, we add flavor enhancers. Balsamic vinegar and olive oil bring richness. Dried oregano and thyme add warmth and depth. Sometimes, I sprinkle grated Parmesan cheese on top for extra creaminess. Fresh basil leaves are a must for garnish. They add a bright, fresh touch. For the full recipe, check out the [Full Recipe]. This dish not only looks appealing but also tastes amazing. I love how the flavors blend together during baking. Each bite is a delightful mix of sweet, tangy, and savory. - Preheat the oven to 400°F (200°C). - Slice zucchinis into rounds. - Halve the cherry tomatoes. - Slice the red onion thinly. First, you need to get your oven hot. Preheating helps the zucchini bake evenly. While the oven heats, prepare your veggies. Slice the zucchinis into rounds. This gives them a nice shape and helps them cook well. Halve the cherry tomatoes; their sweet juice adds flavor. Finally, slice the red onion thin. This adds a nice crunch and sharpness to the dish. - Whisk balsamic mixture. - Toss vegetables with the balsamic mixture. Next, make the balsamic mixture. In a small bowl, whisk together minced garlic, balsamic vinegar, olive oil, dried oregano, dried thyme, salt, and pepper. Taste it; it should be tangy and savory. Now, pour this mixture over your chopped vegetables. Toss them gently until all the veggies are coated. This step is key to infusing flavor throughout the dish. - Transfer to baking dish. - Sprinkle cheese and bake. Now, transfer the vegetable mix to a baking dish. Spread it out evenly to ensure even cooking. If you like cheese, sprinkle grated Parmesan on top. It adds a lovely, creamy finish. Bake in your preheated oven for 25-30 minutes. The zucchini should be tender and caramelized. When it’s done, let it cool a bit. Garnish with fresh basil leaves before serving. Enjoy your Balsamic Zucchini Tomato Bake! For the complete recipe, check the [Full Recipe]. For a rustic look, serve the Balsamic Zucchini Tomato Bake in the dish it was cooked in. This adds charm and warmth to your meal. To enhance the dish's colors, drizzle some extra balsamic reduction over the top. Add a few fresh basil leaves as a final touch. You can pair this bake with a light salad or crusty bread for a complete meal. To ensure the zucchini has the right texture, slice it into even rounds. This helps it cook evenly. If you prefer a firmer zucchini, reduce the baking time. Check the bake at 20 minutes; it may need just a few extra minutes to reach your desired doneness. Consider adding fresh herbs like rosemary or parsley for extra flavor. You can also spice it up with a pinch of red pepper flakes for heat. If you want to make it more filling, add grilled chicken or chickpeas for protein. Quinoa or brown rice can also make great additions for a hearty dish. {{image_2}} You can swap ingredients to change the dish. Try using bell peppers or mushrooms for extra flavor. Carrots and eggplant also work well. If you're avoiding gluten, this recipe is naturally gluten-free. For a dairy-free option, skip the Parmesan cheese or use a plant-based alternative. Want to spice things up? Add red pepper flakes or jalapeños for heat. You can also try different vinegars. Apple cider vinegar or red wine vinegar can change the taste. Each vinegar adds a unique twist to the dish. Grilling is a fun option! It gives the veggies a smoky flavor. Just toss them on a grill until they're tender. If you prefer a slow cooker, you can use it too. Cook on low for about four hours. This method makes the veggies very soft and flavorful. Explore the [Full Recipe] for all the cooking steps and tips! After you serve Balsamic Zucchini Tomato Bake, store leftovers in the fridge. Let the dish cool down first. Then, place it in an airtight container. This helps keep the flavors fresh. Glass containers work best, but plastic ones are fine too. Make sure to seal them tightly. Leftovers can last for up to three days. When you reheat the bake, aim for gentle heat. The best method is to use an oven. Set it to 350°F (175°C). Place the dish in for about 10-15 minutes. This keeps the zucchini tender. Use a cover to keep moisture in. Avoid the microwave, as it can make the zucchini mushy. If you want to freeze this dish, first let it cool completely. Then, divide it into portions. Use freezer-safe containers or bags. Squeeze out as much air as you can. The bake can last for up to three months in the freezer. When you're ready to eat, thaw it in the fridge overnight. Reheat it in the oven for best results. How long does it take to bake Balsamic Zucchini Tomato Bake? Baking this dish takes about 25 to 30 minutes. You want the zucchini tender and caramelized. Can I prepare this dish in advance? Yes, you can prep it a day ahead. Just cover it and store it in the fridge. Is this dish vegan-friendly? Yes, this dish is vegan if you skip the cheese. All other ingredients are plant-based. Is it suitable for gluten-free diets? Absolutely! All ingredients are gluten-free. Enjoy this dish without worry. What can I use instead of balsamic vinegar? You can use red wine vinegar or apple cider vinegar. Both add nice flavor. Can I use dried herbs instead of fresh? Yes, you can use dried herbs. Just remember to use less since they’re stronger. This blog post covered a delicious Balsamic Zucchini Tomato Bake. We discussed key ingredients like zucchinis, cherry tomatoes, and red onion. I shared how to enhance the flavors with balsamic vinegar and olive oil. You learned simple preparation steps, baking tips, and fun variations. In the end, this dish is versatile and easy to make. Enjoy experimenting with flavors and ingredients to personalize your meal. Don’t forget to have fun in the kitchen!](https://stirredrecipes.com/wp-content/uploads/2025/07/be5cc9cb-e79d-474b-9b95-11d9c4fe8eb0.webp)
Balsamic Zucchini Tomato Bake Flavorful Vegetable Dish
If you’re looking for a quick, tasty, and healthy dish, try my Balsamic Zucchini Tomato Bake. This flavorful vegetable dish combines fresh ingredients like zucchini,

Savory Sesame Chicken & Green Beans Delight
Craving a dish that’s both simple and packed with flavor? Look no further! In this blog post, I’ll guide you through making Savory Sesame Chicken
. - Achieving the best flavor profiles: Start with fresh asparagus. It packs a punch of flavor. Use ripe lemons for zest and juice. The zest adds brightness, while the juice balances the dish. A touch of red pepper flakes offers a nice kick, but adjust to your taste. - Adjusting seasoning preferences: Taste as you go. Add salt and pepper in small amounts. This helps you control the dish's flavor. If you prefer a creamier dish, add more ricotta. For a tangy twist, increase the lemon juice. - Overcooking the squash or asparagus: Keep a close eye when roasting the squash. It should be tender but not mushy. Asparagus needs just a few minutes in the pan. You want it vibrant and slightly crisp. - Misproportions in ingredients: Follow the recipe closely. Too much ricotta can overwhelm the dish. If you add extra lemon, it might become too sour. Balance is key for a great taste. {{image_2}} You can boost your dish with extra vegetables. Here are some ideas: - Cherry tomatoes: Add them for sweetness. - Spinach: It brings a nice green touch. - Bell peppers: They add crunch and color. If you want protein, try these options: - Grilled chicken: It's a classic choice. - Shrimp: They cook quickly and add flavor. - Tofu: A great option for a plant-based meal. This dish is easy to adapt for different diets. - Gluten-free: Spaghetti squash is naturally gluten-free. Enjoy it without worry. - Vegan: Swap ricotta with cashew cheese or silken tofu. For lower calories, reduce ricotta cheese. You can use less oil or skip the cheese. This keeps the dish light yet tasty. After enjoying your spaghetti squash with asparagus and ricotta, you may have some leftovers. To keep them fresh, store them in the fridge. Place the dish in an airtight container. This helps to lock in moisture and flavor. The leftovers will stay good for about 3-4 days. If you want to save them longer, consider freezing. First, let the dish cool down completely. Then, transfer it to a freezer-safe container. Make sure to remove as much air as possible. This prevents freezer burn. You can freeze it for up to 2-3 months. When it’s time to enjoy your leftovers, reheating correctly matters. The best method is to use the oven. Preheat it to 350°F (175°C). Place your spaghetti squash in an oven-safe dish. Cover it with foil to keep moisture in. Heat for about 15-20 minutes or until warm. You can also use the microwave. Place the dish in a microwave-safe bowl and cover it with a damp paper towel. Heat in short bursts of 1-2 minutes, stirring in between. This helps to keep the texture and flavor intact. Avoid overheating, as this can dry out the dish. To tell if spaghetti squash is done, look for a few signs. The skin should feel soft when you press it. You also want to see some browning on the cut sides. A fork should easily pierce the flesh. To test, you can poke it with a fork. If it goes in with little effort, it’s ready. Cook it longer if it feels hard. Yes, you can make this dish ahead of time. To save time, roast your squash and cook the asparagus a day before. Then, mix them with the ricotta right before serving. Store the components in separate airtight containers in the fridge. This way, you keep the flavors fresh until you are ready to eat. You can serve many sides with spaghetti squash. A light salad with mixed greens pairs well. Try garlic bread for a nice crunch. For a complete meal, add grilled chicken or shrimp. These choices enhance your dish and add protein to fill you up. In this post, we explored making spaghetti squash with asparagus and ricotta. We discussed key ingredients and provided step-by-step cooking instructions. I shared tips to boost flavor and avoid common mistakes. You can try fun variations and learn how to store leftovers. This dish is healthy, simple, and can fit many diets. With these tips, you can enjoy a tasty meal that delights. Try it out, and let your kitchen shine!](https://stirredrecipes.com/wp-content/uploads/2025/07/e77356f0-ff56-413a-a324-7a0df0f37678.webp)
Spaghetti Squash with Asparagus and Ricotta Delight
Are you ready to try a healthy meal that’s bursting with flavor? My Spaghetti Squash with Asparagus and Ricotta Delight combines creamy ricotta, crisp asparagus,

Jalapeno Peach Chicken Bold and Flavorful Delight
Are you ready to spice up your dinner table? Jalapeno Peach Chicken is a bold and tasty dish that combines sweetness and heat. This unique
![To make a Sweet Corn and Zucchini Pie, you will need a few simple ingredients. Here’s what you’ll need: - 2 cups fresh corn kernels (or 1 can of corn, drained) - 2 medium zucchinis, grated - 1 small onion, finely chopped - 2 cloves garlic, minced - 3 large eggs - 1 cup heavy cream - 1 cup shredded cheddar cheese - 1 teaspoon dried thyme - 1 teaspoon paprika - Salt and pepper to taste - 1 pre-made pie crust (store-bought or homemade) - 2 tablespoons olive oil These ingredients come together to create a pie that is both tasty and satisfying. Fresh corn gives the dish a sweet crunch, while the zucchini adds moisture and nutrition. The cheeses melt wonderfully, giving the pie a rich flavor. When you mix these together, you get a dish that is great for any meal! 1. Preheat the oven and prepare ingredients: First, set the oven to 375°F (190°C). Gather all your ingredients. This makes cooking easier. 2. Sauté onions and garlic until fragrant: In a large skillet, heat 2 tablespoons of olive oil over medium heat. Add 1 small chopped onion. Cook for about 3-4 minutes until it looks clear. Then, add 2 minced cloves of garlic. Stir for 1 more minute until it smells great. 3. Cook the zucchini and corn mixture: Next, grate 2 medium zucchinis and add them to the skillet. Cook for about 5 minutes until they are softer. Now, add 2 cups of fresh corn kernels. Season with 1 teaspoon of dried thyme, 1 teaspoon of paprika, salt, and pepper. Cook for another 2-3 minutes. Remove the mix from heat and let it cool a bit. 1. Whisk together eggs and cream: In a large bowl, whisk 3 large eggs and 1 cup of heavy cream. Mix well until everything blends together. 2. Combine with cooled vegetable mixture: Slowly add the cooled corn and zucchini mix to the egg and cream. Also, add 1 cup of shredded cheddar cheese. Stir until all is mixed well. 3. Pour the filling into the pie crust: Take 1 pre-made pie crust. Pour the filling into it, making sure it spreads evenly. 1. Baking time and tips to check for doneness: Place the pie in the preheated oven. Bake for 35 to 40 minutes. To check if it's done, insert a toothpick into the center. If it comes out clean, your pie is ready. 2. Cooling time before serving: Let the pie cool for a few minutes. This helps it set. Slice it into wedges and enjoy! To make a great sweet corn and zucchini pie, texture matters. You want a smooth filling that holds together. Cook the zucchini just right—soft but not mushy. If overcooked, it can turn watery. Drain excess moisture before mixing it into your filling. To enhance the flavors, use fresh corn if possible. Fresh corn brings a sweet burst that canned corn cannot match. When sautéing, let the onions become translucent; this step builds a rich base. Season your mixture well with salt and pepper, and don't skip the thyme and paprika. They add depth and warmth. When serving your pie, slice it into wedges. This makes it easy for guests to grab a piece. Serve warm or at room temperature. Garnish each slice with fresh herbs, such as parsley or basil. This adds color and a fresh taste. You can even drizzle a bit of olive oil on top for extra flair. Remember, we eat with our eyes first, so make it look good! For the full recipe, check out the [Full Recipe]. {{image_2}} You can easily change the cheese in this recipe. Here are some options: - Feta cheese: It adds a salty and tangy flavor. - Goat cheese: This option gives a creamy and rich texture. - Mozzarella: It melts well and keeps the pie light. For those who need dairy-free options, try these: - Plant-based cream: Use coconut or cashew cream for a creamy base. - Nutritional yeast: This gives a cheesy flavor without dairy. - Almond milk: Replace heavy cream with unsweetened almond milk. For gluten-free needs, you can swap the pie crust: - Gluten-free crust: You can find ready-made options at many stores. - Cauliflower crust: A fun and healthy alternative that works well. To make your pie even tastier, think about adding herbs and spices: - Basil: Fresh basil adds a nice touch. - Oregano: This herb brings a warm flavor to the mix. - Cumin: A small amount can add a nice earthy taste. You can also mix in other vegetables for extra nutrition: - Spinach: Adds color and a healthy boost. - Bell peppers: They add a sweet crunch. - Mushrooms: They provide a savory depth to the pie. Feel free to get creative! These variations allow you to make this dish your own. Check the Full Recipe for the basics and then explore your ideas. To keep your Sweet Corn and Zucchini Pie fresh, refrigerate it soon after serving. Place it in an airtight container or cover it tightly with plastic wrap. This helps keep the pie moist and prevents it from absorbing any odors in the fridge. You can store the pie in the fridge for up to 3-4 days. If you want to enjoy it later, freezing is a great option. To freeze your pie, let it cool completely first. Wrap it tightly in plastic wrap, then cover it with aluminum foil. This double layer protects it from freezer burn. You can freeze the pie for up to 2-3 months. When you're ready to enjoy it, thaw the pie in the fridge overnight. For reheating, bake it in a 375°F (190°C) oven for about 20-25 minutes or until it's heated through. This method keeps the crust crispy and the filling creamy, so you get the best quality. What can I serve with Sweet Corn and Zucchini Pie? You can serve this pie with a fresh salad. A simple green salad works well. You can also pair it with a light soup. Try a tomato basil soup for a tasty combo. Can I make this pie ahead of time? Yes, you can prepare the pie a day in advance. Just bake it and let it cool. Store it in the fridge. Reheat it when you are ready to serve. How do I know when the pie is done baking? The pie is done when the top is golden brown. A toothpick inserted into the center should come out clean. If it’s still wet, bake it a little longer. Is it possible to use frozen corn or zucchini? Yes, you can use frozen corn and zucchini. Just thaw and drain them first. Squeeze out any excess water from the zucchini to avoid a soggy pie. What is the best way to reheat leftovers? To reheat leftovers, place the pie in the oven. Set it to 350°F (175°C). Heat for about 15 minutes or until it’s warm. This keeps the crust crispy. Can I use another type of crust for this pie? Absolutely! You can use a whole wheat crust or a gluten-free crust. A puff pastry crust adds a nice flaky texture too. Just make sure it fits your pie dish. We explored a tasty Sweet Corn and Zucchini Pie recipe. You learned about the key ingredients, from fresh corn to cheddar cheese. I laid out each step, making it easy to prepare and bake. I've shared tips for perfecting the pie and ways to present it beautifully. You also found variations and storage tips to enjoy this dish longer. Now, it’s your turn to make this pie and impress everyone! Happy cooking!](https://stirredrecipes.com/wp-content/uploads/2025/07/b2c389d5-ceea-4e76-ad19-2895fbd89fe3.webp)
Delicious Sweet Corn and Zucchini Pie Simple Recipe
Are you ready to enjoy a fresh twist on your dinner table? This Delicious Sweet Corn and Zucchini Pie is easy to make and packed
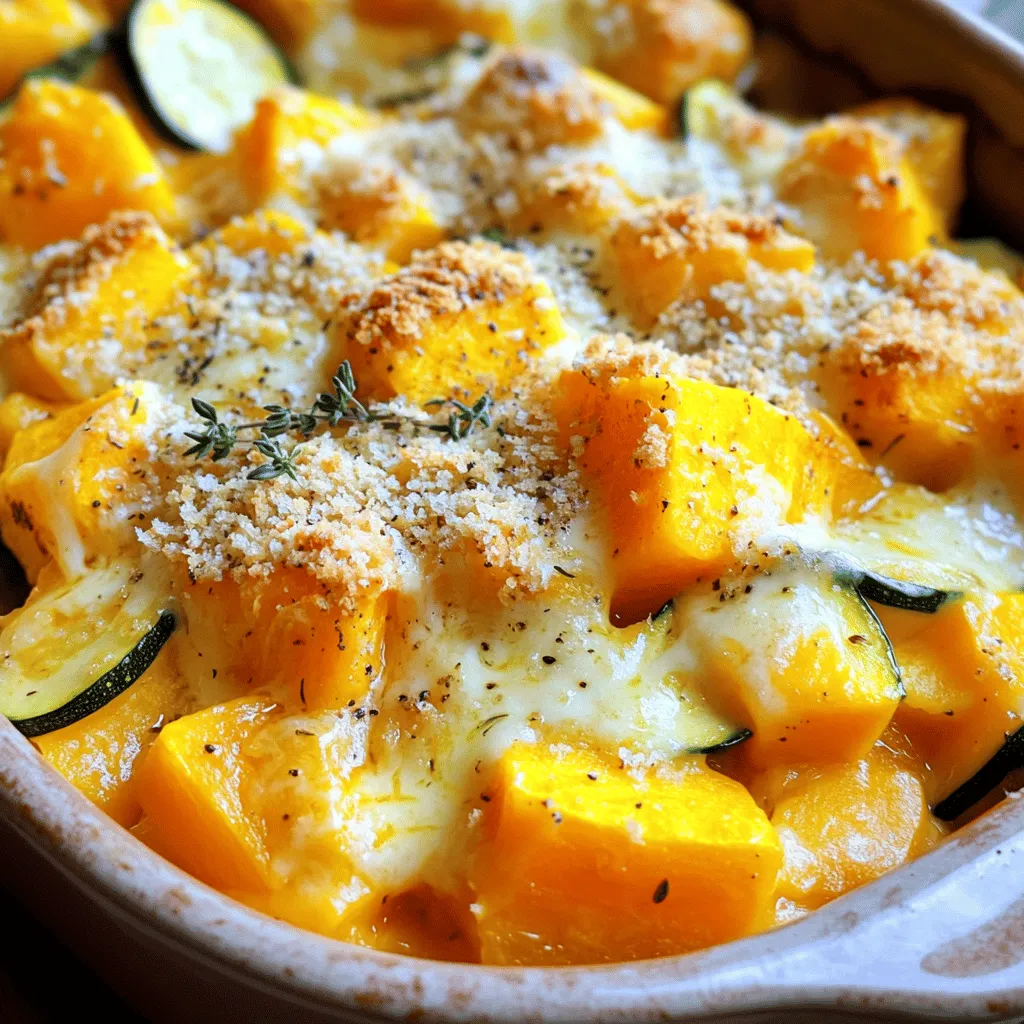
Savory Squash Casserole Creamy and Hearty Delight
Are you ready for a dish that warms both the belly and the heart? My Savory Squash Casserole is creamy, hearty, and packed with flavor.
. - Spiralizing the zucchini Start by washing the zucchinis. Cut off the ends. Use a spiralizer to make thin noodles. If you don’t have a spiralizer, a vegetable peeler works too. Just slice the zucchini into long strips. - Halving the cherry tomatoes Rinse the cherry tomatoes and place them on a cutting board. Use a sharp knife to cut each tomato in half. This helps them cook faster and release their juices. - Mincing the garlic Take your garlic cloves and peel them. Place them on the board and chop them finely. This will bring out their strong flavor in the dish. - Heating the olive oil Grab a large skillet and set it on medium heat. Pour in the olive oil. Let it heat for about a minute until it shimmers. - Sautéing garlic and tomatoes Add the minced garlic to the skillet. Stir it for about a minute. Then, toss in the halved cherry tomatoes. Cook them for 5-7 minutes. Stir often until they soften and release their juices. - Adding zucchini and seasoning Now, stir in the spiralized zucchini and dried oregano. Cook for another 3-5 minutes. You want the zucchini to be tender but still a bit crunchy. If you like heat, sprinkle in some red pepper flakes. Season with salt and pepper to taste. - Stirring in fresh basil After removing the skillet from heat, add the chopped fresh basil. Stir well to mix the flavors. - Serving suggestions with Parmesan cheese Serve your pasta hot. You can top it with grated Parmesan cheese if you like. This adds a nice creamy texture to the dish. Enjoy your fresh and flavorful Tomato Zucchini Pasta! For the complete recipe, check the [Full Recipe]. To avoid soggy zucchini, cook it quickly. First, spiralize your zucchini, then drain it for a few minutes. This step helps remove extra water. When cooking, add the zucchini last. This way, it stays firm. For perfectly sautéing garlic, use medium heat. Add garlic to hot oil and stir for about one minute. Watch it closely to prevent burning. Once it turns golden, it’s ready to add other ingredients. Adjusting spice levels is easy. If you like heat, add more red pepper flakes. Start with a small amount, taste, and add more if needed. You control the spice! If you don’t have zucchini, try yellow squash or carrots. Both can be spiralized and add great flavor. For tomatoes, use diced canned tomatoes or sun-dried tomatoes for a twist. Each option gives a different taste. For cheese, if you want a vegan option, use nutritional yeast. It adds a cheesy flavor. You can also use vegan cheese shreds that melt well. Pair this dish with crusty bread or a fresh salad. A simple green salad with lemon vinaigrette works great. It adds a nice crunch and balances the meal. This dish shines for casual dinners or family gatherings. Serve it at summer barbecues or cozy nights in. The bright colors and fresh taste make it a crowd-pleaser. For the full recipe, check out the section above. {{image_2}} You can make Tomato Zucchini Pasta even better with protein. Adding grilled chicken gives the dish a nice boost. Just slice cooked chicken and mix it in. It adds flavor and makes it filling. If you love seafood, try incorporating shrimp. Cook the shrimp in the skillet until pink. Then, add it to the pasta for a tasty twist. For those who need gluten-free meals, you have options! You can use gluten-free pasta alternatives. Look for brands made from rice or quinoa. They work well and taste great with this dish. You can easily make this dish vegan. Just omit the cheese. Instead, sprinkle nutritional yeast on top. It adds a cheesy flavor without using dairy. You’ll still enjoy a rich taste while keeping it plant-based. For the full recipe, check out the [Full Recipe]. To keep your Tomato Zucchini Pasta fresh, let it cool first. Place it in a clean container. Use an airtight container for best results. This helps keep the flavors locked in and prevents spills. Store it in the fridge for up to three days. If you want to eat it later, freezing is a good option. When you reheat, do it gently. Use a skillet over low heat. Add a splash of water or olive oil to keep it moist. Stir often to warm it evenly. This method keeps the zucchini from getting mushy. You can also use a microwave. Heat in short bursts, stirring in between. If you want to freeze your Tomato Zucchini Pasta, start by cooling it down. Use freezer-safe containers or bags to prevent freezer burn. It can last up to three months in the freezer. When you're ready to eat, thaw it overnight in the fridge. Reheat thoroughly before serving. This keeps the flavors bright and tasty. Enjoy your meal anytime with these easy storage tips! For the complete recipe, check out the Full Recipe. To add more flavor, use fresh herbs like basil and parsley. You can also try adding a splash of lemon juice for brightness. A sprinkle of good-quality olive oil enhances the taste, too. If you want heat, add red pepper flakes. You might also sauté onions with garlic for a sweet base. These tips will make your dish pop with flavor. Yes, you can use regular pasta if you prefer. Just cook it according to the package instructions. Spiralized zucchini serves as a low-carb option, but pasta brings a classic taste. Mix both for a fun texture. This way, you can enjoy the best of both worlds in your meal. Yes, Tomato Zucchini Pasta is healthy! Zucchini has low calories and lots of fiber. Cherry tomatoes are packed with vitamins. This dish is great for a balanced meal. Plus, you can skip cheese for a lighter option. With fresh ingredients, you get a nutritious meal that tastes great. Serve your Tomato Zucchini Pasta with a side salad for crunch. Garlic bread makes a tasty pairing, too. Try a glass of white wine to complement the flavors. You can also add grilled chicken or shrimp for extra protein. These sides elevate your meal and make it even more satisfying. In this blog post, we explored making a delicious Tomato Zucchini Pasta. We covered fresh ingredients, pantry staples, and optional toppings. You learned step-by-step instructions for preparation, cooking, and finishing touches. We shared tips for cooking and ingredient swaps, plus storage and reheating advice. In conclusion, this dish is healthy and easy to customize. Enjoy trying different variations and sharing it with others!](https://stirredrecipes.com/wp-content/uploads/2025/07/c8563d8e-616c-48c5-9000-df5d3528464a.webp)
Tomato Zucchini Pasta Fresh and Flavorful Delight
If you’re looking for a simple yet delicious meal, Tomato Zucchini Pasta is a must-try. This dish bursts with fresh flavor from zucchini, cherry tomatoes,
![- 1 lb baby potatoes, halved - 2 medium zucchinis, sliced into half-moons - 4 cloves garlic, minced - 3 tablespoons olive oil - 1 teaspoon dried oregano - 1 teaspoon dried thyme - 1 teaspoon smoked paprika - Salt and pepper to taste - Fresh parsley, chopped (for garnish) Cooking starts with good ingredients. Each one plays a key role. Baby potatoes bring a creamy texture. Zucchini adds a fresh crunch. Garlic gives a rich flavor that makes everything pop. Olive oil helps the veggies roast well and adds healthy fat. Herbs like oregano and thyme bring depth. Smoked paprika adds a warm, smoky taste. Salt and pepper enhance all the flavors. The fresh parsley at the end not only looks nice but adds a burst of flavor too. - Calories per serving: About 200 - Macronutrient breakdown: 5g protein, 30g carbohydrates, 8g fat - Dietary accommodations: This dish is gluten-free and vegan. Garlic Herb Roasted Potatoes and Zucchini makes a great side. You get healthy carbs from potatoes and fiber from zucchini. It fits well in many diets. This recipe is simple yet satisfying. Want to explore more? Check out the Full Recipe for details! - Preheat your oven to 425°F (220°C). - Prepare a baking sheet with parchment paper if you like. In a large mixing bowl, combine the halved baby potatoes, sliced zucchinis, and minced garlic. This mix is the heart of your dish. Drizzle 3 tablespoons of olive oil over the vegetables. The oil helps the veggies roast well. Next, sprinkle in 1 teaspoon each of dried oregano, dried thyme, and smoked paprika. Add salt and pepper to taste. The spices bring out the flavors of the vegetables. Toss everything together until the veggies are evenly coated. This step is key for great flavor. Spread the mixture in a single layer on the baking sheet. Place it in the preheated oven. Roast for 25 to 30 minutes. Stir halfway through to ensure even cooking. Watch for the signs of readiness. The potatoes should be golden brown and tender. Use a fork to check if they are soft. Once done, remove from the oven, and garnish with fresh chopped parsley. For the full recipe, refer to the instructions above. To boost flavor, consider adding fresh herbs like rosemary or basil. You can also try spices like cumin or chili powder for a different kick. Marinating the vegetables in olive oil and herbs for 30 minutes can make a big difference. This extra time allows the veggies to soak up the flavors well. For the best results, place your baking sheet in the middle of the oven. This spot helps the heat circulate evenly around the food. Stir the vegetables halfway through roasting to ensure they brown nicely. Doing this helps them cook evenly and adds to that perfect golden look. Garlic Herb Roasted Potatoes and Zucchini pair well with grilled chicken or fish. You can also serve them alongside a fresh salad for a complete meal. For a festive touch, arrange them on a large platter. Drizzle with olive oil and add a sprinkle of fresh parsley for color. This adds a nice pop that’s sure to impress your guests! {{image_2}} You can switch out zucchini for other veggies. Bell peppers add a sweet crunch. Carrots bring a nice sweetness and color. If you're tired of regular potatoes, try sweet potatoes. They have a lovely flavor and are packed with nutrients. Want to boost the taste? Add cheese! Parmesan gives a rich, nutty flavor. Feta adds a salty kick that pairs well with the herbs. If you like heat, sprinkle in some red pepper flakes. This adds a nice spice without being too hot. You can also cook this dish in an air fryer. Just set it to 400°F (200°C) and cook for about 15-20 minutes. Shake the basket halfway through for even cooking. Another option is grilling. Toss the veggies on a grill pan for a smoky flavor. This method gives a nice char that enhances the taste. For the full recipe, check the recipe section above. To keep your Garlic Herb Roasted Potatoes and Zucchini fresh, store leftovers in an airtight container. This helps maintain their flavor and texture. When stored properly, the dish lasts about 3 to 5 days in the fridge. Always let your leftovers cool before sealing them up. When it comes to reheating, I recommend using the oven. This method keeps the vegetables crispy. Preheat your oven to 350°F (175°C) and spread the veggies on a baking sheet. Heat for about 10-15 minutes, stirring once. If you're in a hurry, the microwave works too. Just remember, it may make the potatoes soft. If you want to freeze your Garlic Herb Roasted Potatoes and Zucchini, make sure to cool them completely first. Place portions in freezer-safe bags or containers. Be sure to remove as much air as possible. For best taste, use within 2-3 months. When you're ready to eat, thaw them in the fridge overnight. Reheat in the oven or microwave as mentioned above. This way, you can enjoy this dish anytime! Want the full recipe? Check it out [Full Recipe]. Roasting potatoes and zucchini takes about 25 to 30 minutes at 425°F (220°C). You want the potatoes to be golden brown and tender. Stir halfway through to ensure even cooking. I recommend checking the potatoes with a fork. If they are soft, they are ready! Yes, you can make this dish ahead of time. Roast the vegetables and let them cool. Store them in an airtight container in the fridge for up to three days. When you are ready to eat, just reheat in the oven or microwave until warm. This makes meal prep easy! These roasted vegetables pair well with many proteins. Grilled chicken or baked fish are great choices. You can also serve them with tofu for a vegetarian option. For a heartier meal, try them with steak or pork chops. They complement rich flavors beautifully! This blog post covered a simple, tasty recipe for Garlic Herb Roasted Potatoes and Zucchini. We discussed the key ingredients and their nutritional value. You learned step-by-step instructions for preparation, roasting, and serving. Tips and variations helped make your dish unique. Finally, we shared storage and reheating advice. With this knowledge, you can create a healthy, flavorful dish. Enjoy your cooking and share it with friends and family!](https://stirredrecipes.com/wp-content/uploads/2025/07/525814fd-7c9e-4538-a53b-e026d05ad359.webp)
Garlic Herb Roasted Potatoes and Zucchini Delight
Craving a tasty and easy side dish? You’ll love these Garlic Herb Roasted Potatoes and Zucchini! This recipe combines tender baby potatoes and fresh zucchini

Garlic Parmesan Chicken & Potatoes Flavorful Dinner
Looking for a quick and tasty dinner? My Garlic Parmesan Chicken & Potatoes hits the spot! This dish pairs juicy chicken with tender baby potatoes,

Crispy Honey Garlic Tofu Easy and Flavorful Recipe
Are you ready to spice up your dinner routine? This Crispy Honey Garlic Tofu recipe brings bold flavor and crunch to your plate. Whether you’re