Dinner
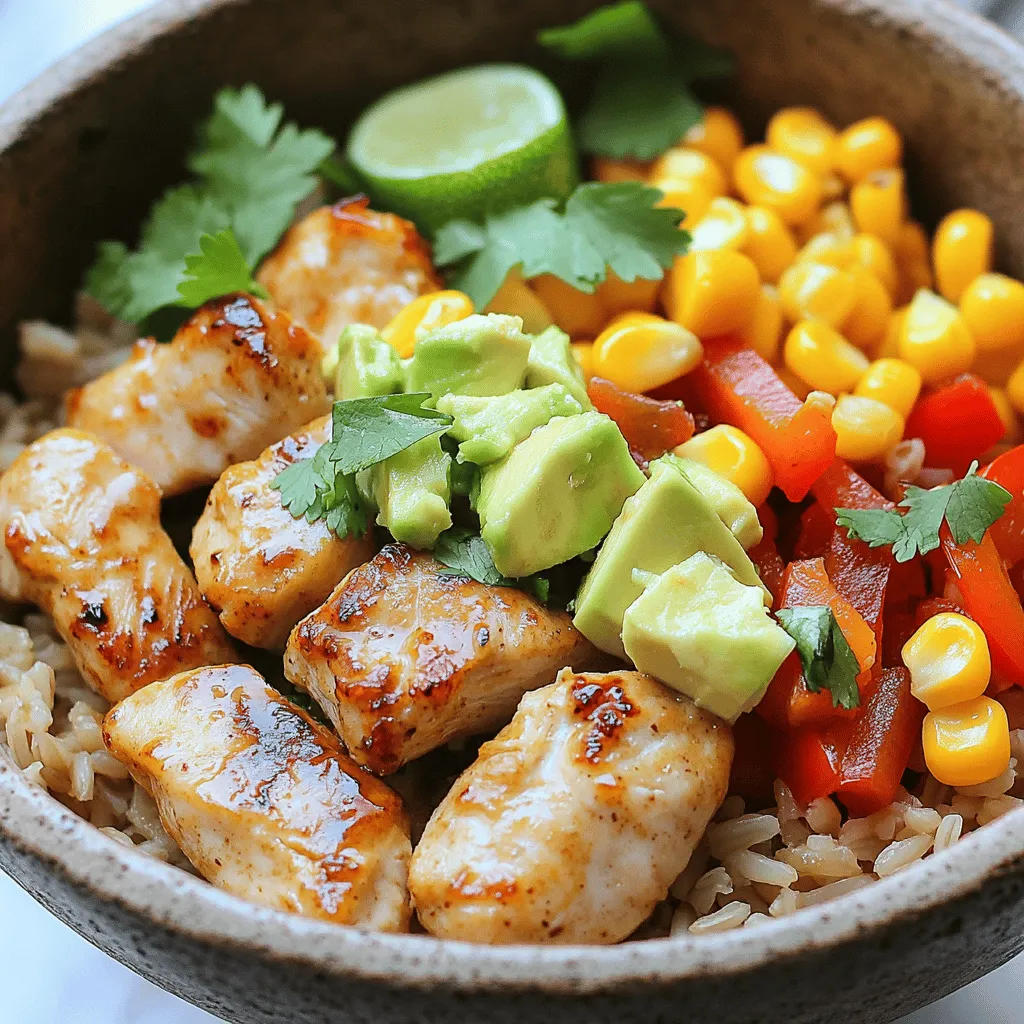
Healthy Chicken Bowl with Rice and Corn Delight
Looking for a quick, tasty meal that’s also good for you? The Healthy Chicken Bowl with Rice and Corn Delight is your solution! This easy
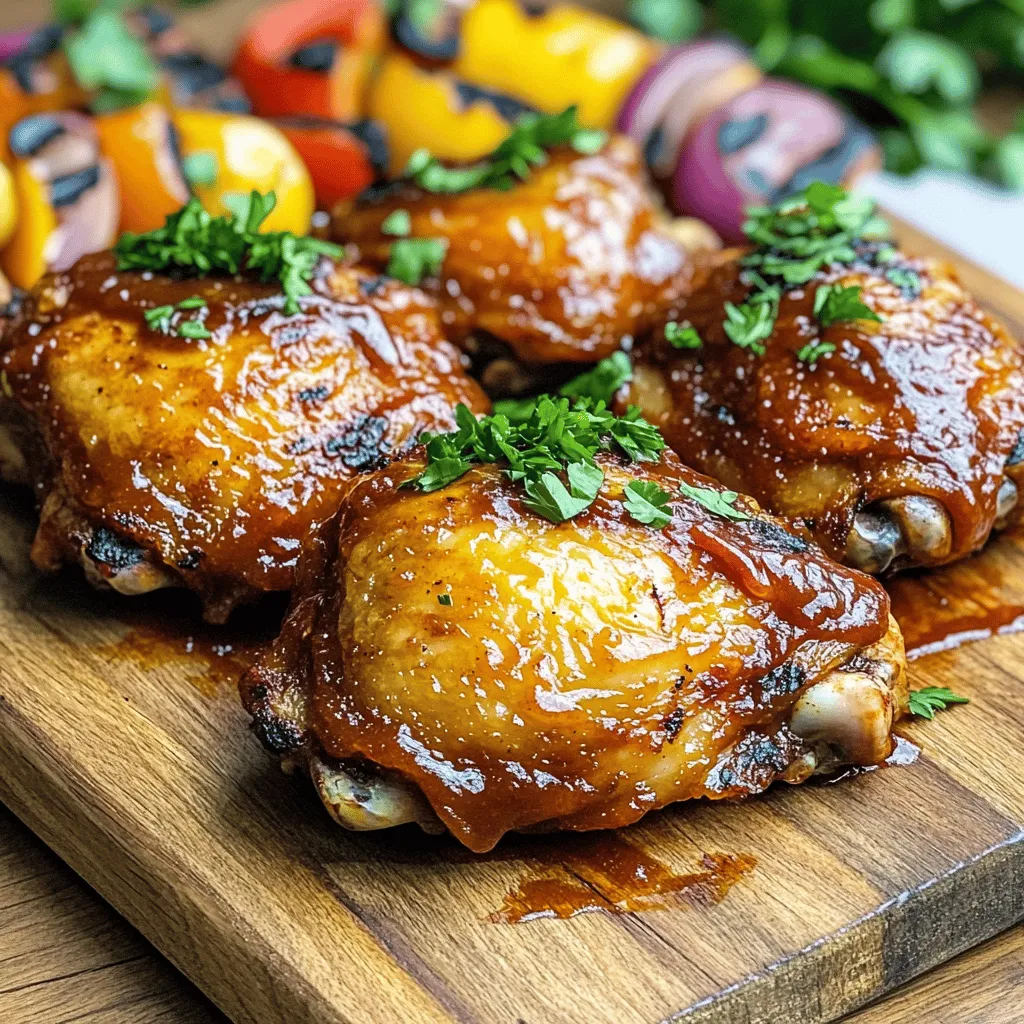
Low Carb BBQ Chicken Thighs Simple and Flavorful Recipe
If you’re craving juicy, flavorful BBQ chicken thighs that won’t wreck your diet, you’re in the right place! This simple recipe not only features sugar-free
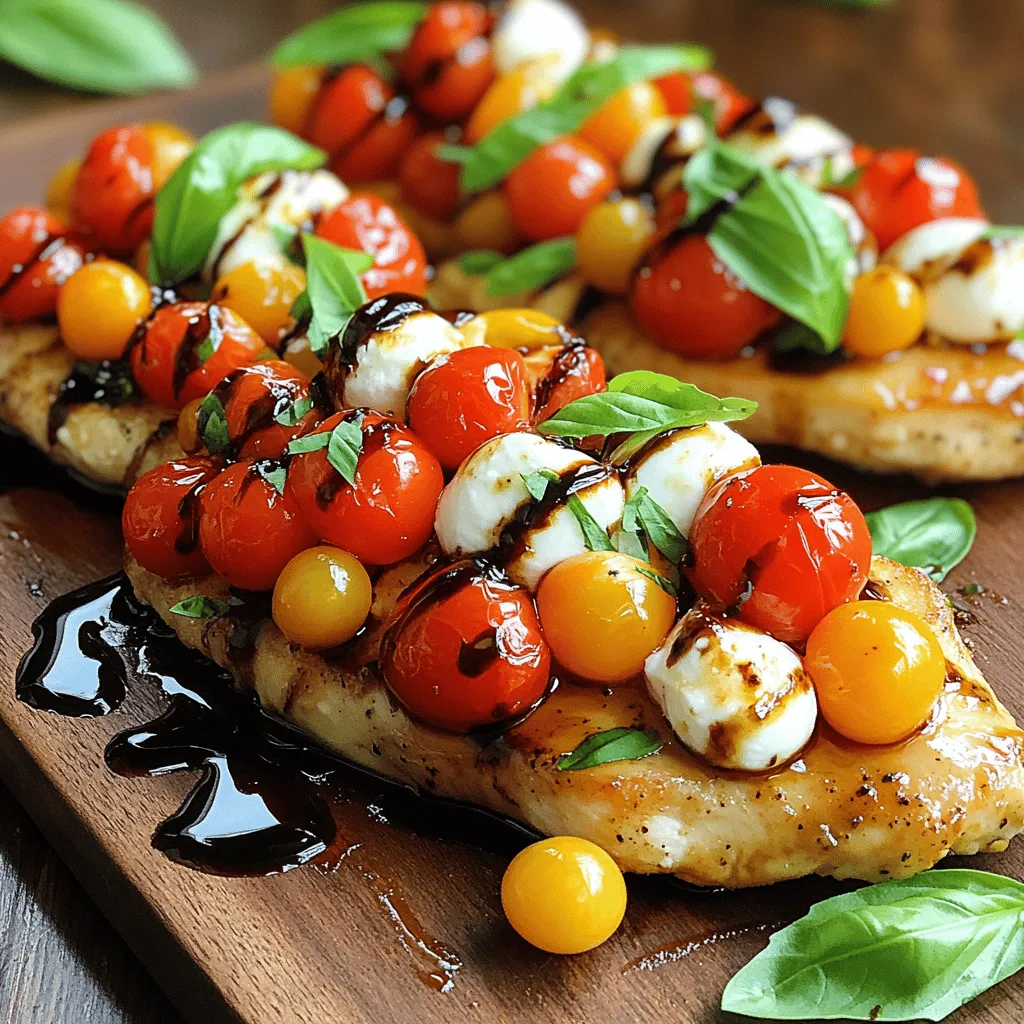
Bruschetta Chicken Flavorful and Simple Recipe Guide
Bruschetta chicken is a tasty dish that’s easy to make and perfect for any meal. In this guide, I focus on each step to help

Zucchini Corn Chowder Hearty and Flavorful Recipe
Craving something warm and satisfying? This Zucchini Corn Chowder is your answer! Packed with fresh veggies and rich flavors, this chowder is perfect for any
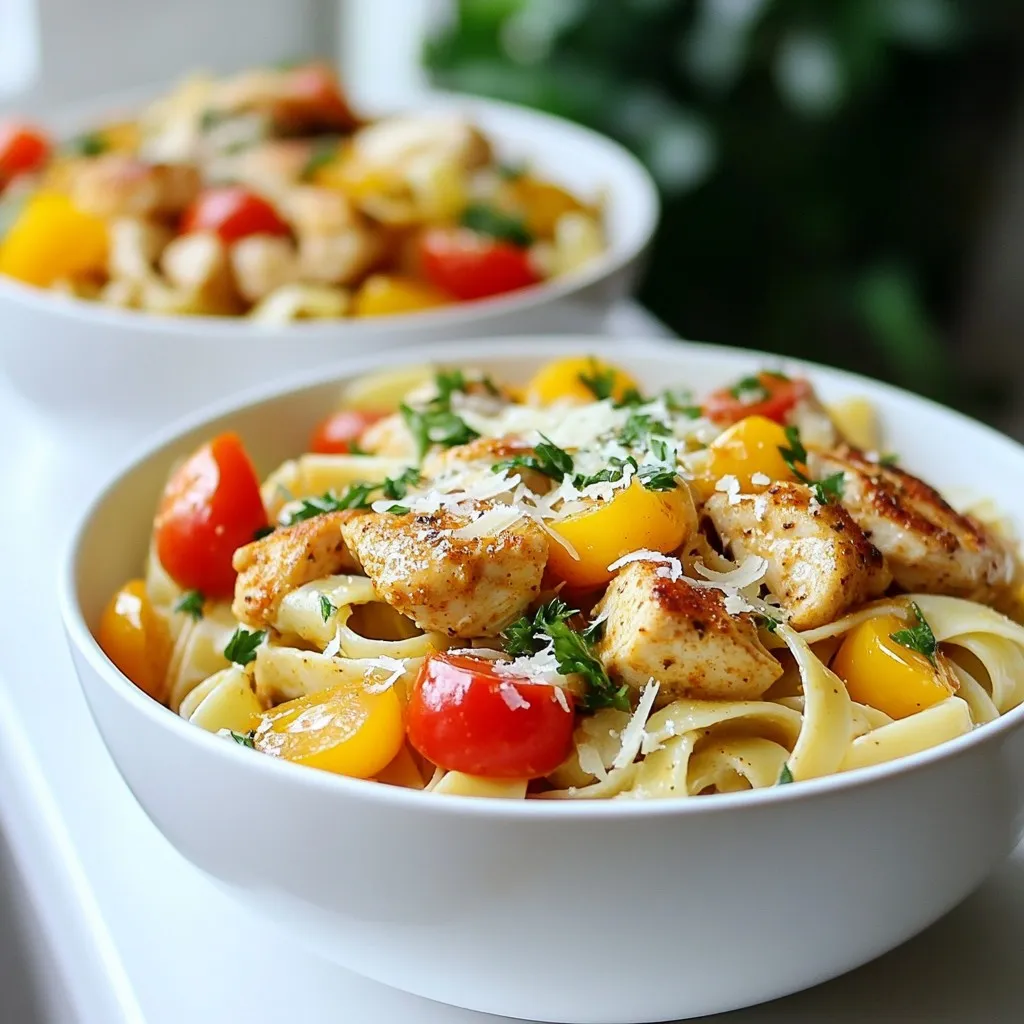
Cajun Chicken Pasta Flavorful and Easy Dinner Recipe
If you’re searching for a dinner that’s both flavorful and easy, look no further than Cajun Chicken Pasta. This dish is perfect for busy nights,
 To make the best fried chicken cutlets, start with the right chicken. Use two boneless, skinless chicken breasts. These stay juicy and cook well. Pound them to about ½ inch thick. This helps them cook evenly. Next, set up your breading station. You will need three bowls. In the first bowl, mix flour, garlic powder, onion powder, paprika, salt, black pepper, and oregano. This gives the cutlets a great flavor. In the second bowl, whisk eggs and buttermilk. In the third bowl, place your breadcrumbs. Now it’s time to bread the chicken. First, dredge each piece in the flour mix. Make sure to cover it well. Shake off any extra flour. Then dip the chicken in the egg mix. Allow excess to drip off. Finally, coat with breadcrumbs. Press gently so they stick. Heat about ¼ inch of vegetable oil in a large skillet over medium heat. To test if the oil is ready, drop in a small piece of bread. If it sizzles, you’re good to go. Place the breaded cutlets in the skillet. Avoid overcrowding. Fry each side for about 4-5 minutes. Look for a golden brown color. Adjust heat as needed to prevent burning. After frying, remove the cutlets. Place them on a paper towel-lined plate to soak up extra oil. Garnish with fresh parsley before serving. Enjoy your crispy and flavorful chicken cutlets! You now know how to make crispy chicken cutlets, from preparation to storage. Use the right ingredients and follow each step carefully. The tips can help you achieve the best taste and texture. Don’t forget to try variations or pair them with your favorite sides. Enjoy serving this dish to family and friends. You can also explore reheating and storage options for later enjoyment. Happy cooking!](https://stirredrecipes.com/wp-content/uploads/2025/07/50bb6d7d-f04d-4441-8d02-e4ef7da0a6bc.webp)
Fried Chicken Cutlets Crispy and Flavorful Delight
Craving crispy and flavorful fried chicken cutlets? You’re in the right place! In this post, I’ll guide you through the easy steps to create a
![- 4 boneless, skinless chicken breasts - 4 tablespoons unsalted butter - 4 cloves garlic, minced - 1 teaspoon fresh thyme leaves - 1 teaspoon paprika - Salt and pepper, to taste - Juice of 1 lemon - 2 tablespoons olive oil - Fresh parsley, chopped (for garnish) In this dish, the boneless, skinless chicken breasts are the star. They cook quickly and stay juicy. The unsalted butter adds richness, while fresh garlic gives a bold flavor. The thyme and paprika enhance the taste and aroma. To boost the flavor, you can try spices like onion powder, cumin, or black pepper. Adjust salt to your taste; start with a pinch and add more if needed. The paprika gives a nice color and warmth, so don’t skip it. Fresh parsley adds a pop of color and a fresh taste. You can also use basil or cilantro if you like. For side dishes, serve with rice, mashed potatoes, or a fresh salad. These pair well with the garlic butter sauce and round out the meal. Start by seasoning the chicken breasts. Sprinkle salt, pepper, and paprika on both sides. This step adds flavor and makes the chicken taste great. Use fresh spices for the best taste. Next, check the temperature of your ingredients. Make sure your chicken breasts are at room temperature before cooking. This helps them cook evenly. Cold chicken can lead to uneven cooking, which you want to avoid. Now, heat your skillet. Use a large skillet and set it over medium-high heat. Add olive oil into the pan and let it get hot. You want the oil to shimmer before adding the chicken. To achieve a golden brown crust, don't crowd the pan. Place only a few chicken breasts in the skillet at a time. This allows them to cook properly. Cook each side for about 5-7 minutes. You want a nice, crispy surface. Timing is key for the garlic. After you cook the chicken, lower the heat and add the butter. Let it melt, then add the minced garlic and thyme. Cook until the garlic smells great, about 1-2 minutes. Be careful not to burn the garlic; it can turn bitter. To balance flavors, add lemon juice to the sauce. This adds freshness and cuts through the richness of the butter. Spoon the sauce over the chicken as it cooks for an extra burst of flavor. For the complete dish, follow the [Full Recipe]. Enjoy your delicious garlic butter pan-fried chicken breasts! - To avoid dry chicken, always use a meat thermometer. Cook until it reaches 165°F (75°C). - Let chicken rest for a few minutes after cooking. This helps keep it juicy. - For even cooking, pound chicken breasts to a uniform thickness before seasoning. This ensures they cook at the same rate. - Pair this dish with fluffy rice or creamy mashed potatoes for a complete meal. - Roasted vegetables add color and nutrition. Think carrots, green beans, or broccoli. - For a beautiful presentation, serve the chicken on a large platter. Drizzle the garlic butter sauce over the top. Add lemon wedges and sprinkle fresh parsley for a pop of color. - Overcooking chicken can make it tough and dry. Keep an eye on cooking times. - Not using enough seasoning can lead to bland chicken. Don’t skip the salt, pepper, and spices in the recipe. - Skipping the resting time can cause juices to run out, leaving you with a dry meal. {{image_2}} You can change the taste of garlic butter pan-fried chicken breasts easily. Try adding fresh herbs like rosemary or basil. They bring a new layer of flavor. You can also mix in spices like chili powder or cumin for a kick. Cheese lovers can sprinkle feta or parmesan on top while cooking. This adds creaminess and richness to the dish. Don't be afraid to experiment with your favorite flavors! If you want to cook differently, try baking the chicken. Preheat your oven to 400°F (200°C). Place the seasoned chicken in a baking dish and cover with foil. Bake for 20-25 minutes until cooked through. This method keeps the chicken juicy and tender. Grilling is another great option. Heat your grill to medium-high. Grill the chicken for about 6-8 minutes on each side. This gives a nice smoky flavor. Make sure to check the internal temperature reaches 165°F (75°C) for safety. You can swap butter with olive oil or coconut oil for a lighter version. These oils still give great flavor. If you need a dairy-free option, use vegan butter instead. For protein, chicken thighs work well too. They are juicier and packed with flavor. You can even use tofu for a vegetarian twist. Just make sure to adjust the cooking time for different proteins. You can still enjoy this dish with your choices! Store your garlic butter pan-fried chicken breasts in an airtight container. This keeps them fresh and prevents them from drying out. Place the container in the fridge within two hours of cooking. Make sure the chicken has cooled down a bit before sealing it up. This prevents steam from building up and keeps your chicken from becoming soggy. To reheat your chicken, use a skillet on low heat. This method warms the chicken evenly and keeps it juicy. Add a splash of chicken broth or water to the pan to help maintain moisture. Cover with a lid to trap steam. You can also use a microwave, but be careful. Heat the chicken in short bursts to avoid drying it out. To freeze chicken, cut it into portions and wrap each piece tightly in plastic wrap. Then place them in a freezer bag or container. Be sure to label the bags with the date. For best quality, use the frozen chicken within three months. When you're ready to eat, thaw the chicken in the fridge overnight for safe and even thawing. Avoid thawing at room temperature to prevent bacteria growth. To know if your chicken is done, use a meat thermometer. Insert it into the thickest part of the chicken. The safe internal temperature is 165°F (75°C). This step ensures that the chicken is safe to eat. If you don’t have a thermometer, cut into the chicken. The juices should run clear, not pink. Yes, you can prepare this dish in advance. Cook the chicken and let it cool. Store it in an airtight container in the fridge. It will stay fresh for up to three days. Reheat it in a skillet or microwave when you’re ready to eat. For best taste, add fresh garlic butter just before serving. Garlic butter pan-fried chicken pairs well with many sides. Here are some popular options: - Steamed broccoli or green beans - Mashed potatoes or rice - A fresh garden salad - Roasted vegetables Feel free to mix and match these sides to create a balanced meal. This article covered how to make delicious garlic butter chicken breasts. You learned about ingredients like chicken, butter, and fresh garlic. I shared tips on seasoning, cooking methods, and serving suggestions. We also discussed common mistakes and variations to keep meals exciting. In conclusion, cooking is about enjoyment and learning. With practice, you will master this dish. Soon, cooking chicken will become a breeze!](https://stirredrecipes.com/wp-content/uploads/2025/07/97026adf-6c8e-4003-89af-b8b24b0ac97b.webp)
Garlic Butter Pan Fried Chicken Breasts Delight Recipe
Welcome to my kitchen! Today, I’m sharing a simple, yet tasty dish: Garlic Butter Pan Fried Chicken Breasts. This recipe is perfect for both busy
![For the Zucchini and Yellow Squash Casserole, here are the must-have ingredients: - 2 medium zucchinis, sliced - 2 medium yellow squashes, sliced - 1 cup cherry tomatoes, halved - 1 small onion, diced - 4 cloves garlic, minced - 1 cup shredded mozzarella cheese - 1/2 cup grated Parmesan cheese - 1 teaspoon dried oregano - 1 teaspoon dried thyme - Salt and pepper to taste - 2 tablespoons olive oil These ingredients work together to create a tasty and colorful dish. You can add a few extra ingredients to make your casserole even better: - 1/2 cup breadcrumbs (for a crunchy topping) - Fresh herbs like basil or parsley (for garnish) - Bell peppers, diced (for added crunch and color) - Red pepper flakes (for a little heat) Feel free to mix and match these options based on your taste. If you need to swap ingredients, here are some ideas: - For zucchini, use yellow squash or eggplant. - Instead of mozzarella, try cheddar or gouda cheese. - Use shallots or green onions instead of regular onion. - For a dairy-free option, replace cheese with nutritional yeast. These substitutes can help you adapt the recipe to what you have on hand or your dietary needs. Start by gathering all your ingredients. You will need: - 2 medium zucchinis, sliced - 2 medium yellow squashes, sliced - 1 cup cherry tomatoes, halved - 1 small onion, diced - 4 cloves garlic, minced - 1 cup shredded mozzarella cheese - 1/2 cup grated Parmesan cheese - 1 teaspoon dried oregano - 1 teaspoon dried thyme - Salt and pepper to taste - 2 tablespoons olive oil - 1/2 cup breadcrumbs (optional for topping) Wash and slice the zucchinis and yellow squashes. Dice the onion and halve the cherry tomatoes. Mince the garlic. Set everything aside for easy access. 1. Preheat your oven to 375°F (190°C). 2. Use a large skillet and heat the olive oil over medium heat. 3. Add the diced onions and cook until they turn clear, about 3-4 minutes. 4. Stir in the minced garlic and cook for another minute. 5. Add the sliced zucchinis and yellow squashes to the skillet. Sauté for about 5-7 minutes until they soften. 6. Mix in the cherry tomatoes, dried oregano, dried thyme, salt, and pepper. Cook for an additional 3-4 minutes. 7. Remove the skillet from heat and let the mixture cool slightly. 8. In a large bowl, combine the vegetables with half of the mozzarella and half of the Parmesan cheese. Stir well. 9. Transfer the mix to a greased 9x13-inch baking dish, spreading it evenly. 10. Top the casserole with the remaining mozzarella and Parmesan cheese. If using, sprinkle breadcrumbs on top. 11. Bake in the oven for 25-30 minutes. The cheese should be bubbly and the top golden brown. 12. Once done, remove from the oven and let it sit for 5 minutes before serving. - Ensure your skillet is hot before adding onions. This helps them cook evenly. - Do not rush the sautéing process. Let the zucchinis and squashes soften to improve the flavor. - When mixing the cheeses, make sure they are evenly distributed for a cheesy bite in every forkful. - If you like a crunch, use breadcrumbs on top. Bake until golden for added texture. Follow these steps for a delicious Zucchini and Yellow Squash Casserole. For the complete recipe, check out the [Full Recipe]. To make the best zucchini and yellow squash casserole, follow these steps: - Choose fresh veggies: Look for firm zucchinis and yellow squashes. They should feel heavy for their size. - Slice evenly: Cut your vegetables into similar sizes. This helps them cook evenly. - Preheat the oven: Always start with a hot oven. This ensures your casserole cooks right. - Grease your dish: Use a little olive oil or cooking spray. This helps prevent sticking. - Layer wisely: Spread your vegetable mix evenly in the baking dish. This helps with even cooking. Here are some common pitfalls: - Overcooking the veggies: Sauté them just until they soften. They will cook more in the oven. - Skipping seasoning: Don’t forget salt and pepper! They enhance the flavors of your dish. - Using too much cheese: While cheese is delicious, too much can make your casserole greasy. - Not letting it rest: Give your casserole 5 minutes to sit after baking. This helps it set. If you need to adjust cooking time, consider these factors: - Oven differences: Every oven is different. If yours runs hot, check your casserole early. - Vegetable moisture: If your zucchini or squash is watery, it may take longer to cook. - Size of dish: A deeper dish may require more time. A shallow dish cooks faster. - Bubbling cheese: Look for bubbling cheese and a golden top. This means it’s ready! For cooking specifics, refer to the [Full Recipe]. {{image_2}} You can add proteins to this casserole for a hearty meal. Chicken or turkey works well. Cook them first and mix them in with the veggies. You can also use cooked sausage for a spicy kick. If you want something lighter, try shrimp or tofu. Just make sure to season them well before mixing. Changing the spices can make your casserole unique. Try adding cumin for a warm taste. Smoked paprika adds a nice depth. You can also use Italian seasoning for a classic touch. If you love heat, sprinkle in some red pepper flakes. Don't be afraid to experiment with herbs like basil or dill. Each spice will bring a new twist to your dish. This casserole is easy to make vegetarian or vegan. For a vegan version, skip the cheese. Use a plant-based cheese or nutritional yeast for flavor. You can also add beans like black beans or chickpeas for protein. They add a nice texture and keep it filling. With these swaps, you still get a delicious, satisfying meal. Check out the Full Recipe for more tips on making this dish your own. To keep your Zucchini and Yellow Squash Casserole fresh, let it cool first. Once cool, place it in an airtight container. This helps keep the flavors locked in. You can store it in your fridge for up to three days. If you want to keep it longer, freezing is a great option. When it’s time to eat the leftovers, preheat your oven to 350°F (175°C). Place the casserole in a baking dish. Cover it with foil to prevent drying out. Heat for about 20 minutes or until it’s warm all the way through. You can also use the microwave. Just heat in short bursts, stirring in between, until hot. To freeze, let the casserole cool down completely. Cut it into portions for easy serving later. Wrap each piece tightly in plastic wrap, then place them in a freezer bag. You can freeze it for up to three months. When ready to cook, thaw it in the fridge overnight. Then, reheat it in the oven for the best taste and texture. Serve this casserole warm, right from the oven. I like to add fresh herbs like basil or parsley on top. They add color and burst with flavor. You can pair it with grilled chicken or a fresh salad. This dish is also great as a side for any meal. Yes, you can prepare this casserole a day ahead. Just follow the steps until you are ready to bake. Cover it with foil and place it in the fridge. When you are ready, bake it straight from the fridge. You might need to add a few extra minutes to the cooking time. Look for a bubbly top with a golden brown color. The cheese should melt and blend with the veggies. Insert a fork into the casserole to check if the squash is soft. If it is tender, your casserole is ready to enjoy. For the full recipe, refer to the earlier sections. This blog post covered key ingredients, preparation, and cooking steps for a great casserole. I shared best practices and common mistakes to help you succeed. You learned how to adjust cooking times and explore tasty variations. Storing and reheating tips ensured leftovers stay fresh and delicious. Remember, with a few simple changes, you can make this dish your own. Enjoy creating and sharing your perfect casserole!](https://stirredrecipes.com/wp-content/uploads/2025/07/34bebae0-03aa-4033-97fe-9ea61a9a66c3.webp)
Zucchini and Yellow Squash Casserole Tasty Easy Recipe
Are you ready to dive into a dish that’s both tasty and easy? This Zucchini and Yellow Squash Casserole recipe is perfect for any meal
![- Ground turkey - Zucchini - Bell pepper - Onion - Garlic To make a tasty turkey and zucchini skillet, you need fresh, simple ingredients. Ground turkey is the star here. It's lean and cooks quickly. Zucchini adds a nice texture and flavor. You can use one or two medium zucchinis, diced into cubes. A bell pepper, either red or yellow, brings color and sweetness. Finely chopped onion and minced garlic round out the base. These two ingredients create a fragrant aroma that fills your kitchen. - Dried oregano - Smoked paprika - Salt and black pepper Spices bring your dish to life. I love using dried oregano for its earthy taste. Smoked paprika adds a hint of warmth and depth. A little salt and black pepper are key to enhancing all the flavors. Just remember, you can adjust these to match your taste. - Fresh basil leaves To finish off your turkey and zucchini skillet, consider fresh basil leaves. They add a burst of color and a fresh flavor. Simply sprinkle them on top before serving for an extra pop! For the full recipe, check out the details above. 1. First, heat two tablespoons of olive oil in a large skillet over medium heat. This helps to get the right flavor. 2. Next, add the finely chopped onion. Sauté it for 2-3 minutes until it becomes soft and clear. 3. Then, stir in the minced garlic. Cook it for another minute. You want to smell that great aroma. 4. Now, increase the heat to medium-high and add the ground turkey. Cook it until it turns brown. Break it apart with a spatula for about 5-7 minutes. 1. Once the turkey is cooked, season it with dried oregano, smoked paprika, salt, and black pepper. Mix everything well. 2. Add the diced zucchinis and bell pepper to the skillet. Stir and cook for 5 minutes. This keeps the veggies crisp. 3. Next, fold in the halved cherry tomatoes. Cook for another 2-3 minutes until they soften slightly. 1. Remove the skillet from heat. 2. Garnish with fresh basil leaves. This adds a nice touch of color and freshness. 3. Serve your turkey and zucchini skillet warm. Enjoy this quick and flavorful meal! For the full recipe, check out the details above. - Choosing the right turkey: Use lean ground turkey. It has less fat and cooks well. Look for a turkey that is 93% lean or higher. This keeps the dish light and flavorful. - Ensuring vegetables maintain texture: Cut the zucchini and bell pepper into even pieces. This helps them cook at the same rate. Don’t overcook them. They should remain slightly crisp for the best texture. - Best side dishes to pair: Serve this dish with a side salad. A simple green salad with lemon dressing works great. Brown rice or quinoa also pairs well for a filling meal. - Ideal plates and presentation tips: Use a wide, shallow bowl to serve. This allows the colors to shine. Garnish with fresh basil leaves before serving. It adds a nice touch and fresh flavor. - Low-calorie substitutes: Replace ground turkey with chicken or turkey breast. You can also use cauliflower rice instead of brown rice. This cuts calories while adding fiber. - Incorporating more vegetables: Add more veggies like spinach or mushrooms. You can also mix in kale or carrots. This boosts nutrition and flavor without many extra calories. For the complete recipe, see the [Full Recipe]. {{image_2}} You can change the ground turkey for other meats. Ground chicken or beef works well. Each choice gives a different taste and texture. If you want to keep it light, try ground turkey. You can also swap out zucchini. Try bell peppers, squash, or even carrots. Each veggie adds its own flavor and nutrition. This lets you make the dish your own. Add more spices or sauces to kick up the taste. A dash of chili powder can add heat. If you like sweetness, a splash of soy sauce makes it savory. Incorporate fresh herbs for a bright flavor. Try thyme or cilantro mixed in. These herbs can change the taste and make it fresh. For a gluten-free dish, check your sauces. Most spices are gluten-free, but some sauces may contain it. Simple swaps keep the dish safe for all diets. If you want a vegetarian option, use plant-based meat or beans. Mushrooms also make a hearty substitute. This way, you can enjoy the meal without meat. For the full recipe, check the section above. To keep your Turkey and Zucchini Skillet fresh, use an airtight container. Glass or BPA-free plastic containers work well. Make sure to let the skillet cool down before sealing it. Store it in the fridge for up to three days. When you are ready to enjoy leftovers, you can reheat them in two ways. The stovetop is best for keeping flavors intact. Heat a pan over medium heat, then add the skillet contents. Stir often until warm. If you use a microwave, place the skillet in a microwave-safe bowl. Cover it with a lid or wrap to keep moisture in. Heat for one minute, then stir and check if it's hot. Repeat as needed. You can freeze the Turkey and Zucchini Skillet for longer storage. First, let it cool completely. Then, transfer it to a freezer-safe container or bag. Squeeze out as much air as possible before sealing. This dish can stay frozen for up to three months. When ready to eat, thaw it overnight in the fridge before reheating. For the complete recipe, check the Full Recipe section above to get started. It only takes 25 minutes to make this dish. You need 10 minutes to prep the ingredients and 15 minutes to cook. This quick meal fits well into busy days. You can easily whip it up for lunch or dinner. Yes, you can use frozen zucchini. Frozen zucchini is handy when fresh zucchini is not available. However, fresh zucchini has a better texture and flavor. If you use frozen, make sure to drain any extra water before adding it to the skillet. This helps keep the dish from becoming too watery. You can pair this skillet with many sides. Here are some great options: - Quinoa or rice for added fiber. - A fresh green salad for crunch. - Whole-grain bread to soak up flavors. - Roasted potatoes for a hearty side. Yes, this recipe is quite healthy! Ground turkey is a lean protein that is low in fat. Zucchini and bell peppers add vitamins and minerals. Olive oil provides healthy fats, while garlic boosts flavor with health benefits. This dish is packed with nutrients and can fit into many diets. For those looking to eat well, it’s a great choice. For the full recipe, check the section above. This blog post covers a great turkey and zucchini skillet recipe. We explored key ingredients and spices that enhance flavor. You learned step-by-step instructions and useful tips for cooking and serving. We also discussed variations and storage methods to keep your meal fresh. In the end, this dish is easy to make and adaptable for your needs. Enjoy this healthy meal with your favorite side, knowing you can customize it as you wish!](https://stirredrecipes.com/wp-content/uploads/2025/07/d7cdd01a-dca1-4c13-98c4-c40876795d8e.webp)
Turkey and Zucchini Skillet Quick and Flavorful Meal
Looking for a quick and tasty meal? Try my Turkey and Zucchini Skillet! This dish combines lean ground turkey, fresh zucchini, and vibrant bell peppers
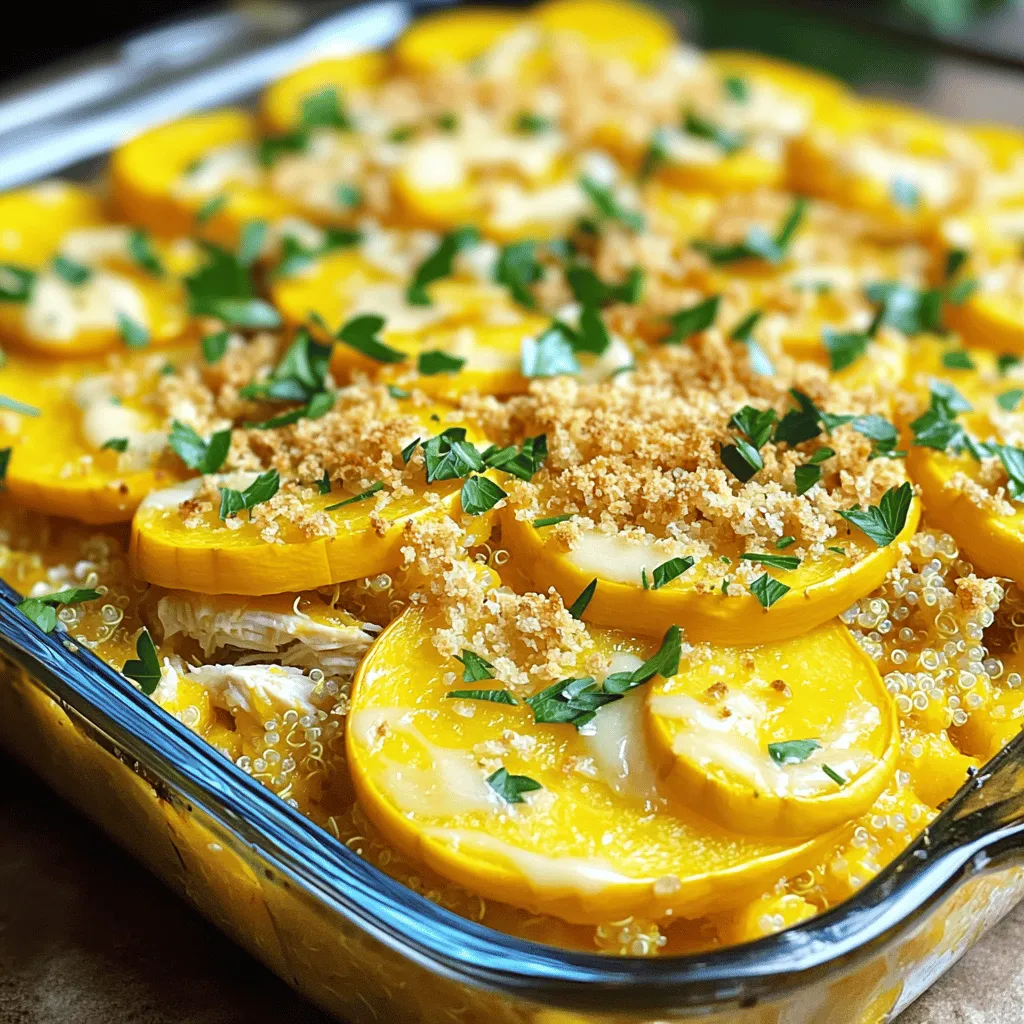
Flavorful Yellow Squash Casserole with Chicken Dish
Are you ready to impress your family with a delicious meal? This Flavorful Yellow Squash Casserole with Chicken is not only easy to make but