Dinner

Savory Honey Garlic Chicken with Sweet Potatoes Recipe
Get ready to delight your taste buds with my Savory Honey Garlic Chicken with Sweet Potatoes recipe! This dish offers a perfect blend of sweet
![- Chicken breasts - Fettuccine pasta - Cherry tomatoes - Fresh basil - Mozzarella cheese - Olive oil - Garlic - Balsamic vinegar - Salt and pepper - Parmesan cheese - Additional herbs The main ingredients in bruschetta chicken pasta create a balance of flavors. Chicken breasts provide lean protein. Fettuccine pasta adds a hearty base. Cherry tomatoes give sweetness and color. Fresh basil brings a fragrant touch, while mozzarella cheese adds creaminess. For seasoning and cooking essentials, olive oil is key for sautéing. Garlic adds a bold flavor. Balsamic vinegar introduces acidity, which brightens the dish. Salt and pepper are essential for enhancing the overall taste. You may choose to garnish your pasta with Parmesan cheese. Additional herbs can add freshness and flavor. This simple yet vibrant meal is a great way to impress friends and family. For the full recipe, check out the details and instructions in the [Full Recipe]. First, season the chicken breasts with salt and pepper. This simple step adds great flavor. Next, heat olive oil in a large skillet over medium heat. Place the chicken in the skillet and cook for 6-7 minutes on each side. Ensure the chicken is cooked through and no longer pink inside. Once done, take the chicken out and let it cool. Slice it into strips for later. Now, let’s make the bruschetta base! In the same skillet, add minced garlic. Sauté it for about a minute until it smells great. Be careful not to burn the garlic, as it can become bitter. Afterward, add halved cherry tomatoes and chopped basil to the skillet. Cook for 3-4 minutes until the tomatoes soften. Drizzle balsamic vinegar over the mix and stir gently. While the bruschetta base cooks, bring a pot of water to a boil. Add the fettuccine and cook according to the package instructions until it is al dente. This means it should be firm to the bite. Once cooked, drain the pasta but save a little pasta water. This water can help with the sauce later. It’s time to bring everything together! Add the cooked pasta to the skillet with the tomato and basil mix. Toss gently to combine all the flavors. If the mix looks dry, add some reserved pasta water to moisten it. Finally, fold in the sliced chicken and sprinkle shredded mozzarella cheese on top. Mix everything well until the cheese melts slightly. This adds a lovely creaminess to the dish. Enjoy making this bruschetta chicken pasta. For the full recipe, check out the details! To keep your chicken tender and juicy, start with good seasoning. Use salt and pepper on both sides of the chicken breasts. Searing the chicken in hot olive oil helps lock in moisture. Cook each side for about 6-7 minutes. Make sure it reaches 165°F inside for safety. Remove the chicken and let it rest before slicing. This keeps it juicy. For the sautéed tomatoes, use fresh cherry tomatoes. Cut them in half to release their juices. Sauté them with minced garlic for about 3-4 minutes. This method brings out their natural sweetness. Add chopped basil and drizzle balsamic vinegar in the last minute of cooking. This adds a bright touch to the dish. For a stunning plate, choose vibrant dinnerware. A white plate really makes the colors pop. Serve the pasta in a generous portion. Top it with grated Parmesan cheese and a sprig of fresh basil. A drizzle of balsamic vinegar looks great too. You can also add a side salad or garlic bread for a full meal. This adds more flavors and textures to your dinner. If you have extra chicken or tomatoes, don’t waste them. Shred leftover chicken for a tasty sandwich. Toss extra tomatoes into a salad for a fresh bite. For meal prep, you can cook a big batch of pasta. Store it in the fridge for quick meals. Mix it with different veggies or proteins each day to keep it exciting. This way, you enjoy the flavors of bruschetta chicken pasta all week long! {{image_2}} You can switch up the pasta. Try penne or whole wheat pasta for a different taste. If you want a lighter option, use zucchini noodles or spaghetti squash. For proteins, chicken is great, but shrimp or tofu also work well. Tofu adds a nice texture and absorbs flavors well. To make it spicier, add red pepper flakes while cooking. You can also try smoked paprika for a smoky flavor. Different cheeses can change the dish, too. Use goat cheese for a tangy twist or feta for a salty kick. If you follow a gluten-free diet, choose gluten-free pasta made from rice or quinoa. For a vegan version, swap the chicken for chickpeas and use vegan cheese or nutritional yeast. These substitutes keep the dish tasty and satisfying without dairy or meat. If you want to see how I make this dish, check out the Full Recipe for step-by-step instructions! To store bruschetta chicken pasta, let it cool first. Place it in an airtight container. This keeps it fresh and tasty. You can store it in the fridge for up to three days. Make sure to label the container with the date. This helps you remember when you made it. For reheating, you can use the microwave or the stovetop. The microwave is quick but may dry the dish. Heat it in short bursts and stir in between. The stovetop keeps the pasta moist. Just add a splash of water and heat on low. Stir gently to keep the texture nice. Yes, you can freeze bruschetta chicken pasta! First, let it cool completely. Then, place it in a freezer-safe container. It can last up to three months in the freezer. When you’re ready to eat, thaw it in the fridge overnight. Reheat it on the stovetop for the best flavor and texture. Bruschetta Chicken Pasta is a tasty dish that combines cooked chicken and pasta with fresh tomatoes and basil. This meal has roots in Italian cooking. It celebrates the classic bruschetta flavor, which is a mix of tomatoes, garlic, and basil. The warmth of the cooked pasta and chicken pairs well with the bright, fresh topping. This dish brings a vibrant taste with every bite. Making Bruschetta Chicken Pasta takes about 30 minutes. Here’s how that time breaks down: - Prep time: 15 minutes - Cook time: 15 minutes This quick time makes it perfect for busy weeknights or a fun dinner with friends. Yes, you can make this dish ahead of time! Here are some tips for meal prep and storage: - Cook the chicken and pasta in advance. - Keep the bruschetta topping separate until ready to serve. - Store everything in airtight containers in the fridge for up to three days. This way, you can enjoy a quick meal any time! To make Bruschetta Chicken Pasta from scratch, follow these steps: 1. Cook the chicken: Season and cook chicken breasts in olive oil. 2. Sauté garlic: Add minced garlic to the skillet until fragrant. 3. Mix in tomatoes and basil: Add halved cherry tomatoes and fresh basil. 4. Prepare fettuccine: Cook fettuccine until al dente, then drain. 5. Combine everything: Toss the pasta with the tomato mixture. 6. Add chicken and cheese: Stir in sliced chicken and shredded mozzarella. 7. Serve: Plate and sprinkle with Parmesan cheese. For more details, check out the Full Recipe. Bruschetta Chicken Pasta pairs well with several side dishes and drinks: - A crisp green salad with vinaigrette - Garlic bread or crusty bread for dipping - White wine, like Pinot Grigio, enhances the meal These sides will complete your dining experience and elevate the flavors. Bruschetta Chicken Pasta combines tasty ingredients like chicken, fresh tomatoes, and mozzarella. You can cook it easily with simple steps, tips, and variations. Whether you’re making it for a family meal or using leftovers, it's a great dish. Remember, you can adjust it to match your needs. Don’t be afraid to try new flavors or substitutes. Enjoy your cooking adventure with this delicious and versatile meal!](https://stirredrecipes.com/wp-content/uploads/2025/07/2d07095b-a23b-4f5a-a164-d6a9ada6e437.webp)
Bruschetta Chicken Pasta Flavorful Dinner Delight
Craving a delicious and easy dinner? Look no further! Bruschetta Chicken Pasta is a vibrant dish that brings fresh flavors to your table. With juicy
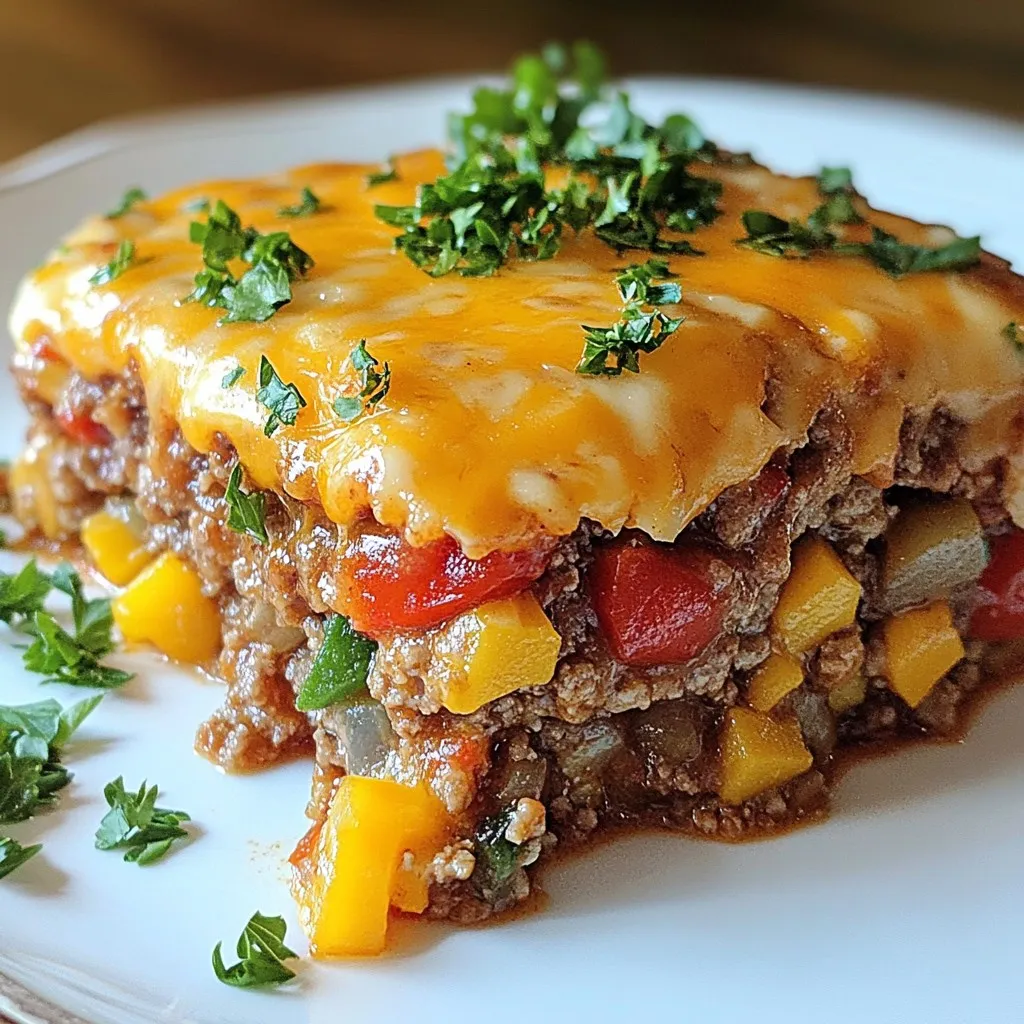
Cheesy Meatloaf Casserole Savory and Simple Dish
If you love comfort food, you’ll adore my Cheesy Meatloaf Casserole. This dish is both savory and simple to prepare. Packed with flavor and melty
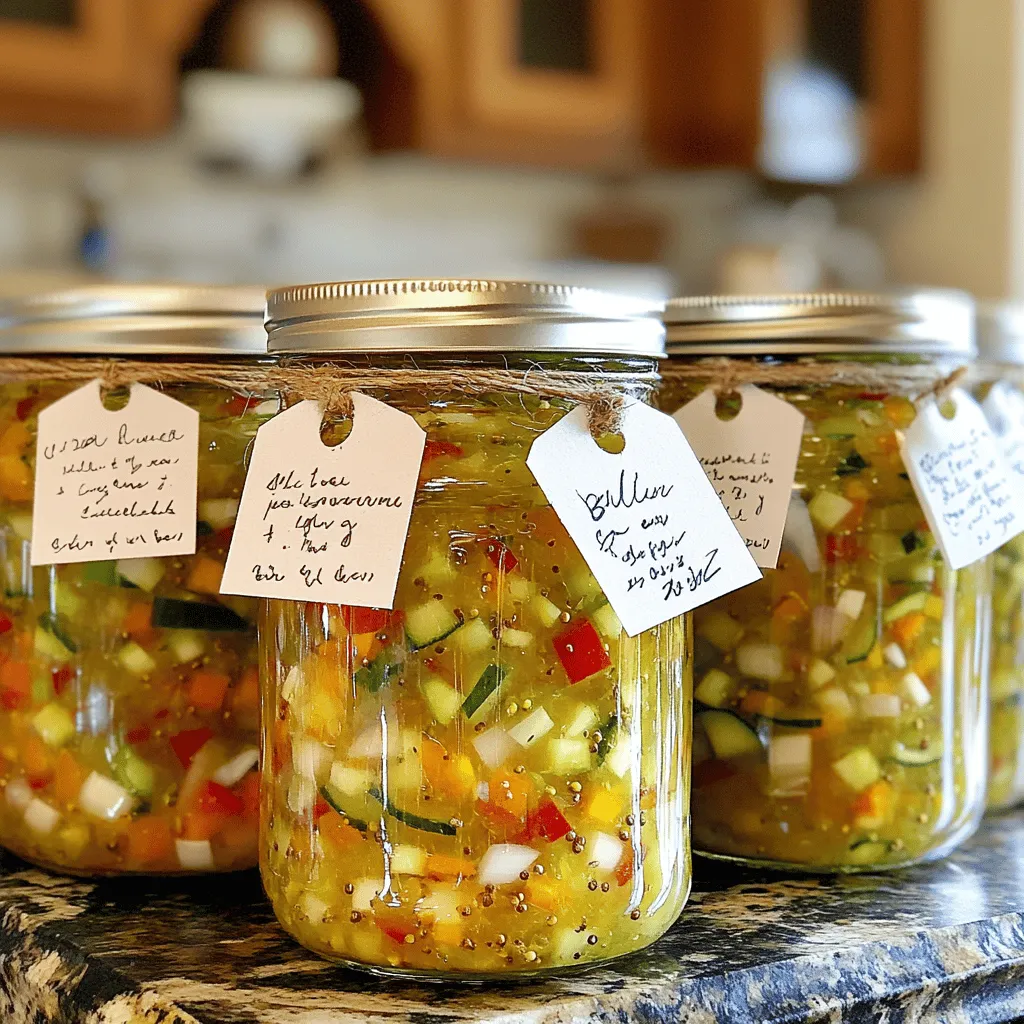
Delicious Sweet Cucumber Relish for Canning Recipe
Are you ready to elevate your canning game? This Delicious Sweet Cucumber Relish recipe is the perfect balance of sweet and tangy. With simple ingredients
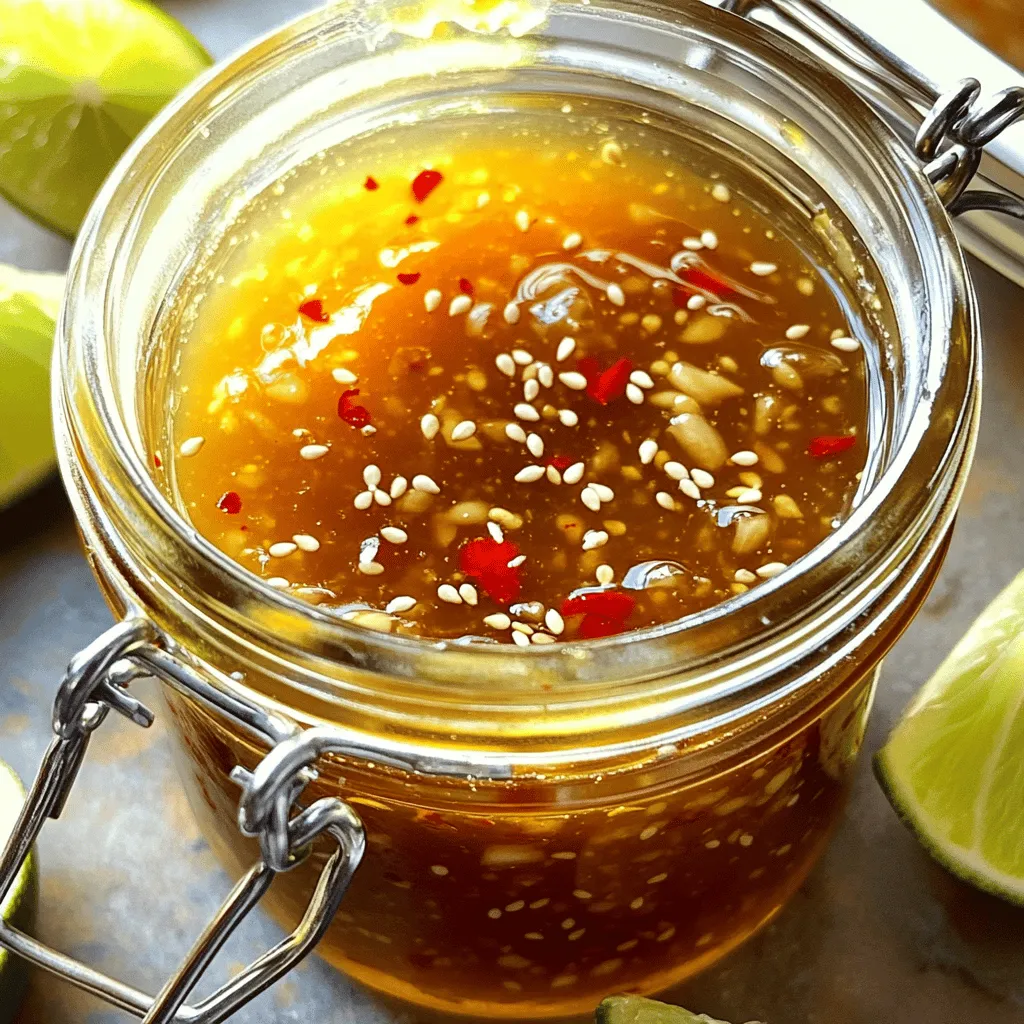
Honey Soy Garlic Sauce with Chili Lime Recipe Delight
Are you ready to elevate your meals? Let me share my Honey Soy Garlic Sauce with Chili Lime recipe. This simple yet delicious sauce packs
. First, gather all your ingredients. You need: - 4 boneless, skinless chicken breasts - 2 cups cherry tomatoes, quartered - 1 cup fresh basil, chopped - 1 cup mozzarella cheese, shredded - 2 tablespoons balsamic vinegar - 3 tablespoons olive oil - 3 cloves garlic, minced - Salt and pepper to taste - 1 teaspoon dried oregano - Balsamic glaze for drizzling (optional) Preheat your oven to 400°F (200°C). In a bowl, mix the cherry tomatoes, basil, garlic, balsamic vinegar, 1 tablespoon of olive oil, salt, and pepper. Let this sit for a bit. It will enhance the flavors. Next, season both sides of the chicken breasts with salt, pepper, and oregano. Heat 2 tablespoons of olive oil in an oven-safe skillet over medium-high heat. When hot, add the chicken breasts. Sear each side for about 4-5 minutes until they turn golden brown. After browning, take the skillet off the heat. Spoon the tomato mixture over each chicken breast. Top with the shredded mozzarella cheese. Now, put the skillet in the preheated oven. Bake for 20-25 minutes until the chicken is cooked through and the cheese is melted and bubbly. Once it's done, remove the skillet from the oven and let it rest for 5 minutes. For a special touch, drizzle with balsamic glaze before serving. Enjoy your delicious bruschetta chicken! For the full recipe, you can refer back to the beginning. To cook chicken perfectly, start with even thickness. Pound the chicken breasts to about one inch thick. This helps them cook evenly. Season both sides well with salt, pepper, and oregano. For best results, use a hot skillet. Sear the chicken for 4-5 minutes on each side until golden brown. This gives it a nice crust. Finally, bake it in the oven to finish cooking. This method keeps the chicken juicy and tender. Marinades add great flavor to your chicken. Mix balsamic vinegar, olive oil, and minced garlic in a bowl. Add salt and pepper for taste. Let the chicken sit in this mix for at least 30 minutes. If you have time, marinate it overnight in the fridge. This allows the chicken to absorb more flavor. You can also toss in fresh herbs like basil. The longer it marinates, the tastier it becomes. Presentation matters when serving bruschetta chicken. Start with a warm plate for serving. Place the chicken in the center. Spoon some of the marinated tomato mixture over the top. Sprinkle fresh basil on for color. A drizzle of balsamic glaze adds a nice touch. Serve with a side of green salad or crusty bread. This makes for a beautiful and tasty meal. Check out the Full Recipe for more details! {{image_2}} You can switch up the chicken for other proteins. Try using turkey breasts or pork chops. These options cook similarly and hold the bruschetta toppings well. For a seafood twist, use salmon fillets. The rich flavor of salmon pairs nicely with the fresh toppings. Just adjust the cooking time to ensure everything cooks evenly. If you prefer a meatless meal, there are great options. Grilled portobello mushrooms make an excellent base. They are thick and juicy, perfect for holding toppings. You can also try firm tofu. Press the tofu to remove excess water, then grill or bake until golden. Top with the same fresh tomato mix for a satisfying dish. Get creative with your toppings! Besides the classic tomato and basil, consider using roasted red peppers or artichokes. They add a nice flavor and texture. You could also sprinkle some feta cheese for a tangy twist. For a kick, add jalapeños or a drizzle of hot sauce. Experiment with flavors to find what you love best! For the full recipe, check out the details above. To keep your leftover bruschetta chicken fresh, let it cool first. Then, place it in an airtight container. Store it in the fridge for up to three days. Make sure to keep the chicken and toppings separate if you want the best texture. If you want to prepare meals ahead, freezing is a great option. Wrap each piece of bruschetta chicken tightly in plastic wrap. Then, place them in a freezer-safe bag or container. This way, it can last up to three months. When you're ready to eat, just thaw it overnight in the fridge. To reheat bruschetta chicken, preheat your oven to 350°F (175°C). Place the chicken on a baking sheet. Cover it with foil to keep it moist. Heat for about 15 to 20 minutes, or until warmed through. You can also use the microwave, but it may make the chicken a bit dry. Enjoy your delicious leftovers! Yes, you can use different cheeses. Cheddar or feta can add a nice twist. You can also try goat cheese for a tangy flavor. Just remember to adjust the amount based on how strong you want the cheese taste to be. Experimenting with cheese can make your bruschetta chicken unique. To check if the chicken is done, use a meat thermometer. The internal temperature should reach 165°F (75°C). If you don’t have a thermometer, you can cut into the chicken. The meat should be white, not pink or red. Juices should run clear, too. Always check in the thickest part of the chicken for the best results. Bruschetta chicken pairs well with many sides. Here are some tasty options: - Garlic bread for a crunchy bite - A fresh garden salad for a light touch - Steamed vegetables like broccoli or green beans - Pasta with olive oil or marinara sauce These sides balance the flavors and make a complete meal. Enjoy your cooking adventure with the full recipe! Bruschetta chicken is simple and fun to make. You learned about key ingredients, tools, and steps to cook it perfectly. Remember to use marinades for extra flavor and try different toppings or proteins. Proper storage will keep leftovers fresh for later. This dish is great for any meal, and you can tailor it to fit your taste. Enjoy cooking and sharing your bruschetta chicken creations with loved ones. It’s a dish that brings joy and flavor to the table.](https://stirredrecipes.com/wp-content/uploads/2025/07/e1e77f4c-8e6e-41d7-bff1-ba7eec5992ab.webp)
Irresistible Bruschetta Chicken Quick and Easy Recipe
Looking for a quick and tasty meal? Try this Irresistible Bruschetta Chicken recipe! With fresh toppings and juicy chicken, it’s sure to please everyone. I’ll
![- 2 medium sweet potatoes, peeled and diced - 1 can (15 oz) black beans, rinsed and drained - 1 tablespoon olive oil - 1 teaspoon ground cumin - 1 teaspoon smoked paprika - 1/2 teaspoon chili powder - Salt and pepper to taste - 8 small corn tortillas - 1 avocado, sliced - 1/4 cup red onion, finely diced - 1/4 cup fresh cilantro, chopped - 1 lime, cut into wedges - Optional: Hot sauce for serving Gather these ingredients to make delicious roasted sweet potato and black bean tacos. The sweet potatoes bring a nice sweetness, while the black beans add protein and texture. The spices make everything taste great together. You can also customize your tacos with your favorite toppings. For the full recipe, check the section above. - Preheat your oven to 425°F (220°C). - Toss sweet potatoes with olive oil and seasonings. Start by peeling and dicing two medium sweet potatoes. Next, place them in a large bowl. Drizzle one tablespoon of olive oil over the sweet potatoes. Add one teaspoon of ground cumin, one teaspoon of smoked paprika, and half a teaspoon of chili powder. Season with salt and pepper to taste. Toss everything until the sweet potatoes are well coated. - Spread on a baking sheet and roast for 25-30 minutes. - Stir halfway through for even cooking. After preparing the sweet potatoes, spread them out on a baking sheet in a single layer. This helps them roast evenly. Place the baking sheet in the oven and roast for about 25 to 30 minutes. Halfway through, take them out and stir the sweet potatoes. This step ensures they cook evenly and get nice and tender. - Warm black beans in a saucepan for 5 minutes. - Heat corn tortillas on a pan or in the oven. While the sweet potatoes roast, open a can of black beans. Rinse and drain them well. In a small saucepan, warm the black beans over medium heat for about 5 minutes. Stir occasionally and add salt and pepper to taste. For the corn tortillas, heat them in a pan for about 30 seconds on each side until warm and soft. Alternatively, wrap them in foil and place them in the oven during the last 10 minutes of roasting. - Layer roasted sweet potatoes and black beans on each tortilla. - Top with avocado, red onion, and cilantro. When the sweet potatoes are done, it’s time to assemble the tacos. Take a warm corn tortilla and add a generous spoonful of roasted sweet potatoes. Next, add a scoop of black beans on top. To finish, layer slices of avocado, diced red onion, and fresh cilantro. You can find the full recipe [here]. Enjoy your tasty tacos! - Use parchment paper for easier cleanup. It keeps the sweet potatoes from sticking. - Check for tenderness by piercing with a fork. They should feel soft and give easily. - Add fresh lime juice for brightness. It boosts the taste of the tacos. - Experiment with spices to suit your taste. Try adding garlic powder or cayenne for a kick. - Use flour tortillas for a different texture. They are soft and hold fillings well. - Consider soft taco or larger burrito sizes. Larger tortillas can fit more delicious filling. These tips will help you make the best roasted sweet potato and black bean tacos. For the complete process, refer to the Full Recipe. {{image_2}} You can add grilled chicken or shrimp to these tacos for extra protein. Both options work well with the sweet potatoes. If you want a creamy touch, crumble feta or goat cheese over the top. This adds flavor and richness. If you want to switch things up, replace black beans with lentils or chickpeas. Both options are tasty and high in protein. You can also use butternut squash instead of sweet potatoes. It has a nice sweetness and pairs perfectly with spices. For some heat, try adding pickled jalapeños. They give a nice kick to your tacos. You can also add cheese, sour cream, or yogurt for added richness. These toppings will make your tacos even more delicious. For the full recipe, check out the complete details above. Enjoy experimenting with these variations to find your perfect taco! Store leftover tacos in an airtight container. This keeps them fresh. You can refrigerate them for up to 3 days. If you want to enjoy them later, make sure they are cooled first. You can freeze roasted sweet potatoes and black beans separately. This works well for future meals. When you are ready to eat, just thaw and reheat the ingredients. Reheat in the oven for a crispy texture. Preheat your oven to 350°F (175°C) and heat for about 10 minutes. You can also use the microwave for quick meals. Just cover the tacos with a damp paper towel to keep them moist. Yes, you can prepare the roasted sweet potatoes and black beans ahead of time. Store them in an airtight container in the fridge for up to three days. When you're ready to eat, just warm them up and assemble your tacos. You can use pinto beans, kidney beans, or even lentils. Each option brings a different taste and texture to your tacos. If you want a creamier texture, try mashed avocado instead. To add some heat, you can sprinkle in more chili powder or add diced jalapeños. You might also drizzle your favorite hot sauce on top. Experiment until you find the perfect spice level for you. Yes, these tacos are gluten-free as long as you use corn tortillas. Always check the labels to ensure they are certified gluten-free if you have a gluten sensitivity. Heat them in a dry skillet over medium heat for about 30 seconds on each side. You can also wrap them in foil and warm them in the oven during the last 10 minutes of roasting the sweet potatoes. To boost protein, consider adding grilled chicken, sautéed shrimp, or crumbled feta cheese. You can also top your tacos with Greek yogurt for added creaminess and protein. For the complete recipe, check the Full Recipe section. These roasted sweet potato and black bean tacos are simple and tasty. You blend fresh ingredients like sweet potatoes and black beans, seasoned just right. With optional toppings like avocado and cilantro, you can customize them to your liking. Think about adding protein or different toppings for more variety. Remember, these tacos store well in the fridge or freeze easily. Enjoy this easy meal anytime, and feel free to get creative!](https://stirredrecipes.com/wp-content/uploads/2025/07/eab0095d-c964-4cff-881b-5ed1d492f519.webp)
Roasted Sweet Potato and Black Bean Tacos Recipe
Are you ready to enjoy a tasty and healthy meal? These Roasted Sweet Potato and Black Bean Tacos are the perfect choice! Packed with flavor
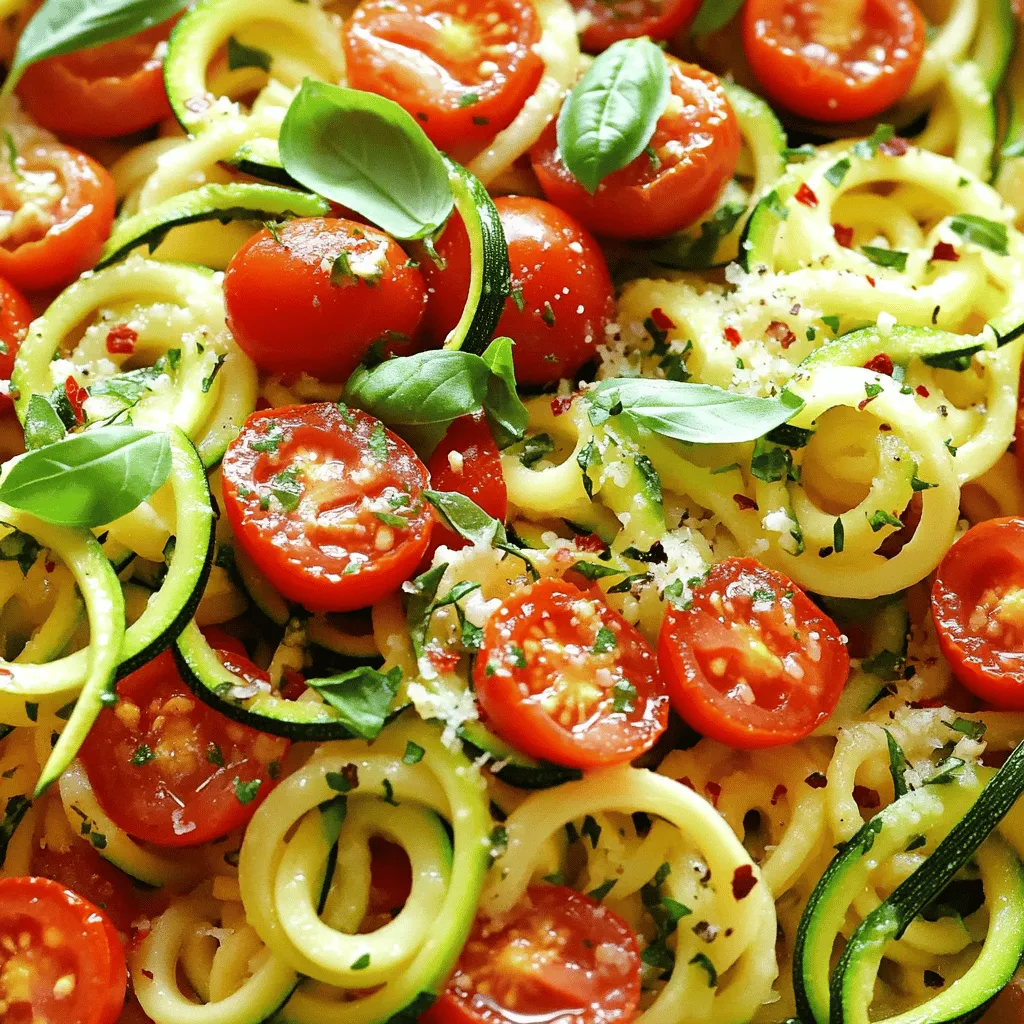
Healthy Tomato Zucchini Pasta Quick and Easy Recipe
Looking for a quick and healthy meal? You’ll love this Tomato Zucchini Pasta! It’s a light dish packed with fresh flavors and good nutrition. Imagine

Easy Grilled Shrimp Bowl with Avocado Delight
Are you ready to enjoy a burst of flavor that’s both healthy and simple? Let me introduce you to the Easy Grilled Shrimp Bowl with
![To make this dish, you will need a few key items. Here’s what you need: - 4 boneless, skinless chicken breasts - 1 cup fresh parsley, chopped - 1/2 cup olive oil - 1/4 cup red wine vinegar - 4 cloves garlic, minced These main ingredients create a tasty and juicy chicken. Fresh parsley gives the dish a bright flavor. The chicken breasts are the star, soaking up all the flavor from the chimichurri sauce. Seasonings play a big role in this recipe. Here are the essential ones: - 1 teaspoon red pepper flakes - 1 teaspoon dried oregano - Salt and pepper to taste Red pepper flakes add a little heat, while oregano brings a warm, earthy taste. Salt and pepper enhance all the flavors, so don’t skip these! Garnishes add the final touch to your dish. You can use: - Lemon wedges for serving Serving with lemon wedges gives a zesty flavor. Squeeze fresh lemon juice over the chicken for an extra kick. For more details, check the Full Recipe. Start by gathering your fresh ingredients. You will need parsley, olive oil, red wine vinegar, garlic, red pepper flakes, and dried oregano. In a mixing bowl, add 1 cup of chopped parsley. Pour in 1/2 cup of olive oil and 1/4 cup of red wine vinegar. Next, add 4 cloves of minced garlic. Sprinkle in 1 teaspoon of red pepper flakes and 1 teaspoon of dried oregano. Season with salt and pepper to taste. Mix all the ingredients well. This sauce brings a bright, zesty flavor to your chicken. Now, take 4 boneless, skinless chicken breasts. Pat them dry using paper towels. This helps the seasoning stick better. Season both sides of the chicken generously with salt and pepper. Place the chicken breasts in a baking dish. Pour half of your chimichurri sauce over the chicken. Make sure each piece is well coated. Set aside the other half of the sauce for later. Preheat your oven to 400°F (200°C). Once the oven is hot, place your baking dish inside. Bake the chicken for 25 to 30 minutes. You want the chicken to reach an internal temperature of 165°F (75°C). This ensures it is safe to eat. After baking, remove the dish from the oven. Let the chicken rest for 5 minutes before slicing. This keeps the juices inside. Serve the chicken on a platter, drizzled with the reserved chimichurri sauce. Add lemon wedges on the side for a fresh touch. For the full recipe, check the recipe card above. To get juicy chicken, start with even pieces. Cut your chicken breasts to the same size. This helps them cook evenly. Use a meat thermometer to check the center. When it hits 165°F (75°C), it’s done. Let it rest for five minutes after baking. This keeps all the tasty juices inside. The chimichurri sauce makes this dish shine. Use fresh herbs for a bright taste. Chop parsley finely, and don’t skip the garlic. It adds great flavor. If you want more heat, add extra red pepper flakes. A splash of lemon juice boosts the freshness. Mix your sauce a few hours ahead for deeper flavor. Serve the chicken on a big platter. Drizzle the extra chimichurri sauce on top. This makes it look nice and adds flavor. Pair it with lemon wedges for a zesty kick. Add a side of rice or roasted veggies to complete the meal. This dish is perfect for family dinners or gatherings. Check out the Full Recipe to make it at home! {{image_2}} You can switch chicken breasts for thighs in this dish. Chicken thighs are juicier and have more flavor. They cook well with the chimichurri sauce, adding a rich taste. When you bake them, make sure they reach 165°F (75°C) just like the breasts. They may take a little longer to cook, about 30-35 minutes. Thighs will keep your meal tender and tasty. If you want a vegetarian option, use portobello mushrooms instead of chicken. Their meaty texture makes them a great choice. Just marinate the mushrooms in the chimichurri sauce for about 30 minutes. Then, bake them at 400°F (200°C) for 20-25 minutes. This gives them a deep flavor. You can serve them on a bed of rice or with a side salad for a full meal. You can customize the chimichurri sauce by adding different herbs. Try cilantro for a fresh twist or basil for a sweet taste. You can also mix in mint for a cool flavor. Each herb changes the sauce’s taste and makes it unique. Feel free to experiment with what you have at home. This way, you can create a dish that fits your personal taste. For the complete recipe, check the [Full Recipe]. After enjoying your baked chimichurri chicken, store leftovers in a safe way. Place the chicken in an airtight container. This keeps it fresh and tasty. You can keep it in the fridge for up to four days. Make sure to add some of the chimichurri sauce for extra flavor. When you want to reheat your chicken, there are easy steps to follow. Preheat your oven to 350°F (175°C). Place the chicken on a baking sheet. Cover it with foil to keep it moist. Heat for about 15-20 minutes or until warm. You can also use a microwave. Just heat for 1-2 minutes, checking often to avoid overcooking. If you want to save your chicken for later, freezing works well. Wrap each piece tightly in plastic wrap. Then, place them in a freezer bag. This helps avoid freezer burn. You can freeze the chicken for up to three months. When ready to eat, thaw it overnight in the fridge before reheating. For best results, use the chimichurri sauce within the same time frame. For the full recipe, please click [Full Recipe]. Yes, you can use dried herbs. They work well but have a different flavor. Use about one-third of the amount. For example, if the recipe calls for one cup of fresh parsley, use about one-third cup of dried parsley. Dried herbs are more concentrated, so you need less. Baked Chimichurri Chicken pairs well with many sides. Here are some ideas: - Rice or quinoa for a filling base. - Roasted vegetables for a colorful plate. - A fresh salad for a light touch. - Tortillas for a fun wrap option. You can also serve it with crusty bread to soak up the extra chimichurri sauce. Chimichurri sauce can be spicy, but it depends on how much red pepper you add. The recipe calls for one teaspoon of red pepper flakes, which gives a mild heat. If you want more spice, add more flakes or fresh chili peppers. Adjust the heat to your taste. The sauce should enhance the chicken, not overpower it. For the full recipe, check the detailed instructions above. Baked Chimichurri Chicken is easy to make and full of flavor. We covered the main ingredients, tips for cooking, and how to store leftovers. You learned how to make the sauce and bake the chicken perfectly. Don't forget to try different herbs or make a vegetarian version. Now, you can enjoy this dish anytime. It’s a great meal for busy days or special occasions. With this guide, cooking will feel fun and tasty. Get ready to impress with your new skills!](https://stirredrecipes.com/wp-content/uploads/2025/07/7a139eed-c40f-46ce-b1b7-991e9bd125dd.webp)
Baked Chimichurri Chicken Savory and Flavorful Dish
Are you craving a dish that bursts with flavor and is easy to prepare? Look no further than Baked Chimichurri Chicken! This savory recipe combines