Dinner

Loaded Potato Soup Comforting and Creamy Delight
Welcome to the world of loaded potato soup—a comforting and creamy delight! If you’re looking for a warm bowl that feels like a hug, you’ve

One Pot Hatch Green Chile Stew Hearty and Flavorful
Looking for a cozy meal that packs a punch? My One Pot Hatch Green Chile Stew is just what you need! With juicy chicken thighs,
![For the best flavor, choose fresh mushrooms. I like to use button and shiitake mushrooms. Button mushrooms are mild and soft. Shiitake mushrooms add a rich, earthy taste. Slice them evenly for a nice texture in the soup. You need about 2 cups total of these mushrooms, sliced. This mix creates a great depth of flavor. Spices make the soup pop. Use smoked paprika for a deep, smoky taste. It gives the soup warmth and richness. Dried thyme adds a hint of earthiness. You only need 1 teaspoon of each spice. Don’t forget to add salt and pepper to taste. These simple spices transform the dish into a comforting bowl of goodness. For creaminess, you can use milk or a dairy-free alternative. I recommend whole milk for a rich flavor. If you prefer dairy-free, almond or oat milk works well. You will need 1 cup in total. Flour helps thicken the soup for a hearty texture. Use 2 tablespoons of flour mixed with a bit of milk to create a slurry. This step makes sure your soup is smooth. For the complete recipe, check out [Full Recipe]. Start by washing your mushrooms well. I like to use both button and shiitake mushrooms for a mix of flavors. Slice them thinly. Next, finely chop the onion and mince the garlic. This step is key for a good base. The onion adds sweetness, while the garlic gives it depth. Heat olive oil in a large pot over medium heat. Once hot, add the chopped onion. Sauté for about five minutes until it turns translucent. Then, add the minced garlic. Stir for about a minute until you smell that lovely aroma. Now, toss in the sliced mushrooms. Cook them for about 7-10 minutes. Stir occasionally to brown them evenly. The mushrooms will release water, which helps build flavor. Sprinkle in smoked paprika and dried thyme. These spices give the soup its signature taste. Pour in the vegetable broth and soy sauce. Bring the mixture to a gentle simmer and let it cook for around 10 minutes. To thicken the soup, grab a small bowl. Mix the flour with a bit of milk to make a slurry. This helps avoid lumps. Slowly whisk this mixture back into the pot, followed by the rest of the milk. Stir continuously to blend everything well. Now, reduce the heat to low. Allow the soup to thicken for another 5-7 minutes. Season with salt and pepper to taste. After that, remove the pot from the heat and let it sit for a few minutes. Your hearty Hungarian mushroom soup is almost ready! Remember to check out the Full Recipe for all the details. Choose fresh mushrooms for the best taste. I like a mix of button and shiitake mushrooms. Button mushrooms add a mild flavor. Shiitake mushrooms bring a rich, earthy taste. Look for firm mushrooms with no dark spots. Fresh mushrooms should smell pleasant, not sour. You can change the soup's thickness easily. For a thicker soup, add more flour when cooking. Mix flour with a bit of milk first to avoid lumps. For a creamier texture, use more milk. If you want a lighter soup, use less milk or a dairy-free option. To boost flavor, I suggest adding fresh herbs like thyme or parsley. A splash of lemon juice can brighten the taste too. If you like spice, add a pinch of cayenne pepper. You can also use a splash of soy sauce for depth. Experiment with these tips to find your perfect flavor balance. For the full recipe, check out Mushroom Delight: Hungarian Comfort Soup. {{image_2}} If you want a vegan version of Hungarian mushroom soup, you can easily make some swaps. First, use vegetable broth instead of chicken broth. Replace the milk with a dairy-free option like almond or oat milk. These alternatives will keep the soup creamy and rich while being kind to your diet. You can also skip the flour or use cornstarch to thicken the soup. This way, you can enjoy all the flavors without any dairy. To change up the flavor, think about using different mushrooms. Try adding portobello or enoki mushrooms for a new twist. You can also mix in some fresh herbs like dill or tarragon to add depth. If you like heat, toss in a pinch of cayenne pepper or some red pepper flakes. For a more savory taste, consider adding a splash of balsamic vinegar. Each ingredient can give your soup a fresh touch. Seasonal ingredients can make this soup even better. In the fall, add some pumpkin or squash for sweetness. In the spring, throw in some fresh peas or asparagus for a pop of color and freshness. You can also mix in some cooked grains like barley or quinoa to make it heartier. These add-ins not only boost the nutrition but also make the dish more filling. By using seasonal ingredients, you can enjoy the soup all year round, each time with a new flavor. After making Hungarian mushroom soup, let it cool. Cooling helps keep it safe to eat later. Place the soup in a shallow bowl to cool quickly. Once it is at room temperature, cover it well. Use an airtight container or plastic wrap. Store the soup in the fridge. It will stay fresh for about three days. If you want to save the soup for longer, freezing is a great option. First, let the soup cool down completely. Then, pour it into freezer-safe containers. Leave some space at the top for expansion. You can also use freezer bags for easy storage. When you are ready to eat, simply thaw it overnight in the fridge. It will stay good for up to three months in the freezer. To reheat your soup, use a pot on the stove. Heat it over medium-low heat. Stir it often to keep it from sticking. You can also use the microwave. Pour the soup into a microwave-safe bowl. Heat it in short bursts, stirring in between. If the soup seems too thick, add a splash of water or broth. This will help bring back its creamy texture. Always taste it before serving to adjust the seasoning if needed. Enjoy this flavorful dish again! Check out the full recipe for more tips. I prefer using fresh button and shiitake mushrooms. Button mushrooms add a mild taste. Shiitake mushrooms bring a rich, earthy flavor. Together, they create a well-rounded base for the soup. You can also try cremini mushrooms for a deeper flavor. Mixing different types adds more depth to your dish. Yes, you can make this soup ahead of time. It tastes even better after resting. Make the soup, let it cool, and store it in the fridge. You can keep it for up to three days. Just reheat on the stove before serving. If you want, you can also freeze it for later use. Thaw it overnight in the fridge before reheating. This soup pairs well with crusty bread or a simple salad. A fresh garden salad can balance the richness of the soup. You can also serve it with a sprinkle of fresh parsley for color. For a heartier meal, add a side of roasted vegetables. This combination makes for a comforting and satisfying experience. You can find the full recipe and more tips to enhance your meal. In this blog post, we explored the key ingredients for Hungarian Mushroom Soup. I shared how to select fresh mushrooms and essential herbs. You learned step-by-step instructions on preparing and cooking, plus tips for thickening the soup. Finally, I highlighted variation ideas, storage tips, and answered common questions. Making this soup is fun and rewarding. Enjoy trying new flavors and techniques in your kitchen. Your next batch of soup will be a hit!](https://stirredrecipes.com/wp-content/uploads/2025/07/a05edf02-1e0d-4e96-b0ee-3bb73f441e91.webp)
Hungarian Mushroom Soup Flavorful and Comforting Dish
Looking for a warm and tasty dish? Hungarian Mushroom Soup is the answer! This soup offers rich flavors and comforting textures, making it perfect for

Air Fryer Korean Soy Garlic Chicken Thighs Delight
Are you ready to elevate your dinner game with a mouthwatering dish? Air Fryer Korean Soy Garlic Chicken Thighs are your answer! With juicy, flavorful
![- 1.5 lbs boneless, skinless chicken thighs, cut into bite-sized pieces - 2 tablespoons olive oil - 1 medium onion, diced - 3 cloves garlic, minced - 1-2 fresh green chiles (jalapeño or serrano), diced (adjust for heat preference) - 2 cups roasted green chiles, peeled and chopped (canned or fresh) - 4 cups chicken broth - 1 large potato, peeled and diced - 1 bell pepper (green or red), chopped - 1 cup corn kernels (frozen or fresh) Chicken is the star of this stew. I use thighs for their rich flavor and tender texture. You can use breasts, but they may dry out. Green chiles add heat and depth. I love using a mix of fresh and roasted for that smoky taste. If you want more heat, add more fresh chiles. Vegetables complete the dish. Onions and garlic build a flavorful base. Potatoes and bell peppers add heartiness. Corn brings sweetness and color. - 1 teaspoon ground cumin - 1 teaspoon smoked paprika - Salt and pepper to taste Cumin gives a warm, earthy flavor. It pairs well with chiles. Smoked paprika adds a nice smokiness and enhances the stew's depth. Salt and pepper are key. They boost all the flavors. Taste and adjust as you cook to get it just right. - Fresh cilantro, chopped (for garnish) - Lime wedges (for serving) Fresh cilantro adds brightness and freshness. A squeeze of lime lifts the flavors. These garnishes make the stew pop! For the full recipe, check out the [Full Recipe] section above. To make this green chile chicken stew, follow a simple sequence. First, gather all your ingredients. Next, chop the vegetables and chicken. Then, heat your pot and start cooking the base. Finally, let it simmer to blend all the flavors. This method ensures each step builds on the last, leading to a tasty dish. Start by heating 2 tablespoons of olive oil in a large pot over medium heat. Add 1 diced onion and sauté it for about 5 minutes. You want the onion to turn soft and clear. Next, stir in 3 minced garlic cloves and 1-2 diced fresh green chiles. Cook this mix for another 2 minutes until you smell the flavors come alive. Now, add the chicken. Cook it for 5-7 minutes until it turns white and is no longer pink. This step builds a rich base for the stew. After the base is ready, add the rest of your ingredients. Stir in 2 cups of roasted green chiles, 4 cups of chicken broth, and 1 diced potato. Don’t forget 1 chopped bell pepper and your spices: 1 teaspoon of ground cumin and 1 teaspoon of smoked paprika. Season with salt and pepper to taste. Bring everything to a boil. Then, reduce the heat to low and cover the pot. Let it simmer for 25-30 minutes. This timing allows the chicken to cook fully and the potatoes to soften. Finally, stir in 1 cup of corn kernels and let it cook for another 5 minutes. Taste and adjust the seasoning as needed. Enjoy the warm, hearty stew! For the full recipe, check the earlier section. Using fresh ingredients can boost flavor. Fresh green chiles bring heat and zest. They add a crisp taste that canned chiles may lack. Canned chiles are still good. They are easy to use and save time. When you choose, think about your taste. Want more spice? Go fresh. Prefer milder? Canned works just fine. This stew is easy to make gluten-free. Just check your broth for gluten. Most chicken broths are gluten-free. If you want a low-carb option, swap potatoes for cauliflower. Cauliflower gives a nice texture and absorbs flavor well. You can feel good about these choices while enjoying a hearty meal. To avoid overcooking chicken, watch the time. Cook it just until it is no longer pink. This keeps the chicken juicy. For potatoes, cut them into even pieces. This helps them cook evenly. If they cook too long, they can become mushy. Keep an eye on the clock for the best results. {{image_2}} You can make this stew even spicier. Try using different green chiles. For a milder taste, use poblano chiles. They add flavor without too much heat. If you want more heat, use serrano chiles. You can also mix different chiles for a unique flavor. Just remember to taste as you go! If you want vegetarian or vegan options, you can swap the chicken. Use hearty veggies like mushrooms or butternut squash instead. You can also use plant-based protein, such as tofu or tempeh. These swaps keep the dish tasty and filling. For a more robust flavor, use vegetable broth instead of chicken broth. Pair your stew with tasty sides. Serve it with warm tortillas or crusty bread. You can also add toppings like avocado or shredded cheese. For a fresh touch, sprinkle lime juice over the stew. Fresh cilantro makes a great garnish too! These pairings bring out the flavors in the stew and make it even better. You can find the Full Recipe to help you create this delicious meal. To store leftovers, first let the stew cool to room temperature. Then, place it in an airtight container. You can keep it in the fridge for up to three days. If you want to save it longer, consider freezing it instead. Always label the container with the date to track freshness. For freezing, pour the cooled stew into freezer-safe bags or containers. Leave some space at the top to allow for expansion. This will help keep the flavor and texture intact. It’s best to use the stew within three months. When you want to eat it, thaw it overnight in the fridge before reheating. To reheat, pour the stew into a pot and warm it over medium heat. Stir it often to help it heat evenly. If the stew is too thick, add a bit of broth or water to reach your desired consistency. You can also microwave it in a covered bowl, stirring every minute until hot. Enjoy your warm, comforting bowl of Green Chile Chicken Stew! For the full recipe, check out the earlier section. You can use canned green chiles or poblano peppers. If you want a milder flavor, use bell peppers. For a spicy kick, try serrano or Anaheim peppers. These options work well and still add great taste. Add more fresh green chiles. You can also sprinkle in some cayenne pepper or red pepper flakes. Adjust the heat slowly. Taste as you go. This way, you can find the perfect spice level for you. Yes, you can use chicken breasts. They are leaner and cook faster. However, they can dry out if overcooked. Chicken thighs have more fat, making them juicy and tender. Choose based on your taste and cooking style. This stew will last about 3 to 4 days in the fridge. Store it in an airtight container. Make sure it cools before putting it in the fridge. This helps keep the flavor fresh. Serve it with warm tortillas, rice, or cornbread. A fresh salad or avocado slices make great sides too. You can also add sour cream or cheese on top for extra creaminess. These pairings enhance the stew's flavors and make a full meal. In this post, we covered how to make Green Chile Chicken Stew. We discussed essential ingredients like chicken, green chiles, and decisive spices. You learned the cooking steps, from sautéing to simmering, to build flavor. I also shared tips for adjusting the recipe to fit your needs. Remember, you can customize this stew to your taste. Whether spicy or mild, it’s a great meal. Enjoy making it your own!](https://stirredrecipes.com/wp-content/uploads/2025/07/001b0af0-ccf0-4410-9c3d-f51643bf757c.webp)
Green Chile Chicken Stew Hearty and Simple Recipe
Looking for a tasty way to warm up? My Green Chile Chicken Stew is perfect for you! It’s hearty, easy to make, and packed with

Cozy Cinnamon Apple Tea with Ginger Comforting Brew
When the weather turns chilly, warm up with a cup of Cozy Cinnamon Apple Tea with Ginger. This comforting brew combines vibrant apples, zesty ginger,

Satisfying Slow Cooker French Onion Soup Recipe
If you crave a warm, savory dish that fills your home with amazing aromas, this Satisfying Slow Cooker French Onion Soup recipe is for you.
![- 2 lbs ripe Roma tomatoes - 1 medium onion - 6 cloves garlic - 3 tablespoons olive oil - Salt and pepper To create a rich and tasty roasted tomato sauce, you need ripe Roma tomatoes. They have a sweet flavor and low moisture. The onion adds depth, while garlic brings a wonderful aroma. Olive oil helps everything roast nicely. Lastly, salt and pepper enhance all the flavors. - 1 teaspoon dried oregano - 1 teaspoon balsamic vinegar - Fresh basil leaves for garnish You can add dried oregano for a classic taste. Balsamic vinegar adds a touch of sweetness. Fresh basil leaves make the dish look pretty and add fresh flavor. These optional ingredients can elevate your sauce even more. For the complete recipe, check out the Full Recipe section. Enjoy making your sauce! - Preheat the oven to 400°F (200°C). - In a large mixing bowl, combine the halved tomatoes, quartered onion, and unpeeled garlic. Pour in the olive oil, and sprinkle with salt, pepper, and dried oregano. Toss the mixture until the vegetables are well coated. - Spread the coated vegetables evenly on a baking sheet lined with parchment paper. Make sure there’s space between the tomatoes. - Roast in the preheated oven for 30-35 minutes. You want the tomatoes to become caramelized and soft. The garlic should be lightly browned. - After roasting, let the vegetables cool for a few minutes. - Squeeze the roasted garlic out of its skin into a blender or food processor. Add the roasted tomatoes and onions, along with any juices from the baking sheet. - Blend the mixture until smooth. If you want a hint of sweetness, add balsamic vinegar and blend again. - Taste the sauce and adjust the seasoning with salt and pepper as needed. This roasted tomato magic sauce is perfect right away, but you can also store it. Enjoy it over pasta, or store it in the fridge for up to a week. You can freeze it for longer storage. Check the [Full Recipe] for all the details! To make your roasted tomato sauce stand out, use the freshest tomatoes. Ripe Roma tomatoes are my go-to. Their flavor is sweet and rich. You can also try heirloom varieties for a unique taste. Next, don’t shy away from experimenting with herbs and spices. Fresh basil pairs well with tomatoes. Other good options include oregano, thyme, or a pinch of red pepper flakes for heat. Mix and match to find your perfect blend. Roasting longer can bring out deeper flavors. If you want a richer taste, add an extra 10 minutes to your roasting time. Just watch for burning. When blending, you can adjust the sauce's texture. For a chunky sauce, leave some bits. If you want it smooth, blend it longer. Add a splash of balsamic vinegar for sweetness if you like. This also helps balance the sauce's acidity. For the complete process, check out the Full Recipe. {{image_2}} You can make your roasted tomato sauce heartier by adding protein. Meat, like ground beef or turkey, works well. Sauté the meat in a pan before mixing it into the sauce. If you prefer a plant-based option, try adding beans like cannellini or black beans. They add protein and texture without meat. Just stir them in after blending your sauce. This extra step makes your dish more filling and satisfying. To take your sauce up a notch, consider adding spicy peppers. A pinch of red pepper flakes can give it a kick. For a more mellow heat, try diced jalapeños. Fresh or dried herbs can also change the flavor profile. Basil, thyme, or rosemary all work great. You can even mix and match for a unique taste. Using different tomato varieties can also enhance your sauce. While Roma tomatoes are sweet, try heirloom or beefsteak tomatoes for a richer flavor. Each type brings its own character to the sauce. Experimenting with these variations lets you create a sauce that’s just right for you. For the complete process, refer to the Full Recipe for roasted tomato magic sauce. You can store roasted tomato sauce in an airtight container. Make sure the lid fits snugly. This will keep the sauce fresh for up to one week in the fridge. The cold air will help preserve its great flavor. Always let the sauce cool down before sealing it. This prevents steam from building up inside the container. Freezing is a great option if you want to keep your sauce longer. Pour the cooled sauce into freezer-safe containers or bags. Leave some space at the top, as the sauce will expand when it freezes. Make sure to label the bags with the date. When you’re ready to use it, thaw the sauce in the fridge overnight. You can also use the microwave for quick thawing if needed. In the fridge, roasted tomato sauce stays good for about seven days. If you freeze it, you can enjoy it for up to six months. However, for the best taste and quality, use it within three months. Always check for any off smells or changes in color before using thawed sauce. If everything looks good, you’re ready to savor your homemade roasted tomato sauce! For the full recipe, refer to the earlier sections. Yes, you can use canned tomatoes. Look for whole or diced tomatoes. Canned tomatoes are often sweeter. They can save you time too. Just drain some liquid before roasting. Roasted tomato sauce lasts about six months in the freezer. Make sure to store it in airtight containers. Label them with the date for easy tracking. Absolutely! You can halve or double the recipe. Just keep the ingredient ratios the same. If you want more sauce, add more tomatoes and garlic. You can serve this sauce over pasta, pizza, or grilled veggies. It also works well in soups or as a dip. Add fresh herbs or cheese for extra flavor. For more ideas, check out the Full Recipe. This blog covers how to make roasted tomato sauce. We explored main and optional ingredients, along with simple steps to prepare and roast your veggies. You learned tips to enhance flavor and variations to customize your sauce. Plus, we discussed how to store it to keep it fresh. Overall, this sauce is easy to make and fun to tweak. You can enjoy it your way or share it with friends. Embrace your creativity in the kitchen, and make this sauce your new favorite!](https://stirredrecipes.com/wp-content/uploads/2025/07/d01f5f05-74fe-488d-99f5-9a206b4236d3.webp)
How to Make Roasted Tomato Sauce Flavorful and Simple
Making roasted tomato sauce is easy and rewarding. With just a few simple ingredients, you can create a rich and tasty sauce that elevates any

Pumpkin Gnocchi Delightful Recipe to Try Today
If you’re ready to impress your taste buds, this Pumpkin Gnocchi recipe is for you! I’ll show you how to create soft, flavorful gnocchi that’s
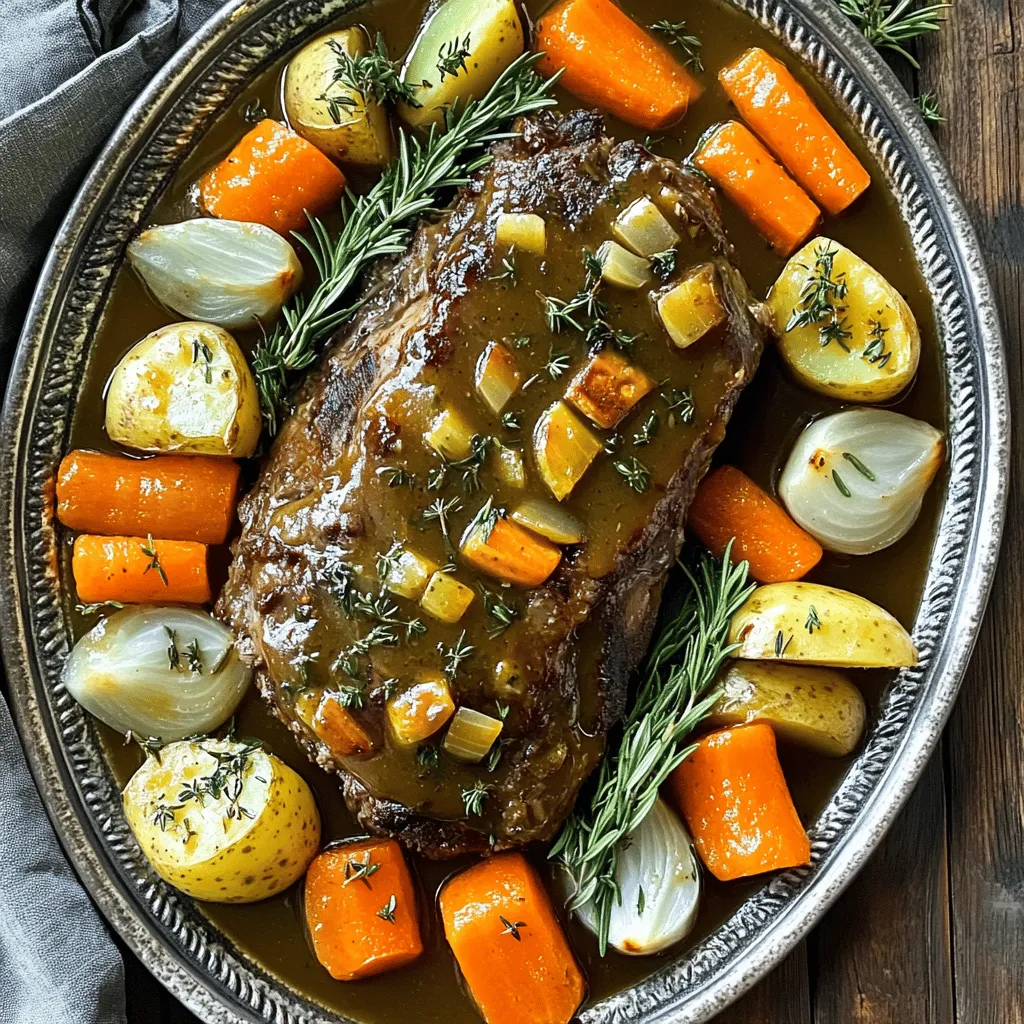
Slow Cooker Garlic Herb Pot Roast Savory and Tender
Are you ready for a meal that melts in your mouth? My Slow Cooker Garlic Herb Pot Roast is the answer! With tender chuck roast,