Dinner

- Chicken and Pasta Essentials - 2 boneless, skinless chicken breasts, cubed - 8 oz penne pasta - Creamy Sauce Components - 1 cup heavy cream - 1 cup grated Parmesan cheese - 3 cloves garlic, minced - Seasoning and Garnish Options - 2 tablespoons olive oil - Salt and pepper to taste - 1 teaspoon Italian seasoning - ¼ teaspoon red pepper flakes (optional) - Fresh parsley, chopped (for garnish) For this dish, you need chicken, pasta, and a creamy sauce. The penne pasta is perfect for holding the sauce. The chicken adds protein, and the heavy cream and Parmesan cheese give it a rich flavor. You can spice it up with garlic, Italian seasoning, and red pepper flakes. Fresh parsley is great for garnish and adds color. Make sure to have all these ingredients ready. This will help you cook faster and enjoy your meal sooner. You can also try different cheeses or herbs if you want to mix things up. How to Cook Penne Pasta Perfectly To cook penne pasta, start by boiling a pot of water. Add a pinch of salt. This helps flavor the pasta. Add the penne to the boiling water. Cook it for about 10-12 minutes. You want it to be al dente, which means it should be firm but not hard. Drain the pasta in a colander. Reserve about half a cup of pasta water for later use. Tips for Reserving Pasta Water When you drain the pasta, be careful not to lose the water. Use a measuring cup to catch the water before it all goes down the drain. This water is starchy and helps thicken the sauce later. Set it aside in a safe spot. Seasoning and Cooking Chicken Breasts Take two boneless, skinless chicken breasts and cut them into cubes. Heat two tablespoons of olive oil in a large skillet over medium heat. Add the chicken cubes to the pan. Season them with salt, pepper, and one teaspoon of Italian seasoning. Cook the chicken for about 5-7 minutes. Look for a golden-brown color to know it’s done. Ensuring the Chicken is Cooked Through To check if your chicken is fully cooked, cut a piece in half. The inside should be white, not pink. If you see pink, cook it a bit longer. Once done, remove the chicken from the skillet and set it aside on a plate. Sautéing Garlic for Flavor In the same skillet, add three minced garlic cloves. Sauté them for about 30 seconds. You want to smell the garlic, but don’t let it burn. This step adds a lot of flavor to your sauce. Whisking in Heavy Cream and Parmesan Lower the heat to medium-low. Pour in one cup of heavy cream and stir well. Let it simmer gently for about 2-3 minutes. Then, gradually whisk in one cup of grated Parmesan cheese. Keep stirring until the cheese melts and the sauce is creamy. If it becomes too thick, add some of that reserved pasta water until it reaches your desired texture. Using Fresh Ingredients Using fresh ingredients makes a big difference. Fresh chicken tastes better than frozen. Fresh spinach adds bright color and flavor. Choose high-quality Parmesan for a richer taste. Fresh garlic gives a strong aroma and boosts flavor. Adjusting Seasoning to Taste Taste as you cook. Add salt and pepper bit by bit. This helps you find the right balance. If you like spice, add red pepper flakes. Fresh herbs like parsley can also brighten the dish. Adjusting Sauce Thickness You want a creamy sauce that clings to the pasta. If it’s too thick, add reserved pasta water. Start with a little, then stir well. This helps you control the texture. A good sauce coats but does not drown. Alternative Cheese Suggestions While Parmesan is great, try other cheeses too. Romano gives a sharper bite. For a milder taste, use mozzarella. Mixing cheeses can create unique flavors. Just remember to adjust salt if you use a salty cheese. Meal Prep Prep ingredients in advance to save time. Chop chicken and garlic ahead of time. Wash and dry spinach so it’s ready to go. Cooked pasta can be stored in the fridge for a quick meal later. Using Cooked Chicken Using cooked chicken can save even more time. You can use rotisserie chicken for flavor. Just shred it and add it to the sauce. This speeds up your cooking and makes it easier to enjoy your meal. {{image_2}} Gluten-Free Pasta Options If you need a gluten-free version, use rice or quinoa pasta. These options cook well and hold the sauce nicely. They also provide a similar texture to traditional penne. Dairy-Free Alternatives For a dairy-free dish, try coconut cream or almond milk instead of heavy cream. Nutritional yeast can replace Parmesan cheese for a cheesy flavor without dairy. Adding Vegetables (Mushrooms, Peas) You can add vegetables to boost nutrition. Sauté mushrooms with the garlic for a rich taste. Toss in peas for a sweet pop of flavor. Protein Alternatives (Shrimp, Tofu) If you want to swap proteins, shrimp cooks quickly and pairs well with the sauce. Tofu is a great plant-based choice. Just sauté it until golden and firm. Incorporating Other Herbs and Spices Feel free to mix herbs into the dish. Basil, oregano, or thyme can add fresh notes. Experimenting with different herbs makes the dish exciting and unique. Adding Heat with Red Pepper Flakes If you like a kick, add red pepper flakes. A little goes a long way. It adds warmth and balances the creaminess of the sauce. To store leftovers, place the creamy parmesan chicken pasta in an airtight container. Make sure it cools to room temperature before sealing. This helps keep it fresh longer. You can store it in the fridge for up to three days. When reheating, use a skillet for best results. Add a splash of water or cream to keep it moist. Heat over low to medium heat, stirring often until warmed through. To freeze creamy parmesan chicken pasta, let it cool completely. Transfer it to a freezer-safe container. Make sure to leave some space for expansion. You can freeze it for up to three months. When you're ready to eat it, thaw the pasta in the fridge overnight. For the best texture, reheat it on the stove. Add a little cream or water while heating. This helps restore the creamy sauce. In the fridge, creamy parmesan chicken pasta lasts about three days. In the freezer, it can stay good for up to three months. Always check for any off smells or changes in texture before eating. Keeping an eye on these signs helps ensure your meal stays tasty and safe. Can I use a different type of pasta? Yes, you can use any pasta you like. Penne works well, but spaghetti or fettuccine are great too. Just cook it al dente, like the recipe says. Is it possible to make this dish ahead of time? You can prep the chicken and sauce in advance. Just cook the pasta fresh when ready to serve. This keeps the pasta from getting mushy. What can I substitute for heavy cream? You can use half-and-half or whole milk mixed with butter. This will give you a creamy texture. Coconut cream is a good dairy-free option too. Can I bake this dish instead of cooking it on the stove? Yes, you can bake it! After mixing everything in an oven-safe dish, bake it at 350°F for 20 minutes. This adds a nice golden touch to the top. What goes well with Creamy Parmesan Chicken Pasta? A fresh salad pairs nicely. Garlic bread is also a favorite. You can even serve it with roasted vegetables for more color. How do I make this dish more filling? Add more protein like shrimp or sausage. You can also mix in veggies like broccoli or peas. This not only fills the dish but adds great flavor too. In this post, we explored making Creamy Parmesan Chicken Pasta. You learned the key ingredients, step-by-step cooking tips, and ways to enhance flavor. We also discussed variations, storage info, and answered common questions. Remember, this dish is versatile and easy to customize. Try different ingredients and flavors to make it your own. With these tips, you can enjoy a delicious meal that fits your needs perfectly. Happy cooking!
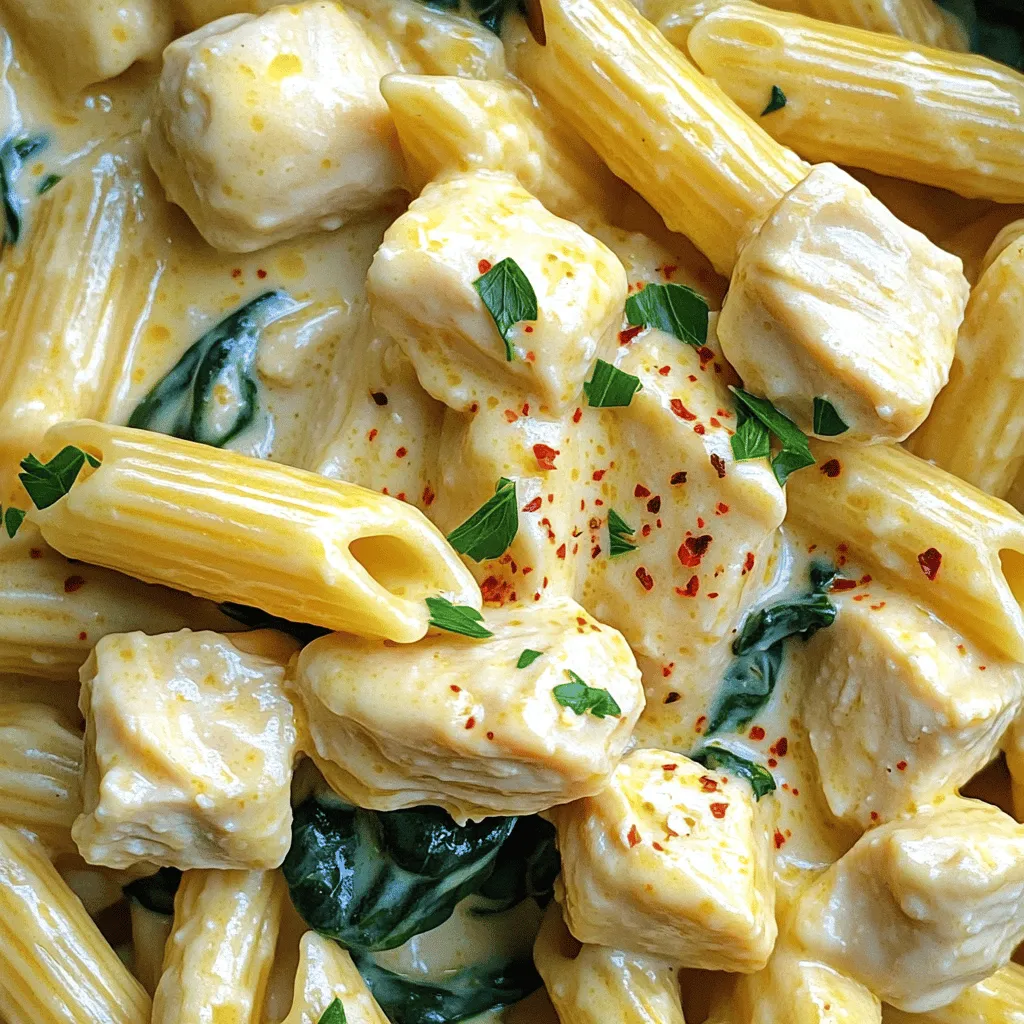
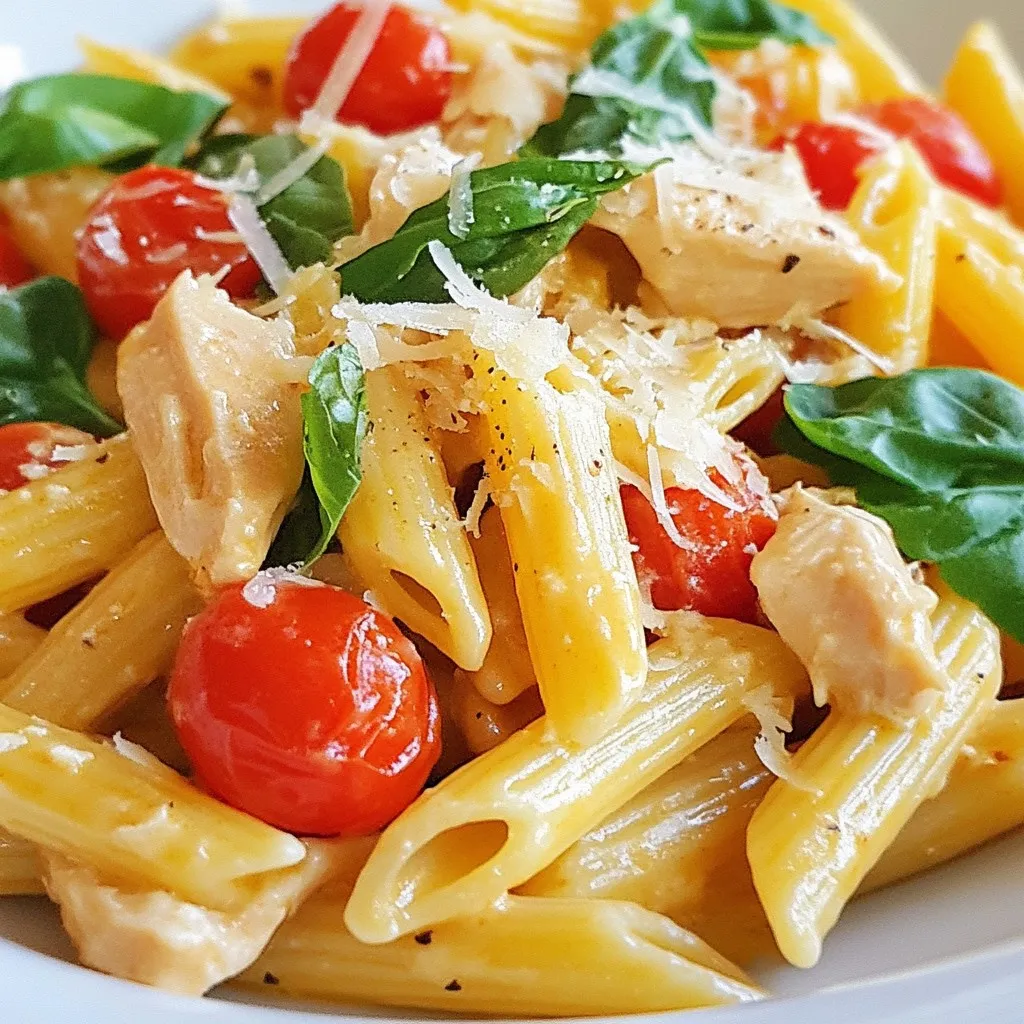
Creamy Parmesan Chicken Pasta Simple and Tasty Meal
If you’re searching for a quick and tasty dinner, look no further! Creamy Parmesan Chicken Pasta is simple to make and absolutely delicious. With just
- 4 boneless, skinless chicken thighs - 1 cup broccoli florets - 1 cup bell peppers, sliced (red and yellow) - 1 cup snap peas - 1 tablespoon olive oil - Salt and pepper to taste - 1/4 cup low-sodium soy sauce - 2 tablespoons honey - 1 tablespoon rice vinegar - 1 teaspoon sesame oil - 1 clove garlic, minced - 1 teaspoon fresh ginger, grated - 1 tablespoon cornstarch mixed with 2 tablespoons water (slurry) - Garnishes: sesame seeds and sliced green onions The main ingredients in this dish are simple yet full of flavor. The chicken thighs provide a juicy base, while the veggies add bright colors and crunch. Broccoli, bell peppers, and snap peas give a nice mix of textures. For the teriyaki sauce, you need a few key items. Low-sodium soy sauce keeps the dish savory without being too salty. Honey brings a sweet touch, balancing the salt. Rice vinegar adds a hint of tang, making the sauce pop. Sesame oil brings a nutty flavor that rounds out the taste. Garlic and ginger add depth. The cornstarch slurry helps thicken the sauce, giving it a nice glaze. Finally, sesame seeds and green onions are the perfect garnishes, adding a fresh look and taste. - Preheat oven to 400°F (200°C). - Prepare a baking sheet with parchment paper. This makes cleanup easy. - In a bowl, whisk together: - 1/4 cup soy sauce - 2 tablespoons honey - 1 tablespoon rice vinegar - 1 teaspoon sesame oil - 1 clove garlic, minced - 1 teaspoon fresh ginger, grated - 1 tablespoon cornstarch mixed with 2 tablespoons water (slurry) - Mix until smooth. Set it aside for later. - Place 4 boneless, skinless chicken thighs on one half of the baking sheet. - Season chicken with salt and pepper to taste. - Pour half the teriyaki sauce over the chicken. Make sure to coat it well. - On the other half of the sheet, add: - 1 cup broccoli florets - 1 cup sliced bell peppers (red and yellow) - 1 cup snap peas - Drizzle the veggies with 1 tablespoon olive oil. Toss lightly. - Bake for 20-25 minutes. The chicken should reach 165°F (75°C) to be safe to eat. - Five minutes before finishing, pour the rest of the teriyaki sauce over the chicken and veggies. This adds great flavor. This method makes a tasty meal with minimal effort. Enjoy the ease of sheet pan cooking! To check if your chicken is done, use a meat thermometer. The internal temperature should be 165°F (75°C). If you don’t have a thermometer, cut into the thickest part. The juices should run clear, not pink. This simple check ensures safe and juicy chicken. For crispy veggies, spread them out on the baking sheet. Crowding can lead to steaming instead of roasting. Drizzle with olive oil and season well. Toss them slightly before baking to enhance their crispness. Want to add some heat? Sprinkle red pepper flakes into the teriyaki sauce. Start with a pinch and adjust to your taste. This small change brings extra flavor and warmth. You can also swap honey for other sweeteners. Maple syrup or agave nectar works well. Each sweetener gives a different note to the sauce. Experiment to find your favorite! If you use thicker chicken cuts, increase the baking time. Check for doneness at 25-30 minutes. Always verify the internal temperature before serving. For high-altitude baking, you may need to adjust the time. Higher altitudes can cause food to cook faster. Keep a close eye on your dish. You want it perfect, not overdone! {{image_2}} You can change up the veggies in this dish. Try using asparagus or green beans instead of snap peas. Both add a nice crunch and fresh taste. You can also add onions or carrots for more color and flavor. Just slice them thin so they cook well. If you want to switch the protein, you have options. You can use chicken breasts instead of thighs. Tofu is a great choice for a meat-free meal. You can also try pork or shrimp for a different twist. Both cook well and soak up the teriyaki sauce nicely. Need gluten-free options? Use tamari instead of soy sauce. It tastes similar but is safe for gluten-free diets. For a vegan version, look for vegan teriyaki sauce. You can make your own with soy sauce, maple syrup, and some garlic. This keeps the dish friendly for all diets. To keep your leftovers fresh, refrigerate them right away. Place the chicken and veggies in an airtight container. This helps to lock in moisture and flavor. Use glass or plastic containers with tight lids for best results. If you plan to eat them within three days, this method works well. You can easily reheat your leftovers in the microwave or oven. For the microwave, place the food on a microwave-safe plate. Heat it in 30-second bursts until warm. If you prefer the oven, preheat it to 350°F (175°C). Spread the food on a baking sheet and heat for about 10 minutes. Adding a splash of water can help maintain moisture. If you want to freeze the dish, let it cool completely first. Portion it into freezer bags or containers. Be sure to remove as much air as possible to prevent freezer burn. For best taste, eat it within three months. When ready to eat, thaw the dish overnight in the fridge. Reheat as mentioned above for best quality. This dish takes about 35 minutes to make. You spend 10 minutes prepping and 25 minutes cooking. You’ll love how quick it is, especially on busy nights. Yes, you can use frozen vegetables. They make cooking easier and faster. Fresh vegetables have a better taste and crunch. If you have fresh veggies, use them for the best flavor. Frozen works well, too, if you’re in a rush. Some great side dishes include rice or quinoa. You can also serve a simple salad. These sides balance the flavors and add more nutrients to your meal. Try a light cucumber salad to cool down the dish. Absolutely! You can make the teriyaki sauce ahead of time. Store it in the fridge for up to a week. Just mix all the ingredients and keep it in an airtight container. This makes your cooking even faster when you're ready to eat. In this blog post, we explored how to make delicious Sheet Pan Teriyaki Chicken. You learned about the simple ingredients, from chicken to vibrant veggies and a tasty sauce. The step-by-step instructions make it easy to prepare and bake. We shared tips for perfect chicken and ideas for swapping ingredients. Finally, we covered how to store and reheat leftovers. Try this recipe to enjoy a flavorful and healthy meal. Cooking can be fun and rewarding!
Sheet Pan Teriyaki Chicken Flavorful and Easy Meal
Are you ready to impress your taste buds with a simple yet delicious dinner? This Sheet Pan Teriyaki Chicken recipe brings vibrant flavors and easy
To make Greek chicken meatballs, you need a few simple ingredients. Here’s the list: - 1 lb ground chicken - 1/2 cup breadcrumbs - 1/4 cup grated Parmesan cheese - 1/4 cup finely chopped red onion - 2 cloves garlic, minced - 1/4 cup fresh parsley, chopped - 1/4 cup fresh mint, chopped - 1 large egg - 1 teaspoon dried oregano - 1 teaspoon salt - 1/2 teaspoon black pepper - 1/4 teaspoon cayenne pepper (optional for heat) - 2 tablespoons olive oil (for frying) These ingredients blend well to give your meatballs a fresh and tasty flavor. The ground chicken provides a light base. The breadcrumbs help with the texture. Adding Parmesan gives a salty twist. Fresh herbs like parsley and mint add a burst of brightness. Garlic and onion bring depth to each bite. If you want some heat, cayenne pepper works great. Olive oil helps to cook the meatballs perfectly and adds a nice richness. {{ingredient_image_1}} - In a large bowl, combine 1 pound of ground chicken with 1/2 cup of breadcrumbs. - Add 1/4 cup of grated Parmesan cheese, 1/4 cup of chopped red onion, and 2 minced garlic cloves. - Mix in 1/4 cup of fresh parsley, 1/4 cup of fresh mint, and 1 large egg. - Sprinkle in 1 teaspoon of dried oregano, 1 teaspoon of salt, 1/2 teaspoon of black pepper, and 1/4 teaspoon of cayenne pepper if you want heat. - Use your hands or a spoon to mix everything well. - Cover the bowl and chill the mixture in the refrigerator for about 30 minutes. This helps the flavors blend and makes shaping easier. - Preheat a large skillet over medium heat and add 2 tablespoons of olive oil. - While the oil heats, shape the chicken mixture into small meatballs, about 1 to 1.5 inches wide. - Carefully place the meatballs in the skillet. Cook in batches if needed to avoid crowding. - Cook them for about 5 to 7 minutes on each side. You want them golden brown and cooked through. - Serve your warm meatballs with tzatziki sauce for a cool contrast. - Pair them with warm pita bread for a delightful bite. - Add a fresh salad of tomatoes, cucumber, and feta to round out the meal. To make great Greek chicken meatballs, mix ingredients well. Use your hands for an even blend. This helps every bite be tasty. After mixing, cover the bowl and chill for 30 minutes. This resting time helps the flavors blend together. It also makes the mixture easier to shape. Cooking meatballs just right gives them a golden brown color. Preheat your skillet to medium heat. Add olive oil and wait until it's hot. Place the meatballs gently in the skillet. Avoid overcrowding; cook in batches if needed. Cook each side for 5-7 minutes. The meatballs should be golden brown when done. Want to boost flavor? Adjust the seasoning to your liking. You can add more salt or pepper for extra taste. Consider adding spices like cumin or coriander for a twist. Fresh herbs like dill or basil can also change the flavor. If you like heat, add cayenne pepper for a kick. Pro Tips Chill the Mixture: Letting the meatball mixture rest in the refrigerator for at least 30 minutes helps the flavors meld and makes shaping easier. Use Wet Hands: Dipping your hands in water before shaping the meatballs can help prevent the mixture from sticking to your hands. Don’t Overcrowd the Pan: Cooking the meatballs in batches allows for even cooking and prevents steaming, ensuring they get that nice golden brown color. Check for Doneness: To ensure the meatballs are fully cooked, use a meat thermometer; they should reach an internal temperature of 165°F (74°C). {{image_2}} You can easily swap ground chicken for turkey or beef. This change gives a different taste and texture. If you need a gluten-free option, use gluten-free breadcrumbs. This keeps the meatballs safe for those with gluten allergies. To spice things up, add cumin or coriander. These spices give a warm and rich flavor. You might also try different herbs. Basil or dill can change the flavor profile nicely. If you want a healthier option, bake the meatballs instead of frying. Preheat your oven to 400°F and place the meatballs on a lined baking sheet. Bake for about 20 minutes. Grilling is another great method. It adds a nice char and smoky flavor. Just make sure to oil the grill to prevent sticking. To keep your Greek chicken meatballs fresh, store them in an airtight container. Place a paper towel at the bottom to absorb any moisture. This helps prevent sogginess. You can refrigerate them for up to three days. For longer storage, freeze the meatballs. Lay them on a baking sheet and freeze for an hour. Once firm, transfer them to a freezer bag. They can last up to three months in the freezer. When reheating, avoid drying out the meatballs. The best way is to use the oven. Preheat your oven to 350°F. Place the meatballs on a baking sheet and cover them with foil. Heat for about 15-20 minutes. You can also use the microwave. Place them in a microwave-safe dish and cover with a damp paper towel. Heat in short bursts of 30 seconds, checking until warmed through. Greek chicken meatballs can stay fresh in the fridge for about three days. In the freezer, they can last up to three months. Look for signs of spoilage, such as off smells or a change in color. If they feel sticky or slimy, it's best to toss them. Always trust your senses when it comes to food safety. To ensure your Greek chicken meatballs are safe to eat, check the internal temperature. They should reach at least 165°F (75°C). You can use a meat thermometer to check this. Insert it into the center of a meatball. If it reads 165°F or higher, your meatballs are done. This keeps them juicy and safe. Yes, you can make Greek chicken meatballs ahead of time. Mix the ingredients and form the meatballs. Then, cover and refrigerate them for up to 24 hours. This saves you time on a busy day. You can also freeze them. Just place them in a single layer on a baking sheet. Once frozen, transfer them to a freezer bag. They will last for about three months. When ready to cook, thaw overnight in the fridge before frying. Tzatziki sauce is the classic choice for Greek chicken meatballs. It adds a cool and creamy touch. You can also try a simple tomato sauce or a yogurt-based dip. For a twist, serve with a spicy harissa sauce. Each of these options enhances the flavors of the meatballs. You can pair these sauces with warm pita bread for a complete meal. To sum up, we explored how to make delicious Greek chicken meatballs. We covered key ingredients, step-by-step cooking, and serving ideas. I shared tips for mixing and cooking techniques to enhance flavor. You can also try fun variations like using turkey or baking instead of frying. Store your leftovers properly for best results. With these insights, you can create a tasty meal everyone will love. Enjoy experimenting with flavors and techniques in your kitchen!
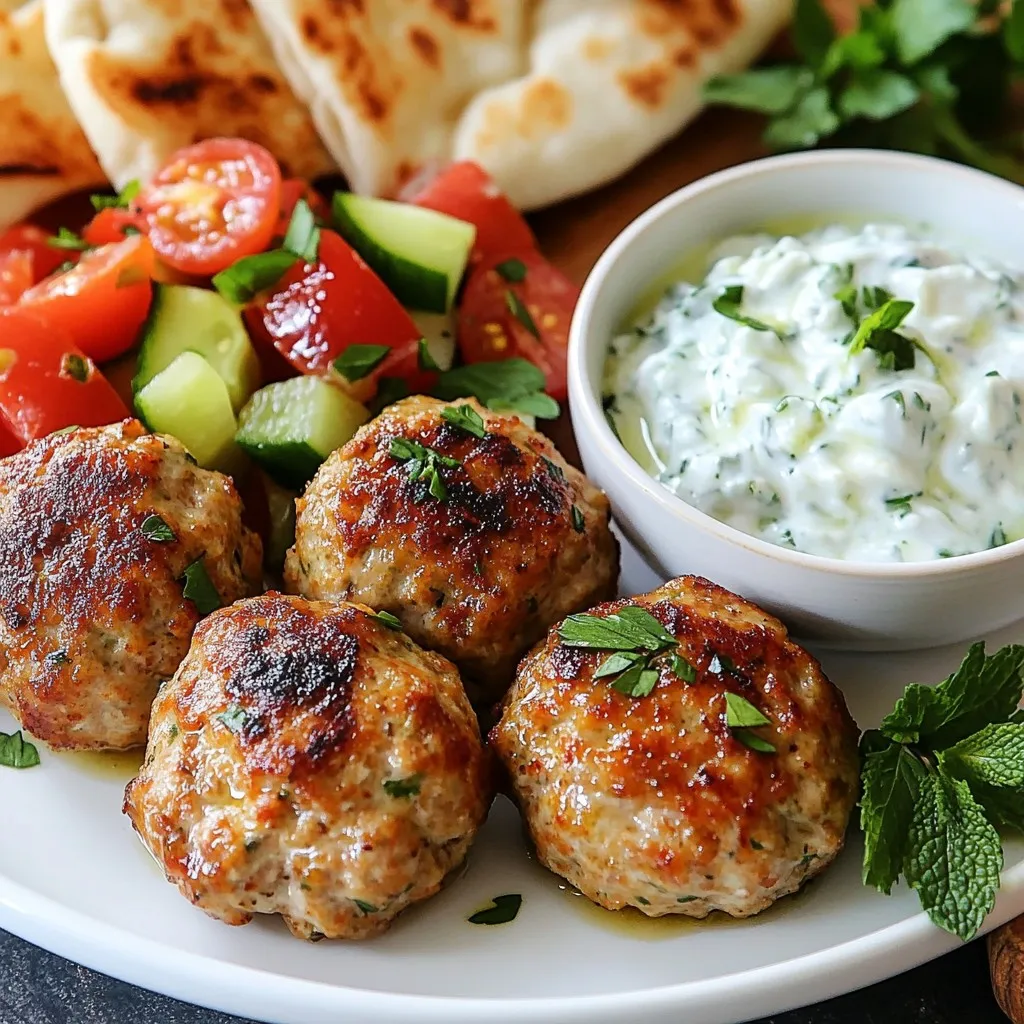
Greek Chicken Meatballs Flavorful and Easy Recipe
Looking for a dish that’s both flavorful and easy to make? Greek chicken meatballs are a fantastic choice! In this article, I’ll guide you through
- 4 boneless, skinless chicken breasts - 1 red bell pepper, sliced - 1 yellow onion, chopped - 1 cup baby spinach, chopped - 1 can (14 oz) diced tomatoes with herbs - 1 cup low-sodium chicken broth - 3 cloves garlic, minced - 1 teaspoon dried oregano - 1 teaspoon dried basil - ½ teaspoon red pepper flakes (optional) - Salt and pepper to taste - 1 tablespoon olive oil - Fresh basil for garnish When you gather your ingredients, keep them fresh and ready. The chicken breasts are the star of the dish. They soak up the flavors well. The red bell pepper adds sweetness, and the onion gives depth. Baby spinach rounds out the dish with color and nutrients. The diced tomatoes bring a vibrant base. They add moisture and flavor. Low-sodium chicken broth adds richness without being too salty. For seasonings, I love using garlic, oregano, and basil. They create a classic Tuscan flavor. The red pepper flakes can add a touch of heat if you like spice. Salt and pepper enhance all the flavors. Olive oil helps to sauté the onions and garlic, making everything fragrant. Finally, fresh basil adds a lovely finish to your dish. This blend of ingredients makes a simple yet delicious meal. 1. Start by heating 1 tablespoon of olive oil in a skillet over medium heat. 2. Add the chopped yellow onion and minced garlic. Sauté until the onions turn translucent, about 3-4 minutes. 3. Place the 4 boneless, skinless chicken breasts in the bottom of the crockpot. 4. Season the chicken with salt, pepper, 1 teaspoon of dried oregano, and 1 teaspoon of dried basil. 1. Pour the sautéed onion and garlic mixture over the chicken. 2. Add 1 sliced red bell pepper on top of the chicken. 3. Pour in 1 can of diced tomatoes with herbs and 1 cup of low-sodium chicken broth. 4. If you like heat, sprinkle ½ teaspoon of red pepper flakes. Stir gently to mix without disturbing the chicken. 1. Cover the crockpot and set it to cook on low for 6-8 hours or on high for 4-5 hours. The chicken should be tender and cooked through. 2. About 30 minutes before the cooking ends, stir in 1 cup of chopped baby spinach. Let it wilt before serving. 3. Once done, shred the chicken in the crockpot using two forks. Mix it well with the sauce and vegetables for a delicious finish. Using fresh herbs adds a bright taste to your dish. If you use dried herbs, use less because they are stronger. Always season the chicken well with salt and pepper before cooking. This helps the flavor soak in and makes the chicken tasty. A slow cooker is great for this recipe. It keeps the chicken moist and tender. If you want to cook it on the stovetop, watch the heat. Too much heat can dry out the chicken. To avoid dry chicken, make sure to check the time. Cook it just until it’s done. For sides, creamy polenta or pasta pairs well with the chicken. The sauce complements these dishes nicely. To make your plate look great, use fresh basil as a garnish. It adds color and a fresh smell. Enjoy your meal with friends or family! {{image_2}} You can easily change up the protein in this meal. Turkey or pork can work well instead of chicken. Just make sure to adjust cooking times as these meats may vary. You can also mix in different vegetables. Try zucchini, mushrooms, or even carrots for extra flavor and texture. This makes the dish more colorful and healthy. Want to add a twist? A splash of white wine can bring more depth to the sauce. If you prefer a tangy kick, balsamic vinegar is great too. You can also add cheese for richness. Parmesan or mozzarella melts nicely into the dish, making it creamy and tasty. If you need gluten-free options, swap regular chicken broth for a gluten-free version. This keeps the dish safe for everyone. For a low-carb twist, serve it over cauliflower rice instead of traditional pasta. You can enjoy the flavors without the extra carbs. You can keep leftover Tuscan Crockpot Chicken in the fridge for up to three days. Store it in an airtight container. When you are ready to eat it again, reheat it gently. Use the stovetop or microwave. Add a splash of chicken broth if it seems dry. To freeze Tuscan Crockpot Chicken, let it cool first. Place it in a freezer-safe bag or container. Remove as much air as possible to prevent freezer burn. It can last up to three months. When you want to enjoy it, thaw it in the fridge overnight. Reheat it on low heat on the stovetop or in the microwave. Stir it occasionally for even warming. Cooking Tuscan Crockpot Chicken takes different times based on the heat setting. If you choose low, it cooks for 6 to 8 hours. On high, it takes about 4 to 5 hours. I recommend the low setting for the best flavor. It lets the chicken soak in the tasty juices. Yes, you can use frozen chicken breasts! Just adjust the cooking time. If using frozen, cook on high for about 6 to 7 hours. This ensures the chicken cooks through safely. Always check the chicken's internal temperature. It should reach 165°F for safe eating. You can serve Tuscan Crockpot Chicken with many sides. I suggest creamy polenta or pasta. Both soak up the sauce well. A simple salad with fresh greens adds a nice crunch, too. You can also add garlic bread for a tasty touch. Enjoy your meal! This article shared all the details for a tasty Tuscan Crockpot Chicken. You learned about the meat, veggies, liquids, and spices to use. The step-by-step guide made cooking easy. You also found tips for the best flavor and fun variations. Storing your meals properly ensures safety. Overall, this recipe is fun, flexible, and simple. I hope you feel ready to try it. Enjoy your cooking adventure!
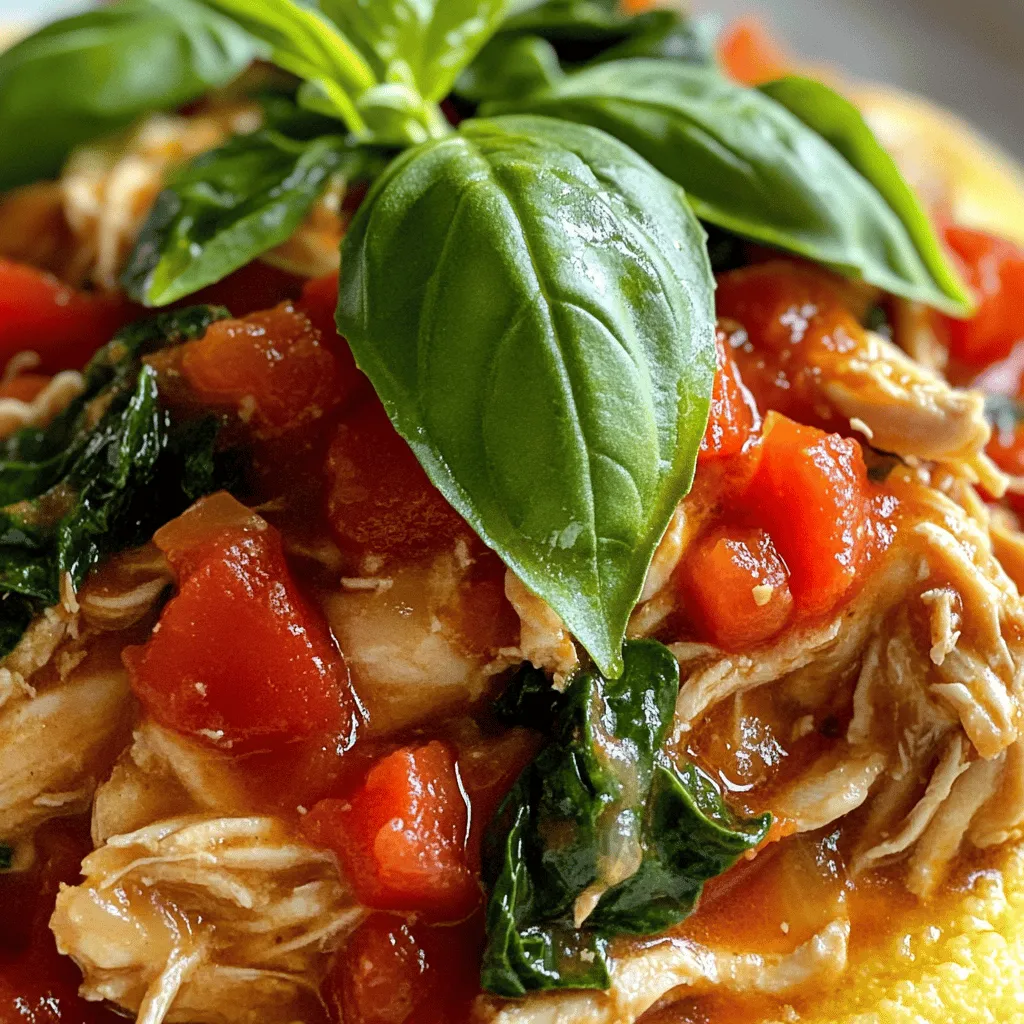
Tuscan Crockpot Chicken Flavorful Easy Dinner Recipe
Looking for an easy, mouth-watering dinner option? Try my Tuscan Crockpot Chicken! Packed with juicy chicken breasts, vibrant veggies, and aromatic herbs, this dish is
- 4 salmon fillets - 2 tablespoons teriyaki sauce - 1 tablespoon soy sauce - 1 tablespoon honey - 1 tablespoon sesame oil - 1 bell pepper, sliced (any color) - 2 cups broccoli florets - 1 cup snap peas - 1 carrot, thinly sliced - 2 tablespoons sesame seeds (for garnish) - Salt and pepper to taste - Fresh cilantro - Green onions You can swap salmon for chicken or tofu. Both work well with the sauce. If you don't have teriyaki sauce, mix soy sauce with brown sugar. For veggies, use zucchini or asparagus if you like. Don’t have sesame oil? Olive oil is a good choice. Just remember, each swap will slightly change the taste. Adjust to your liking! Start by preheating your oven to 400°F (200°C). This temperature helps cook the salmon and veggies evenly. Next, line a large baking sheet with parchment paper. This makes cleanup easy and keeps the food from sticking. In a small bowl, whisk together the teriyaki sauce, soy sauce, honey, and sesame oil. Mix them well until smooth. This sauce adds a sweet and savory flavor to the dish. Set the bowl aside for now. Place the salmon fillets in the center of your baking sheet. Season them with salt and pepper to taste. Next, arrange the sliced bell peppers, broccoli florets, snap peas, and sliced carrots around the salmon. Make sure to spread the veggies out. Drizzle the teriyaki sauce mixture over the salmon and veggies. Toss the vegetables gently to coat them in the sauce. Bake everything in the oven for about 15-20 minutes. The salmon should flake easily with a fork when done. The veggies will be tender and bright. Once finished, sprinkle sesame seeds and chopped cilantro or green onions on top for a fresh look. To get perfect salmon, start with fresh fillets. Look for bright, shiny skin. It should look moist, not dry. Season the salmon with salt and pepper before cooking. This adds flavor and helps enhance its natural taste. When you bake the salmon, keep an eye on the time. It usually takes 15 to 20 minutes at 400°F. The salmon is done when it flakes easily with a fork. This means it is moist and tender, just how you want it. Choose colorful veggies for a beautiful dish. I like to use bell peppers, broccoli, snap peas, and carrots. Cut the veggies into even pieces for uniform cooking. Slice bell peppers into strips and carrots into thin rounds. Broccoli florets should be bite-sized. This helps them cook at the same rate as the salmon. Toss the veggies with the teriyaki sauce for extra flavor. This also helps them get that nice, glossy look. To cook everything evenly, spread the salmon and veggies out on the baking sheet. Make sure they are not crowded. If they are too close, they will steam instead of roast. Roasting gives a nice, caramelized edge. Rotate the baking sheet halfway through cooking. This ensures even heat and perfect results. If you notice some veggies cooking faster, you can remove them early. Just keep an eye on them to maintain that perfect texture. {{image_2}} You can easily switch the salmon for other proteins. Chicken breasts or thighs work well. They absorb the sauce nicely. Tofu is a great choice for a plant-based meal. It becomes flavorful when marinated. Shrimp is another quick option. Just adjust the cooking time to avoid overcooking. Feel free to mix in other veggies. Asparagus adds a nice crunch. Zucchini slices cook quickly and taste great. Cauliflower florets are a fun option too. You can even toss in baby corn or mushrooms for extra texture. Use whatever veggies you have on hand. This dish is flexible and fun to build upon. You can change the flavor profile easily. Try adding ginger for a spicy kick. A splash of lime juice brightens the dish. Swap teriyaki sauce for hoisin sauce for a twist. You could also add chili paste for heat. Experiment with different spices like garlic powder or onion powder for depth. This way, you'll always enjoy something new! After you enjoy your meal, let the leftovers cool. Place them in an airtight container. You can keep them in the fridge for up to three days. If you plan to eat them later, store them separately. This helps keep the salmon and veggies fresh. To reheat, preheat your oven to 350°F (175°C). Place the salmon and veggies on a baking sheet. Cover them with foil to keep moisture in. Heat for about 10-15 minutes. You can also use a microwave. Use a microwave-safe dish and cover it. Heat in short bursts until warm. If you want to save the dish for later, freezing is a good option. Wrap the salmon and veggies tightly in plastic wrap. Then, place them in a freezer bag. They can last for up to three months in the freezer. When you're ready to eat, move them to the fridge to thaw overnight. Reheat as mentioned above. This keeps the flavors strong and delicious. You should bake salmon and vegetables for about 15 to 20 minutes. The salmon is ready when it flakes easily with a fork. The veggies should be tender yet still bright and crisp. Keep an eye on them, as oven times can vary. Yes, you can use frozen salmon! Just make sure to thaw it first. Place the frozen fillets in the fridge overnight or run them under cold water for about an hour. This helps the salmon cook evenly and taste great. Many sides go well with Teriyaki Salmon and veggies. Some tasty options include: - Steamed rice or jasmine rice - Quinoa for a healthy grain - A fresh green salad with a light dressing - Noodles tossed in sesame oil These sides complement the flavors and add variety to your meal. In this post, I shared a simple way to make sheet-pan teriyaki salmon and veggies. You learned about the key ingredients, step-by-step instructions, and helpful tips. I also covered variations and storage tips to keep your meal fresh. Remember, cooking should be fun and easy. Don’t hesitate to try new ingredients or flavors. Enjoy your cooking journey with this delicious dish!
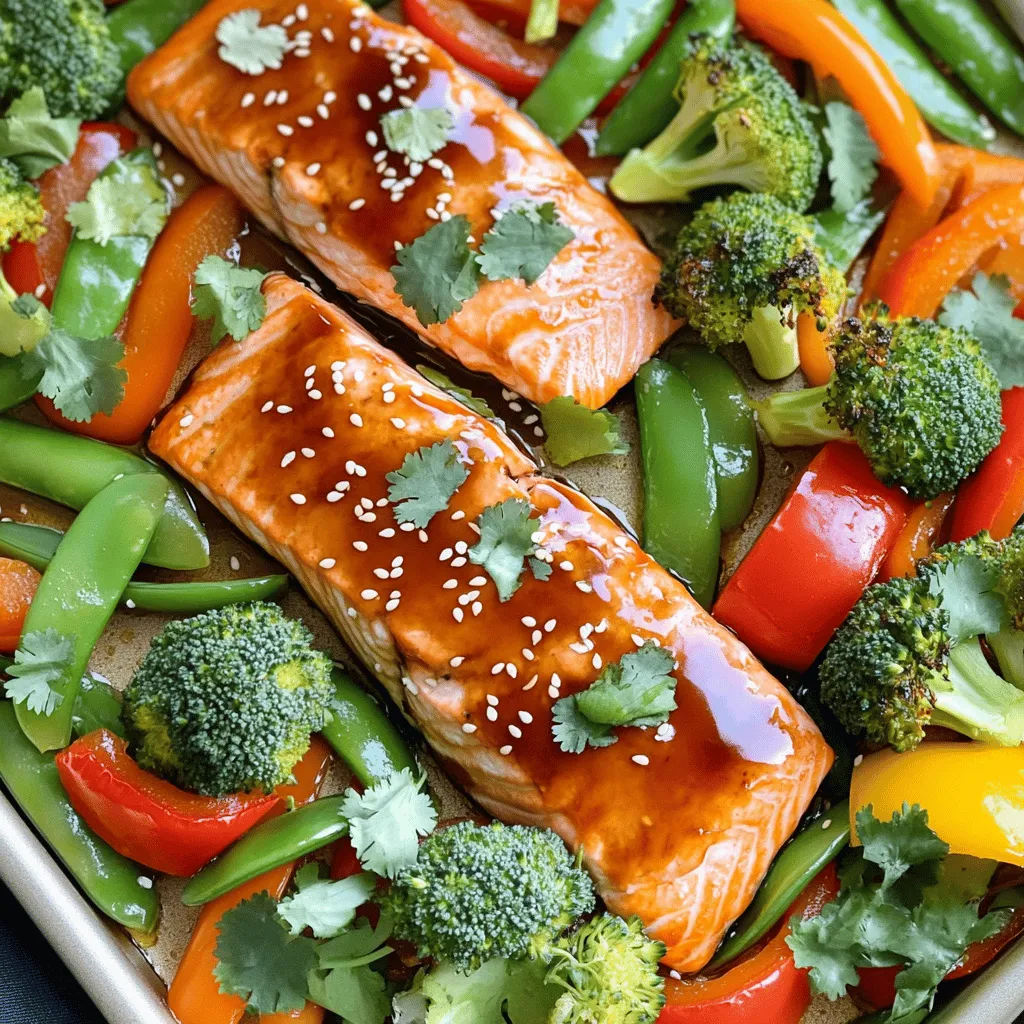
Sheet-Pan Teriyaki Salmon & Veggies Simple Recipe
Ready for a quick and tasty meal? This Sheet-Pan Teriyaki Salmon & Veggies recipe makes dinner a breeze. With simple ingredients and easy steps, you’ll
You will need 4 cups of fresh corn kernels. This is about 6 ears of corn. Fresh corn adds great texture and sweetness. You can also use frozen corn if you prefer. Just make sure to thaw it before cooking. Next, gather 4 tablespoons of unsalted butter and 3 tablespoons of honey. The butter gives the dish a rich flavor. Honey adds a sweet touch that pairs well with the corn. Together, they create a delicious glaze. For seasoning, you need 1/2 teaspoon of salt, 1/4 teaspoon of black pepper, and 1/4 teaspoon of paprika. These spices enhance the corn's natural taste. To finish, use 2 tablespoons of fresh cilantro, chopped, for garnish. A squeeze of lime juice from 1 lime adds a bright flavor. Start by cutting the corn from the cobs. Use about six ears of fresh corn. If you prefer, you can use frozen corn. Just remember to thaw it before cooking. This step helps with even cooking and texture. Grab a large skillet and place it on medium heat. Add four tablespoons of unsalted butter. Let it melt until it begins to foam. Next, add the corn kernels to the skillet. Sauté them for about five to seven minutes. Stir occasionally to prevent sticking. You want the corn to soften and get a nice golden edge. Now, drizzle in three tablespoons of honey while stirring the corn. This will coat each kernel nicely. Season with half a teaspoon of salt, a quarter teaspoon of black pepper, and a quarter teaspoon of paprika. Stir everything together. Let it cook for an extra two to three minutes to blend the flavors. Finally, squeeze the juice from one lime over the corn. Stir again and taste. Adjust the seasonings if needed. Transfer your corn to a serving dish and sprinkle fresh cilantro on top. Enjoy your tasty, sweet, and savory dish! To make Honey Butter Skillet Corn, start with fresh corn. Look for ears that feel firm. The husks should be bright green and tightly wrapped. When you peel back the husk, the kernels should be plump and shiny. If fresh corn is not available, frozen corn is a good choice. Just make sure to thaw it before cooking. When sautéing corn, use medium heat. This helps the corn cook evenly. Melt the butter in the skillet until it foams slightly. This shows it is hot enough. Add the corn and stir every few minutes. You want some golden edges for flavor. Cook for about 5-7 minutes. This timing brings out the best taste and texture. Sweetness is key in this dish. Start with the honey, but taste as you go. If it’s too sweet, add a bit more lime juice. Salt and pepper are must-haves too. Use about 1/2 teaspoon of salt. The paprika adds a nice touch, giving a hint of heat. Mix well and taste again. Adjust until the flavors fit your liking. {{image_2}} You can swap honey for other sweeteners. Maple syrup adds a rich flavor. Agave nectar gives a light sweetness. You might even try brown sugar for a caramel touch. Each sweetener changes the taste. Experiment to find your favorite! Want some heat? Try adding red pepper flakes or cayenne. Start with a pinch and taste. You can always add more. A bit of chili powder also works well. These spices make the dish lively and fun! You can make this dish even better by adding veggies. Bell peppers add sweetness and color. Zucchini gives a nice texture. Try mixing in some chopped onions for a savory kick. Just sauté them with the corn for a complete dish! Store leftover corn in an airtight container. Let it cool to room temperature first. Place it in the fridge for up to three days. If you want to keep it longer, consider freezing it. Reheat the corn on the stove for the best taste. Use low heat and add a little butter to keep it moist. Stir often until it warms up. You can also use the microwave. Heat it in short bursts, stirring between each one. To freeze skillet corn, let it cool completely. Transfer it to a freezer-safe bag. Remove as much air as possible to prevent freezer burn. It will last up to six months in the freezer. When you’re ready to use it, thaw it in the fridge overnight before reheating. Yes, you can use frozen corn. Just thaw it before cooking. Frozen corn is quick and easy. It saves time and still tastes great. To add spice, mix in some chili powder or cayenne pepper. Start with a small amount. Taste as you go to find your heat level. You can also add diced jalapeños for a fresh kick. Honey Butter Skillet Corn pairs well with grilled meats or fish. It also goes nicely with tacos or barbecue dishes. Serve it alongside a fresh salad for a complete meal. You’ve learned how to make a tasty dish with fresh corn. We covered key ingredients like corn, butter, and honey. Then, I walked you through how to prepare, cook, and add flavor. I shared tips on picking corn and getting the sauté just right. We explored fun variations and how to store leftovers. Now, you can enjoy a sweet, savory side dish that fits any meal. Cooking can be fun, so don’t hold back. Experiment and make this dish your own!
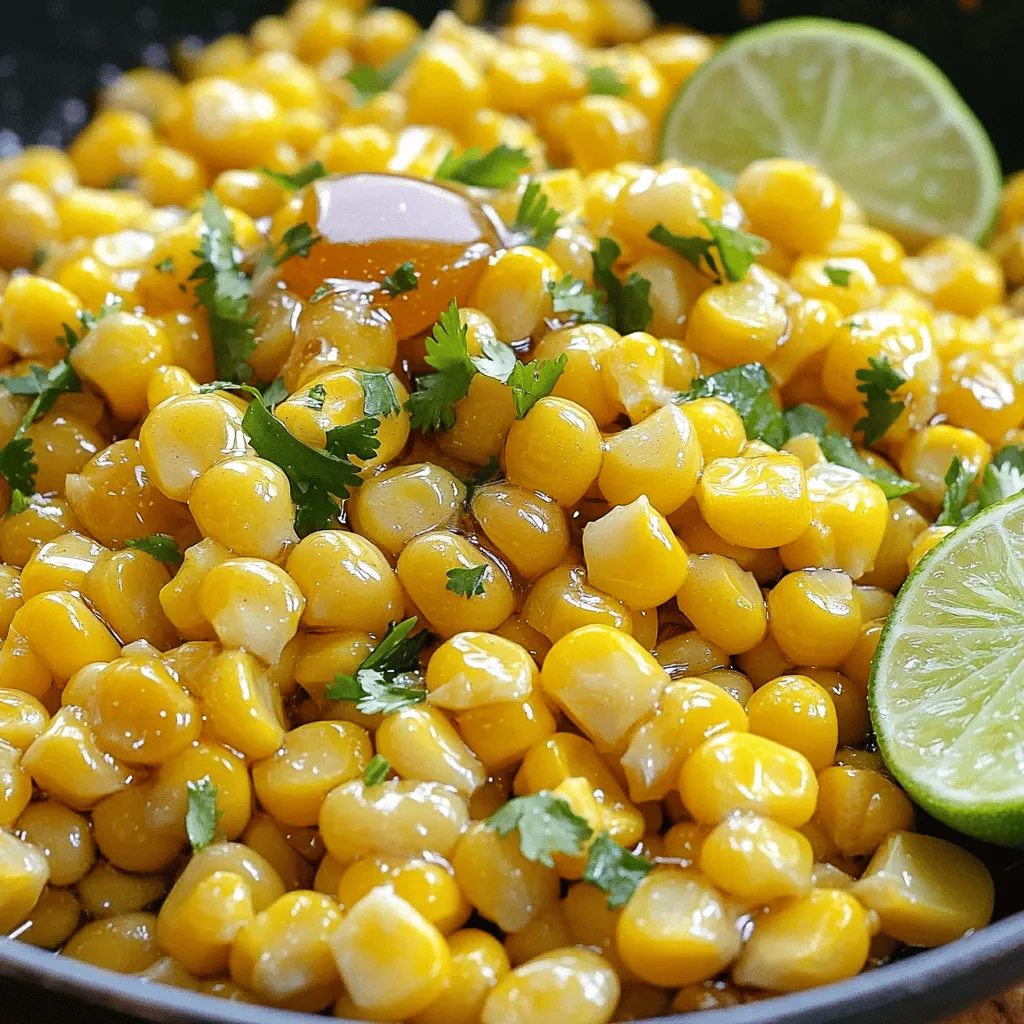
Honey Butter Skillet Corn Tasty and Simple Dish
If you’re looking for a fun, tasty side dish, look no further! Honey Butter Skillet Corn packs sweet and buttery flavors into a simple recipe.
To make Tuscan Chicken Pasta, you need these simple ingredients: - 8 oz. penne pasta - 2 boneless, skinless chicken breasts, diced - 2 tablespoons olive oil - 3 cloves garlic, minced - 1 cup cherry tomatoes, halved - 1 cup fresh spinach - 1/2 cup heavy cream - 1/2 cup grated parmesan cheese - 1 teaspoon dried oregano - Salt and pepper to taste - Fresh basil for garnish You can swap some ingredients if you want. Here are some ideas: - Pasta: Use fusilli or farfalle instead of penne. - Chicken: Try turkey or shrimp instead of chicken. - Olive oil: Use avocado oil or butter if needed. - Heavy cream: Swap with coconut milk or any dairy-free cream. - Parmesan cheese: Nutritional yeast works for a vegan option. These swaps keep the dish tasty and fun! Penne pasta works great for this dish. Its shape holds onto the sauce well. However, other pasta types can also shine in this recipe: - Fusilli: Twists grab sauce nicely. - Farfalle: Bow ties add a fun look. - Rigatoni: Tubes hold sauce with great flavor. Choose your favorite pasta, and enjoy your meal! {{ingredient_image_1}} First, fill a large pot with water. Add salt and bring it to a boil. Once boiling, add 8 ounces of penne pasta. Cook the pasta according to the package instructions until it is al dente. This usually takes about 8 to 10 minutes. When the pasta is ready, drain it in a colander and set it aside. Next, grab a large skillet and place it over medium heat. Add 2 tablespoons of olive oil to the skillet. Once the oil is hot, add 2 diced, boneless chicken breasts. Season the chicken with salt, pepper, and 1 teaspoon of dried oregano. Cook the chicken for about 5 to 7 minutes until it turns golden brown and is fully cooked. Remove the chicken from the skillet and set it aside on a plate. In the same skillet, add 3 minced garlic cloves. Sauté the garlic for about 1 minute until it smells great. Then, add 1 cup of halved cherry tomatoes to the skillet. Cook the tomatoes for 3 to 4 minutes until they soften. Next, toss in 1 cup of fresh spinach and stir until it wilts, which takes about 2 minutes. Lower the heat and pour in 1/2 cup of heavy cream, stirring well to combine. Now, return the cooked chicken to the skillet. Add the drained penne pasta and 1/2 cup of grated parmesan cheese. Toss everything together so the pasta gets coated in the creamy sauce. Taste your dish and adjust the seasoning with more salt and pepper if needed. Finally, remove the skillet from heat and garnish with fresh basil before serving. Enjoy your Tuscan Chicken Pasta! To cook chicken well, use fresh, boneless pieces. Cut them into small cubes. This helps them cook faster and more evenly. Heat olive oil in a skillet over medium heat. Add chicken and season with salt, pepper, and oregano. Cook for about 5-7 minutes. Look for a golden color. Make sure the chicken is cooked through. A meat thermometer should read 165°F. This ensures it's safe to eat. For a creamy sauce, start with heavy cream. Pour it in after cooking the garlic and tomatoes. Keep the heat low to avoid boiling. Stir well to mix it with the veggies. The sauce should be silky and smooth. If it feels too thick, add a little pasta water. This helps loosen it up without losing flavor. To boost flavor, use fresh herbs like basil. Add them just before serving for a burst of freshness. You can also mix in red pepper flakes for heat. Taste the sauce as you go. Adjust with extra salt and pepper if needed. For an even richer taste, add more parmesan cheese. This makes the dish even more indulgent and creamy. Pro Tips Perfect Pasta: Make sure to cook the penne pasta until al dente for the best texture and to prevent it from becoming mushy when mixed with the sauce. Chicken Browning: For a nice golden color and flavor, ensure the chicken is dry before adding it to the skillet. This will help achieve a good sear. Fresh Ingredients: Using fresh spinach and cherry tomatoes will enhance the flavor and nutrients of the dish. Opt for organic if possible. Adjust Creaminess: If you prefer a lighter sauce, you can substitute half of the heavy cream with chicken broth or milk for a less rich flavor. {{image_2}} You can easily make a tasty vegetarian version of Tuscan chicken pasta. Simply replace the chicken with hearty mushrooms or chickpeas. Both options add great texture and taste. Use plant-based cream or cashew cream instead of heavy cream. This swap keeps your dish creamy and rich but makes it vegan-friendly. You can also add some protein with tofu or tempeh. If you need a gluten-free option, swap the penne pasta for gluten-free pasta. Many brands offer great alternatives made from rice or chickpeas. They cook similarly and taste just as good. Check the package for cooking times. For the sauce, ensure your cream is gluten-free, and you are ready to enjoy this meal without worry. Want to boost nutrition? Add more vegetables to your dish! Spinach is great, but you can also use bell peppers, zucchini, or broccoli. They add color and crunch. If you like more protein, consider adding shrimp or sausage. Cook them with the chicken for a flavor-packed meal. Mix it all together for a delicious, hearty dinner. To keep your Tuscan Chicken Pasta fresh, store it in an airtight container. Let the pasta cool down first. This helps avoid steam buildup, which can make it soggy. Place the container in the fridge. It’s best to eat the leftovers within three days for the best taste. When you're ready to enjoy your leftovers, reheat them on the stove. Add a splash of water or broth to keep it moist. Heat over medium-low heat. Stir often until hot. You can also use a microwave. Cover the dish and heat in short bursts. Stir between each burst to ensure even warming. You can freeze Tuscan Chicken Pasta for up to three months. Use a freezer-safe container and leave some space at the top. The pasta may change texture after freezing but will still taste great. To thaw, move it to the fridge overnight. Reheat as mentioned before when you're ready to eat. You can use half-and-half or whole milk. Both give a creamy texture. For a dairy-free option, try coconut milk or cashew cream. These will change the taste a bit, but they still work well. Adjust the seasoning to balance the flavors. Yes, you can use frozen chicken. Just ensure to fully thaw it before cooking. If you cook it from frozen, the chicken may not brown nicely. This can affect the taste. Thawing helps to keep it juicy and flavorful. To spice things up, add red pepper flakes. Start with a pinch and adjust to your taste. You can also use spicy sausage instead of chicken. Another option is to add fresh jalapeños for a kick. These add heat without losing flavor. This blog covered how to make a tasty pasta dish. You learned about key ingredients and swaps. Cooking tips helped you get perfect chicken and creamy sauce. We explored variations like vegetarian options and gluten-free swaps. Proper storage info makes leftovers easy to handle. In conclusion, enjoy creating this meal your way. Experiment, adjust flavors, and share it with friends. Happy cooking!
Tuscan Chicken Pasta Flavorful Dinner Delight
Looking for a hearty meal that brings the taste of Italy to your table? Tuscan Chicken Pasta is a flavorful dinner delight that combines tender
To make a great pizza grilled cheese, you need a few key items: - 4 slices of sourdough bread - 4 tablespoons marinara sauce - 1 cup shredded mozzarella cheese - 1/2 cup pepperoni slices (or any toppings you like) - 1 teaspoon Italian seasoning - 2 tablespoons unsalted butter These ingredients blend well to create a tasty meal. Sourdough bread offers a nice crunch. The marinara sauce adds flavor and moisture. Mozzarella cheese melts beautifully, holding everything together. You can make your pizza grilled cheese unique by adding toppings. Here are some ideas: - Bell peppers - Mushrooms - Onions - Olives - Spinach Feel free to mix and match your favorite toppings. This way, you can cater to your taste. For a spicy kick, add jalapeños or spicy sausage. While mozzarella is classic, other cheeses can work too. Here are some good choices: - Provolone - Cheddar - Gouda - Fontina Each cheese brings its own flavor. Mixing cheeses can create a rich taste. Try different combinations to find your favorite blend. {{ingredient_image_1}} Start by gathering your sourdough bread. You will need four slices. Spread one tablespoon of marinara sauce on one side of each slice. Make sure the sauce covers the bread well. This adds flavor and helps with the cheese melting. Now, take two of the slices with sauce. On the sauce side, layer half a cup of shredded mozzarella cheese. Feel free to add your favorite toppings, like pepperoni, bell peppers, or mushrooms. Sprinkle some Italian seasoning over the toppings for a burst of flavor. Place the remaining slices of bread on top, sauce side down, to make two sandwiches. Heat a large skillet over medium heat. Melt one tablespoon of butter in the skillet. Place one sandwich in the skillet and cook until the bread turns golden brown and the cheese melts, about 3 to 4 minutes. Carefully flip the sandwich using a spatula. If you need, add the last tablespoon of butter to the skillet. Cook for another 3 to 4 minutes until golden brown. Remove from the skillet and repeat with the second sandwich. Cut both sandwiches diagonally and serve with extra marinara sauce for dipping. To get that gooey cheese, you need the right heat. Cook on medium heat, not high. This helps the cheese melt all the way through. I recommend using shredded mozzarella for its great stretch. Layer it thick; you want a cheesy bite in every slice. If you want more flavor, mix in other cheeses like cheddar or provolone. Sourdough is my favorite for this dish. It has a nice texture and flavor. Choose bread that is thick enough to hold the filling. You can also use whole grain or ciabatta if you like. Just make sure it’s fresh. The bread should crisp up nicely in the skillet. Italian seasoning is a great choice for this recipe. It adds a nice touch to your grilled cheese. For more flavor, try adding fresh basil or oregano. A sprinkle of garlic powder gives it a nice kick. Don't forget to season your toppings too, like pepperoni or veggies, to boost those flavors. Pro Tips Use Fresh Ingredients: Freshly shredded mozzarella and quality toppings can make a significant difference in flavor and texture. Control the Heat: Cooking on medium heat ensures that the bread browns evenly while allowing the cheese to melt without burning. Experiment with Toppings: Don't hesitate to try different toppings like veggies or different meats to customize your grilled cheese experience. Serve with Dipping Sauce: Pair your sandwich with extra marinara sauce or even ranch dressing for an extra flavor boost. {{image_2}} You can easily make a vegetarian pizza grilled cheese. Start by replacing pepperoni with veggies. I love using bell peppers, mushrooms, and spinach. These add great flavor and texture. You can also mix in some olives for a briny kick. Just layer them on the cheese before grilling. If you like heat, add some spice to your grilled cheese. Try using spicy pepperoni or hot Italian sausage. You can also sprinkle red pepper flakes on the cheese. For extra heat, add jalapeños or banana peppers. This gives your sandwich a nice, spicy kick that wakes up your taste buds. While marinara is classic, you can explore other sauces. Pesto adds a fresh flavor and bright green color. Alfredo sauce gives a creamy twist to the dish. BBQ sauce can make a sweet and smoky pizza grilled cheese. Feel free to experiment with any sauce you enjoy for a new flavor. To keep your Pizza Grilled Cheese fresh, let it cool first. Place the sandwiches in an airtight container. This helps keep the bread soft. You can store them in the fridge for up to three days. If you use a plate, cover it tightly with plastic wrap. This way, the sandwiches will not dry out. When you are ready to eat, reheat the sandwiches on the stove. Use a skillet over medium heat. Place the sandwich in the skillet without any oil. This keeps the bread crispy. Cook for about 3 minutes on each side. You can also use an air fryer. Set it to 350°F (180°C) for about 5 minutes. This method also works well. You can freeze Pizza Grilled Cheese for later use. Wrap each sandwich in plastic wrap tightly. Then, put them in a freezer bag. Remove as much air as possible to avoid freezer burn. They can last in the freezer for up to three months. When you want to eat them, let them thaw in the fridge overnight before reheating. Yes, you can make Pizza Grilled Cheese in the oven. Preheat your oven to 400°F (200°C). Prepare your sandwiches as usual. Place them on a baking sheet lined with parchment paper. Bake for about 10-12 minutes, flipping halfway through. This method gives you a nice crisp on both sides. Plus, it melts the cheese evenly. The best cheese for Pizza Grilled Cheese is mozzarella. It melts perfectly and has a mild flavor. You can also mix in provolone or cheddar for a richer taste. If you want a tangy kick, try adding some fontina or gouda. These cheeses pair well with marinara sauce and toppings. To make a healthier version, use whole grain bread instead of sourdough. Choose low-fat cheese or a vegan cheese option. Add more veggies like bell peppers, mushrooms, or spinach for extra nutrients. You can also reduce the butter or use a cooking spray to lower the fat. Enjoy a tasty dish that’s good for you! You learned how to make a tasty Pizza Grilled Cheese. We covered the best ingredients, like essential cheeses and fun toppings. You know the steps for preparing, assembling, and cooking. I shared tips for great melted cheese and the best bread choices. You also discovered delicious variations and smart storage tips. These simple ideas can help you create a meal that suits your taste. Enjoy making this dish your own!
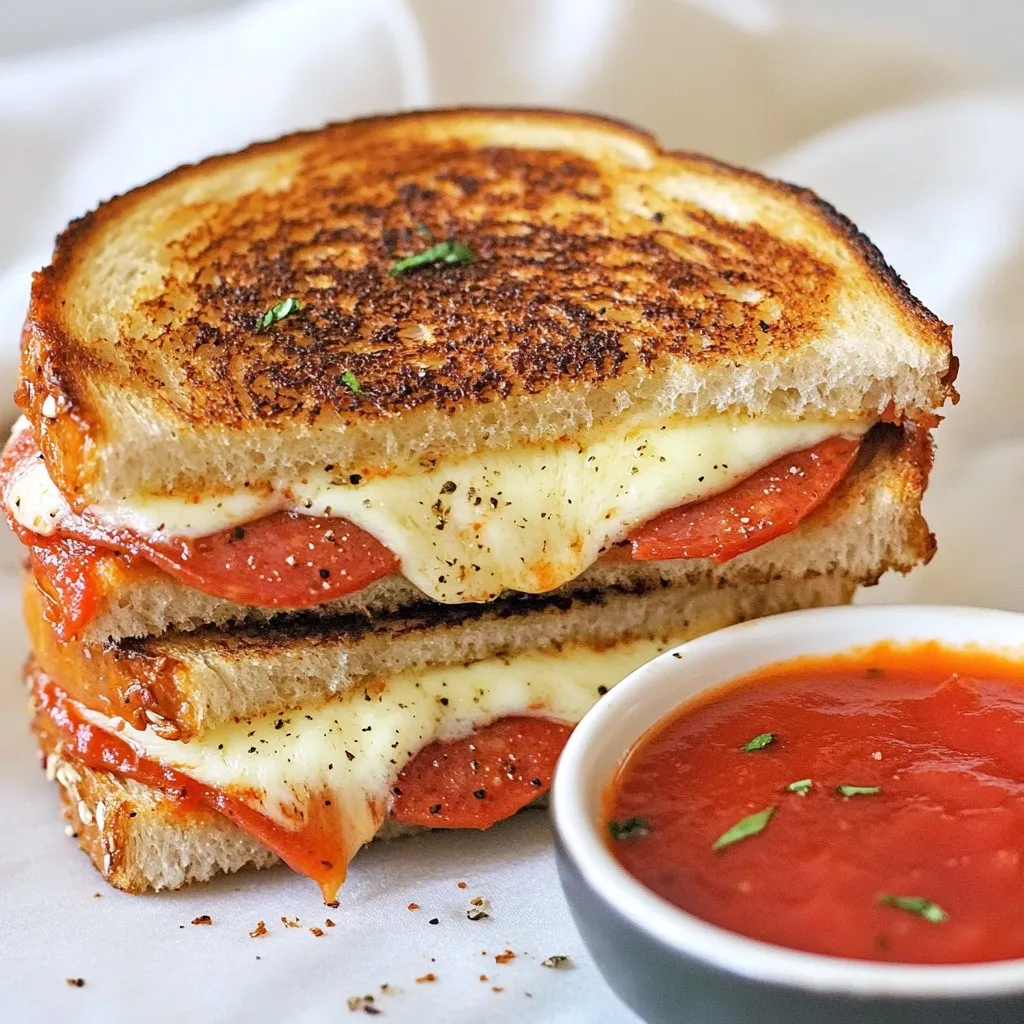
Pizza Grilled Cheese Simple and Satisfying Dish
Are you craving a dish that combines the best of both worlds? Pizza Grilled Cheese is your answer! This simple, fun meal is sure to
For the One-Pan Harvest Chicken & Veggie Bake, you will need: - 4 boneless, skinless chicken thighs - 2 cups Brussels sprouts, halved - 1 cup butternut squash, diced - 1 red onion, cut into wedges - 2 apples, cored and sliced - 3 cloves garlic, minced - 2 tablespoons olive oil - 1 teaspoon dried thyme - 1 teaspoon dried rosemary - 1/2 teaspoon smoked paprika - Salt and pepper to taste - Fresh parsley for garnish (optional) Each ingredient plays a key role in flavor and texture. The chicken thighs bring protein and richness. The Brussels sprouts and butternut squash add crunch and sweetness. Apples lend a fruity touch, while garlic and herbs infuse the dish with aroma. Two tablespoons of olive oil help everything cook evenly. Remember to season with salt and pepper to enhance all the flavors. I recommend using fresh ingredients for the best taste. Fresh Brussels sprouts and butternut squash have a vibrant flavor. Apples should be crisp for the right texture. If you use frozen vegetables, the bake may turn out soggier. Frozen items can lose their crunch and flavor during cooking. For this dish, fresh ingredients truly shine and make a huge difference in the final result. Start by preheating your oven to 400°F (200°C). This step is key. A hot oven ensures the chicken cooks well and the veggies get crispy. Set a timer for a few minutes. You want it hot when you add the food. Grab a large mixing bowl. Add 2 cups of halved Brussels sprouts, 1 cup of diced butternut squash, 1 red onion cut into wedges, and 2 sliced apples. These ingredients add color and flavor. Next, add 3 cloves of minced garlic, 2 tablespoons of olive oil, 1 teaspoon of thyme, 1 teaspoon of rosemary, and 1/2 teaspoon of smoked paprika. Sprinkle in salt and pepper to taste. Toss it all together. Make sure each piece is coated in oil and herbs. This step enhances taste and helps with cooking. Now, take your chicken thighs. You need 4 boneless, skinless ones. Season them with salt and pepper on both sides. This brings out the chicken's natural flavor. Make space in the center of your veggie mix on the baking sheet. Place the chicken thighs there. Nestling them among the veggies helps them soak up all the great flavors. Now, your dish is ready to bake! To achieve juicy chicken, use boneless, skinless thighs. They cook evenly and stay moist. Season the chicken with salt and pepper before baking. Place the chicken in the center of the veggies. This helps it cook in the steam from the vegetables. Bake until the internal temperature reaches 165°F. This ensures safe eating and great flavor. For tender veggies, cut them into similar sizes. This helps them cook evenly. Brussels sprouts and butternut squash should be halved and diced, respectively. Toss them well with oil and herbs. This adds flavor and helps with browning. Bake until they are soft and caramelized. This brings out their natural sweetness. For a rustic look, serve directly from the baking sheet. This creates a homey feel. Garnish with fresh parsley to add a pop of color. You can also drizzle a little extra olive oil on top before serving. Pair this dish with crusty bread or a simple salad for a complete meal. {{image_2}} You can switch up the veggies in this dish. If you don’t have Brussels sprouts, try green beans or broccoli. Carrots add a nice touch, too. Butternut squash works well, but sweet potatoes can be a great swap. Choose your favorites for a personal twist! While chicken thighs shine in this recipe, you can use other proteins. Try chicken breasts if you prefer leaner meat. Turkey thighs are another tasty option. For a seafood twist, salmon fillets work great. Just adjust the cooking time to ensure everything cooks evenly. To make this dish vegetarian, skip the chicken. Add more hearty veggies like mushrooms and zucchini instead. Chickpeas or lentils can add protein and texture. You can also toss in some quinoa for a filling meal. Enjoy all the flavors while keeping it plant-based! To store leftovers, let the dish cool first. Place the chicken and veggies in an airtight container. Keep it in the fridge for up to three days. Make sure it’s sealed well to avoid drying out. Label the container with the date to track freshness. When you are ready to eat, reheat the leftovers. You can use the oven or microwave. For the oven, preheat it to 350°F (175°C). Place the dish on a baking sheet and cover it with foil. Heat it for about 20 minutes or until warm. If you use a microwave, heat in short bursts. Stir in between to ensure even heating. If you want to freeze the dish, it’s best to do it right away. Store the cooled chicken and veggies in a freezer-safe container. You can also use freezer bags for easy storage. This can last for up to three months in the freezer. When ready to eat, thaw it overnight in the fridge. Reheat as instructed above. You can tell when the chicken is done by checking its internal temperature. Use a meat thermometer to ensure it reaches 165°F (75°C). The meat should look white, not pink. If you cut into the chicken and the juices run clear, then it's ready to eat. This step is key for food safety. Yes, you can prepare this dish ahead of time. Chop the veggies and season the chicken. Store them in the fridge for up to 24 hours. When ready to cook, just spread the veggies on the baking sheet, add the chicken, and bake. This saves you time on busy days. This dish pairs well with many sides. You can serve it with rice or quinoa for a hearty meal. A simple green salad also works great to add freshness. If you want to keep it rustic, enjoy it with crusty bread to soak up the juices. In this post, we covered how to make a delicious One-Pan Harvest Chicken & Veggie Bake. We looked at the right ingredients and measurements, and discussed fresh versus frozen options. You learned key steps like preheating the oven and cooking the chicken perfectly. We also shared tips for tender veggies and serving ideas. Don’t forget about variations, storage, and reheating. This dish is simple and fun to make, making it perfect for any meal. Enjoy your cooking and the tasty results!
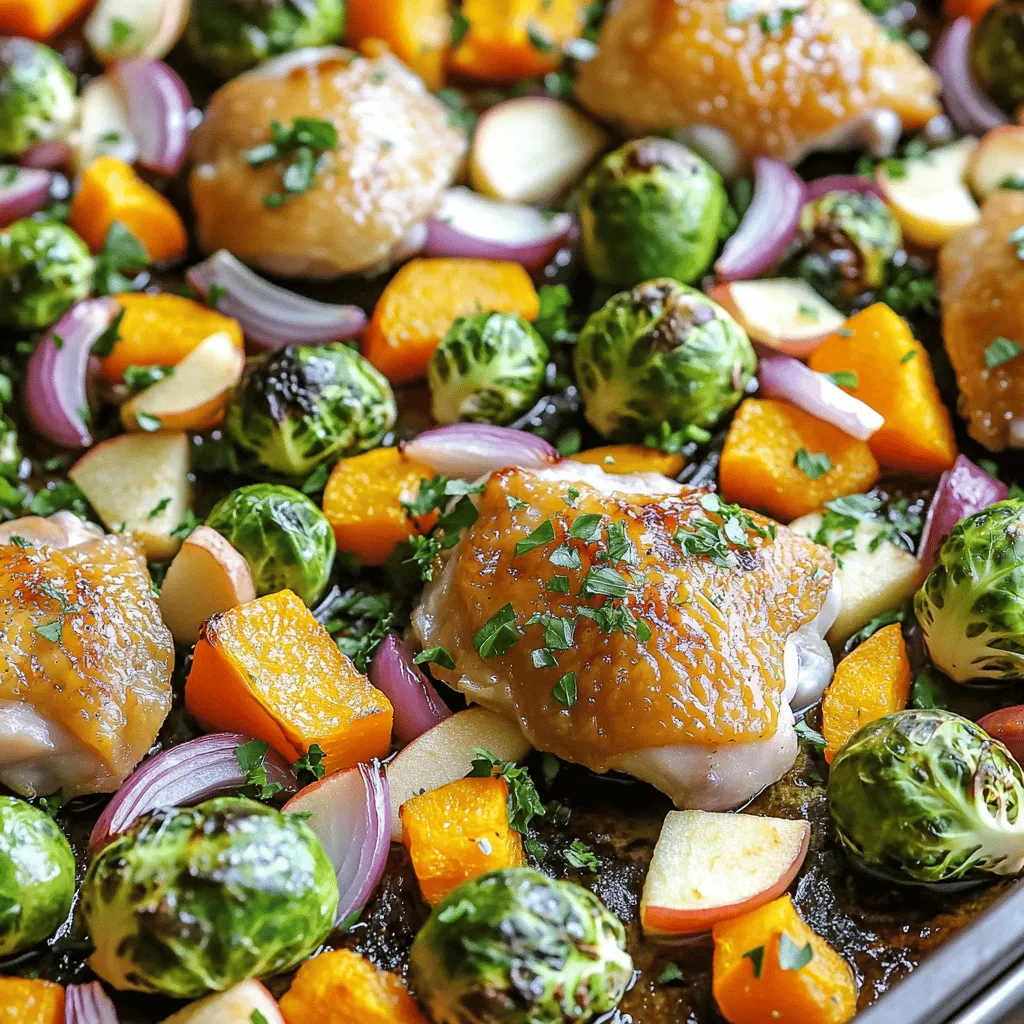
One-Pan Harvest Chicken & Veggie Bake Delight
Are you ready to savor the season with a tasty One-Pan Harvest Chicken & Veggie Bake? This simple recipe brings warmth and flavor to your
- 2 cups mushrooms, sliced (preferably a mix of cremini and shiitake) - 1 medium onion, diced - 2 cloves garlic, minced - 1 cup carrots, diced - 1 cup celery, diced - 1 cup frozen peas - 3 tablespoons unsalted butter - 3 tablespoons all-purpose flour - 2 cups vegetable broth - 1 cup heavy cream (or coconut cream for a dairy-free option) - 1 teaspoon thyme - Salt and pepper to taste - 1 sheet puff pastry, thawed - 1 egg (for egg wash) First, always clean your mushrooms gently with a damp cloth. This helps keep them fresh. Next, chop the onion, garlic, carrots, and celery into small pieces. This allows them to cook evenly. For the garlic, press it with a knife before mincing. This releases more flavor. When dicing the carrots and celery, aim for uniform size. This ensures they soften at the same rate. It’s best to thaw the puff pastry in the fridge overnight. This keeps it easy to handle. If you need a dairy-free option, use coconut cream instead of heavy cream. For gluten-free, choose a gluten-free flour blend in place of all-purpose flour. You can also swap the puff pastry with a gluten-free crust. If you want a vegan version, replace the butter with olive oil and the egg with a flax egg. Feel free to mix in your favorite veggies, like spinach or bell peppers, to the filling. Start by gathering your ingredients. You will need: - 2 cups mushrooms, sliced (cremini and shiitake work best) - 1 medium onion, diced - 2 cloves garlic, minced - 1 cup carrots, diced - 1 cup celery, diced - 1 cup frozen peas - 3 tablespoons unsalted butter - 3 tablespoons all-purpose flour - 2 cups vegetable broth - 1 cup heavy cream (or use coconut cream for dairy-free) - 1 teaspoon thyme - Salt and pepper to taste - 1 sheet puff pastry, thawed - 1 egg (for egg wash) Preheat your oven to 400°F (200°C). This step ensures the pot pie cooks evenly and gets that golden crust. In a large skillet, melt the butter over medium heat. Add the diced onion, carrots, and celery. Sauté for about 5 minutes until softened. This builds the base flavor. Next, stir in the minced garlic and sliced mushrooms. Cook for another 5 minutes. The mushrooms will release moisture and brown nicely. Sprinkle the flour over the mixture. Stir well to combine, cooking for 2 more minutes to create a roux. This step thickens your filling. Gradually pour in the vegetable broth while stirring. Follow with the cream and allow the mix to simmer for 5 minutes until it thickens. Add the frozen peas, thyme, salt, and pepper. Mix well and remove from heat. Let it cool slightly before you add it to your pie. Roll out the puff pastry on a floured surface. Cut it to fit over your pie dish. Spoon the mushroom filling into the dish. Cover it with the puff pastry and seal the edges. Cut small vents in the top for steam to escape. Brush the pastry with beaten egg for a golden finish. Bake in the preheated oven for 25-30 minutes. Keep an eye on it. You want the pastry to be puffed and golden brown. Remove it from the oven and let it cool for a few minutes before serving to avoid burns. Serve it in individual bowls, and garnish with fresh thyme for a beautiful touch. Enjoy your Butter Mushroom Pot Pie! To make a great filling, use fresh mushrooms. I like cremini and shiitake. Slice them thinly for even cooking. Start by sautéing onions, carrots, and celery in butter. This gives the filling a rich base. Cook these until they soften, about five minutes. Next, add garlic and mushrooms. Cook until mushrooms brown and moisture leaves, about five more minutes. Sprinkle flour over the mix and stir well. This thickens the filling. Gradually add vegetable broth and cream. Let the mix simmer until it thickens, about five minutes. Don't forget to add peas, thyme, salt, and pepper for flavor. Allow it to cool slightly before using. For a golden puff pastry, start with a thawed sheet. Roll it out on a floured surface to fit your dish. Cut small vents on top to let steam escape. This helps the pastry rise and stay flaky. Brush the pastry with a beaten egg. This gives a shiny, golden finish when baked. Bake at 400°F (200°C) for 25-30 minutes. Keep an eye on it to avoid burning. Avoid using old or soggy mushrooms, as they can ruin the taste. Don't skip the cooling step for the filling. If it's too hot, the pastry will become soggy. Make sure to seal the edges of the pastry well. If not sealed, the filling can leak out. Lastly, remember to keep an eye on bake time. Overbaking can lead to a dry pot pie. {{image_2}} You can easily make this pot pie fully vegetarian. Instead of using heavy cream, use coconut cream or a mix of cashew cream and vegetable broth. These options keep your filling rich and creamy. You can also add more veggies like bell peppers or zucchini for extra flavor and texture. Using different mushrooms can change the taste of your pot pie. Cremini and shiitake mushrooms work well together, but try adding portobello or oyster mushrooms for a unique twist. Each type brings its own flavor. Mix and match to find your favorite combo. If you need a gluten-free version, swap out the all-purpose flour for a gluten-free blend. You can also use a gluten-free puff pastry. Many stores sell frozen options that work great. Always check the labels to make sure they fit your needs. Store any leftover Butter Mushroom Pot Pie in an airtight container. Place it in the fridge. It will stay fresh for about 3 to 4 days. For best taste, let it cool before sealing. Avoid leaving it out at room temperature. This helps keep the filling creamy and tasty. When you are ready to enjoy your leftovers, reheat the pot pie in the oven. Preheat your oven to 350°F (175°C). Cover the pie with foil to keep it from browning too much. Heat for about 15 to 20 minutes. Check if it is hot all the way through. If you want a crispier crust, remove the foil for the last 5 minutes. To freeze the pot pie, let it cool completely. Wrap it well in plastic wrap. Then, place it in a freezer-safe bag or container. It can last up to 2 months in the freezer. When you are ready to eat, thaw it overnight in the fridge. Reheat it as mentioned above for the best taste. This way, you can enjoy this savory delight anytime! To make Butter Mushroom Pot Pie dairy-free, you can swap heavy cream for coconut cream. Coconut cream gives a creamy texture without dairy. Use a plant-based butter instead of unsalted butter. This keeps the rich flavor while making it suitable for dairy-free diets. Yes, you can use different types of pastry for your pot pie. Puff pastry works well for its flaky texture. You can also try pie crust or biscuit dough for a different bite. If you want to be unique, use phyllo dough for a lighter, crispier top. Several sides go great with Butter Mushroom Pot Pie. A fresh green salad adds a nice crunch. Roasted veggies can bring extra flavor to your meal. You could also serve it with mashed potatoes for a comforting touch. In this article, we explored the key ingredients and tips for making a Butter Mushroom Pot Pie. You learned about ingredient prep, cooking methods, and common mistakes to avoid. We also discussed tasty variations and how to store leftovers or freeze for later. Cooking can be fun and rewarding. With these tips, I believe you will create a delightful dish that everyone will love. Enjoy your cooking journey!
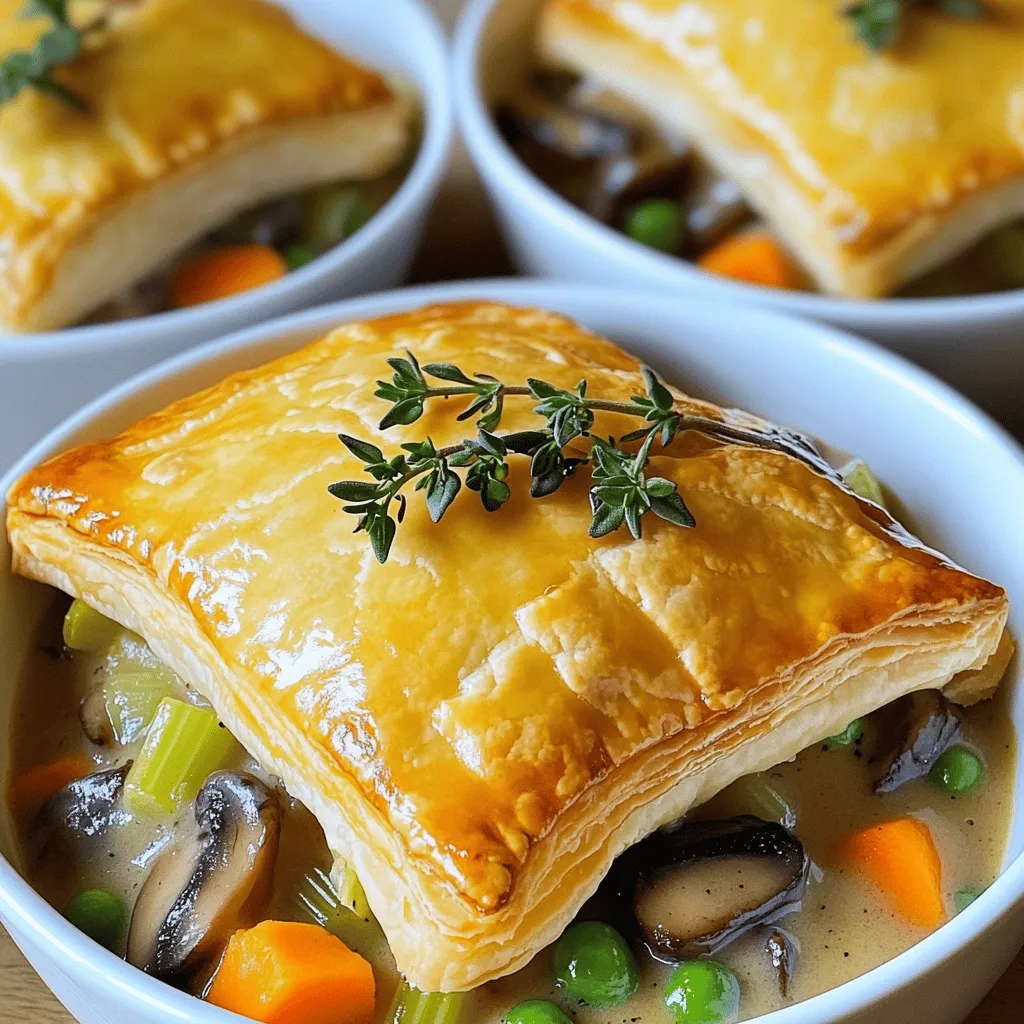
Butter Mushroom Pot Pie Savory Comfort Food Delight
Craving something warm and hearty? You’re in the right place! My Butter Mushroom Pot Pie is a savory hug in a dish, perfect for any