Desserts
![Summer desserts should be bright and refreshing. Here are some must-have ingredients: - Fresh fruits (like strawberries, lemons, and raspberries) - Natural sweeteners (such as honey and agave syrup) - Dairy options (like coconut milk and buttermilk) - Herbs (like basil and mint for extra flavor) - Light and airy elements (think whipped cream or meringue) These ingredients help create sweet treats that are perfect for warm days. When making summer desserts, you can use either fresh or frozen fruits. Fresh fruits taste great and add a vibrant look. They give a juicy burst in every bite. Frozen fruits are easy to store and often cheaper. They work well in smoothies and popsicles. Just remember, thaw them before use to avoid excess water. Using fresh ingredients often gives the best taste and texture. But don’t shy away from frozen options. They can save time and still taste good. Many ingredients can be swapped in dessert recipes. Here are some common substitutes: - Sugar: Use honey or maple syrup for a natural sweetness. - Butter: Swap with coconut oil for a dairy-free option. - Flour: Almond flour or oat flour can be great gluten-free choices. - Dairy: Use almond milk or coconut cream for a vegan alternative. These swaps help you cater to different diets while keeping desserts delicious. To make the Chilled Lemon Basil Sorbet, for example, you can easily replace sugar with honey. This change adds a unique flavor twist. Explore and enjoy making your summer desserts! To make Chilled Lemon Basil Sorbet, start by mixing water, sugar, and lemon zest in a saucepan. Heat it gently until the sugar dissolves. Let it cool, then stir in lemon juice and basil. Pour into a shallow dish and freeze. Every 30 minutes, stir with a fork until fluffy. This process takes about 3-4 hours. For Strawberry Coconut Popsicles, blend hulled strawberries with honey and vanilla. Then, blend coconut milk until creamy. Layer the mixtures in popsicle molds. Freeze for at least 4 hours. Run warm water over the molds to release the popsicles. To bake Raspberry Lemonade Cupcakes, preheat your oven to 350°F. Whisk flour, sugar, baking powder, and salt in one bowl. In another bowl, cream butter and mix in eggs, buttermilk, lemon zest, and juice. Combine wet and dry mixes, folding in raspberries. Bake for 18-20 minutes. Baking during summer needs some care. Use lighter pans to avoid overheating. Avoiding dark pans helps prevent burning, especially with delicate recipes. Always preheat your oven for even baking. This ensures your cupcakes rise nicely. If you want to add a twist, try infusing flavors. Mix in herbs or spices to your batter. This small change can make a big impact, giving your dessert a unique twist. Cooling desserts is key for summer treats. For sorbets, break up ice crystals while freezing. This ensures a light, fluffy texture. You can use a shallow dish for faster freezing, too. For cupcakes, let them cool in the tray for a few minutes. Then, transfer them to a wire rack. This prevents sogginess. For popsicles, warm water makes it easy to remove them. Enjoy them right away or store them back in the freezer for later. These methods help create perfect, refreshing desserts for your summer picnic. Don't forget to check out the Full Recipe for more details! To make your picnic dessert a hit, opt for treats that are easy to eat. Finger foods like cupcakes or popsicles are great. Choose desserts that do not melt quickly. Chilled Lemon Basil Sorbet is a refreshing choice. Make sure your desserts are not too sweet. Balance is key for hot summer days. Keeping your desserts fresh can be tricky. Use an insulated cooler to store your treats. Ice packs will help keep everything cool. For items like Raspberry Lemonade Cupcakes, avoid direct sunlight. Cover them with a clean cloth or lid. This helps prevent drying out. If you use fruit, rinse and dry it well before packing. A beautiful spread makes your picnic fun. Use colorful napkins and plates to brighten things up. Arrange desserts in a way that is pleasing to the eye. Layer your Strawberry Coconut Popsicles in a cooler for a fun display. Garnish treats like the Chilled Lemon Basil Sorbet with fresh basil leaves. Simple touches can make your picnic feel special. {{image_2}} Fruit-based desserts shine in summer. They are fresh, colorful, and full of flavor. You can use seasonal fruits like berries, peaches, and melons. Here are some ideas: - Fruit Salad: Mix your favorite fruits. Try berries, kiwi, and watermelon for a bright dish. - Berry Parfaits: Layer yogurt, granola, and berries in cups. They look great and taste amazing! - Fruit Tarts: Use a simple tart crust. Fill it with cream cheese or custard, then top with fresh fruit. No-bake desserts are perfect for summer. They save time and keep your kitchen cool. Here are a few easy options: - Chilled Lemon Basil Sorbet: This refreshing sorbet uses lemon and basil for a unique twist. You combine water, sugar, lemon juice, and basil. Freeze it for a simple summer treat. [Full Recipe] - Strawberry Coconut Popsicles: Blend strawberries, coconut milk, and honey. Pour into molds and freeze. They are fruity and creamy. - Chocolate Mousse: Whip cream and mix it with melted chocolate. Chill until set. Serve in cups for a rich dessert. Many people look for gluten-free and vegan options today. These desserts can still be tasty and fun. - Gluten-Free Brownies: Use almond flour or a gluten-free blend. They can be fudgy and delicious! - Vegan Banana Bread: Swap eggs for flaxseeds and use plant milk. It’s moist and perfect for any picnic. - Chia Seed Pudding: Mix chia seeds with almond milk and sweetener. Let it sit overnight. Top with fresh fruit in the morning. These variations ensure everyone at your picnic can enjoy a treat! Storing desserts is key for keeping them fresh and tasty. For most desserts, wrap them well. Use plastic wrap or foil to cover them tightly. This method helps keep moisture in. If you make cupcakes, store them in an airtight container. For cakes, consider slicing them and storing in layers with parchment paper in between. This way, they won’t stick. You can store many desserts in the fridge. Just remember to let them cool first. Transporting desserts on a hot day can be tricky. Always use ice packs to keep things cool. Place your desserts in a cooler with ice packs around them. If you are taking cupcakes or fragile desserts, use a sturdy box. It helps prevent them from tipping over. Try to keep the cooler in the shade. Avoid leaving it in direct sunlight. If you can, serve desserts right after you arrive. This keeps them fresh and tasty. Choosing the right containers makes a big difference. For cakes, a cake carrier works well. It protects the top and keeps the cake fresh. For cupcakes, use a cupcake carrier. These containers have special holders to keep each cupcake safe. For cookies or bars, a flat, airtight container is best. Make sure it seals tightly to keep the treats fresh. Clear containers let you see what’s inside, making it easy to grab your favorites. Don’t forget to check the [Full Recipe] for delicious dessert options to try at your next picnic! Desserts that are sturdy and not too delicate work best for picnics. Here are some great options: - Brownies - Cookies - Bars - Cupcakes - Fruit-based desserts like tarts These desserts stay fresh and are easy to serve. For instance, brownies do not crumble easily. Cookies are portable and can be stacked. Cupcakes can be topped with frosting and still hold their shape. Yes, many desserts can be made ahead of time. This makes planning your picnic easier. For example, brownies and cookies can be baked a day or two before. Just store them in a sealed container. Cupcakes can also be baked in advance. Frost them on the day of the picnic to keep them fresh. You can even freeze some desserts. This is great for pies or bars. Just thaw them in the fridge the night before. To help your desserts last longer, follow these tips: - Store desserts in airtight containers. - Keep them in a cool place. - Use fresh ingredients when possible. If you are making chilled desserts, like the Chilled Lemon Basil Sorbet, keep them in the freezer until you are ready to serve. This will prevent them from melting. Always check for signs of spoilage before serving. For a delicious treat, try making the Chilled Lemon Basil Sorbet. It’s refreshing and perfect for summer. For the full recipe, click here. In this blog post, we explored essential ingredients for summer desserts, from fresh fruits to common substitutes. I shared step-by-step methods for preparing treats, baking techniques, and cooling options. We discussed best practices for serving desserts outdoors and tips for keeping them fresh. You also learned about fruit-based, no-bake, and dietary-specific options. Finally, we covered proper storage and transport details. Great desserts can make your picnic fun. With the right ingredients and tips, you can impress everyone!](https://stirredrecipes.com/wp-content/uploads/2025/06/e9a10524-31b2-4094-b01d-2c4922f6c259.webp)
38 Desserts Perfect for a Summer Picnic Treat
Get ready to wow your friends at your next summer picnic with delicious desserts! I’ll share 38 easy and tasty treats perfect for sunny days.
![- 6 ripe peaches, pitted and sliced - 1 tablespoon lemon juice Choosing ripe peaches is key for great flavor. Look for peaches that feel firm but yield slightly when you press them. The skin should have a nice golden hue. The lemon juice adds a bright taste and helps keep the peaches fresh. - 1/4 cup granulated sugar - 1 teaspoon vanilla extract - 1 teaspoon cinnamon The sugar sweetens the peaches well. You can adjust it based on how sweet your peaches are. Vanilla adds warmth, while cinnamon gives a cozy spice that makes the crumble special. - 1 cup rolled oats - 1/2 cup all-purpose flour - 1/2 cup packed brown sugar - 1/4 teaspoon salt - 1/2 teaspoon nutmeg - 1/2 cup unsalted butter, melted For the topping, rolled oats provide great texture and crunch. All-purpose flour binds the mix. The brown sugar adds a deeper sweetness. Salt balances the flavors, while nutmeg gives a warm kick. Melted butter brings everything together, making it crumbly and rich. You can find the full recipe to guide you through making this simple and delicious delight. - Start by washing 6 ripe peaches. - Cut the peaches in half and remove the pits. - Slice the peaches into thin pieces. - In a large bowl, mix the sliced peaches with: - 1/4 cup granulated sugar - 1 tablespoon lemon juice - 1 teaspoon vanilla extract - 1 teaspoon cinnamon - Toss everything gently until the peaches are well coated. - Pour this peach mixture into a greased 9x9 inch baking dish. - In another bowl, mix together: - 1 cup rolled oats - 1/2 cup all-purpose flour - 1/2 cup packed brown sugar - 1/4 teaspoon salt - 1/2 teaspoon nutmeg - Pour in 1/2 cup melted unsalted butter. - Stir until the mixture is crumbly. - Preheat your oven to 350°F (175°C). - Sprinkle the crumble topping evenly over the peach filling. - Bake in the oven for 35-40 minutes. - Look for a golden brown topping and bubbling peaches. - Let the crumble cool for about 10 minutes before serving. Enjoy your peach crumble warm, maybe with a scoop of vanilla ice cream on top! For the full recipe, check out the complete instructions. To make a great peach crumble, start with ripe peaches. Look for peaches that have a slight give when you press them. Their skin should be smooth and fragrant. If the peaches are not ripe, your crumble may taste bland. If your peaches are very sweet, use less sugar. If they are tart, don’t be shy with the sugar. This balance makes each bite delicious. The ideal crumble topping should be both crunchy and crumbly. You want it to hold together yet break apart easily. Mix the oats, flour, and sugar well. Then, add melted butter until it looks like coarse crumbs. If you want to save time, you can make this topping a day ahead. Just store it in the fridge until you are ready to bake. Serve your peach crumble warm for the best taste. A scoop of vanilla ice cream on top makes it even better. You can also try whipped cream for a lighter option. For a nice touch, garnish your dish with fresh mint leaves. This adds color and a hint of freshness. Enjoy the flavors and textures together for a delightful dessert experience! {{image_2}} You can easily swap peaches for other fruits. Try using apples, berries, or cherries. Each fruit adds its own flavor. You can also mix fruits! Combine peaches with blueberries for a fun twist. This creates a vibrant and tasty crumble. Want a gluten-free version? Use almond flour or oat flour instead of all-purpose flour. This makes the crumble just as tasty. For vegan options, replace the butter with coconut oil or vegan butter. You can also use coconut sugar or maple syrup for sweetness. Add nuts like walnuts or pecans for a crunch. Chocolate chips can also make it extra special. Don’t forget about spices! A pinch of ginger or cardamom can add warmth and depth. Experiment with what you love to make it your own. For the complete Peach Paradise Crumble recipe, check the [Full Recipe]. To store leftovers, place peach crumble in the fridge. Use an airtight container. This keeps it fresh and tasty. You can freeze peach crumble for later. Wrap it well in plastic wrap, then foil. This helps prevent freezer burn. For reheating, bake it at 350°F. Heat until warm and bubbly. Peach crumble lasts about 3-5 days in the fridge. If frozen, it can last up to 3 months. Enjoy your peach crumble at its best! For the full recipe, check out the Peach Paradise Crumble. You can try many fruits for your crumble. Here are some great options: - Apples - Pears - Berries (like blueberries or raspberries) - Cherries - Plums Mixing different fruits can add unique flavors. For example, a mix of apples and berries gives a tasty twist. Yes, you can prepare peach crumble ahead of time. Here are some tips: - Assemble the filling and topping in advance. - Cover and store them in the fridge for up to a day. - Bake just before serving to keep it fresh. This way, you save time and still enjoy a warm crumble. Check for these signs to know if your crumble is ready: - The topping should be golden brown. - The peaches should bubble around the edges. - A fork should easily pierce the fruit. These signs mean your crumble is perfect and ready to enjoy. Yes, you can use canned or frozen peaches. Here’s how: - If using canned peaches, drain and rinse them first. - For frozen peaches, thaw them and drain excess water. Both options work well in the recipe. Just adjust sugar based on their sweetness. For the full recipe, check out the Peach Paradise Crumble. You can enjoy making a delicious peach crumble with fresh ingredients and easy steps. By choosing the right peaches, sweetening them well, and preparing a crumbly topping, you create a tasty dessert. Always remember to adjust sweetness based on ripeness and explore variations with other fruits. Proper storage helps keep your crumble fresh. I hope these tips enhance your baking skills and inspire your creativity. Enjoy every bite!](https://stirredrecipes.com/wp-content/uploads/2025/06/9a371596-9c42-4ec5-903e-3f13455839b6.webp)
Peach Crumble Recipe Simple and Delicious Delight
Are you ready to indulge in a warm, fruity treat? Our Peach Crumble Recipe is simple yet bursting with flavor! Using just a few fresh
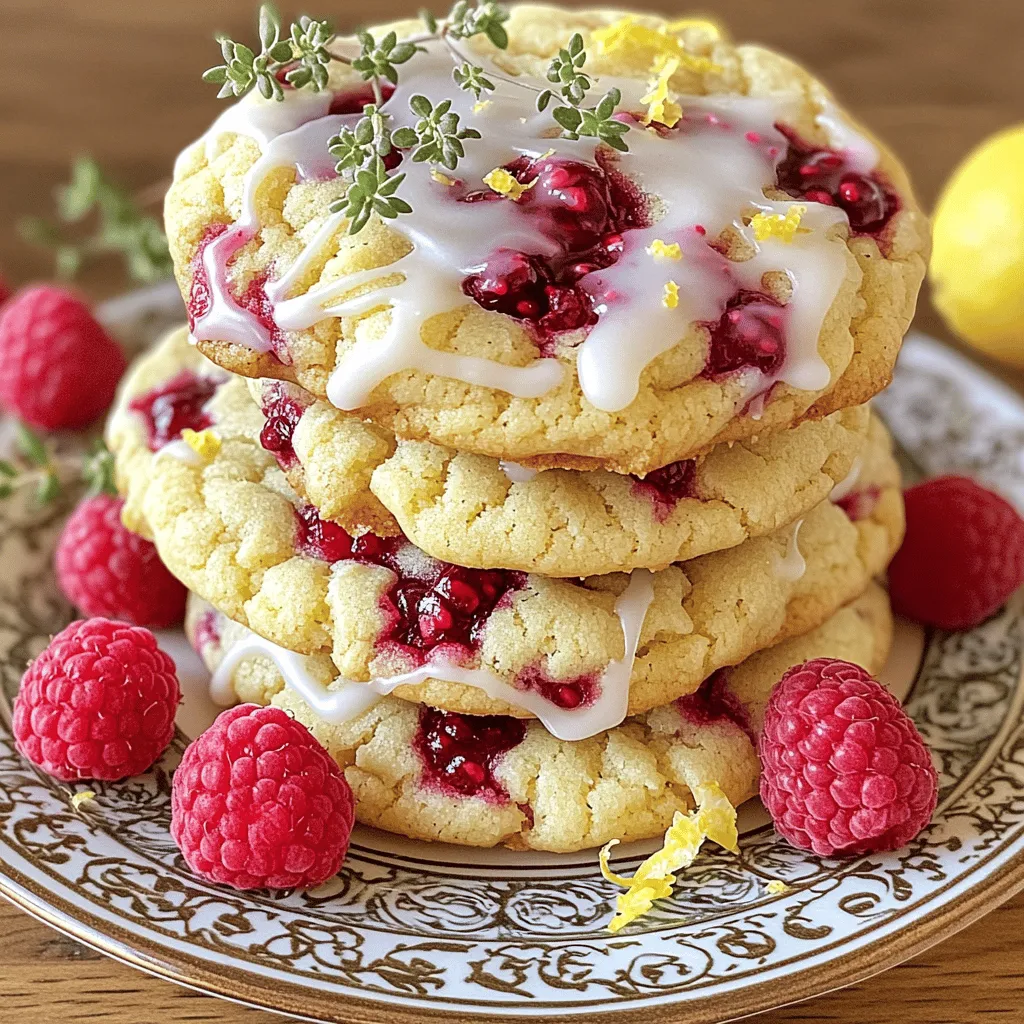
Raspberry Lemon Cookies Delightful and Easy Recipe
Are you ready to bake something delicious? These Raspberry Lemon Cookies are both easy and delightful! With a perfect blend of tart raspberries and zesty
![- 4 large ripe peaches, sliced - 2 cups fresh strawberries, hulled and halved - 1 tablespoon lemon juice Fresh fruits are key for this crisp. I love using sweet peaches and juicy strawberries. They blend well together, creating a nice balance of flavors. First, slice your peaches into thin wedges. Make sure they are ripe for the best taste. Next, hull and halve your strawberries. Toss the fruit in a bowl with lemon juice. This adds brightness and helps keep the fruit fresh. - 1 cup rolled oats - 1/2 cup all-purpose flour - 1/3 cup brown sugar, packed - 1 teaspoon cinnamon - 1/4 teaspoon salt - 1/2 cup unsalted butter, melted Now, let's talk about the topping. It gives the crisp its crunchy texture. Start with rolled oats; they add a hearty bite. Mix in the flour to help bind everything. Brown sugar adds sweetness and a deep flavor. A touch of cinnamon gives warmth to the dish. Don’t forget the salt; it enhances all the flavors. Finally, pour over melted butter. This helps create that golden, crispy top. - Vanilla ice cream (for serving) Serving this crisp warm is a must. The best part? A scoop of vanilla ice cream on top. The creaminess of the ice cream pairs perfectly with the warm, fruity filling. You get a mix of hot and cold that is simply delightful. If you want a fun twist, try a flavored ice cream, like peach or strawberry. It adds an extra layer of flavor that elevates the dish. For the full recipe, check out the link above. - Preheat the oven to 350°F (175°C). - In a large bowl, combine the sliced peaches and halved strawberries. Add 1/4 cup of granulated sugar and 1 tablespoon of lemon juice. Gently toss the fruit to coat it well. This step brings out the sweet juices and balances the flavors. Once mixed, transfer the fruit to a greased 9x13 inch baking dish. - In another bowl, mix 1 cup of rolled oats, 1/2 cup of all-purpose flour, 1/3 cup of brown sugar, 1 teaspoon of cinnamon, and 1/4 teaspoon of salt. Stir these dry ingredients well until they are combined. - Pour in 1/2 cup of melted butter. Mix until the topping is crumbly and well combined. This creates a crunchy texture that pairs perfectly with the soft fruit. - Evenly layer the fruit mixture in the baking dish. - Spread the crisp topping over the fruit mixture. Make sure to cover all the fruit for an even bake. - Bake in the preheated oven for 30-35 minutes. You will know it’s done when the top is golden brown and the fruit is bubbling. The smell will fill your kitchen, making it hard to wait! For the full recipe, check out the [Full Recipe]. To make the best Peach & Strawberry Crisp, you need ripe fruits. Look for peaches that are slightly soft when you press them. They should have a sweet scent. For strawberries, choose bright red ones. They should be firm but not hard. Avoid any that look dull or have dark spots. To enhance flavor, add a pinch of cinnamon or nutmeg to your fruit mix. These spices bring out the sweetness. You can also try a bit of ginger for an extra kick. A golden-brown topping makes your dessert look and taste great. To achieve this, use melted butter in your topping mix. It helps the oats brown nicely. Bake until you see a rich golden color. Let your crisp cool for about 10 minutes after baking. This cooling time helps the fruit set. It also makes it easier to serve. If you cut it too soon, it may fall apart. One common mistake is overmixing the topping. Mix just until combined. Overmixing can make it tough instead of crumbly. Another mistake is serving it right out of the oven. Let it cool first. This helps the flavors meld together. It also prevents burns when you take a bite. For the full recipe, follow the steps closely for the best results. {{image_2}} You can switch up the fruits in your crisp. Try using mixed berries like blueberries, blackberries, or raspberries. They add a fun burst of flavor. Apples are also a great choice, especially sweet ones like Honeycrisp or Fuji. Their crunch contrasts well with the soft peaches and strawberries. If you want to explore tropical flavors, consider using mango or pineapple. These fruits bring a sunny taste to your dish. Combining peaches with tropical fruits can make a unique summer treat. If you're looking for a lighter option, consider gluten-free substitutes. You can use almond flour or coconut flour instead of all-purpose flour. This gives your crisp a nutty flavor and works well for those with gluten sensitivities. You can also cut back on sugar. Use just half the amount or swap granulated sugar for honey or maple syrup. This keeps the sweetness while making it a bit healthier. For a vegan version, swap butter for coconut oil or vegan butter. You can replace granulated sugar with coconut sugar or agave syrup. These changes keep the taste but remove animal products. If you're on a low-carb diet, use a sugar substitute like erythritol. You can also skip the oats and use nuts for the topping. This will keep your crisp crunchy while fitting into keto guidelines. You can find the full recipe at the beginning of this article. To store leftovers, let the crisp cool at room temperature. Then, cover it tightly with plastic wrap or foil. You can also place it in an airtight container. Refrigeration is best for short-term storage, while freezing is great for longer periods. If you choose to freeze, use a freezer-safe container. This keeps the flavors fresh and avoids freezer burn. To reheat for freshness, the best method is to use the oven. Preheat your oven to 350°F (175°C). Place the crisp in an oven-safe dish and cover it with foil. Heat for about 15-20 minutes until warm. You can also use the microwave for quick reheating but may lose some crispness. For serving, warm slices with a scoop of vanilla ice cream on top. This adds a lovely creaminess and contrast to the warm fruit. In the fridge, Peach & Strawberry Crisp lasts about 3-5 days. If you freeze it, it can last up to 3 months. Just make sure to wrap it well to keep out air. When ready to eat, thaw it in the fridge overnight before reheating. Enjoy the taste of summer any time! You can tell your crisp is ready when the top is golden brown. Look for bubbling fruit around the edges. The smell will fill your kitchen with sweetness. It usually takes about 30 to 35 minutes in the oven. If you see these signs, your dessert is done! Yes, you can prep this recipe in advance. You can slice the peaches and strawberries a few hours before baking. Just keep them in the fridge to stay fresh. You can also mix the crisp topping ahead of time. Store it in the fridge until you are ready to bake. This way, you save time on busy days! Absolutely! You can use many fruits in this crisp. Try apples for a fall twist. Berries like blueberries and raspberries work well too. For a tropical flavor, add pineapple or mango. Just choose ripe fruits that you enjoy. Each fruit will give a unique taste to your crisp! This blog post covered a delicious peach and strawberry crisp. We detailed fresh ingredients and a simple, step-by-step process. You learned how to prepare the fruit and make a crunchy topping. We shared tips for fruit selection and avoiding common mistakes. Variations and storage tips help you enjoy this dessert for days. Try this recipe to impress friends and family. It’s easy, tasty, and adaptable. Enjoy creating your own unique twist on this dessert!](https://stirredrecipes.com/wp-content/uploads/2025/06/898d1d15-7acb-470a-a2f1-b935108a5595.webp)
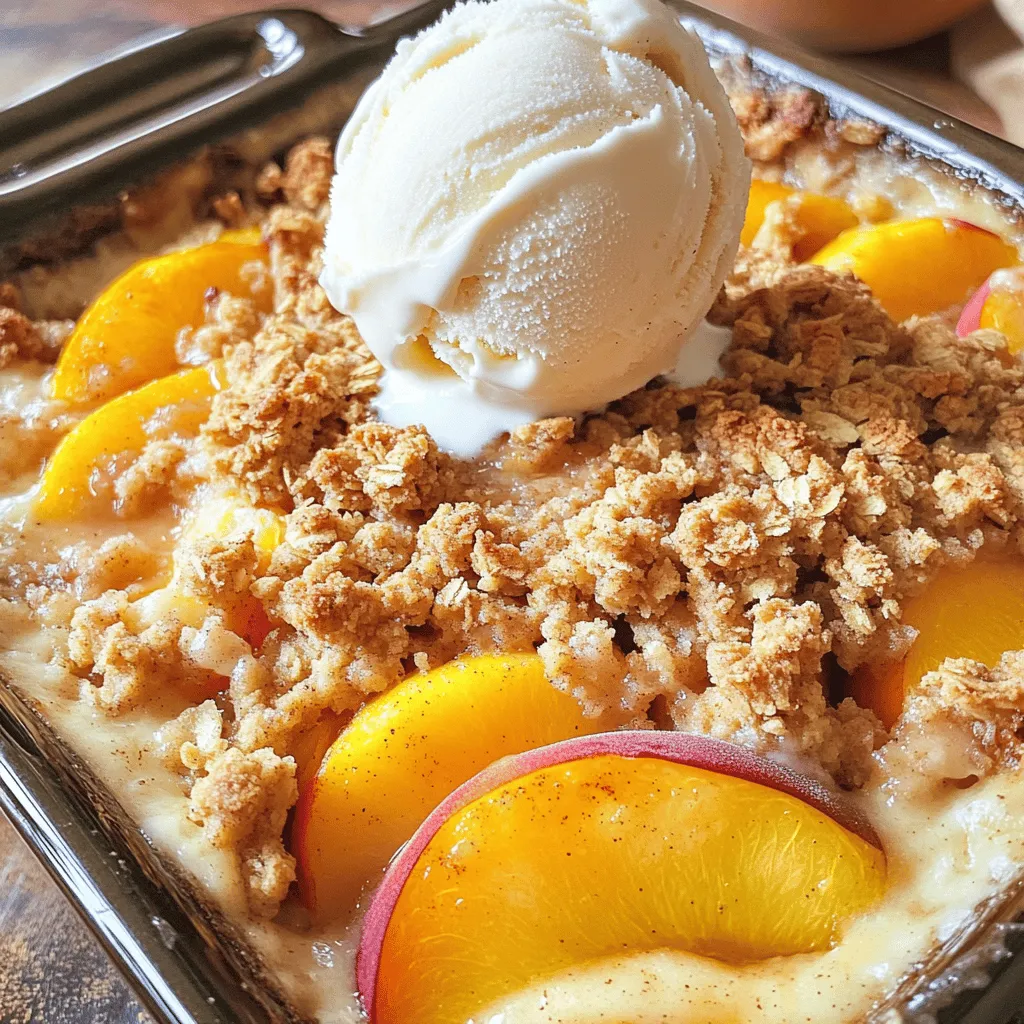
Peach & Strawberry Crisp Delectable Summer Dessert
Summer brings fresh fruit and sweet cravings. What better way to celebrate than with a Peach & Strawberry Crisp? This easy dessert combines juicy peaches
Peach Crumble Bliss Delightful Dessert Recipe
Are you ready to dive into a warm and fruity treat? My Peach Crumble Bliss dessert recipe is the perfect balance of sweet peaches and
![- 4 ripe peaches, peeled and sliced - 1 tablespoon lemon juice - 1 tablespoon honey or maple syrup Fresh peaches are key to this dish. Choose ripe peaches for the best flavor. Lemon juice adds a tangy kick. Use honey or maple syrup for sweetness without refined sugar. - 1 cup rolled oats - 1/2 cup almond flour or whole wheat flour - 1/4 cup chopped nuts (such as walnuts or pecans) Rolled oats give a nice crunch. Almond flour or whole wheat flour adds fiber. Chopped nuts add texture and flavor. Feel free to mix nuts you like best. - 1 teaspoon cinnamon - 1/4 teaspoon salt - 1 tablespoon ground flaxseed (optional) Cinnamon brings warmth and depth. A bit of salt enhances all the flavors. Ground flaxseed is optional but great for extra nutrients. You can also add shredded coconut for a tropical twist. For the full recipe, check [Full Recipe]. Enjoy making this healthy peach crisp! 1. Preheat the oven: Start by preheating your oven to 350°F (175°C). This step is key for even baking. 2. Prepare peaches with lemon juice and sweetener: In a mixing bowl, take 4 ripe peaches, peel and slice them. Add 1 tablespoon of lemon juice and 1 tablespoon of honey or maple syrup. Toss gently until the peaches are coated. Spread this peach mixture evenly in your greased 8-inch square baking dish. 1. Mix dry ingredients: In another bowl, combine 1 cup of rolled oats, 1/2 cup of almond flour (or whole wheat flour), 1/4 cup of chopped nuts, 1 teaspoon of cinnamon, and 1/4 teaspoon of salt. If you want a nutritional boost, add 1 tablespoon of ground flaxseed and 1/4 cup of unsweetened shredded coconut. 2. Combine with melted coconut oil: Pour 3 tablespoons of melted coconut oil over the dry mixture. Mix well until everything is crumbly. This topping gives your crisp a delicious crunch. 1. Assemble layers in the baking dish: Evenly distribute the oat topping over the peach layer in the baking dish. Make sure it covers all the peaches. 2. Bake details and tips: Place the dish in the oven and bake for 30-35 minutes. Look for a golden-brown topping and bubbling peaches. If the topping browns too quickly, cover it with foil. Allow it to cool for a few minutes before serving. Enjoy your healthy peach crisp! For the full recipe, check the detailed steps above. To make your peach crisp even healthier, consider lowering the sugar. You can cut back on honey or maple syrup. Try using just a teaspoon, or leave it out entirely. The natural sweetness from ripe peaches often meets our taste needs. You can also explore alternative flour options. Instead of almond flour, you might use whole wheat flour or oat flour. These options add fiber and nutrients. They can also improve the texture of your crisp. Spice variations can really elevate your dish. Besides cinnamon, try adding nutmeg or ginger for a warm kick. These spices add depth and can transform the flavor profile. Nut alternatives can also give your peach crisp a unique twist. Use pecans or hazelnuts instead of walnuts. Each nut brings its own flavor and crunch. You can also skip the nuts for a nut-free version. For serving, pair your peach crisp with yogurt or ice cream. Greek yogurt adds creaminess and protein. Vanilla ice cream provides a sweet contrast to the tart peaches. Garnishing ideas for presentation can make your dish shine. Add fresh mint leaves for a pop of color. You might sprinkle some extra cinnamon on top. This makes your dish look and taste even better. Want the full details? Check out the Full Recipe for a step-by-step guide to make this dessert truly shine! {{image_2}} You can mix things up by using other fruits. Try using apples or plums instead of peaches. Both fruits have a sweet and juicy taste. You can also combine peaches with berries. Blueberries, raspberries, or strawberries add color and flavor. This mix brightens the dish and gives you more health benefits. If you need gluten-free options, use certified gluten-free oats and almond flour. This keeps the crisp tasty while making it safe for gluten-sensitive folks. For a vegan variation, swap honey for maple syrup. This simple change makes the dish plant-based and still delicious. To make your peach crisp extra special, add spices. Nutmeg and cinnamon work well together. A splash of vanilla extract can also enhance the flavor. Citrus zest, like lemon or orange, adds a fresh twist too. These small changes make a big difference in taste and make each bite exciting. To keep your Healthy Peach Crisp fresh, store it in the fridge. Place it in an airtight container to prevent moisture loss. This helps maintain its taste and texture. Use glass or plastic containers with tight lids. You can also cover the dish with plastic wrap if you don't have a container. If you want to save it for later, freezing is a great option. Let the peach crisp cool completely before freezing. Wrap it tightly in plastic wrap, then place it in a freezer-safe bag or container. This keeps it safe from freezer burn. When you want to enjoy it again, thaw it overnight in the fridge. To reheat, place it in the oven at 350°F (175°C) for about 15-20 minutes. You can also microwave it for a quick snack. In the refrigerator, your Healthy Peach Crisp lasts about 3 to 5 days. For the freezer, it can keep well for about 2 to 3 months. Remember to label your containers with the date. This way, you will know when it’s time to eat or toss it. Keeping track helps you enjoy your dessert at its best. Can I use frozen peaches? Yes, you can use frozen peaches. Just thaw them first. Drain any extra liquid. This keeps your crisp from getting too watery. How can I make it nut-free? To make it nut-free, simply skip the nuts in the recipe. You can use more oats or seeds for crunch. Try sunflower seeds or pumpkin seeds instead. What are the health benefits of the main ingredients? The main ingredients offer great health benefits: - Peaches: High in vitamins A and C. They help with skin health. - Oats: Good for heart health and help you feel full. - Almond flour: Low in carbs and high in healthy fats, which can aid weight loss. - Honey: A natural sweetener with antioxidants. How many calories per serving? This healthy peach crisp has about 200 calories per serving. This makes it a guilt-free treat. What can I do if the topping is soggy? If the topping is soggy, bake it a little longer. Check every five minutes. You want a golden brown color. You can also add more oats to absorb moisture next time. How to tell when the crisp is perfectly baked? The crisp is ready when the topping is golden brown. The peaches should be bubbling around the edges. This shows the flavors are melded together well. This article covered how to make a delicious peach crisp. We discussed fresh and dry ingredients. I shared simple steps from preparing to baking, along with helpful tips. You learned variations, storage info, and answered common questions. In summary, you have everything you need to create your peach crisp. Experiment with flavors and enjoy this tasty dish! Go ahead, gather your ingredients, and let the baking begin.](https://stirredrecipes.com/wp-content/uploads/2025/06/8027ac5d-3749-452b-bdc6-415717ea0477.webp)
Healthy Peach Crisp Simple and Delicious Dessert
Are you craving a dessert that’s both healthy and delicious? This Healthy Peach Crisp is your answer! Packed with fresh peaches and wholesome ingredients, it’s
![To make these tasty bars, gather these key ingredients: - 2 cups all-purpose flour - 1 cup rolled oats - 1/2 cup brown sugar, packed - 1/2 cup granulated sugar - 1 teaspoon baking powder - 1/2 teaspoon salt - 1 cup unsalted butter, softened - 2 cups fresh peaches, peeled and diced - 1 tablespoon lemon juice - 2 tablespoons cornstarch - 1 teaspoon cinnamon - 1/2 teaspoon nutmeg - 1/2 teaspoon vanilla extract Each ingredient plays a vital role in the flavor and texture of the bars. The flour and oats create a sturdy base, while the sugars add sweetness. Brown sugar gives a rich, caramel-like taste. The baking powder and salt help the bars rise and balance the flavors. Fresh peaches are the star of this dish. Peeling and dicing them makes them easy to mix in. The lemon juice brightens the peach flavor and adds a nice zing. Cornstarch thickens the filling, helping it stay together. Cinnamon and nutmeg bring warmth and depth. To make this easy recipe, you will need: - Mixing bowl - Baking dish (9x13 inches) - Parchment paper (for easy removal) - Measuring cups and spoons Using the right tools makes cooking smoother. A good mixing bowl helps blend ingredients well. A baking dish of the right size ensures even cooking. Parchment paper helps you remove the bars without breaking them. Measuring cups are key for accuracy in baking. For the full recipe, check out the details on how to put these ingredients together! - Preheat your oven to 350°F (175°C). - Grease or line your baking dish with parchment paper. Start by getting your oven hot. This helps the bars bake evenly. Greasing or lining the dish makes it easy to remove the bars later. I like using parchment paper because it prevents sticking. - Combine dry ingredients and mix well. - Mix in butter until crumbly. In a mixing bowl, combine the flour, oats, brown sugar, granulated sugar, baking powder, and salt. Stir it all together so everything is mixed evenly. Then, add in the softened butter. Use your fingers or a fork to mix it until you see small clumps. This gives your crust a nice crumbly texture. - Coat diced peaches with lemon juice and spices. - Mix in cornstarch for thickening. Next, take your fresh peaches and dice them into small pieces. In a bowl, mix the diced peaches with lemon juice and spices. This adds flavor and stops the peaches from browning. After that, stir in the cornstarch. This will help thicken the filling while it bakes. - Press crumb mixture into the baking dish. - Layer with peach filling and topping. Now, take the crumb mixture and press it down evenly into the bottom of your baking dish. This will be your crust. Then, pour the peach filling over the crust, spreading it out evenly. Finally, sprinkle the leftover crumb mixture on top of the peaches. - Bake for 30-35 minutes until golden brown. - Let cool before slicing. Place the dish in the oven and bake for 30 to 35 minutes. You want the topping to be golden brown and the peach filling to bubble. Once done, take it out and let it cool for about 30 minutes before slicing. This helps the bars set and makes them easier to cut. For the full recipe, check the detailed instructions above. To bake the best peach pie crumble bars, make sure you spread the mixture evenly. This helps the bars cook uniformly. Keep an eye on the oven as they bake. You want a golden brown topping. If it looks pale, give it a few more minutes. Start by dicing your peaches properly. Cut them into small, even pieces. This helps them cook evenly and blend well with the other flavors. Also, use room-temperature butter. It mixes better with the dry ingredients, creating a nice crumbly texture. You can enhance the flavor by adding nuts or spices. Chopped pecans or walnuts add a nice crunch. A pinch of ginger or cardamom can bring warmth to the dish. If you want to reduce sugar, try using alternative sweeteners like honey or maple syrup. These can add unique flavors and keep your bars sweet without being too sugary. For more details, check the Full Recipe. {{image_2}} To make gluten-free peach pie crumble bars, start by substituting all-purpose flour with gluten-free flour. This swap keeps the texture light and tasty. Make sure to use certified gluten-free oats as well. Not all oats are gluten-free, so this step is key for safety and flavor. For a vegan version, you can replace the butter with coconut oil or vegan butter. Both options work well and add a nice flavor. Instead of eggs, use flaxseed or chia seeds as substitutes. Mix 1 tablespoon of either seed with 2.5 tablespoons of water. Let it sit until it thickens, then add it to your dough. You can switch up the fruit in your bars based on the season. Use berries or apples for a fun twist. Each fruit brings its own taste and texture. You can also adapt the spices for these alternatives. For berries, try adding lemon zest instead of cinnamon. For apples, a pinch of nutmeg pairs perfectly. These variations keep your dessert fresh and exciting! For the full recipe, check out the detailed instructions and tips. To keep your peach pie crumble bars fresh, store them in an airtight container. This will help prevent them from drying out. You can keep them at room temperature for a few days. If you want to store them longer, place them in the fridge. For freezing, wrap each bar in plastic wrap, then place them in a freezer-safe bag. This keeps them safe from freezer burn. At room temperature, these bars last about 3 days. In the fridge, they can stay fresh for up to a week. When you freeze them, they can last for 3 months. To thaw them, just take them out of the freezer and let them sit at room temperature for a few hours. You can also heat them in the microwave for a quick treat. To reheat your bars, place them in the oven at 350°F (175°C) for about 10 minutes. This will help restore their crisp topping. You can also enjoy leftover bars with yogurt or ice cream. Crumble them on top of vanilla ice cream for a tasty twist. You can even use them as a filling for pancakes or waffles! For the full recipe, check out the [Full Recipe]. Yes, you can make Peach Pie Crumble Bars ahead of time. To do this, bake the bars as directed. Once they cool, store them in an airtight container. Keep them in the fridge if you plan to eat them within a week. If you want to store them longer, freeze them. Wrap the bars tightly in plastic wrap, then place them in a freezer-safe bag. They can last up to three months in the freezer. Just remember to thaw them in the fridge before enjoying. You can tell the bars are done when the topping turns golden brown. Look for bubbling around the edges of the peach filling. This bubbling shows the fruit is hot and cooked through. A toothpick can help too. Insert it into the center; if it comes out clean, your bars are ready. Make sure to keep an eye on them towards the end of baking for perfect results. Absolutely, you can use frozen peaches in this recipe. Just make sure to thaw them first and drain any excess liquid. You may need to add a bit more cornstarch to help thicken the filling. This will prevent the bars from being too soggy. Frozen peaches can taste just as good, especially when fresh ones are out of season. To slice the bars neatly, let them cool completely in the pan. Use a sharp knife to cut through the bars. A gentle sawing motion helps avoid crumbling. For even cleaner cuts, dip the knife in warm water between slices. Wipe it dry before making the next cut. This technique keeps the crumbs from falling apart and gives you beautiful squares. Peach pie crumble bars are simple and tasty. You need fresh ingredients like peaches, flour, and oats. The steps are easy: mix, layer, and bake. Use tips to make them even better, like adding nuts or spices. You can also try gluten-free or vegan options. Store them right for long-lasting flavor. Enjoy your peach pie crumble bars fresh or in new desserts. Now, get baking and savor the deliciousness!](https://stirredrecipes.com/wp-content/uploads/2025/06/894cc63e-5f51-4545-839c-e4b3f74abc6c.webp)
Peach Pie Crumble Bars Tasty and Simple Dessert Treat
Craving a sweet treat that’s both simple and delicious? Let me introduce you to my Peach Pie Crumble Bars! These bars bring a taste of
![- Zucchini: You need 2 cups of grated zucchini, which is about 2 medium zucchinis. To prepare, wash them well. Grate them using a box grater or food processor. Make sure to drain excess moisture by letting it sit in a colander for a few minutes. This helps keep the bread from getting soggy. - Apple: Use 1 cup of peeled and grated apple. A medium apple will work well. I like using Granny Smith for its tartness, but you can choose any type you enjoy. Grate it just like the zucchini for a nice texture in the bread. - Sugars: You will use 1/2 cup of granulated sugar and 1/2 cup of packed brown sugar. Granulated sugar adds sweetness, while brown sugar brings moisture and a hint of caramel flavor. Both sugars work together to create the perfect balance. - Nuts: You can add 1/2 cup of chopped walnuts or pecans. They add a nice crunch and nutty flavor. If you're not a fan of nuts, feel free to skip them. - Spices: Consider adding more spices like ground ginger or allspice for extra warmth. A little bit goes a long way in enhancing the flavor of your bread. - Flour: Use 1/2 cup of all-purpose flour for the topping. This will create a nice, crumbly texture that contrasts well with the soft bread. - Brown sugar: Use 1/3 cup of brown sugar in the crumb topping. It adds sweetness and a rich flavor that complements the topping perfectly. - Butter: For the crumb topping, you will need 1/4 cup of unsalted butter, melted. If you want a healthier option, try using coconut oil or applesauce instead. These alternatives will still give you a great crumb topping. Now that you have your ingredients ready, check out the Full Recipe to start making your delicious Zucchini Apple Crumb Bread! 1. Preheat your oven to 350°F (175°C). Grease and flour a 9x5-inch loaf pan. This step helps the bread not stick. 2. Grate 2 medium zucchinis and 1 medium apple. Place them in a large bowl. Let them sit for about 10 minutes to drain excess moisture. This keeps the bread from getting soggy. 3. In a separate bowl, mix together the wet ingredients. Combine 1/2 cup granulated sugar, 1/2 cup brown sugar, 1/2 cup vegetable oil, 2 large eggs, and 2 teaspoons vanilla extract. Whisk until they blend well. 4. In another bowl, mix the dry ingredients. Combine 2 cups all-purpose flour, 1 teaspoon baking powder, 1/2 teaspoon baking soda, 1/2 teaspoon salt, 1 teaspoon ground cinnamon, and 1/4 teaspoon ground nutmeg. This adds flavor and helps the bread rise. 5. Gradually add the dry mixture to the wet mixture. Stir until just combined. Then, fold in the drained zucchini and apple mixture. If you like, add 1/2 cup chopped walnuts or pecans for some crunch. 6. Pour the batter into the prepared loaf pan. Smooth the top with a spatula. 7. For the crumb topping, mix 1/2 cup flour, 1/3 cup brown sugar, 1/4 cup melted butter, and 1/2 teaspoon cinnamon in a small bowl. Sprinkle this mixture on top of the batter. 8. Bake in the preheated oven for 50-60 minutes. Check doneness by inserting a toothpick into the center. If it comes out clean, it is ready. 9. Let the bread cool in the pan for about 10-15 minutes. Then, transfer it to a wire rack to cool completely. Feel free to explore the [Full Recipe] for more tips and ideas! - Checking doneness with a toothpick: Insert a toothpick into the center of the bread. If it comes out clean, your bread is done. If not, bake it a bit longer. This simple test helps you avoid undercooked bread. - Adjusting bake time for different ovens: Oven temperatures can vary. Some run hot, while others run cool. Start checking your bread after 50 minutes. If it's not done, add time in 5-minute increments. This way, you can find the perfect bake for your oven. - Best ways to serve or enjoy the bread: Slice the bread warm. A pat of butter on top makes it even better. You can also sprinkle some cinnamon or add thin apple slices for a nice touch. - Pairing ideas with beverages: This bread pairs well with tea or coffee. A glass of cold milk is great too. Choose your favorite drink for a cozy treat. - Overmixing the batter: Mix just enough to combine the ingredients. Overmixing can make the bread tough. Gentle mixing ensures a soft texture. - Not draining excess moisture from zucchini: Zucchini holds a lot of water. Make sure to drain it well before adding it to the batter. This keeps your bread from being soggy. {{image_2}} You can change the flavor of your bread easily. Adding chocolate chips gives it a sweet touch. Use about 1 cup of chocolate chips for a rich taste. You can also add dried fruit, like raisins or cranberries. Just one cup of dried fruit will brighten the flavors. Switching up the type of apple can also change the taste. Tart apples like Granny Smith add a nice zing. Sweet apples like Fuji will make your bread softer. Try different apples to find your favorite! If you want a healthier option, use honey or maple syrup. Replace the granulated sugar with 1/2 cup of honey or maple syrup. You may need to reduce the liquid in the recipe a bit. Make sure to adjust the amount so it still tastes sweet. When using alternative sweeteners, adjust the measurements. For example, if you use stevia, check the package for the right amount. Some sweeteners are much stronger than sugar, so use less. If you need a gluten-free version, substitute the flours. Use a gluten-free all-purpose flour mix. These blends usually work well in quick breads. Look for ones that have xanthan gum; it helps with texture. You can also use almond flour or coconut flour for a different taste. If you use coconut flour, reduce the amount by half. Coconut flour absorbs more moisture, so add extra eggs or liquid to keep it moist. To store your zucchini apple crumb bread at room temperature, place it in an airtight container. This keeps the bread fresh for a few days. If you don't have a container, wrap the bread in plastic wrap. Make sure it is sealed tight to block air. For long-term storage, freezing is a great option. Slice the bread first, then wrap each slice in plastic wrap. Place the wrapped slices in a freezer bag. Squeeze out as much air as you can before sealing. This method helps keep the bread moist and tasty. To thaw, simply take a slice out and let it sit at room temperature for about 30 minutes. You can also use a microwave for quick thawing. Just heat it for 15-20 seconds. In the fridge, your zucchini apple crumb bread lasts about one week. You can tell if it’s spoiled if you see mold or if it smells off. A dry texture may mean it’s past its prime, so always check before enjoying your slice. To make Zucchini Apple Crumb Bread healthier, you can reduce the sugar. Try using 1/4 cup of granulated sugar instead of 1/2 cup. You can also swap in honey or maple syrup for sweetness. For healthy fats, use applesauce in place of vegetable oil. Replace half the flour with whole wheat flour for added fiber. Yes, you can make this recipe vegan! Use flax eggs instead of regular eggs. To make a flax egg, mix 1 tablespoon of ground flaxseed with 2.5 tablespoons of water. For butter, use coconut oil or vegan butter. This keeps the bread rich and moist while staying plant-based. If your bread turns out dry, check your baking time. Baking too long can dry it out. To add moisture, you can brush the top with melted butter or a simple syrup. You can also store the bread in an airtight container to keep it moist. Adding extra grated zucchini can help too. Absolutely! You can double the recipe easily. Just mix all ingredients in a larger bowl. Use two loaf pans or bake one large loaf. If you bake a larger loaf, check for doneness by using a toothpick in the center. Baking time may be longer, so keep an eye on it. You can find the full recipe for the original version above. This blog post covered how to make a delicious zucchini apple bread. We explored key ingredients like zucchini, apples, and sugars, plus optional add-ins like nuts and spices. I shared step-by-step instructions, baking tips, and common mistakes to avoid. You can try different flavors or sugar alternatives for fun twists. Lastly, I detailed storage tips to keep your bread fresh. Now, you have the tools to create a tasty treat. Enjoy baking!](https://stirredrecipes.com/wp-content/uploads/2025/06/8b7b8c84-447d-4ff0-988f-041bafbd8b0a.webp)
Zucchini Apple Crumb Bread Simple and Tasty Recipe
If you love baked goods, this Zucchini Apple Crumb Bread will surprise you! This simple and tasty recipe combines fresh zucchini and apples to create
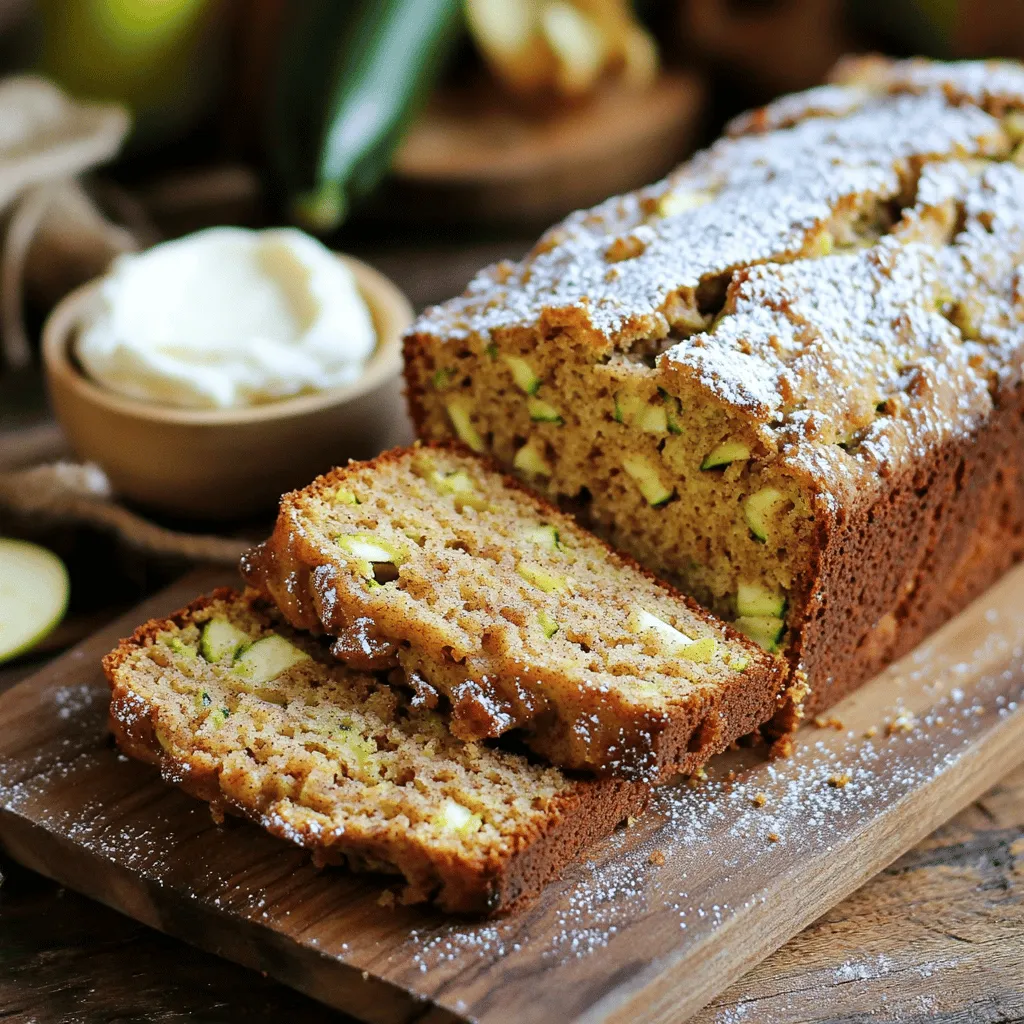
World’s Best Apple Cinnamon Zucchini Bread Recipe
Get ready to bake the best apple cinnamon zucchini bread you’ve ever tasted! This moist, flavorful loaf blends the sweetness of apples with the subtle

Tennessee Peach Pudding Irresistible Southern Delight
Are you ready to savor a true Southern treat? Tennessee Peach Pudding is the perfect blend of fresh peaches and fluffy batter, creating a delightful