Desserts
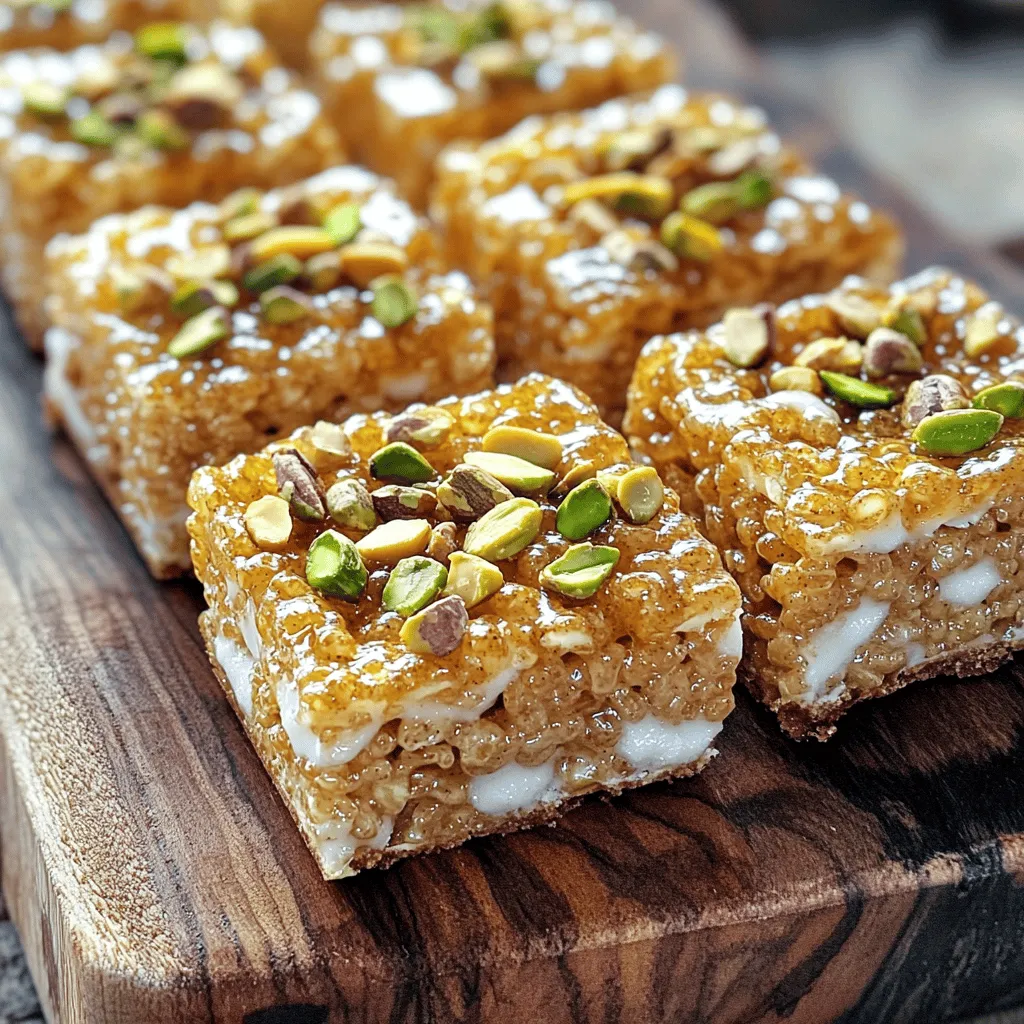
Chai Spiced Rice Krispie Treats Irresistible Flavor Boost
Are you ready to elevate your snack game? Chai Spiced Rice Krispie Treats combine the classic marshmallow delight with warm, aromatic chai spices. In this
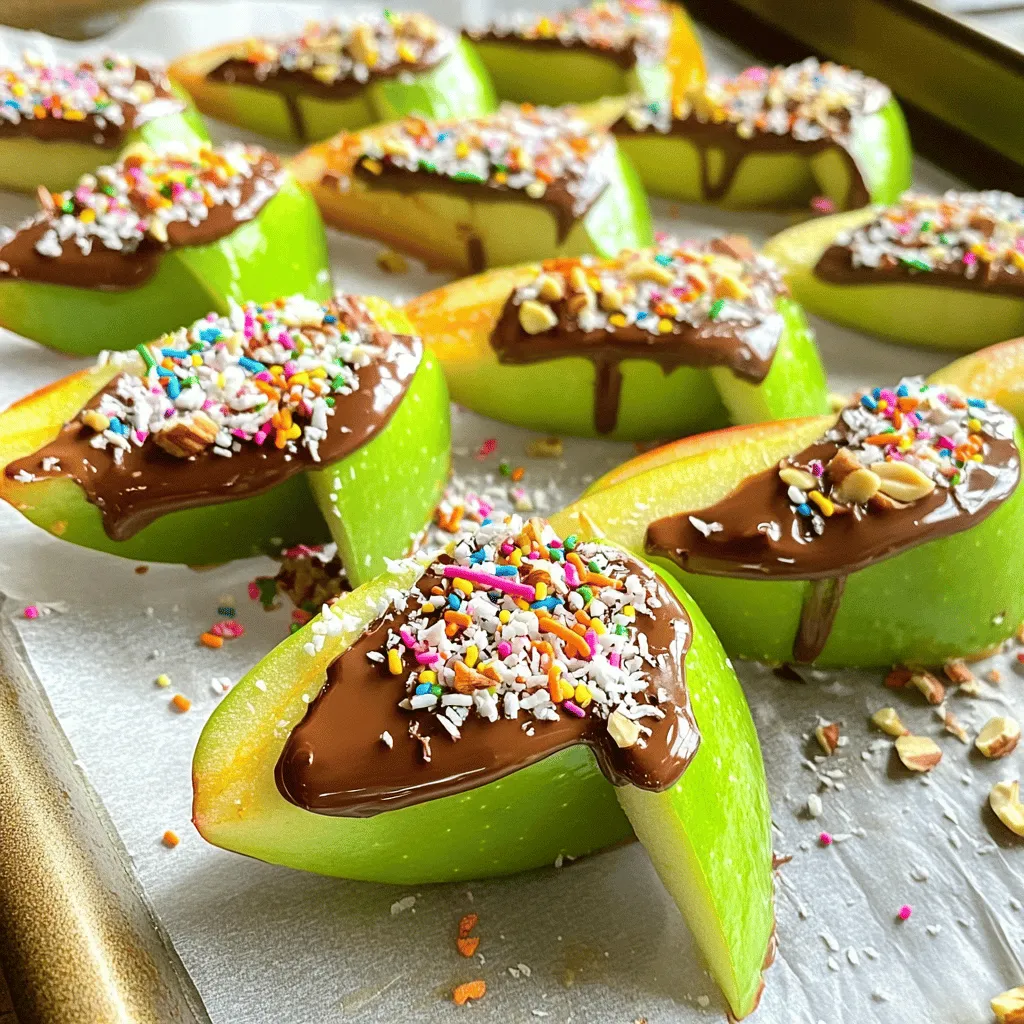
Dipped Apple Slices on a Stick Delightful Treat
Looking for a fun and tasty snack? Try my Dipped Apple Slices on a Stick! This delight combines juicy apples with creamy chocolate and your
![- 6 medium apples (Granny Smith or Honeycrisp), peeled, cored, and diced - 1/4 cup unsalted butter - 1/4 cup brown sugar - 1 teaspoon ground cinnamon - 1/4 teaspoon nutmeg (optional) - 1 tablespoon lemon juice - Pinch of salt Choosing the best apples for flavor For this recipe, I love using Granny Smith or Honeycrisp apples. These apples give a nice sweet-tart balance. Their firm texture holds up well in cooking, ensuring a great sauce. Best butter options for richness Unsalted butter is key for this dish. It lets you control the salt level. If you prefer a richer taste, use a quality European-style butter. It has a higher fat content, making the sauce even creamier. Substitutes for brown sugar If you run out of brown sugar, you can use white sugar with a bit of molasses. A tablespoon of molasses mixed with white sugar gives a similar flavor. You could also try maple syrup or honey for a unique twist. Both will add sweetness and a hint of flavor. For the full recipe, visit [Full Recipe]. 1. Preparing the apples: Start by peeling each apple. Use a sharp peeler for ease. Next, core the apples to remove the seeds. Finally, dice them into small pieces. This helps them cook evenly. 2. Melting the butter in a saucepan: Place a large saucepan on medium heat. Add 1/4 cup of unsalted butter to the pan. Let it melt completely. Watch for bubbling; this means it’s ready for the apples. 1. Sautéing the apples: Once the butter melts, add the diced apples to the pan. Stir gently so they coat in butter. Cook for about five minutes until they start to soften. 2. Adding ingredients for flavor: Now, it’s time to spice things up! Stir in 1/4 cup of brown sugar and 1 teaspoon of ground cinnamon. If you like, add a pinch of nutmeg. Don’t forget the tablespoon of lemon juice and a pinch of salt. Mix well to combine. 3. Achieving desired sauce consistency: Keep cooking the mixture for 10 to 15 minutes. Stir occasionally. The apples will soften, and the sauce will thicken. You can mash the apples with a potato masher for a chunkier texture or blend it for a smooth sauce. This Hot Buttered Apple Sauce With Cinnamon is now ready to enjoy. For the complete recipe, check out the [Full Recipe]. To make your hot buttered apple sauce shine, think about adding more spices. Try a pinch of ginger for warmth or a bit of cloves for depth. You could even add a splash of vanilla extract for a sweet touch. Each spice brings a new twist to the flavor. If you want it sweeter, consider your options. You can add more brown sugar or use maple syrup. Honey is a great choice too! Taste the sauce as you go. This way, you can get it just right for your liking. When serving your apple sauce, consider using a cute bowl or jar. A sprinkle of cinnamon on top makes it look nice. You can even add a dollop of whipped cream for extra fun. This apple sauce goes well with many dishes. Serve it warm over pancakes or waffles for breakfast. It’s also tasty with pork or chicken as a side. You can mix it into yogurt for a quick snack. The possibilities are endless! For the full recipe, check out the [Full Recipe]. {{image_2}} You can switch things up with healthier options. Try coconut oil instead of butter. It adds a light flavor and is a great choice for health-conscious cooks. Instead of brown sugar, you can use honey. It gives the sauce a natural sweetness and a unique taste. You can also play with different fruits. Instead of just apples, add diced pears for a softer texture. You can even mix in berries, like blueberries or raspberries, for a fruity twist. Each fruit brings its own taste, making the sauce exciting. As the seasons change, so can your apple sauce! In the fall, add cranberries for a tart kick. Chopped walnuts also add a nice crunch and a rich flavor. These additions make the sauce perfect for cozy fall meals. In summer, blend in fresh peaches or plums. They add a juicy sweetness that brightens the dish. You can enjoy this sauce warm or cold, making it a great treat for any season. For the full recipe, check out the Hot Buttered Apple Sauce With Cinnamon recipe. To keep your hot buttered apple sauce fresh, start by letting it cool completely. Transfer the sauce to an airtight container. Store it in the refrigerator for up to one week. If you want to enjoy it longer, freezing works great. Just pour the cooled apple sauce into freezer-safe bags or containers. Leave some space at the top, as liquids expand when frozen. Label the bags with the date for easy tracking. Apple sauce can last quite a while if stored properly. In the fridge, it stays fresh for about seven days. If you freeze it, you can enjoy it for about six months. After that, the flavor may fade. Always check for signs of spoilage, like off smells or changes in color. Use your senses; they are your best guide. Can I make hot buttered apple sauce ahead of time? Yes, you can make hot buttered apple sauce in advance. Just cook it and let it cool. Store it in the fridge for up to a week. When you want to eat it, simply reheat in a pan or microwave. How do I make apple sauce more cinnamon-flavored? To boost the cinnamon flavor, add extra ground cinnamon. Start with half a teaspoon more, then taste. You can also try adding cinnamon sticks while cooking for a deeper flavor. What are some serving suggestions for this recipe? Serve hot buttered apple sauce with pancakes or waffles. It pairs well with oatmeal or yogurt too. You can even use it as a topping for ice cream or as a side for roasted meats. Can I use a slow cooker for this recipe? Yes, you can use a slow cooker. Just combine all the ingredients and cook on low for about 4 hours. This will give you a different texture but still delicious flavor. What if I don’t have nutmeg or lemon juice? If you don’t have nutmeg, you can skip it. For lemon juice, try using a splash of vinegar for some acidity. It won't taste the same, but it will still enhance the flavor. What to do if the sauce is too thin or too thick? If the sauce is too thin, cook it longer to evaporate some liquid. For a thicker sauce, you can mash the apples more or add a bit of cornstarch mixed with water. How to restore flavor if too sweet or bland? For a sweet sauce, add a pinch of salt or a dash of lemon juice to balance the taste. If it’s bland, boost the spices—more cinnamon or a hint of vanilla can work wonders. This blog post covered making delicious apple sauce. You learned about the best ingredients, preparation steps, and cooking methods. We also explored tips for enhancing flavor and creative variations. With proper storage advice, your apple sauce can stay fresh longer. To wrap up, remember to experiment with different fruits and spices to find your favorite flavor. Making apple sauce can be fun and rewarding, so enjoy the process!](https://stirredrecipes.com/wp-content/uploads/2025/07/975cb29c-ef77-4580-a247-446208d5e30a.webp)
Hot Buttered Apple Sauce With Cinnamon Recipe Delight
Are you ready to savor a warm, sweet treat that brings comfort with every bite? My Hot Buttered Apple Sauce with Cinnamon recipe is your
![- 1 cup graham cracker crumbs - 1/4 cup sugar - 1/2 cup unsalted butter, melted - 16 oz cream cheese, softened - 1 cup canned pumpkin puree - 3/4 cup sugar - 3 large eggs - 1 teaspoon vanilla extract - 1 teaspoon ground cinnamon - 1/2 teaspoon ground nutmeg - 1/4 teaspoon ground ginger - 1/4 teaspoon salt - Whipped cream and pumpkin spice for topping (optional) To create the best pumpkin cheesecake cupcakes, I focus on quality ingredients. Use fresh cream cheese for a rich taste. Look for pumpkin puree that has no added sugars or spices. It should be pure and smooth. For graham cracker crumbs, I like to crush whole crackers myself. This gives a better texture and flavor. If you have dietary needs, there are easy swaps. For gluten-free options, use gluten-free graham crackers. You can also choose a vegan cream cheese. For a dairy-free version, use coconut cream. These changes will still give you a great cupcake with a delicious taste. Check out the Full Recipe for more details on how to make these tasty treats! 1. Start by preheating your oven to 325°F (163°C). This step is key for even baking. 2. Line a muffin tin with cupcake liners. This helps with easy removal later. 3. For the graham cracker crust, mix 1 cup of graham cracker crumbs, 1/4 cup sugar, and 1/2 cup melted butter in a bowl. Mix well until the crumbs are coated. 4. Press about a tablespoon of the crumb mixture into each cupcake liner. This forms a tasty base. 5. Now, in a large bowl, beat 16 oz of softened cream cheese until smooth. This makes the filling creamy. 6. Gradually add 1 cup of canned pumpkin puree and 3/4 cup sugar. Mix until everything is combined. 7. Add 3 large eggs, one at a time. Mix on low speed after each egg until it's just combined. 8. Stir in 1 teaspoon of vanilla extract, 1 teaspoon ground cinnamon, 1/2 teaspoon ground nutmeg, 1/4 teaspoon ground ginger, and 1/4 teaspoon salt. Mix until the batter is smooth and well-blended. 1. Pour the pumpkin cheesecake batter into the prepared liners. Fill each about 3/4 full to allow for rising. 2. Bake for 20-25 minutes. The edges should be set, but the centers can be slightly jiggly. 3. Turn off the oven and crack the door open. Let the cupcakes cool inside for about 10 minutes. This helps prevent cracking. 4. Remove them from the oven and let them cool completely at room temperature. Then refrigerate for at least 2 hours before serving. 1. Serve the cupcakes chilled. Top them with whipped cream and a sprinkle of pumpkin spice for extra flair. 2. These cupcakes pair well with coffee, apple cider, or a warm cup of tea. They also go great with other fall desserts like pecan pie. For the complete recipe, check out the [Full Recipe]. To get the best texture and flavor for your pumpkin cheesecake cupcakes, follow these simple steps: - Use room-temperature cream cheese. This helps it mix smoothly. - Don’t overmix the batter. Mix until just combined to keep it light. - Fill the cupcake liners about three-quarters full for even baking. To prevent overmixing, add the eggs one at a time. Mix on low speed until just blended. This keeps your cupcakes fluffy and soft. For storing leftovers, place your cupcakes in an airtight container. They stay fresh in the fridge for up to five days. When reheating, use the microwave. Heat them for about 10-15 seconds. This warms them without drying them out. To elevate flavors, consider adding chocolate chips or caramel drizzle. These add a nice twist to the classic recipe. You can also adjust the spices. Try adding extra cinnamon or a dash of cloves for a warm, cozy flavor. Top with whipped cream and a sprinkle of pumpkin spice. These small changes make your cupcakes shine. For the full recipe, check out the detailed steps above to create your own delightful fall treat! {{image_2}} To make gluten-free pumpkin cheesecake cupcakes, swap the graham cracker crumbs. Use gluten-free graham cracker crumbs or almond flour instead. For the sugar, stick with regular options; it is gluten-free. Ensure all your other ingredients, like baking powder and vanilla, are also gluten-free. For a plant-based version, replace cream cheese with vegan cream cheese. Use silken tofu blended until smooth as another option. Instead of eggs, use flaxseed meal. Combine one tablespoon of flaxseed meal with three tablespoons of water for each egg. Choose a non-dairy milk like almond or oat milk in your mix. Ensure your sugar is vegan, too, as some sugars use bone char in processing. You can explore many fun flavors! Try adding cocoa powder to the batter for chocolate pumpkin cupcakes. Mix in chopped apples and a hint of cinnamon for spiced apple cupcakes. Another option is to swirl in some caramel sauce for a sweet twist. You can even add a splash of maple syrup for a richer flavor. All of these variations keep the spirit of fall alive while making each bite unique. For the full recipe, check the main section above. Pumpkin cheesecake cupcakes stay fresh in the fridge for about five days. To keep them tasty, seal them well. Use an airtight container or wrap them tightly in plastic wrap. This helps prevent them from drying out or absorbing other smells in the fridge. Freezing cupcakes is simple and great for later. First, let the cupcakes cool completely. Then, wrap each one in plastic wrap. Place the wrapped cupcakes in a freezer-safe bag or container. This keeps them safe from freezer burn. To thaw, take the cupcakes out of the freezer. Leave them in the fridge overnight or for a few hours at room temperature. This way, they stay moist and delicious. You can enjoy your pumpkin cheesecake cupcakes whenever you want! For the full recipe, check out the detailed instructions above. Can I use fresh pumpkin instead of canned? Yes, you can use fresh pumpkin. Just make sure to cook and puree it first. For best results, roast the pumpkin until soft. Then, blend it until smooth. This gives a fresh flavor. Do note that fresh pumpkin might have more water. You can strain it if needed. How do I know when the cupcakes are done? Check the edges of the cupcakes. They should be set while the center looks slightly jiggly. A toothpick inserted should come out mostly clean. Remember, they will firm up as they cool. What toppings work best? Whipped cream is a classic choice. You can also sprinkle pumpkin spice on top. For a twist, try caramel or chocolate drizzle. Nuts like pecans add a nice crunch too. Can they be made ahead of time? Yes, these cupcakes are great for making ahead. You can bake them a day or two early. Just store them in the fridge. They taste even better after chilling. How to modify for allergies and food preferences? For gluten-free, use gluten-free graham crackers. A dairy-free option can use vegan cream cheese. You can also swap eggs for flax eggs if needed. What's the best way to make them less sweet? To reduce sweetness, cut the sugar by a third. You can also use unsweetened pumpkin puree. Adding a hint of salt can help balance flavors too. These pumpkin cheesecake cupcakes are a treat you can't miss. We broke down every step, from selecting ingredients to serving suggestions. Plus, you can customize them to fit your needs. Whether you go gluten-free or vegan, there's a version for everyone. Remember to store them well for later enjoyment. Try different flavors or toppings to keep it exciting. I hope you enjoy making these cupcakes as much as I do. Happy baking!](https://stirredrecipes.com/wp-content/uploads/2025/07/fc62d1be-e4d0-4141-a74f-efd628a232ae.webp)
Pumpkin Cheesecake Cupcakes Delightful Fall Treat
Get ready to fall in love with pumpkin cheesecake cupcakes! These delightful treats mix creamy cheesecake with rich pumpkin flavor, making them perfect for autumn.
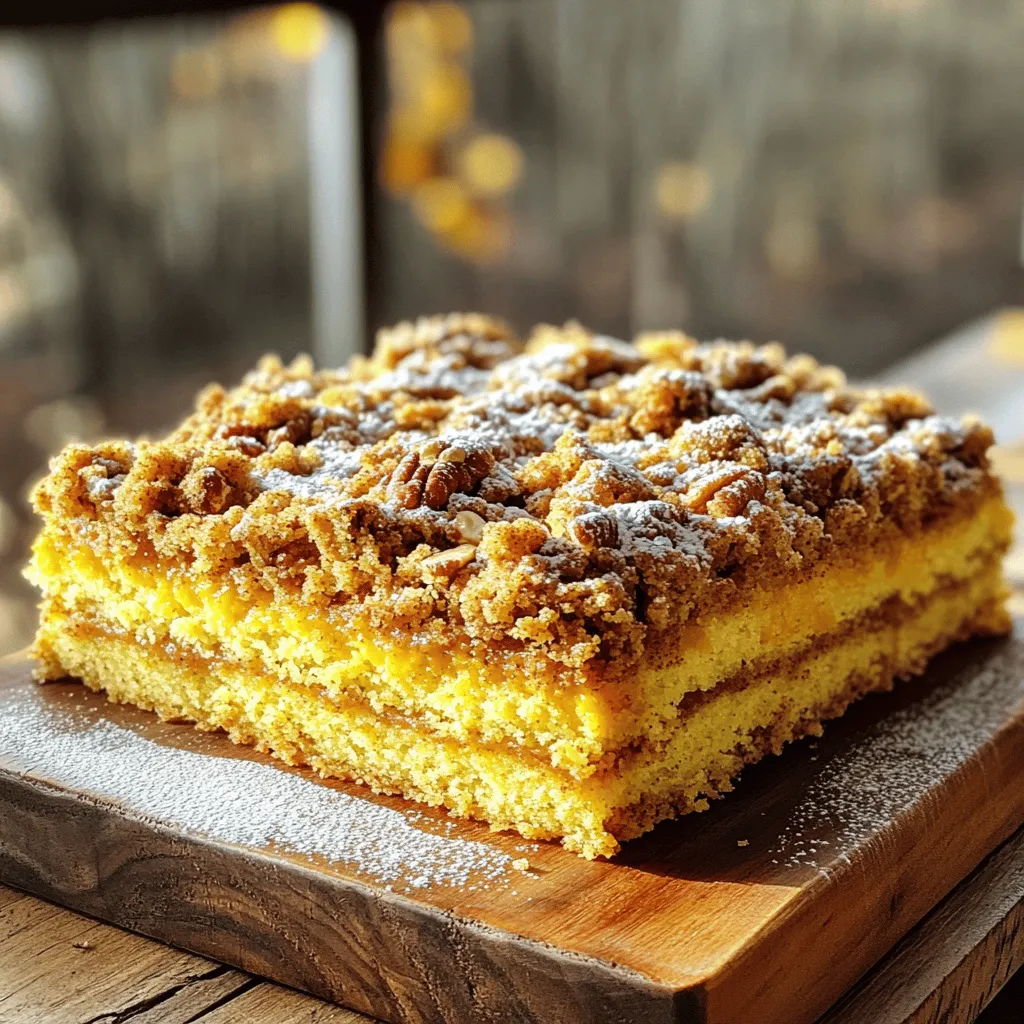
Pumpkin Coffee Cake Irresistible and Flavorful Treat
Are you ready to spice up your baking routine? This Pumpkin Coffee Cake is an irresistible treat that will warm your heart and home. With
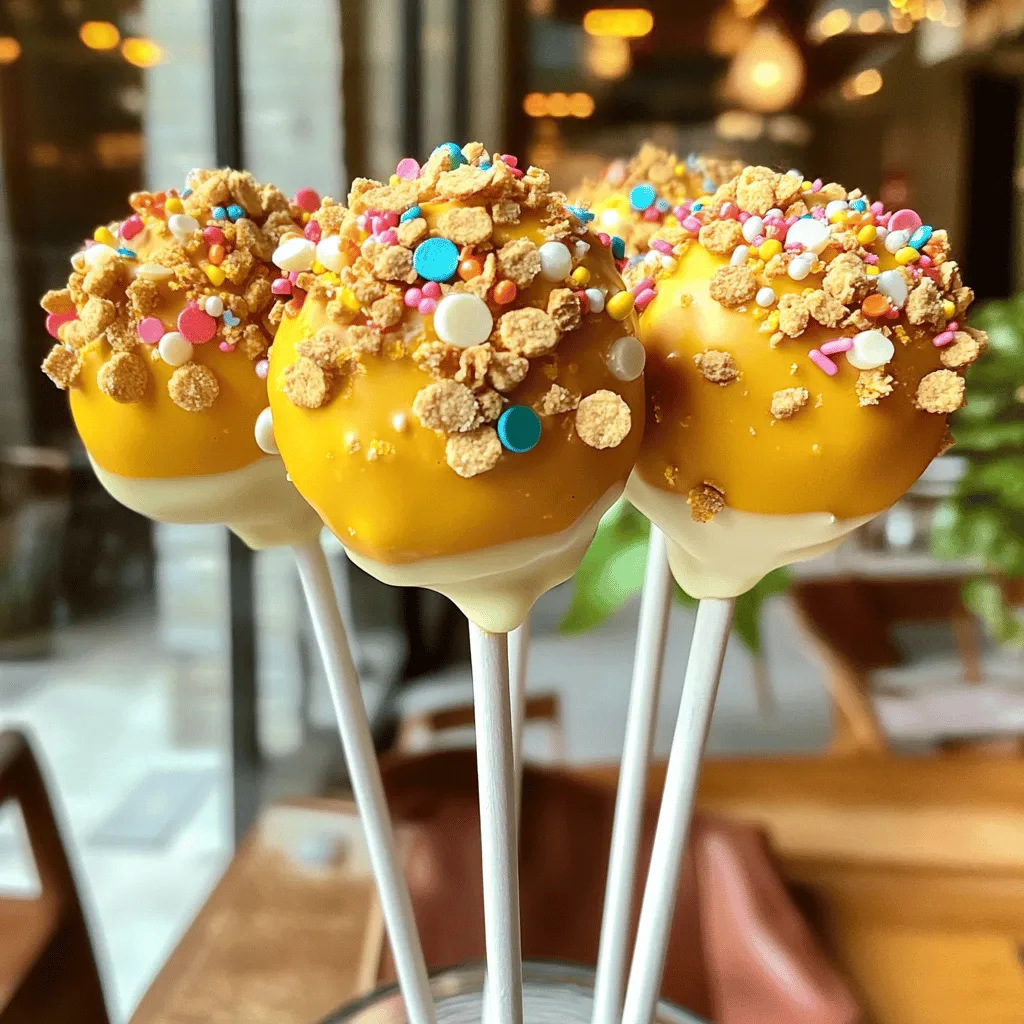
Pumpkin Pie Cake Pops Delightful Fall Treat
Ready to bite into fall? These Pumpkin Pie Cake Pops are the perfect treat. Soft, sweet, and packed with pumpkin flavor, they’re simple to make
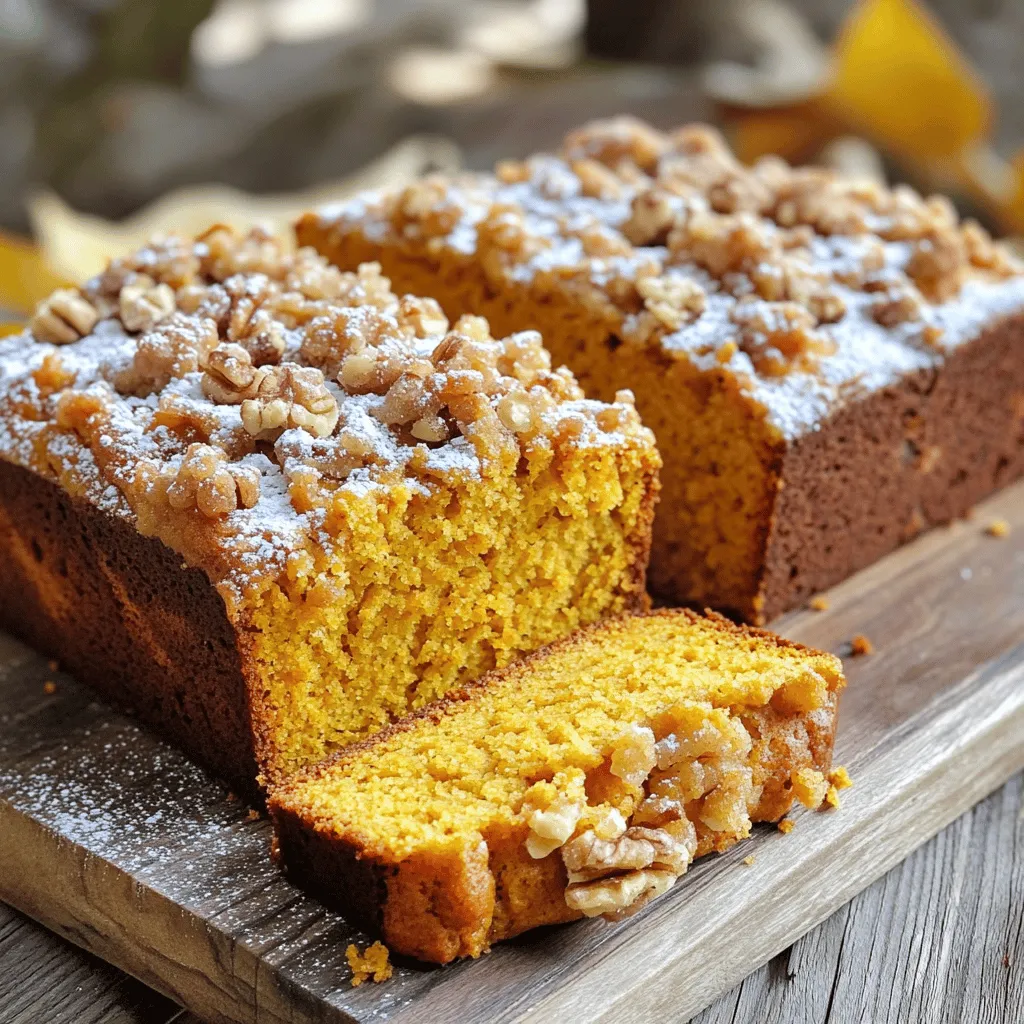
MOIST Pumpkin Bread with Streusel Topping Delight
Craving a warm, comforting treat? Let me introduce you to my MOIST Pumpkin Bread with Streusel Topping! This recipe packs bold pumpkin flavor and a
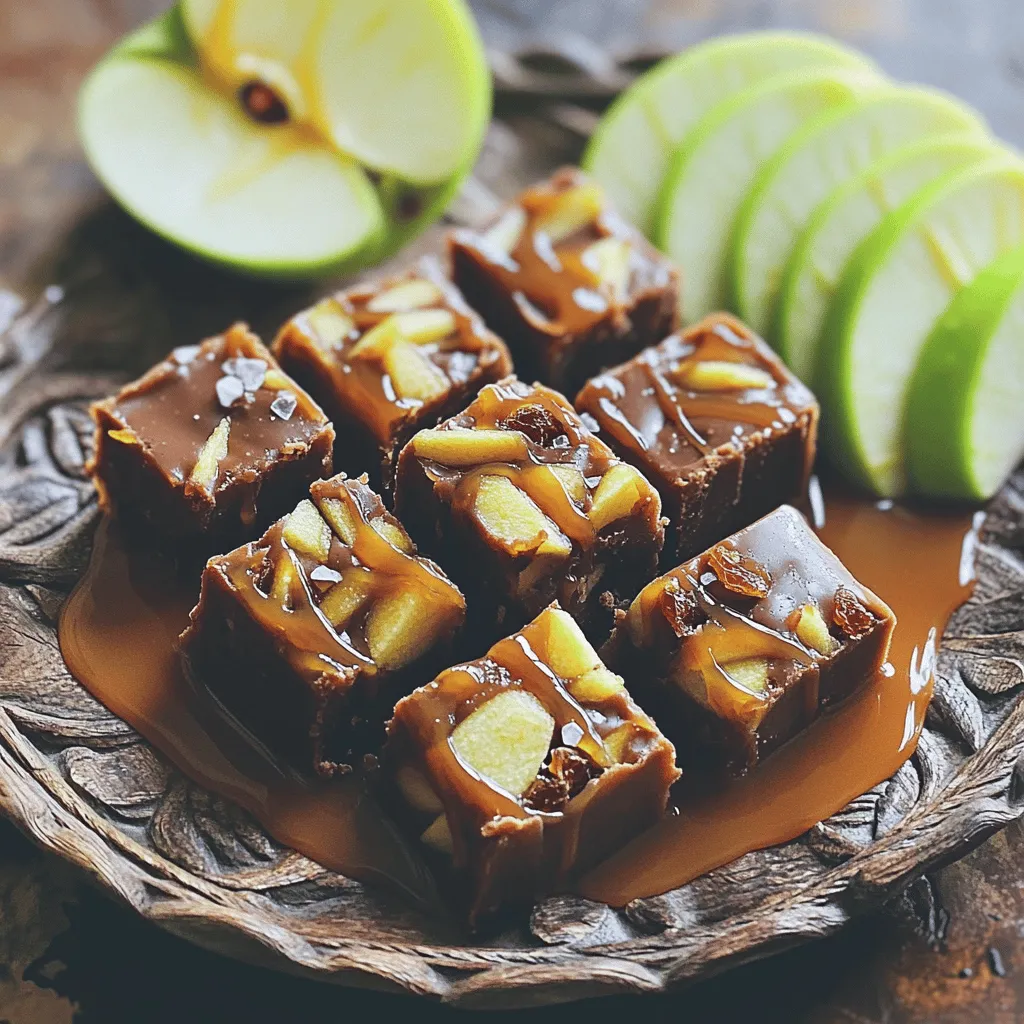
Caramel Apple Fudge Irresistible Fall Treat Recipe
If you’re looking for a dessert that screams fall, you’ve found it! This Caramel Apple Fudge is rich, sweet, and full of the flavors we
Chewy Maple Pumpkin Cookies Perfectly Holiday Treat
Looking for the perfect holiday treat? Chewy Maple Pumpkin Cookies offer a warm blend of flavors that celebrate the season! In this guide, I’ll share
![- 1 ½ cups graham cracker crumbs - ½ cup unsalted butter, melted - 2 tablespoons brown sugar - 1 teaspoon cinnamon - 3 cups apples, peeled, cored, and diced - ½ cup brown sugar - 1 teaspoon cinnamon - ½ teaspoon nutmeg - 1 tablespoon lemon juice - 1 tablespoon cornstarch - 1 tablespoon unsalted butter - 16 oz cream cheese, softened - ¾ cup granulated sugar - ½ cup sour cream - 3 large eggs - 1 teaspoon vanilla extract - ¼ cup salted caramel sauce - ½ cup salted caramel sauce - ¼ cup chopped pecans (optional) - Sea salt flakes for sprinkling Every layer of this dessert brings joy. For the crust, I use graham cracker crumbs. They give a nice crunch. I mix the crumbs with melted butter, brown sugar, and cinnamon. This mix holds the base together. The apple pie filling is a star. I prefer Granny Smith and Honeycrisp apples. They balance sweetness and tartness well. I cook the diced apples with brown sugar and spices. The lemon juice brightens the flavors. Cornstarch thickens the filling, while butter adds richness. The cheesecake filling is creamy and rich. I blend softened cream cheese with sugar until smooth. Adding sour cream gives it a nice tang. I mix in eggs one at a time for creaminess. Vanilla extract adds warmth, while salted caramel gives that sweet touch. For the topping, I drizzle more salted caramel sauce. Chopped pecans add a nice bite. A sprinkle of sea salt enhances the flavors. This dessert is a perfect mix of sweet and salty. You can find the Full Recipe for this delight to create it at home. - Preheat the oven to 350°F (175°C). - In a medium bowl, mix graham cracker crumbs, melted butter, brown sugar, and cinnamon. - Press the mixture firmly into the bottom of a springform pan and bake for 8-10 minutes until slightly golden. - In a large skillet, combine diced apples with brown sugar, cinnamon, nutmeg, lemon juice, cornstarch, and butter. - Cook over medium heat for about 5-7 minutes until the apples soften but stay firm. - Remove from heat and let the mixture cool slightly. - In a large mixing bowl, beat softened cream cheese on medium speed until creamy and smooth. - Gradually add granulated sugar and mix well. - Next, add sour cream, then eggs one at a time, and vanilla extract, mixing until just combined. - Pour half of the cheesecake batter over the cooled crust. - Layer with half of the apple pie filling, then pour the remaining cheesecake batter on top. - Spoon the rest of the apple filling over the cheesecake layer. - Bake in the preheated oven for 55-60 minutes until the center is set but still slightly jiggly. - Turn off the oven, crack the door open, and let the cheesecake cool inside for 1 hour. - After cooling, let it reach room temperature. - Cover and refrigerate for at least 4 hours or overnight for the best texture. - Before serving, drizzle salted caramel sauce on top and sprinkle with chopped pecans and sea salt for that perfect sweet and salty finish. For the full recipe, you can refer back to the ingredients listed above. Enjoy the process of making this delightful dessert! To keep your cheesecake smooth, bake it slowly. After baking, let it cool in the oven. This helps it set without cracks. Also, make sure your ingredients are at room temperature. Cold cream cheese mixes unevenly and can cause cracks. Don’t over-mix the batter. Over-mixing adds too much air, which creates a dense cheesecake. Use quality cream cheese for the best results. A good cream cheese makes your dessert rich and creamy. This is key to that delightful mouthfeel. Pair your cheesecake with vanilla ice cream for an extra treat. The cold ice cream complements the warm flavors of the cheesecake. This dessert shines at festive occasions and holidays. It adds a special touch to any gathering. For the full recipe, check out the details above. {{image_2}} You can switch up the fruit in this cheesecake. Try using berries instead of apples. Strawberries, blueberries, or raspberries add a fresh taste. You can also use peaches or pears for a seasonal twist. Each fruit brings its own unique flavor. If you want a fun twist, consider using Oreo cookies for the crust. This chocolate flavor pairs well with the creamy cheesecake. For those needing gluten-free options, you can use almond flour or gluten-free cookies. Both options keep the crust tasty without the gluten. To make this cheesecake even better, add spices. Cardamom or cloves can deepen the flavor. You might also want to incorporate a drizzle of chocolate for added richness. This extra layer makes each bite even more exciting. For the full recipe and all the details, check out the [Full Recipe]. Store your salted caramel apple pie cheesecake in an airtight container. It stays fresh for up to a week. I love enjoying it cold after chilling. The flavors deepen, and the texture turns creamy. If you want to save some for later, freeze it! It keeps well for up to two months. Just make sure it’s in a well-sealed container. When you’re ready, thaw it in the fridge before serving. This way, it retains its shape and taste. I recommend serving this cheesecake cold for the best flavor experience. Avoid microwaving it. Instead, let it thaw naturally. This helps preserve the creamy texture and rich taste. Salted caramel apple pie cheesecake is a blend of flavors and textures. It combines rich cheesecake, sweet apples, and salty caramel. The crust is made from graham crackers, giving it a crunchy base. The filling has smooth cream cheese mixed with apple pie spices. Topping it all off, you get a drizzle of salted caramel and optional pecans. This dessert is a feast for the eyes and the taste buds. Yes, you can use store-bought caramel sauce. It saves time and still tastes good. However, I recommend trying homemade caramel for a richer flavor. Making caramel at home lets you control the sweetness and saltiness. Plus, it adds a special touch to your dessert that store-bought can't match. To check if the cheesecake is done, look for a slight jiggle in the center. The edges should be set and firm. If the center moves too much, it needs more time. Remember, it will continue to cook while cooling, so don’t overbake it. This method ensures a creamy texture without cracks. Yes, making the cheesecake a day before is ideal. This allows the flavors to meld and improves the texture. It also saves you time on the day of your gathering. Just make sure to refrigerate it until ready to serve. A chilled cheesecake tastes best and is easy to slice. For the filling, I recommend using a mix of Granny Smith and Honeycrisp apples. Granny Smith adds tartness, while Honeycrisp offers sweetness. This blend creates a balanced flavor. You can also experiment with other varieties, but these two work perfectly together. Absolutely! This cheesecake is perfect for holidays, birthdays, and family gatherings. Its rich flavors and beautiful presentation impress everyone. Treat your guests to something special with this dessert. Salted caramel apple pie cheesecake is sure to be a hit at any event. This dessert combines a delicious graham cracker crust, sweet apple filling, and creamy cheesecake. It’s simple to follow each step from preparing the crust to layering the fillings. Remember to chill it well for the best flavor. Get creative with variations or toppings to suit your taste. This cheesecake is perfect for any occasion. Enjoy your tasty creation!](https://stirredrecipes.com/wp-content/uploads/2025/07/9f45a5a0-03df-44c2-8767-6d6e383b3aba.webp)
Salted Caramel Apple Pie Cheesecake Delight
Craving a dessert that wows? Let me introduce you to the Salted Caramel Apple Pie Cheesecake Delight! This layered treat combines creamy cheesecake, spiced apple