Desserts
![Making apple cider cookies is simple and fun. You will need fresh ingredients that add flavor and texture. - 2 cups all-purpose flour - 1 teaspoon baking soda - 1 teaspoon ground cinnamon - 1/2 teaspoon ground nutmeg - 1/2 teaspoon salt - 3/4 cup unsalted butter, softened - 1 cup brown sugar, packed - 1/2 cup granulated sugar - 1 large egg - 1 teaspoon vanilla extract - 1/4 cup apple cider (not hard cider) - 1 cup chopped apples (preferably Granny Smith or Honeycrisp) - 1/2 cup chopped walnuts or pecans (optional) - 1/4 cup powdered sugar for dusting These cookies shine with the flavors of fall. The apple cider gives them a unique taste. Using fresh apples adds great texture. I recommend Granny Smith or Honeycrisp for the best results. The nuts are optional but add a nice crunch. You can find the full recipe to guide you through each step. Enjoy baking! 1. Preheat your oven to 350°F (175°C). Line two baking sheets with parchment paper. 2. In a medium bowl, whisk together: - 2 cups all-purpose flour - 1 teaspoon baking soda - 1 teaspoon ground cinnamon - 1/2 teaspoon ground nutmeg - 1/2 teaspoon salt 3. In a large bowl, use an electric mixer to beat: - 3/4 cup unsalted butter, softened - 1 cup brown sugar, packed - 1/2 cup granulated sugar Mix until light and fluffy, about 2-3 minutes. 4. Add 1 large egg and 1 teaspoon vanilla extract to the butter mixture. Mix well until smooth. 5. Pour in 1/4 cup apple cider gradually. Mix until the batter is smooth. 6. Gradually add the dry ingredients to the wet mixture. Mix until just combined. Do not overmix. 7. Fold in: - 1 cup chopped apples (preferably Granny Smith or Honeycrisp) - 1/2 cup chopped walnuts or pecans (optional) Make sure they are evenly distributed. 8. Using a tablespoon or cookie scoop, drop spoonfuls of dough onto the prepared baking sheets. Space them about 2 inches apart. 9. Bake in the preheated oven for 10-12 minutes. The edges should turn golden brown. The centers can look slightly underbaked for a chewy texture. 10. Let the cookies cool on the baking sheets for 5 minutes. Then, transfer them to a wire rack to cool completely. 11. Once cooled, dust the cookies with 1/4 cup powdered sugar for a sweet finish. Enjoy making these cinnamon-infused apple cider cookies! For the complete process, see the Full Recipe. - Set your oven to 350°F (175°C). This heat helps cookies bake evenly. - Bake for 10-12 minutes. The edges should turn golden brown. - Look for a slight shine in the center. This means they are perfect. - Try adding a pinch of ginger for warmth. Nutmeg also works well. - For chewiness, do not overmix the dough. Fold ingredients gently. - Chilling the dough for 30 minutes can enhance the flavors. - Arrange cookies on a colorful plate. This makes them more inviting. - Dust with powdered sugar for a snowy look. - Add apple slices or cinnamon sticks for a festive touch. - Serve with warm apple cider for a cozy feel. This recipe is a joy to make and share! You can find the Full Recipe to enjoy these delightful cookies. {{image_2}} You can easily swap some ingredients in this cookie recipe. For a gluten-free option, use gluten-free flour. This works well and keeps the cookies tasty. You can also try different sugars. Instead of brown sugar, use coconut sugar for a deeper flavor. Or, use white sugar for a lighter taste. Each swap can change the cookie's character while keeping it delicious. Want to mix up the taste? Add chocolate chips or dried fruits to the dough. Chocolate chips give a sweet twist, while dried fruits like cranberries add chewiness. You can also change spice levels. If you love cinnamon, add more! If you prefer a milder flavor, cut back a bit. Make the cookies your own by adjusting these flavors. If you're looking for eggless options, use flaxseed meal. Mix one tablespoon of flaxseed meal with three tablespoons of water. Let this sit to thicken, then add it to the dough. This works just as well. For nut-free recipes, skip the walnuts or pecans. You can replace them with seeds like sunflower or pumpkin for crunch. These options make the cookies safe for all to enjoy. For the full recipe, check here: [Full Recipe]. To keep your apple cider cookies fresh at room temperature, place them in an airtight container. This helps maintain their soft texture. You can stack the cookies neatly, but use parchment paper between layers to prevent sticking. Always store them in a cool, dry spot away from sunlight. If you want to enjoy these cookies later, freezing is a great option. Wrap each cookie in plastic wrap and place them in a freezer bag. This keeps them fresh for about three months. When you're ready to eat, remove them from the freezer and let them thaw at room temperature. To maintain texture, heat them in a low oven for a few minutes. When stored properly, apple cider cookies can last about one week at room temperature. Look for signs that they are no longer fresh, such as a hard or dry texture. If they smell off or have visible mold, it’s time to toss them. Keeping an eye on these details helps you enjoy your treats at their best. Can I use hard cider instead of apple cider? No, stick with apple cider. Hard cider has alcohol and will change the taste. It can also affect the cookie's texture and rise, making them less tender. How can I make these cookies less sweet? You can reduce the sugars. Try using 3/4 cup of brown sugar instead of 1 cup. You can also skip the powdered sugar dusting on top. This helps cut down on sweetness. Best ways to enjoy apple cider cookies? Serve them warm with a glass of apple cider. They pair well with coffee or tea too! For a fun twist, try adding a scoop of vanilla ice cream on top. How to double the recipe successfully? To double the recipe, just multiply each ingredient by two. Make sure you have enough space on your baking sheets. You might need to bake in batches if your oven cannot fit them all. Substitutions for missing ingredients? If you run out of butter, you can use coconut oil or margarine. For apples, any firm fruit works. If you don’t have walnuts or pecans, just leave them out or use chocolate chips instead. What is the best way to measure flour? Always spoon flour into a measuring cup. Avoid scooping directly from the bag. This prevents packing the flour, which leads to too much in your dough. Level it with a knife for accuracy. Should I chill the cookie dough before baking? Chilling the dough helps the cookies spread less. If you want thicker cookies, chill for 30 minutes. If you prefer a chewier texture, go ahead and bake right away. This blog post shared a simple and tasty apple cider cookie recipe. You learned the main ingredients, easy steps, and helpful tips to bake them perfectly. With suggested variations, you can customize these cookies for any taste. You also found smart ways to store them for later enjoyment. Bake these cookies and enjoy the warm flavors. Whether for a special event or just for fun, they are sure to please. Happy baking!](https://stirredrecipes.com/wp-content/uploads/2025/08/a740d98f-3cce-428d-89ca-9763f9c7a32e.webp)
Apple Cider Cookies Scrumptious and Easy Treat
Looking for a cozy treat this fall? These Apple Cider Cookies are scrumptious and easy to make. With warm spices and fresh apples, they capture

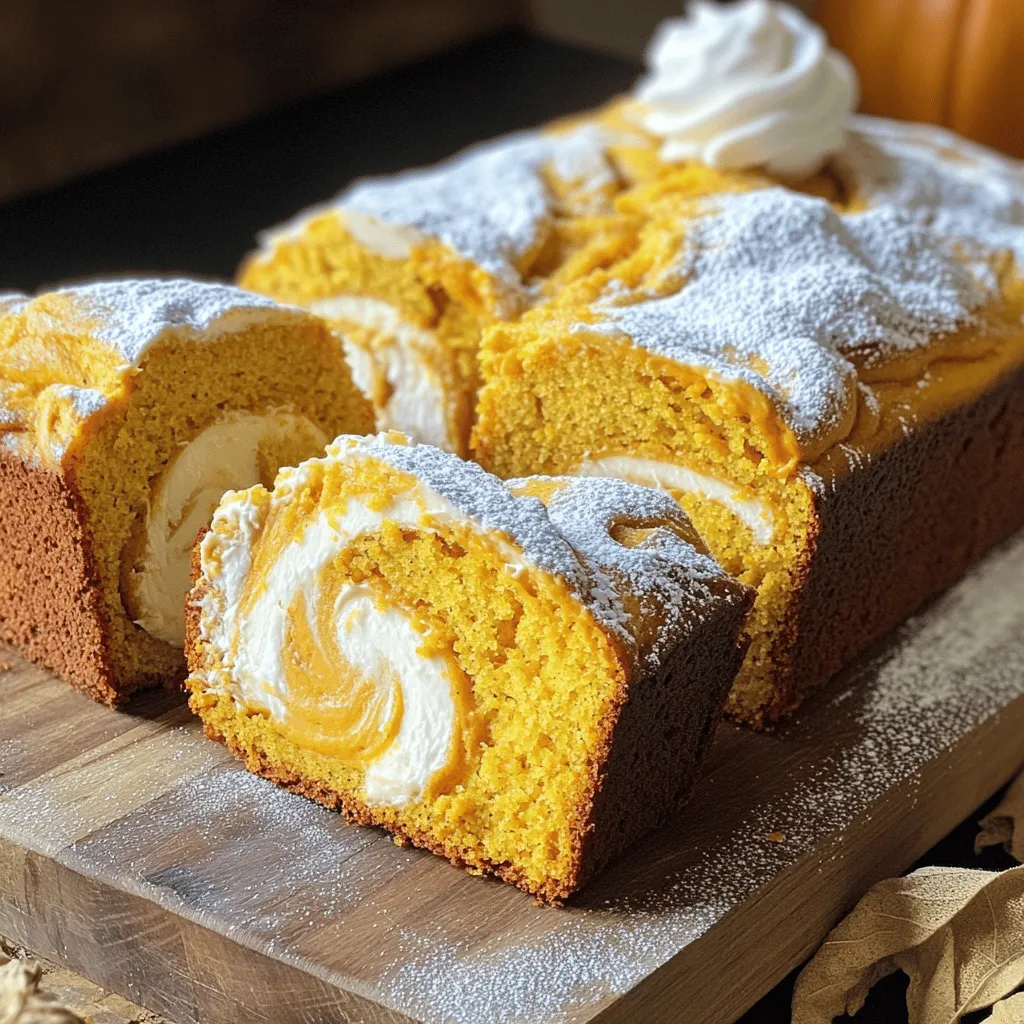
Chewy Pumpkin Cookies Perfect for Fall Baking
Fall is here, and that means it’s time to bake something special! These chewy pumpkin cookies are the perfect treat, blending the warm flavors of
. Enjoy the process! - Make sure your butter is at room temperature. This helps it cream better. - Insert a toothpick into the center of the cake to check if it's done. If it comes out clean, your cake is ready! - If you want, you can use brown sugar instead of granulated sugar. This adds a nice flavor. - Try using different apples, like Fuji or Honeycrisp, for a sweeter taste. You can also swap pecans for walnuts or almonds if you prefer. - Serve the cake warm with a scoop of vanilla ice cream on top. It melts a bit and tastes amazing! - Pair your cake with coffee or tea. The warm spices in the cake go great with these drinks. For the complete recipe, check out the [Full Recipe]. {{image_2}} You can add more flavor to your Apple Pecan Cake by using spices. Try adding ginger or cloves for a warm kick. These spices pair well with apples and pecans. You can also mix in dried fruits like raisins or cranberries. This adds sweetness and texture to the cake. Each bite will surprise your taste buds! If you need a gluten-free option, you can use gluten-free flour. It works well in this recipe. For those who want a vegan cake, replace the eggs with applesauce. You can also use coconut oil instead of butter. These swaps keep the cake moist and tasty. Everyone can enjoy this delicious treat! You can change the size and shape of your cake. Bake it in different pan sizes for varied thickness. A round pan gives you a classic look. You can also make cupcakes or muffins. This makes serving easy for gatherings or lunchboxes. Plus, they bake faster than a full cake. Enjoy the fun of baking your way! To store your Apple Pecan Cake, let it cool first. Once cool, cover it with plastic wrap or foil. This keeps the cake moist and fresh. You can also place it in an airtight container. It will last in the fridge for about five days. If it’s hot outside, refrigerate it to avoid spoilage. If you want to keep the cake longer, freezing is a great option. Cut the cake into slices for easy serving. Wrap each slice in plastic wrap, then put them in a freezer bag. This keeps them fresh for up to three months. To enjoy, thaw the slices overnight in the fridge. Reheat them in the microwave for a few seconds, and they’ll taste fresh again. At room temperature, the cake lasts about two days. Make sure to keep it covered to protect it from air. Look for signs of spoilage, like mold or an off smell. If the cake feels dry or crumbly, it’s best to toss it. For the best flavor, eat it while it’s fresh. This is when the apples and pecans shine the most. For the full recipe, check the section above. To make the Apple Pecan Cake, follow these steps: 1. Preheat your oven to 350°F (175°C). Grease and flour a 9x13 inch baking pan. 2. In a large bowl, mix the dry ingredients: flour, sugar, baking powder, baking soda, salt, cinnamon, and nutmeg. 3. In another bowl, cream the softened butter until smooth. 4. Add the eggs, one at a time, and mix well. Then add the vanilla extract. 5. Slowly add the dry ingredients to the wet mixture until just combined. 6. Gently fold in the chopped apples and pecans. 7. Pour the batter into the prepared pan. Smooth it out with a spatula. 8. For the topping, mix brown sugar, oats, and cinnamon in a small bowl. Sprinkle it on top of the batter. 9. Bake for 35-40 minutes. Check with a toothpick; it should come out clean. 10. Cool the cake in the pan for about 10 minutes, then move it to a wire rack. This process makes a delightful cake you can enjoy with friends and family. For the full recipe, check out the recipe section above. Yes, you can use other nuts in this recipe. Here are some great options: - Walnuts: They add a rich taste and crunch. - Almonds: Sliced almonds give a nice texture. - Hazelnuts: These offer a unique flavor twist. - Cashews: They add creaminess and a soft crunch. Feel free to experiment with your favorite nuts. Just chop them up and add them like pecans. If your cake turns out dry, don't worry. Here are some tips to fix it: - Check your oven temperature. An oven that is too hot can dry out cakes. - Use fresh apples, as they add moisture. Granny Smith works well here. - Add a bit of applesauce to the batter next time. It keeps the cake moist. - Cover the cake with foil while baking if it browns too fast. These steps can help you achieve a moist and tasty cake every time. In this post, we covered the ingredients for a delicious apple pecan cake. We explored both dry and wet components, plus tasty toppings. I shared clear steps to mix and bake your cake perfectly. I offered tips and variations to make this cake your own. Baking can be fun and rewarding. With this recipe, you can impress friends and family. Enjoy your time in the kitchen and savor every bite of your cake!](https://stirredrecipes.com/wp-content/uploads/2025/08/cb984b07-47ae-4539-b062-84bc17fdb734.webp)
Apple Pecan Cake Delightful and Simple Recipe
Looking to impress your friends with a tasty dessert? My Apple Pecan Cake is both delightful and simple to make! With fresh apples and crunchy
![- 1 ½ cups all-purpose flour - 1 tsp baking powder - 1 tsp baking soda - 1 tsp ground cinnamon - ½ tsp ground nutmeg - ½ tsp ground ginger - ½ tsp salt - 1 cup canned pumpkin puree - ½ cup vegetable oil - ¾ cup brown sugar, packed - ½ cup granulated sugar - 2 large eggs - 1 tsp vanilla extract - 8 oz cream cheese, softened - ½ cup unsalted butter, softened - 2 cups powdered sugar - 1 tsp vanilla extract - 1 tsp ground cinnamon In this recipe, I choose simple, fresh ingredients. The dry ingredients form the base of our cupcakes. They add structure. Flour gives the cupcakes their shape. Baking powder and baking soda help them rise. The spices—cinnamon, nutmeg, and ginger—bring warmth and flavor. For the wet ingredients, we use canned pumpkin puree. It gives moisture and a lovely pumpkin taste. Vegetable oil keeps the cupcakes tender. The sugars add sweetness and depth. Eggs bind everything together while adding richness. Finally, vanilla extract enhances the overall flavor. The frosting is a treat on its own. Cream cheese and butter create a smooth texture. Powdered sugar sweetens it perfectly. A bit of vanilla and cinnamon brings everything together. The result is a creamy frosting that pairs well with the spicy cupcakes. For the full recipe, check the instructions that follow. - Preheat your oven to 350°F (175°C) and line a cupcake tin with paper liners. - In a medium bowl, whisk together 1 ½ cups all-purpose flour, 1 tsp baking powder, 1 tsp baking soda, 1 tsp ground cinnamon, ½ tsp ground nutmeg, ½ tsp ground ginger, and ½ tsp salt. Set aside. - In a large mixing bowl, combine 1 cup canned pumpkin puree, ½ cup vegetable oil, ¾ cup brown sugar, ½ cup granulated sugar, 2 large eggs, and 1 tsp vanilla extract. Whisk until smooth. - Gradually add the dry ingredients to the wet mixture, stirring gently until just combined. Be careful not to overmix. - Scoop the batter into the lined cupcake tins, filling each about 2/3 full. - Bake for 18-22 minutes. Check doneness with a toothpick; it should come out clean. - Let the cupcakes cool for 5 minutes in the tin before transferring them to a wire rack. - For the frosting, beat 8 oz of softened cream cheese and ½ cup of softened unsalted butter together until creamy. - Gradually add 2 cups of powdered sugar, 1 tsp vanilla extract, and 1 tsp ground cinnamon. Mix until smooth and fluffy. - Once the cupcakes are cool, use a piping bag or knife to generously frost each cupcake. To get the best texture for your pumpkin cupcakes, avoid overmixing. When you mix too much, the cupcakes can turn out dense. It’s okay if there are a few lumps in the batter. Also, use room temperature ingredients. This helps them mix better and gives you a softer cupcake. Want to take your cupcakes to the next level? Try adding chocolate chips or chopped pecans to the batter. They add a nice crunch and flavor. You can also experiment with flavored extracts, like almond or maple. This twist can make your cupcakes unique and delightful. For a clean and pretty finish, use a piping bag to frost your cupcakes. It gives them a professional look. If you want to add a little extra, sprinkle some crushed nuts or colorful sprinkles on top. This not only makes them pretty but also adds more texture and taste. For more details, you can check out the Full Recipe. {{image_2}} If you want gluten-free pumpkin cupcakes, you can easily make a swap. Just substitute all-purpose flour with a gluten-free flour blend. This change keeps the cupcakes light and fluffy while making them suitable for those who avoid gluten. It’s a simple swap that allows everyone to enjoy this tasty treat. For a vegan version, you can replace eggs with flax eggs. To make flax eggs, mix one tablespoon of ground flaxseed with three tablespoons of water. Let it sit for a few minutes to thicken. Use dairy-free butter and cream cheese to keep the frosting creamy and delicious. This option still gives you that rich pumpkin flavor without any animal products. You can change up the spices to create new flavors. For a unique twist, try adding cardamom or allspice. These spices add warmth and depth to the flavor profile. You might even experiment with a blend of cinnamon, nutmeg, and ginger for a fragrant cupcake that excites the taste buds. With these variations, you can adapt the pumpkin cupcakes to meet different dietary needs and flavor preferences. For the full recipe, check the [Full Recipe]. Keep your unfrosted pumpkin cupcakes in an airtight container at room temperature. They will stay fresh for up to 3 days. This way, you can enjoy the soft texture and warm spices. If you have frosted these cupcakes with the lovely cinnamon cream cheese frosting, refrigerate them. They will last for up to one week. Before serving, let them sit at room temperature for a bit. This helps bring out the best flavor and texture of the frosting. You can freeze your unfrosted cupcakes if you want to save some for later. They freeze well for up to 3 months. Make sure to wrap each cupcake tightly in plastic wrap or foil. Frost them after thawing to keep the cream cheese frosting fresh and fluffy. For the complete recipe, check out the Full Recipe. Yes, you can use substitutes like flaxseed meal or applesauce. To replace one egg, mix one tablespoon of flaxseed meal with three tablespoons of water. Let it sit for a few minutes until it thickens. You can also use a quarter cup of unsweetened applesauce as a substitute. Both options work well and keep the cupcakes moist. A toothpick inserted in the center should come out clean. If the toothpick has batter on it, the cupcakes need more time. Keep an eye on them after 18 minutes. The baking time is usually 18 to 22 minutes, depending on your oven. Yes, just ensure it's properly cooked and pureed before use. Fresh pumpkin can add a nice flavor. To prepare, roast the pumpkin until it is soft, then scoop out the flesh and blend until smooth. Be sure to measure the puree accurately for best results. You now have all the steps to make delicious pumpkin cupcakes. We covered the key ingredients, step-by-step instructions, and helpful tips. Remember, avoid overmixing for that perfect fluffy texture. You can also try cool variations, like gluten-free or vegan options. Storing them right keeps them fresh longer. Now, get baking and enjoy these tasty treats! Your friends and family will love them.](https://stirredrecipes.com/wp-content/uploads/2025/08/b8049289-d27d-4e6d-82cb-6155e491242d.webp)
Pumpkin Cupcakes with Cinnamon Cream Cheese Delight
Indulge in the perfect fall treat with my Pumpkin Cupcakes with Cinnamon Cream Cheese Delight! These warm, spiced cupcakes are moist and full of flavor,
![To make baked pumpkin donuts, you need these key ingredients: - 1 cup pure pumpkin puree - 1/2 cup granulated sugar - 1/4 cup brown sugar, packed - 1/2 cup unsweetened applesauce - 2 large eggs - 1 teaspoon vanilla extract - 2 cups all-purpose flour - 1 teaspoon baking powder - 1 teaspoon baking soda - 1 teaspoon ground cinnamon - 1/2 teaspoon ground nutmeg - 1/4 teaspoon ground ginger - 1/4 teaspoon salt - 1/4 cup melted coconut oil or unsalted butter - Cinnamon sugar (for coating) These ingredients work together to give the donuts a warm, spiced flavor that screams autumn. The pumpkin puree adds moisture and a rich taste. The applesauce helps keep the donuts soft and tender. You can also add some optional ingredients to elevate your donuts: - Chopped nuts, like walnuts or pecans - Chocolate chips for a sweet twist - Dried fruit, such as cranberries or raisins - A dash of allspice for extra warmth These optional ingredients can make your donuts unique and fun to eat. Try mixing and matching them based on your taste. If you have dietary needs, here are some helpful substitutions: - Use a gluten-free flour mix instead of all-purpose flour. - Replace eggs with flaxseed meal mixed with water (1 tablespoon flaxseed + 2.5 tablespoons water). - Opt for a sugar substitute like stevia or coconut sugar. - Use applesauce as a dairy-free option instead of coconut oil or butter. These substitutions allow everyone to enjoy baked pumpkin donuts without worry. Just remember that these changes may alter the final texture and flavor slightly. For the full recipe, refer to the earlier section. To start, gather all your ingredients. You will need: - 1 cup pure pumpkin puree - 1/2 cup granulated sugar - 1/4 cup brown sugar, packed - 1/2 cup unsweetened applesauce - 2 large eggs - 1 teaspoon vanilla extract - 2 cups all-purpose flour - 1 teaspoon baking powder - 1 teaspoon baking soda - 1 teaspoon ground cinnamon - 1/2 teaspoon ground nutmeg - 1/4 teaspoon ground ginger - 1/4 teaspoon salt - 1/4 cup melted coconut oil or unsalted butter - Cinnamon sugar (for coating) Begin by preheating your oven to 350°F (175°C). Grease your donut pan with non-stick spray or oil. In a large bowl, whisk the pumpkin puree, granulated sugar, brown sugar, applesauce, eggs, and vanilla extract together. Make sure these ingredients mix well. In another bowl, sift the flour, baking powder, baking soda, cinnamon, nutmeg, ginger, and salt. Gradually mix the dry ingredients into the wet ingredients. Stir gently; avoid overmixing. Fold in the melted coconut oil or butter until it blends in fully. Spoon the batter into the donut pan. Fill each cavity about three-quarters full. Bake your donuts for 12 to 15 minutes. You know they are done when a toothpick poked in the center comes out clean. Let the donuts cool in the pan for about 5 minutes. After that, transfer them to a wire rack to cool completely. This step helps keep your donuts light and fluffy. Once cooled, it's time for the final touch! Toss the donuts in cinnamon sugar for added flavor. This gives them a sweet, spiced coat that is hard to resist. Serve these delightful donuts on a rustic platter for a beautiful presentation. Enjoy with a cup of cider or coffee. If you want the full recipe, check out the [Full Recipe]. To make the best baked pumpkin donuts, follow these tips: - Use pure pumpkin puree, not pumpkin pie filling. - Measure your flour correctly. Too much flour makes donuts dense. - Mix wet and dry ingredients separately before combining. This helps avoid lumps. - Do not overmix the batter. Stir until just combined for fluffier donuts. - Fill the donut pan only 3/4 full. This gives donuts room to rise. Here are some common mistakes to watch out for: - Forgetting to preheat the oven can lead to uneven baking. - Using old baking powder or baking soda can cause donuts to be flat. - Overbaking can make your donuts dry. Keep an eye on them. - Skipping the cinnamon sugar coating robs the donuts of extra flavor. - Not letting the donuts cool in the pan can lead to breakage. Having the right tools can help you bake better. Here are my top picks: - Donut Pan: A non-stick donut pan is essential for easy release. - Mixing Bowls: Use large bowls for easy mixing. - Whisk: A good whisk helps blend ingredients well. - Rubber Spatula: This is great for folding in wet and dry ingredients. - Cooling Rack: A wire rack allows air to circulate and cool donuts evenly. For the complete recipe, check out the Full Recipe. {{image_2}} You can spice up your baked pumpkin donuts with simple changes. Try adding a pinch of ground cloves or allspice for extra warmth. You can also mix in chocolate chips or chopped nuts for texture. Dried fruits, like cranberries or raisins, can add a sweet twist. Experiment with flavors to find your favorite combo! If you want gluten-free donuts, swap all-purpose flour with a gluten-free blend. Make sure it has xanthan gum for texture. For a vegan version, replace eggs with flax eggs. Just mix one tablespoon of flaxseed meal with three tablespoons of water. Let it sit until it thickens. Use a plant-based oil instead of butter or coconut oil. Icing and glaze can make your donuts even more fun. A simple glaze can be made with powdered sugar and milk. If you want a rich flavor, try maple syrup in your glaze. For a chocolate glaze, melt dark chocolate and drizzle it over the cooled donuts. You can also sprinkle with nuts or coconut for extra crunch. For the full recipe, check out the [Full Recipe]. To keep your baked pumpkin donuts fresh, store them in an airtight container. Place parchment paper between layers to avoid sticking. Keep the container at room temperature for up to three days. If you want to enjoy them longer, consider freezing. To freeze baked pumpkin donuts, first, let them cool completely. Then, wrap each donut in plastic wrap. Place the wrapped donuts in a freezer-safe bag. They can last for up to three months in the freezer. When you’re ready to eat them, remove the desired amount and let them thaw at room temperature. To warm your donuts, preheat your oven to 350°F (175°C). Place the donuts on a baking sheet and heat for about 5 to 8 minutes. This method keeps them soft and tasty. You can also use a microwave for 10-15 seconds if you need a quick fix. Baked pumpkin donuts stay fresh for about 3 days. Store them in an airtight container at room temperature. If they get too soft, you can pop them in the fridge. They taste best when eaten fresh, but you can also freeze them for up to 2 months. Just make sure to wrap them well. Yes, you can use fresh pumpkin! First, cook the pumpkin until soft. Then, mash it and strain it to remove extra moisture. This makes a tasty puree. Just keep in mind that fresh pumpkin may have a different flavor than canned. You might want to adjust your spices to match your taste. Baked pumpkin donuts pair well with many treats. You can serve them with hot coffee or chai tea for a cozy vibe. Cream cheese frosting or a simple glaze adds a nice touch. Fresh fruit, like apples or pears, also makes a great side. Try adding a scoop of vanilla ice cream for a fun dessert twist! For the full recipe, check out the details above. Baked pumpkin donuts are fun and easy to make. We covered key ingredients, tips, and variations to create your perfect donut. Remember to choose the right flavors and decorations to make it unique. Store extras properly to keep them fresh. Enjoy these donuts any time, with or without a friend. With this guide, you're ready to impress and have fun in the kitchen. Happy baking!](https://stirredrecipes.com/wp-content/uploads/2025/08/f4559351-65c3-4b5f-be9b-dd04218daa5b.webp)
Baked Pumpkin Donuts Irresistible and Simple Recipe
Are you ready to enjoy a tasty fall treat you can make at home? Baked pumpkin donuts are easy to whip up and perfect for
Delicious Pumpkin Cream Cheese Bread Easy Recipe
If you crave the cozy flavors of fall, you’ll love this Pumpkin Cream Cheese Bread recipe! It’s easy to make and combines the warm spices
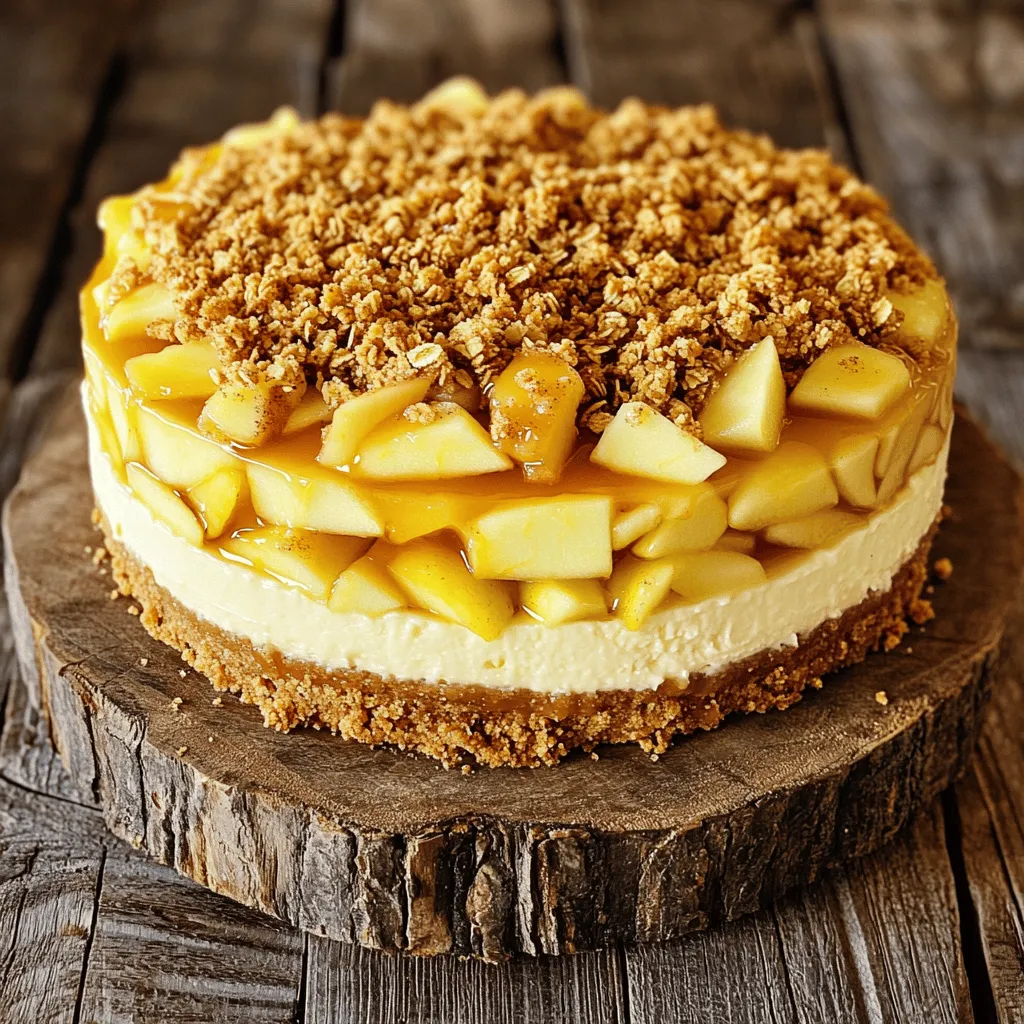
Apple Crisp Cheesecake Irresistible Dessert Recipe
Are you ready to impress your family and friends with a dessert that combines sweet, tart apples and creamy cheesecake? The Apple Crisp Cheesecake is
![- 1 cup pumpkin puree (canned or fresh) - 1 cup granulated sugar - 1/2 cup brown sugar - 1/2 cup vegetable oil - 2 large eggs - 1 teaspoon vanilla extract - 1 1/2 cups all-purpose flour - 1 teaspoon baking powder - 1 teaspoon baking soda - 1 teaspoon ground cinnamon - 1/2 teaspoon ground nutmeg - 1/4 teaspoon ground ginger - 1/4 teaspoon salt - 1/2 cup butter, softened - 1 cup brown sugar - 1/4 cup milk - 2 cups powdered sugar - 1 teaspoon vanilla extract - 9x13 inch baking pan - Mixing bowls - Whisk and spatula - Saucepan for frosting When making pumpkin bars, you’ll need some key items. First, the pumpkin puree is essential. It gives the bars a rich flavor and moistness. You can use canned or fresh pumpkin. Both work well. Next, the sugars add sweetness. I like to combine granulated sugar and brown sugar for depth. The brown sugar brings a hint of caramel flavor. You also need vegetable oil for moisture and eggs to bind everything together. For spices, ground cinnamon, nutmeg, and ginger create that classic fall flavor. The flour, baking powder, and baking soda help the bars rise and stay fluffy. Don’t forget the salt! It balances the sweetness. Now, onto the frosting. You need butter and brown sugar, which create a creamy texture. Milk helps to make it smooth. Finally, powdered sugar adds sweetness and thickness. Before you start baking, gather all these ingredients and equipment. This will make the process smoother. If you're curious about the full recipe, check out the [Full Recipe]. 1. Preheat your oven to 350°F (175°C). This step is key for even baking. 2. In a large mixing bowl, combine these wet ingredients: - 1 cup pumpkin puree (canned or fresh) - 1 cup granulated sugar - 1/2 cup brown sugar - 1/2 cup vegetable oil - 2 large eggs - 1 teaspoon vanilla extract Mix these until they are smooth and well-blended. 3. In another bowl, mix the dry ingredients: - 1 1/2 cups all-purpose flour - 1 teaspoon baking powder - 1 teaspoon baking soda - 1 teaspoon ground cinnamon - 1/2 teaspoon ground nutmeg - 1/4 teaspoon ground ginger - 1/4 teaspoon salt Whisk well to combine. 4. Gently add the dry mix to the wet mix. Stir until just combined. Do not overmix; the batter should be thick and smooth. 5. Pour the batter into a greased 9x13 inch baking pan. Spread it evenly. 6. Bake for 25-30 minutes. Check doneness by inserting a toothpick. It should come out clean. Let the bars cool in the pan on a wire rack. 7. While the bars cool, melt 1/2 cup butter and 1 cup brown sugar in a saucepan over medium heat. Stir continuously. 8. Add 1/4 cup milk and bring to a boil. Then, remove from heat and let it cool slightly. 9. Gradually whisk in 2 cups powdered sugar and 1 teaspoon vanilla extract until smooth and fluffy. 10. Once the bars are cool, spread the brown sugar frosting evenly on top. Now, cut into squares and serve. For the full recipe, check the section above. To get the best pumpkin bars, ensure your pumpkin puree is not too watery. If it is, your bars may turn out soggy. Drain any excess liquid before using it. Also, avoid overmixing the batter. Gently stir the wet and dry ingredients together until just combined. This will help keep your bars light and fluffy. When making your brown sugar frosting, let the mixture cool slightly after boiling. This keeps the frosting from melting when you spread it on the bars. You can also adjust the sugar in the frosting. If you want it sweeter or less sweet, simply add more or less powdered sugar to your taste. For a lovely presentation, serve your pumpkin bars on a decorative platter. A simple dusting of cinnamon adds a nice touch. You can also garnish with pumpkin seeds or chopped pecans. This adds a nice crunch and enhances the overall look. For the full recipe, check out the complete guide! {{image_2}} You can change up the flavor of your pumpkin bars easily. Here are a few fun ideas: - Add chocolate chips: Fold in a cup of semisweet chocolate chips for a rich taste. - Include nuts: Toss in half a cup of chopped walnuts for crunch and flavor. - Experiment with spices: Try adding cloves or allspice instead of just cinnamon. This adds warmth and depth. These small changes can make your pumpkin bars unique and exciting! If you want to switch up the frosting, consider these options: - Cream cheese frosting: This adds a tangy flavor. Mix 8 oz of cream cheese with 1/2 cup of butter, 3 cups of powdered sugar, and vanilla. - Maple syrup glaze: Mix 1 cup of powdered sugar with 2 tablespoons of maple syrup and a bit of milk. This offers a sweet, fall-inspired twist. These alternatives can give your pumpkin bars a whole new personality! You can also make the recipe fit different diets with these swaps: - Coconut oil: Replace vegetable oil with coconut oil for a slight coconut flavor. It adds nice richness. - Gluten-free flour: Use a 1:1 gluten-free flour blend instead of all-purpose flour. This way, everyone can enjoy your treat. With these variations, your pumpkin bars can cater to different tastes and dietary needs, making them a hit for any gathering! For the full recipe, check out the details above. Keep your pumpkin bars covered at room temperature for 3-4 days. This helps keep them soft and moist. For long-term storage, refrigerate the bars in an airtight container. They will last up to a week. You can also freeze them for up to 3 months. You can freeze them either unfrosted or frosted. Just make sure to wrap them well. To enjoy your pumpkin bars warm, just warm them in the microwave for a few seconds. They taste great cold or at room temperature too. You can find the Full Recipe for more details. Yes, you can use homemade pumpkin puree instead of canned. Fresh pumpkin has a great taste. To make puree, cook the pumpkin until soft, then blend it. This adds a lovely texture and flavor to your bars. Cut into squares using a sharp knife for clean edges. A sharp knife helps keep the frosting intact. For best results, cut when the bars are completely cool. This way, you get nice, even pieces that look great on a plate. Absolutely! These bars can be made a few days in advance and stored. Keep them in an airtight container at room temperature. This helps the flavors develop even more. You can frost them right before serving for a fresh look. You can use coconut sugar or a mixture of granulated sugar and molasses. Coconut sugar gives a caramel-like taste. If you use granulated sugar, mix it with molasses in a 1:1 ratio. This makes a great substitute for brown sugar in the frosting. These pumpkin bars are simple to make and taste great. You learned about the key ingredients, how to bake them, and tips for the best texture. Variations let you change flavors, and storage ideas help keep them fresh longer. Feel free to try new frostings or add mix-ins like chocolate chips or nuts. Enjoy the joy of creating your own delicious pumpkin bars!](https://stirredrecipes.com/wp-content/uploads/2025/08/835a977c-229c-4701-a51c-8f5261c58ea2.webp)
Pumpkin Bars with Brown Sugar Frosting Irresistible Treat
If you’re craving a sweet autumn treat that’s simple to make, you’re in the right place! These Pumpkin Bars with Brown Sugar Frosting are sure
![- 1 cup apple cider - 2 cups all-purpose flour - 1 teaspoon baking powder - 1/2 teaspoon baking soda - 1 teaspoon ground cinnamon - 1/2 teaspoon ground nutmeg - 1/2 teaspoon salt - 1/2 cup granulated sugar - 1/4 cup brown sugar, packed - 1/4 cup unsweetened applesauce - 2 large eggs - 1/4 cup vegetable oil - 1 teaspoon vanilla extract - Cinnamon sugar (for coating: mix 1/4 cup sugar with 1 teaspoon cinnamon) When I make baked apple cider donuts, I love using fresh apple cider. It adds a deep flavor. The spices like cinnamon and nutmeg give warmth to each bite. I use both granulated and brown sugar. This mix gives a nice sweetness and a slight caramel note. The applesauce keeps the donuts moist. Eggs help bind everything together. Vegetable oil adds richness, while vanilla extract brightens the taste. Make sure to have a donut pan ready. This recipe yields about 12 donuts. You can enjoy them warm, coated in cinnamon sugar. Trust me; they will disappear fast! For the full recipe, check the details above. 1. Preheat your oven to 350°F (175°C). Grab your donut pan and spray it with cooking spray. This helps the donuts come out easily. 2. Reduce the apple cider. Pour 1 cup of apple cider into a small saucepan. Heat it over medium heat. Bring it to a gentle boil. Then, lower the heat. Let it simmer until it reduces to about 1/2 cup. This takes about 10-15 minutes. After that, let it cool for a bit. 3. Mix your dry ingredients together. In a large bowl, add 2 cups of all-purpose flour. Then, mix in 1 teaspoon of baking powder, 1/2 teaspoon of baking soda, 1 teaspoon of ground cinnamon, 1/2 teaspoon of ground nutmeg, and 1/2 teaspoon of salt. Whisk all of this until it is well combined. 1. Whisk the wet ingredients until smooth. In another bowl, combine 1/2 cup of granulated sugar, 1/4 cup of brown sugar, 1/4 cup of unsweetened applesauce, and 2 large eggs. Add in 1/4 cup of vegetable oil and 1 teaspoon of vanilla extract. Whisk until the mixture is creamy. 2. Combine the wet and dry mixtures carefully. Add the cooled apple cider to the wet mixture. Mix well. Then, slowly add the dry ingredients. Stir gently until just combined. Be careful not to overmix. The batter should be thick. 1. Fill the donut pan and bake. Spoon the thick batter into the greased donut pan. Fill each cavity about 3/4 full. Bake for 10-12 minutes. Check if they are done by inserting a toothpick. It should come out clean. 2. Cool the donuts before serving. After baking, allow the donuts to cool in the pan for about 5 minutes. Gently remove them and roll them in cinnamon sugar while they are still warm. This gives them a sweet finish. For the full recipe, check out the complete instructions above. Enjoy your homemade baked apple cider donuts! To make the best baked apple cider donuts, you must avoid overmixing the batter. When you mix too much, the donuts can turn out tough. Just stir until the dry and wet ingredients blend. It is okay if a few lumps remain. Another key tip is to ensure even baking for a uniform texture. Fill each donut cavity about three-quarters full for consistent size and shape. Rotate your pan halfway through baking. This helps all the donuts bake evenly. Presentation is vital for a great display. Arrange your donuts on a pretty platter. Drizzle some leftover apple cider reduction on top for added flavor. Sprinkle a little extra cinnamon sugar around. This adds a nice touch and makes them look inviting. Pair these donuts with a warm cup of coffee or tea. The warmth of the drinks enhances the spices in the donuts. For a fun twist, serve them with a scoop of vanilla ice cream. It makes for a delightful dessert. If you want the full recipe, check it out in the article above! {{image_2}} You can make baked apple cider donuts even better! Try adding spices like ginger or cloves. These spices add warmth and depth to the flavor. Just a pinch can transform your donuts. You might also enjoy mixing in nuts or chocolate chips. Chopped walnuts or pecans add a nice crunch. If you crave sweetness, chocolate chips can create a delightful surprise in every bite. If you have dietary needs, don’t worry! You can easily substitute gluten-free flour for the all-purpose flour. This keeps your donuts just as tasty. For those who follow a vegan diet, try using egg replacements. Flax eggs or unsweetened yogurt work well. These swaps make the recipe friendly for everyone. Enjoy your baked apple cider donuts no matter your diet! Feel free to explore more ideas and tips in the Full Recipe for baked apple cider donuts! To keep your baked apple cider donuts fresh, follow these tips: - Cool Completely: Let the donuts cool before storing. This prevents moisture build-up. - Use Airtight Containers: Store them in an airtight container to keep them soft. - Room Temperature: Keep them at room temperature for up to three days. - Refrigeration: If you need them to last longer, you can refrigerate them. However, this may change their texture. Reheating donuts can bring back their warm, fresh taste. Here are some simple tips: - Microwave Method: Heat one donut for about 10-15 seconds. This warms it nicely. - Oven Method: Preheat your oven to 350°F (175°C). Place the donuts on a baking sheet for 5-7 minutes. - Taste Tips: Add a sprinkle of cinnamon sugar after reheating for extra flavor. For the full recipe, check out the details above. Enjoy your delicious donuts! Can I use fresh apple juice instead of cider? Yes, you can use fresh apple juice. However, cider has a deeper apple flavor. This adds more richness to the donuts. If using juice, opt for a thick, premium brand. How can I make these donuts healthier? To make the donuts healthier, try these tips: - Use whole wheat flour instead of all-purpose flour. - Replace granulated sugar with a natural sweetener like honey or maple syrup. - Swap applesauce for oil to cut down on fat. These changes can help boost nutrition while keeping the taste delicious. What is the best way to glaze or frost baked donuts? The best way to glaze or frost baked donuts is simple. Start with a basic glaze made of powdered sugar and a splash of milk. Mix until smooth. For a fun twist, add cinnamon or vanilla extract. Drizzle this glaze over the cooled donuts. You can also dip the tops in it for a thicker coat. Enjoy your tasty creation! For a full recipe, visit the [Full Recipe]. You learned how to make apple cider donuts from scratch. We covered the key ingredients, step-by-step instructions, tips for perfection, and tasty variations. Storing and reheating these donuts keeps them fresh and delightful. In the end, baking can be fun and rewarding. Enjoy these donuts while they are fresh and warm. Experiment with flavors to make your own version. Happy baking!](https://stirredrecipes.com/wp-content/uploads/2025/08/ae414916-bf9b-421b-9e37-ea5cc75eda50.webp)
Baked Apple Cider Donuts Simple and Delicious Recipe
Ready for a sweet treat that captures the essence of fall? My baked apple cider donuts are simple to make and bursting with flavor. This
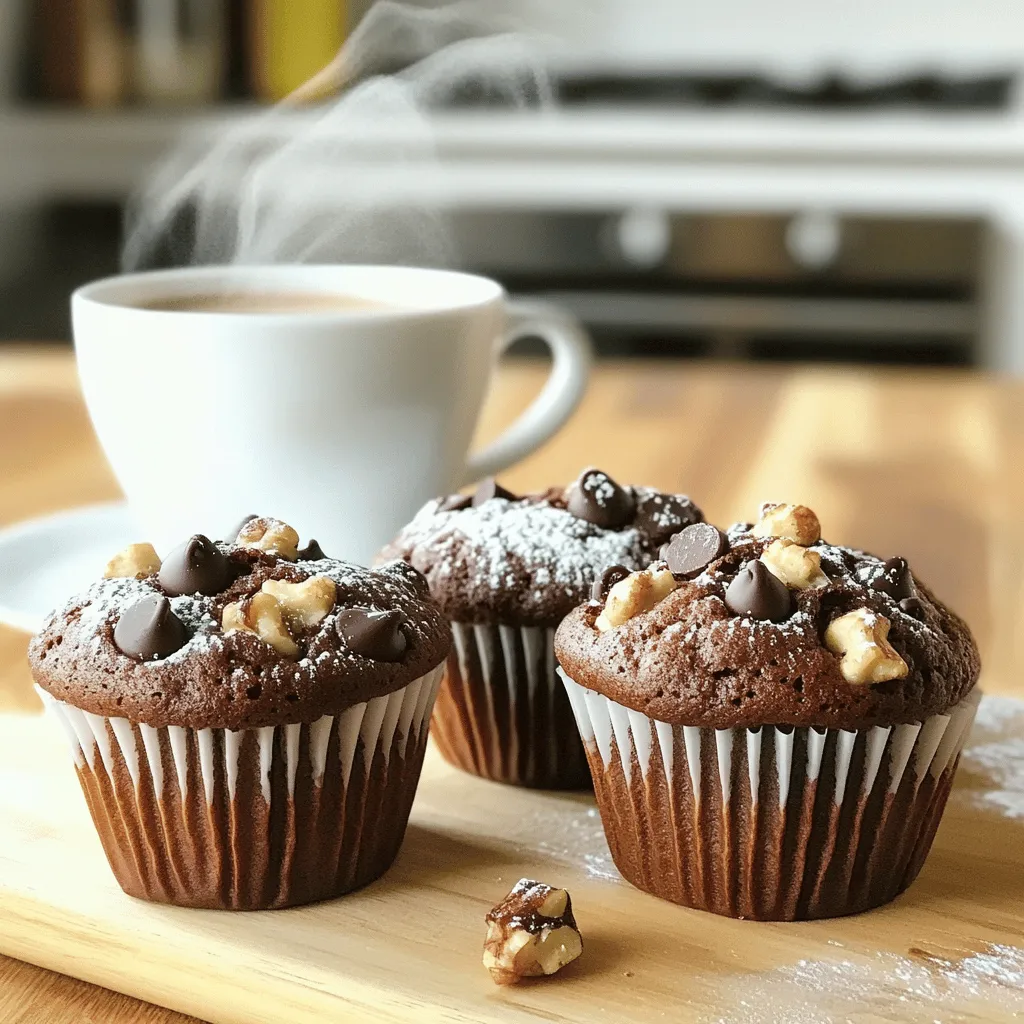
Decadent Double Chocolate Espresso Muffins Recipe
Indulge yourself with my Decadent Double Chocolate Espresso Muffins! These rich, moist muffins blend bold espresso with deep chocolate flavors, creating a treat perfect for