Appetizers

Mini Grilled Cheese Sandwiches Fun and Tasty Treats
Who doesn’t love a warm, gooey mini grilled cheese sandwich? These fun and tasty treats are perfect for any occasion, whether it’s a party, snack
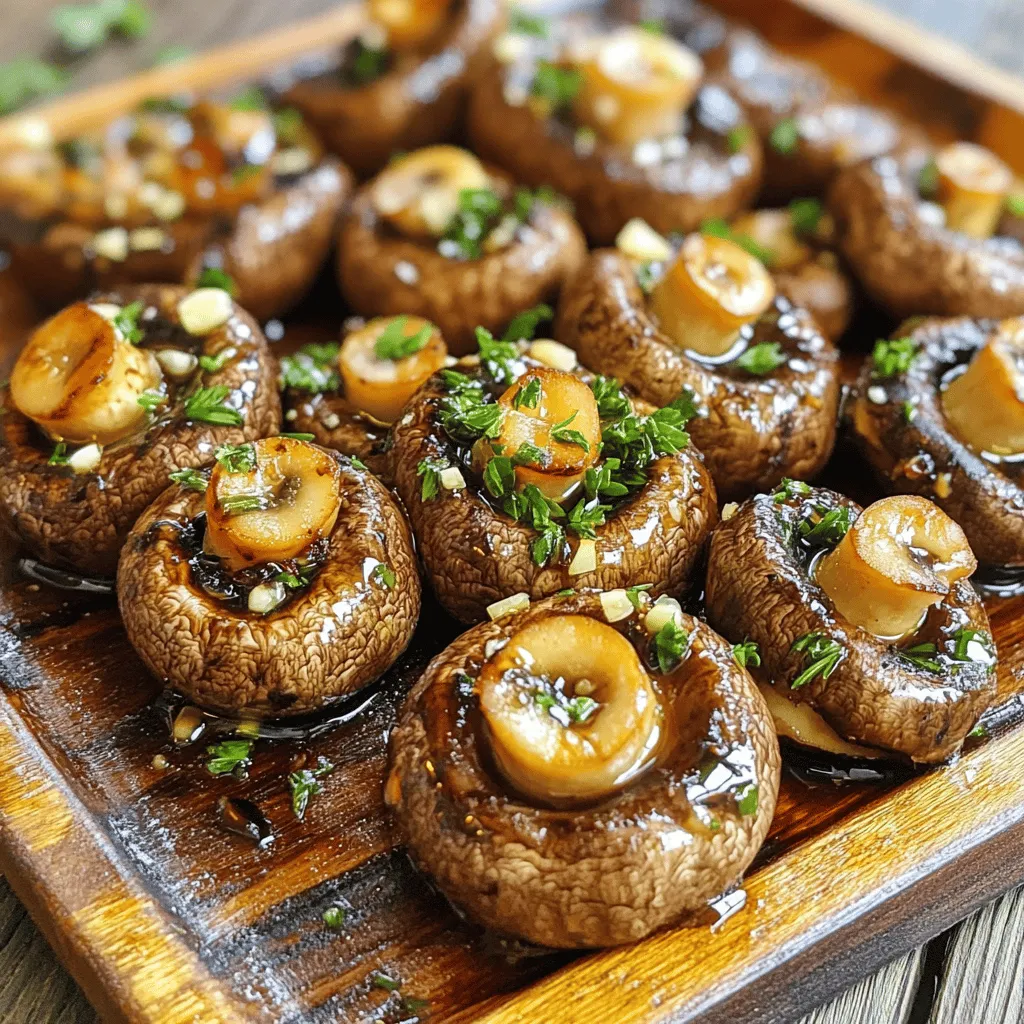
Sautéed Grilled Garlic Mushrooms Tasty and Simple Dish
Are you ready to elevate your dinner with a simple yet tasty dish? Sautéed Grilled Garlic Mushrooms are here to impress! With just a few
![- 2 cups all-purpose flour - 1 tablespoon baking powder - 1/2 teaspoon baking soda - 1 teaspoon salt - 1/2 teaspoon garlic powder - 1/2 cup cold unsalted butter, cubed - 1 cup shredded sharp cheddar cheese - 1 cup canned green chiles, drained and chopped - 3/4 cup buttermilk - 1 tablespoon fresh cilantro, chopped (optional, for garnish) - Choosing the right cheese: Use sharp cheddar for bold flavor. It melts well and adds richness. - Freshness of green chiles: Opt for good-quality canned chiles. Fresh or roasted chiles can work too. - Importance of cold butter: Cold butter makes the biscuits flaky. It creates air pockets that help the biscuits rise. Using fresh and quality ingredients makes a big difference in the taste. I always recommend using the best cheese and fresh chiles when you can. You can find the Full Recipe to guide you through the steps. Enjoy making biscuits that are both tasty and comforting! First, preheat your oven to 425°F (220°C). Line a baking sheet with parchment paper. This step helps prevent sticking and makes cleanup easy. Next, in a large mixing bowl, whisk together the dry ingredients: 2 cups of all-purpose flour, 1 tablespoon of baking powder, 1/2 teaspoon of baking soda, 1 teaspoon of salt, and 1/2 teaspoon of garlic powder. Make sure they mix well. This creates a strong base for your biscuits. Now, let’s add the butter. Take 1/2 cup of cold unsalted butter and cube it. Add the cubes to the flour mix. Use a pastry cutter or your fingers to cut the butter into the flour. You want the mixture to look like coarse crumbs. This step gives the biscuits their flaky texture. Next, gently fold in 1 cup of shredded sharp cheddar cheese and 1 cup of drained, chopped green chiles. Be careful and don’t overmix. Once your mixture is ready, pour in 3/4 cup of buttermilk. Stir gently until the dough comes together. Turn the dough out onto a lightly floured surface and pat it into a rectangle about 1-inch thick. Use a biscuit cutter or a round glass to cut out biscuits. Place them on your prepared baking sheet. Gather any dough scraps, press again, and cut out more biscuits. Bake in the preheated oven for 12-15 minutes until they are golden brown. Enjoy the warm, cheesy aroma filling your kitchen! For the full recipe, check the earlier section. To get the best dough, look for these signs: - It should feel soft, not sticky. - The dough should hold its shape well. Avoid overmixing. Overmixing makes biscuits tough. Mix only until the ingredients combine. A few lumps are okay. This keeps your biscuits light and fluffy. Spices can add a great kick. Try adding a pinch of cayenne pepper or smoked paprika. These spices give a nice, spicy flavor. Using different types of cheese can change the taste. Try pepper jack for more heat or gouda for a rich flavor. Mixing cheeses can make the biscuits even better. For golden brown biscuits, follow these tips: - Bake at 425°F (220°C) for best results. - Keep an eye on them. They should take about 12-15 minutes to bake. Oven temperature is key. An even temperature helps biscuits rise and brown nicely. Use an oven thermometer to check if your oven runs hot or cold. This small step ensures your biscuits turn out perfect every time. Be sure to check out the Full Recipe for all the details! {{image_2}} You can easily switch up the flour in this recipe. Whole wheat flour adds a nuttier taste. Gluten-free flour works well, too, for those avoiding gluten. Just be sure to use a blend made for baking. Cheese is another fun area to explore. You could swap sharp cheddar for pepper jack for a spicy kick. Or try mozzarella for a milder flavor and gooey texture. Each cheese brings its own charm to these biscuits. Want more heat? Add diced jalapeños to the mix. They give a nice zing to every bite. If you want a different twist, try adding herbs like thyme or rosemary. A sprinkle of smoked paprika can add depth and richness, too. Feel free to experiment with spices such as cumin or oregano. Each spice can change the flavor profile in exciting ways. Get creative and find what suits your taste! These biscuits work great alongside soups and stews. Their fluffy texture complements creamy and hearty dishes. You can also serve them with chili for a comfort food feast. If you have leftovers, don’t worry! Use them to make a breakfast sandwich. Just add an egg and some avocado for a tasty morning bite. You could also crumble them over a salad for an unexpected crunch. For more tips and the full recipe, check out the [Full Recipe]. To keep your green chile cheddar biscuits fresh, store them in the fridge. Place the biscuits in an airtight container. This helps keep them soft. You can also wrap them in plastic wrap before putting them in the container. If you want to save them for longer, freeze them. Wrap each biscuit in foil and place them in a freezer bag. They can last up to three months in the freezer. To enjoy your biscuits warm again, reheat them in the oven. Preheat the oven to 350°F (175°C). Place the biscuits on a baking sheet and heat for about 10 minutes. This will keep them nice and fluffy. You can also microwave them for a quick option. Just heat them for 15-20 seconds. For a fun twist, serve them with a drizzle of honey or a spread of butter. These biscuits last about 2 to 3 days in the fridge. After that, they may start to dry out. Look for signs of spoilage, like a hard texture or an off smell. If they become too hard, you can crumble them into a soup or salad for extra flavor. Enjoy your green chile cheddar biscuits fresh for the best taste! For the full recipe, check out the detailed instructions. Look for a few clear signs. First, the biscuits should be golden brown on top. Second, a toothpick inserted in the center should come out clean. Lastly, the biscuits will have a nice rise and feel firm to the touch. For the best results, aim for an internal temperature of 190°F (88°C). This means they are fully baked and ready to enjoy! Yes, you can! You can prepare the dough a day ahead. Just wrap it tightly in plastic wrap and store it in the fridge. When you’re ready to bake, take it out and let it sit at room temperature for about 15 minutes. For optimal texture when reheating, bake the biscuits fresh. If you have leftovers, store them in an airtight container for up to three days. If you want a different flavor, consider using jalapeños or roasted red peppers. Each option brings a unique taste. Jalapeños add more heat, while roasted red peppers offer a sweet touch. You can also try using diced bell peppers for a milder flavor. Just keep in mind, each substitute will change the final taste of the biscuit. Yes, you can modify this recipe for various diets. For gluten-free options, use a gluten-free flour blend. This works well in most baking recipes. If you need a dairy-free version, replace the buttermilk with almond milk and use dairy-free cheese. These changes keep the flavor nice without losing the comfort of the biscuits. In this post, we explored how to make delicious green chile cheddar biscuits. You learned about the key ingredients, step-by-step instructions, and tips for perfecting texture and flavor. We also covered variations, storage, and answers to common questions. These biscuits are not just tasty; they are easy to make and customize. Try them for your next meal, and enjoy the warmth and flavor they bring. You’ll impress everyone, including yourself, with these simple yet delightful snacks.](https://stirredrecipes.com/wp-content/uploads/2025/07/38fc21af-7931-4dec-a9ac-1975f8ee84b5.webp)
Green Chile Cheddar Biscuits Flavorful Comfort Food
If you’re looking for a tasty twist on classic biscuits, you’ve landed in the right spot! My Green Chile Cheddar Biscuits are bursting with flavor

Non-Alcoholic Autumn Harvest Punch Tasty and Festive
Fall is here, and it’s time to sip on something festive! My Non-Alcoholic Autumn Harvest Punch is the perfect blend of flavors to celebrate the

Scarecrow Crunch Snack Mix Tasty Treat Idea
Looking for a fun, festive treat this fall? Let me introduce you to Scarecrow Crunch Snack Mix! This mix combines popcorn, pretzels, candy corn, and
![To make quick and easy salsa, you need fresh and simple ingredients. Here’s what you will need: - Ripe tomatoes - Red onion - Jalapeño - Fresh cilantro - Lime - Cumin - Olive oil - Salt These ingredients create a vibrant and tasty salsa. Ripe tomatoes give the salsa its juicy base. Red onion adds a nice crunch and sweetness. Jalapeño brings heat, which you can adjust based on your taste. Fresh cilantro offers a bright flavor that ties everything together. The lime juice adds acidity, making the salsa lively. Cumin provides an earthy note, and olive oil adds richness. Finally, salt enhances all the flavors. Using fresh produce makes a big difference. I recommend using ripe tomatoes for the best taste. You can find these at your local market or grocery store. Remember, the better the ingredients, the better your salsa will be! For the full recipe, check the earlier section. To make quick and easy salsa, start by dicing the tomatoes. Use fresh, ripe tomatoes for the best flavor. Cut them into small pieces so they mix well. Next, chop the red onion finely. This will add a nice crunch and flavor. After that, prepare the jalapeño. Cut it in half, remove the seeds, and mince it into tiny bits. This step helps control the spice level. Lastly, chop the fresh cilantro. This herb gives the salsa a bright taste. Now it’s time to mix the salsa. Take a medium bowl and put in the diced tomatoes, chopped onion, minced jalapeño, and cilantro. Squeeze the juice of one lime over the mixture. This will add a zesty kick. Next, add one teaspoon of cumin for warmth and flavor. Pour in one tablespoon of olive oil to bring everything together. Season with salt to taste. Then, gently mix all the ingredients until they are well combined. Let the salsa rest for about ten minutes. This allows the flavors to meld together. The waiting time helps the ingredients share their tastes. For the best serving suggestions, enjoy the salsa with tortilla chips. You can also use it as a topping for tacos or grilled meats. The freshness of the salsa makes any meal pop. For the full recipe, check the section above. For salsa, you want juicy and flavorful tomatoes. I recommend using Roma or vine-ripened tomatoes. They have a firm texture and great taste. Ripe tomatoes will give your salsa a rich flavor. Unripe tomatoes may taste bland and watery. Always choose tomatoes that feel heavy for their size and have a deep color. To make your salsa pop, adjust the spice levels to your taste. If you like it hot, add more jalapeño or even a dash of hot sauce. For a milder salsa, remove the seeds from the jalapeño. Fresh herbs like cilantro add a bright flavor. You can also use parsley if you prefer something milder. Serve your salsa in a colorful bowl for visual appeal. Add some lime wedges on the side for a fresh touch. Pair your salsa with tortilla chips, tacos, or grilled meats. It also works well as a topping for fish. This way, your dish looks great and tastes even better. For the full recipe, refer to the section above. {{image_2}} You can add a sweet twist to your salsa by using fruits. Mango or pineapple gives a fresh touch. Just chop them up and mix them in. You can also explore other fruits like peaches or strawberries. Their sweetness balances the tangy flavors of the tomatoes. This adds a fun twist and a burst of color to your dish. Want your salsa to pack more heat? You can easily adjust the spice level. For a milder salsa, remove the seeds from the jalapeño. This helps reduce the heat. If you like it spicy, consider adding a serrano pepper or a few dashes of hot sauce. Each pepper brings its unique flavor and kick. Experimenting with spice can make your salsa stand out. Adding more veggies can create a salsa that is both colorful and tasty. Try incorporating corn, bell peppers, or diced cucumbers for crunch. You can also enhance the flavor with herbs like oregano or basil. Fresh herbs give a fragrant lift to your salsa. Just chop them finely and mix them in. Each ingredient brings its charm to your dish. If you're looking for a classic salsa, you can stick to the [Full Recipe]. To keep your salsa fresh, store it in the fridge. Use an airtight container for best results. A glass jar or plastic container works well. This keeps the salsa from drying out. Always let the salsa cool before sealing it. This helps prevent condensation inside the container. Yes, you can freeze salsa! First, put it in a freezer-safe container. Leave some space at the top, as salsa expands when frozen. To thaw, take it out and place it in the fridge overnight. You can also thaw it in cold water for a quicker option. Once thawed, stir it well before use. Homemade salsa lasts about 5 to 7 days in the fridge. Keep an eye out for any changes. Signs of spoilage include a change in color or smell. If you see mold, toss it out. Always trust your senses when it comes to food safety. For more details on making salsa, check the Full Recipe. To make quick and easy salsa, you follow some simple steps. First, gather your ingredients. You need ripe tomatoes, red onion, jalapeño, cilantro, lime juice, cumin, olive oil, and salt. 1. Dice the ripe tomatoes and chop the red onion. 2. Mince the jalapeño, removing seeds if you want less heat. 3. In a medium bowl, combine the tomatoes, onion, jalapeño, and cilantro. 4. Squeeze the lime juice over the mix. 5. Add the cumin and olive oil. 6. Season with salt to taste. 7. Mix gently until everything is combined. 8. Let it sit for about 10 minutes to let the flavors meld. This whole process takes only about 10 minutes. You can find the full recipe for more details. Yes, you can make salsa ahead of time! For the best flavor, prepare it a few hours in advance. This lets the flavors develop more fully. If you need to make it a day ahead, that works too. Just keep it in the fridge. It’s best to eat it within 2 to 3 days for the freshest taste. Salsa pairs well with many foods. Here are some ideas: - Tortilla chips for a crunchy snack. - Tacos to add zest and freshness. - Grilled meats like chicken or fish for added flavor. - Burritos for a tasty topping. - Nachos to elevate your game day snack. Feel free to experiment with your favorite dishes! This salsa recipe combines fresh tomatoes, onions, and spices for a tasty dish. Preparation is easy if you follow simple steps. Remember, choosing ripe tomatoes and balancing flavors makes a big difference. You can also try fun variations like fruit salsas or adjusting spice levels. Store your salsa well for the best taste. Enjoy your fresh salsa with chips, tacos, or anything you please! Now, get creative and make your perfect batch!](https://stirredrecipes.com/wp-content/uploads/2025/07/dc92d734-6ec5-4ea7-ba76-bee85151fc0a.webp)
Quick and Easy Salsa Flavorful and Fresh Recipe
Looking for a fresh and zesty salsa recipe? You’ve come to the right place! I’ll show you how to whip up a quick and easy
![- 2 cups all-purpose flour - 2 tablespoons olive oil - 1 cup shredded mozzarella cheese - 1/2 cup pepperoni slices - Your choice of vegetable toppings - Red pepper flakes for spice - 1 teaspoon Italian seasoning - 1/2 cup marinara sauce - 1 egg for egg wash To create the perfect pizza pockets, start with the essential ingredients. All-purpose flour gives the dough structure. Olive oil adds flavor and helps with texture. Shredded mozzarella cheese melts beautifully, making it a key ingredient. Next, consider optional ingredients. Pepperoni slices add a classic taste. You can choose any veggies you like, such as bell peppers or mushrooms. If you want some heat, sprinkle on red pepper flakes. For added flavor, use suggested seasonings. Italian seasoning brings an herb blend that enhances the taste. Marinara sauce adds moisture and flavor. An egg wash gives a golden, shiny finish to your pizza pockets. For the full recipe, refer to the [Full Recipe]. Enjoy making these tasty treats! To start, I mix my dry ingredients. I grab a large bowl and add: - 2 cups all-purpose flour - 1 teaspoon salt - 1 teaspoon baking powder I whisk them together until they are well combined. Next, I create a well in the center of the flour mix. I pour in: - 2 tablespoons olive oil - 3/4 cup warm water I stir it all until a dough starts to form. Then, I knead the dough on a floured surface for about 3 to 5 minutes. I want it smooth and elastic. After kneading, I cover the dough with a clean kitchen towel or plastic wrap. I let it rest for 15 minutes. This helps the dough relax. While it rests, I preheat my oven to 400°F (200°C). I also prepare a baking sheet lined with parchment paper. Once the dough has rested, I roll it out on a floured surface. I aim for about 1/8 inch thick. Then, I cut the dough into circles or squares, each about 4 to 6 inches wide. Now it’s time to fill the pockets! On one half of each dough piece, I add: - A generous amount of shredded mozzarella cheese - A few slices of pepperoni (or my favorite veggie toppings) - A teaspoon of marinara sauce - A pinch of Italian seasoning I fold the other half of the dough over the filling. I press the edges together to seal. For a nice touch, I crimp the edges with a fork. I place my assembled pizza pockets on the baking sheet. Before they go in the oven, I prepare an egg wash. I whisk one egg in a small bowl and brush it over the top of each pocket. This gives them a nice, glossy finish. I bake them in the preheated oven for 15 to 20 minutes. I watch for them to turn golden brown. After baking, I let the pizza pockets cool slightly. They are now ready to enjoy! You can serve them with extra marinara sauce for dipping. You will love making these Easy Cheesy Homemade Pizza Pockets! For the full recipe, check out the specific instructions provided. To make the best dough, avoid common mistakes. Use the right flour type. All-purpose flour works best. Make sure to measure your ingredients accurately. Too much or too little flour can change the texture. Knead the dough well for 3-5 minutes. This gives it strength. If the dough feels sticky, add a bit more flour. If it's too dry, a little water will help. For the right texture, let the dough rest. Resting helps the gluten relax. This makes rolling out easier. Cover the dough with a towel while it rests. Let it sit for about 15 minutes. This short wait makes a big difference. Adding flavor is fun! Use herbs and spices to boost taste. Italian seasoning is a must. It gives aroma and depth. You can also add garlic powder or onion powder for extra flavor. Don't be afraid to experiment! For fillings, customize them to your liking. Try different cheeses like cheddar or provolone. You can also add veggies like bell peppers or mushrooms. For a kick, sprinkle in some red pepper flakes. The more you mix, the more unique your pizza pockets will be. An egg wash is key for a golden finish. It adds shine and helps the dough brown. To make an egg wash, whisk one egg with a splash of water. Brush it over the top of each pocket before baking. This simple step enhances the look. For a great presentation, arrange the pizza pockets nicely. Use a wooden board for serving. Add small bowls of marinara sauce for dipping. Sprinkle fresh herbs like basil on top for color. A shiny crust and good presentation make your pizza pockets shine! {{image_2}} For those who crave meat, think about adding more proteins. Consider using cooked sausage or ham along with pepperoni. You can even add diced bacon for a bold flavor. A mix of these meats makes a rich filling that pleases any meat lover. Try combining different flavors, like spicy sausage with sweet bell peppers. This will create a hearty option that everyone will enjoy. If you prefer veggies, there are many tasty fillings to try. You can use mushrooms, spinach, or bell peppers for a fresh taste. Combine these with ricotta or feta cheese for added creaminess. Mixing roasted vegetables with mozzarella can also create a delightful mix. Experiment with different herbs like basil or oregano to enhance the flavor. For those avoiding gluten, you can swap out all-purpose flour. Use almond flour or a gluten-free flour blend instead. These work well for making a dough that holds together. When making gluten-free dough, keep an eye on the texture. Adding a bit of xanthan gum can help with elasticity. This way, you can enjoy pizza pockets without the gluten! For the complete recipe, check out the [Full Recipe]. To keep your pizza pockets fresh, store them in a sealed container. Place them in the fridge. They last up to three days. If you want them to taste great, let them cool first. This step prevents moisture buildup inside the container. To reheat your pizza pockets, use the oven or an air fryer. Preheat the oven to 350°F (175°C). Bake for about 10 minutes. This method keeps the crust crispy. Avoid using the microwave, as it makes the dough soggy. If you must use a microwave, heat them for a short time on a low setting. You can freeze pizza pockets before or after baking. If freezing before baking, wrap each pocket in plastic wrap. Place them in a freezer-safe bag. They will keep for up to three months. To freeze after baking, let them cool first. Then, follow the same wrapping method. When you want to enjoy a frozen pocket, thaw it in the fridge overnight. For a quick option, use the microwave on a low setting for a few minutes. Then, finish by reheating in the oven or air fryer for a crispy texture. Yes, you can use pre-made dough. It saves time and effort. Many stores sell options like pizza dough or puff pastry. Pros: - Quick and easy. - Less mess to clean up. Cons: - Flavor may not be as fresh. - Texture might be less doughy. If you want convenience, pre-made dough works well. Just follow the same steps for filling and baking. You can make these pizza pockets lighter. Start by using whole wheat flour instead of all-purpose flour. - Add more veggies like bell peppers or spinach. - Use less cheese or a low-fat version. - Try a mix of mozzarella and a sprinkle of feta for flavor. These changes keep the taste while adding good nutrients. Marinara is a classic, but there are many choices. Consider these options: - Garlic butter for a rich dip. - Ranch dressing for a creamy option. - Hot sauce for a spicy kick. You can also make a homemade sauce. Mix yogurt with herbs for a fresh dip. Another idea is to blend roasted red peppers with olive oil for a sweet sauce. These sauces will elevate your pizza pockets! You learned how to make pizza pockets from scratch. We covered essential ingredients like flour and mozzarella. You found tips for crafting the perfect dough and filling. We explored tasty variations, including meat and veggie options. Proper storage keeps leftovers fresh, while reheating ensures crispness. With this guide, you can impress anyone with your skills. Enjoy creating delicious pizza pockets tailored to your taste! Simple steps will lead to great results. Now, it’s time to get cooking and share these tasty snacks!](https://stirredrecipes.com/wp-content/uploads/2025/07/67a175e4-cdcf-43bd-a54c-9e4bf9a0482a.webp)
Easy Cheesy Homemade Pizza Pockets Simple Delight
Looking for a fun meal that’s quick and cheesy? You’ll love these Easy Cheesy Homemade Pizza Pockets! With just a few simple ingredients, you can
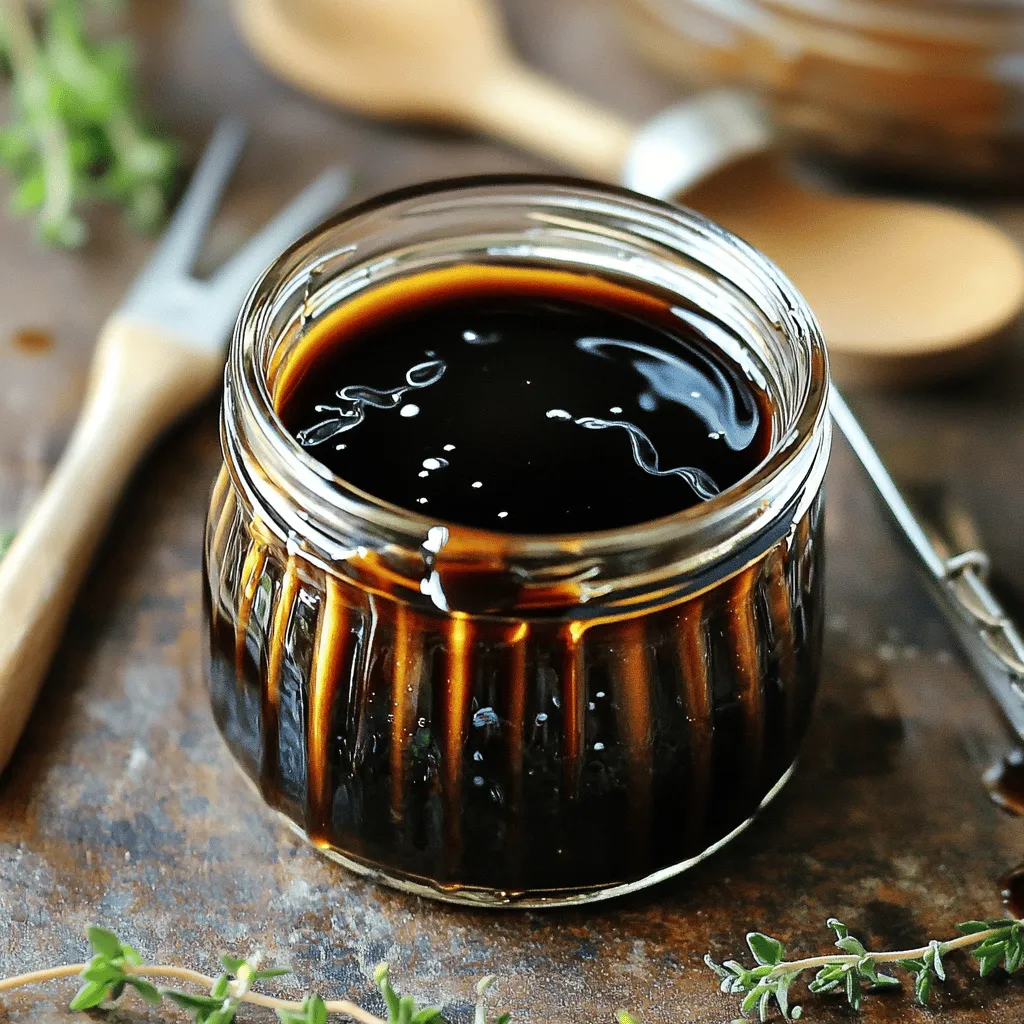
Easy Balsamic Glaze Simple and Delicious Recipe
If you crave a simple yet delicious addition to your meals, look no further! This Easy Balsamic Glaze recipe will transform your dishes with just
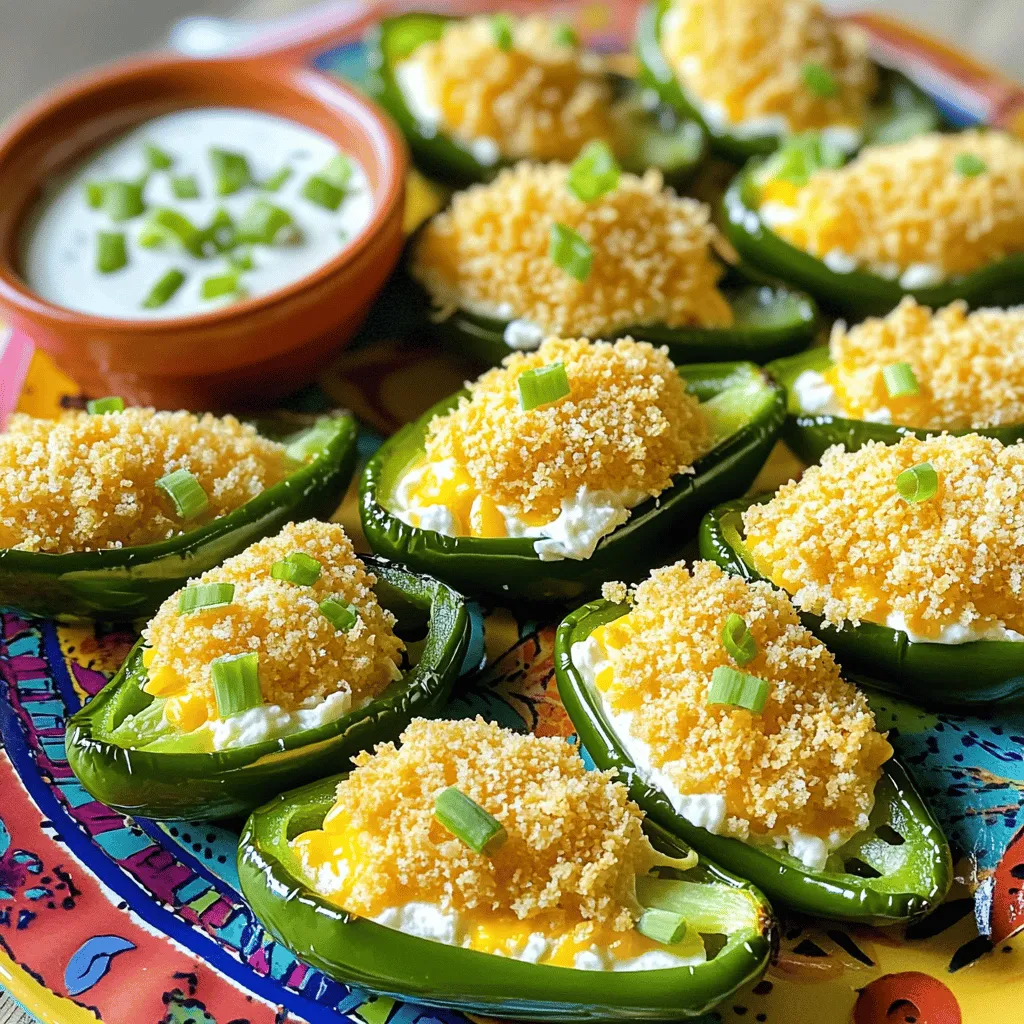
Cheesy Jalapeño Popper Bites Irresistible Snack Treat
Are you ready to elevate your snack game with Cheesy Jalapeño Popper Bites? These bites pack a flavorful punch with creamy cheese and just the

Crispy Bang Bang Chicken Recipe Everyone Will Love
Craving a dish that’s both crispy and packed with flavor? You’re in the right place! My Crispy Bang Bang Chicken Recipe is easy to make