Appetizers

- Cauliflower florets - Flour mixture - Panko breadcrumbs - Seasonings To make fried cauliflower, start with fresh cauliflower florets. Choose a medium head for the best size. The flour mixture adds a nice base. Combine all-purpose flour, garlic powder, onion powder, paprika, turmeric, salt, and pepper for flavor. Panko breadcrumbs add crunch. This blend ensures a crispy coating when fried. - Eggs - Lemon zest - Vegetable oil - Garnishes Eggs help the breading stick. They create a nice layer on the florets. Adding lemon zest gives a fresh taste. Vegetable oil is essential for frying. It needs to be hot enough to cook the cauliflower evenly. For garnishes, fresh parsley adds color and flavor. Lemon wedges make the dish bright and zesty. - Calories per serving - Macronutrients breakdown - Potential health benefits Each serving has about 200 calories. Fried cauliflower is a good source of fiber. It can support a healthy diet. The vitamins in cauliflower boost your immune system. It’s a tasty way to enjoy veggies while keeping things fun. Start by rinsing the cauliflower florets under cold water. This step cleans them well. After rinsing, dry each floret with a clean towel. Drying is key for a crunchy texture. Next, set up three bowls for the breading process. One bowl holds the flour mix, another has the egg wash, and the last contains panko breadcrumbs. In the first bowl, mix flour, garlic powder, onion powder, paprika, turmeric, salt, and pepper. This blend adds great flavor. In the second bowl, whisk the eggs and lemon zest until smooth. Now, for each cauliflower floret, follow these steps: First, coat it in the flour mixture and shake off extra flour. Then, dip it into the egg wash. Finally, roll it in the panko breadcrumbs. Press lightly to help the crumbs stick well. Heat vegetable oil in a large skillet over medium heat. You want the oil to shimmer, which means it's hot enough. Carefully add the breaded florets in batches. Don't overcrowd the pan, or they won’t fry evenly. Fry them for about 3-4 minutes on each side. Look for a golden brown color and a crispy texture. Once done, use a slotted spoon to transfer them to a paper towel-lined plate. This helps drain excess oil. For the full recipe, you can refer to the complete instructions provided above. To get that perfect crunch, you must dry the cauliflower well. Water makes the batter soggy. Rinse the florets, then pat them dry with a towel. This simple step helps ensure each bite remains crisp. Next, keep an eye on the oil temperature. If the oil is too cool, the cauliflower will soak up oil and become greasy. Aim for a hot temperature, around 350°F (175°C). This helps the batter become golden and crispy. Want to kick up the flavor? Try adding spices like cayenne pepper or smoked paprika. They bring a new taste to your fried cauliflower. You can also switch up the breadcrumbs. Use seasoned breadcrumbs or crushed cornflakes for a fun twist. Each option adds its own flavor and crunch. When it comes to serving, think about what pairs well. A tangy dip like ranch or garlic aioli works great. You can even serve it with a side of spicy hot sauce for those who love heat. For a beautiful presentation, plate the cauliflower on a bright dish. Add chopped parsley on top for a pop of color. Arrange lemon wedges around the edge to invite fresh zest. This not only looks good but also adds a bright taste when squeezed over the crispy bites. For the full recipe, check out the Crispy Garlic-Lemon Fried Cauliflower. {{image_2}} You can easily make fried cauliflower fit many diets. For a gluten-free version, swap the all-purpose flour with a gluten-free blend. Use gluten-free panko breadcrumbs, too. This way, you keep the crunch without the gluten. If you're looking for vegan substitutes, skip the eggs entirely. Instead, try a mix of ground flaxseed and water. Use one tablespoon of flaxseed with three tablespoons of water. Let it sit for five minutes to thicken. This mix works well to coat the cauliflower before breading. You can spice up your fried cauliflower for a kick. Add cayenne pepper or chili powder to the flour mix for spicy fried cauliflower. This adds heat without overpowering the flavor. For a cheesy variation, sprinkle some grated cheese into the panko mix. Parmesan or cheddar works great. This gives a rich and savory taste that pairs well with the crispy texture. If you want to cut down on oil, try air frying. Coat the cauliflower as usual, then place it in the air fryer. Set it to 375°F for about 12-15 minutes. Shake the basket halfway through for even crispiness. For a baking option, preheat your oven to 425°F. Arrange the breaded florets on a lined baking sheet. Bake for 20-25 minutes, flipping halfway through. This method keeps it healthy while still delivering flavor. For the full recipe, check out the Crispy Garlic-Lemon Fried Cauliflower. To keep your fried cauliflower fresh, store it in an airtight container. Place it in the fridge. It will stay good for about three days. Make sure it cools down before sealing the container. If you want to keep it longer, consider freezing it. Just wrap each piece in plastic wrap and then put it in a freezer bag. This way, it can last for up to three months. When you want to enjoy your leftover fried cauliflower, reheating is key. The oven is the best choice for keeping it crispy. Preheat your oven to 350°F (175°C). Place the cauliflower on a baking sheet and heat for about 10 minutes. This helps regain that nice crunch. The microwave can work too, but it tends to make it soggy. If you use the microwave, heat in short bursts and check often. Fried cauliflower usually lasts about three days in the fridge. If you freeze it, it can last up to three months. Always check for signs of spoilage before eating. If it has an off smell or looks discolored, it's best to toss it out. Always trust your senses! Enjoy your crispy garlic-lemon fried cauliflower from the [Full Recipe]! Yes, you can use frozen cauliflower. Cooking from frozen is quick and easy. Frozen cauliflower can be cooked without thawing. However, fresh cauliflower has a better texture. Frozen florets may become softer when fried. For best results, use fresh cauliflower. This keeps it crunchy. Fried cauliflower tastes great with many dips. Here are some popular options: - Ranch dressing - Garlic aioli - Spicy sriracha mayonnaise - Classic hummus - Tzatziki sauce Each dip adds a unique flavor. Try them all to find your favorite! To add heat, you can spice up your batter. Mix in cayenne pepper or chili powder. You can also toss the fried cauliflower in hot sauce after frying. For a different kick, try adding diced jalapeños to the flour mix. Adjust the spice level to your taste! If you want the full recipe, check out the Crispy Garlic-Lemon Fried Cauliflower. Fried cauliflower is simple yet delicious. We covered the key ingredients, from florets to seasonings. I shared step-by-step instructions to bread and fry cauliflower perfectly. We also explored tips for crispiness and flavor enhancements. Dietary variations help you enjoy this dish your way. Proper storage ensures leftovers stay good, and I answered common questions about preparation and pairing. Now you know how to make tasty fried cauliflower at home. Enjoy experimenting with flavors!
Fried Cauliflower Crunchy and Flavorful Delight
If you’re craving a crunchy, flavorful treat, then fried cauliflower is the answer! This crispy delight packs all the taste you want from a snack
- 1 cup shrimp, peeled and diced - 1 cup scallops, diced - 1 cup cooked crab meat - 1 large round sourdough bread loaf - 1/2 cup cream cheese, softened - 1/4 cup sour cream - 1/4 cup grated Parmesan cheese - 2 tablespoons fresh dill, chopped - 1 tablespoon lemon juice - 2 cloves garlic, minced - Salt and pepper to taste - 1/2 cup breadcrumbs (for topping) - Fresh parsley for garnish When choosing seafood, I prefer fresh shrimp, scallops, and crab meat. They provide great taste and texture. If you want a quick meal, frozen seafood works well too. Just thaw it before using. For the bread, a large sourdough loaf works best. Its crust is strong enough to hold the filling. You can also use a round ciabatta or baguette if you prefer. The cream cheese and sour cream make the filling rich and creamy. Grated Parmesan adds a salty kick. Fresh dill and lemon juice brighten the dish. Garlic enhances the flavor, while salt and pepper round it out. Breadcrumbs on top give a nice crunch. Finally, fresh parsley makes a beautiful garnish. This dish not only tastes great but looks stunning. You can find the full recipe for more details. - Preheat your oven to 375°F (190°C). - Cut the top off the sourdough bread loaf and scoop out the insides. To create the bread bowl, start by preheating your oven. This step is key for a perfect bake. Next, take your sourdough loaf and cut off the top. Make sure to save that lid; it can be used later for serving. After that, scoop out the insides. Leave some bread on the sides to hold the filling. You can toast the scooped-out bread for dipping later. - In a large mixing bowl, combine the shrimp, scallops, crab meat, cream cheese, and sour cream. - Add dill, lemon juice, garlic, salt, and pepper; mix until well incorporated. For the filling, grab a big mixing bowl. Add in your shrimp, scallops, crab meat, cream cheese, and sour cream. These ingredients work well together to create a creamy and tasty mix. Then, season it with dill, lemon juice, garlic, salt, and pepper. Stir everything until it’s mixed well. This will ensure each bite bursts with flavor. - Spoon the seafood mixture into the hollowed bread bowl. - Sprinkle breadcrumbs over the top and place on a baking sheet. - Bake for 25-30 minutes or until golden brown and heated through. Now comes the fun part! Carefully spoon the seafood mixture into the hollowed bread bowl. Make sure to fill it generously, allowing the seafood mixture to mound a little. Once filled, sprinkle breadcrumbs on top for a crunchy finish. Place your bread bowl on a baking sheet to catch any drips. Bake it in the oven for about 25 to 30 minutes. Look for a golden brown top. This means your dish is ready to serve. Enjoy the warm, tasty goodness alongside the reserved toasted bread pieces. For the full experience, check the Full Recipe. - Use fresh seafood for the best taste. Fresh shrimp and scallops make a big difference. - Consider adding spices like Old Bay seasoning for extra flavor. It adds a nice kick. - Cover with aluminum foil for the first 15 minutes to prevent over-browning. This helps cook evenly. - Let it cool slightly before serving for better texture. Warm, but not too hot, is key. - Serve with a side of toasted bread pieces for dipping. This adds fun and flavor. - Garnish with additional herbs for a pop of color. Fresh parsley looks great and tastes fresh. These tips can help you make an amazing stuffed seafood bread bowl. For the full recipe, check the earlier section. Enjoy your culinary adventure! {{image_2}} You can switch up the seafood in your stuffed bread bowl. Try using lobster or crabmeat instead of shrimp. These options add a sweet and rich flavor. You can also play with different shellfish. Mussels or clams can add a nice twist. Their briny taste pairs well with the creamy filling. Just make sure to clean them well before cooking. If you want a meat-free option, replace the seafood with veggies. Sautéed vegetables work great here. A mix of mushrooms and spinach can make it just as tasty. You can even add bell peppers or zucchini for more flavor. This way, you still get a hearty dish that everyone can enjoy. While sourdough is classic, you can explore other bread. A round ciabatta or a fresh baguette can work well too. These options can change the taste and texture of your dish. Choose one that you love, and it will make your meal even better. Store leftover stuffed seafood bread bowl in an airtight container in the fridge for up to 2 days. This keeps the flavors fresh and the bread from getting too soggy. Just make sure the lid is tight to lock in taste. Reheat in the oven at 350°F (175°C) until warmed through. This step helps keep the bread crispy and the filling creamy. Avoid microwaving; it can make the bread chewy and dry. For longer storage, freeze the unbaked bread bowl before cooking. This makes it easy to bake later. When you’re ready, bake directly from frozen, adding extra time to ensure it cooks all the way through. This way, you can enjoy a fresh dish without much hassle. Yes, thawed frozen seafood can be used; just drain excess moisture. Using frozen seafood saves time and reduces waste. Make sure to dry it well to prevent extra water in your filling. Greek yogurt is a great substitute for sour cream. It adds creaminess and a slight tang. This option is also healthier and boosts protein in your dish. The top should be golden brown and the filling heated through. Check with a food thermometer; it should be at least 145°F. This ensures your seafood is safe to eat and deliciously warm. Yes, you can prepare the filling in advance and assemble before baking for freshness. This makes it easy for busy nights. Just store the filling in the fridge until ready to bake. This seafood bread bowl combines fresh shrimp, scallops, and crab meat for a tasty dish. You learned how to make a creamy filling, assemble it in a bread bowl, and bake it for the best flavor. Remember, you can use different seafood or even go vegetarian if you want. Store leftovers in the fridge or freeze for later. Enjoy making this fun treat for friends and family. It's a great way to impress at any gathering!
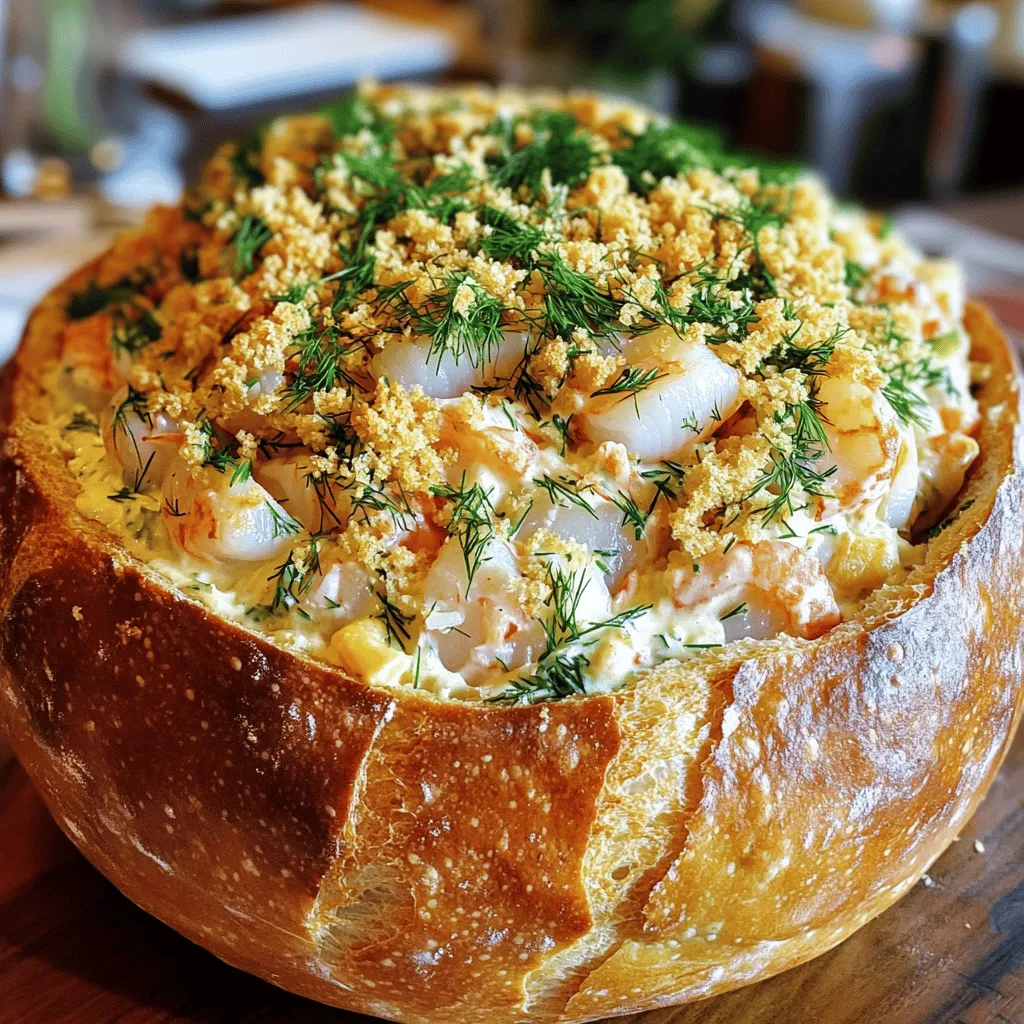
Stuffed Seafood Bread Bowl Irresistible and Tasty Dish
Welcome to my kitchen, where we transform simple ingredients into a show-stopping dish! Today, I’m sharing my stuffed seafood bread bowl recipe, perfect for gatherings
- 2 cups corn kernels (fresh or frozen) - 1/2 cup all-purpose flour - 1/2 cup cornmeal - 1/4 cup shredded pepper jack cheese - 1/4 cup finely chopped red bell pepper - 1/4 cup chopped green onions - 1 fresh jalapeño, finely chopped (seeds removed for less spice) - 1 teaspoon ground cumin - 1 teaspoon chili powder - 1/2 teaspoon baking powder - Salt and pepper to taste - 1/4 cup buttermilk (or regular milk) - Olive oil for frying To make Spicy Mexican Corn Bites, gather these ingredients first. The corn brings sweetness, while the jalapeño adds a kick. You can use fresh corn or frozen corn, depending on what's available. The flour and cornmeal form the base of the bites. Pepper jack cheese gives a creamy texture and some spice. Chop your vegetables finely. This helps them mix well with the batter. The red bell pepper adds color and sweetness. Green onions provide a fresh taste. Ground cumin and chili powder boost the flavor profile. Don't forget the baking powder. It helps the bites puff up while frying. For frying, use olive oil. This gives a nice crispiness. You can also garnish with fresh cilantro and lime wedges for serving. If you want to explore more details, check out the Full Recipe. - In a large mixing bowl, combine the corn kernels, flour, cornmeal, and baking powder. Mix well. - Next, add the shredded pepper jack cheese, chopped red bell pepper, green onions, and jalapeño. Sprinkle in the cumin, chili powder, salt, and pepper. Stir until mixed evenly. - Heat a good amount of olive oil in a skillet over medium heat. You need enough oil to cover the skillet’s bottom. - When the oil is hot, use a spoon to drop spoonfuls of the corn mixture into the skillet. Leave space between each one to flip them easily. - Cook each side for about 3-4 minutes until golden brown. Adjust the heat if needed to avoid burning. - Once cooked, remove the corn bites from the skillet. Place them on paper towels to drain excess oil. - While still hot, season them with a pinch of salt. Enjoy them warm with your favorite dipping sauce. For the complete recipe, visit [Full Recipe]. How can you make Spicy Mexican Corn Bites milder? Start by removing the seeds from the jalapeño. This action cuts down the heat. You can also use a smaller amount of jalapeño in your mix. If you want it even milder, replace the pepper jack cheese with a mild cheese like mozzarella. For those who crave a bolder flavor, try adding more jalapeño or using a spicier cheese. You can also mix in cayenne pepper or diced serrano peppers. These changes will give your bites that extra kick. What is the right batter consistency? Your batter should be thick but not dry. It should easily hold its shape when you scoop it. If it feels too thick, add a little more buttermilk until you achieve the right texture. For crispy edges, make sure your oil is hot enough before adding the batter. A good test is to drop a small spoonful of batter into the oil. If it sizzles right away, you're ready to go. Also, avoid overcrowding the pan. This will keep the oil temperature steady and help the bites crisp up nicely. What are the best dipping sauces to complement these bites? Creamy cilantro lime sauce pairs wonderfully. Its freshness balances the spice. Spicy salsa is another great choice, adding a zesty kick. When it comes to drinks, consider serving them with a cold cerveza, like a light lager or a pale ale. If you prefer non-alcoholic options, a refreshing limeade or sparkling water works well too. These drinks will enhance the flavors of your bites and make for a fun experience. For the full recipe, check out the detailed instructions above! {{image_2}} You can switch up the cheese in this recipe. Try using cheddar or feta cheese instead of pepper jack. Each cheese offers a unique taste. You can also change the vegetables. Zucchini or sweet corn peppers can add different textures. Feel free to experiment with what you have at home. If you want a healthier option, try air frying. It gives you a nice crunch without much oil. Set your air fryer to 375°F and cook for about 10 minutes. Flip halfway through for even crispiness. Baking is another option. Preheat your oven to 400°F. Spread the corn bites on a baking sheet and bake for 20 minutes or until golden brown. You can add spices for a new flavor. Smoked paprika gives a warm taste, while cayenne adds heat. Mixing in proteins is another great way to amp up the dish. Cooked chicken or shrimp can make these bites heartier. You might even try diced chorizo for a spicy kick. Don't hesitate to get creative with flavors! To keep your Spicy Mexican Corn Bites fresh, put them in an airtight container. They should go in the fridge within two hours of cooking. Use parchment paper between layers to avoid sticking. If you want to freeze them, let them cool first. Place them in a freezer-safe bag, removing as much air as possible. This helps prevent freezer burn. To reheat, you can bake or pan-fry them. If baking, preheat your oven to 375°F (190°C). Place the bites on a baking sheet and heat for 10-15 minutes. If pan-frying, use a little olive oil over medium heat. Heat for about 3-5 minutes until warm and crispy again. In the fridge, these bites last about 3-4 days. If frozen, they can last up to 2 months. Always check for signs of spoilage before eating. If they smell off or have a strange color, it’s best to throw them out. Fresh bites should smell sweet and corn-like, with a golden color. You can pair Spicy Mexican Corn Bites with fun dips. Here are some ideas: - Creamy cilantro lime sauce - Spicy salsa - Guacamole - Sour cream with lime These dips enhance the flavor and add a tasty twist. Pair with a refreshing drink like lemonade or a light beer for a great meal. Yes, you can make this recipe gluten-free. Here are some simple swaps: - Use gluten-free all-purpose flour instead of regular flour. - Ensure your cornmeal is gluten-free. These changes keep the taste but make it safe for those with gluten issues. You can prep these bites ahead of time. Here are some tips: - Make the batter and store it in the fridge for up to 2 hours. - Form the bites and freeze them for later use. When ready to cook, just fry them straight from the freezer. This saves time and keeps them fresh. Yes, Spicy Mexican Corn Bites are vegetarian-friendly. The ingredients include: - Corn - Vegetables - Cheese There are no meat products in this recipe, making it a great option for vegetarians. Enjoy these bites without worry! You just learned how to make Spicy Mexican Corn Bites. We covered the key ingredients, step-by-step cooking, and helpful tips. These bites are perfect for snacking or serving at parties. You can easily adjust the spice levels and try different flavors too. Plus, we discussed how to store leftovers properly. Experiment with different ingredients and cooking methods to suit your taste. Enjoy the deliciousness of these bites, and don’t hesitate to share with family and friends!
Spicy Mexican Corn Bites Flavorful and Easy Recipe
Are you ready to spice up your snack game? These Spicy Mexican Corn Bites are bursting with flavor and are super easy to make! With
To make Lemon Pepper Corn on the Cob, you will need these simple ingredients: - 4 ears of fresh sweet corn, husked - 1/4 cup unsalted butter, melted - 2 tablespoons fresh lemon juice - 1 teaspoon lemon zest - 1 teaspoon freshly cracked black pepper - 1 teaspoon garlic powder - 1 teaspoon fresh parsley, chopped (for garnish) - Salt to taste These ingredients come together to create a bright and zesty dish. Fresh corn adds sweetness, while lemon juice and zest give it a refreshing kick. The butter enhances the rich flavor, and the black pepper adds a nice bite. Garlic powder rounds out the taste, making it perfect for summer barbecues or any meal. When you use fresh corn, look for ears that feel firm and heavy. The silk should be slightly sticky, and the kernels should be plump. This will ensure you get the best flavor for your dish. Remember, this recipe is easy and quick. You can whip it up in about 20 minutes. So, gather your ingredients, and let’s get cooking! For the full recipe, check the earlier section. - Husk corn and remove silk - Rinse and pat dry corn Start by husking each ear of corn. Pull down the green outer leaves and remove the silky threads. This makes the corn clean and ready to cook. Rinse the corn under cool running water to remove any dirt. After rinsing, pat the corn dry with a towel to prevent excess water from affecting your seasoning mix. - Whisk together melted butter, lemon juice, lemon zest, black pepper, garlic powder, and salt In a small bowl, melt your butter in the microwave or on the stove. Once it’s melted, add fresh lemon juice and lemon zest for that tangy flavor. Next, mix in freshly cracked black pepper and garlic powder. Add a pinch of salt to bring all the flavors together. Whisk until it’s smooth and well combined. This lemon butter will add a zesty kick to your corn. - Preheat grill or boil corn - Grilling instructions: Brush with lemon butter, grill for 10-12 minutes Before you start cooking, preheat your grill to medium-high heat, about 400°F. If you prefer, you can also boil the corn in water for 5-7 minutes. For grilling, place the corn directly on the grill or in a grill pan. Use a pastry brush to generously apply the lemon butter mixture over the corn. Grill the corn for 10-12 minutes, turning it every few minutes. This helps to get those beautiful grill marks and ensures even cooking. Baste the corn with more lemon butter as it grills for extra flavor. Once cooked, remove the corn and drizzle any leftover butter on top. Serve it hot for the best taste. For the full recipe, check out the details above. To make lemon pepper corn just right, adjust the lemon and pepper levels. You can add more lemon juice for a tangy kick. If you love spice, increase the black pepper. This dish shines with balance. For even grilling, rotate the corn every few minutes. This way, all sides get that nice char. Keep an eye on the corn to avoid burning. Boiling and grilling each has its perks. Boiling is quick and easy, but grilling adds a smoky flavor. If you grill, you get those lovely grill marks. To boil, just place corn in a pot of water for 5-7 minutes. For oven roasting, preheat to 400°F. Wrap corn in foil with the lemon butter mix, then roast for about 25 minutes. This method keeps the corn juicy and flavorful. Lemon pepper corn pairs well with many sides. Try it with grilled chicken or fish for a nice balance. A fresh salad also complements it well. Serve the corn warm for the best taste. The heat helps the flavors pop. Enjoy it right off the grill or oven for a tasty treat. For the full recipe, check the earlier section. {{image_2}} You can easily swap out some ingredients. For a twist, use chili powder or cumin instead of the black pepper. These spices give the corn a warm kick. If you want a dairy-free dish, try using olive oil or coconut oil in place of butter. Each option adds its own unique flavor. You can also make lemon pepper corn in the oven. Preheat it to 400°F. Wrap each ear of corn in foil with the lemon butter mixture. Bake for about 20-25 minutes. This method keeps the corn moist and juicy. If you need a quick fix, try the microwave. Place the corn in a dish with a little water and cover it. Microwave for about 4-6 minutes. This method is fast and easy. Want to make your corn even better? Add cheese like Parmesan or feta on top after cooking. Fresh herbs like cilantro or chives also work great. If you want to turn this side dish into a meal, add grilled chicken or shrimp. These proteins will create a tasty and filling dish that everyone will love. After you enjoy your lemon pepper corn on the cob, store any leftovers properly. - Refrigerating cooked corn on the cob: Place the corn in an airtight container. It can stay fresh in the fridge for up to 3 days. Make sure to wrap it tightly to keep it moist. - Freezing options for prepped corn: If you want to save it longer, you can freeze the corn. Husk and cook the corn first. Then, cut the kernels off the cob. Place the kernels in a freezer bag. Squeeze out all the air and seal it. Frozen corn can last for about 6 months. When you're ready to eat your leftover corn, follow these simple tips to keep it tasty. - Best practices for reheating corn: The best way to reheat corn is by steaming it. Place it in a pot with a small amount of water, cover, and heat on medium. This method keeps the corn juicy. - Avoiding rubbery texture: To prevent rubbery corn, do not microwave it for too long. If using a microwave, cover it with a damp paper towel. Heat in short bursts, checking often. This will help maintain its texture. Lemon pepper seasoning is a blend of lemon zest and cracked black pepper. It adds a bright, zesty flavor to dishes. You can use it on meats, veggies, or even popcorn. It's great for grilling and adds a kick to your meals. The tangy lemon balances the heat from the pepper. This seasoning works well in many recipes, including the zesty lemon pepper corn on the cob. Yes, you can use frozen corn for this recipe. Frozen corn is convenient and saves time. However, fresh corn tastes sweeter and has a better texture. If you use frozen corn, thaw it first. Drain any excess water. The cooking time may be shorter, so check for doneness early. Grilling frozen corn can lead to uneven cooking, so keep an eye on it. You can store leftover corn on the cob in the fridge for up to three days. Wrap it in plastic wrap or foil to keep it fresh. To reheat, you can grill it again or microwave it for a short time. If you want to keep it longer, consider freezing the corn. It can last for up to six months in the freezer. Just make sure to store it in an airtight container. You learned how to make delicious lemon pepper corn with easy steps. The recipe uses fresh ingredients like corn, butter, and lemon, bringing bright flavors to your meal. Remember, grilling gives the best taste, but boiling works too. Feel free to adjust the spices or add toppings to make it your own. Enjoying leftovers is simple; just store or reheat correctly to keep them tasty. Try this dish as a side or main, and delight your family with this fresh, flavorful recipe. It’s sure to impress!
Lemon Pepper Corn on the Cob Flavorful and Easy Dish
Are you ready to elevate your summer cookout with a burst of flavor? Lemon Pepper Corn on the Cob is a quick and easy dish
To make the Salmon Tartine with Dill Pickle Mustard, you will need: - 2 slices of crusty sourdough bread - 4 oz smoked salmon - 2 tablespoons cream cheese, softened - 1 tablespoon dill pickle mustard (store-bought or homemade) - 1 tablespoon capers, rinsed - Fresh dill sprigs for garnish - Lemon wedges for serving - Salt and pepper to taste You can enhance your tartine with these tasty toppings: - Sliced radishes for crunch - Avocado for creaminess - Thinly sliced red onion for a bite - A sprinkle of chili flakes for heat Selecting the right ingredients makes a big difference. Here’s how: - Salmon: Look for bright, moist smoked salmon. It should have a clean, fresh scent. Avoid any that smells overly fishy or looks dull. - Bread: Choose a crusty sourdough with a good crust. It should feel firm and not too soft. Look for bread with air pockets inside, as this means it’s fresh and has great texture. These small details can elevate your dish and ensure a tasty result. For the full recipe, check out the provided link. 1. Start with two slices of crusty sourdough bread. 2. Toast them until they turn golden brown and crispy. 3. While the bread toasts, take a small bowl. 4. Add 2 tablespoons of softened cream cheese to the bowl. 5. Then add 1 tablespoon of dill pickle mustard. 6. Mix these together until they are smooth and well combined. 7. Taste the mixture and add a pinch of salt and pepper as needed. 8. Once your bread is toasted, take it out and let it cool slightly. 9. Spread a thick layer of the cream cheese and mustard mix over each slice. 1. Take 4 ounces of smoked salmon and slice it, if needed. 2. Lay the salmon on top of the mustard-spread bread. 3. Arrange the salmon in a nice pattern for a pretty look. 4. Rinse 1 tablespoon of capers under cold water. 5. Sprinkle the capers over the salmon for a burst of flavor. 6. Finish by adding fresh dill sprigs on top for a pop of color. 1. Serve the tartines right away for the best taste. 2. Pair them with lemon wedges on the side. 3. Squeeze the lemon over the tartine for a zesty kick. 4. Consider serving with a light salad or some crisp veggies. 5. A glass of white wine or sparkling water goes well with this dish. For the complete recipe, refer to the Full Recipe. To perfect your salmon tartine with dill pickle mustard, use fresh ingredients. Here are my top tips: - Choose good bread: A crusty sourdough gives the best texture. It holds toppings well. - Spread evenly: Make sure to spread the cream cheese and mustard mix evenly. This helps every bite stay balanced in flavor. - Layer nicely: When placing the smoked salmon, overlap the slices for a nice look. It makes the dish more appealing. Avoid these common pitfalls to get the best results: - Skipping the toast: Don’t skip toasting the bread. It adds crunch and keeps the bread from getting soggy. - Overdoing the mustard: Use just enough dill pickle mustard. Too much can overpower the salmon's flavor. - Using stale ingredients: Always check your salmon and bread for freshness. Old ingredients ruin the tartine. Here are some quick ways to speed up your prep time: - Buy pre-sliced salmon: This saves you minutes and keeps the dish simple. - Prep ahead: Mix the cream cheese and mustard in advance. Store it in the fridge until you’re ready. - Use a toaster oven: If you have one, it quickly toasts your bread while you prepare toppings. For the full recipe, check out the full recipe. Enjoy making this savory delight! {{image_2}} You can play with flavors in your salmon tartine. Try using different mustards, like honey mustard or spicy brown mustard. Each one gives a unique twist. You can also add toppings. Sliced radishes bring crunch, while avocado adds creaminess. For a sweet touch, try thin apple slices. Fresh herbs, such as chives or parsley, can brighten the dish too. Don’t hesitate to mix and match until you find a flavor you love! If you want a vegetarian option, swap the smoked salmon for roasted vegetables. Grilled zucchini or eggplant works great. You can also use hummus or a bean spread instead of cream cheese. For a gluten-free tartine, choose gluten-free bread. There are many tasty options available now. Just make sure to check the label for gluten-free status. Adapt this recipe based on the season. In the summer, top your tartine with fresh tomatoes or cucumbers. They add a refreshing taste. In the fall, consider using roasted squash or pumpkin puree. For winter, try adding sautéed greens like kale or spinach. These changes keep the dish exciting all year long. Explore your local farmers' market to find fresh ingredients. To store leftover salmon tartines, wrap each tartine tightly in plastic wrap. This keeps them fresh and prevents drying out. If you have extra ingredients, like smoked salmon or cream cheese, store them in airtight containers in the fridge. Use them within a few days for the best taste. When reheating, avoid the microwave. It makes the bread soggy. Instead, place the tartines in a toaster oven or regular oven at 350°F (175°C) for about 5 minutes. This keeps the bread crispy while warming the toppings. Check often to avoid overcooking. Smoked salmon lasts about 3 days in the fridge after opening. Cream cheese should also be used within 1 week. Dill pickle mustard can stay fresh for up to a month if stored properly. Always check the labels for specific dates to ensure safety. To make your own dill pickle mustard, you need just a few items. Start with yellow mustard or Dijon mustard as your base. Add finely chopped dill pickles and a bit of pickle juice. Mix these together in a small bowl. For a bit of zest, you can add some garlic powder or a dash of hot sauce. Adjust the taste to your liking. This simple recipe gives your tartine a fresh kick. Yes, you can use fresh salmon instead of smoked salmon. Fresh salmon will give your tartine a different flavor. Make sure to cook the fresh salmon first. You can grill, bake, or pan-sear it. This adds a nice touch to the dish. If you choose fresh, season it well with salt and pepper for the best taste. Each option brings its own unique flavor to the tartine. You can serve your tartine with many sides. A fresh salad with crisp greens pairs well. Consider adding sliced cucumbers or cherry tomatoes for color. You might also serve it with potato chips for crunch. For drinks, a crisp white wine or sparkling water enhances the meal. Each side will bring out the flavors of the salmon tartine. This blog post covered the essential ingredients, tips, and steps to make Salmon Tartine with Dill Pickle Mustard. You learned about required ingredients, optional add-ons, and quality tips for the best flavors. We discussed preparation, assembly, and serving suggestions to impress your guests. You now have expert tips, common mistakes to avoid, and time-saving hacks for quick prep. Lastly, we explored variations, storage info, and answered common questions. With these details, you can craft a delicious tartine at home, delighting your taste buds and those of your friends.
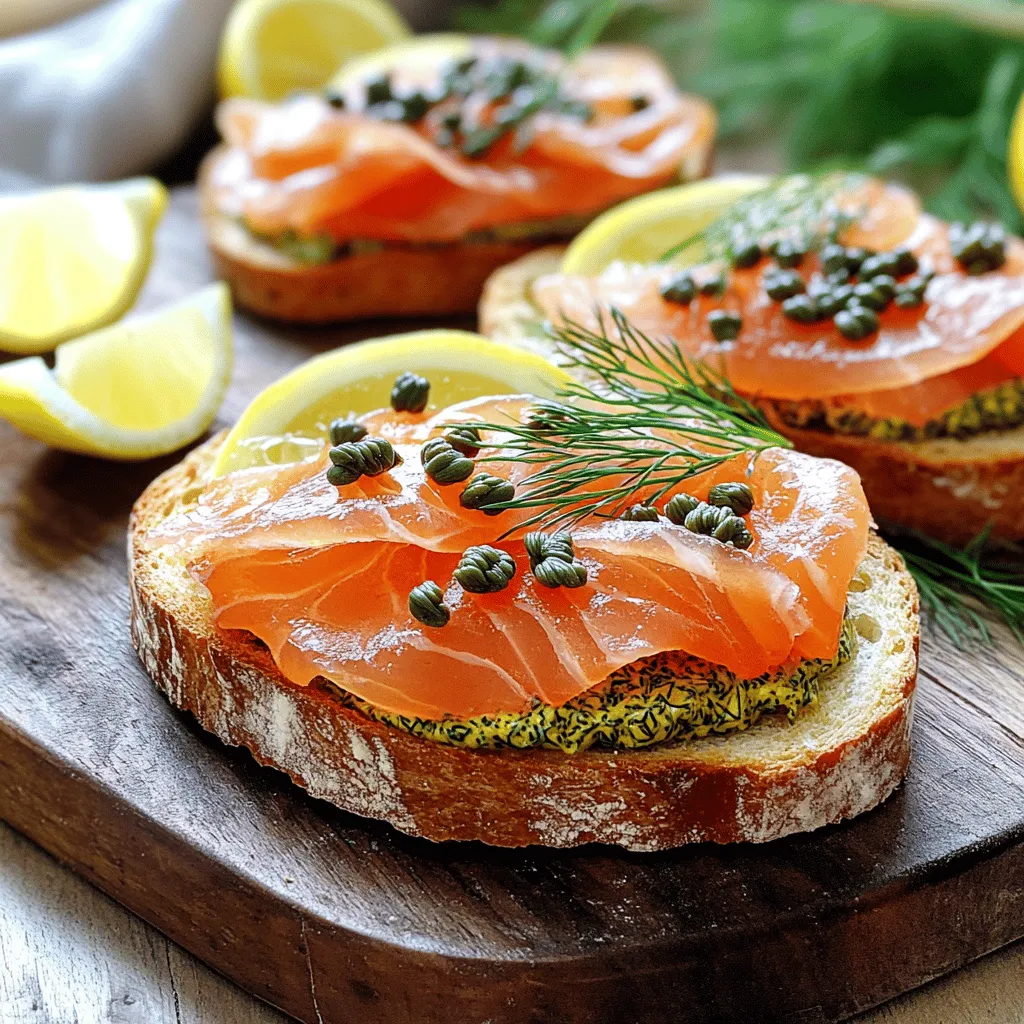
Savory Salmon Tartine with Dill Pickle Mustard Recipe
Are you ready to elevate your snack game? This Savory Salmon Tartine with Dill Pickle Mustard is your new go-to recipe for a quick meal
To make tasty air fryer calzones, you need a few key ingredients: - 2 cups all-purpose flour - 1 packet (2 ¼ teaspoons) instant yeast - ½ teaspoon salt - 1 teaspoon sugar - ¾ cup warm water (about 110°F) - 1 tablespoon olive oil - 1 cup ricotta cheese - 1 cup shredded mozzarella cheese - ½ cup cooked Italian sausage, crumbled - ½ cup spinach, chopped - ½ teaspoon garlic powder - ½ teaspoon dried oregano - Salt and pepper to taste - Marinara sauce for dipping These ingredients work together to create a soft dough and a cheesy filling. The instant yeast helps the dough rise. The ricotta and mozzarella provide creaminess, while the sausage and spinach add flavor. You can mix and match fillings to suit your taste. Here are some options: - Pepperoni slices - Mushrooms, diced - Bell peppers, chopped - Fresh basil leaves - Feta cheese - Different herbs and spices Feel free to get creative! You can also make vegetarian calzones by skipping the meat and loading up on veggies. Choosing the best ingredients makes a big difference. Here are my tips: - Flour: Look for high-protein all-purpose flour for a chewier crust. - Cheese: Use fresh cheeses for better flavor and texture. - Meat: If using sausage, check for high-quality, minimally processed options. - Vegetables: Choose fresh, vibrant vegetables for the best taste. - Olive Oil: Use extra virgin olive oil for its rich taste and health benefits. High-quality ingredients lead to better results. Always pay attention to the freshness and source of your food. Enjoy making your air fryer calzones! For the complete recipe, check the Full Recipe. To make the dough, start with a large bowl. Add 2 cups of all-purpose flour, 2 ¼ teaspoons of instant yeast, ½ teaspoon of salt, and 1 teaspoon of sugar. Mix these dry ingredients well. Now, slowly pour in ¾ cup of warm water and 1 tablespoon of olive oil. Stir until a soft dough forms. Knead the dough on a floured surface for about 5 to 7 minutes until it feels smooth. Next, place the dough in a greased bowl. Cover it with a cloth and let it rise in a warm spot for 30 minutes. This step helps the dough become fluffy. While the dough rises, let's make the filling. In a bowl, combine 1 cup of ricotta cheese and 1 cup of shredded mozzarella cheese. Then, add ½ cup of cooked Italian sausage, crumbled, and ½ cup of chopped spinach. For flavor, mix in ½ teaspoon of garlic powder, ½ teaspoon of dried oregano, and salt and pepper to taste. Stir until everything blends together. This filling is rich and tasty, perfect for your calzones. After the dough has risen, punch it down and divide it into four equal pieces. Roll each piece into a circle about 6 to 7 inches wide. Place a spoonful of the filling on one half of each circle. Leave space at the edges so you can seal them well. Fold the dough over the filling and pinch the edges to close. You can crimp the edges with a fork if you like. Preheat your air fryer to 375°F. Lightly brush each calzone with olive oil and place them in the air fryer basket without touching. Cook them for 12 to 15 minutes until they turn golden brown and crispy. You might need to cook them in batches. Once done, let them cool a bit and serve with marinara sauce for dipping. Enjoy your homemade calzones! For the full recipe, check the section above. To get that perfect crispy crust, start with the right dough. Use all-purpose flour for the best texture. Knead the dough well. This helps it develop gluten. Gluten creates a chewy, sturdy crust. After rolling out the dough, let it rest. This makes it easier to shape. Brush the calzones with olive oil before cooking. The oil helps the calzones brown nicely in the air fryer. Set your air fryer to 375°F for the best results. Cook the calzones for 12 to 15 minutes. Keep an eye on them as they cook. Every air fryer is different. If your calzones don't look golden brown after 12 minutes, add a few more minutes. Don't overcrowd the basket. This ensures they cook evenly and crisp up nicely. One mistake is using too much filling. It can leak out while cooking. Make sure to leave space at the edges when filling. Another mistake is not sealing the edges well. If they aren't sealed, the filling can escape. Lastly, avoid skipping the preheating step. An air fryer needs to be hot before adding food. Follow these tips, and you’ll make delicious calzones! For the complete recipe, check out the full recipe section. {{image_2}} You can easily change your calzones to fit your taste. For a vegetarian option, skip the meat. Use veggies like mushrooms, bell peppers, or zucchini instead. You can mix these with ricotta and mozzarella for a creamy filling. If you want meat, try pepperoni, ham, or chicken. Each choice brings a new flavor and texture. Cheese is key to a great calzone. You can use mozzarella as your base, but don't stop there. Try adding provolone or gouda for a smoky touch. For more tang, add feta or goat cheese. Mixing different cheeses gives your calzones a special flavor blend. Feel free to experiment and find your favorite combo. If you need a gluten-free option, use almond flour or a gluten-free mix. These flours can create a tasty dough, too. If you're low-carb, try using a cauliflower crust. It may take extra time, but the results are worth it. These alternatives let anyone enjoy delicious calzones. Check out the Full Recipe for tips on making these variations. To keep your leftover calzones fresh, store them in an airtight container. Let the calzones cool completely before sealing them. This helps prevent moisture buildup, which can make them soggy. You can keep them in the fridge for up to three days. If you want to keep them longer, consider freezing them. Reheating calzones in the air fryer is quick and easy. Preheat your air fryer to 350°F. Place the calzones in the basket, leaving space between them. Heat for about 5-7 minutes. Check to ensure they are heated through and crispy. This method keeps them tasty and restores their crunch. Freezing calzones is a smart way to save time. First, let them cool completely. Wrap each calzone tightly in plastic wrap, then in aluminum foil. This prevents freezer burn. You can keep them in the freezer for up to three months. When ready to eat, thaw in the fridge overnight, then reheat in the air fryer. For the full recipe, check the details above. You air fry calzones for about 12-15 minutes. The exact time can vary by air fryer. Check them often to avoid burning. You want them golden brown and crispy. Yes, you can use store-bought dough for air fryer calzones. This option saves time and effort. Just roll it out and fill it like you would with homemade dough. It makes the process quick and easy. You can dip calzones in many tasty options. Try ranch dressing for a creamy twist. Garlic butter gives a nice flavor too. Hot sauce adds heat, while pesto offers a fresh taste. Explore different dips to find your favorite! For the full recipe, check the earlier section. You learned how to make great air fryer calzones. We covered the best ingredients and how to pick them. I shared step-by-step instructions to prepare and cook calzones. You got tips to make crispy crusts and avoid common mistakes. We also explored tasty variations and smart storage methods for leftovers. Now, you can create your own versions at home. With these tips, you’ll impress family and friends. Enjoy your cooking journey!
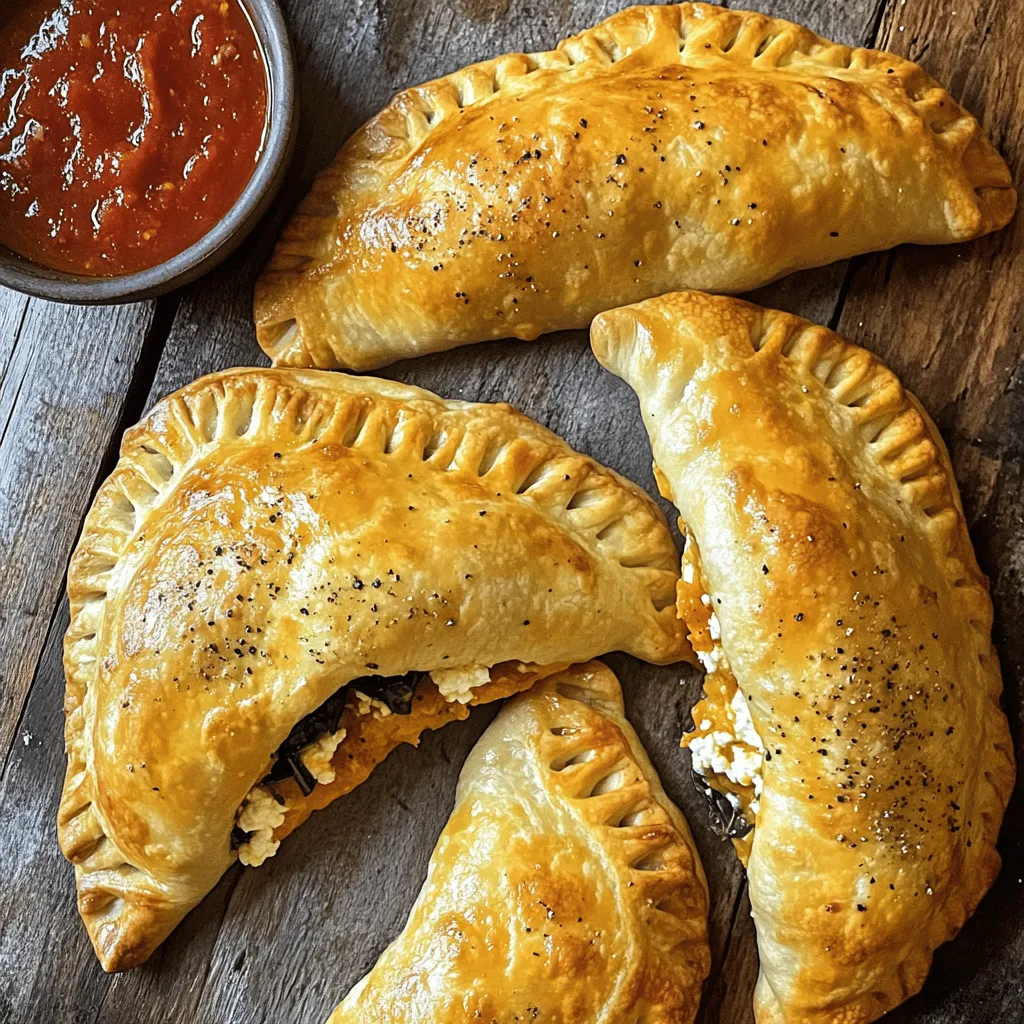
Satisfying Air Fryer Calzones Easy Homemade Delight
Craving a quick, tasty meal? Look no further! Air fryer calzones are your new best friend. They’re easy to make and delightfully satisfying. In this
- 1 lb salmon fillet, skinless and cut into bite-sized cubes - Marinade components: - 1/4 cup honey - 3 tablespoons soy sauce - 2 cloves garlic, minced - 1 tablespoon ginger, grated - Coating ingredients: - 1 tablespoon cornstarch - 1/2 cup breadcrumbs (panko preferred) - Green onions, chopped - Sesame seeds - Salt and pepper to taste - 1 tablespoon sesame oil (for cooking) When I make these crispy honey garlic salmon bites, I start with fresh salmon. The skinless fillet cuts easily into perfect cubes. The marinade is where the magic begins. I mix honey, soy sauce, garlic, and ginger in a bowl. This mix adds a sweet and savory flavor that really makes the salmon shine. I let the salmon cubes soak in this mixture for at least 15 minutes. This helps them absorb all those tasty flavors. For a crunchy coating, I use cornstarch and panko breadcrumbs. Panko gives a nice extra crunch. After coating the salmon, I heat sesame oil in a skillet. The oil should be hot enough to sizzle when I add the salmon. I cook the salmon bites for about 2-3 minutes on each side until they turn golden brown. The key is to only flip them once to keep them crispy. For garnish, I sprinkle some chopped green onions and sesame seeds on top. These add a lovely pop of color and flavor. You can find the full recipe at the end of this article for step-by-step instructions and tips. First, grab a large bowl. Whisk together the honey, soy sauce, minced garlic, grated ginger, salt, and pepper. This will create a tasty marinade. Then, add the salmon cubes to this mix. Toss gently until each piece is coated. Let the salmon marinate for at least 15 minutes. This step helps the salmon soak up all those great flavors. Next, you need to coat the salmon. In a separate bowl, combine the cornstarch and breadcrumbs. Mix them well for an even coating. Now, take each salmon piece from the marinade. Dredge it in the cornstarch and breadcrumb mixture. Make sure each piece is fully coated. This will give your salmon bites a nice crunch when cooked. Now, it's time to cook! Heat sesame oil in a non-stick skillet over medium-high heat. Once the oil is hot, add the salmon bites in a single layer. Cook them for about 2-3 minutes on one side until they turn golden brown. Then, flip them over and cook for another 2-3 minutes. You want them crispy and cooked through. After cooking, place them on a paper towel-lined plate to absorb any extra oil. If you have leftover marinade, you can drizzle it over the salmon bites for extra flavor. You can find the full recipe to guide you through the process. To get that crunchy bite, I always use panko breadcrumbs. They add a great crunch. Make sure the oil is hot before you add the salmon. This helps it fry right and not stick. Want to spice it up? Add chili flakes for a nice kick. You can also try different dipping sauces. Sweet, spicy, or tangy, the choice is yours! For a lovely meal, serve the salmon bites with steamed vegetables or a fresh salad. To make your platter pop, arrange the bites neatly. Garnish with chopped green onions and sesame seeds. It looks great and tastes amazing! {{image_2}} You can swap out salmon for chicken or tofu. Chicken provides a heartier bite, while tofu offers a plant-based option. If you choose chicken, cook it longer to ensure it reaches 165°F. Tofu will need less time. Aim for a golden crust on all choices for the best taste. Want to shake things up? Add citrus zest from lemons or limes. This gives a fresh twist to the dish. You can also try other marinades, like teriyaki or garlic butter. These new flavors can brighten your meal and keep everyone guessing. You don’t have to stick to pan-searing. Baking or air-frying are healthier options. They require less oil and still give a nice crunch. If you prefer, pan-searing adds a richer flavor and a different texture. Each method can make your dish unique. You can store any leftover salmon bites in an airtight container. They will stay fresh for up to 3 days. Make sure to let them cool before sealing. This helps keep them from getting soggy and losing that crispy texture. For reheating, use your oven. Set it to 350°F (175°C) and warm the salmon bites for about 10 minutes. This method helps keep them crispy. Avoid using a microwave, as it can make them soggy and chewy. If you want to save salmon bites for later, freezing is a good option. First, let them cool completely. Then, place them in a single layer on a baking sheet. Freeze for about an hour, then transfer them to a freezer bag. This keeps them from sticking together. You can store them in the freezer for up to 3 months. To cook, just thaw in the fridge overnight and reheat in the oven. To know if salmon is cooked, look for flakiness. Use a fork to test it. The fish should break apart easily. The inside should reach 145°F. If you don’t have a thermometer, just check for that flaky texture. Cook it for about 2-3 minutes on each side. If it is golden brown outside, you are on the right track. Yes, you can prepare this recipe ahead of time. You can marinate the salmon cubes for up to 30 minutes. Just keep them in the fridge until you are ready to cook. This helps the salmon soak up all those tasty flavors. If you want, you can coat the salmon bites in cornstarch and breadcrumbs earlier. But cook them fresh for the best crunch. Crispy Honey Garlic Salmon Bites taste great with many sides. Consider serving them with steamed rice or a fresh salad. Rice soaks up the sauce nicely, while salad adds a crisp texture. You can also try roasted vegetables for a healthy touch. Pair flavors that complement the sweet and savory notes of the salmon. You can find the full recipe for Crispy Honey Garlic Salmon Bites in the section above. It includes all the steps and details you need to make this snack. Enjoy cooking! In this blog post, I covered how to make delicious crispy honey garlic salmon bites. I shared the ingredients you'll need, including easy marinade and coating options. The cooking steps were simple and effective for great flavor and texture. Remember, you can switch proteins or add spice to make it yours. Enjoy experimenting with different sides and sauces to elevate your meal. With these strategies, you can impress anyone at your table. Dive in, and savor your tasty creation!
Crispy Honey Garlic Salmon Bites Savory and Simple Snack
Craving a quick, tasty snack? Let me introduce you to Crispy Honey Garlic Salmon Bites! With just a few simple ingredients, you can create a
When making Garlic Parmesan Bread Bites, you need simple but flavorful ingredients. Each one adds to the tasty result. Here’s what you’ll need: - Ciabatta bread cubes - Unsalted butter - Minced garlic - Grated Parmesan cheese - Fresh parsley - Italian seasoning - Salt and pepper Ciabatta bread gives the bites a nice texture. It holds up well to the garlic and butter. Using unsalted butter lets you control the salt in the dish. Minced garlic offers a bold flavor that blends well with the cheese. Grated Parmesan cheese adds richness and a savory taste. Fresh parsley brings a hint of color and freshness. Italian seasoning combines herbs for a balanced flavor. Lastly, salt and pepper enhance all the tastes. Gather these ingredients, and you're ready to create a delicious appetizer that everyone will love! {{ingredient_image_1}} 1. Preheat your oven to 375°F (190°C). Line a baking sheet with parchment paper. This helps to prevent sticking and makes cleanup easy. 2. In a large mixing bowl, melt the butter. Add the minced garlic to the butter. Stir well to mix them together. The garlic will give a great flavor to the bread. 3. Now, add the cheese and seasonings. Combine the grated Parmesan cheese, chopped parsley, Italian seasoning, and a pinch of salt and pepper. Mix until everything is well blended. This mixture will coat the bread perfectly. 1. Toss the bread cubes in the garlic-parmesan mixture. Make sure each cube gets a good coat of the mixture. This step is key for flavor. 2. Spread the coated bread bites on the baking sheet. Arrange them in a single layer. Avoid overcrowding the bread bites. This helps them bake evenly and get crispy. 1. Bake in the preheated oven for 12-15 minutes. Keep an eye on them. You want them golden brown and crispy on the edges. 2. Once done, remove from the oven. Let them cool slightly before serving. For a nice touch, garnish with extra chopped parsley. Serve with a small bowl of marinara sauce for dipping. Enjoy your tasty garlic parmesan bread bites! To get the best garlic flavor, adjust the garlic to your taste. You can add more or less garlic depending on how strong you like it. I love using fresh garlic, but if you need a quick option, dried garlic works too. Using fresh herbs like parsley enhances the dish. Fresh parsley brightens the flavor. Dried herbs are handy when fresh isn't available. Just remember, dried herbs are stronger. Use less if you're substituting. For crispy bread bites, the right baking time is key. Bake at 375°F (190°C) for 12-15 minutes. Keep an eye on them. Remove them when they turn golden brown. Do not overcrowd the baking sheet. Spread the bread bites in a single layer. This helps them crisp evenly. If they touch, they may steam instead of bake. These garlic Parmesan bread bites shine with dips. A small bowl of marinara sauce makes a great side. You can also pair them with a creamy ranch or tangy garlic aioli. Serve them warm for the best taste. A sprinkle of chopped parsley on top adds color and freshness. Enjoy these bites at parties or as a tasty snack! Pro Tips Use Fresh Garlic: Freshly minced garlic provides a more robust flavor compared to pre-minced or powdered garlic, enhancing the overall taste of the bread bites. Don't Overcrowd the Baking Sheet: Spacing the bread bites out on the baking sheet allows for even cooking and crisping, preventing them from steaming. Try Different Cheeses: Experiment with other cheeses like mozzarella or cheddar for a unique twist on the classic garlic bread flavor. Serve Immediately: For the best texture and flavor, serve these bread bites right out of the oven while they are still warm and crispy. {{image_2}} You can change the bread for these bites. Ciabatta is great, but you can try other types. Sourdough adds a tangy flavor. French bread gives a nice crust. Even whole wheat bread works well. Each option gives a unique taste and texture. Want to spice things up? You can add other cheeses or spices to the mix. Mozzarella melts beautifully and adds creaminess. Cheddar gives a sharp taste. For spices, try red pepper flakes for heat or smoked paprika for depth. Mixing flavors keeps things fun and fresh. If you need gluten-free bites, no worries! Substitute with gluten-free bread. Many stores sell good gluten-free options. Just check if they are soft enough to cube. The rest of the recipe stays the same. You can still enjoy all the cheesy, garlicky goodness! To keep your Garlic Parmesan Bread Bites fresh, store them in the refrigerator. Place them in an airtight container. This method will help maintain their flavor and texture. Leftovers can last for up to three days. If you notice any moisture, add a paper towel to absorb it. Reheating these bread bites is easy. You can use an oven or a microwave. For the oven, preheat it to 350°F (175°C). Place the bread bites on a baking sheet. Heat them for about 5-7 minutes until they are warm and crispy. If using a microwave, heat in short intervals of 20-30 seconds. This method may make them softer. Freezing is a great way to save these bites for later. To freeze, place the cooled bread bites in a freezer-safe bag. Remove as much air as possible before sealing. They can stay in the freezer for up to three months. To thaw, leave them in the refrigerator overnight. Reheat them in the oven for the best result. Garlic Parmesan Bread Bites last for about three days in the fridge. Store them in an airtight container. This keeps them fresh and safe to eat. If they smell off or look moldy, throw them away. Always check before eating leftovers. Yes, you can make these bread bites ahead. Prepare the garlic-parmesan mixture and coat the bread cubes. Store them in the fridge for up to a day. When you're ready, bake them as directed. This saves time when you have guests. These bread bites pair well with marinara sauce for dipping. You can also serve them with a fresh salad or a cheese platter. They make a great snack for parties or game nights. Enjoy them with a nice glass of wine, too! Garlic Parmesan bread bites are simple yet bursting with flavor. We covered the key ingredients, preparation steps, and baking tips to ensure you get crispy, tasty bites every time. Remember, adjusting garlic and herbs can elevate your dish to new heights. You can also explore variations using different breads or cheeses. With proper storage, these bites remain delicious, allowing you to savor them later. Try pairing them with your favorite dips for extra enjoyment. Enjoy your cooking adventure, and remember, the best flavors start in your kitchen!
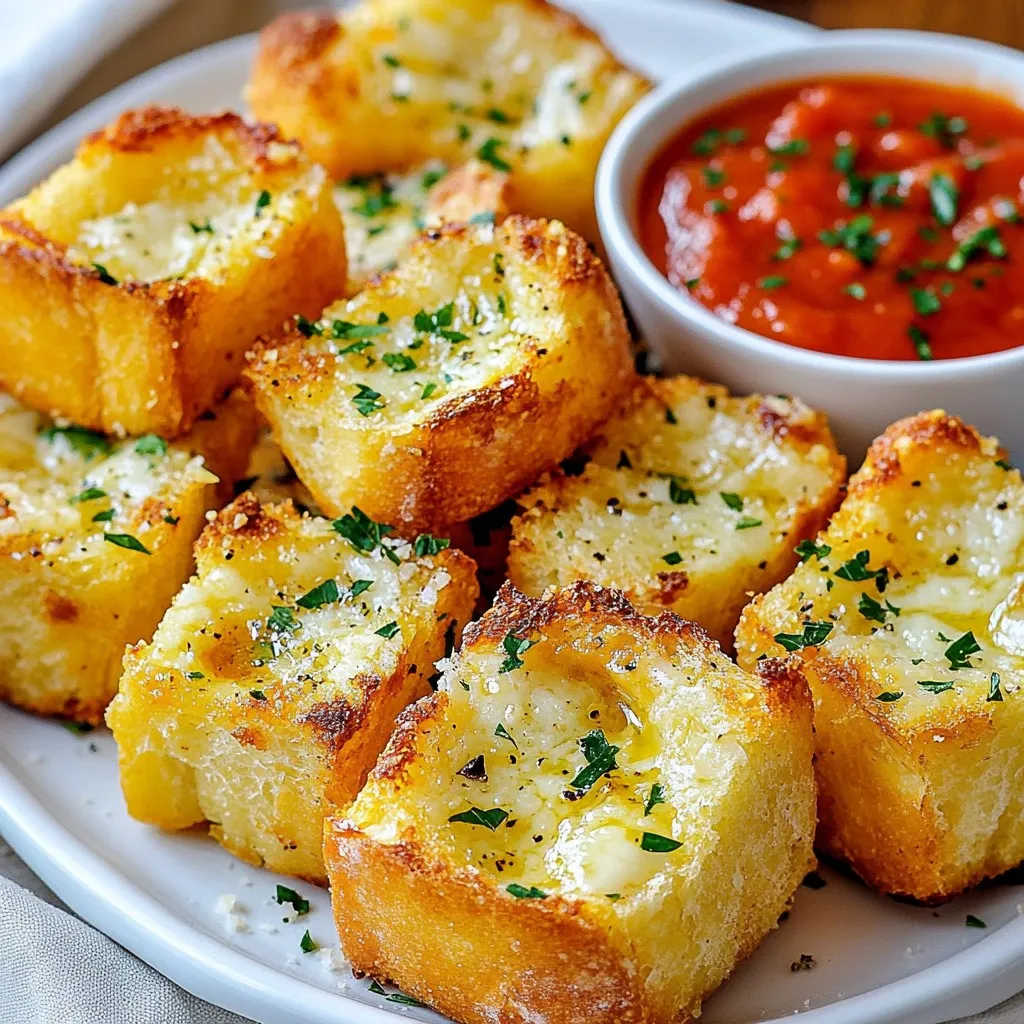
Garlic Parmesan Bread Bites Irresistible Appetizer Treat
Get ready to impress your guests with Garlic Parmesan Bread Bites! This quick and easy appetizer will steal the show at your next gathering. Crispy,
- 1 package of refrigerated pizza dough - 1 cup shredded mozzarella cheese - 1 cup pepperoni slices - 1/2 cup marinara sauce for dipping - Fresh basil for garnish - 1 tablespoon Italian seasoning - 1 garlic clove, minced - 1 tablespoon olive oil - Cornmeal for dusting (optional) When I create Cheesy Pepperoni Pizza Roll-Ups, I focus on fresh ingredients. The main ingredients are simple and easy to find. The pizza dough forms the base, while mozzarella cheese adds that gooey stretch. Pepperoni gives a classic taste that everyone loves. I also recommend some optional ingredients. Marinara sauce makes a great dip. Fresh basil adds a pop of color and flavor. You can skip these if you want, but they enhance the dish. Supporting ingredients play a key role too. Italian seasoning brings depth to the flavor. Minced garlic adds a savory kick. Olive oil helps the dough crisp up nicely. If you use cornmeal, it adds texture to the bottom of the roll-ups. For the full recipe, you can refer to the [Full Recipe]. Remember, the quality of your ingredients matters for the best taste. 1. Preheat your oven to 400°F (200°C). 2. Line a baking sheet with parchment paper. If you want, sprinkle some cornmeal on the parchment for a nice crunch. 3. On a lightly floured surface, roll out the pizza dough. Make it about 1/4 inch thick and try to get a rectangle shape. 4. Brush the dough with olive oil. Spread the minced garlic evenly over the surface. 1. Sprinkle the shredded mozzarella cheese on the dough. Leave a little space around the edges. 2. Layer the pepperoni slices over the cheese. Add a sprinkle of Italian seasoning for extra flavor. 3. Starting from one edge, roll the dough tightly into a log shape. Keep the fillings inside as you roll. 4. After rolling, slice the log into equal pieces, about 1.5 inches thick. You should end up with around 12-16 roll-ups. 1. Place the roll-ups on your prepared baking sheet. Make sure they are spaced apart. 2. Bake in the preheated oven for about 15-20 minutes. Look for them to turn golden brown and for the cheese to melt and bubble. 3. Once done, take them out and let them cool for a few minutes. This step helps avoid burning your mouth when you eat them. For the full recipe, refer to the previous section. Enjoy these tasty treats! To make your Cheesy Pepperoni Pizza Roll-Ups pop, focus on seasoning. Use fresh Italian seasoning for the best taste. You can easily mix dried basil, oregano, and thyme. Fresh ingredients also make a big difference. Use fresh mozzarella for a creamy bite. Fresh garlic adds a nice kick, too. Baking these roll-ups right is key. To ensure even cooking, place them spaced apart on the baking sheet. This helps heat flow evenly. To stop them from sticking, use parchment paper. You can also dust the paper with cornmeal. This adds texture and keeps them from sticking. Making your roll-ups look great is fun! You can garnish with fresh basil leaves. This adds color and a fresh taste. Serve them warm with marinara sauce for dipping. For a twist, try mixing in some parmesan cheese on top before baking. This gives a nice golden color and extra flavor. For the full recipe, check the detailed instructions above. {{image_2}} You can easily swap out cheese in this recipe. Try cheddar or provolone for a new taste. Both melt well and add great flavor. For meat substitutes, use turkey pepperoni or even salami. You can also try plant-based pepperoni for a healthier option. Adding vegetables can enhance your roll-ups. Consider bell peppers, mushrooms, or spinach. Chop them small, and layer them with the cheese and pepperoni. Different sauces can also change the game. Instead of marinara, try pesto, ranch, or even a spicy sriracha sauce for a kick. If you need a gluten-free option, use gluten-free pizza dough. Many brands now offer tasty choices in stores. For a vegetarian version, skip the pepperoni and add more cheese and veggies. You can even use olives or artichokes for extra flavor. Explore more ideas and find what you love! You can create a new favorite from this full recipe. To store leftovers, place them in an airtight container. Keep them in the refrigerator for up to three days. If you want to save them for later, you can freeze them. Wrap each roll-up tightly in plastic wrap and then place them in a freezer bag. They can last up to two months in the freezer. For reheating, use an oven for the best results. Preheat your oven to 350°F (175°C). Place the roll-ups on a baking sheet. Heat them for about 10-15 minutes or until hot. This method helps keep the roll-ups crispy. You can also use a microwave, but they may become soft. In the fridge, these roll-ups last about three days. If they sit longer, check for spoilage. Signs include a sour smell or a change in color. Always trust your nose! If you see any mold, throw them away. How to make Cheesy Pepperoni Pizza Roll-Ups from scratch? To make Cheesy Pepperoni Pizza Roll-Ups, you start with pizza dough. Roll it out flat on a floured surface. Brush olive oil and sprinkle minced garlic on the dough. Next, add shredded mozzarella cheese and pepperoni slices. Roll the dough tightly and slice it into pieces. Bake at 400°F (200°C) until golden brown. For the full recipe, check out the details above. Can I use other toppings besides pepperoni? Yes, you can customize your roll-ups! Try using cooked sausage, mushrooms, or veggies like bell peppers. Just keep in mind to chop or slice the toppings small so they fit well inside the roll-ups. Caloric content per serving Each serving of Cheesy Pepperoni Pizza Roll-Ups contains about 300-350 calories. The exact number may vary based on the toppings and dough used. Dietary considerations These roll-ups are high in protein and carbs. They are not gluten-free due to the pizza dough. For a healthier option, you can use whole wheat dough or add more vegetables for fiber. How long do Cheesy Pepperoni Pizza Roll-Ups take to cook? It takes about 15-20 minutes to bake the roll-ups. Make sure to keep an eye on them. You want them golden brown and bubbly. Prep time and total cooking time considerations The prep time is around 15 minutes. So, you can make these tasty roll-ups in about 35 minutes total. Perfect for a quick meal or snack! This guide covered making Cheesy Pepperoni Pizza Roll-Ups easily. You learned about ingredients, preparation, baking, and storage tips. I shared variations for taste and dietary needs. These roll-ups are fun to make and great to eat. You can adjust flavors to fit your cravings. With these steps, you'll enjoy a tasty treat anytime. Happy cooking!
Cheesy Pepperoni Pizza Roll-Ups Tasty and Easy Recipe
Got a craving for a quick snack? Try my Cheesy Pepperoni Pizza Roll-Ups! This tasty recipe is super easy, taking just a few minutes to
To make cheese breadsticks, gather these must-have items: - 2 cups all-purpose flour - 1 tablespoon sugar - 1 teaspoon salt - 2 teaspoons baking powder - 1 cup shredded mozzarella cheese - 1/2 cup milk - 1/4 cup unsalted butter, melted - 2 teaspoons garlic powder - 1 tablespoon fresh parsley (optional) - Marinara sauce (for dipping, optional) You might want to change things up. Here are some easy swaps: - Using whole wheat flour gives a nutty taste and adds fiber. - Dairy-free cheese works well for a vegan option. Look for brands that melt nicely. - Consider adding herbs like oregano or thyme for extra flavor. You can even use Italian seasoning. Fresh ingredients make a big difference in your breadsticks. They improve flavor and texture. Here are some tips: - Choose high-quality mozzarella for the best melt and taste. - Fresh parsley adds a nice color and fresh flavor. Using fresh ingredients ensures your cheese breadsticks are as tasty as possible! 1. Preheat your oven to 375°F (190°C). This step is key for the perfect bake. 2. Line a baking sheet with parchment paper. This helps prevent sticking and makes cleanup easy. 3. In a large bowl, combine 2 cups of all-purpose flour, 1 tablespoon of sugar, 1 teaspoon of salt, and 2 teaspoons of baking powder. Mix well until the dry ingredients blend nicely. 4. Stir in 1 cup of shredded mozzarella cheese. Make sure the cheese is evenly spread through the flour mix. 5. In a separate bowl, mix 1/2 cup of milk and 1/4 cup of melted unsalted butter. Pour this into the dry mix. Stir until a dough forms. 1. Transfer the dough onto a lightly floured surface. 2. Knead it gently for about a minute. This helps the dough become smooth and elastic. 3. Roll the dough into a rectangle about 1/2 inch thick. 4. Cut the dough into strips. Aim for pieces that are about 1 inch wide and 4 inches long. 1. Place the strips on your prepared baking sheet, leaving space between each one. 2. Mix 2 teaspoons of garlic powder with a tablespoon of melted butter in a small bowl. 3. Brush this garlic butter mixture generously over the breadsticks. This adds flavor and a nice golden color. 4. Bake in your preheated oven for 15-18 minutes. Watch for a golden brown color at the edges. 5. Once baked, remove from the oven and let cool slightly. Optionally, sprinkle with fresh parsley before serving. These steps will guide you to make delicious cheese breadsticks. For the Full Recipe, check the details above. To get the best texture, focus on the dough's thickness. It should be about 1/2 inch thick. If it’s too thick, the breadsticks may not cook through. If it’s too thin, they can become dry. Common mistakes include over-kneading the dough. Knead it just enough to make it smooth. Also, avoid adding too much flour. This can lead to dry breadsticks that lose their chewy texture. Cheese breadsticks shine when served warm. You can pair them with marinara sauce for a classic touch. But don’t stop there! Try ranch dressing, garlic butter, or even pesto. For a fun twist, serve them with a cheese board. Add olives, nuts, or sliced meats to make it a feast. To boost flavor, experiment with different herbs and spices. Oregano, basil, or Italian seasoning can add depth. Try mixing in some crushed red pepper for heat. Adding different cheese blends can also change the taste. Combine mozzarella with cheddar or parmesan. Each blend gives a different flavor and texture, making your breadsticks unique. {{image_2}} You can use many types of cheese for your breadsticks. Cheddar adds a sharp taste. Parmesan gives a nutty flavor. Feta brings a tangy kick. Mixing cheeses can make your breadsticks even better. Try a blend of mozzarella and cheddar for a creamy texture. You can also mix parmesan and feta for a bold flavor combination. Celebrate the holidays with special cheese breadsticks. Add toppings like cranberries or chopped nuts for a festive touch. During fall, sprinkle in some pumpkin spice for a seasonal twist. For special occasions, try using colorful herbs or seasonal veggies. This way, you can create a dish that matches the theme of your gathering. You can still enjoy cheese breadsticks if you have dietary restrictions. Use gluten-free flour blends, like rice or almond flour. For dairy-free options, try vegan cheese made from nuts. You may need to adjust the liquid in the recipe to get the right dough. These changes can help everyone enjoy this tasty treat! You can store leftover cheese breadsticks at room temperature for a few hours. If you want to keep them fresh longer, place them in the fridge. To store, wrap them in plastic wrap or foil. This keeps moisture in and prevents them from drying out. Don’t forget to keep them in a sealed container too. To reheat cheese breadsticks, the oven is your best friend. Set the oven to 350°F (175°C). Place the breadsticks on a baking sheet for about 5-10 minutes. This method keeps them crispy. If you're short on time, use the microwave. Heat in short bursts of 15-20 seconds. Be careful, as this method can make them soft. You can freeze cheese breadsticks before or after baking. For freezing before baking, cut the dough into strips. Place them on a baking sheet and freeze for 1-2 hours. Once frozen, wrap them in plastic and store in a freezer bag. To cook, bake straight from the freezer, adding a few extra minutes to the baking time. For frozen baked breadsticks, thaw them overnight in the fridge. Then reheat in the oven for best results. Yes, you can make cheese breadsticks ahead. To prepare the dough, mix the dry ingredients first. Then, add the cheese and wet ingredients. Once you form the dough, wrap it tightly in plastic wrap. Store it in the fridge for up to 24 hours. This way, you can bake them fresh later. Just remember to let the dough warm up for 15 minutes before rolling it out. You have many tasty options for dipping cheese breadsticks. Here are some popular choices: - Marinara sauce - Ranch dressing - Garlic butter - Pesto - Cheese sauce These dips add flavor and fun to every bite. You can even mix and match for variety! Baked cheese breadsticks last about 2-3 days when stored properly. Keep them in an airtight container at room temperature. Unbaked breadsticks can last about 1-2 days in the fridge. Wrap them well to avoid drying out. For longer storage, consider freezing them. Absolutely! You can use cheese breadstick dough for many other recipes. Here are a few ideas: - Make cheese twists by twisting the strips before baking. - Form mini pizzas by adding toppings on the dough. - Create a cheesy pull-apart loaf by baking the strips in a round pan. These options let your creativity shine in the kitchen! For the complete and detailed recipe, check out the Cheesy Garlic Pull-Apart Breadsticks. This blog post covered all you need to make delicious cheese breadsticks. We explored essential ingredients, substitutes, and the importance of using fresh items. I shared simple steps for mixing, shaping, and baking the dough. You also learned tips for the best texture and creative ways to serve them. For those needing variations or storage info, I provided helpful suggestions. Remember, these breadsticks are perfect for any occasion and easy to adapt. Enjoy making them your own and savor every cheesy bite.
Cheese Breadsticks Tasty and Easy Recipe Guide
Are you craving a warm, cheesy snack that’s easy to whip up? Look no further! My Cheese Breadsticks recipe is simple enough for any skill