Appetizers
![- 4 large russet potatoes - 3 tablespoons olive oil - 4 cloves garlic - 1 cup grated Parmesan cheese - 1 teaspoon paprika - 1 teaspoon dried oregano - 1 teaspoon salt - ½ teaspoon black pepper - Fresh parsley (for garnish) - Alternative seasonings (like cayenne pepper or Italian seasoning) - Cheese variations (such as mozzarella or cheese blends) - Baking sheet - Parchment paper - Mixing bowl - Knife - Cutting board Gathering the right ingredients is key for great baked garlic Parmesan potato wedges. Start with russet potatoes for their sturdy texture. Their starch helps create that crispy outside. Use fresh garlic for the best flavor. Grated Parmesan adds a nice salty note. You can play with optional ingredients. Add cayenne pepper for heat or Italian seasoning for more flavor. For cheese lovers, try mozzarella or a blend of cheeses. This makes the dish extra cheesy and delicious. Tools are simple and easy to find. A baking sheet keeps the wedges flat as they cook. Parchment paper makes clean-up easy. A mixing bowl is perfect for tossing all the ingredients. Use a knife and cutting board to cut the potatoes into wedges. Once you have everything ready, check out the full recipe for steps to make these tasty potato wedges. You'll enjoy the cooking process and the great results! - Preheat the oven to 425°F (220°C). - Cut russet potatoes into wedges. The first step is easy. Start by preheating your oven. This ensures the wedges cook evenly and get nice and crispy. While the oven heats up, grab your russet potatoes. Wash them well and then slice them into wedges. Aim for uniform sizes. This helps them cook at the same rate. - Combine olive oil and minced garlic in a mixing bowl. - Add the spices and mix thoroughly. Now, let’s make the tasty mixture. In a bowl, add olive oil and minced garlic. Mix them well. The garlic will give the potatoes great flavor. Next, sprinkle in the paprika, oregano, salt, and black pepper. Stir everything together until it's well combined. This mixture will coat the potatoes perfectly. - Coat potato wedges in the mixture. - Sprinkle Parmesan and arrange on the baking sheet. - Bake for 30-35 minutes, turning halfway. Time to coat the wedges! Toss the potato wedges in the garlic mixture. Make sure each wedge gets a good coating. Then, sprinkle the grated Parmesan cheese over the top. This adds a crunchy, cheesy layer. Place the coated wedges on a baking sheet lined with parchment paper. Make sure they are in a single layer. This helps them bake evenly. Bake for 30-35 minutes, flipping them halfway. When they are golden brown and crispy, they are ready to serve. For the full recipe, check the instructions above. To get crispy baked garlic Parmesan potato wedges, lay them out in a single layer. This way, all sides can get nice and golden. Overcrowding the baking sheet leads to steaming, not baking. Space is key for that perfect crunch. You can mix up the seasonings to fit your taste. Try adding a pinch of cayenne for heat or lemon zest for brightness. Always use freshly grated Parmesan for the best melting. This cheese adds a rich flavor that store-bought pre-grated cheese just can't match. These wedges pair well with many dipping sauces. Try ranch or marinara for a tasty treat. They also make a great side dish for grilled meats. A plate of these wedges next to burgers or chicken will impress your guests and family alike. Check the [Full Recipe] for more ideas! {{image_2}} You can take your baked garlic Parmesan potato wedges to the next level! Adding jalapeños gives them a spicy kick. Slice fresh jalapeños and mix them in when you toss the potatoes. If you love cheese, try cheddar or even a blend of cheeses. They melt nicely and add great flavor. If you want a vegan dish, use vegan cheese instead of Parmesan. Many brands offer tasty alternatives that melt well. For gluten-free options, replace regular coating with cornstarch. This keeps the wedges crispy without any gluten. Want a quicker option? Use an air fryer! It cooks the wedges fast and makes them super crispy. Just adjust the time and temperature to match your air fryer’s settings. If it’s summer, consider grilling them. Grilling adds a smoky flavor that works great with garlic and cheese. After enjoying your baked garlic Parmesan potato wedges, store them right. Place them in an airtight container. This keeps them fresh. Consume leftovers within 3-4 days for the best taste. You want them crispy and flavorful, right? When it’s time to reheat, the oven is your best friend. Preheat your oven to 400°F (200°C). Place the wedges on a baking sheet. Heat for about 10-15 minutes. This way, they stay crispy. If you're in a hurry, use the microwave. Heat them for 30 seconds to 1 minute. They won’t be as crispy, but they’ll still taste good. You can freeze baked potato wedges for later. First, let them cool completely. Then, place them in a single layer on a baking sheet. Freeze them for about 1-2 hours until firm. After that, transfer them to a freezer bag. For best taste, use them within 1-2 months. To reheat, thaw in the fridge overnight. Then, follow the oven reheating steps. Enjoy your crispy delight anytime! You can tell potato wedges are done by checking their texture and color. Look for a golden-brown color on the outside. The wedges should be crispy and firm. If you poke them with a fork, they should feel soft inside. This means they are cooked through. Yes, you can use other types of potatoes. Sweet potatoes are a great option. They add a nice sweetness and a unique flavor. Yukon Gold potatoes also work well. They have a buttery taste and creamy texture. Just keep in mind that cooking times may vary slightly. Leftover baked garlic Parmesan potato wedges are very versatile. You can slice them and add them to salads for extra crunch. They make a great topping for pizzas too. You could also mash them up and use them in a breakfast hash. Get creative and enjoy! To sum up, we explored how to make delicious baked garlic Parmesan potato wedges. We covered essential ingredients, providing options to customize flavors and textures. You learned step-by-step instructions for preparation, baking, and serving suggestions. Remember, experimenting with toppings and methods can create unique dishes. Whether you dress them up or enjoy them plain, these wedges are a satisfying choice. Store leftovers properly for future meals, ensuring you enjoy every last bite. Happy cooking!](https://stirredrecipes.com/wp-content/uploads/2025/06/33243c6f-e4a1-4300-975e-cbba5f232ecd.webp)
Baked Garlic Parmesan Potato Wedges Crispy Delight
Welcome to a crispy delight that will transform your snacking game! Baked Garlic Parmesan Potato Wedges are not just any side dish; they are the

Spicy Chili Garlic Deviled Eggs Zesty Flavor Boost
Get ready to spice up your party or weeknight dinner with my Spicy Chili Garlic Deviled Eggs! These tasty bites pack a zesty punch that

Irresistible Asian-Style Ground Beef Lettuce Wraps
Are you ready to discover a dish that’s bursting with flavor and easy to make? These Irresistible Asian-Style Ground Beef Lettuce Wraps blend savory ground
![- Fresh blackberries - Cucumber - Fresh mozzarella balls - Fresh basil leaves - Balsamic glaze - Extra virgin olive oil - Salt and pepper - Toothpicks or small skewers - Cutting board and knife To create these tasty Blackberry-Cucumber Caprese Bites, you need fresh ingredients. The blackberries give a sweet burst, while cucumber adds a satisfying crunch. You’ll want to find ripe mozzarella balls, which melt in your mouth. Fresh basil leaves add a lovely aroma and flavor. You can drizzle balsamic glaze for a tangy kick. Extra virgin olive oil enhances the taste and adds richness. A bit of salt and pepper balances the flavors. For tools, grab some toothpicks or small skewers. These help assemble each bite. A cutting board and knife are also key for slicing the cucumber. With these ingredients and tools, you are ready to make a refreshing and delicious snack. Check out the Full Recipe to get started! - Slice cucumber into rounds, about 1/4-inch thick. Set aside. - Rinse and dry blackberries gently under cold water. - Create the bites using toothpicks or small skewers. - Alternate ingredients properly: start with a cucumber slice, then a basil leaf, followed by a mozzarella ball, and finish with a blackberry. - Drizzle the bites with extra virgin olive oil and balsamic glaze for a tasty finish. - Season lightly with salt and pepper to enhance the flavors. These simple steps make a delightful snack. For the complete recipe, check out the [Full Recipe]. Enjoy your tasty Blackberry-Cucumber Caprese Bites! Using a white platter makes your bites pop. The bright colors of the blackberries and cucumber stand out. This simple choice enhances the dish's appeal. You can also garnish with extra basil leaves. This adds freshness and a touch of green. These bites taste best when fresh. However, you can make them ahead of time if needed. Just keep them covered in the fridge. For drinks, pair them with a light white wine or sparkling water. These flavors complement the bites well. One common mistake is over-soaking blackberries. This can make them mushy and less tasty. Rinse them gently instead. Another mistake is not slicing cucumbers evenly. Aim for 1/4-inch rounds for the best texture. Consistent sizes help with the bite's overall look and feel. {{image_2}} You can make these bites even more fun! Try different cheeses like feta or goat cheese. They add a unique taste. You can also swap in other fruits. Strawberries or raspberries work well too. They bring a sweet twist to your bites. Want to spice things up? Add a sprinkle of chili flakes to your bites. This small change adds heat and excitement. If you like sweet flavors, drizzle a bit of honey on top. It balances the taste of the cheese and berries. You can create themed Caprese bites for any occasion. For holidays, decorate them with colors that fit the season. Use local produce to make seasonal variations. This can add freshness and support local farmers. Try these fun ideas to keep your Caprese bites exciting! For the full recipe, check out the section above. To keep your Blackberry-Cucumber Caprese Bites fresh, place them in an airtight container. Store them in the fridge. They taste best when eaten within a day. This way, you enjoy their full flavor and texture. For longer storage, prepare the ingredients separately. Slice the cucumber and rinse the blackberries, but don’t assemble them yet. Keep the mozzarella and basil in the fridge too. When you are ready to serve, assemble the bites. This method keeps everything fresh and tasty. Reheating is not recommended for these bites. They are best served cold. Enjoy the crisp cucumber and juicy blackberry as they are meant to be! Yes, for best flavor, assemble just before serving. This keeps the ingredients fresh and bright. If you prepare them too early, the blackberries and cucumber may lose their crunch. Store in an airtight container in the refrigerator for up to 24 hours. This keeps the flavors intact and prevents the ingredients from drying out. Enjoy them within a day for the best taste. Fresh blackberries are recommended for optimal taste and texture; frozen may alter texture. Frozen blackberries can become mushy when thawed, which affects the bite's crunch. Fresh berries offer a burst of flavor that elevates this dish. They pair well with cocktails, wine, and other appetizers. A light white wine complements the flavors nicely. You can also serve them with a refreshing drink like lemonade or iced tea. Blackberry-Cucumber Caprese Bites are easy and fun to make. You learned about the main ingredients, important tools, and simple steps to create this tasty snack. Remember to use fresh ingredients for the best flavor. You can also swap in different cheeses or fruits for variety. Serve them on a bright platter, fresh from the fridge, for that added wow factor. Enjoy these bites at your next gathering or as a quick snack!](https://stirredrecipes.com/wp-content/uploads/2025/06/54b1ce1b-f715-4db3-8ff9-35a824b52b6e.webp)
Blackberry-Cucumber Caprese Bites Refreshing Snack Idea
Looking for a quick and tasty snack? Blackberry-Cucumber Caprese Bites offer a fresh twist on a classic treat. These colorful bites combine juicy blackberries, crisp
![- 6 large eggs - 2 tablespoons mayonnaise - 1 teaspoon Dijon mustard - 1 teaspoon hot sauce (optional) - Salt and pepper to taste - 4 slices of crispy lettuce - 4 slices of ripe tomato - 4 slices of crispy turkey bacon or vegetarian bacon - 4 soft slider buns - Fresh chives, chopped for garnish To create tasty Devilled BLT Egg Sliders, gather all your ingredients first. Start with six large eggs. These are the base of our devilled egg mix. You will also need two tablespoons of mayonnaise, which adds creaminess. A teaspoon of Dijon mustard gives it a nice tang. If you like heat, add a teaspoon of hot sauce. Don't forget salt and pepper to taste! Next, you will need four slices of crispy lettuce and four slices of ripe tomato. These fresh veggies add crunch and flavor. For the protein, grab four slices of crispy turkey bacon or vegetarian bacon. This gives the sliders that classic BLT taste. Finally, you need four soft slider buns to hold everything together. Chop fresh chives for garnish. They add a pop of color and flavor. Once you have all these ingredients, you are ready to make your sliders. For the full recipe, check out the detailed instructions. Boiling the Eggs Start by placing the eggs in a saucepan. Cover them with cold water. Turn the heat to medium and bring it to a boil. Once the water boils, cover the pan and turn off the heat. Let the eggs sit for 12 minutes. This method gives you perfect hard-boiled eggs. Cooling and Peeling the Eggs After 12 minutes, move the eggs to a bowl of ice water. Let them cool for about 5 minutes. This step helps to stop the cooking and makes peeling easier. Once cooled, gently tap each egg on a hard surface. Roll it to loosen the shell, then peel it off carefully. Mixing Ingredients In a medium bowl, chop the peeled eggs into small pieces. Add 2 tablespoons of mayonnaise, 1 teaspoon of Dijon mustard, and 1 teaspoon of hot sauce if you want some heat. Stir the mixture until it’s creamy and smooth. This is your devilled egg base. Seasoning Add salt and pepper to taste. Start with a pinch of each and adjust as needed. A good balance of flavors will make your sliders shine. Taste the mixture to see if it needs more seasoning. Preparing the Slider Ingredients Cook the turkey bacon or vegetarian bacon until crispy. If you choose vegetarian bacon, follow the package instructions. While the bacon cooks, wash and dry your lettuce. Slice the tomatoes into rounds. Layering the Sliders Take the slider buns and slice them in half. On the bottom half of each bun, place a leaf of crispy lettuce. Add a slice of ripe tomato next. Spoon the devilled egg mixture on top of the tomato. Finally, layer on the crispy bacon. Place the top bun on each slider to finish. This step-by-step guide will help you create delightful Devilled BLT Egg Sliders. For the full recipe, check the details above! Adjusting Seasonings Start with the basic mix of eggs, mayonnaise, and Dijon mustard. Taste it as you go. If you want more flavor, add salt, pepper, or hot sauce. You can also try lemon juice for a fresh twist. Just remember: small changes can make a big impact. Texture Tips For a creamy texture, mix the ingredients well. Use a fork or a hand mixer for smoothness. If you like a bit of crunch, add finely chopped celery or pickles. This gives your devilled egg mixture both flavor and bite. Bun Selection Choose soft slider buns for the best taste. Look for fresh bakery buns or whole wheat options for a healthy twist. The bun should hold the filling without falling apart. Avoid buns that are too crusty or dense. Layering Techniques Start with lettuce on the bottom. This keeps the bun from getting soggy. Then add a slice of tomato, followed by a generous scoop of the devilled egg mixture. Finally, top it off with crispy bacon. This method ensures every bite has balanced flavors. Ideal Accompaniments Pair your sliders with a light salad or fresh fruit. Chips or fries also work well for a crunch. If you want something warm, serve with soup. Each of these options complements the sliders nicely. Presentation Tips Arrange the sliders on a nice platter. Use a colorful cloth or plate for a pop. Garnish with chopped chives on top. This adds a splash of color and makes the dish more inviting. For a fun touch, use toothpicks to hold the sliders together. For the full recipe, refer to the [Full Recipe]. {{image_2}} Vegetarian Options If you want a meat-free twist, swap turkey bacon for vegetarian bacon. It adds great flavor without the meat. You can also use avocado slices instead of bacon. This makes for a creamy and rich slider. Different Types of Bacon Try different kinds of bacon for unique tastes. You can use bacon made from pork, beef, or turkey. Each type gives a different flavor. Smoked bacon can add a wonderful depth to your sliders. Spicy Additions Need some heat? Add diced jalapeños to the devilled mixture. Another option is to mix in some cayenne pepper. This will make each bite exciting and bold. Herb Infusions Fresh herbs can brighten up your sliders. Try adding chopped dill or parsley to the egg mixture. This will give your devilled eggs a fresh kick. Basil can also add a lovely aroma and flavor. Gluten-Free Options For a gluten-free choice, look for gluten-free slider buns. Many brands now offer tasty alternatives. You can also use lettuce wraps for a low-carb option. Larger Sliders Want more food? Use regular burger buns instead of slider buns. This makes a filling meal for lunch or dinner. You can even stack two patties high for a hearty treat. Explore these variations to make your Devilled BLT Egg Sliders even more fun. For the full recipe, check the recipe section. Refrigerate any leftover sliders within two hours of making them. Place them in an airtight container. This keeps them fresh for up to three days. If you leave them out, they can spoil fast. For reheating, use an oven or toaster oven. Preheat it to 350°F (175°C). Wrap the sliders in foil to keep them moist. Heat for about 10 minutes. Check to ensure they are warm throughout. The devilled egg mixture lasts up to three days in the fridge. Store it in a sealed container. This helps keep it fresh and safe to eat. For best flavor and texture, consume it within the first two days. If you want to keep it fresh longer, avoid adding the crispy bacon until serving. This keeps everything crunchy and tasty. To make eggs easy to peel, start with older eggs. Fresh eggs stick to the shell more. After boiling, cool them in ice water for five minutes. This quick cool down helps loosen the shell. Gently tap the egg on the counter to crack it all over. This step makes peeling much easier. Yes, you can prepare the devilled egg mixture ahead of time. Store it in an airtight container in the fridge. It will stay fresh for up to two days. Just remember to stir it again before serving. This saves time on busy days and makes meal prep a breeze. You can make this recipe healthier by using Greek yogurt instead of mayonnaise. It adds creaminess without extra fat. You can also swap turkey bacon for turkey slices or tofu for a vegetarian option. Using whole-grain buns can add fiber to your meal. These swaps keep it tasty and nutritious. These sliders pair well with many sides. Try serving them with a fresh salad or vegetable sticks. You could also offer a light soup for a full meal. For a fun touch, serve some sweet potato fries. They add crunch and color to your plate. Explore these options to find your favorite side! This blog post covered how to make delicious Devilled BLT Egg Sliders. We explored all the ingredients, step-by-step instructions, and helpful tips. We also discussed fun variations and proper storage methods. Remember, you can customize this recipe to fit your tastes. Whether you prefer vegetarian options or spicy flavors, there's a way to make it yours. Enjoy serving these sliders at your next gathering; they are sure to impress!](https://stirredrecipes.com/wp-content/uploads/2025/06/4cee163b-33dc-44b8-9c23-7790196b46d3.webp)
Devilled BLT Egg Sliders Tasty and Easy Recipe
Are you ready to elevate your snack game? These Devilled BLT Egg Sliders are packed with flavor and super easy to make. With creamy eggs,

Philly Cheesesteak Sliders Tasty and Easy Recipe
Craving something delicious and easy? You’re in the right place! These Philly Cheesesteak Sliders pack all the classic flavors into bite-sized goodness. With juicy ribeye,
![To create the perfect Boat Dip, you need these main items: - 1 can (10 oz) diced tomatoes with green chilies (like Rotel) - 1 cup sour cream - 1 packet ranch seasoning mix - 1 cup cream cheese, softened - 1 cup shredded cheddar cheese - 1/2 cup diced green onions - 1/2 cup diced bell pepper (any color) These ingredients bring flavor and creaminess to the dip. The diced tomatoes add a nice kick, while the cream cheese and sour cream give it a rich texture. Feel free to add your own twist with these optional ingredients: - 1/4 cup black olives, sliced (optional) - A splash of hot sauce or diced jalapeños for heat These extras let you make the dip your own. If you love olives, toss them in. Want more spice? A little hot sauce does the trick! Serve your Boat Dip with these tasty items for the best experience: - Tortilla chips - Veggie sticks (like carrots or celery) Tortilla chips are crunchy and perfect for scooping. Veggie sticks offer a fresh, healthy option. Whichever you choose, your guests will love it! For the full recipe, check the previous section. Making Boat Dip is quick and easy. You will need about 15 minutes to prep. Gather all your ingredients first. This will help you move faster. You can find the full recipe above. Start by taking a large bowl. Add the softened cream cheese, sour cream, and ranch seasoning mix. Mix these three together until it is smooth and creamy. This is the base of your dip. Next, drain the can of diced tomatoes with green chilies. Add them to the bowl and stir until well combined. Now it is time to add the fun stuff! Fold in the shredded cheddar cheese, diced green onions, diced bell pepper, and black olives if you want. Mix it gently so you keep the cheese chunks. Taste your dip and adjust the seasoning if needed. If you want more heat, add a splash of hot sauce or diced jalapeños. Once it is all mixed, transfer your dip to a serving bowl. Chill it in the fridge for at least 30 minutes. This helps all the flavors blend together. Serve it cold with tortilla chips or veggie sticks. Enjoy your delicious Boat Dip! To make your Boat Dip even tastier, try adding fun flavors. Here are some ideas: - Hot Sauce: Add a few dashes for spice. - Jalapeños: Fresh or pickled ones give a kick. - Cilantro: Fresh herbs add a bright taste. - Corn: Sweet corn adds crunch and sweetness. Each of these can give your dip a unique twist. Mix and match to find your favorite blend! A great dip deserves a great look. Here are some tips to serve your Boat Dip: - Chill it: Let it cool for at least 30 minutes. This helps the flavors blend well. - Garnish: Sprinkle extra green onions or cheese on top before serving. - Serve in style: Use a fun bowl or even a hollowed-out bell pepper for a colorful touch. - Pair with dips: Offer tortilla chips and veggie sticks for a nice spread. These small steps can make your dip the star of the table! When making Boat Dip, some mistakes can happen. Here’s what to watch out for: - Skipping the chill time: Don’t rush this step. Chilling helps flavors mix. - Not draining tomatoes: Ensure you drain the canned tomatoes well. Too much liquid makes it runny. - Overmixing: Mix just enough to combine. Overmixing can change the texture. - Forget to taste: Always taste your dip before serving. Adjust seasoning as needed. Avoiding these common errors will help you make a perfect dip every time. For the full recipe, check the [Full Recipe]. {{image_2}} If you like heat, you can spice up your boat dip. You can add diced jalapeños or a splash of hot sauce. Both options bring a great kick to the dip. For more heat, try adding diced serrano peppers. You can also use spicy ranch seasoning instead of the regular kind. This will give your dip a bold flavor. Just remember to taste as you go. Adjust to find the heat level you enjoy. You can easily make this dip vegetarian. Swap the ranch seasoning for a plant-based version. Use vegan cream cheese and sour cream for a dairy-free dip. You can also add more veggies. Chopped spinach or artichokes can enhance the dip's texture. Grated carrots or diced cucumbers also work well. These additions make the dip healthy and colorful. Everyone will enjoy it, even if they don’t follow a vegetarian diet. Cheese is key in boat dip, but you have options. If you want a lighter dip, use low-fat cream cheese. You can also swap in mozzarella for a milder taste. If you love blue cheese, crumbled blue cheese can add a strong flavor. For a nutty twist, try using nutritional yeast. This will give your dip a cheesy flavor without dairy. Each option changes the taste, so have fun exploring! For the full recipe, check out the complete guide above! To keep leftover Boat Dip fresh, place it in an airtight container. Make sure to seal it well. Store it in the fridge. It will stay good for about three days. If you notice any change in smell or color, it’s best to toss it out. If you want to freeze Boat Dip, use a freezer-safe container. Leave some space at the top. The dip may expand when frozen. It can last up to two months in the freezer. When you’re ready to eat it, thaw it in the fridge overnight. To reheat Boat Dip, avoid using the microwave. Instead, warm it gently in a saucepan over low heat. Stir often to keep it smooth. If the dip looks thick, add a splash of sour cream. This keeps it creamy and tasty. Enjoy your dip warm with chips or veggies. For the full recipe, check the main article. Boat Dip stands out due to its creamy texture and bold flavors. The main ingredient is cream cheese, which gives it a rich, smooth base. The combination of diced tomatoes with green chilies adds a zesty kick. Ranch seasoning brings in a tangy flavor that pairs well with the cheese. This dip is effortless to make and perfect for gatherings. You can serve it cold or at room temperature, making it versatile for any occasion. Yes, you can make Boat Dip in advance. In fact, making it a day before can enhance the flavors. Just prepare the dip as per the Full Recipe and store it in an airtight container. Keep it in the fridge until you’re ready to serve. When you take it out, give it a quick stir and enjoy the burst of flavors. If you don’t have ranch seasoning, you can make your own mix. Combine equal parts of dried herbs such as dill, parsley, and chives. Add some garlic powder and onion powder for extra flavor. You can also use Italian seasoning or any favorite seasoning blend. Just remember to taste and adjust the flavors to your liking. In this blog post, we explored how to craft a delicious boat dip. We discussed key ingredients, step-by-step instructions, and tips to enhance flavor. We also looked at tasty variations and how to store your dip effectively. Remember, boat dip can be tailored to your taste, so don’t be afraid to experiment! With these tips, your next gathering will have a crowd-pleaser on the table. Enjoy making your perfect dip and share it with friends!](https://stirredrecipes.com/wp-content/uploads/2025/05/62367366-4b8d-4fd2-855d-b1af2abf489e.webp)
Boat Dip Rotel Ranch Dip Easy and Flavorful Recipe
If you love a tasty and easy dip, you’re in for a treat! Boat Dip, also known as Rotel Ranch Dip, is the perfect blend
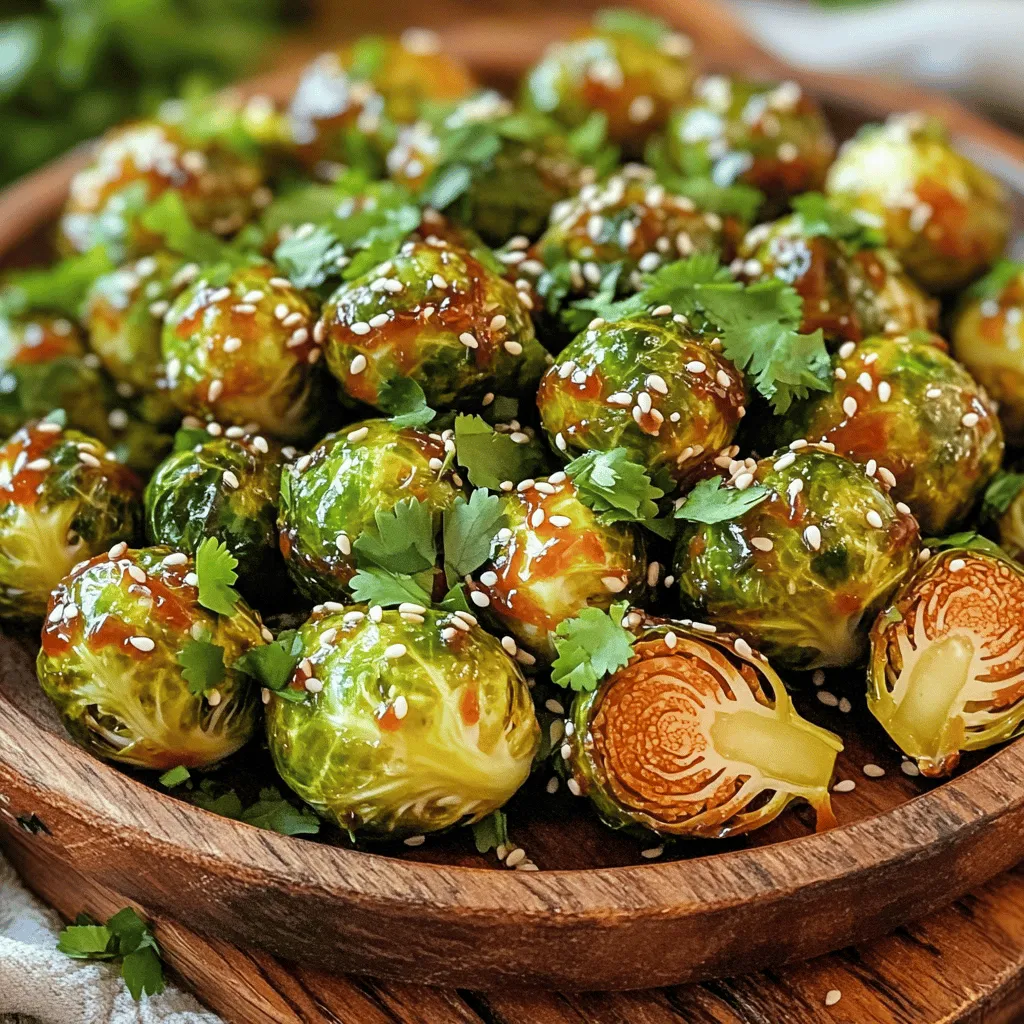
Sweet Chili Air Fryer Brussels Sprouts Delight
Are you ready to elevate your vegetable game? Sweet Chili Air Fryer Brussels Sprouts Delight offers a crispy, tangy twist on a classic dish. You’ll
![- 1 lb fresh salmon fillet, skin removed and cut into bite-sized pieces - 1 cup panko breadcrumbs - 1/2 cup all-purpose flour - 2 large eggs, beaten - 1 teaspoon garlic powder - 1 teaspoon paprika - 1/2 teaspoon salt - 1/4 teaspoon black pepper - 1/2 cup mayonnaise - 2 tablespoons sweet chili sauce - 1 tablespoon sriracha (adjust for spiciness) - 1 tablespoon lime juice - Fresh cilantro, chopped (for garnish) - Lime wedges (for serving) The main parts of this recipe come together to create tasty bites. First, we start with the salmon fillet. It is fresh and packed with nutrients. I love using panko breadcrumbs because they give a light and crispy texture. The all-purpose flour helps the coating stick well. Beaten eggs act like glue for the breadcrumbs. Next, we add flavor with seasonings. Garlic powder and paprika add depth. Salt and pepper make everything pop. The Bang Bang sauce is the star here. It mixes creamy mayonnaise with sweet chili sauce and a kick from sriracha and lime juice. This sauce adds a zesty twist. Garnishing with fresh cilantro brightens the dish. Lime wedges add a fresh squeeze that enhances the bites. For the full recipe, check the section above. Enjoy crafting these crispy bites for a quick, flavorful snack! To make Crispy Bang Bang Salmon Bites, start with a few easy steps. First, preheat your oven to 425°F (220°C). This high heat helps make the salmon bites crispy. Next, prepare your baking sheet. Line it with parchment paper and lightly spray it with cooking oil. This prevents sticking and ensures a good crunch. Now, let’s set up your dredging station. You’ll need three bowls. Fill one bowl with flour, another with beaten eggs, and the last with panko breadcrumbs mixed with garlic powder, paprika, salt, and black pepper. This setup makes coating the salmon easy and quick. Take each piece of salmon and coat it lightly in flour first. Then, dip it in the beaten eggs. Finally, roll it in the panko mixture. Make sure each piece is well-coated. This ensures each bite is super crispy. Next, arrange the coated salmon bites on the baking sheet. Make sure to leave space between each piece. If they are too close, they won’t crisp up properly. Lightly spray the tops with cooking oil for extra crunch. Bake the salmon bites for 12 to 15 minutes. They should turn golden brown and reach an internal temperature of 145°F (63°C). Keep an eye on them, as each oven can vary slightly. For the full recipe, check back to get all the details you need to enjoy this quick and tasty snack! To get that perfect crunch, use panko instead of regular breadcrumbs. Panko is lighter and airier. It creates a crispier texture on your salmon bites. Light oil spraying is key too. Spray the tops of the salmon with oil before baking. This helps them brown nicely and adds extra crunch. You can choose between the oven and an air fryer. Both methods work well, but the air fryer gives a quicker crisp. If you use the oven, preheat it to 425°F (220°C) for best results. To check for doneness, use a food thermometer. Salmon should reach 145°F (63°C). This ensures it's cooked and safe to eat. You can adjust the spice level to fit your taste. Want it hotter? Add more sriracha to the Bang Bang sauce. For extra flavor, try adding herbs like dill or parsley. A pinch of smoked paprika can also enhance the taste. These small changes can make your bites even better. For the full recipe, check out the Crispy Bang Bang Salmon Bites. Enjoy your cooking adventure! {{image_2}} You can switch salmon for other proteins. Chicken works great. Cut chicken into small pieces, just like the salmon. The cooking time may change, so check for doneness. Tofu is another option. Use firm tofu for the best texture. Press it to remove excess moisture, then cut it into bite-sized pieces. This adds a fun twist to the recipe. For seafood lovers, shrimp is a fantastic choice. Use medium or large shrimp, peeled and deveined. Coat them in the same way as salmon. Bake until they turn pink and crispy. If you need a gluten-free version, swap the all-purpose flour. Use gluten-free flour instead. It works just as well for coating. For breadcrumbs, choose gluten-free panko. This keeps the bites crispy without gluten. Make sure to check the labels on your ingredients. Not all brands are gluten-free, so read carefully. Add some excitement to your dish with new flavors. Mango salsa is a fresh and fruity option. Just chop mango, red onion, and cilantro. Squeeze some lime juice over it and mix. This pairs perfectly with the crispy bites. Another great idea is to use avocado sauce. Mash ripe avocados and mix with lime juice and salt. This creamy dip complements the crunch of the salmon. You can also enhance flavors by adding herbs or spices. Fresh dill or cilantro can brighten the dish. For a spicy kick, try adding cayenne pepper or chili flakes to the coating. This will give your bites an extra zing. For the full recipe, check out the Crispy Bang Bang Salmon Bites recipe! After enjoying your Crispy Bang Bang Salmon Bites, you may have some left. To keep them fresh, place them in a container. - Use an airtight container to lock in flavor. - Store in the fridge for up to three days. Make sure to let them cool down first. This will help keep the texture intact. When it's time to enjoy leftovers, you have two main options: the oven or the microwave. - Oven: Preheat to 350°F (175°C). Place the bites on a baking sheet. Heat for about 10-12 minutes. This method keeps them crispy. - Microwave: Place the bites on a microwave-safe plate. Heat for 30 seconds to 1 minute. This method is faster, but it may make them soft. If you want crispy bites, I recommend the oven. If you want to save some for later, freezing is a great option. - Freezing Salmon Bites: Place them in a single layer on a baking sheet. Freeze until solid, then transfer to a freezer bag. This prevents them from sticking together. - Thawing Tips: When you're ready to eat, take them out the night before. Place them in the fridge to thaw. You can also thaw them in the microwave, but be cautious. You don't want to cook them. For the full recipe and tips, check out the [Full Recipe]. Yes, you can use frozen salmon. Just make sure to thaw it first. Thaw the salmon in the fridge or under cold running water. This keeps it fresh and safe. Using thawed salmon helps the bites cook evenly. The salmon is done when it reaches 145°F (63°C). You can check this with a food thermometer. The inside should be opaque and flake easily with a fork. If it looks shiny and raw, it needs more time. You can serve these bites with many sides. Here are a few ideas: - Fresh green salad - Steamed vegetables - Rice or quinoa - Sweet potato fries - Dipping sauces like extra Bang Bang sauce or soy sauce To make the Bang Bang sauce spicier, add more sriracha. You can also include red pepper flakes for extra heat. Start with a little, and taste as you go. Adjust it to match your spice level. Yes, you can prepare the salmon bites ahead of time. Coat them and place them on the baking sheet. Cover and refrigerate for up to 24 hours. When ready, bake them straight from the fridge. This saves time and makes your snack quick. For the full recipe, check the earlier section. This blog post covered everything you need for Crispy Bang Bang Salmon Bites. We explored the main ingredients, seasonings, preparation steps, and cooking techniques. I shared tips to ensure crispiness and various proteins you can use. We also discussed storage and reheating methods for leftovers. Now you have the tools to make a delicious dish. Enjoy your cooking and feel free to get creative!](https://stirredrecipes.com/wp-content/uploads/2025/05/89de1647-a89e-439b-b773-4dea133b2388.webp)
Crispy Bang Bang Salmon Bites Flavorful Quick Snack
Are you ready to elevate your snacking game? Crispy Bang Bang Salmon Bites are a quick, tasty treat that’s perfect for any occasion. Packed with

Air Fryer Cheesy Mashed Potato Balls Crispy Delight
Get ready for a tasty treat! My Air Fryer Cheesy Mashed Potato Balls are crispy, cheesy, and so easy to make. This recipe transforms simple