Appetizers
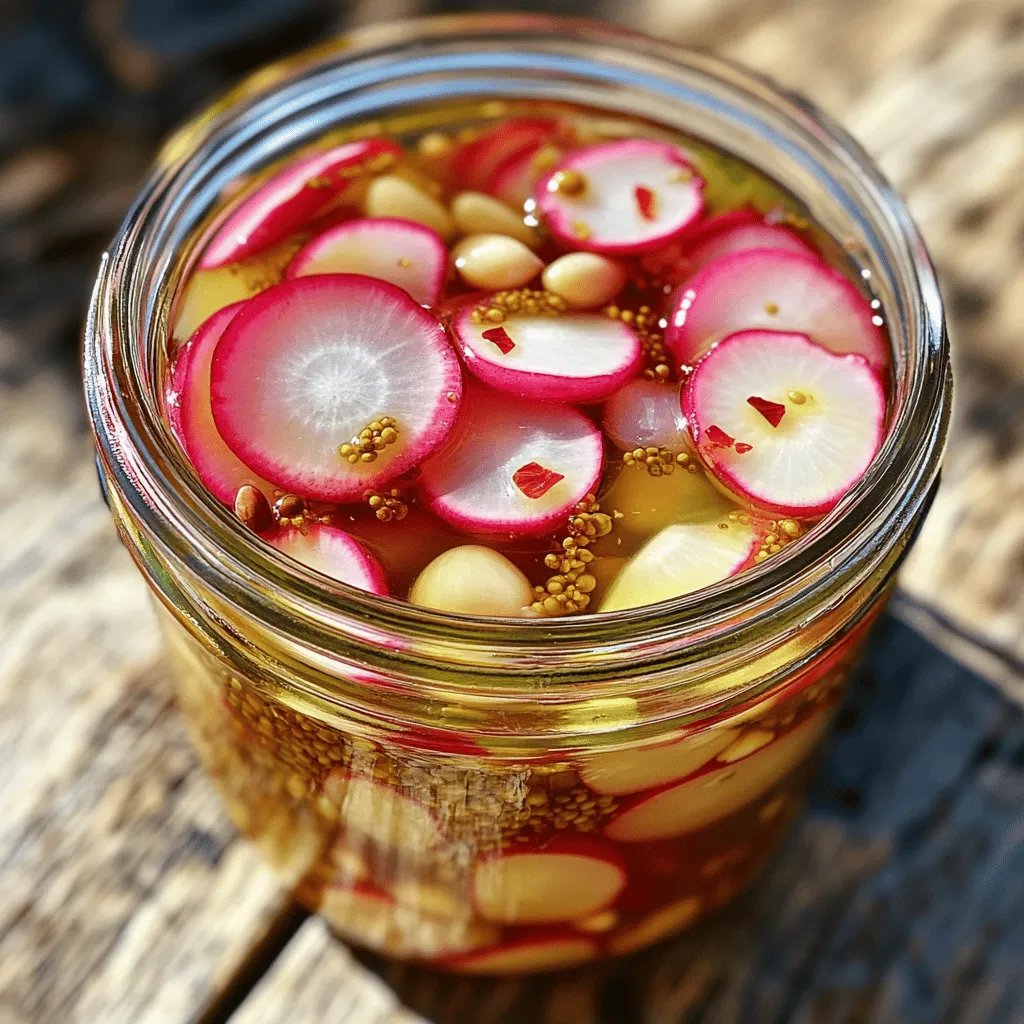
Pickled Radishes for Flavorful and Tangy Snacks
Are you ready to add a burst of flavor to your snacking? Pickled radishes are the perfect blend of tangy and crunchy, making them a
Taco Pickles Crunchy and Flavorful Homemade Delight
Are you ready to spice up your meals with a zesty twist? Taco pickles are your new best friend! These crunchy delights are packed with
![- 4 large bell peppers (red, yellow, or green) - 2 cups cooked chicken, shredded - 1/2 cup buffalo sauce (adjust according to taste) - 1 cup cream cheese, softened - 1 cup shredded cheddar cheese - 1/2 cup green onions, chopped - 1/2 teaspoon garlic powder - 1/2 teaspoon onion powder - Salt and pepper to taste - 1/4 cup crumbled blue cheese (optional) The core of this recipe is the bell peppers and shredded chicken. The bell peppers serve as the tasty vessel for the filling. I love using colorful peppers for a vibrant dish. The chicken gives protein and texture. Buffalo sauce adds that spicy kick we crave. Cream cheese and cheddar cheese blend to create a creamy filling. Green onions bring a fresh crunch. Garlic and onion powders add depth to the flavor. You can switch things up easily! A favorite option is crumbled blue cheese on top. It adds more flavor and pairs well with buffalo sauce. You can also try different cheeses like mozzarella or pepper jack for a twist. If you want fewer carbs, use cauliflower rice instead of chicken. This dish can fit many diets! Just have fun with it and make it your own. First, gather all your ingredients. You will need bell peppers, chicken, buffalo sauce, and cheese. Next, preheat your oven to 375°F (190°C). This step is key for cooking the peppers evenly. While the oven heats, cut the tops off the bell peppers. Remove the seeds and the white membranes inside. This makes space for the tasty filling. In a large bowl, mix the shredded chicken and buffalo sauce. You can adjust the sauce to make it spicier or milder. Add the softened cream cheese, shredded cheddar, chopped green onions, garlic powder, onion powder, and a pinch of salt and pepper. Stir until everything is well mixed. This mixture is where all the flavor lives. Now it’s time to stuff the peppers. Take each hollowed pepper and fill it with the buffalo chicken mixture. Pack it in until it's full. Place the stuffed peppers in a baking dish. Cover them loosely with aluminum foil. This helps them cook without burning. Bake in the oven for 25 minutes. After that, remove the foil and bake for another 10 to 15 minutes. The peppers should be tender, and the filling needs to be bubbly and slightly golden. If you like blue cheese, sprinkle it on the peppers during the last five minutes of baking. Once the peppers are done, take them out of the oven. Let them cool for a few minutes before serving. For a nice touch, serve the stuffed peppers on a colorful platter. Drizzle some extra buffalo sauce on top and sprinkle with more chopped green onions. You can also add a side of ranch or blue cheese dressing for dipping. It's a fun and tasty way to enjoy your meal! For the complete recipe, check the Full Recipe section. To make the best buffalo chicken stuffed peppers, choose ripe bell peppers. They should be firm and colorful. Cut the tops off carefully. Make sure to remove all the seeds and membranes. This step helps the peppers cook evenly and taste better. When mixing your filling, blend the chicken and cheeses well. This helps every bite have the same flavor. One common mistake is not pre-cooking the chicken. Always use cooked chicken for a safe and tasty meal. Another mistake is overfilling the peppers. Leave a little space at the top to allow for bubbling. This will keep the filling from spilling over. Lastly, don’t skip the foil during the first part of baking. It keeps the peppers moist and helps them cook through. You can add more depth to your dish by mixing in different ingredients. For a spicy kick, add jalapeños or extra buffalo sauce. If you like a creamy taste, stir in some sour cream or ranch. For a fresh touch, try adding chopped cilantro or parsley. These small changes can make your stuffed peppers even more exciting. You can find the full recipe for buffalo chicken stuffed peppers to get started. {{image_2}} You can easily make a veggie version of these stuffed peppers. Instead of chicken, use black beans or lentils. These options make a tasty filling. Add extra veggies like corn or diced tomatoes for more texture. Use the same buffalo sauce for that spicy kick. Cream cheese can be replaced with a dairy-free option. This keeps the creamy taste while being plant-based. If you want a low-carb meal, skip the peppers. Instead, use zucchini boats or mushrooms. They hold the filling well and taste great. You can also swap the cream cheese with ricotta. This will keep your dish light yet creamy. Look for low-carb buffalo sauces to stay within your diet goals. Feel free to mix up the flavors! Try different sauces like barbecue or teriyaki for a new twist. Use Monterey Jack or pepper jack cheese for an added kick. For a smoky flavor, add some chipotle sauce. You can even top the peppers with crispy bacon bits for extra crunch. Consider garnishing with fresh herbs like cilantro or parsley for a fresh touch. For the full recipe, check the [Full Recipe]. To store leftover stuffed peppers, let them cool first. Place them in an airtight container. You can keep them in the fridge for up to three days. Make sure to cover them well to keep the flavors fresh. You can freeze these stuffed peppers too! Wrap each stuffed pepper tightly in plastic wrap. Then, place them in a freezer-safe bag. They can last for about three months in the freezer. When you want to enjoy them, thaw them overnight in the fridge. To reheat, preheat your oven to 350°F (175°C). Place the peppers in a baking dish. Cover with foil to keep moisture in. Heat for about 20 minutes or until warm. You can also use a microwave. Heat for about two to three minutes, checking often to avoid overcooking. Enjoy your Buffalo Chicken Stuffed Peppers again! No, you should not use raw chicken. The filling needs cooked chicken for safety. Cooking raw chicken in the peppers will not cook evenly. Use shredded rotisserie chicken or any leftover cooked chicken. This saves time and ensures great flavor. If you want a cream cheese substitute, try sour cream or Greek yogurt. Both add creaminess and tang. You can also use cottage cheese for a lighter option. Just blend it until smooth for a similar texture. This keeps your dish rich without the cream cheese. To make this dish gluten-free, choose a gluten-free buffalo sauce. Most brands are gluten-free, but always check the label. Also, ensure that any cheese you use is free from gluten. This way, you enjoy all the flavors without worry about gluten. In summary, we covered how to make delicious Buffalo Chicken Stuffed Peppers. We highlighted key ingredients, step-by-step cooking, and helpful tips. You learned about variations, storage, and answers to common questions. Enjoy creating your own stuffed peppers. Remember, customizing them can make all the difference. Don't be afraid to experiment with flavors and ingredients for unique twists! With these recipes, you can impress anyone at your next meal.](https://stirredrecipes.com/wp-content/uploads/2025/06/181c26ae-514b-4a40-a17f-bf475973c612.webp)
Buffalo Chicken Stuffed Peppers Flavorful and Easy Dish
If you’re craving a dish that’s both spicy and satisfying, you’ve come to the right place! Buffalo Chicken Stuffed Peppers are simple to make and
![- 1 large head of cauliflower, cut into florets - 1 cup grated Parmesan cheese - 1/2 cup almond flour (or breadcrumbs for a gluten option) - 1 teaspoon garlic powder - 1 teaspoon onion powder - 1 teaspoon dried oregano - 1/2 teaspoon paprika - 1/4 teaspoon black pepper - 1/2 teaspoon salt - 3 tablespoons olive oil - Fresh parsley, chopped (for garnish) Using fresh ingredients is key. Cauliflower has a mild taste, so it absorbs flavors well. Parmesan adds a rich, nutty touch. The almond flour helps create a crunchy crust. - Calories per serving: About 150 calories. - Macronutrients breakdown: Each serving has roughly 10g fat, 5g protein, and 10g carbohydrates. - Health benefits: Cauliflower is low in calories and full of vitamins. It has fiber that supports digestion. Parmesan adds calcium for strong bones. This dish is a healthy choice for any meal. I love how this recipe makes veggies fun to eat. With the right mix of ingredients, you can enjoy a tasty treat. If you want to dive deeper, check out the Full Recipe. 1. Preheat your oven to 425°F (220°C). This high heat helps make the cauliflower crispy. 2. Line a baking sheet with parchment paper. This keeps the cauliflower from sticking. 3. In a large bowl, mix together these dry ingredients: - 1 cup grated Parmesan cheese - 1/2 cup almond flour (or breadcrumbs) - 1 teaspoon garlic powder - 1 teaspoon onion powder - 1 teaspoon dried oregano - 1/2 teaspoon paprika - 1/4 teaspoon black pepper - 1/2 teaspoon salt Stir until everything is well combined. 1. In another bowl, toss the cauliflower florets with 3 tablespoons of olive oil. Make sure each floret is coated. 2. Add the seasoned mixture to the bowl with the cauliflower. Toss until all florets are covered with the cheese mix. 1. Spread the coated cauliflower evenly on the prepared baking sheet. Avoid crowding the florets; this helps them roast well. 2. Bake in the preheated oven for about 25-30 minutes. Halfway through, toss the cauliflower to ensure even cooking. Look for a golden brown color and crispy texture. 3. Once done, remove from the oven. Garnish with fresh parsley for a burst of color. For the full recipe, check the [Full Recipe] section. Enjoy this tasty side dish with your favorite meals! To get that crispy texture, start by preheating your oven to 425°F (220°C). This high heat helps to roast the cauliflower quickly. If the oven is too cool, the cauliflower will steam instead of roast. Spread the cauliflower florets evenly on your baking sheet. If they are too close, they will not crisp up. Give each floret some room to breathe. You can boost the taste of your crispy cauliflower with some great spices. I recommend adding a pinch of chili powder for heat or some dried thyme for an herby touch. You can also try a squeeze of lemon juice after baking for a fresh zing. For dips, serve with garlic aioli or a tangy yogurt sauce. They pair nicely with the flavors of the cauliflower. For baking sheets, use a heavy-duty, rimmed baking sheet. This helps the florets crisp up evenly. A non-stick surface is also great to prevent sticking. When preparing, a large mixing bowl is key for tossing the ingredients together well. A sturdy spatula works wonders for mixing everything evenly. {{image_2}} You can make this dish gluten-free. Just swap the breadcrumbs with gluten-free breadcrumbs. This change keeps the crunch you love, while making it safe for gluten-sensitive eaters. Want to mix things up? Try different cheeses. Cheddar gives a sharp twist, while nutritional yeast makes it vegan-friendly. You can also add other veggies like broccoli or Brussels sprouts. These greens roast well and soak up the flavors, making them great partners for cauliflower. Add seasonal herbs for extra flavor. In the fall, rosemary works wonders. Its earthy notes pair well with the roasted cauliflower. You can also brighten the dish with citrus zest. A hint of lemon or orange can lift the flavors and add a fresh touch. For the full recipe, please refer to the detailed instructions above. To store leftovers, let the cauliflower cool completely. Place it in an airtight container. This helps keep it fresh. I recommend using glass containers for better flavor retention. You can store it in the fridge for up to 3 days. If you want to save it for later, freezing works well. First, let the cauliflower cool completely. Then, spread it out on a baking sheet. Freeze it until solid, about 1-2 hours. Once frozen, transfer the pieces to a freezer bag. This way, it can last up to 3 months. When you're ready to eat, reheat the cauliflower in the oven. Bake it at 375°F (190°C) for about 15 minutes. This will help restore its crispiness. In the fridge, Crispy Parmesan Roasted Cauliflower stays fresh for about 3 days. You can tell if it’s spoiled if it develops a sour smell or slimy texture. Always check for these signs before eating leftovers. Yes, you can use frozen cauliflower. It makes cooking easier, but keep a few tips in mind: - Thaw and Drain: First, thaw the cauliflower and drain any excess water. This helps it crisp up. - Adjust Cooking Time: Bake for a few extra minutes since frozen cauliflower cools the oven more when added. - Coat Well: Make sure to coat thawed florets in olive oil and seasoning. This helps them get crispy. To make Crispy Parmesan Roasted Cauliflower vegan, you can easily swap some ingredients: - Cheese Substitute: Use nutritional yeast instead of Parmesan. It adds a cheesy flavor. - Egg Replacement: If you use an egg wash for coating, try a mix of ground flaxseed and water instead. - Flours: Stick with almond flour or gluten-free breadcrumbs for the coating. This dish pairs well with many meals. Here are some ideas: - Main Dishes: Serve it alongside grilled chicken or fish. - Vegetarian Options: It works great with pasta dishes or veggie burgers. - Appetizers: Enjoy it as a tasty snack with dips like ranch or hummus. - Salads: It adds a nice crunch on top of salads for extra flavor. Try the full recipe for a delicious side that everyone will love! Crispy Parmesan Roasted Cauliflower offers a tasty treat that's easy to make. We covered the ingredients, step-by-step instructions, tips for the best results, and variations to suit any taste. You can enjoy a healthy and delicious side dish or appetizer. Experiment with flavors and find what you love most. Store leftovers properly to keep them fresh. Enjoy your culinary journey with this recipe; you won’t be disappointed!](https://stirredrecipes.com/wp-content/uploads/2025/06/3b8049a1-d429-4de6-85cb-fce487cb3412.webp)
Crispy Parmesan Roasted Cauliflower Flavorful Side Dish
Crispy Parmesan Roasted Cauliflower is the side dish you never knew you needed. Crunchy, cheesy, and loaded with flavor, it transforms any meal into a
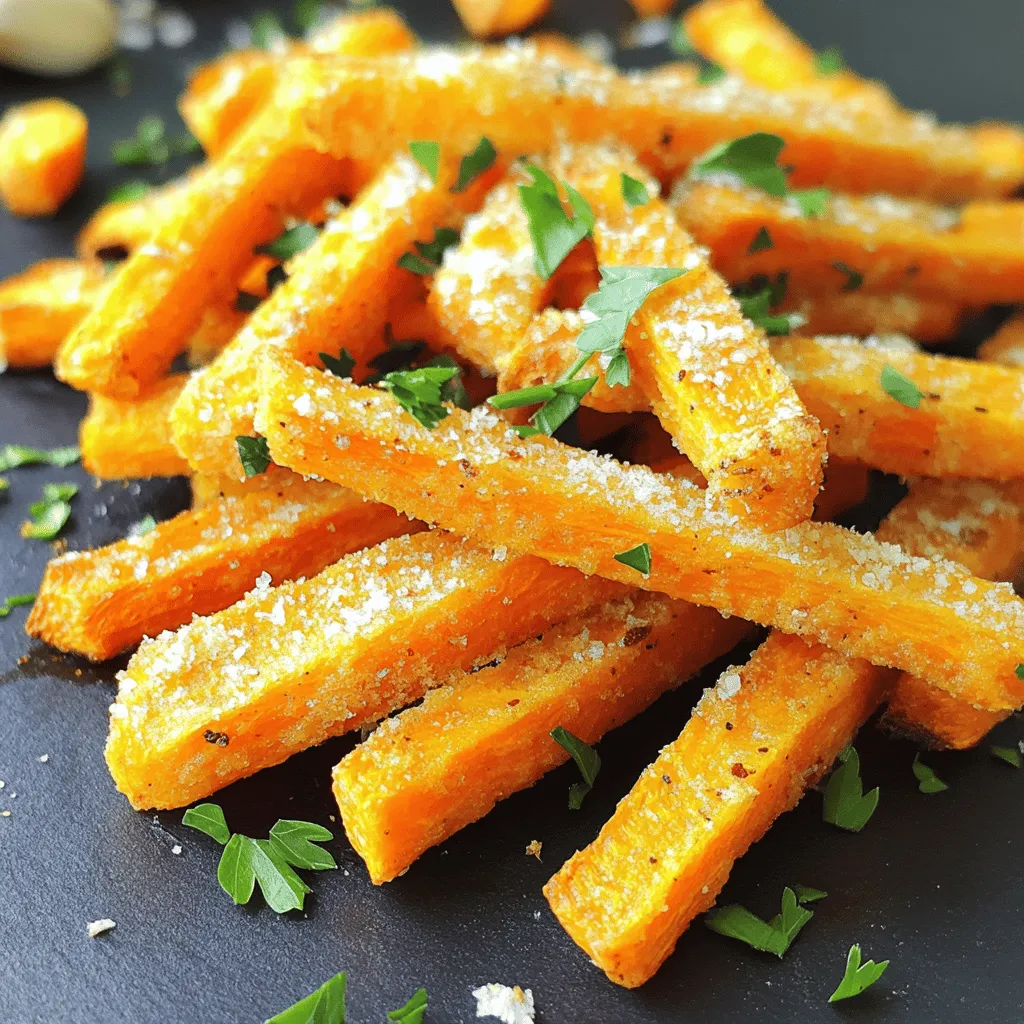
Parmesan Roasted Carrot Fries Healthy Snack Delight
Are you looking for a tasty and healthy snack that won’t ruin your diet? Try Parmesan Roasted Carrot Fries! These crispy delights are easy to
![- 2 medium zucchinis, grated - 2 large potatoes, peeled and grated - 1 cup all-purpose flour - 1 cup grated Parmesan cheese - 2 large eggs - 1/4 cup milk - 1 teaspoon garlic powder - 1 teaspoon onion powder - 1/2 teaspoon salt - 1/4 teaspoon black pepper - 1/2 teaspoon baking powder - Olive oil spray for greasing the muffin tin - Muffin tin - Grater - Mixing bowls - Measuring cups and spoons Freshness matters in cooking. Use the freshest zucchinis and potatoes you can find. They add great flavor and texture to your muffins. Look for firm zucchinis with shiny skin. For potatoes, choose waxy varieties like Yukon Gold. These hold their shape better when grating. Parmesan cheese is key too. Freshly grated Parmesan offers the best taste. Avoid pre-grated options if you can. The flavor will shine through in every bite. High-quality ingredients make a big difference in your muffins. For the best results, use the best ingredients. For the full recipe, check the link. Start by prepping the zucchinis and potatoes. Use a grater to shred them finely. Place them in a clean kitchen towel and squeeze out the excess moisture. This step helps keep your muffins from getting soggy. Next, mix your dry ingredients in a large bowl. Combine the all-purpose flour, grated Parmesan cheese, garlic powder, onion powder, salt, black pepper, and baking powder. Make sure everything is well combined, so each muffin has a consistent flavor. Now, let’s combine the wet and dry components. In a separate bowl, beat the two eggs and the milk together until they are smooth. Pour this mixture into the bowl with the zucchini and potato mix. Stir everything together gently. You want to make sure all the ingredients are mixed well, but don’t overmix. The batter should be thick and hold together nicely. It’s time to bake! Preheat your oven to 350°F (175°C). Lightly grease your muffin tin with olive oil spray. Spoon the batter into each muffin cup, filling them about three-quarters full. This allows room for rising. Bake the muffins for 25-30 minutes. Keep an eye on them. You want them to turn golden brown. To check for doneness, insert a toothpick into the center of a muffin. If it comes out clean, your muffins are ready. Let them cool in the tin for 5 minutes before transferring them to a wire rack. Enjoy these delicious treats! For a complete guide, refer to the Full Recipe. To make your muffins extra crispy, start by removing moisture from the zucchinis. After grating the zucchinis, place them in a clean kitchen towel. Twist the towel to squeeze out as much water as you can. This step is key for that crisp texture you want. For baking tips, preheat your oven properly. A hot oven helps the outside crisp up. You can also spray the muffin tin lightly with olive oil. This will help the muffins brown nicely and not stick. You can boost flavor by adding herbs and spices. Try adding dried oregano, thyme, or even crushed red pepper. Each will give a different twist to your muffins. If you want to switch up the cheese, consider using sharp cheddar or feta. Each cheese brings its own taste, making the muffins even more fun. To serve the muffins, present them on a rustic wooden board. This adds charm and makes them look inviting. You can sprinkle some extra Parmesan on top and add fresh herbs like parsley for color. Pair the muffins with a tangy dipping sauce. A mix of yogurt and lemon juice works great. You can also try marinara or even a spicy aioli for a kick. These simple ideas elevate your dish and impress your guests. For the full recipe, check [Full Recipe]. {{image_2}} You can easily swap out ingredients in this recipe. For a sweeter taste, try using sweet potatoes instead of regular potatoes. They add a nice twist to the muffins. You can also mix in other veggies like carrots or cauliflower for added nutrition. If you need a gluten-free option, use almond flour or a gluten-free all-purpose blend. This keeps the muffins delicious and friendly for everyone. Adding meat can make these muffins heartier. Diced cooked bacon or crumbled sausage works great. For a vegetarian option, try adding cooked lentils or chickpeas. You can also play with different cheeses. Instead of Parmesan, experiment with cheddar, feta, or even goat cheese. Each cheese gives the muffins a unique flavor that can match your mood. You can change up the herbs and spices based on the season. Fresh basil or thyme in summer adds bright flavors. In fall, try adding nutmeg or sage for a warm touch. For holidays, consider adding some festive spices like cinnamon or a pinch of allspice. Adjusting ingredients this way keeps your muffins fresh and exciting throughout the year. To keep your muffins fresh, use an airtight container. Place them in the container once they are completely cool. This helps lock in moisture and flavor. You can store them at room temperature for up to three days. If you want them to last longer, consider refrigerating them. Just remember to let them come to room temperature before enjoying. Freezing is a great way to keep your muffins for later. Wrap each muffin tightly in plastic wrap. Then, put them in a freezer-safe bag or container. Make sure to remove as much air as possible. This will prevent freezer burn. When you’re ready to eat them, take out a muffin and thaw it at room temperature. You can also reheat it in the oven at 350°F for about 10 minutes for that fresh-baked taste. These muffins can last about three days at room temperature. If stored in the fridge, they can stay good for about a week. Always check for signs of spoilage, like a strange smell or mold. If you notice these signs, it’s best to throw them away. Enjoy your muffins while they're fresh and tasty! You can follow my simple recipe to make these tasty muffins. Start by preheating your oven to 350°F (175°C). Grease a muffin tin with olive oil spray. Grate two medium zucchinis and two large potatoes, then squeeze out extra moisture. In a bowl, mix the grated veggies with flour, Parmesan cheese, and spices. In another bowl, whisk together eggs and milk, then combine everything. Fill the muffin tin and bake for 25-30 minutes. For the full recipe, check out the link. Yes, you can make these muffins ahead of time! They store well in an airtight container for up to three days. You can also freeze them for longer storage. Just let the muffins cool completely before freezing. When you're ready to eat, thaw them in the fridge overnight. Reheat in the oven or microwave for a warm treat. These muffins pair great with a variety of dishes. Try serving them with a fresh salad for a light meal. They also work well with soups, especially tomato or vegetable soup. For a fun twist, serve them with a tangy dipping sauce like ranch or a spicy aioli. Enjoy experimenting with different pairings! In this blog post, we explored how to make Crispy Parmesan Zucchini Potato Muffins. We covered essential ingredients, tools, and the baking process. Remember to focus on ingredient quality for the best flavor. Use tips for extra crispiness and don’t hesitate to explore variations. Proper storage ensures your muffins stay fresh longer. Try these muffins for a tasty snack or side dish that’s sure to impress. Enjoy experimenting and making them your own!](https://stirredrecipes.com/wp-content/uploads/2025/06/27c8aaf8-51d0-49b4-9212-f82d1b14711f.webp)
Crispy Parmesan Zucchini Potato Muffins Simple Recipe
Are you ready to impress your taste buds? I’m excited to share my simple recipe for Crispy Parmesan Zucchini Potato Muffins! These fluffy muffins combine

Mini Baked Potatoes Quick and Tasty Snack Guide
Looking for a quick, tasty snack? You’re in the right place! Mini baked potatoes are fun, simple, and delicious. In just a few easy steps,

Cheeseburger Egg Rolls Irresistible Crunchy Delight
If you love cheeseburgers and crunchy snacks, you’re in for a treat! Cheeseburger egg rolls combine two favorites into one irresistible bite. Imagine crispy wraps

Leftover Mashed Potato Cheese Puffs Irresistible Snack
Do you have leftover mashed potatoes? Turn them into a tasty snack with my Leftover Mashed Potato Cheese Puffs! These cheesy bites are easy to
![- 1 pound small shrimp, peeled and deveined - 12 mini corn tortillas - 1 cup shredded red cabbage - 1 ripe avocado, diced - 1/4 cup fresh cilantro, chopped - 1/2 cup diced tomatoes - 1 tablespoon lime juice - 1 teaspoon ground cumin - 2 tablespoons olive oil - Salt and pepper to taste - Optional: Jalapeño slices for garnish When making mini shrimp tostadas, choose fresh ingredients. Fresh shrimp gives the best flavor. You can find small shrimp at your local market. If you prefer, frozen shrimp works too. Just make sure to thaw them first. The mini corn tortillas are key. They create a nice bite-sized base. Look for the smaller size to keep each tostada light. The shredded red cabbage adds crunch and color. It also gives a fresh taste that pairs well with shrimp. Avocado adds creaminess. Use a ripe avocado for the best texture. The lime juice brightens up the dish. You can adjust the amount to your taste. Ground cumin adds a warm flavor. It's a small amount, but it makes a big difference. Use good olive oil for cooking the shrimp. It helps seal in the flavor. Don’t forget salt and pepper! They enhance all the fresh ingredients. If you like heat, add jalapeño slices as a garnish. They bring a nice kick to each bite. The nutritional information for this dish varies. Each serving has about 200 calories. It mainly consists of protein from shrimp and healthy fats from avocado. It's a great choice for a light meal or appetizer. For the full recipe, visit the [Full Recipe] link. This will guide you through each step while using these ingredients. - Start by cleaning the shrimp. Rinse them under cold water. Pat them dry with a paper towel. This helps remove any grit. - In a medium bowl, mix the shrimp with olive oil, ground cumin, salt, and pepper. Toss well to coat each shrimp evenly. This will add great flavor. - Heat a skillet over medium heat. This is the perfect level for cooking shrimp. - Add the shrimp to the hot skillet. Cook for about 2-3 minutes on each side. Watch for them to turn pink and opaque. This shows they are done. Remove from heat and set aside. - Lightly toast the mini corn tortillas for 1-2 minutes on each side. This makes them warm and slightly crisp. - For each tostada, layer a spoonful of the cabbage and tomato mix on the tortilla first. This adds a fresh crunch. - Then, place a few shrimp on top. Make sure to spread them out for even flavor. - Finish with a dollop of the creamy avocado mix and a sprinkle of cilantro. If you like spice, add jalapeño slices on top for an extra kick. Follow these steps for a delightful mini shrimp tostada experience! For the full recipe, check out the details above. To make great shrimp, avoid overcooking. Cook shrimp for 2-3 minutes per side. They turn pink and opaque when done. If they curl tightly, you cooked them too long. For flavor, season the shrimp well. Use olive oil, ground cumin, salt, and pepper. You can also add garlic or chili powder for extra taste. Marinate for about 15 minutes before cooking. This helps the flavors blend. Pair your mini shrimp tostadas with fresh sides. A cool salad or rice works well. Consider serving with a zesty lime wedge. This adds a fresh kick to your dish. These tostadas suit many occasions. Serve them at parties, game nights, or family dinners. They are quick to make and fun to eat. Plating is key for a stunning dish. Use a colorful plate to make your tostadas pop. Stack the ingredients neatly for a beautiful look. Garnish with fresh herbs like cilantro. This adds color and freshness. You can also sprinkle some lime zest on top. It enhances the visual appeal and flavor. For the full recipe, check out [Full Recipe]. {{image_2}} You can switch up the shrimp in many ways. Try chicken or fish for a different taste. For a vegan option, use jackfruit or tofu. Both give nice texture and flavor. For toppings, if you don't like avocado, use hummus or a bright salsa. You can swap red cabbage for green lettuce or even spicy arugula. Each choice adds a unique twist to your tostadas. Want some heat? Add jalapeños, serranos, or even a dash of hot sauce. These will kick up the spice level. You could also use smoked paprika for a smoky flavor. If you prefer sweet, a mango salsa pairs well. Just mix diced mango, lime juice, and cilantro. This adds a refreshing touch that balances the shrimp. You can serve mini shrimp tostadas as a fun appetizer or make them a main meal. For an appetizer, aim for small portions. For a main dish, add more toppings and sides. Consider how you present them. A single plate makes it easy for small gatherings. A large platter looks great for parties. Each way shows off your tasty creation! For the full recipe, check out the [Full Recipe]. To keep mini shrimp tostadas fresh, store them in an airtight container. This keeps the flavors intact and prevents sogginess. You can place the cooked shrimp and toppings separately. This way, the tortillas stay crisp. In the fridge, they will last for about 2 days. After that, the quality might drop. Yes, you can freeze tostadas! However, freeze the shrimp and toppings separately. The tortillas can get soggy when frozen. Wrap the shrimp tightly in plastic wrap and place it in a freezer bag. For best results, eat them within 1 month. When you are ready to eat, thaw the shrimp in the fridge overnight. Reheat the shrimp in a skillet until warm. Toast the tortillas for a few minutes to refresh their crispness. You can definitely make parts of this dish ahead of time. Cook the shrimp in advance and store it in the fridge. You can also prepare the toppings, like the avocado mixture and cabbage mix, a day before. Just keep everything in airtight containers. For parties, plan to assemble the tostadas right before serving. This ensures they taste fresh and crunchy! Yes, you can use frozen shrimp. Frozen shrimp is easy to find and often cheaper. It’s great when fresh shrimp is not available. Just remember to thaw it before cooking. You can place the shrimp in cold water for about 15 minutes. This method keeps the shrimp from losing flavor. However, frozen shrimp may not taste as fresh as raw shrimp. If you don't have corn tortillas, you can use flour tortillas. They are soft and work well. You can also try rice cakes for a crunchy base. Lettuce wraps are another fun option, giving a fresh taste. Each option brings its own flavor and texture. To add heat, try using cayenne pepper or chili powder. You can mix these into the shrimp before cooking. Another option is to add hot sauce to the avocado topping. Sliced jalapeños also add a spicy kick. Each choice gives your tostadas a different level of heat. Mini shrimp tostadas are simple and tasty. We covered all the key parts: ingredients, cooking steps, tips, and storage. Use fresh shrimp for the best flavor, and don't forget the avocado and cilantro. You can make them spicy, or even swap the shrimp for other proteins. These tostadas are perfect for gatherings or a cozy dinner. Remember to store leftovers properly for the best taste. With this guide, you can create a dish everyone will love! Enjoy making your tostadas just the way you like them.](https://stirredrecipes.com/wp-content/uploads/2025/06/f892e639-57d7-4548-905a-69f9589b3939.webp)
Mini Shrimp Tostadas Tasty and Simple Recipe Guide
Are you ready to make a tasty snack that’s both simple and impressive? Mini shrimp tostadas are the perfect dish for any occasion, whether it’s