Cajun Sausage Alfredo Pasta Easy and Flavorful Meal
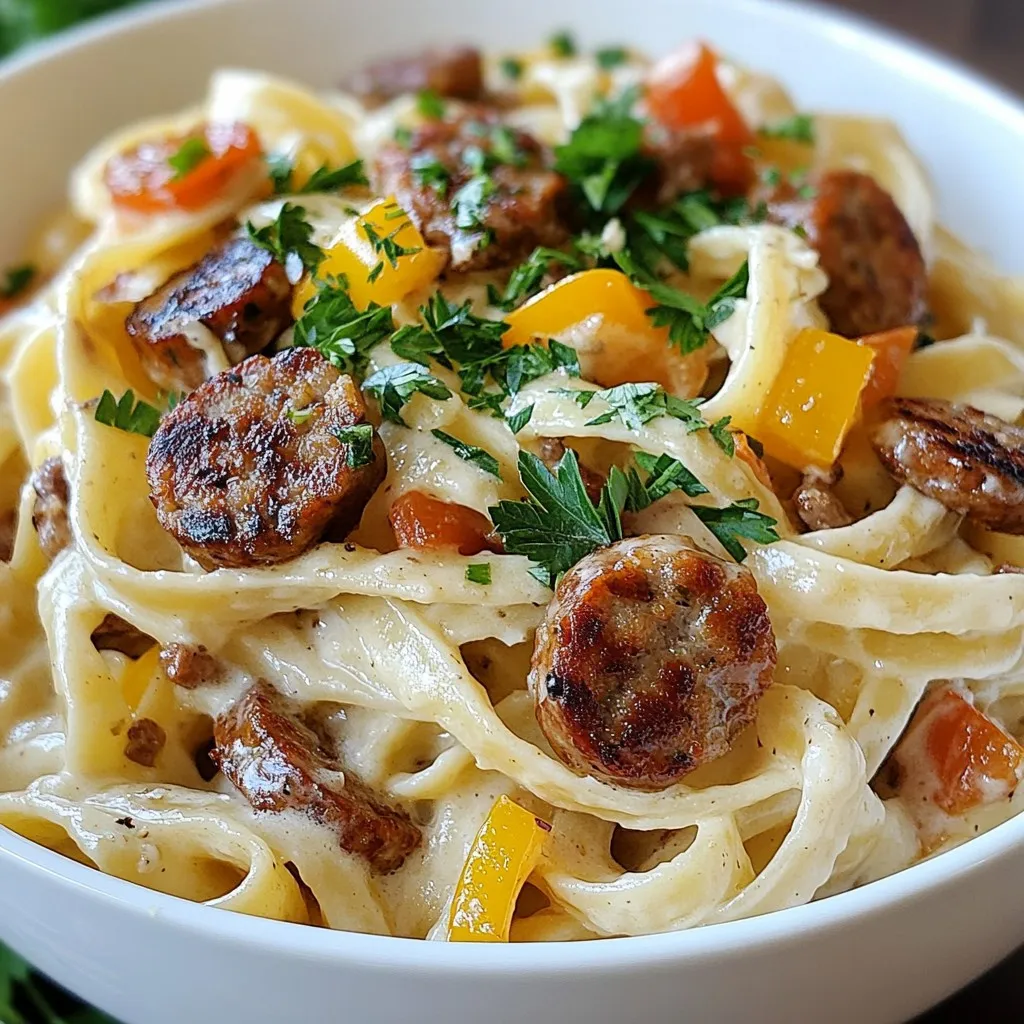
Craving a dish that’s both creamy and spicy? Look no further! My Cajun Sausage Alfredo Pasta is your new go-to meal. It’s easy to make and packed with flavor. Whether …
Craving a dish that’s both creamy and spicy? Look no further! My Cajun Sausage Alfredo Pasta is your new go-to meal. It’s easy to make and packed with flavor. Whether …

Looking for a way to make the perfect crispy chicken? I’ve got you covered! This recipe uses an air fryer to deliver juicy, flavorful chicken without the grease. You’ll love …

Get ready to wow your taste buds with Air Fryer Taco Bombs! This easy recipe combines ground beef, cheese, and taco seasoning, all wrapped in flaky crescent dough. You’ll have …
![- 6 ripe peaches, peeled and sliced - 1 cup granulated sugar - 1 tablespoon lemon juice - 1 teaspoon cinnamon - 1 teaspoon vanilla extract - 1 cup rolled oats - 1 cup all-purpose flour - 1/2 cup brown sugar - 1/2 teaspoon baking powder - 1/2 cup unsalted butter, melted - Pinch of salt Choosing ripe vs. overripe peaches Ripe peaches are key for the best peach crisp. Look for peaches that yield slightly when you press them. They should smell sweet and fragrant. Avoid overripe peaches, as they can become mushy when baked. Alternatives for sugar: brown vs. granulated You can use brown sugar for a deeper flavor. Brown sugar adds a hint of molasses and moisture. However, granulated sugar works well too, giving a pure sweetness. Feel free to mix both for a balanced taste. Importance of fresh vs. canned peaches Fresh peaches shine in this dish. They have great flavor and texture. Canned peaches can work in a pinch but may have added sugar. If using canned peaches, drain them well to avoid excess liquid in your crisp. For the full recipe, check out [Full Recipe]. - Preheat the oven to 350°F (175°C). - Prepare the peach filling by mixing sliced peaches, sugar, lemon juice, cinnamon, and vanilla in a bowl. Toss until the peaches are well-coated. Pour this mix into a 9x13-inch baking dish. - For the crisp topping, mix rolled oats, flour, brown sugar, baking powder, and salt in a separate bowl. - Pour in the melted butter. Stir until the mix is crumbly and well combined. This will give your topping a nice texture. - Layer the oat mixture evenly over the peach layer in the baking dish. - Bake in your preheated oven for 30-35 minutes. The top should turn golden brown, and the peach juices will bubble. Enjoy the sweet aroma as it bakes! To make the best peach crisp, you need ripe peaches. Look for peaches that are slightly soft but not mushy. They should have a sweet aroma. The skin should be smooth and free of blemishes. The best peach varieties for baking are freestone peaches. They come off the pit easily and have great flavor. Varieties like Clingstone also work, but they can be tougher to slice. The topping is key to a great peach crisp. Start with a mix of oats, flour, and sugars. Adjust the topping to get a crumbly texture. If it feels too wet, add more oats or flour. For a golden top, make sure your oven is set to the right temperature. Bake until you see a nice golden brown color. This usually takes about 30 to 35 minutes. Serve your peach crisp warm. Top it with a scoop of vanilla ice cream or a dollop of whipped cream. Both add a nice touch to the sweet peaches. You can also serve peach crisp with a side of yogurt or fresh fruit. This makes a great dessert or even a special breakfast. For the full recipe, check out the details above. {{image_2}} You can mix things up with your peach crisp. Try using blueberries, cherries, or apples instead of peaches. Each fruit adds its own sweet taste. You can even combine different fruits. For example, mix peaches with blueberries. This creates a colorful and tasty dish. If you need a gluten-free option, use almond flour or gluten-free oats. These swaps keep your crisp delicious. For those who want a vegan version, replace butter with coconut oil. Use maple syrup or agave instead of granulated sugar. These changes still deliver great flavor and texture. Want to kick up the flavor? Add spices like nutmeg or ginger to your peach mix. These spices bring warmth and depth. You can also infuse the topping with nuts or seeds. Try adding chopped pecans or sunflower seeds. They add crunch and extra taste to your crisp. Looking for more ideas? Check out the Full Recipe for the best peach crisp! Enjoy experimenting with these variations! To keep your peach crisp fresh, store it in the fridge. Place it in an airtight container. This helps keep the peach flavor strong. If you want to save it longer, freeze it. Wrap it tightly in plastic wrap and then foil. This will help prevent freezer burn. To retain crispness, place a paper towel in the container. This absorbs extra moisture. When reheating, the oven is your best friend. Preheat it to 350°F (175°C). Then, place the peach crisp in a baking dish. Cover it with foil to keep it from drying out. Heat for about 15 minutes. If you prefer, you can serve it cold. Some people enjoy it this way, but warm is best. Peach crisp lasts about 3-4 days in the fridge. After that, it may lose flavor and texture. In the freezer, it can last up to 3 months. Check for signs of spoilage. If you see mold or an off smell, throw it away. Always trust your senses when it comes to food safety. To make peach crisp with frozen peaches, first, you need to thaw them. This helps release extra water. Drain any excess liquid to avoid a soggy crisp. You may want to add a bit more cornstarch to thicken the juices. Also, increase the baking time by about 5 to 10 minutes. This ensures the filling cooks well and the topping gets crispy. Yes! You can prepare peach crisp a day in advance. Just follow the recipe and store it unbaked in the fridge. When you’re ready to bake, take it out and let it sit for about 30 minutes. Then bake according to the recipe. This way, the topping stays crunchy, and the peach mixture remains flavorful. You can use honey or maple syrup as natural sweeteners. They add a nice flavor and moisture. If you use honey, reduce the liquid in the recipe slightly. Coconut sugar is another great option. It has a lower glycemic index and a rich flavor. Just keep in mind that these sweeteners may change the crisp's color and texture. Absolutely! Doubling the recipe is easy. Just use a larger baking dish, like a 12x18-inch pan. Keep the same ingredient ratios. You may need to bake it a bit longer, so watch for the top to turn golden brown. You want the peaches to bubble and the topping to be crisp. Enjoy this larger batch with family and friends! For the full recipe, check out the recipe section above. In this blog post, we explored how to make a delicious peach crisp. We discussed key ingredients, from ripe peaches to sugar choices, and shared step-by-step instructions. We also offered tips on perfecting the texture and using different fruits or dietary modifications. Remember to store your crisp properly and reheat it to enjoy later. With these insights, you can make a flavorful peach crisp that'll impress anyone. Enjoy baking and experimenting with flavors to make this dish your own!](https://stirredrecipes.com/wp-content/uploads/2025/06/bc7cca7e-0f78-46db-83bd-4a2db0e32b22.webp)
If you crave a sweet treat that’s easy to make, this Peach Crisp recipe is for you. With ripe peaches and a crunchy topping, it offers the perfect balance of …
![- 8 oz fettuccine or any pasta of choice - 2 tablespoons olive oil - 1 yellow bell pepper, diced - 1 red bell pepper, diced - 1 green bell pepper, diced - 1 medium onion, sliced - 2 cloves garlic, minced - 1 teaspoon jerk seasoning - 1 cup coconut milk - 1 cup cherry tomatoes, halved - 1 cup spinach leaves - Salt and pepper to taste - Fresh parsley, chopped (for garnish) - Lime wedges (for serving) - Additional spices (paprika, cayenne) - Protein options (chicken, shrimp, tofu) The best Jamaican Rasta pasta starts with simple yet vibrant ingredients. You'll want to choose fresh veggies for maximum flavor. The mix of bell peppers gives a bright touch to the dish. I use fettuccine for its wide surface, allowing the sauce to cling well. Olive oil adds richness and helps the veggies cook perfectly. Jerk seasoning brings that spicy kick, which makes this dish stand out. Coconut milk gives a creamy texture that balances the spices. Cherry tomatoes burst with juice, adding sweetness. Spinach adds color and nutrients. Don't forget salt and pepper to bring all the flavors together. For a heartier meal, you can add protein like chicken or shrimp. Tofu is a great plant-based option. This recipe is flexible, so feel free to mix and match your favorite ingredients. Check out the full recipe for precise measurements and cooking steps. Enjoy creating your own flavorful Jamaican Rasta pasta! Start by boiling water in a large pot. Add salt to the water for flavor. Cook the pasta according to the package instructions until it is al dente. This means it should be firm but not hard. Once cooked, drain the pasta and set it aside in a bowl. In a large skillet, heat two tablespoons of olive oil over medium heat. Add the diced yellow, red, and green bell peppers, along with the sliced onion. Sauté them for about five minutes. You want them to get tender and bright. This step adds great flavor to your dish. Now, it’s time to add more taste. Stir in the minced garlic and one teaspoon of jerk seasoning. Let this cook for about a minute until you smell the garlic. Then, pour in one cup of coconut milk. Bring it to a gentle simmer. This will take around three to four minutes. The coconut milk makes it creamy and rich. Next, mix in one cup of halved cherry tomatoes and one cup of fresh spinach leaves. Stir them until the spinach wilts. This adds color and nutrients. Finally, combine the cooked pasta with the sauce and veggies in the skillet. Toss everything together. Make sure the pasta is well-coated with the sauce. Season with salt and pepper to taste. For the full recipe, check below. - Use freshly minced garlic for stronger aroma. - Adjust jerk seasoning to taste for spice level. Start with a little, and add more if you like heat. This blend adds rich flavor to the dish. - Don't overcook the pasta for the best texture. Aim for al dente; it holds up better in sauce. - Reserve some pasta water for adjusting sauce consistency. This starchy water helps the sauce cling to the pasta. - Garnish with fresh parsley and lime wedges. This adds color and a bright taste. - Serve with a side of plantains or a fresh salad. These sides balance the meal and add nutrition. For the complete recipe, check out the [Full Recipe]. {{image_2}} You can use many types of pasta for Jamaican rasta pasta. Penne and spaghetti work well. They both hold sauce nicely and add a different bite. If you want a gluten-free option, try brown rice pasta or chickpea pasta. These options keep the dish tasty while being kinder to your diet. To make this dish vegan, swap coconut milk with cashew cream. This change keeps the creaminess and flavor. You can also add more veggies or legumes for protein. Think about adding black beans, chickpeas, or lentils. They boost nutrition without losing taste. For extra flavor, consider adding cooked chicken, shrimp, or tofu. These proteins enhance the dish's heartiness. Adding vegetables like zucchini or corn gives it a fresh twist. Each bite becomes more colorful and exciting. You can mix and match to create your perfect rasta pasta. Enjoy crafting your unique version! For the full recipe, refer to the earlier section. To keep your Jamaican Rasta Pasta fresh, refrigerate it. Place the pasta in an airtight container. This way, it lasts for up to 3 days. If you want to freeze it, do this right after cooking. Let it cool, then transfer it to a freezer-safe bag. Remove as much air as possible. You can freeze it for up to 2 months. When ready to eat, thaw it overnight in the fridge. To reheat your pasta, use a skillet on low heat. Add a splash of coconut milk or water. This helps keep the texture nice and creamy. Stir gently until heated through. You can also use the microwave. Place it in a bowl, cover with a damp paper towel, and heat in short bursts. Check and stir every 30 seconds. When serving, consider adding fresh lime juice or topping with extra spinach. These will enhance the flavor and freshness of the dish. Enjoy your meal! Rasta Pasta is a tasty dish from Jamaica. It blends Italian pasta with Jamaican flavors. The dish celebrates the Rastafarian culture, which values peace and love. The bright colors of bell peppers represent the Rastafarian flag, making it visually appealing. You get a mix of creamy coconut milk and spicy jerk seasoning. This creates a unique and vibrant meal that hits all the right notes. Yes, you can prep Rasta Pasta ahead of time. Start by cooking the pasta and sautéing the vegetables. Store them separately in airtight containers. When you're ready to eat, simply combine them and heat everything together. This keeps the pasta from getting mushy. It also helps the flavors stay fresh. You can add the coconut milk right before serving to keep it creamy. To add more heat, try these tips. First, use extra jerk seasoning. You can also add chopped fresh peppers like scotch bonnet for more kick. Another option is to sprinkle in some cayenne pepper. Finally, serve with hot sauce on the side for those who want it spicier. These additions enhance the flavor and make it more exciting. Yes, Rasta Pasta is vegetarian-friendly. The core ingredients are all plant-based. You have pasta, bell peppers, onions, garlic, and coconut milk, all of which are vegetarian. If you want to make it vegan, just skip any cheese garnishes. You can add protein options like tofu or chickpeas for more nutrition. This dish is perfect for everyone! In this blog post, we explored making Rasta Pasta with easy steps and tasty ingredients. We covered the essential components and some optional flavors to enhance your dish. I shared tips for perfect pasta and how to present it well. You learned about variations for different diets and how to store your leftovers. With these tips, you can create a delicious meal that suits your taste. Embrace the joy of cooking and make it your own!](https://stirredrecipes.com/wp-content/uploads/2025/06/1e271182-7ace-4429-875b-47e41eef3ac8.webp)
Looking for a flavorful and easy meal? You’ve come to the right place! Today, I’m sharing my favorite Jamaican Rasta Pasta recipe. It’s a perfect mix of colorful veggies, rich …
![To make spicy pickled green beans, start with fresh green beans. You need 1 pound, trimmed. Choose bright green beans without blemishes. They should feel crisp and firm. For the pickling liquid, gather these ingredients: - 1 ½ cups distilled white vinegar - 1 cup water - 2 tablespoons sea salt - 1 tablespoon sugar The vinegar gives the beans their tangy flavor. The water helps balance the taste. Salt adds flavor and aids in preservation. Sugar softens the sharpness of the vinegar. Spices add depth to your pickles. Use: - 3 cloves garlic, sliced - 1 teaspoon mustard seeds - 1 teaspoon coriander seeds - 1 teaspoon red pepper flakes (adjust for heat preference) - 1 bay leaf - 1/2 teaspoon black peppercorns Garlic brings a savory note. Mustard seeds add a slight crunch. Coriander seeds give a warm flavor. Red pepper flakes offer heat; adjust them to your taste. The bay leaf adds a subtle aroma, while black peppercorns enhance the overall flavor. For the full recipe, check the details provided earlier. Start by cleaning your jars and lids. Place them in a pot of boiling water for 10 minutes. This kills any germs. After boiling, let them air dry completely. Clean jars keep your pickled green beans safe and fresh. Next, grab a medium saucepan. Mix the distilled white vinegar, water, sea salt, and sugar in the pan. Heat this mixture over medium heat. Stir it until the salt and sugar dissolve. Once it boils, take it off the heat. Add sliced garlic, mustard seeds, coriander seeds, red pepper flakes, a bay leaf, and black peppercorns. This blend gives your beans a bold flavor. Now, prepare your green beans. Wash them and trim the ends. Cut long beans in half if needed. Pack the green beans into your sterilized jars. Make sure they fit tightly but aren't crushed. Carefully pour the hot pickling mixture over the beans. Ensure they are fully submerged, leaving a little space at the top. Wipe the rims of the jars with a clean cloth. This helps the lids seal properly. Screw on the lids tightly. Let the jars cool for about an hour at room temperature. Then, move them to the fridge. Wait at least 24 hours before tasting. This gives the flavors time to blend. Your spicy pickled green beans will last up to 3-4 weeks in the fridge. For the complete recipe, check the [Full Recipe]. Enjoy these tangy treats as a side or snack! Sterilization keeps your pickled green beans safe to eat. Start by boiling your jars and lids for 10 minutes. This step removes germs and bacteria. After boiling, let them air dry completely. This ensures no water stays inside. Water can spoil your pickles. Always use clean tools when handling your jars. Spice levels can change the taste of your pickled green beans. If you like it hot, add more red pepper flakes. For milder beans, use less. Start with the recipe’s amount, then taste the brine before pouring. You can always add more spice later, but it's hard to take it out. Remember, the heat builds over time, so they may taste spicier after a day in the fridge. To develop great flavors, let the beans sit in the fridge for at least 24 hours. This time allows the spices to infuse. The longer they sit, the better they taste. You can also try adding herbs like dill or thyme for extra flavor. Experiment with different spices to find your favorite blend. Your taste buds will thank you for trying new things! For the full recipe, check out the detailed instructions above. {{image_2}} You can use many veggies in place of green beans. Carrots, cucumbers, and radishes all work well. Try using asparagus for a fun twist. Each vegetable brings its own taste, changing the final dish. Experimenting with different choices makes pickling exciting! Feel free to change the spice mix to suit your taste. Add dill for a fresh flavor. You could also try adding cumin for warmth. For a zesty kick, include some sliced jalapeños. Mixing spices allows you to create your perfect balance of heat and flavor. You can make pickled green beans sweet or savory. For a sweet version, add more sugar. You can also use honey or maple syrup for natural sweetness. If you prefer savory, skip the sugar and add more garlic or herbs. Each style gives you a different taste experience and complements various dishes. Explore these variations to make spicy pickled green beans your own. The full recipe will help guide your pickling adventure! To keep your spicy pickled green beans fresh, store them in the fridge. Use clean jars with tight-fitting lids. Make sure the beans are submerged in the pickling liquid to avoid spoilage. If you notice any mold or off smells, discard them. These spicy pickled green beans can last up to 3-4 weeks in the refrigerator. The longer they sit, the more flavor they develop. Use them in salads, on sandwiches, or as a crunchy snack. Always check for freshness before consuming. I do not recommend freezing pickled green beans. Freezing can change their texture, making them mushy. Refrigerating keeps them crisp and flavorful. If you plan to eat them soon, the fridge is the best option. For the full recipe, check the details above. Spicy pickled green beans can last up to 3-4 weeks in the fridge. Their sharp, tangy flavor makes them a tasty snack. The vinegar helps preserve them, keeping them fresh. Always check for any signs of spoilage. If they look or smell off, it’s best to toss them. Yes, you can make spicy pickled green beans without sugar. Removing sugar changes the taste, making it less sweet. However, it will still be tangy and spicy. If you want a touch of sweetness, try using honey or agave syrup instead. Adjust the amount to your taste. Pickled green beans offer several health benefits. They are low in calories and high in fiber. They also contain vitamins A, C, and K. The probiotics from the fermentation process can aid digestion. Enjoy these beans as a crunchy snack or side dish. They add flavor without many calories. For the full recipe, check the detailed instructions to make this vibrant treat. In this blog post, we explored how to make pickled green beans. You learned about key ingredients like fresh green beans, spices, and brine. I shared step-by-step instructions to help you pickle beans perfectly. We also covered storage tips and answered common questions. Pickled green beans are a great way to add flavor to your meals. With this guide, you can customize them to your taste. Enjoy your pickling journey and experiment with different ingredients!](https://stirredrecipes.com/wp-content/uploads/2025/06/c1cd89b8-9f50-48cf-af11-9fcc9286cb46.webp)
Are you ready to add a zesty twist to your meals? Spicy pickled green beans are the perfect treat! They’re crunchy, tangy, and pack a flavorful punch. Whether you’re looking …
![- Grated zucchini - All-purpose flour - Granulated sugar - Unsweetened cocoa powder - Baking soda, baking powder, and salt - Semi-sweet chocolate chips - Chopped walnuts or pecans What can I use instead of sugar? You can replace granulated sugar with brown sugar or honey. Both options add a nice flavor. What can I use instead of eggs? If you want to skip eggs, try flaxseed or applesauce. Both work well in this recipe. Using flaxseed can help bind the ingredients together. You only need 1 tablespoon of ground flaxseed mixed with 2.5 tablespoons of water for one egg. Applesauce gives moisture and sweetness. Use 1/4 cup of unsweetened applesauce for each egg. These substitutions keep the bread tasty and moist. Don't worry; it will still taste amazing! For the full recipe, check out the Decadent Chocolate Zucchini Bread. First, you need to preheat your oven to 350°F (175°C). This step is key for even baking. While the oven heats up, take a 9x5-inch loaf pan. Grease it with a bit of oil or butter. Flour it lightly, or for easier cleanup, line it with parchment paper. This will help the bread slide out smoothly after baking. In a large mixing bowl, combine the following dry ingredients: - 1 ½ cups all-purpose flour - ½ cup unsweetened cocoa powder - ½ teaspoon baking soda - ½ teaspoon baking powder - ½ teaspoon salt - 1 cup granulated sugar Whisk these together until they blend well. This helps the leavening agents work better as they mix with wet ingredients. Now, in another bowl, mix together: - 1 cup grated zucchini - 2 large eggs - ½ cup vegetable oil - 1 teaspoon vanilla extract Stir these until they are well blended. The zucchini adds moisture and makes the bread soft. Next, gently combine the dry ingredients with the wet mixture. Add the dry mix slowly to the zucchini mix. Stir gently to avoid overmixing. Overmixing can lead to tough bread. A few lumps in the batter are perfectly fine. Once combined, fold in ½ cup semi-sweet chocolate chips and nuts if you like. Pour the batter into your prepared loaf pan. Smooth the top with a spatula. Bake in the oven for about 50 to 60 minutes. To check for doneness, insert a toothpick into the center. If it comes out clean, your bread is ready. After baking, let it cool in the pan for about 10 minutes before moving it to a wire rack. Enjoy the sweet aroma filling your kitchen! For the full recipe of this delicious chocolate zucchini bread, check out the [Full Recipe]. To keep your chocolate zucchini bread moist, grated zucchini is key. Grating the zucchini helps release its natural moisture. This moisture will blend with the other ingredients, making the bread soft and tender. Be sure to use fresh zucchini for the best results. Proper measuring of dry ingredients is also very important. Use a spoon to scoop flour into your measuring cup. Then, level it off with a straight edge. This method helps prevent adding too much flour, which can dry out the bread. When storing leftover chocolate zucchini bread, let it cool completely first. Wrap the bread tightly in plastic wrap or foil. This helps to keep it moist and fresh. You can store it at room temperature for up to three days. For longer storage, place it in the fridge or freezer. If you choose to freeze it, slice the bread first. This way, you can take out just what you need. Wrap each slice in plastic wrap, then place them in a freezer-safe bag. This method will keep your bread tasty for about three months. Get creative with how you serve your chocolate zucchini bread! It’s great on its own, but you can enhance it. Try adding a dollop of whipped cream on top for a special treat. It’s also delicious with a sprinkle of powdered sugar. Pairing it with a cup of coffee or tea makes it even better. You can enjoy it at breakfast or as a snack. For an extra flavor twist, serve it with a scoop of vanilla ice cream. This combination is sure to impress your guests! For the complete recipe, check out the [Full Recipe]. {{image_2}} To make your chocolate zucchini bread healthier, try these two options: - Lower-sugar options: You can reduce the sugar by half. Use ripe bananas or applesauce to add natural sweetness. This keeps the bread moist and flavorful while cutting calories. - Whole wheat flour substitution: Swap out all-purpose flour for whole wheat flour. This adds fiber and nutrients. The bread stays moist while enhancing the taste. Add some extra flavor to your chocolate zucchini bread with these tips: - Adding spices: Try mixing in a teaspoon of cinnamon or nutmeg. These spices give a warm taste that pairs well with chocolate. You can also add a pinch of salt to boost the flavors. - Incorporating different types of chocolate: Instead of semi-sweet chocolate chips, use dark or white chocolate. This change gives a fun twist and can change the overall flavor profile of the bread. In the fall, you can switch up the recipe for a seasonal treat: - Using pumpkin instead of zucchini: Replace the grated zucchini with canned pumpkin. This gives a rich flavor and adds moisture. The spices you add will shine in this version, making it perfect for fall. You can view the Full Recipe for more detailed steps on making this delicious bread. To keep your chocolate zucchini bread fresh, store it properly. For short-term storage, you can keep it at room temperature. Wrap it tightly in plastic wrap or place it in an airtight container. This method works best if you plan to eat it within a few days. For long-term preservation, refrigeration is a great option. Place the wrapped bread in the fridge. This helps it last longer while still keeping it moist. Just remember to let it come to room temperature before serving for the best taste. Freezing chocolate zucchini bread is simple. First, let it cool completely after baking. Then, wrap it tightly in plastic wrap and aluminum foil. This helps prevent freezer burn. You can freeze it for up to three months. When you're ready to enjoy it, thaw the bread in the fridge overnight. For a quicker option, you can leave it out at room temperature for a few hours. Enjoy it warm for the best flavor! The shelf life of chocolate zucchini bread is impressive. When stored at room temperature, it stays fresh for about three days. If you keep it in the fridge, it can last up to a week. Proper storage ensures you enjoy every slice of this moist and tasty treat. Yes, you can use frozen zucchini. Just make sure to thaw and drain it well. Excess water can make your bread too wet. Fresh zucchini gives a better texture, but frozen works in a pinch. If you use frozen, chop it into smaller pieces for easier mixing. You can use several substitutes for eggs in this recipe. Some great options include: - 1/4 cup unsweetened applesauce for each egg - 1/4 cup mashed banana for each egg - 1 tablespoon ground flaxseed mixed with 2.5 tablespoons water (let it sit for 5 minutes) These options keep your bread moist and tasty. To check for doneness, look for a few signs: - The top should be firm and spring back when touched. - A toothpick inserted in the center should come out clean or with a few crumbs, not wet batter. If you see wet batter, bake for a few more minutes. Yes, you can make mini loaves! Use smaller pans and adjust the baking time. Bake for about 25-35 minutes. Check doneness with a toothpick as you would for a large loaf. Mini loaves are great for sharing or gifting! If your bread turns out dry, try these tips: - Add a bit of moisture with a glaze or syrup on top. - Serve slices with butter or cream cheese to add richness. - For the next bake, consider adding more zucchini or oil. This will help keep it moist. This blog post shared how to make delicious chocolate zucchini bread. We covered ingredients, mixing steps, baking tips, and storage methods. Remember to measure accurately and check for doneness. Feel free to customize with add-ins or try different flavors. With these tips, you can create a moist and tasty treat every time. Enjoy your baking journey and don’t hesitate to experiment!](https://stirredrecipes.com/wp-content/uploads/2025/06/5f201c6a-cff6-4dd7-835d-55a636a63e0b.webp)
Are you ready to indulge in a delicious, moist treat? My Chocolate Zucchini Bread recipe is the perfect mix of rich cocoa and hidden veggies. It’s simple to make and …

Are you ready to enjoy a delightful and simple dessert? This Fresh Peach Delight recipe features ripe peaches and creamy yogurt, making it a tasty treat for any occasion. With …

Get ready to impress your taste buds with this easy recipe for Chicken Cordon Bleu with Swiss Cheese Sauce. Perfect for dinner, this dish features juicy chicken breasts stuffed with …
![To make Tennessee Peach Pudding, you need fresh, simple ingredients. Here’s what you will need: - 5 ripe peaches, peeled and sliced - 1 cup granulated sugar - 1 cup all-purpose flour - 1 teaspoon baking powder - 1/2 teaspoon salt - 1 cup milk - 1/2 cup unsalted butter, melted - 2 large eggs - 1 teaspoon vanilla extract - 1/2 teaspoon cinnamon - Whipped cream for serving (optional) These ingredients blend together to create a warm and sweet dessert. The ripe peaches give a juicy flavor, while the sugar adds sweetness. Flour and baking powder create a soft texture. Milk and butter make it rich and creamy. Eggs hold everything together, and vanilla adds a lovely aroma. Finally, a sprinkle of cinnamon gives it a cozy warmth. You can find the full recipe in the earlier section. Gather these ingredients, and get ready to create this delightful dish! To start, we need to make our peaches shine. First, peel and slice 5 ripe peaches. Then, mix them with 1/2 cup of sugar in a bowl. This helps draw out their sweet juices. Let them sit for 15 minutes. The sugar will work its magic, making the peaches juicy and flavorful. When choosing peaches, look for ones that are firm but yield slightly when pressed. They should smell sweet and fragrant. Avoid any with bruises or dark spots. The right fruits will make your pudding taste amazing. Next, we’ll focus on our dry mix. In a large bowl, whisk together 1 cup of all-purpose flour, 1 teaspoon of baking powder, 1/2 teaspoon of salt, and 1/2 teaspoon of cinnamon. This blend gives our pudding a warm flavor. Make sure there are no lumps in the flour. A smooth mix is key for a great texture. Now, let’s make our batter. In a separate bowl, combine 1 cup of milk, 1/2 cup of melted unsalted butter, 2 large eggs, and 1 teaspoon of vanilla extract. Whisk until everything is well mixed. Next, pour this wet mixture into the dry ingredients. Stir just until combined. Be careful not to overmix! This keeps the batter light. A few lumps are okay; they will bake out. It’s time to bake! First, pour the batter into a greased 9x13 inch baking dish. Spread it evenly across the bottom. Now, gently spoon the prepared peaches over the batter. Do not mix them in! The peaches will sink as they bake, creating a lovely layer. Set your oven to 350°F (175°C) and bake for 35-40 minutes. Watch for a golden top. A toothpick should come out clean from the center. Once done, let the pudding cool a bit before serving. Enjoy your Tennessee Peach Pudding with a dollop of whipped cream if you like! For the complete recipe, check out the [Full Recipe]. To get the best texture in your pudding, start with room temperature ingredients. When your butter, eggs, and milk are at room temp, they blend better. This helps create a light and fluffy pudding. Mix the wet and dry ingredients gently. Overmixing can make it dense. You want to see some lumps in the batter. Tennessee Peach Pudding shines when served warm. Add a scoop of vanilla ice cream or a dollop of whipped cream on top. The cold cream pairs well with the warm pudding. You can also sprinkle a bit of cinnamon for extra flavor. This adds a nice touch and makes it look pretty. One common mistake is not handling peaches well. Make sure they are ripe but not too soft. If they are mushy, they may break down too much during baking. For the batter, check the consistency. If it’s too runny, it won’t hold the peaches well. Follow the recipe closely for the best results. For the full recipe, check out the earlier section. {{image_2}} You can swap peaches for other fruits easily. Try fresh berries like blueberries or raspberries. Apples and pears also work great, especially when in season. Each fruit brings a unique flavor. This lets you enjoy this pudding all year long. If you're gluten-free, replace all-purpose flour with almond flour or oat flour. For lactose-free pudding, use almond milk or coconut milk instead of regular milk. These swaps make the recipe fit many diets. You still get the same yummy taste. To boost flavor, add spices like nutmeg or ginger. A splash of almond extract gives a nice twist, too. You can also mix in a bit of lemon zest for brightness. These extras make your pudding unique and fun. Enjoy experimenting with what you love! To keep your Tennessee Peach Pudding fresh, let it cool first. Once cool, cover it tightly with plastic wrap or place it in an airtight container. Store it in the fridge. Proper storage will help keep the pudding moist and tasty. Remember, it should last about three to four days in the fridge. Avoid letting it sit out too long, as warmth can affect its texture. When you are ready to enjoy your leftovers, reheating is easy. Preheat your oven to 350°F (175°C). Place the pudding in a baking dish. Cover it with foil to keep it from drying out. Heat for about 15 to 20 minutes. Check to see if it’s warm all the way through. You can also reheat slices in the microwave. Heat for about 30 seconds, checking every 10 seconds to prevent overheating. Freezing the pudding is a great option if you want to save some for later. First, let the pudding cool completely. After it cools, cut it into portions. Wrap each piece tightly in plastic wrap. Place the wrapped pieces in a freezer-safe bag or container. Label it with the date. It can last up to three months in the freezer. When you are ready to eat it, defrost it in the fridge overnight. Then, reheat using the methods above. This way, you can enjoy the taste of summer anytime! Tennessee peach pudding is a warm dessert made with fresh peaches. This dish mixes sweet peaches with a soft, cake-like base. It holds a special place in Southern cuisine, reminding many of family gatherings and summer days. Peaches grow well in Tennessee's warm climate, making them a local favorite. The pudding is often served warm, topped with whipped cream or ice cream for extra enjoyment. Yes, you can make Tennessee peach pudding ahead of time. To prep, follow these steps: - Prepare the batter and peaches as usual. - Assemble the pudding in the dish but do not bake it. - Cover it tightly with plastic wrap and refrigerate. - When ready, bake it right from the fridge. Just add a few extra minutes to the baking time. This method allows you to enjoy a fresh dessert with less effort on busy days. Tennessee peach pudding stays fresh for about 3-4 days in the fridge. Store it in an airtight container. Signs that it has spoiled include a sour smell or mold. If you want to keep it longer, you can freeze it. When freezing, wrap it well and store it for up to three months. To serve, thaw it overnight in the fridge, then reheat in the oven. Tennessee Peach Pudding is more than just a dessert; it’s a tradition. You learned how to prepare ripe peaches, mix the batter, and bake it to perfection. Remember the tips on texture and storage. This dish shines with seasonal fruits and is easy to adapt. Serve it warm with whipped cream, or enjoy it cold. Whether you're new to cooking or a seasoned pro, this pudding is sure to impress. Enjoy your sweet creation and share it with friends and family for lasting memories.](https://stirredrecipes.com/wp-content/uploads/2025/06/d6822951-5b53-438d-9412-7ff8100266dc.webp)
Are you ready to whip up a dessert that captures summer’s sweetness? Tennessee Peach Pudding is a simple, delightful treat bursting with juicy peaches. This classic recipe combines tender fruit …