Skip to content
Stirred Recipes
  • Home
  • Appetizers
  • Desserts
  • Salads
  • Breakfast
  • Dinner
  • Privacy Policy
  • Contact
  • About

Chef Luca

Sheet-Pan Maple Glazed Sausage & Fall Veggies Delight

October 18, 2025 by Chef Luca
- 1 pound chicken or turkey sausage links - 2 cups Brussels sprouts, halved - 2 sweet potatoes, cubed - 1 red onion, cut into wedges - 1 cup carrots, sliced - 1/4 cup pure maple syrup - 2 tablespoons olive oil - 1 teaspoon dried thyme - 1 teaspoon garlic powder - Salt and pepper to taste - 1/4 cup chopped fresh parsley for garnish Gather these ingredients for a tasty dish. The chicken or turkey sausage offers lean protein. Brussels sprouts add a great crunch, while sweet potatoes bring sweetness. Carrots and red onions add color and flavor. The maple syrup gives a warm glaze. Olive oil helps everything roast well. Thyme and garlic powder give depth. Don’t forget salt and pepper to bring out all the tastes. Finally, fresh parsley adds a lovely finish. This mix of ingredients makes for a satisfying meal. 1. Preheating the oven: First, set your oven to 425°F (220°C). This high heat helps the food roast and caramelize nicely. 2. Preparing the vegetables: Take 2 cups of Brussels sprouts and slice them in half. Cube 2 sweet potatoes into bite-sized pieces. Cut 1 red onion into wedges and slice 1 cup of carrots. 3. Mixing the maple glaze: In a small bowl, whisk together 1/4 cup of pure maple syrup, 2 tablespoons of olive oil, 1 teaspoon of dried thyme, and 1 teaspoon of garlic powder. Add salt and pepper to taste. This glaze brings a sweet and savory flavor. 1. Tossing the ingredients: In a large bowl, combine the sliced chicken or turkey sausage, Brussels sprouts, sweet potatoes, red onion, and carrots. Pour the maple glaze over this mixture. Toss everything well so that all the ingredients are coated. 2. Spreading on the baking sheet: Take a large baking sheet and spread the mixture evenly. Make sure the ingredients lie in a single layer. This helps them roast evenly. 3. Roasting time and techniques: Place the baking sheet in the preheated oven. Roast for 25-30 minutes. Stir the mixture halfway through. This helps to brown the sausages and tenderize the veggies perfectly. 1. Allowing to cool briefly: When the roasting time is up, take the pan out of the oven. Let it cool for a couple of minutes. This makes it easier to serve. 2. Garnishing with parsley: Finally, sprinkle 1/4 cup of chopped fresh parsley over the dish. This adds color and a fresh taste to your meal. Enjoy your sheet-pan delight! To ensure even roasting, spread the sausage and veggies in a single layer. This way, hot air can reach all parts. Stir the mix halfway through cooking. This helps things brown nicely. For cooking time, it matters what type of sausage you use. Chicken or turkey sausages need less time than pork. Always check the sausage for doneness with a meat thermometer. It should read 165°F (74°C) for safety. To boost flavor, think about adding herbs like rosemary or sage. They pair well with sweet potatoes and sausage. You can also try spices like smoked paprika for a kick. If you want a different glaze, consider using honey or balsamic vinegar. Both add a sweet touch. Maple syrup can be mixed with mustard for a tangy twist. Serving directly from the baking sheet is easy and charming. The colors of the veggies and sausage pop when served this way. It makes for a cozy, rustic meal. For a more polished look, transfer the dish to a large platter. Arrange the veggies and sausage in a way that showcases their vibrant colors. A sprinkle of fresh parsley on top adds a nice touch. {{image_2}} You can change the protein in this dish. If you want a different taste, try pork sausage. It adds a nice, rich flavor. You can also use beef sausage for a heartier dish. For those who prefer plant-based options, use veggie sausage. Many brands offer great vegan choices. You can also try chickpeas or lentils for protein. These options make the meal healthy and tasty. Feel free to mix up the vegetables based on what you have. Seasonal veggies like butternut squash or parsnips work well. You can also use green beans or cauliflower if you prefer. Mixing different root vegetables adds texture and flavor. Just aim for a mix of colors for a beautiful dish. This keeps it fun and fresh every time you make it. You can change the glaze to suit your taste. For a spicy kick, add red pepper flakes or hot sauce. This gives the dish a nice heat. If you want a different sweetness, use honey or agave syrup. Both options add a unique twist. You can even mix maple syrup with mustard for a tangy flavor. These changes keep the dish exciting and tasty! Store your leftovers in an airtight container. This helps keep the flavors fresh. You can place them in the fridge for up to three days. If you want to keep them longer, freezing is a good choice. For the best taste, reheat in the oven. Preheat your oven to 350°F (175°C). Spread the leftovers on a baking sheet. Heat for about 15-20 minutes or until warmed through. You can also use a microwave, but this may make the veggies soft. To keep texture, add a splash of water to the dish before microwaving. To freeze leftovers, let them cool first. Then, place them in a freezer-safe container. Label with the date and use within three months for best quality. To thaw, move the container to the fridge overnight. Reheat in the oven or microwave as mentioned above. Enjoy your meal again later! Yes, you can use regular pork sausage. It adds great flavor. Pork sausage is juicy and savory. Just keep in mind that it may cook slightly differently. You might need to adjust the cooking time. Check for browning and doneness. Feel free to try different types, such as Italian or spicy sausage, for a twist. You will know the veggies are done by their look and feel. The Brussels sprouts should be tender and slightly browned. The sweet potatoes need to be soft when pierced with a fork. The carrots should be bright and cooked through. The sausage should be browned on the outside and hot in the middle. Stir halfway through cooking to ensure even roasting. This dish pairs well with simple sides. Consider a light salad with greens and a vinaigrette. A crusty bread would also be great for soaking up the glaze. Rice or quinoa can add a nice base too. If you want a warm side, try mashed potatoes or a creamy polenta. These options keep the meal cozy and satisfying. This recipe combines hearty sausages with seasonal veggies for a tasty meal. You learned how to prep, cook, and serve this dish perfectly. We shared tips to enhance flavors and store leftovers safely for future meals. Remember, you can swap proteins and veggies to fit your taste. Experiment with glazes for an extra kick. Enjoy creating this dish and feel free to share your results! Cooking should be fun and rewarding. Your kitchen is a canvas, so let your creativity shine through every bite!

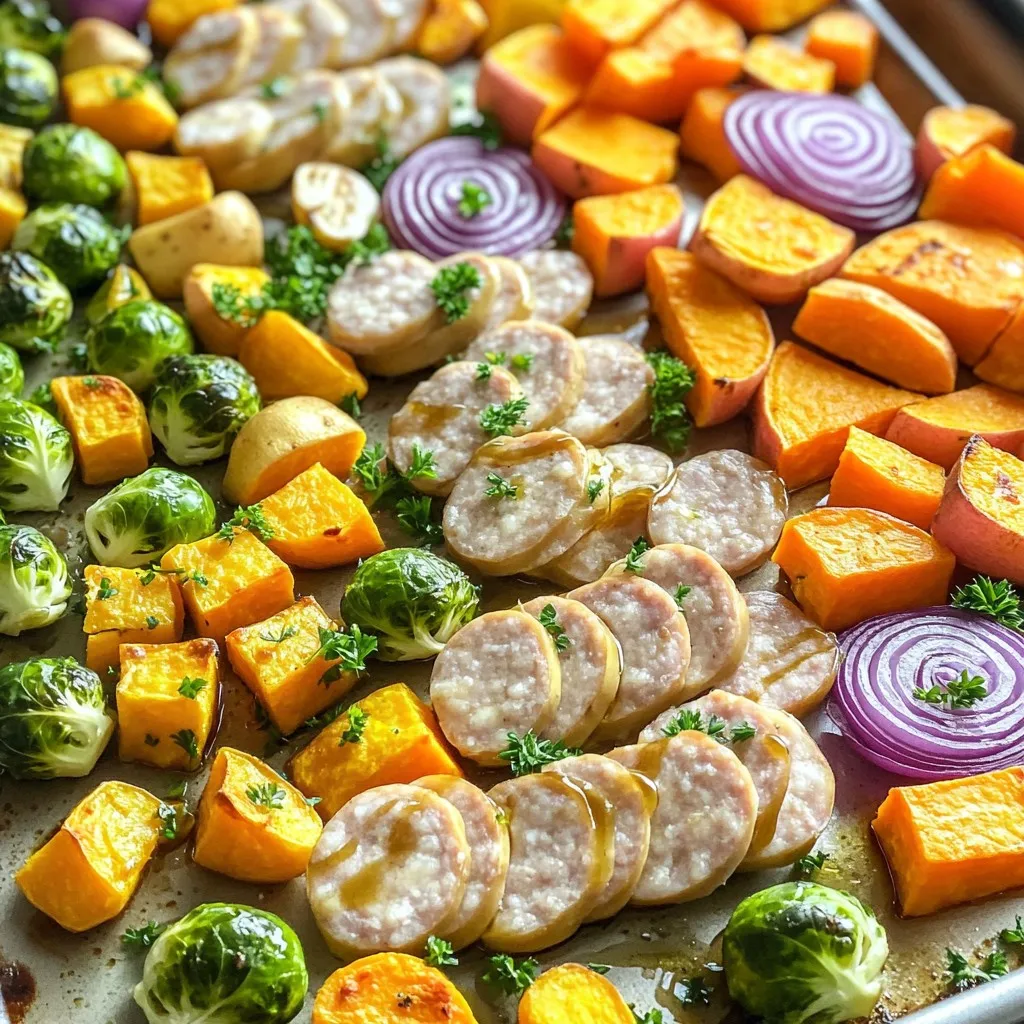
Get ready to savor every bite of this Sheet-Pan Maple Glazed Sausage & Fall Veggies Delight! This dish brings together juicy sausage and fresh, seasonal veggies, all drizzled with a …

Read more

Categories Dinner

Perfect Apple Crisp Simple and Delicious Recipe

November 12, 2025October 18, 2025 by Chef Luca
To create the best apple crisp, I use these key ingredients: - 6 cups of apples, peeled, cored, and sliced (I love using a mix of Granny Smith and Honeycrisp) - 1 tablespoon of lemon juice - 1 teaspoon of ground cinnamon - ½ teaspoon of nutmeg - ¾ cup of packed brown sugar - 1 cup of old-fashioned oats - ¾ cup of all-purpose flour - ½ cup of unsalted butter, melted - ¼ teaspoon of salt - ¼ cup of chopped pecans or walnuts (optional) These apples bring the right balance of tartness and sweetness. The spices add warmth and depth. Brown sugar gives a rich flavor that pairs well with oats and butter. For this recipe, you'll need a few tools to make your baking smooth: - A 9x13 inch baking dish for even cooking - Mixing bowls for combining ingredients - Measuring cups to get the right amounts If you want to make apple prep easier, a peeler and slicer can be helpful. They save time and help get uniform slices for even cooking. These tools help ensure your apple crisp turns out perfect every time! {{ingredient_image_1}} Start by peeling, coring, and slicing the apples. I like to use a mix of Granny Smith and Honeycrisp. These apples balance tart and sweet. Use a sharp peeler to remove the skin. Then, cut the apples into thin slices. Aim for about 1/4 inch thick. This helps them bake evenly. A tip I recommend is to toss the apple slices with lemon juice right after slicing. This keeps them fresh and bright. Add ground cinnamon and nutmeg to the apples for a warm flavor. Mix them well in a large bowl. Now, let’s make the oat mixture. In another bowl, combine brown sugar, oats, flour, melted butter, and salt. Use your hands or a fork to mix until it looks crumbly. For a crunchy twist, you can add chopped pecans or walnuts. Just fold them in gently. To get the right texture, make sure not to overmix. You want some clumps in the topping. This gives your apple crisp a nice crunch when baked. Preheat your oven to 350°F (175°C). This step is key for a perfect bake. Spread the apple mixture evenly in a greased 9x13 inch baking dish. Then, sprinkle the oat topping over the apples. Make sure to cover all the apple slices. Bake in your preheated oven for 35-40 minutes. Keep an eye on it! The apples should bubble, and the topping should turn golden brown. This is how you know it’s done. Let it cool for about 10 minutes before serving. Enjoy your delicious apple crisp warm! To get the best texture, choose the right apples. I love using Granny Smith and Honeycrisp. These apples hold their shape well when baked. They give a nice sweet and tart balance. To prevent a soggy bottom crust, make sure to slice your apples evenly. Toss them with lemon juice, cinnamon, and nutmeg to add flavor while helping them stay crisp. Spread the apple mixture evenly in your baking dish. This helps the heat distribute well. For a unique twist, try adding spices like ginger or cardamom. You can also mix in a splash of vanilla extract or a drizzle of maple syrup. These add depth to the flavor. When serving, give it a little flair. Top your apple crisp with a sprinkle of cinnamon or a handful of chopped nuts. It not only looks nice but adds extra taste and texture. The best serving temperature is warm. This lets the flavors shine and the topping stay crunchy. Pair your warm apple crisp with a scoop of vanilla ice cream or whipped cream. The cold creaminess contrasts beautifully with the warm apples. It’s a match that everyone loves! Pro Tips Choose the Right Apples: A mix of tart and sweet apples like Granny Smith and Honeycrisp provides a balanced flavor that enhances the crisp. Use Fresh Spices: For the best flavor, use freshly ground cinnamon and nutmeg to elevate the aroma and taste of your apple crisp. Don’t Overmix the Topping: Mix the topping just until crumbly; overmixing can result in a dense texture instead of a light and crispy topping. Let it Rest: Allow the apple crisp to cool for about 10 minutes before serving; this helps the juices to thicken and makes it easier to serve. {{image_2}} You can mix flavors in your apple crisp. Adding fruits like berries or pears gives it a new twist. Blueberries or raspberries blend well with apples. If you want some tang, try adding pears. They pair nicely with the sweetness of apples. You can also use different nuts or seeds. Pecans and walnuts add crunch and flavor. If you want a lighter touch, sunflower seeds work great too. Each nut adds its own flavor. Experiment to find your favorite mix! Sometimes, you may want a healthier version of your apple crisp. You can substitute whole grain flour for all-purpose flour. This adds fiber and nutrients. You can also use less sugar. Try using honey or maple syrup instead of brown sugar. This keeps the sweetness but reduces added sugars. Another tip is to reduce butter. Use unsweetened applesauce or coconut oil instead. This keeps the crisp moist while being a bit lighter. Apple crisp can change with the seasons. You can switch up your fruit based on what’s fresh. In spring, try rhubarb or strawberries. In summer, peaches or cherries are great choices. In fall, stick with classic apples, but add some pumpkin spice for a warm flavor. Winter can bring in citrus fruits like oranges for a zesty twist. Each season brings a new taste to enjoy! To keep your apple crisp fresh, store it in the fridge. Place it in an airtight container. This helps prevent it from drying out. You can also cover the dish with plastic wrap. When you're ready to enjoy your leftovers, reheat them in the oven. Set your oven to 350°F (175°C) and warm it for about 15 minutes. This method keeps the topping crispy. You can also use the microwave for a quick fix. Just heat it for 30 seconds to a minute. If you want to freeze your apple crisp, first let it cool completely. Then, wrap it tightly in plastic wrap. After that, place it in a freezer-safe bag or container. This helps avoid freezer burn. When it's time to eat, move it to the fridge to thaw overnight. For reheating, bake it at 350°F (175°C) for 20-30 minutes or until it's hot. When stored properly, your apple crisp can last up to 4 days in the fridge. If frozen, it can stay fresh for about 3 months. Just make sure to check for any signs of spoilage before enjoying it. Yes, you can use other apples. Granny Smith and Honeycrisp are best. They give a nice tartness and sweetness. Other good options are Fuji, Gala, or Braeburn. Each apple brings its own flavor. Mixing two types can add depth to your crisp. You can easily skip the nuts. Just leave out the pecans or walnuts. To add crunch, increase the oats or use more flour. You can also add seeds like pumpkin or sunflower. They give great texture without nuts. Yes, you can prepare it ahead of time. Just follow the steps, but don’t bake it. Cover the dish and store it in the fridge. When you're ready, bake it straight from the fridge. You may need to add a few extra minutes to the bake time. This way, you enjoy fresh apple crisp anytime! In this blog post, I shared how to create the perfect apple crisp. Start with the right apples like Granny Smith and Honeycrisp. Gather essential tools like mixing bowls and a baking dish. Follow step-by-step instructions to prep your apples and make the topping. Remember tips for texture and flavor to enhance your dish. You can also try fun variations and store leftovers wisely. Enjoy your apple crisp journey, and share it with loved ones for delightful moments!

Are you ready to make the perfect apple crisp? This simple and delicious recipe will guide you step by step. With just a few key ingredients like Granny Smith apples …

Read more

Categories Desserts

Savory One Pot Lemon Garlic Orzo Soup Recipe

October 15, 2025 by Chef Luca
To make this tasty soup, you need: - 1 tablespoon olive oil - 1 medium onion, diced - 3 cloves garlic, minced - 2 carrots, diced - 2 celery stalks, diced - 6 cups vegetable broth - 1 cup orzo pasta - 1 large lemon (juiced and zested) - 1 cup spinach (fresh or frozen) - 1 teaspoon dried thyme - 1 teaspoon dried oregano - Salt and pepper to taste - Fresh parsley, chopped (for garnish) You can use either fresh or frozen spinach in this soup. Fresh spinach adds a bright color and texture. It wilts quickly and blends well into the soup. Frozen spinach, on the other hand, is convenient and often cheaper. It’s already chopped and ready to go. Just thaw it before adding it to the pot. Both options work great, so it depends on what you have on hand. Garnishes can elevate your soup. I suggest using fresh parsley on top for color and flavor. A bit of extra lemon zest adds a nice touch. For sides, crusty bread pairs well. It’s perfect for dipping into the soup. You can also serve a light salad alongside to keep the meal fresh and bright. 1. Start by gathering all your ingredients. This makes cooking easier and more fun. 2. Dice one medium onion, three cloves of garlic, two carrots, and two celery stalks. 3. Zest and juice one large lemon. Set both the zest and juice aside for later. 4. Measure out six cups of vegetable broth and one cup of orzo pasta. 5. If using fresh spinach, wash it well. If using frozen, just measure one cup. - Cook the orzo in the broth, not in water. This helps it soak up more flavor. - Add the orzo after the broth boils. This way, it cooks evenly and stays firm. - Check the orzo after 10 minutes. It should be tender but not mushy. - Stir gently to keep the orzo from sticking to the pot. - Taste the soup before serving. Add salt and pepper to suit your taste. - If the soup is too thick, add more vegetable broth. Stir until it reaches your desired consistency. - For a punch of flavor, add more lemon juice or zest. It brightens the dish. - Fresh parsley makes a great garnish. It adds color and fresh taste. One-pot cooking is all about ease and flavor. Here are some tips to get the best results: - Prep before cooking: Chop all your veggies first. This saves time and keeps you organized. - Sauté vegetables first: Start with the onion and garlic. This builds a strong base for your soup. - Use high heat to start: Bring your broth to a boil quickly. This helps the orzo cook evenly. - Stir occasionally: This prevents the orzo from sticking to the pot. It also helps distribute flavors. Enhancing flavors takes your soup to the next level. Here’s how to do it: - Add fresh herbs: Use fresh parsley as a garnish. It adds a pop of color and taste. - Try different citrus: A splash of lime juice can give a unique twist. - Incorporate spices: A pinch of red pepper flakes adds warmth. You can also try smoked paprika for depth. - Finish with a drizzle of olive oil: This makes the soup richer and adds a lovely sheen. Everyone makes mistakes in the kitchen. Here are some to watch out for: - Overcooking the orzo: Keep an eye on it. It should be al dente, not mushy. - Neglecting seasoning: Taste as you go. It’s easy to forget salt and pepper until the end. - Skipping the resting time: Let the soup sit for a few minutes after cooking. This helps the flavors meld together. - Using low-quality broth: A good broth makes all the difference. Always choose a flavorful vegetable broth for your base. {{image_2}} You can boost the nutrition of your soup with some easy changes. Try adding more veggies. You can use: - Zucchini - Bell peppers - Green beans - Peas These vegetables add color and flavor. They also provide extra vitamins and minerals. Consider using seasonal vegetables for the best taste. Adding protein makes your soup heartier. You have a few great options: - Cooked chicken, shredded or cubed - Cooked shrimp, peeled and tail-off - Canned beans like chickpeas or white beans Add these during the last few minutes of cooking. This keeps them tender and tasty. Herbs and spices can change the soup's flavor. Here are some ideas: - Fresh basil for a sweet twist - Rosemary for a strong, earthy taste - Red pepper flakes for heat Experiment with these options. Find what you like best. Adding fresh herbs at the end gives a bright flavor. To store your leftover soup, let it cool first. Then, transfer it to an airtight container. This keeps it fresh and tasty. You can store it in the fridge for up to three days. If you want to save it longer, consider freezing. When you're ready to enjoy your soup again, heat it on the stove. Pour the soup into a pot and warm it over medium heat. Stir it often to avoid sticking. If it seems too thick, add a splash of water or broth. This will help bring back its creamy texture. For long-term storage, freeze the soup in portions. Use freezer-safe containers or bags. Leave some space at the top for expansion. Your soup can last up to three months in the freezer. When you want to eat it, thaw it overnight in the fridge before reheating. Yes, you can use different pasta shapes. Small pasta like ditalini or alphabet pasta works well. Just keep an eye on cooking times. You want the pasta to be tender but not mushy. To make this soup gluten-free, swap orzo for gluten-free pasta. Look for brands that offer gluten-free orzo or use rice instead. Also, ensure your vegetable broth is gluten-free. Many store brands are safe, but check the label. If you don't have vegetable broth, use chicken broth for a richer flavor. You can also make a simple broth with water and seasonings. Add garlic, herbs, and a squeeze of lemon to give it more taste. One Pot Lemon Garlic Orzo Soup is simple and tasty. It uses easy steps and fresh ingredients. You learned how to prep, cook, and store the soup. You can change it up with protein and veggies. Remember to avoid common mistakes for the best results. I hope you feel inspired to try this recipe. Enjoy your cooking and share it with others!

Craving a comforting bowl of soup? You need to try this Savory One Pot Lemon Garlic Orzo Soup! It’s quick to make, uses simple ingredients, and bursts with flavor. Whether …

Read more

Categories Dinner

Cheesy Spinach Artichoke Pull-Apart Bread Delight

October 15, 2025 by Chef Luca
- 1 large round sourdough loaf - 1 cup frozen spinach, thawed and drained - 1 can (14 oz) artichoke hearts, drained and chopped - 1 cup cream cheese, softened - 1 cup shredded mozzarella cheese - 1/2 cup grated Parmesan cheese - 2 cloves garlic, minced - 1/2 teaspoon crushed red pepper flakes (optional) - Salt and pepper to taste - 2 tablespoons olive oil - Fresh parsley, chopped (for garnish) You might want to add: - Chopped sun-dried tomatoes for a sweet kick - Cooked bacon bits for a smoky taste - A dash of Worcestershire sauce for depth If you need swaps, here are some ideas: - Use a gluten-free bread for a gluten-free option. - Swap cream cheese for a dairy-free cream cheese. - Replace mozzarella with a vegan cheese alternative. Start by preheating your oven to 375°F (190°C). This ensures the bread bakes evenly. In a medium bowl, mix the cream cheese, mozzarella, and Parmesan cheese. Add the minced garlic, thawed spinach, and chopped artichokes. If you like a kick, toss in the crushed red pepper flakes. Season this mix with salt and pepper to taste. Stir until everything is well combined. Take your large round sourdough loaf and place it on a cutting board. Use a serrated knife to cut it into a grid pattern. Make sure not to cut all the way through the bottom. Gently pull apart the squares to create pockets. This step makes it easy to stuff the cheesy mixture into the bread. Carefully spoon the filling into each opening. Spread it evenly for the best flavor. Once stuffed, brush the outside of the bread with olive oil. This will help the crust get nice and golden. Wrap the bread in aluminum foil and place it on a baking sheet. Bake it for 25 minutes. After that, remove the foil and bake for another 10-15 minutes. Look for bubbly cheese and a golden crust. When done, take it out and let it cool for a few minutes. Finally, sprinkle fresh parsley on top for a pop of color before serving. To get that perfect cheese melt, use fresh cheese. Shredded cheese melts much better than pre-shredded. Mix mozzarella, cream cheese, and Parmesan together for a great blend. Make sure your oven is set to 375°F (190°C). This heat melts the cheese without burning the bread. Cover your bread with foil for the first part of baking. This traps heat and helps with melting. Remove the foil later to crisp the crust. Having the right tools makes cooking fun and easy. Here are some tools you should have: - A serrated knife for cutting the bread without squishing it. - A medium mixing bowl for combining the filling ingredients. - A baking sheet to catch any drips while baking. - Aluminum foil for wrapping the bread. - A pastry brush for applying olive oil evenly. These tools help you work faster and stay neat in the kitchen. Avoid these common mistakes to ensure your bread shines: - Don’t cut the bread too deep; keep the bottom intact. - Make sure to drain the spinach and artichokes well. Extra water can make the filling soggy. - Don’t skip the olive oil brush. It adds flavor and helps the crust brown nicely. - Bake the bread long enough for the cheese to bubble. A golden crust means it’s ready. By steering clear of these missteps, you’ll enjoy a tasty and beautiful dish. {{image_2}} To make this dish gluten-free, use a gluten-free bread. Look for a round loaf that holds up well. You can also use cauliflower bread for a low-carb option. Both choices will still give you that lovely pull-apart effect. You can mix in sun-dried tomatoes for a tangy twist. Chopped bacon adds a smoky flavor that pairs well with the cheese. For a spicy kick, try adding jalapeños or diced green chilies. Each option enhances the taste of the cheesy filling. While sourdough is classic, you can use other types of bread. Ciabatta has a nice crust and airy inside, perfect for stuffing. A baguette works well too, giving a crunchy bite. Choose any bread you love to create your own version of this dish. Storing leftover pull-apart bread is easy. First, let the bread cool down completely. Wrap it tightly in plastic wrap or aluminum foil. You can also store it in an airtight container. This method keeps the bread fresh for 2 to 3 days at room temperature. If you want to keep it longer, consider freezing it. To reheat your cheesy spinach artichoke pull-apart bread, preheat your oven to 350°F (175°C). Remove any plastic wrap or foil. Place the bread on a baking sheet. Cover it loosely with aluminum foil to prevent it from drying out. Heat for about 15 to 20 minutes. This method helps preserve the cheese's creaminess and the bread's texture. If you want to freeze the pull-apart bread, follow these steps. First, let the bread cool completely. Wrap it tightly in plastic wrap, then in aluminum foil. You can also use a freezer-safe bag. This keeps it fresh for up to 3 months. To use, let it thaw in the fridge overnight. Reheat as described above for the best taste. Yes, you can make this bread ahead. Prepare the filling and bread, then stuff it. Wrap it well and store it in the fridge for up to a day. When ready, just bake it. This saves time and makes hosting easy. This cheesy bread pairs well with many dishes. Here are some options: - A fresh garden salad - Creamy tomato soup - A charcuterie board - Dipping sauces like marinara or ranch These sides make your meal more fun and tasty. Check the bread after 35 minutes. The cheese should be bubbly and the crust golden brown. If it looks good, it’s done. You can also use a toothpick to test. If it comes out clean, the bread is ready. Absolutely! Feel free to mix in your favorite cheeses. Here are some great options: - Cheddar for a sharp taste - Gouda for creaminess - Feta for a tangy kick These options will add new flavors and make your bread even better. You learned how to create delicious Cheesy Spinach Artichoke Pull-Apart Bread. We covered the key ingredients and offered great tips for preparation. Remember, you can customize your dish with fun add-ins and bread types. Proper storage keeps leftovers fresh for later. Try making this ahead for gatherings or enjoy it fresh from the oven. With practice, you’ll master this recipe and impress everyone at the table. Happy baking!

Are you ready to impress your friends with a crowd-pleasing snack? My Cheesy Spinach Artichoke Pull-Apart Bread will have everyone coming back for more. With gooey cheese and savory artichokes, …

Read more

Categories Appetizers

Viral Baked Feta Pasta Easy and Flavorful Recipe

October 15, 2025 by Chef Luca
To make this dish, you need some key items. Here’s what you will need: - 250g pasta (fusilli or penne) - 200g block of feta cheese - 250g cherry tomatoes, halved - 3 cloves garlic, minced - 3 tablespoons olive oil - 1 teaspoon dried oregano - Salt and pepper to taste - Fresh basil leaves for garnish - Zest and juice of 1 lemon You can add more taste with these extras: - 1 teaspoon red chili flakes (for a spicy kick) - 1 cup baby spinach (for added greens) These options can help you customize the dish to your liking. If you don’t have an ingredient, here are some swaps: - Use any pasta shape you like. - You can try goat cheese if feta is not available. - Cherry tomatoes can be replaced with regular tomatoes, just chop them up. - For a milder flavor, skip the chili flakes. These substitutions will keep your dish tasty while using what you have at home. Start by gathering all your ingredients. You need pasta, feta, cherry tomatoes, garlic, and spices. Measure out 250g of your choice of pasta, like fusilli or penne. Next, grab a 200g block of feta cheese. Then, halve 250g of cherry tomatoes. Mince three cloves of garlic. Get your teaspoon ready for red chili flakes, olive oil, and dried oregano. Don't forget salt and pepper for taste. If you want greens, set aside 1 cup of baby spinach. Lastly, zest and juice one lemon for a fresh kick. Preheat your oven to 200°C (400°F). In a large baking dish, place the block of feta in the center. Surround the feta with the halved cherry tomatoes and minced garlic. Drizzle three tablespoons of olive oil over everything. Sprinkle on the red chili flakes, oregano, salt, and pepper. Toss the tomatoes slightly to mix the flavors. Bake this in the oven for about 25 to 30 minutes. Look for the feta to be soft and slightly golden, and the tomatoes to be blistered. While the feta and tomatoes bake, cook the pasta. Bring a large pot of salted water to a boil. Add the pasta and cook according to the package instructions. When it's done, save 1/2 cup of pasta water, then drain the rest. After baking, take the dish out of the oven. Add the cooked pasta directly to the baking dish. If you like, toss in the baby spinach for some added greens. Stir gently to combine everything, breaking the feta into a creamy sauce. If it seems dry, add reserved pasta water slowly until you reach the creaminess you want. Finally, mix in the lemon zest and juice to brighten the dish. Adjust the seasoning with salt and pepper as needed. Serve hot, topped with fresh basil leaves for a colorful finish. To get a creamy sauce, choose the right pasta. Fusilli or penne works best. Cook the pasta in salted water until al dente. This means it should still have a slight bite. When mixing, break the feta gently. This helps create a smooth sauce. If the sauce is too thick, add reserved pasta water a little at a time. The heat will help blend the flavors. Store leftover baked feta pasta in an airtight container. It stays fresh for up to three days in the fridge. When reheating, add a splash of water or olive oil. This keeps the pasta moist. Microwave it in short bursts, stirring in between. You can also reheat it on the stove over low heat. For a vegetarian option, this recipe already fits! If you want it gluten-free, use gluten-free pasta. For a dairy-free version, swap feta with tofu or a nut-based cheese. You can also reduce the oil if you're watching calories. Adjust the spices to suit your taste. Feel free to add more veggies like bell peppers or zucchini for extra nutrients. {{image_2}} You can easily make this dish vegetarian. Simply skip the meat and load up on veggies. Try adding zucchini, bell peppers, or mushrooms. These veggies add great flavor and texture. You can also toss in some artichoke hearts for a unique twist. They blend well with the creamy feta and sweet tomatoes. For a hearty meal, consider adding protein. Grilled chicken works well and adds a nice flavor. Cook it separately, then mix it into the baked feta pasta. Shrimp is another great option. Just sauté it briefly before adding. If you prefer plant-based options, tofu is a solid choice. Press and cube it, then bake it alongside the feta for a tasty addition. Spice up your dish with different herbs and spices. Fresh thyme or rosemary can add depth. For added heat, toss in more chili flakes or some diced jalapeños. You can also mix in olives or capers for a salty bite. Finally, a splash of balsamic vinegar can enhance the flavors beautifully. Experiment to find your favorite combo! To keep leftover baked feta pasta fresh, place it in an airtight container. Make sure to cool it to room temperature before sealing. This helps prevent moisture buildup. Store it in the fridge for up to three days. If you want to enjoy it later, consider freezing it. When it's time to reheat, use a microwave or oven. If using a microwave, heat in short bursts. Stir the pasta to warm it evenly. If using an oven, preheat it to 180°C (350°F). Place the pasta in an oven-safe dish and cover with foil. Heat for about 15-20 minutes until warm. You can add a splash of water or olive oil to keep it moist. You can freeze baked feta pasta for longer storage. Allow it to cool completely. Then, portion it into freezer-safe containers. Seal tightly to avoid freezer burn. It will last for about two months in the freezer. When you’re ready to eat, thaw it in the fridge overnight. Then reheat as mentioned above for the best flavor and texture. Any short pasta works great for this dish. I love fusilli or penne. They hold sauce well and mix nicely with the creamy feta. You can also try other shapes like rotini or farfalle. Just make sure to cook it until it's al dente for the best texture. Yes, you can use other cheeses like goat cheese or ricotta. These cheeses offer different flavors and textures. If you pick goat cheese, it will add a tangy taste. Ricotta will give a softer, creamier feel. Both options work well in this recipe. To add spice, use red chili flakes. Just one teaspoon gives a nice kick. If you want it spicier, feel free to add more. You can also add fresh jalapeños or even hot sauce for extra heat. Adjust the spice level to fit your taste. Absolutely! This recipe is great for meal prep. You can make it ahead and store it in the fridge. Just reheat it when you're ready to eat. The flavors will blend even more after a day. It stays tasty for about three days in the fridge. Yes, adding vegetables is a smart way to boost nutrition. You can toss in bell peppers, zucchini, or broccoli. Spinach is also a great option if you want greens. Just make sure to cook them a bit before mixing them in, so they are tender and flavorful. In summary, we explored baked feta pasta from ingredients to storage tips. You learned how to prep your ingredients, bake the feta, and create a creamy sauce. Variations allow for customization, whether you want it vegetarian or packed with protein. Remember to store leftovers properly and reheat for the best taste. This dish is easy to adapt to fit your diet. Enjoy making this delightful meal that is sure to impress!

Are you ready to dive into the delicious world of viral baked feta pasta? This easy and flavorful recipe has taken the internet by storm, and for good reason! With …

Read more

Categories Dinner

Hot Cocoa Protein Smoothie Tasty and Healthy Treat

October 15, 2025 by Chef Luca
- 1 frozen banana - 1 cup almond milk (or any milk of your choice) - 1 scoop chocolate protein powder - 2 tablespoons unsweetened cocoa powder - 1 tablespoon peanut butter (or almond butter) - 1 tablespoon honey or maple syrup (adjust for sweetness) - 1/2 teaspoon vanilla extract - A pinch of sea salt - Ice cubes (optional, for a thicker texture) This smoothie is a tasty way to enjoy a healthy treat. Each ingredient adds unique flavor and nutrition. The frozen banana gives a creamy base. It also adds natural sweetness. Almond milk makes it smooth and light. You can use any milk you like. Chocolate protein powder is key here. It adds protein, which helps you feel full. Unsweetened cocoa powder gives that rich cocoa flavor. It makes the drink taste like dessert. Peanut butter or almond butter adds healthy fats. It makes the smoothie creamy and rich. Sweetener like honey or maple syrup can boost the sweetness. Adjust this to fit your taste. Vanilla extract adds a warm note. A pinch of sea salt enhances all the flavors. Lastly, ice cubes are optional. They make the smoothie thicker and colder. Gather these ingredients, and you're ready for a delicious drink! 1. Start by taking your blender. Add the frozen banana, almond milk, and chocolate protein powder. 2. Next, sprinkle in the unsweetened cocoa powder. Then, add the peanut butter, honey, vanilla extract, and sea salt. 3. If you want a thicker smoothie, toss in a handful of ice cubes. 4. Now, blend everything on high speed until it is smooth and creamy. You may need to stop and scrape the sides of the blender. 5. After blending, taste your smoothie. If you want it sweeter, add more honey or syrup. 6. Once you reach your desired consistency, pour the smoothie into a glass or jar. - Serve your smoothie in a tall glass or a fun jar to make it look nice. - For a little flair, you can sprinkle extra cocoa powder on top. Chocolate shavings also add a tasty touch! To make your hot cocoa protein smoothie smooth and creamy, start with a good blender. Here are some tips: - Layer Ingredients: Add the liquid first, then the powders, and top with solids. This order helps blend better. - Use Frozen Banana: A frozen banana gives a thick and creamy texture. - Blend in Batches: If your blender struggles, blend in smaller amounts. This ensures a smoother mix. - High Speed Setting: Blend on high speed for about 30 to 60 seconds. Stop to scrape the sides if needed. You can make your smoothie even better with some extra flavors: - Spices: Add a dash of cinnamon or nutmeg for warmth. These spices pair well with cocoa. - Adjust Sweetness: Taste your smoothie before serving. Add more honey or syrup if it needs more sweetness. - Nutty Flavor: Try adding a splash of hazelnut milk for a rich taste. It complements the chocolate nicely. - Chocolate Boost: For more chocolate flavor, add a little more cocoa powder or chocolate chips. Experiment with these tips to find your perfect blend! {{image_2}} If you want a dairy-free treat, use alternative milks. Almond milk is popular. It adds a light, nutty flavor. You can also try oat milk for a creamier touch. Coconut milk gives a tropical vibe. Each milk changes the taste a bit, so pick what you like. Not a fan of chocolate protein powder? No problem! Try vanilla protein powder instead. It blends well and adds a nice flavor. You can also use unflavored protein powder for a neutral taste. For a vegan choice, look for plant-based protein like pea or hemp. These options keep it healthy and tasty. Want to make your smoothie even better? Add some spinach for extra nutrients. You won’t taste it much, but it boosts vitamins. Chia seeds are another great choice. They add fiber and healthy fats. You can also toss in a tablespoon of flaxseed. It’s a simple way to enhance your smoothie’s nutrition. You can store your Hot Cocoa Protein Smoothie in the fridge. It stays fresh for up to 24 hours. Make sure to use a sealed container to keep it tasty. The longer it sits, the more it may separate. Just give it a good shake before you drink it. If you want to save some for later, freezing is a great option. Pour leftovers into ice cube trays or freezer bags. This makes it easy to grab a portion. When you're ready to use it, just take out the amount you need. To defrost, let it sit in the fridge overnight. You can also blend it straight from the freezer for a thicker drink. What can I use instead of banana in my smoothie? You can use avocado for creaminess. Applesauce also works well. Frozen mango adds sweetness too. Can I make this smoothie vegan? Yes, just use plant-based protein powder. Swap honey for maple syrup. Use almond milk or oat milk. How do I make my smoothie thicker? Add more frozen fruit like berries or mango. You can also toss in ice cubes. Chia seeds or oats help too. How much protein does this smoothie contain? This smoothie has about 20 grams of protein. The protein powder gives a big boost. Are there any low-calorie options for this recipe? Yes, use unsweetened almond milk and less sweetener. You can skip the peanut butter too. This smoothie recipe combines simple ingredients for a tasty treat. We explored how to blend frozen bananas, nut milk, and protein powder into a creamy drink. I shared tips to make it even better with flavors or extra nutrients. You can also freeze this smoothie for later use. Enjoy your delicious and healthy smoothie, knowing it’s easy to customize to your taste. Make it a fun part of your day, whether you enjoy it now or later!

Craving something both delicious and nutritious? Try my Hot Cocoa Protein Smoothie! Packed with flavor, this treat gives your body the fuel it needs. With simple ingredients like frozen bananas …

Read more

Categories Breakfast

Brown Butter Maple Pecan Cookies Delightfully Flavored

October 15, 2025 by Chef Luca
- 1 cup unsalted butter (2 sticks) - 1 cup brown sugar, packed - 1/2 cup granulated sugar - 1/4 cup pure maple syrup - 1 large egg - 1 teaspoon vanilla extract - 2 cups all-purpose flour - 1 teaspoon baking soda - 1/2 teaspoon salt - 1 cup pecans, chopped (toasted for extra flavor) - 1/2 teaspoon cinnamon These ingredients come together to create a rich, sweet cookie. The brown butter adds depth, while maple syrup brings warmth. Pecan pieces give a nice crunch and nutty flavor. - Medium saucepan - Large mixing bowl - Whisk and spatula - Baking sheets and parchment paper Using the right tools makes baking easier. A medium saucepan helps in browning the butter. A large bowl allows for easy mixing. Parchment paper keeps cookies from sticking to the sheets. - Extra maple syrup - Whole pecans for decoration These garnishes enhance the presentation. Drizzling extra maple syrup adds sweetness. Whole pecans can be a charming touch on top of the cookies. To start, melt the unsalted butter in a medium saucepan. Use medium heat for this step. Watch closely as the butter melts. Stir it often. After a few minutes, the butter will foam. Keep cooking until it turns a golden amber color. This should take about 5-7 minutes. You will notice a lovely nutty aroma. This smell means your butter is now brown. Remove it from the heat and let it cool. In a large mixing bowl, combine the brown sugar, granulated sugar, and the cooled brown butter. Use a whisk to mix them until smooth. Next, add in the maple syrup, egg, and vanilla extract. Stir until it is all combined nicely. In a separate bowl, whisk the dry ingredients: flour, baking soda, salt, and cinnamon. Gradually add this dry mix to the wet mix. Stir gently until just combined. Now it’s time to fold in the chopped pecans. Use a spatula to ensure they mix well into the dough. Cover the bowl with plastic wrap and chill the dough in the fridge for at least 30 minutes. This helps the cookies hold their shape. Preheat your oven to 350°F (175°C) and line baking sheets with parchment paper. Once chilled, use a tablespoon or cookie scoop to drop balls of dough onto the sheets. Space them about 2 inches apart. Bake for 10-12 minutes, until the edges are lightly golden. The centers should still look soft. After baking, let the cookies cool on the sheets for about 5 minutes. Then, transfer them to wire racks to cool completely. To make brown butter, watch the color and smell. It should turn golden amber and smell nutty. This process takes about 5-7 minutes. Be careful not to burn it! Once it reaches that point, remove it from the heat. Let it cool slightly before mixing it with the sugars. Cooling helps the butter mix well without cooking the egg. Cookie texture matters. Avoid overmixing the dough. This can make the cookies tough. Mix until just combined for the best results. Underbaking is another issue. Bake just until the edges are golden but the centers are still soft. Chilling the dough is key too. Aim for at least 30 minutes in the fridge. This helps the cookies hold their shape and gives them a nice, chewy texture. Presentation adds a special touch. Serve the cookies on a nice plate. Drizzle a little extra maple syrup on top for sweetness. This also adds shine. Garnish with whole pecans for a fun look and extra crunch. A beautiful presentation makes your cookies even more inviting! {{image_2}} You can switch up the nuts in these cookies. Instead of pecans, try walnuts or almonds. Walnuts add a rich flavor. Almonds bring a nice crunch. Each nut gives the cookies a new taste. Just chop the nuts and fold them into the dough like you do with pecans. Want to add more flavor? Toss in some chocolate chips or dried fruits. Chocolate chips make the cookies sweet and creamy. Dried fruits, like cranberries, add a chewy texture. Both options make the cookies even more fun to eat. Mix them in just before you chill the dough. If you need gluten-free cookies, use alternative flours. Almond flour or oat flour works well. For vegan cookies, replace the egg with a flax egg. Simply mix one tablespoon of flaxseed meal with three tablespoons of water. Let it sit for a few minutes to thicken. Also, use dairy-free butter instead of regular butter. These swaps keep the flavor and texture just right. To keep your Brown Butter Maple Pecan Cookies fresh, store them in an airtight container. This prevents air from making them stale. You can layer parchment paper between the cookies to stop them from sticking together. A glass or plastic container works well for storage. To freeze the dough, scoop out the cookie balls and place them on a baking sheet. Freeze them for about an hour until solid. Then, transfer the frozen dough balls to a freezer bag. When you're ready to bake, just take out how many you want and bake them straight from the freezer. For baked cookies, let them cool completely before freezing. Place them in an airtight container or freezer bag, then seal tightly. When stored properly, these cookies last about one week at room temperature. If you freeze the dough or baked cookies, they stay good for up to three months. Just remember to label your containers with the date, so you know how long they’ve been stored. Enjoy these cookies fresh for the best flavor! Yes, you can use salted butter. However, it will change the flavor. The salt in the butter can make the cookies taste different. You may want to reduce the added salt in the recipe. This helps keep the sweet and nutty flavors balanced. If your cookies are dry, you have a few options. First, add a little milk or water to the dough. Start with a tablespoon and mix well. If the dough is still dry, add another tablespoon. You can also try baking for a shorter time. This keeps the centers soft and chewy. Chill the dough for at least 30 minutes. This helps the cookies hold their shape. If you have more time, you can chill for up to two hours. Longer chilling makes the flavors blend better and leads to better texture. In this blog post, I shared the best tips for making delicious cookies. We covered key ingredients, like brown butter and pecans, step-by-step instructions, and ways to enhance your cookie experience. Remember, proper mixing and chilling is crucial for the perfect texture. Don’t forget to explore variations and storage tips to keep your cookies fresh. Enjoy experimenting with flavors and textures. Baking cookies is a joyful and rewarding experience. So, let’s get baking!

Get ready for a treat that combines rich flavors and a crispy texture! Brown Butter Maple Pecan Cookies are not just cookies; they are pure joy in every bite. With …

Read more

Categories Desserts

Slow Cooker Sweet Chili Chicken Tacos Delightful Meal

October 15, 2025 by Chef Luca
To make these tasty tacos, you need a few key items: - 1.5 lbs boneless, skinless chicken breasts - 1 cup sweet chili sauce - 1/4 cup soy sauce - 2 tablespoons honey - 2 cloves garlic, minced - 1 teaspoon ginger, grated - 1 red bell pepper, sliced - 1 yellow bell pepper, sliced - 1 small red onion, sliced - 1 tablespoon lime juice - Corn or flour tortillas These ingredients create a sweet and spicy flavor that makes the dish shine. To make your tacos even better, consider these garnishes: - Fresh cilantro, chopped - Lime wedges - Avocado slices These add freshness and a nice touch to your meal. When picking peppers and onions, look for vibrant colors. They should feel firm and heavy. Soft spots or wrinkles mean they are old. For lime, choose ones that feel heavy for their size. A fresh lime is juicy and bright. Check the cilantro for bright green leaves. Avoid yellowing or wilting. Fresh produce makes your tacos taste great! To start, take 1.5 pounds of boneless, skinless chicken breasts. Place them at the bottom of your slow cooker. In a bowl, mix 1 cup of sweet chili sauce, 1/4 cup of soy sauce, and 2 tablespoons of honey. Add 2 cloves of minced garlic and 1 teaspoon of grated ginger. Finally, pour in 1 tablespoon of lime juice. Stir the mix until it blends well. This sauce gives a sweet and tangy taste. Now, pour the sauce over the chicken in the slow cooker. Next, add sliced red and yellow bell peppers along with a sliced red onion on top of the chicken. Cover the slow cooker. Set it on low for 6 to 7 hours or on high for 3 to 4 hours. The chicken will become tender and easy to shred with a fork. Once the chicken is cooked, take it out of the slow cooker. Use two forks to shred it into bite-sized pieces. Return the shredded chicken to the slow cooker. Stir it well to mix with the sauce and vegetables. To serve, take warm corn or flour tortillas. Fill them with the shredded chicken mixture. Top with fresh cilantro and avocado slices if you like. Squeeze fresh lime juice on top for added flavor. Enjoy your delightful tacos! To get juicy chicken, follow these tips. First, use boneless, skinless chicken breasts. They cook evenly and stay moist. Also, do not overcook the chicken. Set your slow cooker to low for 6-7 hours. If you’re in a hurry, high for 3-4 hours works too. Always shred the chicken after cooking. This helps mix it with the sauce and veggies. You can play with flavors in this recipe. Try adding more garlic for a stronger taste. A splash of lime juice adds freshness. Want it spicy? Add sliced jalapeños or a dash of hot sauce. For a smoky flavor, sprinkle in some smoked paprika. You can also switch the sweet chili sauce for barbecue sauce for a different twist. A good slow cooker is key to this dish. Choose one with a timer for easy cooking. A 6-quart slow cooker is perfect for this recipe. Use a cutting board and a sharp knife for prep. Also, grab two forks for shredding the chicken. If you want to serve warm tortillas, a tortilla warmer is handy. {{image_2}} You can switch the chicken for other proteins. Try using turkey for a leaner meal. Pork also works well, adding a nice flavor. If you prefer beef, ground beef can be a tasty choice. Just cook it until browned before adding it to the slow cooker. Fish is another option; use firm types like salmon or cod. Make sure to adjust cooking times for each protein to keep it tender. For a vegetarian meal, use jackfruit as a meat substitute. It shreds nicely and absorbs flavors well. You can also use lentils or chickpeas for added protein. For a vegan version, replace honey with maple syrup or agave. Use vegetable broth instead of chicken broth to keep it plant-based. Serve the filling on warm corn or flour tortillas for a delicious vegan taco. To change the flavor, add spices like cumin or chili powder. These spices will give your dish a warm kick. You can also mix in fresh herbs like basil or mint for a fresh taste. If you want a tangy twist, add more lime juice or some orange juice. For a spicy kick, toss in sliced jalapeños or red pepper flakes. Adjust these flavors to match your taste and enjoy a unique taco experience! After your meal, store leftovers in an airtight container. This keeps the chicken moist and tasty. You can put it in the fridge for up to three days. Make sure to cool it down first. Divide the chicken and veggies to keep them fresh longer. To freeze leftovers, place the chicken mixture in a freezer bag. Squeeze out extra air before sealing. You can freeze it for up to three months. It’s a great way to save time for busy days. Just remember to label the bag with the date. When ready to eat, thaw the chicken mixture in the fridge overnight. For quick reheating, use a microwave-safe bowl. Heat it on high for about two minutes. Stir halfway through to warm it evenly. If you prefer, you can reheat it on the stove too. Just add a splash of water to keep it from drying out. Enjoy your tasty tacos again! Yes, you can use frozen chicken for this recipe. It’s easy and saves time. Just make sure to extend the cooking time. If you use frozen chicken, set your slow cooker on high for 4-5 hours. The chicken will still turn out tender and delicious. Just remember to check for doneness. Corn or flour tortillas both work great for these tacos. Corn tortillas have a nice flavor and texture. They are gluten-free and hold up well. Flour tortillas are soft and chewy, making them easy to fold. Choose what you like best! I often use a mix of both for variety. To make this recipe spicier, add sliced jalapeños to the slow cooker. You can also use spicy chili sauce instead of sweet chili sauce. Another option is to add red pepper flakes into the sauce mix. Start with a little and taste as you go. Adjust the heat to your liking! This blog post covered making yummy Slow Cooker Sweet Chili Chicken. We talked about key ingredients and how to prepare them. You learned step-by-step cooking tips, from chicken prep to final touches. I shared variations to suit your taste, plus storage tips for leftovers. Slow cooker meals are simple and fun to make. You can enjoy this dish any time. Get creative and make it your own! Your kitchen adventures will make every meal special.

Looking for a meal that’s both easy to make and full of flavor? Try my Slow Cooker Sweet Chili Chicken Tacos! This dish brings together juicy chicken and a sweet …

Read more

Categories Dinner

Garlic Butter Gnocchi with Spinach Rich and Simple Meal

October 15, 2025 by Chef Luca
- 1 lb gnocchi (store-bought or homemade) - 4 tablespoons unsalted butter - 4 cloves garlic, minced - 5 oz fresh spinach - 1/2 teaspoon red chili flakes (optional) - Salt and black pepper to taste - 1/4 cup grated Parmesan cheese (for serving) - Fresh basil leaves for garnish Gather these ingredients before you start cooking. For the gnocchi, you can use store-bought or make your own. I often choose store-bought for ease, but homemade can bring a special touch. The butter and garlic form the base of the rich flavor. Fresh spinach adds color and nutrients, while the Parmesan cheese gives that final cheesy kick. The red chili flakes are optional, but they add a nice hint of heat. Adjust salt and pepper to your taste. Fresh basil leaves not only look great but also add a lovely aroma. This dish is simple yet packed with flavor, perfect for a quick weeknight meal or a cozy dinner. - Boil water and salt in a pot. - Add gnocchi until they float (2-3 mins). - Drain and set aside. To cook the gnocchi, fill a pot with water, adding a pinch of salt. Bring it to a boil. When the water bubbles, gently place the gnocchi in. It takes only 2 to 3 minutes for them to float. This means they are ready! Once they float, drain them well. You can set them aside while you make the garlic butter. - Melt butter over medium heat. - Add minced garlic and chili flakes. - Sauté until fragrant (1-2 mins). For the garlic butter, take a large skillet and melt the unsalted butter over medium heat. Once the butter melts and starts to bubble, add minced garlic and optional chili flakes. Stir it gently for about 1 to 2 minutes. You want the garlic to smell good but not turn brown. This step is where the magic happens, filling your kitchen with a lovely aroma. - Add cooked gnocchi to skillet. - Cook for another 2-3 mins for crispiness. - Stir in fresh spinach and wilt (1-2 mins). Now, it’s time to combine everything. Add the cooked gnocchi into the skillet with the garlic butter. Stir gently to coat them well. Cook for another 2 to 3 minutes. This makes the gnocchi crispy outside but soft inside. After that, toss in the fresh spinach. Stir until it wilts down, which takes about 1 to 2 minutes. This adds a pop of color and nutrients to your dish. To achieve the right texture for your gnocchi, cook them until they float. This usually takes about 2-3 minutes in boiling salted water. Don't leave them too long, or they may become mushy. Drain them gently to keep their shape. When adding spinach, remember to avoid overcooking it. Add the spinach right after the gnocchi. Stir it in for just 1-2 minutes. This keeps the bright green color and fresh taste. For a beautiful finish, use extra Parmesan cheese. Sprinkle it generously on top just before serving. It adds a rich flavor and looks great too. Drizzle some melted butter around the edges of the plate. This not only adds flavor but also enhances the dish's visual appeal. A couple of whole basil leaves can add a nice touch of color and freshness. {{image_2}} You can add proteins to your garlic butter gnocchi for a heartier meal. - Chicken: Sauté diced chicken breast in the garlic butter. Cook until golden brown. This adds a nice texture and flavor. - Shrimp: Toss in shrimp after cooking the garlic. Cook until they turn pink. Shrimp pairs beautifully with garlic and butter. - Tofu: For a vegetarian option, use firm tofu. Cube and sauté until crispy. This will give you a great protein boost without meat. Adding some extras can take your dish to the next level. - Sun-Dried Tomatoes: Chop them and stir in with the spinach. They add a sweet and tangy taste that contrasts well with the creamy butter. - Cheeses: Experiment with different cheeses. Try goat cheese for creaminess or mozzarella for a gooey texture. Each cheese brings its own unique flavor. These variations can make your garlic butter gnocchi with spinach more exciting and delicious! To keep your garlic butter gnocchi fresh, let them cool first. Place the gnocchi in an airtight container. This helps avoid moisture loss and keeps them tasty. You can store them in the fridge for up to three days. If you want to keep them longer, consider freezing them. Just make sure they are in a freezer-safe container. For best results, use them within three months. When you are ready to enjoy leftovers, you can reheat them safely. The best method is to use a skillet. Heat a small amount of butter or oil over medium heat. Add the gnocchi and stir gently. This keeps them crisp and flavorful. You can also use the microwave if you are in a hurry. Use a microwave-safe dish and cover it with a lid. Heat in short bursts, stirring in between. This will help maintain their texture and flavor. Yes, you can use homemade gnocchi. Making gnocchi from scratch is fun and rewarding. You need potatoes, flour, and an egg. First, boil the potatoes until soft. Peel and mash them. Then, mix in flour and the egg until you get a dough. Roll the dough into ropes and cut them into small pieces. Use a fork to shape them, creating that classic gnocchi look. Cook them just like store-bought gnocchi. They will float when ready. Fresh gnocchi has a light and fluffy texture that adds a personal touch to your dish. You can add many veggies to this dish. Try these options: - Cherry tomatoes for sweetness. - Zucchini for a fresh crunch. - Peas for color and flavor. - Mushrooms for an earthy taste. - Bell peppers for a pop of color. Just sauté them with the garlic in the butter. This keeps the flavors bright and fresh. Feel free to mix and match your favorites! Making this dish vegan is easy! Start by choosing vegan gnocchi. Many brands offer options without eggs. Replace the butter with olive oil or vegan butter. For a cheesy taste, use nutritional yeast instead of Parmesan. Add a squeeze of lemon juice for brightness. This keeps the dish rich and delicious. You can still enjoy all the tasty flavors while making it plant-based! This blog post shared simple steps to make a tasty gnocchi dish. I covered the main ingredients needed, like gnocchi, garlic, and fresh spinach. We explored cooking techniques, tips for perfect texture, and fun variations to try. Remember, cooking is about creativity. Feel free to mix and match ingredients to suit your taste. Enjoy your meal, and share it with loved ones! Cooking can be fun and delicious.

Looking for a quick yet satisfying meal? Garlic Butter Gnocchi with Spinach is a winning choice! This dish combines soft gnocchi with a rich garlic butter sauce, making it full …

Read more

Categories Dinner

Pumpkin Streusel Coffee Cake Cozy Fall Delight

October 15, 2025 by Chef Luca
- 2 cups all-purpose flour - 1 cup granulated sugar - 1 tablespoon baking powder - 1 teaspoon baking soda - 1 teaspoon ground cinnamon - ½ teaspoon ground nutmeg - ½ teaspoon salt - 1 cup canned pumpkin puree - ½ cup vegetable oil - 2 large eggs - 1 teaspoon vanilla extract - ½ cup brown sugar, packed - ½ cup rolled oats - ¼ cup all-purpose flour - 1 teaspoon ground cinnamon - ¼ cup unsalted butter, melted - ½ cup chopped walnuts or pecans (optional) Gather these ingredients before starting. The dry ingredients build the cake's base. The wet ingredients add moisture and flavor. The streusel topping gives a nice crunch. Make sure to have everything ready. This way, you can enjoy the process without rushing. Each ingredient adds to the warm, cozy flavor of fall. The pumpkin gives a rich taste, while the spices add a lovely aroma. If you like nuts, they add a nice texture to the topping. Prepare to dive into this delightful recipe! - Preheat your oven to 350°F (175°C). Grease and flour a 9x13 inch baking dish. - In a large bowl, whisk together: - 2 cups all-purpose flour - 1 cup granulated sugar - 1 tablespoon baking powder - 1 teaspoon baking soda - 1 teaspoon ground cinnamon - ½ teaspoon ground nutmeg - ½ teaspoon salt - In a separate bowl, mix: - 1 cup canned pumpkin puree - ½ cup vegetable oil - 2 large eggs - 1 teaspoon vanilla extract until smooth. - Slowly add the wet mixture to the dry mixture. Mix just until combined. - Pour the batter into the prepared baking dish. Spread it evenly with a spatula. - In a new bowl, mix: - ½ cup brown sugar, packed - ½ cup rolled oats - ¼ cup all-purpose flour - 1 teaspoon ground cinnamon - ¼ cup unsalted butter, melted - If you want, fold in: - ½ cup chopped walnuts or pecans. - Evenly sprinkle the streusel mixture over the batter. - Bake in the preheated oven for 30-35 minutes. Check doneness by inserting a toothpick. It should come out clean. - Let the cake cool in the pan for about 10 minutes. Then, transfer it to a wire rack to cool completely. How to avoid overmixing Overmixing can make your cake tough. Mix the wet and dry ingredients just until they blend. Stop as soon as you no longer see dry flour. This helps keep the cake light and fluffy. Testing for doneness To check if your cake is done, use a toothpick. Insert it in the center. If it comes out clean, your cake is ready. If it has batter on it, bake for a few more minutes. Serving suggestions Cut the coffee cake into squares. Serve warm or at room temperature. It looks lovely on a nice plate. You can also sprinkle it with extra cinnamon for a warm touch. Adding icing or whipped cream For a sweet finish, drizzle a simple icing over the cake. Mix powdered sugar with water to get a nice glaze. You can also serve it with whipped cream on the side. This adds creaminess and flavor. Adjusting spices for personal taste Feel free to change the spices to suit your taste. If you love cinnamon, add a bit more. If nutmeg isn’t your thing, leave it out. This cake is your canvas, so make it yours! Incorporating additional ingredients Want to add a twist? Stir in chocolate chips or chopped apples for extra flavor. You can also add nuts for crunch. They add great texture and taste to the cake. {{image_2}} You can change the flavors of this coffee cake to suit your taste. One fun idea is to use sweet potato puree instead of pumpkin. Sweet potato gives your cake a nice, sweet flavor. It also keeps the cake moist. You can even mix the two for a unique taste. Another option is to add chocolate or nuts. Chocolate chips bring a rich flavor that pairs well with pumpkin. Nuts like walnuts or pecans add a nice crunch. Just fold them into the batter or sprinkle them on top of the streusel. If you need gluten-free options, you can swap the all-purpose flour for a gluten-free blend. Many blends work well in this recipe. Just make sure it has a good balance of starches and proteins. Your cake will still be fluffy and tasty. For vegan adaptations, you can replace the eggs with flax eggs. Mix one tablespoon of ground flaxseed with three tablespoons of water for each egg. Let it sit for a few minutes to thicken. You can also use applesauce as a substitute for oil. This keeps your cake moist and adds a bit of natural sweetness. Using fresh pumpkin instead of canned can add a fresh taste. Roast your pumpkin until it's soft, then mash it to use in the recipe. This can give your coffee cake a nice, vibrant flavor. You can also add holiday-inspired ingredients like cranberries. They provide a tart contrast to the sweet cake. Adding a cup of fresh or dried cranberries to the batter can brighten your coffee cake for special occasions. To keep your pumpkin streusel coffee cake fresh, store it in an airtight container. This helps keep the moisture in and prevents it from drying out. You can also cover the cake with plastic wrap. If you have leftovers, keep them at room temperature for about three days. For long-term storage, you can freeze the coffee cake. First, let it cool completely. Then, wrap it tightly in plastic wrap and foil. This will prevent freezer burn. You can freeze it for up to three months. When you are ready to enjoy it, thaw it overnight in the fridge. Reheat slices in the microwave for about 15-20 seconds or in an oven at 350°F for 10 minutes. At room temperature, the cake lasts about three days. In the fridge, it can last up to a week. Always check for any signs of spoilage before eating the cake after a few days. Keeping it stored properly ensures you enjoy every flavorful bite of this cozy fall treat! Can I use fresh pumpkin instead of canned? Yes, you can use fresh pumpkin. Just cook and puree it first. This adds a fresh taste and can enhance flavor. What can I substitute for eggs? You can use applesauce, mashed bananas, or flaxseed meal mixed with water. Each option works well and keeps the cake moist. How can I make it less sweet? To cut down on sweetness, use less sugar in the batter. You can also leave out some streusel topping. Why is my cake too dense? A dense cake may come from overmixing the batter. Mix just until combined for a lighter texture. What do I do if my streusel topping is too crumbly? If it crumbles too much, add a little melted butter. This helps bind the ingredients together better. Pairing this cake with drinks This cake pairs well with coffee or chai tea. Their warmth complements the spices in the cake. Best accompaniments for serving Serve the cake with a dollop of whipped cream or a light drizzle of icing. This adds a nice touch and extra flavor. This cake blends spices, pumpkin, and streusel for a delightful treat. You now know how to mix dry and wet ingredients, prepare a perfect batter, and bake it to perfection. Remember to try the tips for flavor and presentation, too. With various storage options and creative variations, your cake will shine on any table. Enjoy creating a delicious experience for yourself and others. Happy baking!

As the leaves change and the air turns crisp, there’s no better treat than Pumpkin Streusel Coffee Cake. This cozy fall delight combines warm spices with a buttery streusel topping, …

Read more

Categories Desserts
Older posts
Newer posts
← Previous Page1 … Page8 Page9 Page10 … Page113 Next →

STIRRED RECIPES

Where every dish begins with a stir! 🍲✨

PAGES

Home About Contact Privacy Policy Terms & Conditions Cookie Policy GDPR Policy Copyright Policy Disclaimer

CATEGORIES

Appetizers Desserts Salads Breakfast Dinner

Contact

  • Pinterest
  • Mail
Copyright © 2025 Stirred Recipes. All rights reserved.