Skip to content
Stirred Recipes
  • Home
  • Appetizers
  • Desserts
  • Salads
  • Breakfast
  • Dinner
  • Privacy Policy
  • Contact
  • About

Chef Luca

Baked Orange Chicken Irresistible Flavor Every Time

June 22, 2025 by Chef Luca
To make Baked Orange Chicken, you need a few key items. Here’s the list: - 1.5 lbs chicken thighs, boneless and skinless - 1 cup fresh orange juice - 2 tablespoons orange zest - 3 tablespoons honey - 3 tablespoons low sodium soy sauce - 2 tablespoons rice vinegar - 1 tablespoon fresh ginger, grated - 3 cloves garlic, minced - 1 teaspoon cornstarch - Salt and pepper to taste These ingredients work well together to create a bright and zesty flavor. The orange juice gives the chicken a sweet and tangy taste. The soy sauce adds depth, while the ginger and garlic bring warmth. Garnishes add a nice touch to your dish. Here are some options: - 2 tablespoons sesame seeds for garnish - Fresh cilantro, chopped (for garnish) These garnishes not only look great but also enhance the flavor. The sesame seeds add a nutty crunch, while cilantro brings freshness to each bite. You can make some simple changes for a healthier version. Here are a few ideas: - Use chicken breast instead of thighs for less fat. - Swap honey for maple syrup for a different sweetness. - Replace soy sauce with coconut aminos for a lower sodium option. - Use a sugar-free orange juice if you want to cut sugar. These substitutions keep the dish tasty while making it a bit healthier. You can enjoy Baked Orange Chicken without worry. For the full recipe, check out the details above. Start by gathering all your ingredients. You need chicken thighs, fresh orange juice, and some other simple items. First, preheat your oven to 400°F (200°C). This step helps the chicken cook evenly. Next, in a medium bowl, whisk together the orange juice, orange zest, honey, soy sauce, rice vinegar, ginger, and garlic. Mix it well to make a tasty sauce. Now, take your chicken thighs and season them with salt and pepper. Place them in a baking dish. Pour the orange sauce over the chicken. Make sure every piece gets a good coating. This sauce gives the chicken a bright, zesty flavor. It's time to bake! Put the baking dish in your preheated oven. Bake the chicken for 25-30 minutes. You want the chicken to reach an internal temperature of 165°F (74°C). This ensures it is safe to eat. While baking, the sauce will bubble and soak into the chicken. This is the magic moment! Once your timer goes off, carefully remove the dish from the oven. Let the chicken rest for a few minutes. This helps keep the juices inside the meat, making it tender. While the chicken rests, thicken the sauce. In a small bowl, mix cornstarch with a tablespoon of cold water to make a slurry. Stir this into the baking dish with the juices, then return it to the oven for an extra 5 minutes. This will make the sauce nice and thick. Now, transfer the chicken to a serving platter. Drizzle the thickened sauce over the top. For a beautiful finish, garnish with sesame seeds and chopped cilantro. This adds a pop of color and taste to your dish. Serve it hot and enjoy the bright flavors of your baked orange chicken! For the complete recipe, refer to the Full Recipe section. To keep your chicken moist, start with thighs. Chicken thighs have more fat and flavor. They stay juicy while baking. You can also marinate the chicken for at least an hour. This helps the chicken soak up all the tasty flavors. If you have more time, marinate overnight in the fridge. Before baking, let the chicken sit at room temperature for 15 minutes. This helps it cook evenly. Use a meat thermometer to check for doneness. The chicken should reach 165°F (74°C). To make your sauce thicker, use cornstarch. Mix one teaspoon of cornstarch with a tablespoon of cold water. Stir this mixture into your sauce. Add it near the end of baking. This will help the sauce become nice and thick. You can also simmer the sauce on the stove. This will reduce it and make it richer. If you want even more flavor, consider adding a splash of orange juice or soy sauce while reducing. To enhance the flavor, use fresh ingredients whenever possible. Fresh ginger and garlic make a big difference. You can also add a pinch of red pepper flakes for a little heat. Try adding more herbs, like cilantro or green onions, for a fresh taste. For a fun twist, add chopped nuts for crunch. Don't forget to let the sauce shine! Drizzle some over your rice or quinoa for a burst of flavor. For the full recipe, check out the instructions above. Enjoy your cooking! {{image_2}} You can easily add heat to your baked orange chicken. To make it spicy, mix in some red pepper flakes to the sauce. Start with half a teaspoon and adjust to your taste. You can also add sriracha or chili paste for a bolder kick. This spice gives the dish an extra zing that balances the sweetness of the orange. You don’t have to stick with chicken thighs. Feel free to use chicken breasts for a leaner option. If you're in the mood for something different, try shrimp or tofu. Shrimp cooks quickly, so reduce the baking time to around 10-15 minutes. Tofu absorbs flavors well and gives a nice texture when baked. For a plant-based twist, swap chicken for chickpeas or tempeh. Both options soak up the orange sauce nicely. Make sure to press the tofu for a firmer texture. You can also use cauliflower florets for a hearty bite. The key is to ensure your protein is well-coated in the orange sauce to get that delicious flavor. For the full recipe, check out the complete list of ingredients and steps. After enjoying your Baked Orange Chicken, let it cool down. Place leftovers in an airtight container. Store it in the fridge for up to four days. This keeps the chicken fresh and tasty. To reheat, use your oven for the best results. Preheat it to 350°F (175°C). Place the chicken on a baking sheet, cover it with foil, and heat for about 15-20 minutes. This warms it without drying it out. You can also microwave it. Just heat on medium power in short bursts until hot. Stir in some extra sauce to keep it moist. If you have extra Baked Orange Chicken, freezing is a great choice. Slice the chicken into portions. Wrap each piece in plastic wrap, then place them in a freezer bag. Squeeze out the air, and seal it tight. You can store it for up to three months. When ready to eat, thaw it overnight in the fridge. Then, reheat it as explained above. This way, you can enjoy this dish anytime! Don't forget to check out the Full Recipe for more delicious details. Yes, you can use chicken breast. However, thighs stay juicier and more tender. If you choose breasts, keep an eye on the bake time. Chicken breasts cook faster and can dry out. Make sure they reach 165°F (74°C) for safety and taste. Bake your orange chicken for 25 to 30 minutes at 400°F (200°C). Check for doneness using a meat thermometer. The internal temperature should hit 165°F (74°C). This timing ensures a juicy and flavorful dish. Always let it rest before serving to keep it moist. I love serving Baked Orange Chicken over jasmine rice or quinoa. The rice soaks up the delicious sauce. Add some sautéed vegetables on the side for color and crunch. You can also drizzle extra sauce over everything for more flavor. For a zesty touch, add fresh orange slices as a garnish. Check out the Full Recipe for more serving ideas! In this post, we covered how to make baked orange chicken. We discussed essential ingredients, optional garnishes, and healthier substitutions. You learned step-by-step baking directions and tips for juicy chicken. Variations included spicy options and veggie alternatives. Finally, we explored storage and reheating tips for leftovers. Baked orange chicken is simple and tasty. With these steps, you can enjoy it any time. I hope you feel inspired to try new flavors and make it your own!

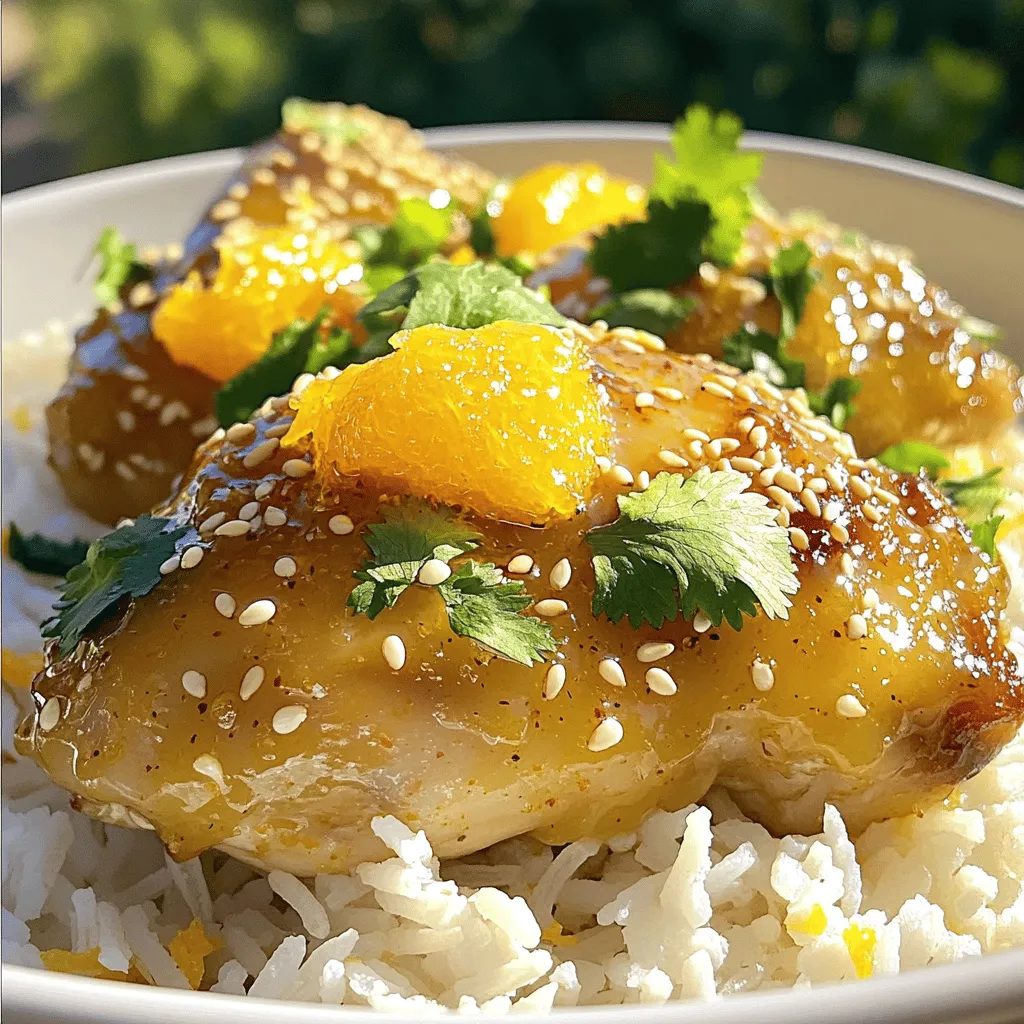
Welcome to the delicious world of Baked Orange Chicken! This dish packs a punch of flavor and is easy to make. With juicy chicken coated in a tangy, sweet sauce, …

Read more

Categories Dinner

Quick and Easy Baked Lemon Pepper Chicken Delight

June 22, 2025 by Chef Luca
To make Quick and Easy Baked Lemon Pepper Chicken, you will need: - 4 boneless, skinless chicken breasts - 3 tablespoons olive oil - Zest of 2 lemons - 1/4 cup fresh lemon juice (about 2 lemons) - 2 teaspoons garlic powder - 1 teaspoon onion powder - 2 teaspoons black pepper - 1 teaspoon sea salt - 1 teaspoon dried oregano - Fresh parsley, chopped (for garnish) When choosing chicken, look for fresh, bright meat. Check for any discoloration. Select lemons that feel heavy for their size. This means they have more juice. Fresh herbs always add great flavor. If you can, buy organic olive oil for the best taste. You can swap chicken breasts for thighs if you like more flavor. Use lemon juice from a bottle if fresh lemons aren’t handy. You can replace olive oil with avocado oil for a different taste. If you don’t have garlic powder, fresh garlic works well too. Just mince a clove or two. You can also use dried thyme or basil in place of oregano for a twist. For a kick, add some crushed red pepper flakes. First, gather all your ingredients. You need: - 4 boneless, skinless chicken breasts - 3 tablespoons olive oil - Zest of 2 lemons - 1/4 cup fresh lemon juice (about 2 lemons) - 2 teaspoons garlic powder - 1 teaspoon onion powder - 2 teaspoons black pepper - 1 teaspoon sea salt - 1 teaspoon dried oregano - Fresh parsley, chopped (for garnish) Make sure your chicken is fresh and thawed. Rinse it gently under cold water. Pat it dry with paper towels. This helps the marinade stick well. Next, zest the lemons using a grater. Be careful not to grate the white pith; it tastes bitter. Squeeze the juice from the lemons into a measuring cup. Measure out 1/4 cup of juice for the marinade. Now, it's time to cook! Preheat your oven to 400°F (200°C). While it heats, mix the marinade. In a small bowl, whisk the olive oil, lemon zest, lemon juice, garlic powder, onion powder, black pepper, sea salt, and dried oregano until smooth. Place the chicken breasts on a baking sheet lined with parchment paper. Pour the marinade over the chicken. Make sure each piece is covered. Let it sit for at least 15 minutes. If you can wait longer, refrigerate it for up to 1 hour. This makes the flavors richer. Once marinated, bake the chicken in the oven for 20-25 minutes. Watch closely! It should be golden and juicy. Remove the chicken when it’s done. To check if your chicken is done, use a meat thermometer. Insert it into the thickest part of the chicken. It should read 165°F (75°C). If you don’t have a thermometer, cut into the chicken. If the juices run clear, it’s ready. After baking, let the chicken rest for 5 minutes. This keeps it juicy. Garnish with fresh parsley before serving. Enjoy your zesty lemon pepper chicken delight! For the Full Recipe, check back at the top of the article. For juicy chicken, choose fresh, high-quality breasts. Look for firm texture and good color. Pat them dry before marinating. This helps the marinade stick well. A good marinade is key to flavor. The mix of lemon and spices creates a tasty dish. Marinate the chicken for at least 15 minutes. If you can wait, try for an hour. This extra time lets the flavors soak in deeply. You can even marinate it overnight for a stronger taste. Just keep it in the fridge during this time. Use a baking sheet lined with parchment paper. This helps with cleanup and prevents sticking. A whisk is great for mixing the marinade. An instant-read thermometer is also useful. It tells you when the chicken reaches 165°F (75°C). This ensures it's safe to eat. For serving, a sharp knife makes slicing easy. Don't forget to have a cutting board handy! {{image_2}} You can make this baked lemon pepper chicken even better. Try adding fresh herbs. Rosemary and thyme work well with lemon. You can mix in some paprika for extra flavor. If you like heat, add a pinch of red pepper flakes. These small changes can make a big difference. Want to switch things up? You can grill the chicken instead of baking it. Simply marinate the chicken as before, then place it on a hot grill. Cook each side for about 6-8 minutes. You can also use a stovetop skillet. Heat some oil in the pan and sear the chicken for about 5 minutes on each side. Both methods give a nice, smoky flavor. Pair this chicken with great side dishes. Roasted veggies make a colorful plate. Garlic mashed potatoes are creamy and comforting. You could also serve a fresh salad with lemon vinaigrette. Rice or quinoa adds a nice touch too. These sides balance the bright lemon flavor and create a lovely meal. Enjoy your cooking adventure! After you enjoy your baked lemon pepper chicken, let it cool. Place leftovers in an airtight container. Keep them in the fridge for up to three days. If you want the chicken to stay fresh longer, you can freeze it. To reheat, take the chicken out of the fridge. Preheat your oven to 350°F (175°C). Place the chicken on a baking sheet. Cover it with foil to keep it moist. Heat for about 15-20 minutes. Check that it’s warm all the way through. You can also use a microwave, but it may dry out. If you freeze baked lemon pepper chicken, wrap it tightly in plastic wrap. Then place it in a freezer bag. This helps to avoid freezer burn. It can stay fresh for up to three months. When you want to eat it, thaw it overnight in the fridge. Then reheat as mentioned above. Bake the chicken for 20-25 minutes at 400°F (200°C). Check the internal temperature. It should reach 165°F (75°C). The chicken will be juicy and tender when cooked properly. Yes, you can use bone-in chicken. Adjust the baking time to about 30-40 minutes. Always check the internal temperature. Bone-in chicken may take longer to cook. Lemon pepper chicken pairs well with many sides. Try roasted vegetables, rice, or a fresh salad. Mashed potatoes also make a great choice. Each adds flavor to your meal. Absolutely! This recipe is great for meal prep. Cook a batch and store it in the fridge. The chicken stays tasty for up to four days. Reheat it for quick lunches or dinners. You can find the Full Recipe in the article above. It includes all the steps and ingredients needed to create this delicious dish. Enjoy your cooking! This guide covered all you need for cooking chicken. We discussed key ingredients, cooking steps, and essential tips. You learned about flavor tweaks and storage tips too. Remember, the right ingredients and tools matter. They make your dish shine. With careful prep and cooking, you'll create tasty meals. Enjoy your cooking adventure and share it with friends!

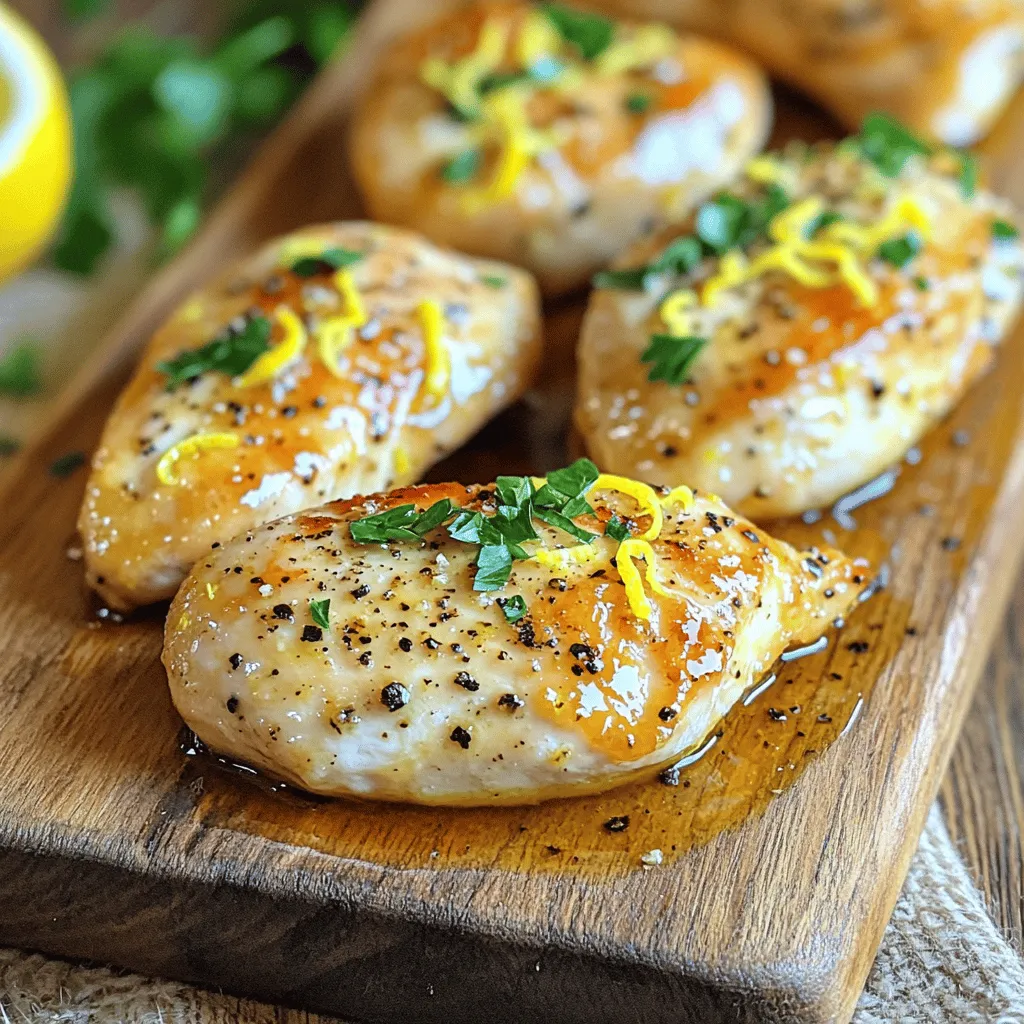
If you’re craving a tasty meal that won’t take hours to prepare, you’re in the right place! My Quick and Easy Baked Lemon Pepper Chicken Delight is a simple, flavorful …

Read more

Categories Dinner

Peach Pie Crumble Bars Tasty and Simple Dessert Treat

June 22, 2025 by Chef Luca
To make these tasty bars, gather these key ingredients: - 2 cups all-purpose flour - 1 cup rolled oats - 1/2 cup brown sugar, packed - 1/2 cup granulated sugar - 1 teaspoon baking powder - 1/2 teaspoon salt - 1 cup unsalted butter, softened - 2 cups fresh peaches, peeled and diced - 1 tablespoon lemon juice - 2 tablespoons cornstarch - 1 teaspoon cinnamon - 1/2 teaspoon nutmeg - 1/2 teaspoon vanilla extract Each ingredient plays a vital role in the flavor and texture of the bars. The flour and oats create a sturdy base, while the sugars add sweetness. Brown sugar gives a rich, caramel-like taste. The baking powder and salt help the bars rise and balance the flavors. Fresh peaches are the star of this dish. Peeling and dicing them makes them easy to mix in. The lemon juice brightens the peach flavor and adds a nice zing. Cornstarch thickens the filling, helping it stay together. Cinnamon and nutmeg bring warmth and depth. To make this easy recipe, you will need: - Mixing bowl - Baking dish (9x13 inches) - Parchment paper (for easy removal) - Measuring cups and spoons Using the right tools makes cooking smoother. A good mixing bowl helps blend ingredients well. A baking dish of the right size ensures even cooking. Parchment paper helps you remove the bars without breaking them. Measuring cups are key for accuracy in baking. For the full recipe, check out the details on how to put these ingredients together! - Preheat your oven to 350°F (175°C). - Grease or line your baking dish with parchment paper. Start by getting your oven hot. This helps the bars bake evenly. Greasing or lining the dish makes it easy to remove the bars later. I like using parchment paper because it prevents sticking. - Combine dry ingredients and mix well. - Mix in butter until crumbly. In a mixing bowl, combine the flour, oats, brown sugar, granulated sugar, baking powder, and salt. Stir it all together so everything is mixed evenly. Then, add in the softened butter. Use your fingers or a fork to mix it until you see small clumps. This gives your crust a nice crumbly texture. - Coat diced peaches with lemon juice and spices. - Mix in cornstarch for thickening. Next, take your fresh peaches and dice them into small pieces. In a bowl, mix the diced peaches with lemon juice and spices. This adds flavor and stops the peaches from browning. After that, stir in the cornstarch. This will help thicken the filling while it bakes. - Press crumb mixture into the baking dish. - Layer with peach filling and topping. Now, take the crumb mixture and press it down evenly into the bottom of your baking dish. This will be your crust. Then, pour the peach filling over the crust, spreading it out evenly. Finally, sprinkle the leftover crumb mixture on top of the peaches. - Bake for 30-35 minutes until golden brown. - Let cool before slicing. Place the dish in the oven and bake for 30 to 35 minutes. You want the topping to be golden brown and the peach filling to bubble. Once done, take it out and let it cool for about 30 minutes before slicing. This helps the bars set and makes them easier to cut. For the full recipe, check the detailed instructions above. To bake the best peach pie crumble bars, make sure you spread the mixture evenly. This helps the bars cook uniformly. Keep an eye on the oven as they bake. You want a golden brown topping. If it looks pale, give it a few more minutes. Start by dicing your peaches properly. Cut them into small, even pieces. This helps them cook evenly and blend well with the other flavors. Also, use room-temperature butter. It mixes better with the dry ingredients, creating a nice crumbly texture. You can enhance the flavor by adding nuts or spices. Chopped pecans or walnuts add a nice crunch. A pinch of ginger or cardamom can bring warmth to the dish. If you want to reduce sugar, try using alternative sweeteners like honey or maple syrup. These can add unique flavors and keep your bars sweet without being too sugary. For more details, check the Full Recipe. {{image_2}} To make gluten-free peach pie crumble bars, start by substituting all-purpose flour with gluten-free flour. This swap keeps the texture light and tasty. Make sure to use certified gluten-free oats as well. Not all oats are gluten-free, so this step is key for safety and flavor. For a vegan version, you can replace the butter with coconut oil or vegan butter. Both options work well and add a nice flavor. Instead of eggs, use flaxseed or chia seeds as substitutes. Mix 1 tablespoon of either seed with 2.5 tablespoons of water. Let it sit until it thickens, then add it to your dough. You can switch up the fruit in your bars based on the season. Use berries or apples for a fun twist. Each fruit brings its own taste and texture. You can also adapt the spices for these alternatives. For berries, try adding lemon zest instead of cinnamon. For apples, a pinch of nutmeg pairs perfectly. These variations keep your dessert fresh and exciting! For the full recipe, check out the detailed instructions and tips. To keep your peach pie crumble bars fresh, store them in an airtight container. This will help prevent them from drying out. You can keep them at room temperature for a few days. If you want to store them longer, place them in the fridge. For freezing, wrap each bar in plastic wrap, then place them in a freezer-safe bag. This keeps them safe from freezer burn. At room temperature, these bars last about 3 days. In the fridge, they can stay fresh for up to a week. When you freeze them, they can last for 3 months. To thaw them, just take them out of the freezer and let them sit at room temperature for a few hours. You can also heat them in the microwave for a quick treat. To reheat your bars, place them in the oven at 350°F (175°C) for about 10 minutes. This will help restore their crisp topping. You can also enjoy leftover bars with yogurt or ice cream. Crumble them on top of vanilla ice cream for a tasty twist. You can even use them as a filling for pancakes or waffles! For the full recipe, check out the [Full Recipe]. Yes, you can make Peach Pie Crumble Bars ahead of time. To do this, bake the bars as directed. Once they cool, store them in an airtight container. Keep them in the fridge if you plan to eat them within a week. If you want to store them longer, freeze them. Wrap the bars tightly in plastic wrap, then place them in a freezer-safe bag. They can last up to three months in the freezer. Just remember to thaw them in the fridge before enjoying. You can tell the bars are done when the topping turns golden brown. Look for bubbling around the edges of the peach filling. This bubbling shows the fruit is hot and cooked through. A toothpick can help too. Insert it into the center; if it comes out clean, your bars are ready. Make sure to keep an eye on them towards the end of baking for perfect results. Absolutely, you can use frozen peaches in this recipe. Just make sure to thaw them first and drain any excess liquid. You may need to add a bit more cornstarch to help thicken the filling. This will prevent the bars from being too soggy. Frozen peaches can taste just as good, especially when fresh ones are out of season. To slice the bars neatly, let them cool completely in the pan. Use a sharp knife to cut through the bars. A gentle sawing motion helps avoid crumbling. For even cleaner cuts, dip the knife in warm water between slices. Wipe it dry before making the next cut. This technique keeps the crumbs from falling apart and gives you beautiful squares. Peach pie crumble bars are simple and tasty. You need fresh ingredients like peaches, flour, and oats. The steps are easy: mix, layer, and bake. Use tips to make them even better, like adding nuts or spices. You can also try gluten-free or vegan options. Store them right for long-lasting flavor. Enjoy your peach pie crumble bars fresh or in new desserts. Now, get baking and savor the deliciousness!

Craving a sweet treat that’s both simple and delicious? Let me introduce you to my Peach Pie Crumble Bars! These bars bring a taste of summer right to your kitchen …

Read more

Categories Desserts

Tomato Eggplant Pie Flavorful and Simple Delight

June 22, 2025 by Chef Luca
To make a great Tomato Eggplant Pie, you need fresh and simple ingredients. Here’s what you’ll need: - 1 large eggplant, sliced into ¼-inch rounds - 2 large tomatoes, sliced - 1 large onion, finely chopped - 2 cloves garlic, minced - 1 cup ricotta cheese - 1 cup shredded mozzarella cheese - 4 sheets of phyllo dough (or a pre-made pie crust) - 2 tablespoons olive oil - 1 teaspoon dried oregano - 1 teaspoon dried basil - Salt and pepper to taste - Fresh basil leaves for garnish These ingredients combine to create a delicious and hearty dish. You can change up the recipe based on your taste. Here are some tasty options: - Spinach or kale for added greens - Feta cheese for a tangy kick - Zucchini slices for extra texture - Red pepper flakes for heat - Fresh herbs like thyme or parsley for brighter flavors Feel free to mix and match these ingredients to make the pie your own. Having the right tools makes cooking easier. For this recipe, you will need: - A sharp knife for slicing - A cutting board for prep work - A skillet for sautéing - A mixing bowl for the cheese - A pie pan for baking - A pastry brush for olive oil - An oven for baking These tools will help you create the perfect pie without any stress. For the full recipe, check out the details above! To start, you need to prep your veggies. Slice one large eggplant into ¼-inch rounds. This makes it easy to cook. Next, slice two large tomatoes. Chop one large onion finely and mince two cloves of garlic. Heat two tablespoons of olive oil in a skillet over medium heat. Add the onion and garlic, stirring them until the onion turns soft and clear. This should take about five minutes. Then, add the eggplant to the skillet. Cook until it becomes soft, around eight to ten minutes. Season with salt, pepper, oregano, and basil. Then set the mixture aside to cool. Now it’s time to build your pie. In a bowl, mix one cup of ricotta cheese with salt, pepper, and half of the shredded mozzarella cheese. Stir this until it blends well. If using phyllo dough, layer two sheets in a pie pan, brushing each with olive oil. For a pre-made crust, just place it in the pan. Spread the ricotta mixture on the crust. Then, layer the sautéed eggplant mixture over it. Finally, place the sliced tomatoes on top and sprinkle the remaining mozzarella cheese. Now, let’s bake! If you used phyllo, add two more sheets on top, brushing with olive oil. Fold in any edges to seal the filling. Preheat your oven to 375°F (190°C). Bake the pie for 30 to 35 minutes, or until it is golden and bubbly. Once done, let it cool for about ten minutes before slicing. For a nice touch, you can add fresh basil leaves on top before serving. Enjoy your Tomato Eggplant Pie, a flavorful and simple delight! For the full recipe, check the earlier section. To keep your crust crisp, you must prepare it right. If using phyllo dough, brush each layer with olive oil. This adds flavor and helps seal in moisture. If you prefer a pie crust, pre-bake it for 10 minutes. This step makes it firmer, so it won’t get soggy. To really bring out the taste, season your veggies well. Salt and pepper are key, but don’t stop there. Use fresh herbs or even lemon zest for a bright touch. I love adding a pinch of chili flakes for a slight kick. Mix these flavors into the ricotta cheese for a richer taste. A beautiful pie makes any meal special. After baking, let it cool for 10 minutes. This helps the layers set. When you slice it, each piece should hold its shape. Garnish with fresh basil leaves for color and aroma. You can also drizzle olive oil or balsamic glaze on top. For more ideas, check out the Full Recipe! {{image_2}} You can easily make this pie more veggie-packed. Try adding zucchini, bell peppers, or spinach. Just slice them thin and layer them with the eggplant and tomatoes. If you want a bolder taste, add some fresh herbs like thyme or parsley. Each veggie brings a new flavor, making your pie unique every time. For a gluten-free version, swap out the phyllo dough or pie crust. Use gluten-free pie crusts that you can buy at stores or make your own from almond flour or coconut flour. Another tasty option is to skip the crust altogether and bake the filling in a greased pie dish. This keeps it simple and still delicious! To elevate your Tomato Eggplant Pie, think about extra toppings. You could sprinkle some feta or goat cheese on top for a salty kick. Try adding olives or sun-dried tomatoes for a Mediterranean twist. If you love crunch, add some toasted pine nuts or breadcrumbs on top before baking. These toppings can transform your pie into a gourmet dish! To store leftovers, let the pie cool completely. Then, wrap it tightly in plastic wrap. You can also place it in an airtight container. This keeps the pie fresh for up to three days in the fridge. Reheat slices in the oven for the best taste. Set your oven to 350°F (175°C). Place the pie on a baking sheet and cover it with foil. Heat for about 15-20 minutes. This helps keep the crust crispy. If you want to freeze the pie, slice it first. Wrap each slice in plastic wrap, then place in a freezer bag. Squeeze out as much air as possible. The pie can last up to three months in the freezer. When ready to eat, thaw in the fridge overnight. Reheat it in the oven as mentioned above for great results. Yes, you can try different cheeses. Feta adds a nice tang. Goat cheese has a creamy texture. You could even use cheddar for a sharper flavor. Remember, each cheese changes the taste. Mix and match to find your favorite! You can prep the pie a day before. Make the filling and assemble the pie. Cover it and store it in the fridge. Bake it the next day when you are ready to serve. This makes it super easy for gatherings! This pie pairs well with a fresh salad. A simple green salad with lemon dressing works great. You can also enjoy it with garlic bread or a side of roasted vegetables. These sides balance the flavors and add more color to your plate. For the full recipe, you can check out the detailed instructions above. This blog post covered everything you need to make a great Tomato Eggplant Pie. We looked at the ingredients, including optional ones for your taste. The step-by-step guide showed you how to prep, assemble, and bake the pie. I shared tips to avoid soggy bottoms and enhance flavor. You can even explore veggie and gluten-free options. Don’t forget how to store your pie for later. Use this guide to impress your friends and family with a delicious dish you made from scratch. Enjoy your cooking!

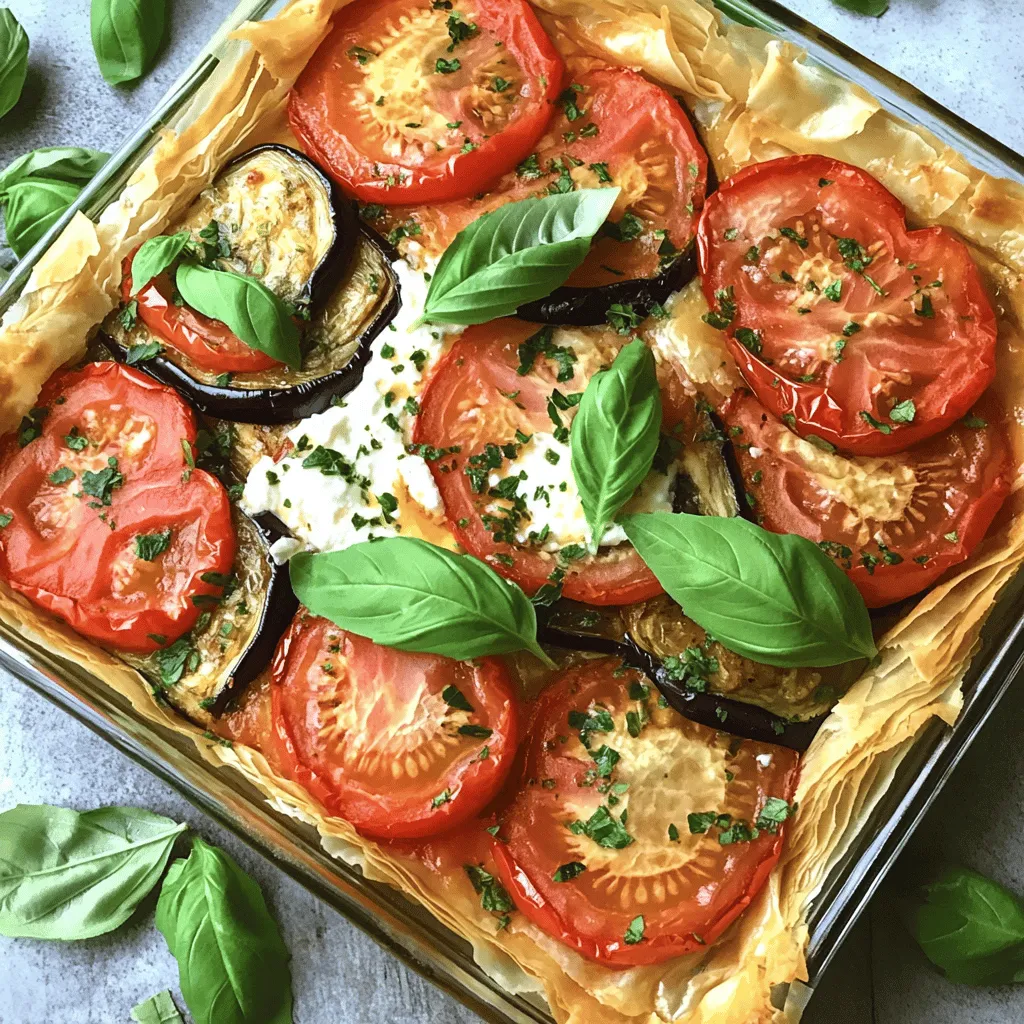
Are you ready to dive into a dish that bursts with flavor? Tomato Eggplant Pie is a simple yet delightful way to enjoy fresh veggies. You’ll love how easy it …

Read more

Categories Dinner

Garlic Dill Pickles Crunchy and Flavorful Recipe

June 22, 2025 by Chef Luca
To make crunchy garlic dill pickles, gather these key items: - 1 pound small cucumbers (preferably pickling cucumbers) - 4 cups water - 1 cup distilled white vinegar - 3 tablespoons kosher salt - 4 garlic cloves, peeled and smashed - 2 tablespoons sugar - 2 teaspoons dill seeds - 1 teaspoon black peppercorns - 1 teaspoon mustard seeds - 1/2 teaspoon red pepper flakes (optional for heat) - Fresh dill sprigs (for garnish) These ingredients work together to create a tangy and crisp pickle. The cucumbers are the stars of this recipe, soaking up the brine to get full flavor. You can add some extra zing with optional ingredients: - A few slices of jalapeño for spice - A pinch of turmeric for color - Fresh herbs like thyme or bay leaves These additions can help you customize your pickles to match your taste. Feel free to experiment and find what you love! If you have allergies or dietary needs, there are easy swaps: - Use sea salt instead of kosher salt if needed. - Substitute apple cider vinegar for a milder taste. - If you're avoiding sugar, try honey or a sugar substitute. These substitutions help you enjoy garlic dill pickles while keeping them safe for everyone. Remember, the key is to keep the basic balance of ingredients to ensure great flavor! Start by rinsing the cucumbers under cold water. This helps remove dirt. Trim the ends of each cucumber to prepare them for pickling. You can slice them into spears or keep them whole. Whole cucumbers hold more crunch. In a large saucepan, mix the water, vinegar, kosher salt, and sugar. Heat this over medium heat. Stir until the salt and sugar dissolve completely. Once done, remove the pan from the heat. Let the brine cool to room temperature. This step is key for great flavor. While the brine cools, prepare your jars. Sterilize a quart-sized mason jar or two pint-sized jars. Boil them in water for 10 minutes or run them through a hot dishwasher cycle. This keeps your pickles safe to eat. Now, add the smashed garlic cloves, dill seeds, black peppercorns, mustard seeds, and optional red pepper flakes to the bottom of the jar(s). Carefully pack the cucumbers into the jar, laying them on top of the spices. Next, pour the cooled brine over the cucumbers. Make sure they are fully submerged. Top with fresh dill sprigs and seal the jar(s) with a lid. Place the pickles in the fridge for at least 24 hours. This time allows the flavors to meld together. Enjoy the full recipe for a delightful treat! To keep your pickles crunchy, choose firm cucumbers. Look for pickling cucumbers, as they are crispier. Always soak them in cold water for a few hours before pickling. This step helps them stay firm in the brine. Avoid overcooking your brine. High heat can soften the cucumbers. Once you pack the cucumbers in jars, make sure the brine covers them completely. This helps with that perfect crunch. After making your garlic dill pickles, let them sit for at least 24 hours. This waiting time allows the flavors to mix well. The longer you wait, the better the taste. You can start tasting them after one day, but they will get even better after a week. If you can wait a bit longer, they will burst with flavor! Sterilizing your jars keeps your pickles safe to eat. Boil your jars in water for 10 minutes to sterilize them. You can also run them through a hot dishwasher cycle. Make sure your jars are completely dry before adding the cucumbers. A clean environment stops bacteria from ruining your delicious pickles. Always use new lids to ensure a good seal. {{image_2}} Want to add some heat? You can make spicy garlic dill pickles. Just add more red pepper flakes to your brine. Start with one teaspoon and taste. You can always add more! You can also add sliced jalapeños for extra spice. This gives your pickles a fun kick that many enjoy. If you like sweet and sour, try sweet garlic dill pickles. You can add more sugar to the brine. Start with an extra tablespoon. This will balance the vinegar’s bite with sweetness. Some people even add a splash of apple cider vinegar for a twist. This variation is perfect for those who want a different flavor. You can also mix in seasonal herbs to your pickles. Fresh herbs like thyme, oregano, or basil can enhance the taste. Just toss a few sprigs into the jar with the cucumbers. Dill is classic, but experimenting with other herbs keeps things exciting. You can create unique flavors with simple changes! For more ideas, check the Full Recipe. Enjoy exploring these variations! After making your garlic dill pickles, store them in the fridge. The cold slows down spoilage. Keep the jar tightly sealed to keep the pickles fresh. This way, they stay crunchy and flavorful. It's best to consume them within a few weeks for optimal taste. If you store your garlic dill pickles correctly, they can last up to three months in the fridge. The longer they sit, the more flavorful they become. However, it's best to enjoy them within the first month for that fresh crunch. Always check for any off smells or mold before eating. Freezing pickles is not recommended. They lose their crunch and taste once thawed. Instead, can them for long-term storage. Use sterilized jars and a proper canning process. This way, you can keep your garlic dill pickles for a year or more. Make sure to follow safe canning practices to prevent spoilage. For the full recipe, refer to the section above. Garlic dill pickles offer many health benefits. First, they are low in calories. This makes them a great snack choice. They also contain probiotics. Probiotics help your gut stay healthy. Garlic adds more benefits. It can boost your immune system. Dill has antioxidants. These help fight inflammation. Overall, these pickles support digestion and health. You can use regular cucumbers, but pickling cucumbers work best. Pickling cucumbers are smaller and crunchier. They have fewer seeds, making them ideal for pickling. Regular cucumbers might be softer and less crisp. If you choose regular cucumbers, look for firm ones. You want them to hold their shape during pickling. Check your pickles for signs of spoilage. If they smell bad or look cloudy, discard them. If you see bubbles or foam, they may not be safe. A good pickle should be firm and crisp. If they feel mushy, throw them out. Always store pickles in the fridge after opening. This keeps them fresh longer. Making garlic dill pickles is easy and fun. We covered the key steps, from choosing ingredients to ensuring a crunchy texture. You learned how to prepare brine and pack jars right. Don't forget the flavor options and storage tips for long-lasting pickles. By following these steps, you can enjoy tasty pickles at home. Explore the variations to find your favorite. This guide gives you the tools needed for success. Happy pickling!

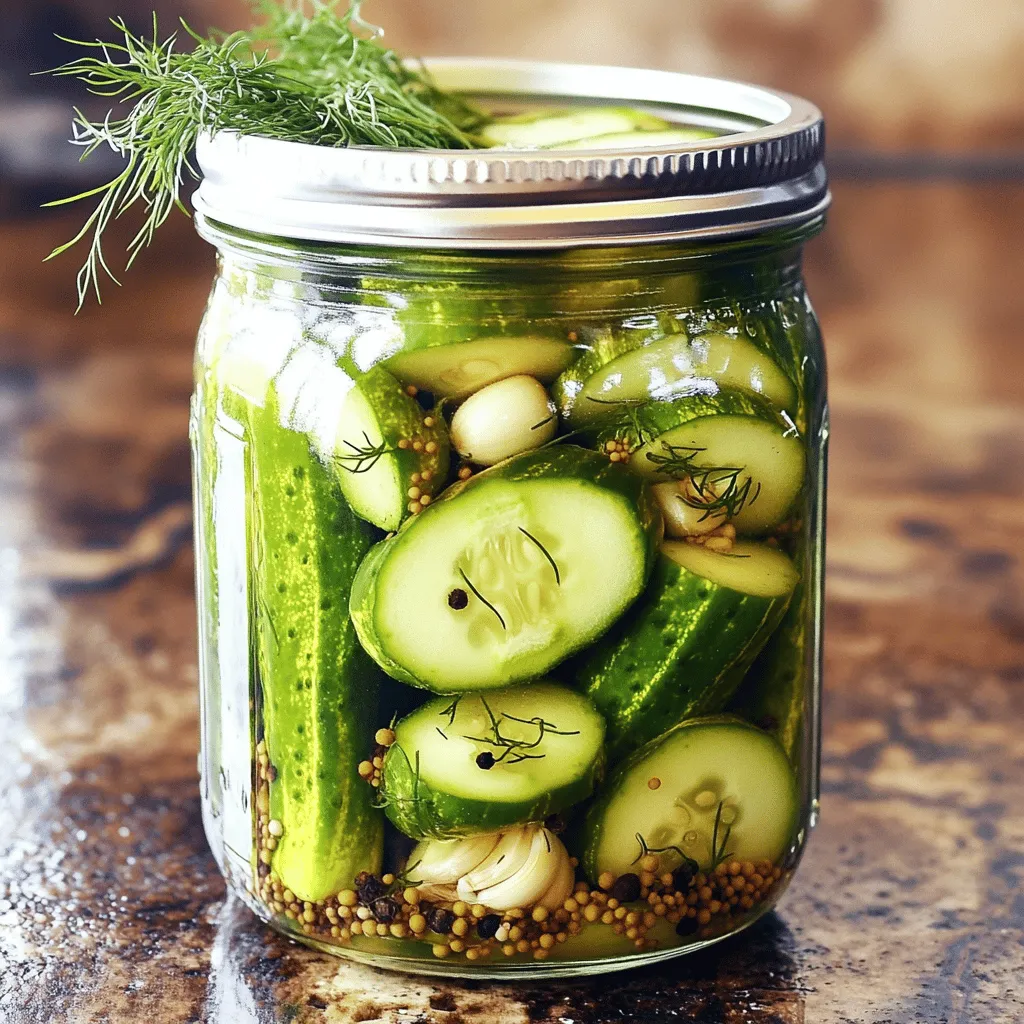
Are you ready to make crunchy and flavorful garlic dill pickles at home? This simple recipe transforms fresh cucumbers into tangy bites you’ll love. With easy steps and common ingredients, …

Read more

Categories Appetizers

Quick Pickled Red Onions Simple and Flavorful Recipe

June 22, 2025 by Chef Luca
For quick pickled red onions, gather these simple ingredients: - 1 large red onion, thinly sliced - 1 cup apple cider vinegar - 1 cup water - 2 tablespoons sugar - 1 teaspoon salt - 1 teaspoon black peppercorns - 3 cloves garlic, peeled and smashed - ½ teaspoon crushed red pepper flakes (optional) - Fresh herbs for garnish (like cilantro or parsley) You can swap out some ingredients if needed. Try these alternatives: - Use white vinegar instead of apple cider vinegar for a sharper taste. - Honey or maple syrup can replace sugar for a natural sweetener. - Sea salt works well in place of regular salt. - Red onion can be replaced with thinly sliced shallots for a milder flavor. To make pickled onions, you will need a few handy tools: - A sharp knife or mandoline for slicing the onion. - A medium saucepan to heat the pickling liquid. - A clean glass jar or container to store the pickled onions. - A fork for pressing the onions down in the jar. These tools make the process quick and easy! For the full recipe, check out the instructions above. To start, grab one large red onion. Peel it and slice it thinly. A sharp knife or a mandoline works well for this. Thin slices soak up the brine better. Next, mix the pickling liquid. In a medium saucepan, combine 1 cup of apple cider vinegar and 1 cup of water. Add 2 tablespoons of sugar and 1 teaspoon of salt. Toss in 1 teaspoon of black peppercorns and 3 smashed garlic cloves. For some heat, you can add ½ teaspoon of crushed red pepper flakes. Heat the mixture over medium heat. Stir occasionally until the sugar and salt dissolve completely. This only takes a few minutes. Once dissolved, remove the saucepan from heat and let it cool for about 10 minutes. Now it's time to pack the onions. Place the sliced red onions in a clean glass jar. Pour the pickling liquid over the onions. Make sure the onions are fully submerged. If they float, gently press them down with a fork. Seal the jar tightly. Allow the jar to cool to room temperature. This helps the flavors mix well. After that, place it in the refrigerator. For the best flavor, let the onions pickle for at least 30 minutes. However, if you can wait, let them sit for a few hours or even overnight. The longer they sit, the better they taste. You can find this method in the Full Recipe. Enjoy your quick pickled red onions! To get the best slices, start with a sharp knife. A dull knife makes it hard to cut cleanly. Slice the onion in half from top to bottom. Lay each half flat on the cutting board. Cut thin slices from root to tip. Aim for about 1/8 inch thick. For even slices, use a mandoline. This tool makes quick work of slicing and keeps them uniform. Want more flavor in your pickled onions? Try adding spices like cumin or coriander. Fresh herbs like dill or thyme also work well. You can add citrus zest for a bright kick. For a sweeter taste, use honey instead of sugar. If you like heat, toss in more crushed red pepper flakes. Each addition gives a unique twist to your pickled onions. Make your pickled onions shine with a pretty display. Use a clear glass jar to show off the vibrant color. Add fresh herbs on top for a pop of green. Serve them in small bowls beside your main dish. They add color and flavor to tacos, salads, and sandwiches. Let your food look as good as it tastes! {{image_2}} You can add many herbs and spices to your pickled red onions. Try using fresh cilantro, dill, or thyme for a burst of flavor. When you want a kick, add some mustard seeds or cumin. Each spice brings out a unique taste. Experiment with what you love! While apple cider vinegar is my go-to, you can try other vinegars. White vinegar gives a sharper taste. Rice vinegar adds a mild sweetness. Balsamic vinegar offers a rich, complex flavor. Each vinegar changes the pickling experience, so feel free to mix it up! Want to make your quick pickles even better? Consider adding sliced jalapeños for heat or diced carrots for crunch. You can also try adding a pinch of sugar to sweeten the mix. Sliced ginger or citrus peels can bring a fresh twist. These fun add-ins can enhance the pickled onions and make them unique! For the complete recipe, check out the Full Recipe. To store your pickled red onions, place them in a clean, airtight jar. Make sure the onions stay submerged in the pickling liquid. You can use any glass jar with a tight lid. This keeps the onions fresh and flavorful. Pickled red onions last about 2 to 4 weeks in the fridge. For the best taste, eat them within a week. Always check for any off smells or changes in color. If you notice anything strange, it's best to toss them out. Keep your jar in the fridge after opening to maintain freshness. You can reuse the pickling liquid! Just add fresh onions or other veggies. This method can save time and add new flavors to your dishes. If the liquid looks cloudy or smells bad, it’s time to make a new batch. Enjoy experimenting with your pickling liquid! Pickled onions last about two weeks in the fridge. They stay crunchy and tangy. The vinegar helps preserve them. Store them in a clean, airtight jar. After two weeks, they may lose their crispness. Yes, you can make this recipe in advance. In fact, the flavor gets better over time. I often prepare them a day ahead. This way, the onions soak in the pickling liquid longer. It’s a great way to save time for busy days. Pickled red onions add a bright touch to many dishes. They are great on tacos, sandwiches, and burgers. I love them in salads and grain bowls, too. Try adding them to your favorite recipes for a zesty kick. For the full recipe, check out the Zesty Quick Pickled Red Onions section. Pickled red onions are easy to make and taste great. First, we covered the ingredients needed and some swaps. Then, I guided you through the steps to prepare, cool, and pack them. Tips on slicing, flavor boosts, and how to present them followed. We explored fun variations and storage tips. Finally, I answered common questions. With these insights, you can create delicious pickled red onions. Enjoy experimenting with flavors and sharing them with others!

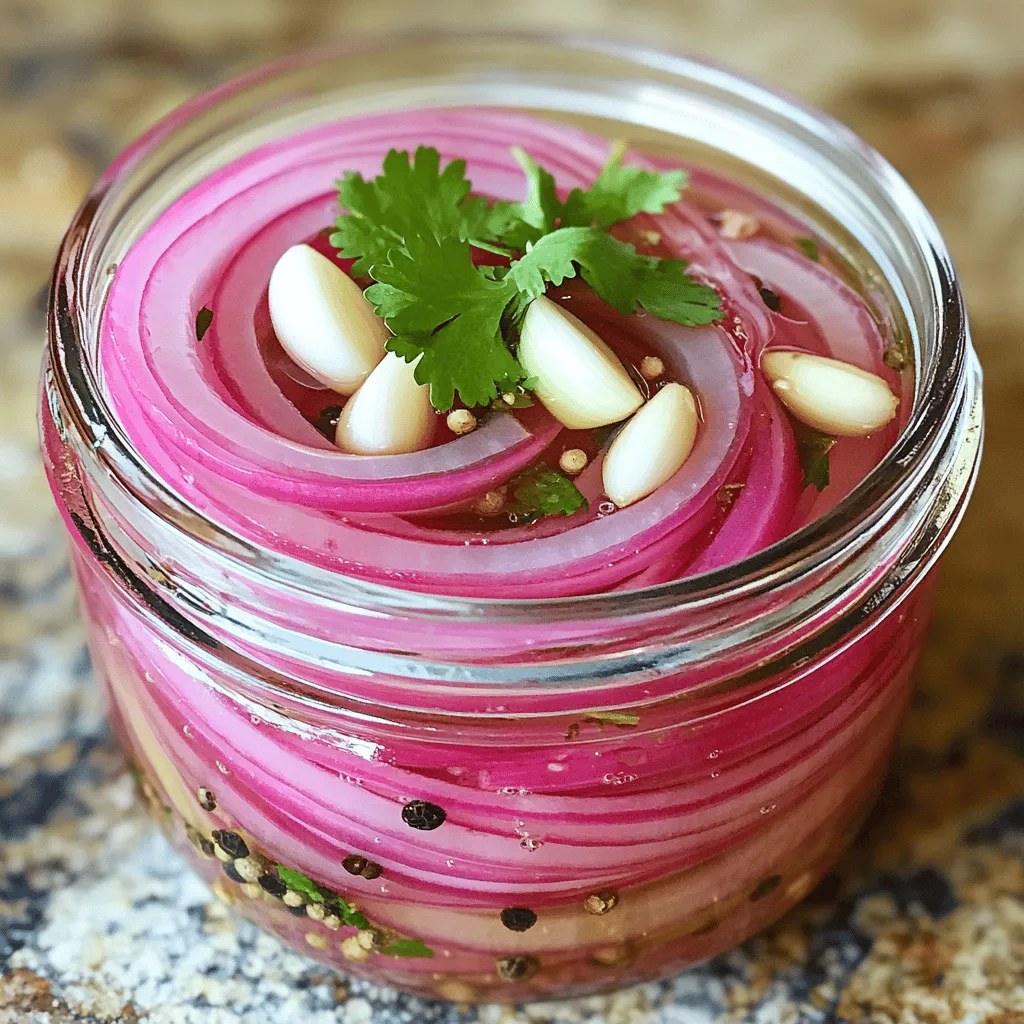
Are you ready to add a burst of flavor to your meals? Quick pickled red onions are simple to make and enhance any dish. In this recipe, I’ll guide you …

Read more

Categories Salads

Spiral Vegetable Tart Flavorful and Colorful Dish

June 21, 2025 by Chef Luca
The Spiral Vegetable Tart combines colorful veggies with creamy cheese. This dish is not only pretty but also tasty. It makes a great meal or side dish. The puff pastry gives a nice crunch. You can find the full recipe at the end. - 1 sheet of puff pastry (thawed if frozen) - 2 medium zucchinis, thinly sliced - 2 medium carrots, thinly sliced - 1 medium sweet potato, peeled and thinly sliced - 1 cup cherry tomatoes, halved - 1 cup ricotta cheese - 1 cup grated mozzarella cheese - 1 tablespoon fresh thyme leaves - 1 tablespoon olive oil - Salt and pepper to taste - 1 egg (for egg wash) To make this tart, you need a few important tools. Here’s what you will need: - A tart or pie dish - A rolling pin - A medium bowl - A small bowl - A whisk - A fork These tools help you create the perfect Spiral Vegetable Tart. With the right ingredients and tools, you will impress everyone! Start by preheating your oven to 400°F (200°C). Next, sprinkle some flour on a clean surface. Roll out the puff pastry until it fits your tart dish. Press it gently into the dish and trim any extra edges. Use a fork to prick the base. This helps it stay flat while baking. In a medium bowl, combine the ricotta cheese, grated mozzarella cheese, fresh thyme, olive oil, salt, and pepper. Mix well until everything blends perfectly. This creamy mixture will add a rich flavor to your tart. Spread it evenly over the pastry base. Now comes the fun part! Begin layering your vegetables in a spiral pattern. Start with the thinly sliced zucchini. Next, add the carrot slices. Follow this with sweet potato slices, and finish off with halved cherry tomatoes. Keep layering until you use all the vegetables. This creates a stunning spiral that is pleasing to the eye. In a small bowl, whisk the egg. Brush it over the edges of the pastry to give it a golden finish. Place your tart in the preheated oven and bake for 30 to 35 minutes. The pastry should turn golden brown, and the veggies should become tender. Once done, take it out and let it cool for a few minutes before slicing. Enjoy your beautiful, colorful Spiral Vegetable Tart! For a complete guide, check the Full Recipe. To make a great spiral, start with even slices. Use a sharp knife or a mandoline for thin, uniform pieces. Lay the slices on the pastry, starting from the center. Overlap each piece slightly as you turn. This creates a lovely spiral effect. Keep layering until you fill the tart. Always pick fresh vegetables for the best taste. Look for bright colors and firm textures. Zucchini should be smooth and shiny. Carrots must be crunchy and vibrant. For sweet potatoes, choose ones that feel heavy for their size. Using seasonal veggies ensures the best flavor and nutrition. To get that golden hue, brush the pastry edges with an egg wash. Whisk an egg with a bit of water for a shiny look. Bake at 400°F (200°C) for 30 to 35 minutes. Keep an eye on it towards the end. Once golden, remove it from the oven and let it cool before slicing. Follow the Full Recipe to enjoy this beautiful dish. {{image_2}} You can easily change the veggies in your spiral vegetable tart. Using seasonal vegetables makes the dish fresh and vibrant. Try using bell peppers in summer or butternut squash in fall. You can even add greens like spinach or kale for extra color and nutrition. Each season brings new flavors, so feel free to mix and match. Just keep the slices thin for the best spiral effect. If you want a different taste, swap out the cheese. For a tangy flavor, use goat cheese instead of ricotta. You can also try feta or cream cheese for a creamy texture. If you like a stronger taste, add sharp cheddar. These swaps keep the dish fun and allow you to explore new flavors. Remember to keep the total cheese amount the same for the best results. To make this tart gluten-free, use a gluten-free puff pastry. Many stores sell this option now. You can also try a crust made from almond flour or oats. These alternatives give you a nice base for your tart without gluten. Just watch the baking time, as these crusts might need slight adjustments. Enjoy your dish without worry! For a full recipe, check the section above. After you enjoy your Spiral Vegetable Tart, let it cool to room temp. Then, cover it tightly with plastic wrap or aluminum foil. You can also place it in an airtight container. This keeps the tart fresh for up to three days. Store it in the fridge for best results. To reheat the tart, preheat your oven to 350°F (175°C). Place the slices on a baking sheet. Cover them loosely with foil to prevent drying out. Heat for about 15 minutes or until warm. You can also use a microwave, but the oven keeps the crust crisp. You can freeze the tart for later! First, let it cool completely. Wrap the whole tart or slices tightly in plastic wrap. Then, place it in a freezer bag or container. It will stay good for about three months. To enjoy, thaw in the fridge overnight and reheat as described above. For the full recipe, check out the Spiral Vegetable Tart recipe section. Yes, you can use frozen vegetables. Just make sure to thaw them first. Drain any excess water to keep the tart from becoming soggy. Frozen veggies can save time, but fresh ones often taste better. I love using fresh vegetables for their bright colors and flavors. To prevent sogginess, prick the puff pastry base with a fork. This allows steam to escape while baking. You can also bake the pastry for a few minutes before adding the cheese and vegetables. This step helps create a barrier. Using less watery vegetables also helps keep the tart crisp. You can serve the tart with a fresh green salad. A simple vinaigrette works well to cut through the richness. Roasted vegetables or a light soup also pair nicely. This makes for a colorful and tasty meal. Enjoy experimenting with different side dishes to find your favorite combo! In this post, I shared how to make a Spiral Vegetable Tart. We covered key ingredients, step-by-step instructions, and essential tools needed for the recipe. I also shared tips for a perfect spiral and storage advice for leftovers. You can swap veggies or choose different cheeses to make it your own. This tart is easy to make and a great way to enjoy fresh flavors. Try it with your favorite vegetables. Don't hesitate to experiment and have fun in the kitchen! Enjoy your culinary journey!

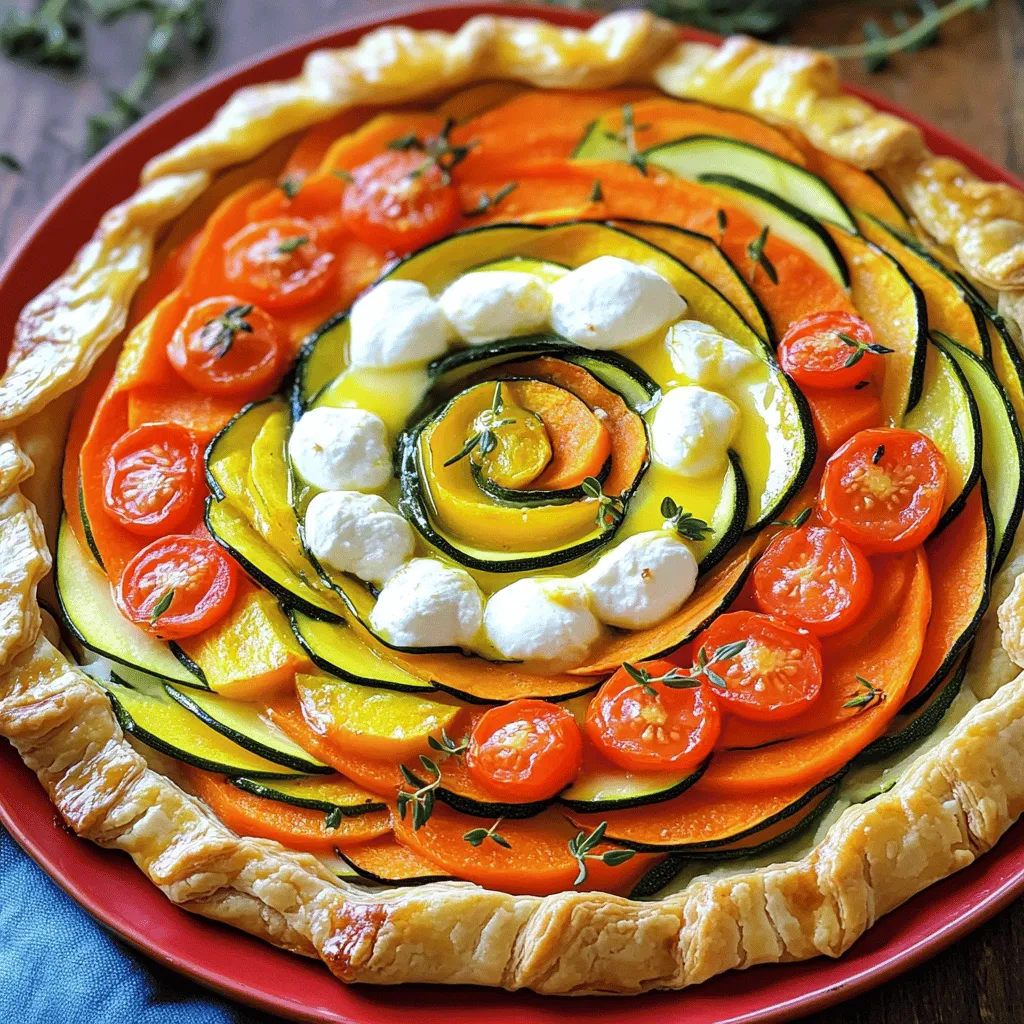
Looking for a dish that’s as tasty as it is eye-catching? The Spiral Vegetable Tart is your answer. This colorful meal packs flavor and fun in every bite. You can …

Read more

Categories Dinner

Oven-Roasted Corn On The Cob Flavorful and Easy Recipe

June 21, 2025 by Chef Luca
You need 4 ears of fresh corn. Choose corn with bright green husks. The kernels should look plump and sweet. Corn is best when it is in season, typically late summer. For the flavor, you will use: - 4 tablespoons unsalted butter, softened - 1 teaspoon garlic powder - 1 teaspoon smoked paprika - 1 teaspoon sea salt - ½ teaspoon black pepper Mix these ingredients together. This seasoned butter adds a savory touch to your corn. To enhance your dish, consider these toppings: - ¼ cup grated Parmesan cheese - Fresh parsley, chopped for garnish Parmesan adds a nice salty flavor. The parsley gives your corn a fresh look. You can mix and match toppings to suit your taste. For the full recipe, check out the complete instructions provided above. First, gather your fresh corn. You need four ears. Husk the corn and clean it well. Make sure to remove all the silk. A good cleaning helps the corn cook evenly. It also lets the flavor soak in better. Next, take a small bowl. Add four tablespoons of softened unsalted butter. Then, mix in one teaspoon of garlic powder. Add one teaspoon of smoked paprika, one teaspoon of sea salt, and half a teaspoon of black pepper. Stir it all together. This butter will give your corn a tasty kick. Now, spread the seasoned butter over each ear of corn. Make sure to coat all sides. After that, wrap each ear in aluminum foil. Seal it tightly to keep the flavor in. Place the wrapped corn directly on the oven rack. Set your oven to 400°F (200°C) and bake for 25-30 minutes. Be sure to turn the corn halfway through. This helps it cook evenly. After 30 minutes, unwrap one ear to check it. The kernels should be plump and juicy. If you want to add cheese, sprinkle some grated Parmesan on top. Rewrap the corn and bake for another five minutes. Finally, unwrap the corn carefully. Garnish with fresh parsley and serve warm. You can find the full recipe for oven-roasted corn on the cob above. To make the best oven-roasted corn on the cob, start with fresh corn. Look for ears with bright green husks. The silk at the top should be brown and sticky. The kernels should feel firm when you squeeze them. If you can, buy corn from a local farmer's market. This way, you get the freshest corn. Roasting corn in the oven is simple. Preheat your oven to 400°F (200°C) for even cooking. Wrap each ear in aluminum foil tightly. This keeps the corn juicy and helps it cook evenly. Turn the corn halfway through cooking. This ensures all sides roast well. Check for tenderness after 30 minutes. The kernels should be plump and juicy. Serve your corn on a platter with a sprinkle of Parmesan cheese and chopped parsley. You can also add extra butter, if you like. For a fun twist, try serving it with lime wedges. The lime juice adds a zesty flavor. This dish pairs well with grilled meats or fresh salads. Enjoy your oven-roasted corn on the cob with family and friends! For the complete recipe, check out the Full Recipe. {{image_2}} You can change the flavor of your corn by using different seasonings. Try using taco seasoning for a zesty twist. You can also mix in Italian herbs for a fresh taste. If you want heat, sprinkle some cayenne pepper. For a sweet kick, add a touch of cinnamon or brown sugar. Toppings can make your corn even better. After baking, add crumbled feta or cotija cheese. A squeeze of lime juice brightens the flavor. If you like spice, drizzle some hot sauce over the corn. For a fun crunch, top with crushed tortilla chips or nuts. You can cook corn on the cob in the oven or on the grill. Grilling adds a smoky flavor and nice char marks. Wrap the corn in foil or place it directly on the grill. Bake it in the oven for a more tender bite. The oven gives you control over cooking time and warmth. Each method makes a delicious ear of corn. Try both to see which you like best! For the full recipe, check out the Oven-Roasted Corn On The Cob recipe. If you have leftover corn, store it in the fridge. Place the corn in an airtight container. It will stay fresh for about 3 to 5 days. You can also wrap it tightly in plastic wrap. Keep the corn away from other strong-smelling foods. This helps keep its sweet taste. To reheat corn on the cob, use the oven or microwave. For the oven, preheat it to 350°F (175°C). Wrap the corn in foil to keep it moist. Heat for about 10-15 minutes. If you use the microwave, place the corn on a plate. Cover it with a damp paper towel. Heat it for 1-2 minutes, checking for warmth. Freezing corn is a great way to save it. First, blanch the corn for 4-6 minutes in boiling water. Then, cool it in ice water. Once cooled, dry the corn and wrap each ear tightly in plastic wrap. Place the wrapped corn in a freezer bag. This method keeps the corn good for up to 6 months. When you're ready to use it, thaw it in the fridge overnight or cook it straight from frozen. For more details on how to make this delicious dish, check the Full Recipe. Roasting corn on the cob in the oven takes about 25 to 30 minutes. Set your oven to 400°F (200°C) for the best results. Wrap each ear of corn in foil to keep it moist. Turn the corn halfway through cooking to ensure even roasting. After 30 minutes, check one ear for tenderness. If the kernels are juicy and plump, it's done and ready to eat. You can roast frozen corn on the cob, but fresh corn works best. If using frozen corn, thaw it first. Then follow the same steps for seasoning and wrapping. Keep in mind that cooking time may differ slightly. You may need an extra 5 to 10 minutes for frozen corn to cook fully. Here are some simple and tasty seasoning ideas for your corn: - Classic Butter and Salt: Just use butter and a sprinkle of sea salt. - Chili Lime: Mix lime juice, chili powder, and a pinch of salt. - Italian Style: Use olive oil, garlic, and Italian herbs. - Cheesy Delight: Add grated Parmesan cheese with herbs. - Sweet and Spicy: Combine honey with cayenne pepper for a kick. Feel free to mix and match to find your favorite flavor! For the full recipe, check the earlier section. Corn on the cob is a tasty treat you can enjoy in many ways. We covered how to pick fresh corn, make the perfect seasoned butter, and bake it just right. Don’t forget those fun toppings and seasoning options! Remember, cooking methods and storage tips help you enjoy every bite later on. Try experimenting with flavors and techniques. You might find a new favorite way to enjoy corn on the cob. Happy cooking, and make your meals delicious!

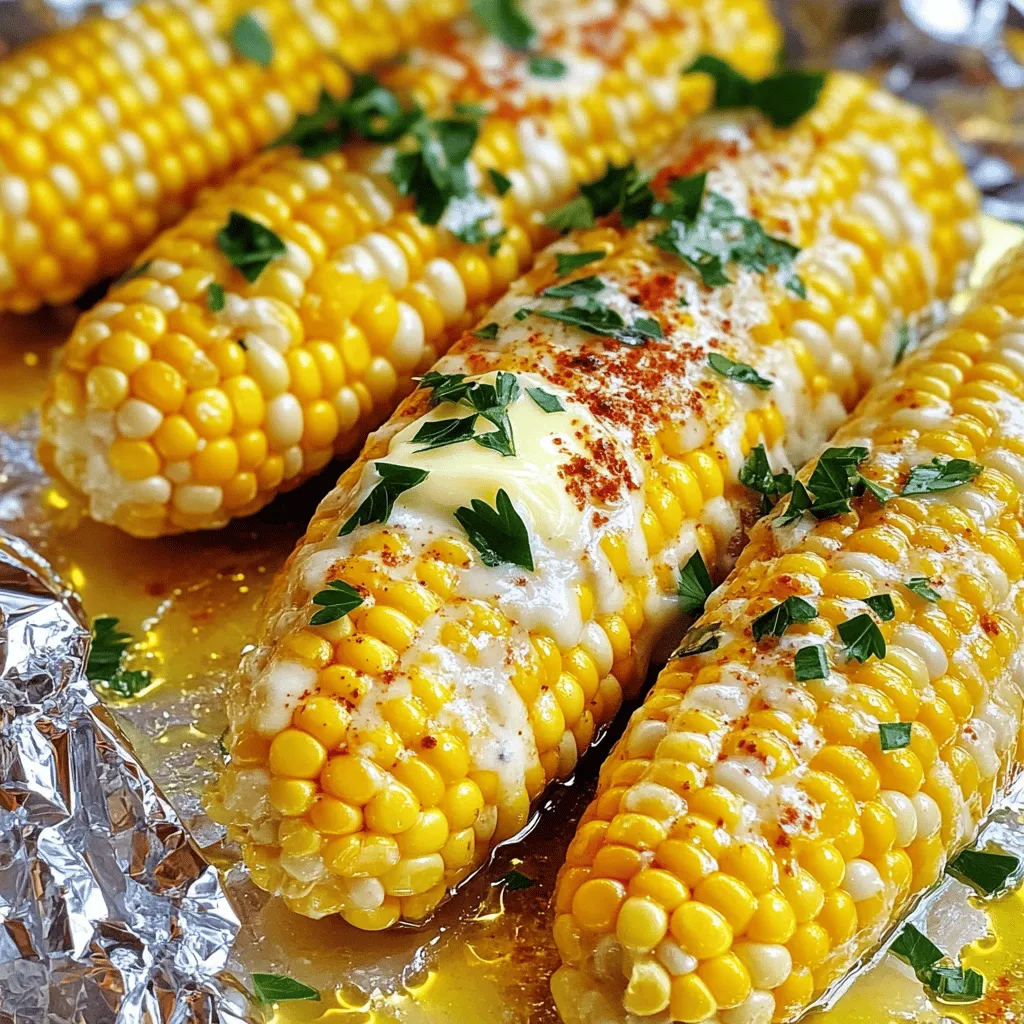
If you’re craving a deliciously sweet and smoky treat, oven-roasted corn on the cob is your answer. This easy recipe will help you create a tasty side dish that impresses …

Read more

Categories Appetizers

Easy Cucumber Caprese Salad Refreshing Summer Treat

June 21, 2025 by Chef Luca
- Cucumber - Cherry Tomatoes - Fresh Basil - Mozzarella Balls - Balsamic Vinegar - Extra Virgin Olive Oil - Salt and Pepper The key to a great Easy Cucumber Caprese Salad lies in its fresh ingredients. You want to use ripe, flavorful produce. Cucumber: Start with two large cucumbers. I love the crunch they add. Slice them into thin rounds for a nice bite. Cherry Tomatoes: Next, grab one cup of cherry tomatoes. Halve them for easy eating. Their sweetness balances the salad perfectly. Fresh Basil: Use a quarter cup of fresh basil leaves. I tear them for a more rustic look. The smell alone lifts your spirits! Next, let’s talk about the dairy. Mozzarella Balls: You need eight ounces of mozzarella balls. These small gems add creaminess. Drain them well to avoid extra moisture. Now, let’s not forget the pantry essentials. Balsamic Vinegar: Three tablespoons of balsamic vinegar add tang. It makes the salad bright and lively. Extra Virgin Olive Oil: Use two tablespoons of extra virgin olive oil. It ties all the flavors together. Salt and Pepper: Finally, don’t skip salt and pepper. They enhance every bite. Adjust to your taste. These ingredients come together to create a refreshing summer treat. For the full recipe, check out the detailed instructions! Start by washing the cucumbers. Use cold water to remove dirt. After washing, slice them into thin rounds. Place these slices in a large mixing bowl. Next, take the cherry tomatoes. Halve each one carefully and add them to the bowl. The fresh tomatoes will add a sweet burst of flavor. Now, drain the mozzarella balls. Make sure to remove excess liquid. This keeps the salad fresh and prevents it from getting soggy. With all your ingredients ready, it’s time to combine them. Add the cucumber slices, halved tomatoes, and drained mozzarella into your mixing bowl. Next, take fresh basil leaves. Tear them into smaller pieces and sprinkle them over the salad. The basil adds a nice herbal touch. Now, let’s make the dressing. In a small bowl, whisk together balsamic vinegar and olive oil. Mix until you see a smooth blend. Drizzle the prepared dressing over the salad mixture. This will coat all the ingredients with flavor. Gently toss everything together. Use your hands or a spoon to mix without smashing the ingredients. Finally, season with salt and freshly ground black pepper to taste. Mix again to ensure every bite is tasty. Let the salad sit for 10 minutes. This allows the flavors to blend together. Enjoy your Easy Cucumber Caprese Salad as a refreshing summer treat! For the full recipe, check out the details provided above! Choosing ripe cucumbers and tomatoes is key. Look for cucumbers that feel firm and smooth. The skin should be a bright green color. For tomatoes, pick ones that are plump and slightly soft to touch. Their color should be vibrant too. This ensures your salad has great taste and texture. Cutting your ingredients well helps with presentation. Slice cucumbers into even rounds. This makes them easy to eat and look nice. Halve the cherry tomatoes for a pop of color. When you place them in the bowl, mix them gently. This keeps the shape of the tomatoes and mozzarella. To boost the flavor, add fresh herbs or spices. Chopped mint or dill works well with this salad. You can also sprinkle in red pepper flakes for some heat. For dressings, try a lemon vinaigrette or even a creamy dressing. Each will give a different twist to the dish. This salad pairs well with grilled meats. Serve it alongside chicken or fish for a light meal. You can also enjoy it with crusty bread for a filling lunch. For parties, place the salad in a big bowl. This makes it easy for guests to serve themselves. Adding a sprinkle of extra basil on top also makes it look pretty. For the full recipe, check out the details above. {{image_2}} You can change up the cheese in your Cucumber Caprese Salad. Try feta or goat cheese instead of mozzarella. These options add a new flavor twist. If you want a creamier taste, use burrata. Each cheese brings its charm to the dish. For the balsamic vinegar, you can explore alternatives. Try red wine vinegar for a sharper taste. Apple cider vinegar adds a light sweetness. You can also use lemon juice for a fresh zing. These swaps can help you find your favorite flavor combo. If you want a vegan option, replace the mozzarella with tofu. Firm tofu can mimic the cheese's texture. Marinate the tofu in some balsamic vinegar for flavor. This way, you can still enjoy a delicious salad. For gluten-free variations, this recipe is perfect as is! All the ingredients are gluten-free. You can serve it with gluten-free bread or crackers if you want a side. In summer, add fresh corn or avocados for added texture. These ingredients make the salad even more refreshing. You can also mix in some diced bell peppers for color and crunch. In winter, consider roasted vegetables like zucchini or butternut squash. They can add warmth to your dish. You might also try adding nuts for crunch. This way, your salad stays tasty year-round. For the full recipe, check out the Refreshing Cucumber Caprese Salad. To keep your cucumber caprese salad fresh, use airtight containers. Glass or plastic containers work well. Make sure the lid seals tightly. Place the salad in the fridge right after serving. Avoid leaving it out for long periods. This keeps the flavors bright and the ingredients crisp. This salad lasts for about 2-3 days in the fridge. After that, the cucumbers may become soggy. The tomatoes might lose their firmness too. If you notice any changes in smell or texture, it’s best to toss it out. You shouldn’t freeze cucumber salad. Freezing alters the texture of cucumbers. When thawing, they become mushy and watery. If you still want to freeze it, consider just freezing the dressing separately. This way, you can use fresh ingredients later. The best cucumber for this salad is the English cucumber. It has thin skin, few seeds, and a crisp texture. Persian cucumbers also work well, as they are sweet and crunchy. Avoid using regular cucumbers, as they can be watery and have a thick skin. For the best taste, choose cucumbers that feel firm and heavy. Yes, you can prepare this salad in advance. However, I recommend waiting to add the dressing. The salad can get soggy if it sits too long. You can chop the cucumbers, tomatoes, and mozzarella ahead of time. Store them in an airtight container in the fridge. Add fresh basil and dressing just before serving for the best flavor. To make this salad more filling, consider adding protein. Grilled chicken or shrimp adds great flavor and texture. You can also add chickpeas or quinoa for a vegetarian option. These ingredients not only fill you up but also add a healthy twist to this refreshing dish. Yes, it is safe to eat cucumbers with the skin on. The skin contains fiber and nutrients. Just make sure to wash them well to remove dirt and pesticides. If you prefer, you can peel them for a milder taste. However, I find that leaving the skin on adds a nice crunch to the salad. If you want to substitute mozzarella, try using feta cheese or goat cheese. Both options add a tangy flavor that complements the salad. You can also use avocado for a creamy texture. Just keep in mind that these options change the taste, but they still work well in the salad. For the full recipe, check out the complete guide above. This salad blends fresh produce with pantry basics. Start by prepping your cucumbers, cherry tomatoes, and mozzarella. Mix these in a bowl, drizzle with dressing, and toss. Remember to choose ripe ingredients for better taste. Feel free to explore variations with different cheeses or dressings. Store any leftovers well to keep them fresh. This simple salad is tasty, versatile, and great for any meal or gathering. Happy salad making!

Looking for a cool, refreshing dish this summer? Try my Easy Cucumber Caprese Salad! This vibrant mix of crisp cucumbers, juicy cherry tomatoes, and creamy mozzarella comes together in minutes. …

Read more

Categories Salads

Garlic Butter Chicken Flavorful and Simple Recipe

June 21, 2025 by Chef Luca
- 4 boneless, skinless chicken breasts - 4 tablespoons unsalted butter - 6 cloves garlic, minced - 1 teaspoon dried thyme - 1 teaspoon paprika - Salt and pepper to taste - 1 cup chicken broth - 2 tablespoons lemon juice - Fresh parsley, chopped for garnish To make garlic butter chicken, use these fresh ingredients. Each plays a key role in flavor. The chicken breasts are juicy and tender. The butter adds richness. Garlic gives a bold, aromatic taste. - Suggested substitutes for chicken: You can use turkey or firm tofu for a change. Both options taste great with this sauce. - Options for low-sodium broth: Use low-sodium chicken broth or vegetable broth. This keeps the dish lighter. - Dairy-free butter alternatives: Try coconut oil or vegan butter. Both work well and keep the dish creamy. When you explore alternatives, you can adjust this dish to fit your needs. Enjoy experimenting with flavors! Start by seasoning the chicken breasts. Use salt, pepper, thyme, and paprika. Make sure to season both sides well. This step builds great flavor. After seasoning, let the chicken sit for about 10 minutes. This time helps the spices soak in. In a large skillet, melt 2 tablespoons of the butter over medium-high heat. Once the butter is bubbling, add the chicken breasts. Cook them for 6-7 minutes on each side. You want them golden brown and fully cooked. Remove the chicken and set it aside. Next, reduce the heat to medium. In the same skillet, add the remaining butter. Let it melt, then add the minced garlic. Sauté for 1-2 minutes. Be careful not to burn the garlic; you want it fragrant. Now, pour in the chicken broth and lemon juice. Scrape the skillet's bottom to release any browned bits. Bring this mix to a gentle simmer. Let it cook for 3-4 minutes to reduce slightly. Return the cooked chicken to the skillet. Spoon the garlic butter sauce over the top. Let it simmer together for another 2-3 minutes. This step allows the flavors to combine nicely. Remove the skillet from heat. Garnish the chicken with freshly chopped parsley. This adds color and a fresh taste. Serve the Garlic Butter Chicken on a platter. Drizzle with the remaining garlic butter sauce. Pair it with steamed vegetables or mashed potatoes for a great meal. Enjoy! To get a great sear, heat your skillet well. A hot skillet gives a nice brown color. If the skillet is too cool, the chicken will steam, not sear. You want to hear a sizzle when the chicken hits the pan. Cook each side for about 6-7 minutes. This timing helps keep your chicken juicy. Overcooking can dry it out. Always check the chicken's internal temperature. It should reach 165°F for safety. Adding herbs boosts the flavor of garlic butter chicken. Consider using fresh thyme or rosemary. These herbs add depth. You can also try adding a pinch of crushed red pepper for heat. Lemon juice balances the dish's richness. It adds a fresh note that cuts through the butter. Use about two tablespoons for a bright taste. One mistake is overcrowding the skillet. If you add too much chicken, the heat drops. This causes the chicken to steam instead of sear. Another mistake is not scraping the bottom of the skillet. Those browned bits hold a lot of flavor. Use a wooden spoon to scrape them up when making the sauce. This simple step enhances the dish’s taste. You can find the full recipe [Full Recipe]. {{image_2}} You can easily swap chicken for shrimp or salmon. Shrimp cooks fast and takes on flavors well. Just sauté it the same way as chicken. Salmon also works great. It has rich flavors that pair nicely with garlic butter. For a vegetarian alternative, try tofu or chickpeas. These options soak up the garlic butter sauce. You can make your meal both tasty and satisfying. To change the flavor, think about adding spices. Cayenne pepper gives a nice kick. Italian seasoning adds warmth and earthiness. You can also switch up the citrus. Instead of lemon, try lime or orange. This adds a fresh twist to your dish. The different flavors keep things exciting and new. You can cook garlic butter chicken in different ways. Baking it in the oven gives you a hands-off approach. Just place the seasoned chicken in a dish, cover, and bake until done. Skillet cooking is faster and adds a nice crisp. For a slow cooker, brown the chicken first. Then, add the garlic butter sauce and let it simmer all day. This method makes the chicken tender and full of flavor. To keep your garlic butter chicken fresh, follow these tips: - Refrigeration: Let the chicken cool to room temperature. Place it in an airtight container. Store it in the fridge for up to three days. - Freezing: For longer storage, wrap the chicken tightly in plastic wrap. Then, place it in a freezer bag. It can last up to three months in the freezer. When it's time to enjoy your leftovers, you have options: - Microwave: Place the chicken on a microwave-safe plate. Cover it loosely and heat for 1-2 minutes. Check to avoid drying it out. - Stovetop: Heat a skillet over medium heat. Add a splash of chicken broth to keep the chicken moist. Heat for about 5-7 minutes, flipping once. Knowing how long your dish stays fresh is key: - Garlic butter chicken stays good in the fridge for about three days. If frozen, it can last up to three months. - Signs of spoilage: If you see mold, a strange odor, or discoloration, it’s best to throw it away. Always trust your senses! You can pair garlic butter chicken with many tasty sides. Here are some ideas: - Steamed broccoli - Mashed potatoes - Roasted carrots - Rice pilaf - Garlic bread - A fresh salad These sides add color and flavor to your meal. They balance the rich and buttery chicken well. You can also mix and match to suit your taste. Yes, you can make garlic butter chicken ahead of time. Here are some tips: - Cook the chicken and garlic sauce. - Let it cool completely. - Store it in an airtight container in the fridge for up to three days. When ready to eat, just reheat it gently on the stove. This saves time on busy days. Garlic butter chicken can be part of a healthy meal. Here’s what to consider: - Chicken is a good source of protein. - Garlic has many health benefits, like boosting immunity. - Using butter adds fat, but choose unsalted for less sodium. You can adjust the recipe to fit your dietary needs. For a lighter version, try using less butter or adding more veggies. This blog post guides you through making delicious garlic butter chicken. We covered the key ingredients and their substitutes to customize the dish. I provided clear instructions for prepping, cooking, and garnishing the meal. You also learned tips to make it perfect and explored variations for different tastes and dietary needs. In closing, this dish is simple to make and brings rich flavor to your table. You can easily adapt it to suit your style. Enjoy cooking and impressing others with your garlic butter chicken!

Are you ready to impress your family with a tasty dinner? This Garlic Butter Chicken is the perfect blend of rich flavors and simple steps. With just a few key …

Read more

Categories Dinner
Older posts
Newer posts
← Previous Page1 … Page87 Page88 Page89 … Page122 Next →

STIRRED RECIPES

Where every dish begins with a stir! 🍲✨

PAGES

Home About Contact Privacy Policy Terms & Conditions Cookie Policy GDPR Policy Copyright Policy Disclaimer

CATEGORIES

Appetizers Desserts Salads Breakfast Dinner

Contact

  • Pinterest
  • Mail
Copyright © 2026 Stirred Recipes. All rights reserved.