Tomato Cobbler Simple Comfort Food Delight

Tomato cobbler is a simple joy, perfect for any meal. It blends fresh, ripe tomatoes with a cheesy, flaky topping. In this guide, I’ll share all the steps to make …
Tomato cobbler is a simple joy, perfect for any meal. It blends fresh, ripe tomatoes with a cheesy, flaky topping. In this guide, I’ll share all the steps to make …

Looking for a quick and tasty meal? These Korean Ground Beef Bowls are savory, sweet, and super easy to make. You just need a few simple ingredients like ground beef, …
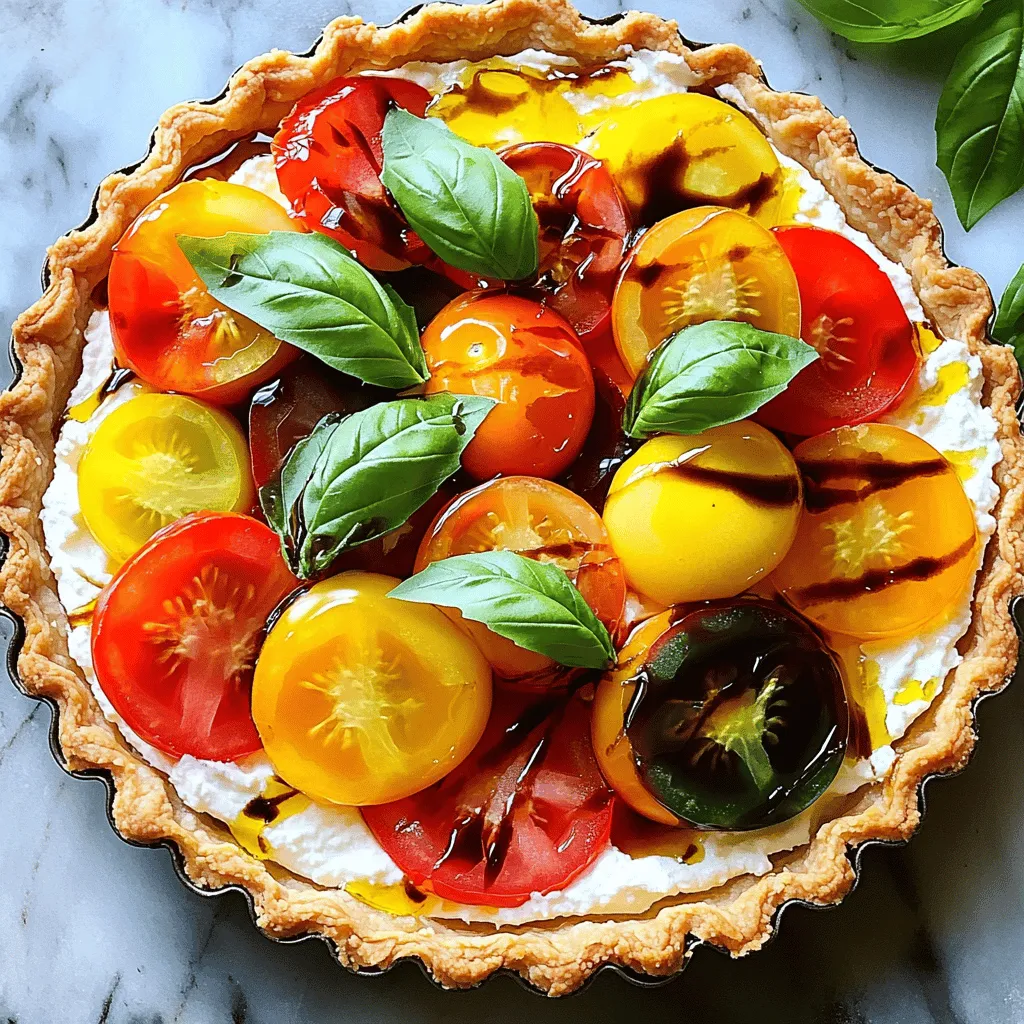
Are you ready to impress friends and family with a dish that’s both simple and delicious? The Fresh Tomato Ricotta Tart combines fresh tomatoes with creamy ricotta for a flavor …
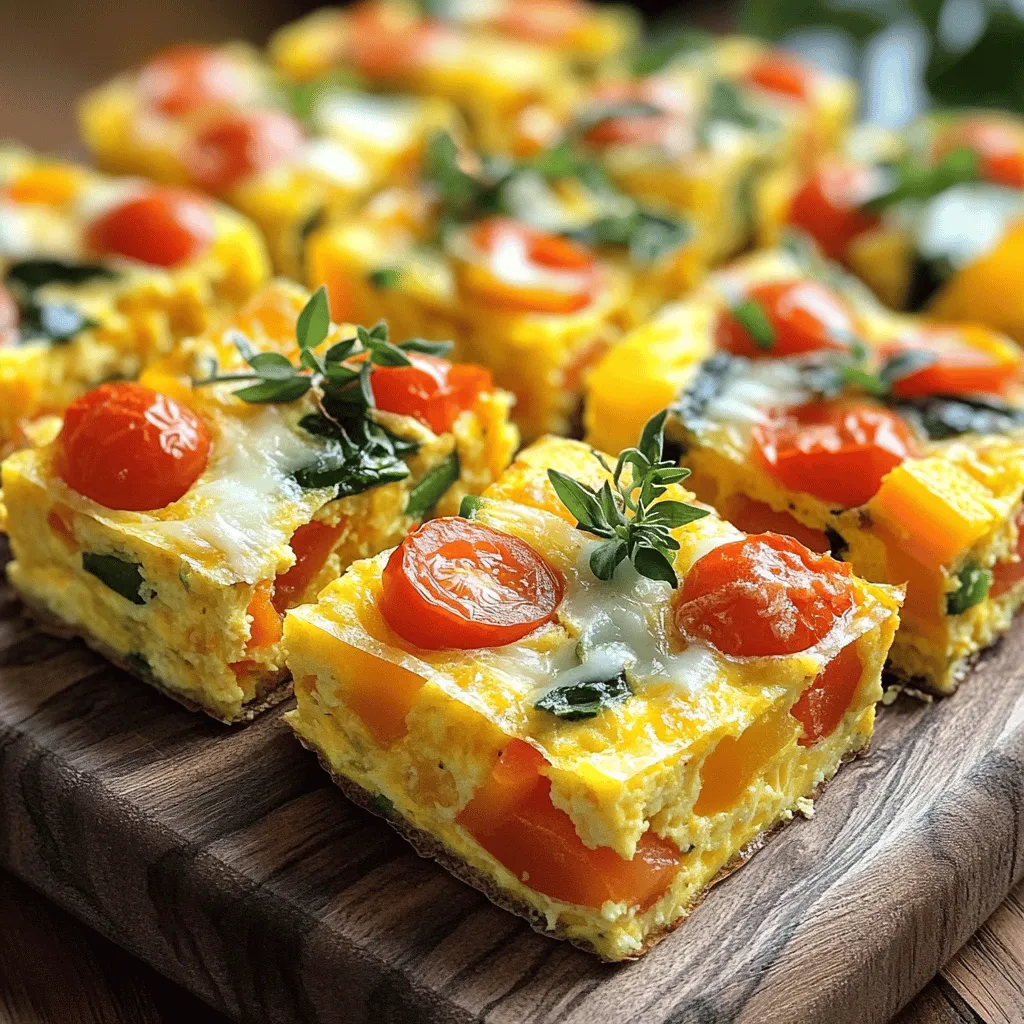
Imagine waking up to a delicious, healthy breakfast ready to go! With my Make-Ahead Frittata Squares, you can enjoy hassle-free meals all week. These tasty squares are easy to customize …
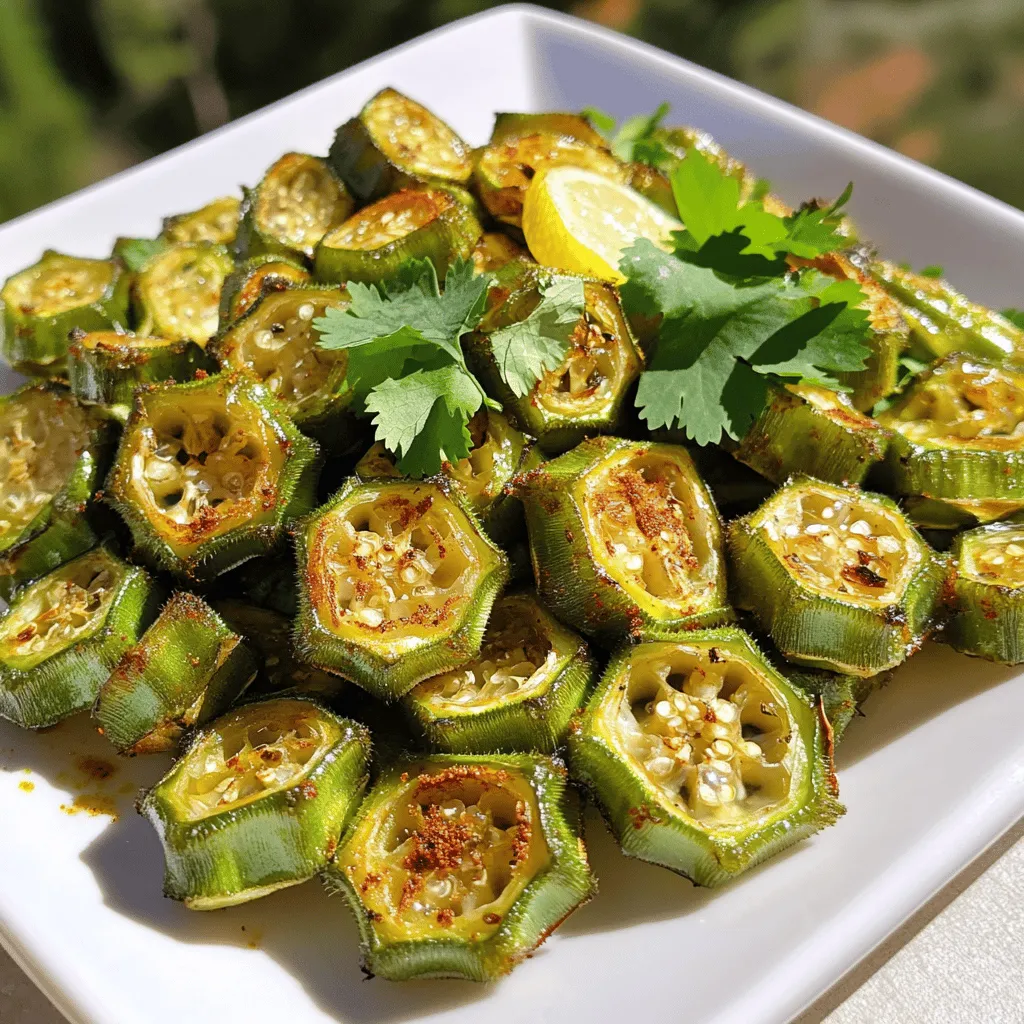
Looking to spice up your veggie game? This Easy and Tasty Roasted Okra Recipe is just what you need! With fresh okra and a few simple spices, you can create …

Are you craving a quick, delicious meal? Honey Garlic Chicken is the answer! This easy recipe brings sweet, savory flavors that even picky eaters will love. With just a few …
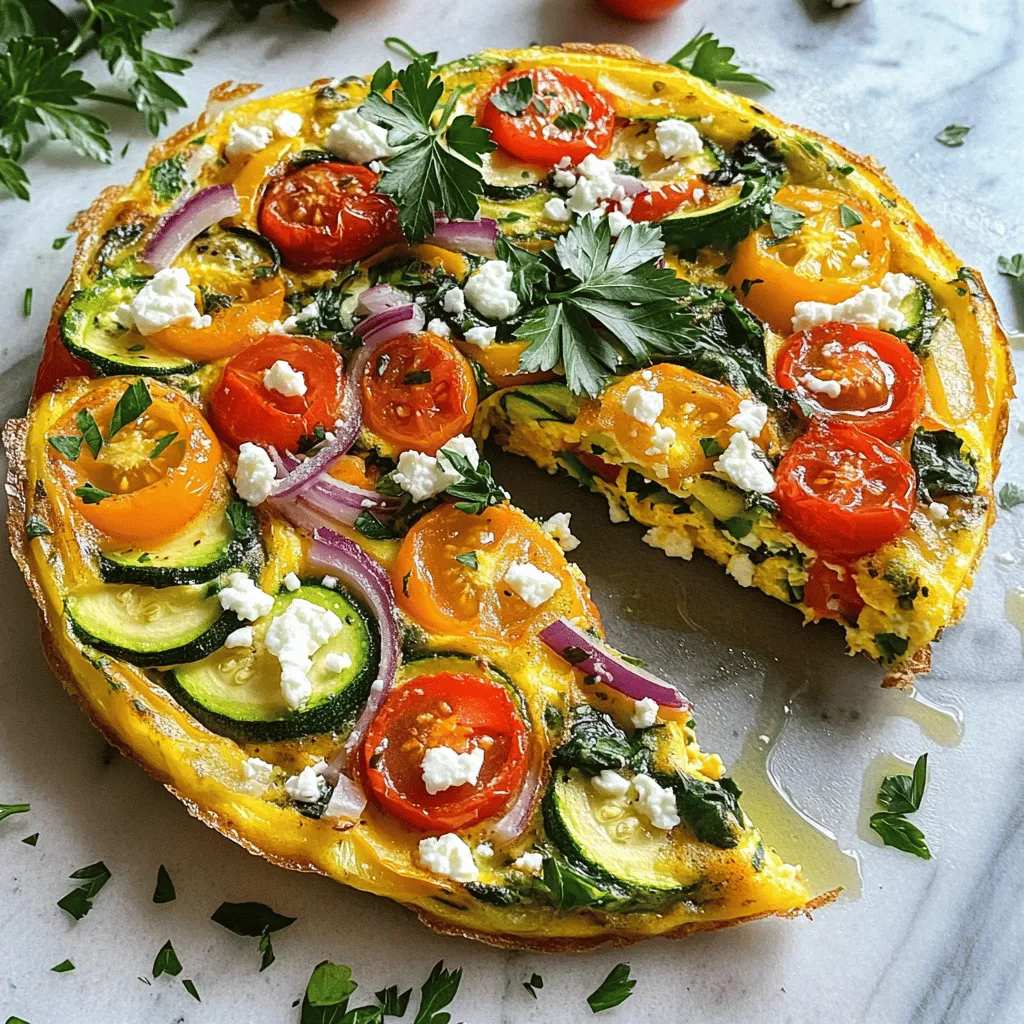
If you crave a dish that’s both tasty and healthy, you’re in for a treat! A Greek Vegetable Frittata is easy to make and packed with fresh ingredients. This vibrant …

Looking for a tasty way to enjoy crispy chicken without frying? You’re in the right spot! My Oven Fried Chicken recipe is a delicious blend of juicy chicken thighs and …
![Summer desserts should be bright and refreshing. Here are some must-have ingredients: - Fresh fruits (like strawberries, lemons, and raspberries) - Natural sweeteners (such as honey and agave syrup) - Dairy options (like coconut milk and buttermilk) - Herbs (like basil and mint for extra flavor) - Light and airy elements (think whipped cream or meringue) These ingredients help create sweet treats that are perfect for warm days. When making summer desserts, you can use either fresh or frozen fruits. Fresh fruits taste great and add a vibrant look. They give a juicy burst in every bite. Frozen fruits are easy to store and often cheaper. They work well in smoothies and popsicles. Just remember, thaw them before use to avoid excess water. Using fresh ingredients often gives the best taste and texture. But don’t shy away from frozen options. They can save time and still taste good. Many ingredients can be swapped in dessert recipes. Here are some common substitutes: - Sugar: Use honey or maple syrup for a natural sweetness. - Butter: Swap with coconut oil for a dairy-free option. - Flour: Almond flour or oat flour can be great gluten-free choices. - Dairy: Use almond milk or coconut cream for a vegan alternative. These swaps help you cater to different diets while keeping desserts delicious. To make the Chilled Lemon Basil Sorbet, for example, you can easily replace sugar with honey. This change adds a unique flavor twist. Explore and enjoy making your summer desserts! To make Chilled Lemon Basil Sorbet, start by mixing water, sugar, and lemon zest in a saucepan. Heat it gently until the sugar dissolves. Let it cool, then stir in lemon juice and basil. Pour into a shallow dish and freeze. Every 30 minutes, stir with a fork until fluffy. This process takes about 3-4 hours. For Strawberry Coconut Popsicles, blend hulled strawberries with honey and vanilla. Then, blend coconut milk until creamy. Layer the mixtures in popsicle molds. Freeze for at least 4 hours. Run warm water over the molds to release the popsicles. To bake Raspberry Lemonade Cupcakes, preheat your oven to 350°F. Whisk flour, sugar, baking powder, and salt in one bowl. In another bowl, cream butter and mix in eggs, buttermilk, lemon zest, and juice. Combine wet and dry mixes, folding in raspberries. Bake for 18-20 minutes. Baking during summer needs some care. Use lighter pans to avoid overheating. Avoiding dark pans helps prevent burning, especially with delicate recipes. Always preheat your oven for even baking. This ensures your cupcakes rise nicely. If you want to add a twist, try infusing flavors. Mix in herbs or spices to your batter. This small change can make a big impact, giving your dessert a unique twist. Cooling desserts is key for summer treats. For sorbets, break up ice crystals while freezing. This ensures a light, fluffy texture. You can use a shallow dish for faster freezing, too. For cupcakes, let them cool in the tray for a few minutes. Then, transfer them to a wire rack. This prevents sogginess. For popsicles, warm water makes it easy to remove them. Enjoy them right away or store them back in the freezer for later. These methods help create perfect, refreshing desserts for your summer picnic. Don't forget to check out the Full Recipe for more details! To make your picnic dessert a hit, opt for treats that are easy to eat. Finger foods like cupcakes or popsicles are great. Choose desserts that do not melt quickly. Chilled Lemon Basil Sorbet is a refreshing choice. Make sure your desserts are not too sweet. Balance is key for hot summer days. Keeping your desserts fresh can be tricky. Use an insulated cooler to store your treats. Ice packs will help keep everything cool. For items like Raspberry Lemonade Cupcakes, avoid direct sunlight. Cover them with a clean cloth or lid. This helps prevent drying out. If you use fruit, rinse and dry it well before packing. A beautiful spread makes your picnic fun. Use colorful napkins and plates to brighten things up. Arrange desserts in a way that is pleasing to the eye. Layer your Strawberry Coconut Popsicles in a cooler for a fun display. Garnish treats like the Chilled Lemon Basil Sorbet with fresh basil leaves. Simple touches can make your picnic feel special. {{image_2}} Fruit-based desserts shine in summer. They are fresh, colorful, and full of flavor. You can use seasonal fruits like berries, peaches, and melons. Here are some ideas: - Fruit Salad: Mix your favorite fruits. Try berries, kiwi, and watermelon for a bright dish. - Berry Parfaits: Layer yogurt, granola, and berries in cups. They look great and taste amazing! - Fruit Tarts: Use a simple tart crust. Fill it with cream cheese or custard, then top with fresh fruit. No-bake desserts are perfect for summer. They save time and keep your kitchen cool. Here are a few easy options: - Chilled Lemon Basil Sorbet: This refreshing sorbet uses lemon and basil for a unique twist. You combine water, sugar, lemon juice, and basil. Freeze it for a simple summer treat. [Full Recipe] - Strawberry Coconut Popsicles: Blend strawberries, coconut milk, and honey. Pour into molds and freeze. They are fruity and creamy. - Chocolate Mousse: Whip cream and mix it with melted chocolate. Chill until set. Serve in cups for a rich dessert. Many people look for gluten-free and vegan options today. These desserts can still be tasty and fun. - Gluten-Free Brownies: Use almond flour or a gluten-free blend. They can be fudgy and delicious! - Vegan Banana Bread: Swap eggs for flaxseeds and use plant milk. It’s moist and perfect for any picnic. - Chia Seed Pudding: Mix chia seeds with almond milk and sweetener. Let it sit overnight. Top with fresh fruit in the morning. These variations ensure everyone at your picnic can enjoy a treat! Storing desserts is key for keeping them fresh and tasty. For most desserts, wrap them well. Use plastic wrap or foil to cover them tightly. This method helps keep moisture in. If you make cupcakes, store them in an airtight container. For cakes, consider slicing them and storing in layers with parchment paper in between. This way, they won’t stick. You can store many desserts in the fridge. Just remember to let them cool first. Transporting desserts on a hot day can be tricky. Always use ice packs to keep things cool. Place your desserts in a cooler with ice packs around them. If you are taking cupcakes or fragile desserts, use a sturdy box. It helps prevent them from tipping over. Try to keep the cooler in the shade. Avoid leaving it in direct sunlight. If you can, serve desserts right after you arrive. This keeps them fresh and tasty. Choosing the right containers makes a big difference. For cakes, a cake carrier works well. It protects the top and keeps the cake fresh. For cupcakes, use a cupcake carrier. These containers have special holders to keep each cupcake safe. For cookies or bars, a flat, airtight container is best. Make sure it seals tightly to keep the treats fresh. Clear containers let you see what’s inside, making it easy to grab your favorites. Don’t forget to check the [Full Recipe] for delicious dessert options to try at your next picnic! Desserts that are sturdy and not too delicate work best for picnics. Here are some great options: - Brownies - Cookies - Bars - Cupcakes - Fruit-based desserts like tarts These desserts stay fresh and are easy to serve. For instance, brownies do not crumble easily. Cookies are portable and can be stacked. Cupcakes can be topped with frosting and still hold their shape. Yes, many desserts can be made ahead of time. This makes planning your picnic easier. For example, brownies and cookies can be baked a day or two before. Just store them in a sealed container. Cupcakes can also be baked in advance. Frost them on the day of the picnic to keep them fresh. You can even freeze some desserts. This is great for pies or bars. Just thaw them in the fridge the night before. To help your desserts last longer, follow these tips: - Store desserts in airtight containers. - Keep them in a cool place. - Use fresh ingredients when possible. If you are making chilled desserts, like the Chilled Lemon Basil Sorbet, keep them in the freezer until you are ready to serve. This will prevent them from melting. Always check for signs of spoilage before serving. For a delicious treat, try making the Chilled Lemon Basil Sorbet. It’s refreshing and perfect for summer. For the full recipe, click here. In this blog post, we explored essential ingredients for summer desserts, from fresh fruits to common substitutes. I shared step-by-step methods for preparing treats, baking techniques, and cooling options. We discussed best practices for serving desserts outdoors and tips for keeping them fresh. You also learned about fruit-based, no-bake, and dietary-specific options. Finally, we covered proper storage and transport details. Great desserts can make your picnic fun. With the right ingredients and tips, you can impress everyone!](https://stirredrecipes.com/wp-content/uploads/2025/06/e9a10524-31b2-4094-b01d-2c4922f6c259.webp)
Get ready to wow your friends at your next summer picnic with delicious desserts! I’ll share 38 easy and tasty treats perfect for sunny days. From fruity delights to no-bake …
![- 6 ripe peaches, pitted and sliced - 1 tablespoon lemon juice Choosing ripe peaches is key for great flavor. Look for peaches that feel firm but yield slightly when you press them. The skin should have a nice golden hue. The lemon juice adds a bright taste and helps keep the peaches fresh. - 1/4 cup granulated sugar - 1 teaspoon vanilla extract - 1 teaspoon cinnamon The sugar sweetens the peaches well. You can adjust it based on how sweet your peaches are. Vanilla adds warmth, while cinnamon gives a cozy spice that makes the crumble special. - 1 cup rolled oats - 1/2 cup all-purpose flour - 1/2 cup packed brown sugar - 1/4 teaspoon salt - 1/2 teaspoon nutmeg - 1/2 cup unsalted butter, melted For the topping, rolled oats provide great texture and crunch. All-purpose flour binds the mix. The brown sugar adds a deeper sweetness. Salt balances the flavors, while nutmeg gives a warm kick. Melted butter brings everything together, making it crumbly and rich. You can find the full recipe to guide you through making this simple and delicious delight. - Start by washing 6 ripe peaches. - Cut the peaches in half and remove the pits. - Slice the peaches into thin pieces. - In a large bowl, mix the sliced peaches with: - 1/4 cup granulated sugar - 1 tablespoon lemon juice - 1 teaspoon vanilla extract - 1 teaspoon cinnamon - Toss everything gently until the peaches are well coated. - Pour this peach mixture into a greased 9x9 inch baking dish. - In another bowl, mix together: - 1 cup rolled oats - 1/2 cup all-purpose flour - 1/2 cup packed brown sugar - 1/4 teaspoon salt - 1/2 teaspoon nutmeg - Pour in 1/2 cup melted unsalted butter. - Stir until the mixture is crumbly. - Preheat your oven to 350°F (175°C). - Sprinkle the crumble topping evenly over the peach filling. - Bake in the oven for 35-40 minutes. - Look for a golden brown topping and bubbling peaches. - Let the crumble cool for about 10 minutes before serving. Enjoy your peach crumble warm, maybe with a scoop of vanilla ice cream on top! For the full recipe, check out the complete instructions. To make a great peach crumble, start with ripe peaches. Look for peaches that have a slight give when you press them. Their skin should be smooth and fragrant. If the peaches are not ripe, your crumble may taste bland. If your peaches are very sweet, use less sugar. If they are tart, don’t be shy with the sugar. This balance makes each bite delicious. The ideal crumble topping should be both crunchy and crumbly. You want it to hold together yet break apart easily. Mix the oats, flour, and sugar well. Then, add melted butter until it looks like coarse crumbs. If you want to save time, you can make this topping a day ahead. Just store it in the fridge until you are ready to bake. Serve your peach crumble warm for the best taste. A scoop of vanilla ice cream on top makes it even better. You can also try whipped cream for a lighter option. For a nice touch, garnish your dish with fresh mint leaves. This adds color and a hint of freshness. Enjoy the flavors and textures together for a delightful dessert experience! {{image_2}} You can easily swap peaches for other fruits. Try using apples, berries, or cherries. Each fruit adds its own flavor. You can also mix fruits! Combine peaches with blueberries for a fun twist. This creates a vibrant and tasty crumble. Want a gluten-free version? Use almond flour or oat flour instead of all-purpose flour. This makes the crumble just as tasty. For vegan options, replace the butter with coconut oil or vegan butter. You can also use coconut sugar or maple syrup for sweetness. Add nuts like walnuts or pecans for a crunch. Chocolate chips can also make it extra special. Don’t forget about spices! A pinch of ginger or cardamom can add warmth and depth. Experiment with what you love to make it your own. For the complete Peach Paradise Crumble recipe, check the [Full Recipe]. To store leftovers, place peach crumble in the fridge. Use an airtight container. This keeps it fresh and tasty. You can freeze peach crumble for later. Wrap it well in plastic wrap, then foil. This helps prevent freezer burn. For reheating, bake it at 350°F. Heat until warm and bubbly. Peach crumble lasts about 3-5 days in the fridge. If frozen, it can last up to 3 months. Enjoy your peach crumble at its best! For the full recipe, check out the Peach Paradise Crumble. You can try many fruits for your crumble. Here are some great options: - Apples - Pears - Berries (like blueberries or raspberries) - Cherries - Plums Mixing different fruits can add unique flavors. For example, a mix of apples and berries gives a tasty twist. Yes, you can prepare peach crumble ahead of time. Here are some tips: - Assemble the filling and topping in advance. - Cover and store them in the fridge for up to a day. - Bake just before serving to keep it fresh. This way, you save time and still enjoy a warm crumble. Check for these signs to know if your crumble is ready: - The topping should be golden brown. - The peaches should bubble around the edges. - A fork should easily pierce the fruit. These signs mean your crumble is perfect and ready to enjoy. Yes, you can use canned or frozen peaches. Here’s how: - If using canned peaches, drain and rinse them first. - For frozen peaches, thaw them and drain excess water. Both options work well in the recipe. Just adjust sugar based on their sweetness. For the full recipe, check out the Peach Paradise Crumble. You can enjoy making a delicious peach crumble with fresh ingredients and easy steps. By choosing the right peaches, sweetening them well, and preparing a crumbly topping, you create a tasty dessert. Always remember to adjust sweetness based on ripeness and explore variations with other fruits. Proper storage helps keep your crumble fresh. I hope these tips enhance your baking skills and inspire your creativity. Enjoy every bite!](https://stirredrecipes.com/wp-content/uploads/2025/06/9a371596-9c42-4ec5-903e-3f13455839b6.webp)
Are you ready to indulge in a warm, fruity treat? Our Peach Crumble Recipe is simple yet bursting with flavor! Using just a few fresh ingredients, I’ll guide you step-by-step …