Luscious Lemon Zucchini Bread Easy and Flavorful Recipe
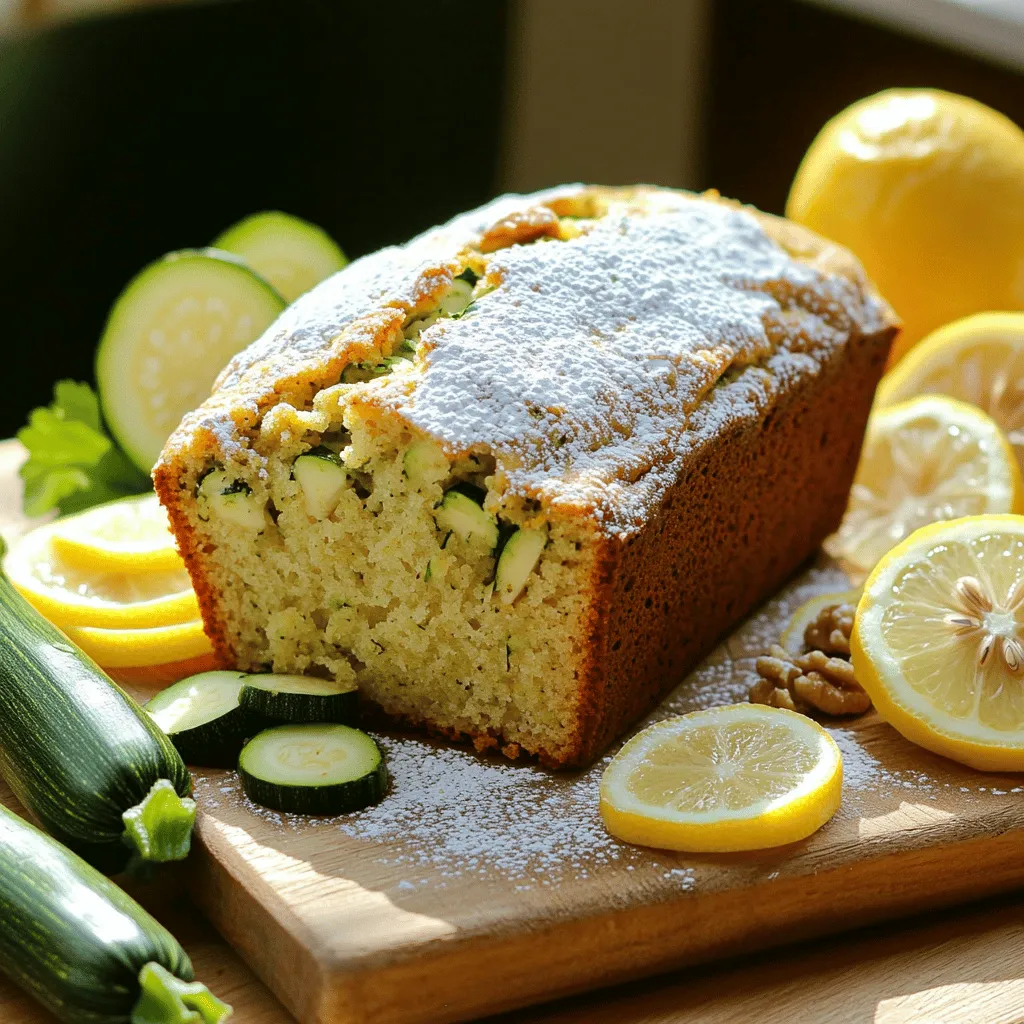
Are you ready to bake something delicious? This Luscious Lemon Zucchini Bread is both easy and full of flavor. It mixes fresh zucchini with a zesty lemon twist, making it …
Are you ready to bake something delicious? This Luscious Lemon Zucchini Bread is both easy and full of flavor. It mixes fresh zucchini with a zesty lemon twist, making it …

Looking for a tasty treat that blends the warmth of pumpkin with the freshness of zucchini? You’ve come to the right place! This Pumpkin Zucchini Bread is not only simple …

Looking for a quick and tasty dinner? My Garlic Parmesan Chicken & Potatoes hits the spot! This dish pairs juicy chicken with tender baby potatoes, all infused with rich garlic …

Are you ready to spice up your dinner routine? This Crispy Honey Garlic Tofu recipe brings bold flavor and crunch to your plate. Whether you’re a tofu lover or just …
![To create a delicious Cinnamon Sugar Zucchini Coffee Cake, gather these ingredients: - Grated zucchini (2 cups, packed, excess moisture squeezed out) - All-purpose flour (2 cups) - Granulated sugar (1 cup) - Brown sugar (1/2 cup, packed) - Unsalted butter (1/2 cup, softened) - Large eggs (3) - Vanilla extract (1 tsp) - Baking powder (2 tsp) - Baking soda (1 tsp) - Ground cinnamon (1 tsp) - Salt (1/2 tsp) - Chopped walnuts (optional, 1/2 cup) - Topping: granulated sugar (1/4 cup) and ground cinnamon (1 tbsp) These ingredients work together to create a moist and flavorful cake. The star of the show is the zucchini. Make sure to squeeze out excess moisture. This step helps keep the cake from becoming too soggy. I love the blend of cinnamon and sugar on top. It gives a sweet and crunchy finish. You can also add walnuts for a nice crunch, but they are optional. If you want to know how to put these ingredients together, check out the Full Recipe. It will guide you through each step for making this delightful treat. - Preheat the oven to 350°F (175°C). - Grease and flour a 9x13 inch baking pan. - In a large bowl, cream together the butter, granulated sugar, and brown sugar. - Mix until light and fluffy. - Add the eggs one at a time. - Stir in the vanilla extract. - In a separate bowl, whisk together the flour, baking powder, baking soda, ground cinnamon, and salt. - Gradually combine the dry ingredients with the wet mixture. - Alternate adding the grated zucchini. - Mix until just combined. - Pour the batter into the prepared baking pan. - Spread it evenly across the pan. - In a small bowl, mix together 1/4 cup granulated sugar and 1 tbsp ground cinnamon. - Sprinkle this topping over the batter. - Bake in the preheated oven for 30-35 minutes. - Check doneness with a toothpick; it should come out clean. - Allow the cake to cool in the pan for about 10 minutes. - Transfer to a wire rack to cool completely. For the full recipe, refer to the details provided above. To make this cake shine, start with well-drained zucchini. If your zucchini has too much water, the cake can turn soggy. Squeeze out the extra moisture using a clean towel. This simple step enhances the cake's texture. If you want to adjust the sweetness, you can try different sweeteners. Maple syrup or honey can work well in place of sugar. You could also use whole wheat flour for added fiber. These swaps make the recipe fit various diets. Mixing your batter is key. Be careful not to over-mix it. Stir until just combined to keep the cake light and fluffy. To check if your cake is ready, use a toothpick. Insert it into the center of the cake. If it comes out clean, your cake is done. If not, give it a few more minutes. When serving, slice the cake into neat squares. Sprinkle powdered sugar on top for a touch of sweetness. A fresh mint sprig adds a pop of color. Pair your cake with coffee or tea for the perfect treat. The warm flavors of cinnamon complement these beverages beautifully. For extra flair, you can serve it warm with a scoop of vanilla ice cream. Enjoy your delightful creation! {{image_2}} You can make great swaps in this recipe. For a healthier option, use whole wheat flour instead of all-purpose flour. Whole wheat adds fiber and a nutty taste. If you need gluten-free choices, try almond flour or a gluten-free blend. Both work well in this cake. If you want a dairy-free version, substitute plant-based butter for the unsalted butter. You can also use almond or oat milk in place of regular milk. This way, everyone can enjoy this treat! To give your cake an extra kick, consider adding chocolate chips or dried fruit. Chocolate chips melt into gooey pockets of joy. Dried fruit, like raisins or cranberries, adds a nice chewiness. You can also play with spices. Try adding nutmeg or allspice for a warm flavor twist. Just a pinch can change the whole taste and make your cake unique! Frosting can take your cake to the next level. A simple glaze made from powdered sugar and milk gives a sweet touch. If you want something richer, cream cheese frosting works wonders. It pairs nicely with the spice and sweetness of the cake. If you prefer a lighter dessert, serve it without frosting. The cake is still delicious on its own. Just slice and enjoy, maybe with a cup of coffee or tea! For the full recipe, check out the [Full Recipe]. To keep your cinnamon sugar zucchini coffee cake fresh, let it cool completely. After cooling, cut the cake into slices. Place the slices in an airtight container. You can also use plastic wrap to cover the cake. This method keeps the cake moist and tasty. For the best results, choose a container that fits the cake well. A glass or plastic dish with a lid works perfectly. Make sure there is no extra air inside. When stored at room temperature, the cake lasts about 2-3 days. If you put it in the fridge, it can stay fresh for up to a week. For longer storage, you can freeze the cake. Wrap each slice tightly in plastic wrap, then place them in a freezer bag. This method helps prevent freezer burn. Frozen cake can last for up to 3 months. Just remember to label the bag with the date. To enjoy your cake again, you can reheat it. If it’s refrigerated, take a slice and place it on a microwave-safe plate. Heat it for about 15-20 seconds. Check if it’s warm enough for your taste. If it’s frozen, let it thaw in the fridge overnight. Then, reheat as mentioned above. This way, the cake stays soft and delicious. Enjoy every bite! How can I tell if my zucchini is fresh? Look for zucchini that is firm and smooth. The skin should be shiny and free from blemishes. Fresh zucchini feels heavy for its size. If it has soft spots or wrinkles, it may be old. Can I use frozen zucchini in this recipe? Yes, you can use frozen zucchini! Just thaw it first and squeeze out excess water. This helps keep the cake from being soggy. How can I make this cake dairy-free? To make this cake dairy-free, use a plant-based butter. You can also swap regular milk with almond or oat milk. This keeps the taste rich without dairy. Can I reduce sugar without compromising texture? Yes, you can cut sugar by a third. Use unsweetened applesauce or mashed bananas to add moisture. This keeps the cake soft and sweet. Best beverages to pair with cinnamon sugar zucchini coffee cake? I love pairing this cake with coffee or herbal tea. A glass of cold milk works well too. These drinks balance the sweet and spicy flavors of the cake. How to serve guests without it sticking to plates? To prevent sticking, use a non-stick baking pan. Grease and flour it well before adding the batter. Serve slices on warm plates for easy lifting. This blog post covered all you need for a delicious Cinnamon Sugar Zucchini Coffee Cake. We explored the ingredients, steps to prepare, and even handy tips. You can tweak this recipe to fit your taste and dietary needs. Storing and reheating options ensure you enjoy it longer. Cooking with zucchini can be fun and tasty. So grab your ingredients, follow the steps, and indulge in this delightful dessert!](https://stirredrecipes.com/wp-content/uploads/2025/06/3b754dfc-89e0-4058-9378-99bbdc8f191e.webp)
Looking for a cozy treat that combines the warmth of cinnamon with the subtle sweetness of zucchini? You’ve found it! This Cinnamon Sugar Zucchini Coffee Cake is moist, delicious, and …
![- 4 medium zucchinis - 1 cup ricotta cheese - 1 cup shredded mozzarella cheese - 1/2 cup grated Parmesan cheese - 1 cup cherry tomatoes, halved - 1 tablespoon dried Italian herbs - 2 cloves garlic, minced - 1/2 teaspoon red pepper flakes - Salt and black pepper to taste - Olive oil for drizzling - Fresh basil for garnish (optional) Gathering the right ingredients is key to making delicious cheese stuffed zucchini boats. Start with four medium zucchinis. They should be firm and fresh. Next, you’ll need one cup of ricotta cheese. This cheese gives a creamy base to your filling. One cup of shredded mozzarella cheese adds a gooey texture that melts beautifully. You’ll also need half a cup of grated Parmesan cheese. This cheese brings a sharp flavor that makes the dish shine. For some freshness, add one cup of halved cherry tomatoes. They add color and a burst of juiciness. A tablespoon of dried Italian herbs adds depth. Mix in two cloves of minced garlic for a punch of flavor. If you want some heat, sprinkle in half a teaspoon of red pepper flakes. Don’t forget salt and black pepper to taste. Lastly, use olive oil for drizzling, which adds richness. Fresh basil can be used as a garnish to brighten the dish. If you want to follow the full recipe, check the detailed instructions above. First, preheat your oven to 375°F (190°C). This helps the zucchinis cook evenly. Next, wash the zucchinis well. Slice each zucchini in half lengthwise. Take a spoon and scoop out the center of each half. You want to create a boat shape. Don’t toss the scooped-out flesh; you will use it later in the filling. In a mixing bowl, combine the ricotta cheese, half of the mozzarella cheese, and the grated Parmesan cheese. Add the halved cherry tomatoes and the minced garlic. Then, mix in the dried Italian herbs, red pepper flakes, salt, and black pepper. Finally, add the chopped zucchini flesh you set aside. Stir gently until everything is well mixed. Now, generously fill each zucchini boat with the cheese mixture, pressing down lightly to pack it in. Arrange the stuffed zucchinis on a baking sheet lined with parchment paper. Drizzle olive oil over the top for added flavor. Sprinkle the remaining mozzarella cheese on top of each stuffed zucchini. Bake them in the preheated oven for 25-30 minutes. You want the zucchinis to be tender and the cheese to be golden and bubbly. Once done, take them out and let them cool for a few minutes. Enjoy this flavorful dish as part of your meal! For the complete recipe, check [Full Recipe]. To keep zucchini from getting soggy, salt them first. After slicing, sprinkle salt inside the boats. Let them sit for about 10-15 minutes. This draws out excess moisture. Then, pat them dry with a paper towel. You will have crispier zucchini. For a tasty cheese mixture, use fresh herbs. Basil and parsley brighten the flavors. Adding garlic enhances the taste, too. I like to mix in some red pepper flakes for a little heat. Always taste your mixture before filling the boats. Adjust salt and pepper as needed. Cheese stuffed zucchini boats pair well with a light salad. A simple arugula salad adds freshness and crunch. You can also serve them with crusty bread. This makes a great meal or side dish. For garnishes, fresh herbs are a must. Chopped parsley or basil look great on top. A drizzle of balsamic glaze adds a nice touch as well. You can even sprinkle some extra cheese for extra richness. For the full recipe, check out the Zesty Cheese Stuffed Zucchini Boats. {{image_2}} You can change the cheese in this recipe. Try goat cheese or feta. These cheeses add a tangy flavor. You can also mix in some cream cheese for a richer taste. Adding protein makes this dish heartier. Ground turkey or sausage works well. Cook the meat before mixing it with the cheese. This adds flavor and makes the meal more filling. If you want a vegan option, use dairy-free cheese. Many brands make great vegan cheese now. You can find them at most grocery stores. You can also add more veggies. Chopped spinach, bell peppers, or mushrooms can boost nutrition. Just sauté them lightly before mixing. This keeps them tender and flavorful. These variations let you customize your zucchini boats. For the full recipe, check out the details above. To store leftover cheese stuffed zucchinis, first, let them cool. Place them in an airtight container. You can keep them in the fridge for up to three days. If you want to keep them longer, freeze them. Wrap each stuffed zucchini in plastic wrap, then place them in a freezer bag. They can last up to three months in the freezer. When it's time to reheat, use an oven for the best results. Preheat your oven to 350°F (175°C). Place the zucchini on a baking sheet. Cover them with foil to keep them from drying out. Heat for about 15-20 minutes, or until warm. For a crisp top, remove the foil for the last five minutes. Enjoy your tasty leftovers! How do I make zucchini boats without cheese? You can swap cheese for cooked quinoa or lentils. Use your favorite spices to add flavor. Mix in veggies like bell peppers and onions for texture. This gives a tasty, cheesy feel without dairy. Can I prepare cheese stuffed zucchini boats ahead of time? Yes, you can prep them ahead. Stuff the zucchini boats and cover them in the fridge. Bake them when you’re ready to eat. This makes dinner quick and easy on busy nights. What's the ideal serving size for this recipe? One zucchini boat is a good serving size. Each boat is filling and packed with flavor. You can serve one or two boats per person, depending on your appetite. Are cheese stuffed zucchini boats healthy? Yes, they are a healthy choice! Zucchini is low in calories and high in fiber. The cheese provides protein and calcium. Plus, the tomatoes and herbs add vitamins and antioxidants. What is the calorie count per serving? Each cheese stuffed zucchini boat has about 150-200 calories. This may vary based on the cheese and toppings you use. You can check the Full Recipe for precise numbers. These cheese stuffed zucchini boats are a tasty and easy dish. You learned how to prepare them step-by-step, from scooping out the zucchini to packing in the flavorful filling. We explored tips to keep them from getting soggy and ways to serve them well. You can even try different cheeses or add protein, making this dish flexible. Enjoy making and sharing this recipe with friends and family. Cooking can be fun and rewarding!](https://stirredrecipes.com/wp-content/uploads/2025/06/c1f36112-6b1d-4a2a-835f-2e5a410c9a5f.webp)
Ready for a tasty dish that’s simple to make? These cheese stuffed zucchini boats pack flavor and satisfaction in every bite! With creamy cheeses and fresh veggies, this recipe is …

Who said you can’t indulge while eating healthy? I’m excited to share my recipe for Healthy & Moist Chocolate Zucchini Muffins. These delightful treats pack a chocolatey punch while hiding …
![To make Chicken Zucchini Casserole, you will need the following ingredients: - 2 large zucchinis, sliced into thin rounds - 2 cups cooked chicken, shredded or diced - 1 cup cherry tomatoes, halved - 1 cup shredded mozzarella cheese - 1 cup ricotta cheese - 1 cup shredded Parmesan cheese - 2 cloves garlic, minced - 1 teaspoon dried oregano - 1 teaspoon dried basil - ½ teaspoon red pepper flakes (adjust for heat preference) - Salt and pepper to taste - 1 tablespoon olive oil - Fresh basil leaves for garnish (optional) For substitutions, feel free to use different vegetables. Broccoli or bell peppers work well. You can swap the chicken for turkey or even use beans for a vegetarian option. If you do not have specific cheeses, try using any cheese you have on hand. This dish is flexible and forgiving, so get creative! You can check out the Full Recipe for more details on preparation and cooking times. To start, you need to prep the zucchinis and chicken. Slice the zucchinis into thin rounds. Use two large ones for best results. If you have leftover chicken, shred or dice it into small pieces. This makes it easier to mix later. Next, let’s sauté the garlic and zucchini. In a large skillet, heat one tablespoon of olive oil over medium heat. Add two minced garlic cloves and cook for about one minute until fragrant. Then, add the sliced zucchinis and cook for about five to seven minutes. Stir often. You want them to be slightly tender. Season with salt, pepper, a teaspoon of dried oregano, and a teaspoon of dried basil. After seasoning, remove the skillet from heat. Now, it’s time to assemble layers in the casserole dish. Grab a large mixing bowl. Combine the cooked chicken, sautéed zucchini, one cup of halved cherry tomatoes, and half of the shredded mozzarella and Parmesan cheese. Mix well until everything is combined. In a separate bowl, mix one cup of ricotta cheese with half a teaspoon of red pepper flakes and a pinch of salt. Grease a 9x13 inch casserole dish and spoon half of the chicken-zucchini mixture as the bottom layer. Spread half of the ricotta mixture on top. Then, sprinkle half of the remaining mozzarella cheese over that. Repeat these layers with the rest of the chicken-zucchini mixture, ricotta cheese, and finally top with the last of the mozzarella and Parmesan cheeses. Cover the casserole with foil. Place it in your preheated oven at 375°F (190°C). Bake it for 25 minutes. After that, remove the foil. Bake for an additional 15 to 20 minutes. You want the cheese to be bubbly and lightly golden. For tips, keep an eye on the casserole during the last few minutes. This helps you achieve that perfect bubbly, golden top. When serving, you can pair this dish with a simple green salad or garlic bread. These sides add freshness and balance the meal. For presentation, I suggest portioning the casserole into squares. This makes it easy to serve and looks nice on the plate. If you want to add a finishing touch, garnish with fresh basil leaves. This adds color and a nice aroma. For the full recipe, you can refer to the beginning of this article. - Overcooking zucchini: Zucchini cooks fast. If you cook it too long, it turns mushy. I suggest sautéing it for just 5-7 minutes until it is slightly tender. This keeps it firm and tasty in the casserole. - Skipping the resting time: After baking, let the casserole sit for 10 minutes. This helps it set and makes serving easier. If you skip this step, it may fall apart on your plate. - Additional seasoning options: You can add more spices to boost flavor. Try garlic powder, onion powder, or even a sprinkle of smoked paprika. These can add a unique twist to your dish. - Adding more vegetables: Feel free to mix in other veggies. Bell peppers, spinach, or mushrooms work great. Adding these can increase the flavor and nutrients in your casserole. Plus, it makes the dish more colorful and appealing! For the full recipe, check out the [Full Recipe]. {{image_2}} You can make your Chicken Zucchini Casserole unique by changing the protein. You can use turkey instead of chicken. This switch keeps the dish lean while still tasty. You could also try a vegetarian version. Swap the chicken for cooked lentils or chickpeas. These options add protein and flavor without meat. Cheese is another area for fun. Instead of mozzarella, experiment with cheddar or gouda. Each cheese can change the taste and texture of your casserole. Mixing cheeses can also bring out new flavors. Adding seasonal vegetables enhances the dish. In summer, bell peppers or eggplants work great. They add color and nutrients. In fall, you might add butternut squash for sweetness. These veggies blend well with zucchini and chicken. Herbs can also change your casserole's flavor. Instead of dried oregano and basil, try fresh thyme or parsley. Fresh herbs can give your dish a bright taste. Experiment with different herbs to find your favorite blend. You can easily make this dish your own. For more ideas, check the Full Recipe for inspiration! To keep your chicken zucchini casserole fresh, use airtight containers. Glass containers work well since they don't stain. Avoid plastic wrap for long-term storage. Store leftovers in the fridge for up to three days. When reheating, use a microwave or an oven. If using a microwave, cover the dish to keep moisture in. If using the oven, preheat to 350°F (175°C) and cover with foil. This helps the casserole stay soft and creamy. You can freeze the casserole for later. To do this, let it cool completely first. Then, place it in a freezer-safe container. Wrap it tightly with plastic wrap and then foil. This prevents freezer burn. You can freeze it for up to three months. When ready to eat, move it to the fridge to thaw overnight. Reheat in the oven at 350°F (175°C) until hot throughout, about 30-40 minutes. Enjoy the flavors just like fresh from the oven! Baking the chicken zucchini casserole takes about 40 to 45 minutes. First, you cover it with foil and bake for 25 minutes. Then, you remove the foil and bake it for another 15 to 20 minutes. This method helps the cheese become bubbly and golden without drying out the dish. Yes, you can make this dish ahead of time. Prepare the casserole up to the baking step, then cover and refrigerate it for up to 24 hours. When ready to bake, let it sit at room temperature for about 30 minutes. Then, bake it as instructed. This makes meal prep easy and saves time during busy days. You can serve many side dishes with chicken zucchini casserole. Here are some tasty options: - A simple green salad with vinaigrette - Garlic bread for a crunchy side - Steamed broccoli or green beans for added veggies - Quinoa or rice to soak up the flavors These sides complement the casserole and make a complete meal. For a full experience, check out the Full Recipe for more details. In this article, we covered the key ingredients and steps to make chicken zucchini casserole. You learned how to prepare, bake, and serve this dish, along with valuable tips and variations. Remember to avoid overcooking the zucchini and consider trying different proteins or veggies for a twist. Enjoying this wholesome meal not only fills your stomach but also brings great flavor to your table. I hope these tips make your cooking easier and more delicious!](https://stirredrecipes.com/wp-content/uploads/2025/06/1e372208-d724-4709-82b1-d81b73b62d47.webp)
Looking for a dish that’s both easy and packed with flavor? You’ll love this Chicken Zucchini Casserole! It’s a perfect meal for busy nights when you want something healthy and …

Craving a sweet treat that’s simple and delicious? You’ll love these Easy Strawberry Peach Pie Bites! With fresh strawberries and peaches wrapped in golden, flaky dough, this recipe is a …
![When making a Lemon Blueberry Zucchini Cake, it's key to have the right ingredients. Here’s what you need: - 2 cups grated zucchini (about 1 medium zucchini) - 1 cup fresh blueberries (plus extra for topping) - 1/2 cup unsalted butter, softened - 1 cup granulated sugar - 2 large eggs - 1 teaspoon vanilla extract - 1 cup all-purpose flour - 1/2 teaspoon baking powder - 1/2 teaspoon baking soda - 1/4 teaspoon salt - Zest of 1 lemon - 2 tablespoons fresh lemon juice - 1/2 teaspoon ground cinnamon Using fresh, high-quality ingredients really makes this cake shine. The zucchini adds moisture, while the blueberries provide a delightful burst of flavor. The lemon zest and juice bring a bright, refreshing taste that balances the sweetness. Don't forget to check the ripeness of your blueberries. Fresh ones will give the best flavor. For the zucchini, make sure to grate it finely. This helps it blend smoothly into the cake. You can find the full recipe [here]. Enjoy the process of gathering these ingredients, as they set the stage for a lovely baking experience! 1. Preheat oven and prepare the cake pan: First, set your oven to 350°F (175°C). Grease and flour an 8-inch round cake pan. This helps the cake come out easily later on. 2. Creaming the butter and sugar: In a large bowl, mix 1/2 cup of softened butter and 1 cup of granulated sugar. Beat them together until the mixture looks light and fluffy. This step adds air to the cake. 3. Incorporating eggs and wet ingredients: Next, add 2 large eggs, one at a time. Stir in 1 teaspoon of vanilla extract, the zest of 1 lemon, and 2 tablespoons of fresh lemon juice. Mix well until it looks smooth and combined. 1. Whisking together flour and leavening agents: In another bowl, whisk together 1 cup of all-purpose flour, 1/2 teaspoon of baking powder, and 1/2 teaspoon of baking soda. This mix helps the cake rise. 2. Adding cinnamon and salt: Add 1/4 teaspoon of salt and 1/2 teaspoon of ground cinnamon to the flour mixture. Whisk again to blend everything evenly. 1. Merging wet and dry mixtures: Gradually add the dry mix to the wet mixture. Stir gently until just combined. Be careful not to overmix, as this can make the cake tough. 2. Folding in zucchini and blueberries: Now, fold in 2 cups of grated zucchini and 1 cup of fresh blueberries. This adds moisture and flavor to the cake. 3. Pouring batter and garnishing: Pour the batter into your prepared cake pan. Smooth the top with a spatula. For a nice touch, scatter a few extra blueberries on top before baking. Now you're ready to bake. For the full recipe, be sure to check out the instructions! To get the best Lemon Blueberry Zucchini Cake, check for doneness with a toothpick. Insert it into the center of the cake. If it comes out clean, your cake is ready. If it has batter on it, bake for a few more minutes. Each oven is different. You may need to adjust the baking time. Start checking at 30 minutes, but don’t be afraid to let it bake longer if needed. For an attractive finish, dust the cooled cake with powdered sugar. Add a sprinkle of lemon zest and some fresh blueberries on top. This makes the cake look fancy and inviting. This cake pairs well with tea or coffee. The lemon and blueberry flavors work nicely with these drinks. Enjoy it as a sweet snack or a delightful dessert with friends! {{image_2}} You can switch out some ingredients for different textures and tastes. If you want a gluten-free cake, try using almond flour or a gluten-free blend. Almond flour gives a nutty flavor and moist texture. Just remember, it may need a little more liquid. If you like your cake sweeter, you can adjust the sugar. You can add more sugar if you prefer a sweeter slice. Alternatively, use honey or maple syrup for a different sweetness. Just reduce the liquid in the recipe to keep the balance. To amp up the flavor, consider adding nuts or spices. Chopped walnuts or pecans add a nice crunch. You might also try adding a pinch of nutmeg for warmth. If you want a twist, use other citrus fruits instead of lemon. Lime gives a fresh zing, while orange adds a sweet aroma. Just replace the lemon zest and juice with the zest and juice of your choice. This keeps the cake exciting and new every time you bake! To keep your Lemon Blueberry Zucchini Cake moist, follow these tips: - Let the cake cool completely before storing it. - Wrap the cake tightly in plastic wrap or foil. - Place it in an airtight container for best results. You can store the cake at room temperature or in the fridge. If you keep it at room temperature, it’s best to eat it within three days. If you store it in the fridge, it can last up to a week. Just remember that the fridge may dry it out a bit, so wrap it well. Freezing your cake is easy and keeps it fresh. Here’s how: - Slice the cake into portions before freezing. - Wrap each slice in plastic wrap, then in foil. - Place the wrapped slices in a freezer-safe bag or container. When you want to enjoy a slice, take it out of the freezer. Let it thaw in the fridge overnight. You can also microwave it for about 15-20 seconds if you need it fast. Enjoy your cake warm for the best taste! Can I use frozen blueberries? Yes, you can use frozen blueberries. Just make sure to thaw and drain them first. This keeps the cake from getting too wet. Fresh blueberries work best, but frozen ones are fine in a pinch. Is it possible to make this cake vegan? You can make this cake vegan. Replace the eggs with flax eggs or applesauce. Use plant-based butter instead of regular butter. This will keep the cake moist and tasty. How can I tell when the cake is done baking? To check if the cake is done, insert a toothpick into the center. If it comes out clean, the cake is ready. The edges should also pull slightly away from the pan. What are the nutritional benefits of zucchini in this cake? Zucchini adds moisture and fiber to the cake. It helps keep the cake light and fluffy. Zucchini is low in calories and high in vitamins like A and C. It also contains antioxidants. How many calories are in a slice of Lemon Blueberry Zucchini Cake? A slice of this Lemon Blueberry Zucchini Cake has about 200 calories. This can vary based on serving size and ingredients. It makes a tasty treat without too many calories. You can enjoy it guilt-free! For the complete recipe, check out the Full Recipe. In this blog post, I covered how to make a delicious Lemon Blueberry Zucchini Cake. We looked at each ingredient, from grated zucchini and fresh blueberries to butter and eggs. You learned step-by-step instructions for baking success. I shared tips for perfecting your cake and ideas for serving and storage. Remember, you can tweak the recipe to fit your taste. Use different flours or flavors. Enjoy this tasty treat with friends or family. Happy baking!](https://stirredrecipes.com/wp-content/uploads/2025/06/6044c600-7d4d-4f32-b9d6-a495372c8b65.webp)
Looking for a delicious way to use zucchini? You’re in the right place! This Lemon Blueberry Zucchini Cake is not only moist and flavorful, it’s also simple to make. With …