Broccoli Cheese Stuffed Chicken Easy Dinner Delight

Looking for a quick, tasty dinner? You’re in the right place! My Broccoli Cheese Stuffed Chicken combines juicy chicken breasts with a creamy, cheesy filling. This dish is loaded with …
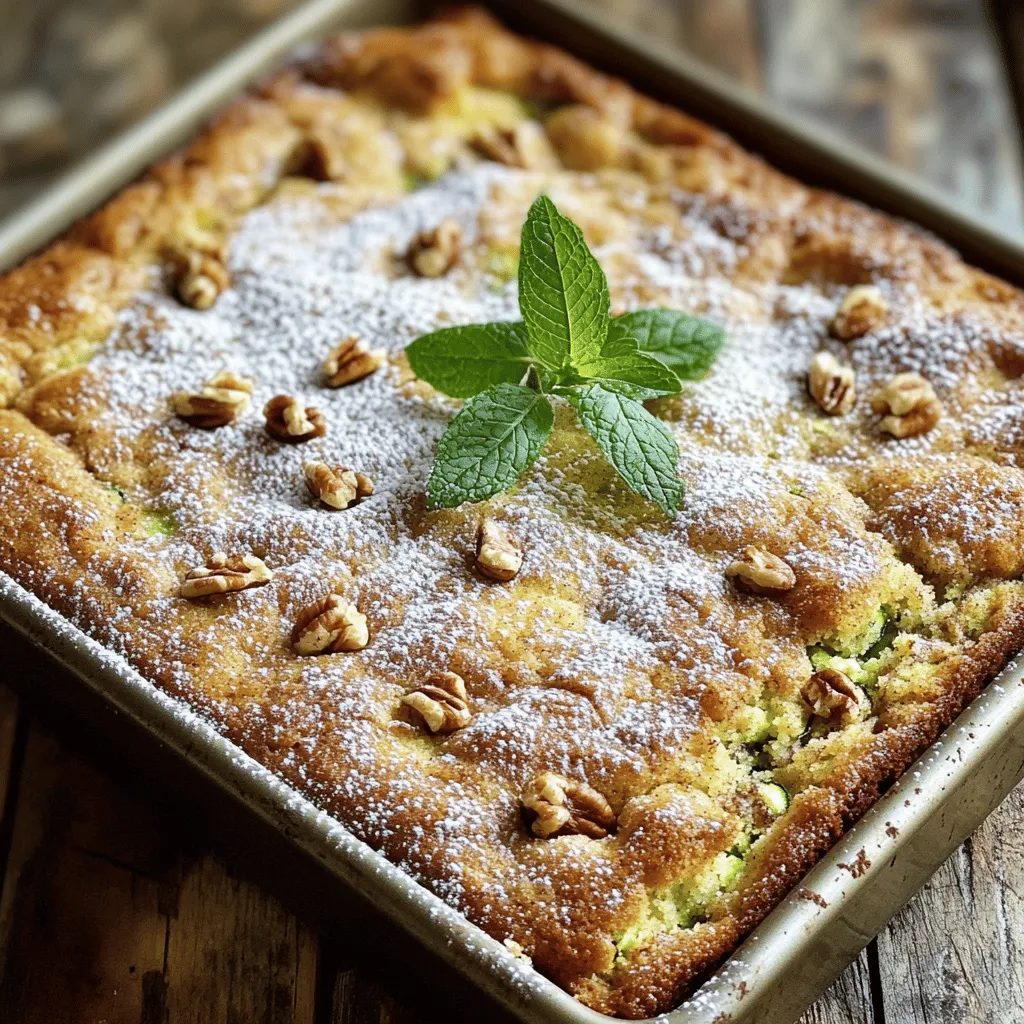
![To make these tasty banana zucchini muffins, you will need: - 1 cup ripe bananas, mashed (about 2-3 bananas) - 1 cup grated zucchini (about 1 medium zucchini) - 1/2 cup vegetable oil or melted coconut oil - 3/4 cup brown sugar - 1/4 cup honey (or maple syrup for a vegan option) - 2 large eggs - 1 teaspoon vanilla extract - 1 1/2 cups all-purpose flour - 1 teaspoon baking soda - 1/2 teaspoon baking powder - 1/2 teaspoon salt - 1 teaspoon cinnamon - Optional: 1/2 cup chopped walnuts or chocolate chips Using ripe bananas is key. They should be soft and sweet. This sweetness helps balance the flavors. Fresh zucchini adds moisture. Make sure to grate it finely. Good-quality oil, like coconut oil, gives a nice flavor. Use pure vanilla extract, not imitation. This adds depth to the muffins. Finally, choose fresh spices. They enhance the taste and aroma. If you don't have brown sugar, you can use white sugar. For a dairy-free muffin, replace eggs with flax eggs. Mix 1 tablespoon of ground flaxseed with 2.5 tablespoons of water. Let it sit for a few minutes to thicken. You can swap honey for maple syrup for a vegan option. Don't have walnuts? Use pecans or leave them out. For a gluten-free version, use a gluten-free flour blend. Follow the [Full Recipe] for precise steps. 1. First, preheat your oven to 350°F (175°C). This makes sure the muffins bake evenly. 2. Next, line a muffin tin with paper liners or grease it with cooking spray. This helps with easy removal. 3. In a large bowl, mash the bananas. You will need about 1 cup. This is roughly 2-3 ripe bananas. 4. Grate one medium zucchini to get 1 cup. Add this to the bowl with the bananas. 5. Pour in 1/2 cup of vegetable oil or melted coconut oil. Stir the mixture until everything is well combined. 6. Now, add 3/4 cup brown sugar, 1/4 cup honey, 2 large eggs, and 1 teaspoon vanilla extract. Mix until smooth. 7. In another bowl, whisk together 1 1/2 cups all-purpose flour, 1 teaspoon baking soda, 1/2 teaspoon baking powder, 1/2 teaspoon salt, and 1 teaspoon cinnamon. This creates your dry mix. 8. Gradually add the dry mix to the wet mix. Stir until no dry flour remains. Be careful not to overmix. 9. If you want, fold in 1/2 cup of chopped walnuts or chocolate chips for extra flavor. 1. Spoon the batter evenly into the muffin tin. Fill each cup about 3/4 full. This allows space for the muffins to rise. 2. Place the muffin tin in the preheated oven. Bake for 18-20 minutes. 3. To check if they are done, insert a toothpick into the center of a muffin. If it comes out clean, they are ready. - Start checking the muffins at 18 minutes. They might be done early. - If you see moist batter on the toothpick, bake for a few more minutes. - Remember, the muffins will continue to cook a bit after you remove them from the oven. - Let them cool in the tin for about 5 minutes. Then transfer them to a wire rack to cool completely. For the full recipe, be sure to check the detailed instructions. Mixing is key to fluffy muffins. Start by mashing bananas well. You want a smooth base. Grate your zucchini finely to blend in easily. When mixing wet and dry ingredients, stir gently. Overmixing makes muffins tough. Stop mixing when you no longer see dry flour. This keeps your muffins light and airy. To boost flavor, add a pinch of nutmeg with the cinnamon. This adds warmth and depth. Use ripe bananas; they are sweeter and tastier. You can also try different extracts. Almond or maple can add fun twists. For crunch, fold in nuts or chocolate chips. This makes every bite exciting. One mistake is skipping the oil. It keeps your muffins moist. Don’t forget to preheat your oven. A hot oven helps muffins rise properly. Avoid packing flour too tightly in your cup. Use a spoon to scoop and level it off. Also, check muffins early. Overbaking makes them dry. For the perfect bake, use a toothpick test. Insert it in the center; if it comes out clean, they are done. For more detailed steps, check out the Full Recipe. {{image_2}} You can easily make these muffins gluten-free. Use a gluten-free all-purpose flour blend. Look for a mix that includes xanthan gum. This helps mimic the texture of regular flour. You may need to adjust the baking time slightly. Check for doneness with a toothpick as you bake. To make these muffins vegan, swap the eggs for flax eggs. Mix one tablespoon of flaxseed meal with three tablespoons of water. Let it sit for five minutes to thicken. You can also replace honey with maple syrup. This keeps the sweetness while keeping it plant-based. Feel free to get creative with flavors. Add spices like nutmeg or ginger for a warm touch. You can also mix in fruit like blueberries or cranberries. Nuts like walnuts or pecans add crunch. For a sweeter twist, consider chocolate chips. These add rich flavor and a fun surprise in each bite. Check the full recipe for the base, then explore these fun twists. Storing your Banana Zucchini Muffins correctly keeps them fresh. Place them in an airtight container at room temperature. They will stay good for about 2-3 days. If you want them to last longer, consider refrigerating them. Just remember, the fridge can dry them out a bit. Freezing is a great way to save muffins for later. Allow your muffins to cool completely. Wrap each muffin in plastic wrap or foil. Then, place them in a freezer bag. They can stay fresh for up to three months. When you want one, just take it out and let it thaw at room temperature. To enjoy warm muffins again, reheat them in the oven. Preheat your oven to 350°F (175°C). Place the muffins on a baking sheet and heat for about 5-10 minutes. You can also use the microwave. Heat for about 10-15 seconds, but be careful not to make them too hot. For a special treat, add a drizzle of honey before enjoying! For the full recipe, check out the earlier section. Yes, you can use frozen zucchini or bananas. Just remember to thaw them first. Make sure to drain any excess water from the zucchini. This helps keep your muffins from getting soggy. Frozen bananas are great too. They become softer when thawed, making them easy to mash. This keeps the muffins moist and tasty. To make these muffins healthier, swap some ingredients. You can use whole wheat flour instead of all-purpose flour. This adds fiber and nutrients. You can also reduce the sugar. Try using half the amount of brown sugar. You might sweeten with applesauce or yogurt. Adding nuts or seeds boosts protein too. Each small change makes a big difference in nutrition. These muffins are great on their own, but you can pair them with many items. A nice option is to serve them with a spread. Cream cheese or nut butter adds flavor and richness. You can also enjoy them with a cup of tea or coffee. For a fun twist, try them with a fruit salad on the side. This adds freshness and color to your meal. For the full recipe, you can check the details above. This article covered everything you need for making delicious Banana Zucchini Muffins. We explored the key ingredients, including how to choose the right quality. I shared step-by-step instructions and important tips to avoid mistakes. You also learned about gluten-free options and ways to store your muffins. In conclusion, these muffins are easy to make healthy and fun to vary. Enjoy mixing flavors and sharing them with friends!](https://stirredrecipes.com/wp-content/uploads/2025/07/74ee1a16-ba2f-4a36-820c-4613ec1bf1f4.webp)

![When crafting Lemon Raspberry Zucchini Bread, having the right ingredients is key. Here’s what you need: - Zucchini: 1 medium, grated (about 1 cup) - Raspberries: 1 cup, fresh or frozen - Flours: 1 cup all-purpose, 1/2 cup whole wheat - Leavening Agents: 1 teaspoon baking powder, 1/2 teaspoon baking soda - Seasonings: 1/4 teaspoon salt, 1/2 teaspoon ground cinnamon - Sugars: 1/2 cup granulated, 1/4 cup brown sugar, packed - Eggs: 2 large - Oils & Flavorings: 1/3 cup vegetable oil, 1 teaspoon vanilla extract - Citrus: Juice and zest of 1 lemon - Optional Add-ins: 1/4 cup chopped walnuts or almonds These ingredients bring together a delightful mix of flavors. The zucchini keeps the bread moist, while the raspberries add a burst of sweetness. The lemon juice and zest brighten up the loaf, making each bite refreshing. Using both all-purpose and whole wheat flour gives the bread a nice texture. The eggs bind everything together, ensuring a perfect rise. You can choose fresh or frozen raspberries based on your preference and what you have on hand. If you want some crunch, add walnuts or almonds. To make this treat, gather all these ingredients. I recommend prepping them ahead of time. It makes mixing easier and quicker. You can find the full recipe to see how to mix and bake these ingredients into a delicious loaf! Zucchini Grating Techniques To prepare the zucchini, wash it well and then grate it using a box grater. This method creates fine shreds that mix easily into the batter. You can leave the skin on for added color and nutrients. Make sure to squeeze out excess moisture using a clean kitchen towel. This step helps keep the bread from becoming too wet. Berry Handling: Fresh vs. Frozen If you use fresh raspberries, rinse them gently and let them dry on a towel. If you prefer frozen raspberries, thaw them first and drain any excess liquid. Frozen berries may break apart more easily, so handle them with care. Both fresh and frozen options work well, but fresh may give a brighter flavor. Measuring Dry and Wet Ingredients Use dry measuring cups for the flour and sugar. Spoon the flour into the cup and level it off with a knife for accuracy. For wet ingredients like oil and lemon juice, use a liquid measuring cup. Pour with care to ensure you get the right amounts. Combining Dry Ingredients In a medium bowl, whisk together the all-purpose flour, whole wheat flour, baking powder, baking soda, salt, and cinnamon. This mix helps evenly distribute the leavening agents and spices, ensuring a well-risen loaf. Set this bowl aside for later. Whisking Wet Ingredients In a large bowl, combine the granulated sugar, brown sugar, eggs, vegetable oil, lemon juice, lemon zest, and vanilla extract. Use a whisk to mix these ingredients until they look smooth and creamy. This step adds richness and flavor to your bread. Folding in Zucchini and Berries Gently fold the grated zucchini and raspberries into the wet mixture. Use a spatula to combine the ingredients without breaking the berries. Be careful not to over-mix, as this can make the bread tough. A few lumps are okay! Pouring Batter into Loaf Pan Once mixed, pour the batter into a greased 9x5-inch loaf pan. Use a spatula to smooth the top. This helps ensure even baking and a nice shape. Baking Time and Temperature Bake your bread in a preheated oven at 350°F (175°C) for about 50-60 minutes. Check for doneness by inserting a toothpick into the center. If it comes out clean or with just a few crumbs, your bread is ready. Cooling Instructions After baking, remove the pan from the oven and let it cool for about 10 minutes. Then, transfer the bread to a wire rack to cool completely. This step helps prevent soggy bottoms and allows for better slicing. Enjoy your Lemon Raspberry Zucchini Bread! For the exact recipe, check the Full Recipe above. Avoiding Over-Mixing for Texture When making Lemon Raspberry Zucchini Bread, mixing too much can ruin the texture. Mix just enough until the dry and wet ingredients blend. A few lumps are okay. This keeps the bread light and fluffy. Ensuring Proper Baking Time Baking time is crucial for perfect bread. Check at 50 minutes, but it may take up to 60 minutes. Insert a toothpick in the center. If it comes out clean, your bread is ready. If it has wet batter, give it more time. Serving Suggestions Serve the bread warm or at room temperature. Slice it into thick pieces. Placing it on a rustic wooden board adds charm. You can also pair it with tea or coffee for a delightful treat. Garnishing for Visual Appeal To make your bread look special, add a few fresh raspberries on top. A light dusting of powdered sugar adds a sweet touch. If you want extra flavor, drizzle a simple lemon glaze over the slices. Issues with Moisture Levels Too much moisture can make your bread soggy. Make sure to drain excess water from the grated zucchini before mixing. This ensures the right balance of moisture. Overbaking or Undercooking Tips Overbaking can dry out your bread. Keep an eye on it as it bakes. If you underbake, the center will be gooey. Always test with a toothpick to find the sweet spot for doneness. For the full recipe, click here [Full Recipe]. {{image_2}} You can change the berries to create new flavors. Strawberries or blueberries work great. If you want a twist, try mixing a few strawberries with the raspberries. You will enjoy a sweet and tart bread. Blueberries add a lovely burst of flavor too. You can also switch up the citrus. Instead of lemon, use orange or lime. Both add a unique taste that pairs well with the zucchini. Orange zest gives a sweet and bright flavor. Lime adds a nice tang. If you want a healthier bread, you can substitute the flour. Use Whole30 compliant or gluten-free flour instead. Almond flour or coconut flour can work well. They keep the bread moist and tasty. To cut down on sugar, use ripe bananas or unsweetened applesauce. You can reduce the granulated sugar by half. Your bread will still taste great without all the sweetness. For vegan options, replace eggs with flaxseed or applesauce. Mix one tablespoon of flaxseed meal with three tablespoons of water. Let it sit for a few minutes until it thickens. This mixture works well for binding the ingredients. You can also use dairy-free milk instead of regular milk. Almond milk or oat milk are great choices. They keep the bread moist without adding dairy. You can find the complete recipe in the full recipe section. Enjoy exploring these tasty variations! You can store leftover lemon raspberry zucchini bread in two ways: at room temperature or in the fridge. - Room Temperature: Wrap the loaf in plastic wrap or foil. This method keeps the bread soft and moist. - Refrigeration: If you want to keep it longer, place it in an airtight container in the fridge. This slows down spoilage. Best Storage Containers: Use a glass or plastic container with a tight lid. This helps keep moisture in and air out. Freezing is a great option for long-term storage of this bread. - How to Freeze for Long-Term Storage: First, let the bread cool completely. Then, wrap it tightly in plastic wrap. After that, place it in a freezer-safe bag. Label the bag with the date. - Thawing Tips for Best Quality: To enjoy your bread at its best, thaw it in the fridge overnight. This keeps it moist and fresh. You can also leave it out at room temperature for a few hours. Understanding shelf life helps you enjoy your bread at its best. - Duration for Storing at Room Temperature: When stored at room temperature, the bread stays fresh for about 2-3 days. Just make sure it stays wrapped. - Best Practices for Maintaining Freshness: Keep the bread in a cool, dry place. Avoid exposing it to heat or sunlight, as this can dry it out. Enjoy your lemon raspberry zucchini bread fresh and flavorful by following these storage tips! For the full recipe, check the earlier sections. Yes, you can use frozen raspberries. First, thaw them before adding to the batter. To thaw, place the frozen raspberries in a bowl at room temperature for about 30 minutes. This helps keep the berries soft and juicy. Just be sure to gently fold them in to avoid breaking them apart. You can easily make this recipe gluten-free. Use a gluten-free flour blend as a substitute. Look for blends that include xanthan gum for better texture. Almond flour and coconut flour can also work, but you may need to adjust the liquid in the recipe. Start with a 1:1 ratio and then tweak as needed. To keep Zucchini Bread moist and fresh, wrap it in plastic wrap or foil. Store it at room temperature for up to three days. If you want to keep it longer, place it in the fridge, where it can last for about a week. You can also freeze it for up to three months. Just slice before freezing for easy servings. In summary, this post shared a simple recipe using zucchini and raspberries. We covered ingredient preparation, mixing methods, and baking tips. You learned how to avoid common mistakes and enhance your bread with flavor variations. You now know how to store leftovers and keep them fresh. Baking should be fun and rewarding. Don’t hesitate to experiment with flavors and techniques. Enjoy your delicious creation and share it with friends or family!](https://stirredrecipes.com/wp-content/uploads/2025/07/9d86f108-8fd8-46e5-a72c-6d87e3eae779.webp)
![- Ripe peaches - Feta cheese - Mixed greens - Red onion - Walnuts For this salad, you need ripe peaches. They should feel soft but not mushy. Feta cheese brings a salty creaminess that balances the sweet peaches. Use mixed greens like arugula, spinach, and romaine for a fresh base. Thinly slice red onion for a slight kick. Toasted walnuts add a nice crunch and nutty flavor. - Balsamic glaze - Olive oil - Salt and pepper These pantry staples enhance your salad. Balsamic glaze adds sweetness and depth. A drizzle of olive oil keeps it rich and smooth. Season with salt and pepper to bring out all the flavors. - Additional nuts - Fresh herbs - Alternative dressings You can customize your salad. Add more nuts like pecans or almonds for extra crunch. Fresh herbs like basil or mint can brighten the dish. Try different dressings, too, if you want to switch it up. This Simple Peach Feta Salad is all about fresh flavors and your personal touch. Check the Full Recipe for more details. Start with your mixed greens. Wash them well and spin them dry. This step keeps the salad crisp. Use a mix of arugula, spinach, and romaine for great flavor. Next, slice the peaches. Choose ripe peaches for sweetness. Cut them into thin wedges. This way, they blend nicely with the greens. Now, grab a large salad bowl. Combine the mixed greens and peach slices in the bowl. Add crumbled feta cheese and thinly sliced red onion. This mix creates a colorful and tasty dish. When it’s time to toss the salad, do it gently. Use two large spoons to lift and turn the ingredients. This keeps the peaches and feta intact. Toasting walnuts is key for flavor. It brings out their nutty richness. Heat a small skillet over medium heat. Add the walnuts and stir them for 3-5 minutes. You’ll know they’re ready when they smell great and turn golden brown. Let the walnuts cool before adding them to the salad. This adds a nice crunch and depth to your dish. For the full recipe, check the [Full Recipe]. When picking peaches, look for ripe ones. Ripe peaches feel slightly soft and smell sweet. If they are too soft, they may be overripe. Overripe peaches can be mushy and lose flavor. You want peaches that are in season. Late summer is the best time for juicy, fresh peaches. This salad shines with a mix of sweet and salty. The peaches are sweet while feta adds saltiness. You can also add herbs like mint or basil for freshness. A sprinkle of black pepper gives a nice kick too. For extra depth, consider using a touch of chili flakes. Pair this salad with grilled chicken or fish for a complete meal. It also goes well with crusty bread or a light soup. To make it pretty, serve in a clear bowl. Layer the greens, and then add the peaches and feta on top. Drizzle the dressing last for a beautiful finish. For the full recipe, check out the details above! {{image_2}} You can switch fruits based on what’s fresh. In summer, use juicy peaches. In fall, swap for apples or pears. You can also add protein like grilled chicken or shrimp. This makes the salad a full meal. For a vegan version, skip the feta. Use avocado for creaminess instead. For gluten-free options, check your balsamic glaze. Some brands add gluten. Choose one that’s safe for you. Try different dressings to change the taste. A honey mustard or lemon vinaigrette works well. You can also add spices like black pepper or fresh herbs like basil. Zest from a lemon or lime adds a nice zing, too. Want to try the full experience? Check out the Full Recipe for more details! To store leftover salad, place it in an airtight container. This keeps the salad fresh longer. If you have extra dressing, store it separately. Avoid mixing it with the salad to prevent sogginess. Keep the salad in the fridge right after serving. You should serve leftover salad cold. If you prefer, let it sit at room temperature for a few minutes. Just remember, do not heat it in the microwave. The freshness of the peaches and greens is best enjoyed cold. The salad lasts about 2-3 days in the fridge. After this time, check for spoilage. Signs include brown or slimy greens and mushy peaches. If you see any of these signs, toss the salad out. Enjoy your Simple Peach Feta Salad while it’s fresh! For the full recipe, check out the section earlier in this article. Yes, you can prepare parts ahead of time. You can wash and dry the mixed greens a day before. Store them in a sealed container with a paper towel. This keeps them crisp. Slice the peaches just before serving. They can brown quickly. You can also crumble the feta and toast the walnuts in advance. Mix everything just before serving for the best taste. If you don’t have feta, you can try goat cheese. It has a creamy texture and tangy taste. Another option is ricotta, which is milder. You might also like using blue cheese for a stronger flavor. Each cheese will change the salad's taste. Choose based on your preference. To ripen peaches fast, place them in a paper bag. The bag traps ethylene gas and speeds up ripening. You can also add an apple or banana to the bag. These fruits release more ethylene. Keep the bag at room temperature. Check daily until they are soft. Enjoy your ripe peaches in the Simple Peach Feta Salad! This blog post covered how to create a Simple Peach Feta Salad. We discussed fresh ingredients like ripe peaches, feta cheese, and walnuts. I shared tips for perfect prep and assembly. You learned about storage, variations, and flavor twists, too. This salad is easy to make, refreshing, and fits many diets. Enjoy experimenting with flavors and fresh ingredients. Your perfect salad awaits!](https://stirredrecipes.com/wp-content/uploads/2025/07/821fbaee-1218-448d-a504-36e56f0e5faa.webp)
![- 4 boneless, skinless chicken breasts - 1 cup breadcrumbs - 1/2 cup grated Parmesan cheese - 2 tablespoons fresh parsley, finely chopped - 2 tablespoons fresh basil, finely chopped - 1 teaspoon garlic powder - 1 teaspoon onion powder - 1/2 teaspoon salt - 1/2 teaspoon black pepper - 2 large eggs - 1 tablespoon Dijon mustard - 1/4 cup all-purpose flour - Olive oil spray When making easy oven baked chicken cutlets, focus on quality ingredients for the best taste. Start with fresh chicken breasts. They should be boneless and skinless for easy handling. The breadcrumbs add crunch, while Parmesan cheese gives a rich flavor. For added taste, I use fresh herbs like parsley and basil. They make the dish brighter and more aromatic. Garlic powder and onion powder enhance the savory notes. Salt and black pepper bring everything together, creating a well-rounded flavor. The binding ingredients are key for the perfect crust. Eggs mixed with Dijon mustard help the breadcrumbs stick. Flour provides a base layer that keeps the chicken moist. A light spray of olive oil before baking helps achieve that crispy finish. This is a simple yet effective way to create a delicious meal. For the full recipe, check out the steps that follow. - Preheat your oven to 400°F (200°C). - Line a baking sheet with parchment paper and spray with olive oil. To start, you need to preheat the oven. This helps cook the chicken evenly. While it warms up, get a baking sheet ready. The parchment paper will prevent sticking and make clean-up easier. A light spray of olive oil adds a nice touch. - Combine breadcrumbs, Parmesan, and herbs in one dish. - Whisk eggs and mustard in a second dish and place flour in a third dish. Next, let's prepare the coatings. In one dish, mix breadcrumbs, grated Parmesan, and your favorite herbs. This will give the chicken great flavor. In another dish, whisk the eggs and Dijon mustard. This mix helps the coating stick. Finally, place flour in a third dish. Each step builds flavor and texture. - Coat chicken with flour, dip in egg mixture, and press into breadcrumb mixture. - Place coated chicken cutlets on the prepared baking sheet. Now it’s time to coat the chicken. First, take a chicken breast and lightly coat it with flour. Shake off any extra flour. Next, dip it in the egg mixture, ensuring it's well-covered. Finally, press it into the breadcrumb mix. Make sure each piece is fully coated. Place the coated chicken cutlets on the baking sheet. - Lightly spray tops with olive oil for crispiness. - Bake for 20-25 minutes, flipping halfway. Before baking, give the tops a light spray of olive oil. This helps create a crispy finish. Bake in the preheated oven for 20 to 25 minutes. Remember to flip the cutlets halfway through. This ensures even cooking. When done, they should be golden brown and juicy. Enjoy your crispy and flavorful chicken cutlets! For more details, check the Full Recipe. To get that perfect crunch, choose the right breadcrumbs. Use panko breadcrumbs. They provide a light, airy texture that makes the cutlets crispy. Before baking, lightly spray the tops with olive oil. This adds extra crunch and color. Flavor is key in any dish. You can mix up the herbs and spices to suit your taste. Try adding a pinch of paprika or a dash of cayenne for some heat. You can also marinate the chicken for a few hours. This adds depth and makes the chicken juicy and tasty. One common mistake is overcrowding your baking sheet. This can lead to uneven cooking. Make sure there is space between each cutlet. Also, ensure that the chicken is fully coated. A good coat keeps the chicken moist and prevents dryness. Follow these tips for the best results and enjoy your meal! {{image_2}} If you need a gluten-free option, use almond flour or gluten-free breadcrumbs. These work well and keep your cutlets crispy. You can also swap chicken for pork or turkey cutlets. Just ensure the cooking time adjusts to the thickness of the meat. To add new flavors, try different herbs like thyme or oregano. These herbs give a fresh taste and can change the whole dish. You can also use flavored breadcrumbs. Options like garlic or Italian-seasoned breadcrumbs add a fun twist to the cutlets. Pair your chicken cutlets with dips like marinara or ranch. This adds extra flavor and fun. For sides, consider mashed potatoes or steamed veggies. These options make a well-rounded meal. You can even serve the cutlets with a side salad for a fresh crunch. Don't forget to check the [Full Recipe] for more ideas! To keep your chicken cutlets fresh, let them cool first. This helps prevent sogginess. Once cool, place them in airtight containers. Store them in the fridge. Your leftovers will stay good for about three to four days. If you want to save cutlets for later, freezing works well. Wrap each cutlet tightly in plastic wrap. Then, place them in a freezer bag. Make sure to remove any air to avoid freezer burn. When you’re ready to eat, thaw them in the fridge overnight. To reheat, bake them in the oven at 375°F (190°C) for about 15-20 minutes. This keeps them crispy and tasty. In the fridge, chicken cutlets last about three to four days. Look for signs of spoilage like a bad smell or slimy texture. If you freeze them, they stay good for up to three months. After that, they may lose flavor and texture. Always label your containers with dates to keep track. Enjoy your cutlets at their best! For the full recipe, check out the crispy herb-infused oven baked chicken cutlets. To make chicken cutlets crispy, follow these tips: - Use fresh breadcrumbs instead of store-bought for better crunch. - Lightly spray the tops with olive oil before baking. - Bake at 400°F (200°C) for optimal crispiness. - Flip the cutlets halfway through cooking for even browning. - Avoid overcrowding the baking sheet; give each cutlet space to crisp. By following these steps, your chicken cutlets will turn out crispy and golden every time. It takes about 20 to 25 minutes to bake chicken cutlets at 400°F (200°C). Make sure to check that they are cooked through. The cutlets should be golden brown on the outside. Use a meat thermometer; the internal temperature should reach 165°F (74°C). This ensures your meal is not only tasty but safe to eat. Yes, you can make these cutlets ahead of time. Here are some meal prep tips: - Prepare the chicken cutlets and coat them as directed. - Store uncooked cutlets in an airtight container in the fridge for up to 24 hours. - You can also freeze the cutlets before baking. Place them in a single layer on a baking sheet, freeze, and then transfer them to a freezer bag. - When ready to cook, bake from frozen, adding 5 to 10 minutes to the cooking time. This makes weeknight dinners quick and stress-free. These chicken cutlets pair well with many side dishes. Consider these options: - A fresh garden salad for crunch and color. - Roasted vegetables like carrots and broccoli for a healthy balance. - Mashed potatoes or rice for a hearty addition. - Dipping sauces like marinara or ranch for extra flavor. These sides will complement your crispy chicken cutlets perfectly! You covered the key steps to make easy oven-baked chicken cutlets. From selecting main ingredients to perfecting the coating, this guide aims to make cooking simple and fun. Follow the tips for a crispy texture and explore variations to suit your taste. Storing and reheating leftovers is easy, ensuring you enjoy your meal later. With this knowledge, you can create a delicious dish that friends and family will love. Dive in and make these cutlets your new favorite!](https://stirredrecipes.com/wp-content/uploads/2025/07/27d54864-07bc-4a0b-aa91-ef38c70e4f1b.webp)
![- 3 medium zucchinis - 2 cups cherry tomatoes - 1 medium red onion - Balsamic vinegar - Olive oil - Dried oregano and thyme - Grated Parmesan cheese - Fresh basil leaves for garnish When I think about a simple and tasty dish, the Balsamic Zucchini Tomato Bake comes to mind. This dish shines with fresh veggies and bold flavors. The main ingredients are key. You will need three medium zucchinis, two cups of cherry tomatoes, and one medium red onion. This trio is a great base for any bake. Next, we add flavor enhancers. Balsamic vinegar and olive oil bring richness. Dried oregano and thyme add warmth and depth. Sometimes, I sprinkle grated Parmesan cheese on top for extra creaminess. Fresh basil leaves are a must for garnish. They add a bright, fresh touch. For the full recipe, check out the [Full Recipe]. This dish not only looks appealing but also tastes amazing. I love how the flavors blend together during baking. Each bite is a delightful mix of sweet, tangy, and savory. - Preheat the oven to 400°F (200°C). - Slice zucchinis into rounds. - Halve the cherry tomatoes. - Slice the red onion thinly. First, you need to get your oven hot. Preheating helps the zucchini bake evenly. While the oven heats, prepare your veggies. Slice the zucchinis into rounds. This gives them a nice shape and helps them cook well. Halve the cherry tomatoes; their sweet juice adds flavor. Finally, slice the red onion thin. This adds a nice crunch and sharpness to the dish. - Whisk balsamic mixture. - Toss vegetables with the balsamic mixture. Next, make the balsamic mixture. In a small bowl, whisk together minced garlic, balsamic vinegar, olive oil, dried oregano, dried thyme, salt, and pepper. Taste it; it should be tangy and savory. Now, pour this mixture over your chopped vegetables. Toss them gently until all the veggies are coated. This step is key to infusing flavor throughout the dish. - Transfer to baking dish. - Sprinkle cheese and bake. Now, transfer the vegetable mix to a baking dish. Spread it out evenly to ensure even cooking. If you like cheese, sprinkle grated Parmesan on top. It adds a lovely, creamy finish. Bake in your preheated oven for 25-30 minutes. The zucchini should be tender and caramelized. When it’s done, let it cool a bit. Garnish with fresh basil leaves before serving. Enjoy your Balsamic Zucchini Tomato Bake! For the complete recipe, check the [Full Recipe]. For a rustic look, serve the Balsamic Zucchini Tomato Bake in the dish it was cooked in. This adds charm and warmth to your meal. To enhance the dish's colors, drizzle some extra balsamic reduction over the top. Add a few fresh basil leaves as a final touch. You can pair this bake with a light salad or crusty bread for a complete meal. To ensure the zucchini has the right texture, slice it into even rounds. This helps it cook evenly. If you prefer a firmer zucchini, reduce the baking time. Check the bake at 20 minutes; it may need just a few extra minutes to reach your desired doneness. Consider adding fresh herbs like rosemary or parsley for extra flavor. You can also spice it up with a pinch of red pepper flakes for heat. If you want to make it more filling, add grilled chicken or chickpeas for protein. Quinoa or brown rice can also make great additions for a hearty dish. {{image_2}} You can swap ingredients to change the dish. Try using bell peppers or mushrooms for extra flavor. Carrots and eggplant also work well. If you're avoiding gluten, this recipe is naturally gluten-free. For a dairy-free option, skip the Parmesan cheese or use a plant-based alternative. Want to spice things up? Add red pepper flakes or jalapeños for heat. You can also try different vinegars. Apple cider vinegar or red wine vinegar can change the taste. Each vinegar adds a unique twist to the dish. Grilling is a fun option! It gives the veggies a smoky flavor. Just toss them on a grill until they're tender. If you prefer a slow cooker, you can use it too. Cook on low for about four hours. This method makes the veggies very soft and flavorful. Explore the [Full Recipe] for all the cooking steps and tips! After you serve Balsamic Zucchini Tomato Bake, store leftovers in the fridge. Let the dish cool down first. Then, place it in an airtight container. This helps keep the flavors fresh. Glass containers work best, but plastic ones are fine too. Make sure to seal them tightly. Leftovers can last for up to three days. When you reheat the bake, aim for gentle heat. The best method is to use an oven. Set it to 350°F (175°C). Place the dish in for about 10-15 minutes. This keeps the zucchini tender. Use a cover to keep moisture in. Avoid the microwave, as it can make the zucchini mushy. If you want to freeze this dish, first let it cool completely. Then, divide it into portions. Use freezer-safe containers or bags. Squeeze out as much air as you can. The bake can last for up to three months in the freezer. When you're ready to eat, thaw it in the fridge overnight. Reheat it in the oven for best results. How long does it take to bake Balsamic Zucchini Tomato Bake? Baking this dish takes about 25 to 30 minutes. You want the zucchini tender and caramelized. Can I prepare this dish in advance? Yes, you can prep it a day ahead. Just cover it and store it in the fridge. Is this dish vegan-friendly? Yes, this dish is vegan if you skip the cheese. All other ingredients are plant-based. Is it suitable for gluten-free diets? Absolutely! All ingredients are gluten-free. Enjoy this dish without worry. What can I use instead of balsamic vinegar? You can use red wine vinegar or apple cider vinegar. Both add nice flavor. Can I use dried herbs instead of fresh? Yes, you can use dried herbs. Just remember to use less since they’re stronger. This blog post covered a delicious Balsamic Zucchini Tomato Bake. We discussed key ingredients like zucchinis, cherry tomatoes, and red onion. I shared how to enhance the flavors with balsamic vinegar and olive oil. You learned simple preparation steps, baking tips, and fun variations. In the end, this dish is versatile and easy to make. Enjoy experimenting with flavors and ingredients to personalize your meal. Don’t forget to have fun in the kitchen!](https://stirredrecipes.com/wp-content/uploads/2025/07/be5cc9cb-e79d-474b-9b95-11d9c4fe8eb0.webp)
![When making One-Bowl Keto Chocolate Zucchini Bread, you need just a few simple ingredients. Each one plays a key role in creating a moist, tasty loaf. Here’s what you will need: - Grated zucchini (1 medium zucchini, about 1 cup) - Eggs (3 large) - Almond flour (1/2 cup) - Unsweetened cocoa powder (1/4 cup) - Keto sweetener (1/2 cup erythritol or alternative) - Coconut oil (1/4 cup, melted) - Vanilla extract (1 teaspoon) - Baking soda (1 teaspoon) - Baking powder (1/2 teaspoon) - Salt (1/4 teaspoon) - Optional add-ins (1/2 cup sugar-free chocolate chips) Let’s break down the ingredients: 1. Grated Zucchini: This is the star of the show. It adds moisture without extra carbs. 2. Eggs: They bind the ingredients and help the bread rise. 3. Almond Flour: This is a low-carb option that keeps the bread soft. 4. Cocoa Powder: It brings rich chocolate flavor to the bread. 5. Keto Sweetener: Erythritol helps sweeten without adding sugar. 6. Coconut Oil: This adds moisture and enhances the bread's texture. 7. Vanilla Extract: A touch of vanilla boosts the overall flavor. 8. Baking Soda & Baking Powder: These help the bread rise and become fluffy. 9. Salt: Just a little enhances all the flavors. 10. Optional Chocolate Chips: These add extra chocolatey goodness. You can find the full recipe in the main article. This blend of ingredients makes a delicious bread that is both keto-friendly and satisfying. 1. First, preheat your oven to 350°F (175°C). This step warms the oven for even baking. 2. In a large mixing bowl, add the grated zucchini. Beat in the eggs until well mixed. This forms the base of your batter. 3. Next, stir in the melted coconut oil and vanilla extract. Mix until smooth. This adds flavor and moisture. 4. Now, gently sift in the almond flour, cocoa powder, erythritol, baking soda, baking powder, and salt. Mix until just combined. Over-mixing can make it tough. 1. Pour the batter into the prepared loaf pan. Smooth the top with a spatula for even baking. 2. Bake in your preheated oven for 45-55 minutes. Keep an eye on it. The bread is done when a toothpick comes out clean. 3. Once baked, let the bread cool in the pan for about 10 minutes. Then, transfer to a wire rack. Allow it to cool completely before slicing. For the full recipe, check the complete instructions above. Enjoy your baking adventure! Accurate measurements are key to great baking. If you use too much flour or sweetener, your bread might not rise well. To measure almond flour, spoon it into a cup and level it off with a knife. This way, you avoid packing it too tightly. To properly grate zucchini, first wash it well. Use a box grater or a food processor. Grate it finely for the best texture. After grating, place the zucchini in a clean cloth and squeeze out excess moisture. This step helps keep the bread from getting soggy. You can easily boost flavor with spices. Consider adding a teaspoon of cinnamon for warmth or a pinch of nutmeg for depth. If you enjoy a stronger taste, a splash of almond or peppermint extract can work wonders. Choosing the right sweetener is also important. Erythritol is great, but you could try monk fruit or stevia. These sweeteners are low in carbs and have no sugar. Taste as you go to find your perfect balance. Serving your keto chocolate zucchini bread warm is a delight. You can top it with a dollop of whipped cream or a sprinkle of cacao powder for extra flair. Pair it with a cup of coffee or herbal tea for a cozy treat. For a more filling meal, serve it alongside a fresh salad. This combo offers a nice balance of flavors and nutrients. For more ideas, check out the [Full Recipe]. {{image_2}} You can easily change some ingredients in the One-Bowl Keto Chocolate Zucchini Bread. Want to try a different flour? Coconut flour works well. It has a unique flavor and is low in carbs. Just remember, coconut flour absorbs more moisture. Use less than the almond flour amount. For sweeteners, do you prefer something else? You can use monk fruit or stevia. Both are low in carbs and add sweetness. Try them in the same amount as erythritol. Adding nuts or seeds can enhance the flavor. Chopped walnuts or pecans bring a nice crunch. You can also add pumpkin seeds for a twist. Mix in about 1/2 cup of your chosen nuts or seeds for more texture. Spices are another great option! Cinnamon and nutmeg can make your bread smell amazing. Just a pinch of each can add warmth and depth. Experiment with your favorite spices to find what you love. If you need gluten-free options, this recipe is already good to go! Just stick with almond flour and be sure your sweetener is gluten-free. For dairy-free or vegan choices, replace eggs with flax eggs. Mix 1 tablespoon of ground flaxseed with 2.5 tablespoons of water. Let it sit for a few minutes to thicken. Use coconut oil as your fat source, which is already in the recipe. With these variations, you can customize your One-Bowl Keto Chocolate Zucchini Bread to suit your taste and dietary needs! After baking your One-Bowl Keto Chocolate Zucchini Bread, let it cool completely. This step is key. If you wrap it too soon, moisture builds up and can make it soggy. Once cool, wrap the bread tightly in plastic wrap or aluminum foil. This keeps it fresh longer. Choose a container that fits the bread well. A loaf container or a sealed bag works well. If you want to store it long-term, freezing is a great option. Slice the bread first. This way, you can take out only what you need. Wrap each slice in plastic wrap, then place them in a freezer-safe bag. Make sure to remove as much air as possible. To thaw, simply leave the slices on the counter for a few hours. You can also warm them in the microwave for a quick treat. At room temperature, the bread stays fresh for about 3 days. After that, it’s best to refrigerate it. In the fridge, it lasts about a week. To keep the taste and texture, store it in an airtight container. This prevents it from drying out or absorbing other odors. Enjoy your tasty bread, knowing it stays fresh for days! Can I use a different sweetener? Yes, you can use other keto-friendly sweeteners. Options like monk fruit or stevia work well. Just adjust the amount to match your taste. Each sweetener has a unique sweetness level. How do I know when the bread is done? Check for doneness by inserting a toothpick into the center. If it comes out clean, the bread is ready. If wet batter sticks to the toothpick, bake for a few more minutes. Is zucchini bread keto-friendly? Yes! This recipe is perfect for a keto diet. It uses almond flour and a low-carb sweetener. Plus, zucchini adds moisture without many carbs. What if the bread is too dry? If the bread turns out dry, try adding more wet ingredients next time. You can use an extra egg or a bit more coconut oil. This will help keep the bread moist and soft. Handling excess moisture from zucchini If your zucchini has too much moisture, squeeze it in a clean towel before mixing. This helps prevent a soggy bread. Removing excess water makes a big difference in texture. Overview of calorie content per slice Each slice has about 100 calories. This makes it a great low-calorie treat. It fits well into a keto meal plan without adding too many carbs. Nutritional benefits of ingredients used This bread is rich in healthy fats from coconut oil and almond flour. Zucchini adds vitamins and fiber. Using erythritol keeps the sugar content low. Each ingredient supports your health goals. This blog post outlined a simple and tasty keto zucchini bread recipe. We covered the key ingredients, step-by-step instructions, and helpful tips for great results. You learned about variations, storage, and FAQs to address common concerns. In conclusion, this recipe offers a fun way to enjoy baking while sticking to your diet. Feel free to experiment with flavors and enjoy your healthy treat!](https://stirredrecipes.com/wp-content/uploads/2025/07/69c27e86-8d82-4134-a554-2829433f21a2.webp)
![- 2 cups grated zucchini - 1 cup all-purpose flour - 1/2 cup whole wheat flour - 1 teaspoon baking soda - 1/2 teaspoon baking powder - 1/2 teaspoon salt - 1 teaspoon ground cinnamon - 1/4 teaspoon nutmeg - 1/2 cup brown sugar - 1/2 cup granulated sugar - 2 large eggs - 1/2 cup vegetable oil - 1 teaspoon vanilla extract - 1/2 cup chopped walnuts or pecans (optional) - 1/2 cup chocolate chips (optional) To make sensational zucchini bread, you need a mix of simple ingredients. Grated zucchini is key. It gives the bread moisture and flavor. I love using two medium zucchinis to get about two cups. The flour blend of all-purpose and whole wheat adds a nice texture. Baking soda and baking powder help the bread rise. Salt brings out the flavors. Ground cinnamon and nutmeg add warmth and spice. The sugars—brown and granulated—sweeten the bread and keep it soft. Eggs act as a binder. They also help the bread rise. Vegetable oil makes the bread moist. Vanilla extract adds a lovely aroma. You can add chopped walnuts or pecans for crunch. Chocolate chips are a tasty treat if you like sweets. - 9x5-inch loaf pan - Mixing bowls - Whisk - Clean dish towel or cheesecloth You will need some basic tools for this recipe. A 9x5-inch loaf pan works best for baking. Mixing bowls help you combine ingredients easily. A whisk is great for mixing wet and dry ingredients. Lastly, a clean dish towel or cheesecloth helps remove moisture from the zucchini. - Approximately 200 calories per slice - Rich in vitamins A, C, and K - Good source of fiber and antioxidants Each slice of this zucchini bread is about 200 calories. Zucchini is packed with vitamins A, C, and K. These vitamins support your immune system and skin health. The bread also provides fiber, which helps with digestion. Enjoy this tasty treat knowing it has health benefits too! 1. Preheat your oven to 350°F (175°C). Grease a 9x5-inch loaf pan or line it with parchment paper. 2. Grate two medium zucchinis. Use a clean dish towel or cheesecloth to squeeze out the excess moisture. Set the dry zucchini aside. 1. In a large mixing bowl, whisk together: - 1 cup all-purpose flour - 1/2 cup whole wheat flour - 1 teaspoon baking soda - 1/2 teaspoon baking powder - 1/2 teaspoon salt - 1 teaspoon ground cinnamon - 1/4 teaspoon nutmeg 2. In another bowl, mix: - 1/2 cup brown sugar - 1/2 cup granulated sugar - 2 large eggs Mix until smooth. 3. Add: - 1/2 cup vegetable oil - 1 teaspoon vanilla extract Continue mixing until everything is well blended. 1. Gradually fold the dry ingredients into the wet mixture. Stir gently until just combined. Don't overmix! 2. Fold in the squeezed zucchini. If you like, add 1/2 cup nuts or chocolate chips. 3. Pour the batter into your prepared pan. Spread it evenly. 4. Bake for 50-60 minutes. Check doneness by inserting a toothpick into the center. It should come out clean. 5. Let the bread cool in the pan for 10 minutes, then move it to a wire rack to cool completely before slicing. For the complete guide, check the Full Recipe for more tips on serving and enjoying your Sensational Zucchini Bread! To make zucchini bread light and fluffy, avoid overmixing. When you mix the wet and dry ingredients, stir just enough to combine. Overmixing can make the bread dense and tough. You want to keep air in the batter. This air helps it rise nicely in the oven. Adding spices can boost the taste. Try vanilla or almond extract for a sweet twist. You can also use alternative sweeteners like honey or maple syrup. These add unique flavors and cut down on refined sugar. Experiment to find what you like best! Zucchini bread is great on its own, but toppings can make it even better. A dollop of cream cheese or a swipe of butter adds richness. For drinks, consider pairing it with coffee or herbal tea. These complement the flavors and make for a cozy snack. For the complete recipe, check the Full Recipe. {{image_2}} You can make zucchini bread healthier. Start by substituting oils. Instead of vegetable oil, use applesauce. This cuts fat and adds moisture. You can also try avocado oil for a different flavor. It is rich in healthy fats. Using alternative flours is another option. Whole wheat flour adds fiber. Almond flour gives it a nutty taste. You can mix both flours for a unique texture. Experimenting with flours can change the flavor and health benefits. Adding fruits like bananas or apples enhances your zucchini bread. Bananas add natural sweetness and moisture. Apples bring a fresh crunch. You can mash the bananas or chop the apples. Mix them in when adding zucchini. Savory zucchini bread is another fun twist. Add herbs like rosemary or thyme. These herbs give a new flavor profile. You could also add cheese for extra richness. This makes a great side dish for dinner. You can make zucchini bread in the microwave. This cuts cooking time in half. Use a microwave-safe dish and adjust the time. It usually takes about 5-10 minutes. Check for doneness with a toothpick. For gluten-free options, use gluten-free flour blends. Many blends work well for baking. You can also try almond flour or coconut flour. Adjust the liquid in the recipe, as these flours absorb more moisture. For the full recipe, check out the detailed instructions above. You can store zucchini bread at room temperature or in the fridge. If you keep it at room temperature, wrap it in plastic wrap or foil. This keeps it fresh for about three days. If you want it to last longer, place it in the fridge. In the fridge, it stays good for about a week. For even longer storage, you can freeze the zucchini bread. First, let it cool completely. Then, wrap it tightly in plastic wrap. After that, place it in a freezer bag. This method keeps it fresh for up to three months. When you are ready to eat it, just thaw it in the fridge overnight. When it's time to enjoy your zucchini bread, reheating is easy. The best way is to use an oven. Preheat your oven to 350°F (175°C). Place the slices on a baking sheet. Heat for about 10 minutes. This method keeps the bread moist and warm. You can also use a microwave for quicker reheating. Place a slice on a microwave-safe plate. Heat it for 15-20 seconds. If you want, add a little butter on top for extra flavor. Zucchini bread lasts about three days at room temperature. If you keep it in the fridge, it can last up to a week. In the freezer, it will stay good for about three months. Each storage method keeps the bread fresh, but the fridge and freezer extend its life. For best taste, eat it sooner rather than later. Enjoy your Sensational Zucchini Bread! For the complete recipe, check out the [Full Recipe]. Yes, you can use unpeeled zucchini. The skin adds color and nutrients. Just wash the zucchini well. If it’s fresh and firm, it will taste great. To keep your zucchini bread moist, squeeze out excess water from the grated zucchini. Use fresh zucchini, and don’t overbake. Adding oil helps with moisture too. If your zucchini bread does not rise, check your baking powder and baking soda. They may be expired. Ensure you mix ingredients well, but don’t overmix. Yes, you can replace eggs with unsweetened applesauce or mashed bananas. Use 1/4 cup for each egg. This keeps the bread moist and tasty. You can use honey or maple syrup instead of sugar. Coconut sugar or stevia are good choices too. Adjust the amount based on the sweetness you prefer. For the complete recipe, check out the Full Recipe. Zucchini bread is easy to make with simple ingredients. We discussed the main ingredients, step-by-step instructions, and helpful tips to perfect your loaf. Variations let you get creative, and proper storage keeps it fresh longer. Remember, fresh zucchini adds moisture and flavor. With these guidelines, you can enjoy delicious baked goods that suit your taste. Happy baking!](https://stirredrecipes.com/wp-content/uploads/2025/07/89d019db-785d-4ca8-a73d-7fe7415d23cc.webp)