Cheesy Jalapeño Popper Bites Irresistible Snack Treat

Are you ready to elevate your snack game with Cheesy Jalapeño Popper Bites? These bites pack a flavorful punch with creamy cheese and just the right kick from fresh jalapeños. …
Are you ready to elevate your snack game with Cheesy Jalapeño Popper Bites? These bites pack a flavorful punch with creamy cheese and just the right kick from fresh jalapeños. …
![- 2 medium sweet potatoes, peeled and diced - 1 can (15 oz) black beans, rinsed and drained - 1 tablespoon olive oil - 1 teaspoon ground cumin - 1 teaspoon smoked paprika - 1/2 teaspoon chili powder - Salt and pepper to taste - 8 small corn tortillas - 1 avocado, sliced - 1/4 cup red onion, finely diced - 1/4 cup fresh cilantro, chopped - 1 lime, cut into wedges - Optional: Hot sauce for serving Gather these ingredients to make delicious roasted sweet potato and black bean tacos. The sweet potatoes bring a nice sweetness, while the black beans add protein and texture. The spices make everything taste great together. You can also customize your tacos with your favorite toppings. For the full recipe, check the section above. - Preheat your oven to 425°F (220°C). - Toss sweet potatoes with olive oil and seasonings. Start by peeling and dicing two medium sweet potatoes. Next, place them in a large bowl. Drizzle one tablespoon of olive oil over the sweet potatoes. Add one teaspoon of ground cumin, one teaspoon of smoked paprika, and half a teaspoon of chili powder. Season with salt and pepper to taste. Toss everything until the sweet potatoes are well coated. - Spread on a baking sheet and roast for 25-30 minutes. - Stir halfway through for even cooking. After preparing the sweet potatoes, spread them out on a baking sheet in a single layer. This helps them roast evenly. Place the baking sheet in the oven and roast for about 25 to 30 minutes. Halfway through, take them out and stir the sweet potatoes. This step ensures they cook evenly and get nice and tender. - Warm black beans in a saucepan for 5 minutes. - Heat corn tortillas on a pan or in the oven. While the sweet potatoes roast, open a can of black beans. Rinse and drain them well. In a small saucepan, warm the black beans over medium heat for about 5 minutes. Stir occasionally and add salt and pepper to taste. For the corn tortillas, heat them in a pan for about 30 seconds on each side until warm and soft. Alternatively, wrap them in foil and place them in the oven during the last 10 minutes of roasting. - Layer roasted sweet potatoes and black beans on each tortilla. - Top with avocado, red onion, and cilantro. When the sweet potatoes are done, it’s time to assemble the tacos. Take a warm corn tortilla and add a generous spoonful of roasted sweet potatoes. Next, add a scoop of black beans on top. To finish, layer slices of avocado, diced red onion, and fresh cilantro. You can find the full recipe [here]. Enjoy your tasty tacos! - Use parchment paper for easier cleanup. It keeps the sweet potatoes from sticking. - Check for tenderness by piercing with a fork. They should feel soft and give easily. - Add fresh lime juice for brightness. It boosts the taste of the tacos. - Experiment with spices to suit your taste. Try adding garlic powder or cayenne for a kick. - Use flour tortillas for a different texture. They are soft and hold fillings well. - Consider soft taco or larger burrito sizes. Larger tortillas can fit more delicious filling. These tips will help you make the best roasted sweet potato and black bean tacos. For the complete process, refer to the Full Recipe. {{image_2}} You can add grilled chicken or shrimp to these tacos for extra protein. Both options work well with the sweet potatoes. If you want a creamy touch, crumble feta or goat cheese over the top. This adds flavor and richness. If you want to switch things up, replace black beans with lentils or chickpeas. Both options are tasty and high in protein. You can also use butternut squash instead of sweet potatoes. It has a nice sweetness and pairs perfectly with spices. For some heat, try adding pickled jalapeños. They give a nice kick to your tacos. You can also add cheese, sour cream, or yogurt for added richness. These toppings will make your tacos even more delicious. For the full recipe, check out the complete details above. Enjoy experimenting with these variations to find your perfect taco! Store leftover tacos in an airtight container. This keeps them fresh. You can refrigerate them for up to 3 days. If you want to enjoy them later, make sure they are cooled first. You can freeze roasted sweet potatoes and black beans separately. This works well for future meals. When you are ready to eat, just thaw and reheat the ingredients. Reheat in the oven for a crispy texture. Preheat your oven to 350°F (175°C) and heat for about 10 minutes. You can also use the microwave for quick meals. Just cover the tacos with a damp paper towel to keep them moist. Yes, you can prepare the roasted sweet potatoes and black beans ahead of time. Store them in an airtight container in the fridge for up to three days. When you're ready to eat, just warm them up and assemble your tacos. You can use pinto beans, kidney beans, or even lentils. Each option brings a different taste and texture to your tacos. If you want a creamier texture, try mashed avocado instead. To add some heat, you can sprinkle in more chili powder or add diced jalapeños. You might also drizzle your favorite hot sauce on top. Experiment until you find the perfect spice level for you. Yes, these tacos are gluten-free as long as you use corn tortillas. Always check the labels to ensure they are certified gluten-free if you have a gluten sensitivity. Heat them in a dry skillet over medium heat for about 30 seconds on each side. You can also wrap them in foil and warm them in the oven during the last 10 minutes of roasting the sweet potatoes. To boost protein, consider adding grilled chicken, sautéed shrimp, or crumbled feta cheese. You can also top your tacos with Greek yogurt for added creaminess and protein. For the complete recipe, check the Full Recipe section. These roasted sweet potato and black bean tacos are simple and tasty. You blend fresh ingredients like sweet potatoes and black beans, seasoned just right. With optional toppings like avocado and cilantro, you can customize them to your liking. Think about adding protein or different toppings for more variety. Remember, these tacos store well in the fridge or freeze easily. Enjoy this easy meal anytime, and feel free to get creative!](https://stirredrecipes.com/wp-content/uploads/2025/07/eab0095d-c964-4cff-881b-5ed1d492f519.webp)
Are you ready to enjoy a tasty and healthy meal? These Roasted Sweet Potato and Black Bean Tacos are the perfect choice! Packed with flavor and good for you, they …
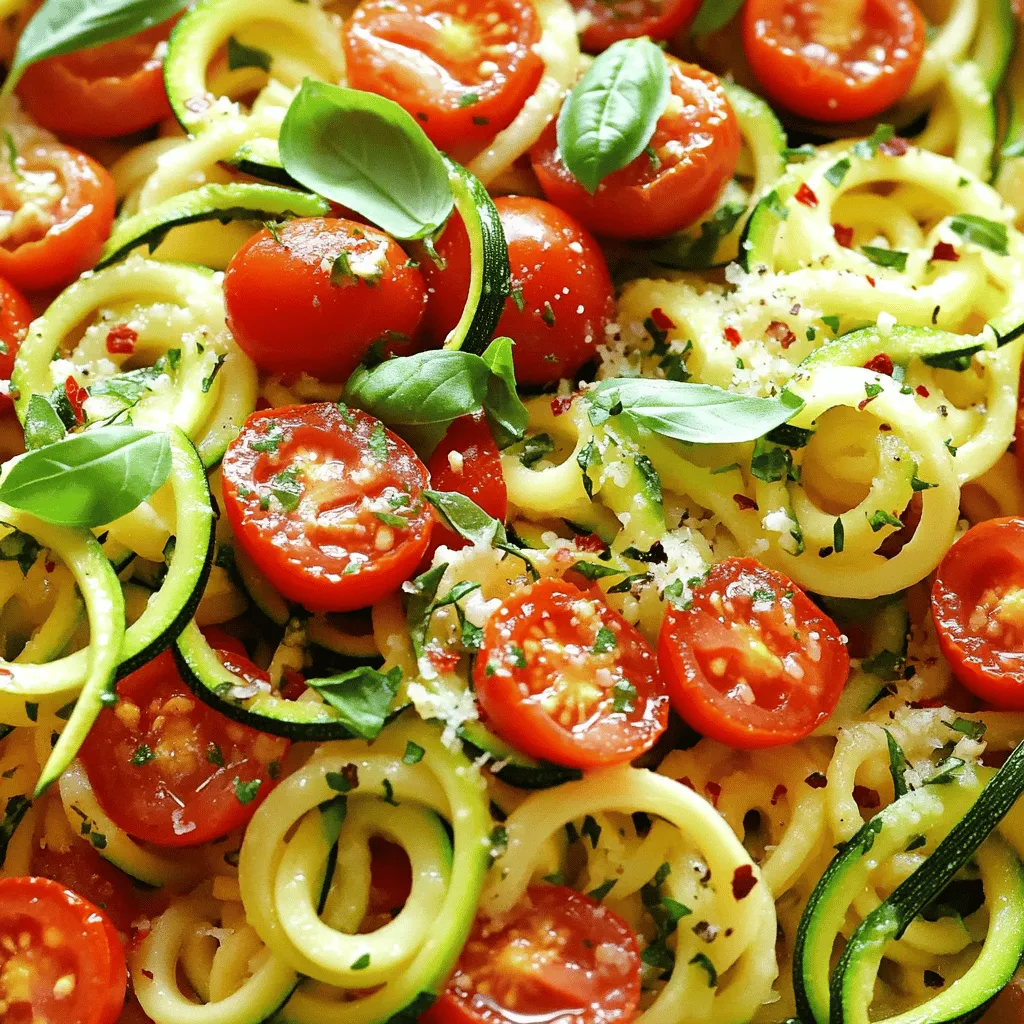
Looking for a quick and healthy meal? You’ll love this Tomato Zucchini Pasta! It’s a light dish packed with fresh flavors and good nutrition. Imagine colorful zucchini noodles topped with …
![To make a delicious chocolate zucchini cake, you need simple, fresh ingredients. Here’s what you will need: - 1 medium zucchini (about 1 cup, grated) - 1 cup all-purpose flour - 1/2 cup unsweetened cocoa powder - 1 tsp baking soda - 1/2 tsp baking powder - 1/4 tsp salt - 1/2 cup granulated sugar - 1/2 cup brown sugar, packed - 1/2 cup vegetable oil - 2 large eggs - 1 tsp vanilla extract - 1/2 cup chocolate chips (semi-sweet or dark) These ingredients create a rich, moist cake that both kids and adults love. The zucchini adds moisture and boosts nutrition without changing the chocolate flavor. You can make fun changes to this recipe by adding a few optional ingredients. Some great choices include: - 1/2 cup chopped nuts, like walnuts or pecans - 1 tsp cinnamon for added warmth - 1/2 cup shredded coconut for a tropical twist - A splash of coffee to deepen the chocolate taste Feel free to mix and match these options to make the cake your own! Using fresh ingredients is key for great flavor and texture. Fresh zucchini gives moisture and a light crunch. Old or wilted zucchini can make the cake soggy. Fresh eggs help the cake rise well. They also provide a nice richness. Finally, use good-quality cocoa powder for the best chocolate flavor. For the most delicious cake, always choose fresh, high-quality ingredients. You will taste the difference! If you want to see the full recipe, check out the [Full Recipe]. Start by grating one medium zucchini. You need about one cup of grated zucchini. Place the zucchini in a bowl and sprinkle it with a pinch of salt. This step helps to draw out extra moisture. Let it sit for about 10 minutes. This is an important step to avoid a soggy cake. In a large mixing bowl, combine the dry ingredients. Add one cup of all-purpose flour, half a cup of unsweetened cocoa powder, one teaspoon of baking soda, half a teaspoon of baking powder, and a quarter teaspoon of salt. Whisk these together until they are mixed well. This creates a smooth base for your cake. In another bowl, whisk together the wet ingredients. Combine half a cup of granulated sugar, half a cup of brown sugar, and half a cup of vegetable oil. Add two large eggs and one teaspoon of vanilla extract to the mix. Whisk until it is smooth and creamy. This mixture will add sweetness and moisture to your cake. Before baking, gently squeeze the zucchini to remove any extra water. Fold it into the wet ingredients. Gradually add the dry mix to the wet ingredients. Stir until just combined. Be careful not to overmix! Finally, fold in half a cup of chocolate chips. Pour the batter into your prepared cake pan. Bake at 350°F for 25-30 minutes. Check if it’s done by inserting a toothpick in the center. If it comes out clean, your cake is ready! To keep zucchini moist, start by grating it finely. This helps it blend well in the batter. After grating, add a pinch of salt and let it sit for about 10 minutes. This process draws out excess moisture, making your cake fluffy. Squeeze the grated zucchini gently to remove any extra water before adding it to your mix. This step ensures your cake remains tender and moist. For the best texture, mix your dry and wet ingredients separately first. Combine them gently, and avoid overmixing. Overmixing can make the cake tough. Stir until just combined for a soft, cake-like feel. Adding chocolate chips at the end helps keep them from sinking. This way, they spread evenly throughout the cake, enhancing every bite. When it comes to decoration, you can keep it simple or get creative. A light dusting of powdered sugar adds a nice touch. You can also top the cake with fresh berries or a dollop of whipped cream. For a richer taste, drizzle melted chocolate over the top. This adds flair and makes your cake look professional. These little touches elevate your dessert and impress your guests. For the full recipe, refer to the Chocolate Zucchini Cake section above. {{image_2}} You can change the sweetness in this cake. If you want it less sweet, use less sugar. Try using only 1/3 cup of each sugar. For more flavor, add spices like cinnamon or nutmeg. These spices blend nicely with chocolate and zucchini. You can also add a splash of strong coffee. Coffee boosts the chocolate taste without being too sweet. Making this cake gluten-free is easy. Instead of all-purpose flour, use a gluten-free flour blend. Many blends work well, so choose one you like. Make sure it contains xanthan gum. This helps the cake hold together. Follow the same steps in the recipe. You may notice slight changes in texture, but it will still taste great. Want to add some crunch? Consider adding nuts! Chopped walnuts or pecans work well. Mix in about half a cup into the batter. You can also include other fun add-ins. Try some dried fruit, like raisins or cranberries. For a richer flavor, consider adding more chocolate chips. This gives extra bursts of chocolate in every bite. For more ideas on how to make this cake your own, check out the Full Recipe. After you enjoy your Chocolate Zucchini Cake, store leftovers properly. Let the cake cool completely. Once it’s cool, cover it tightly with plastic wrap or aluminum foil. This keeps it moist and fresh. You can also place it in an airtight container. Store it at room temperature for up to three days. If you want it to last longer, consider freezing. For short-term storage, use a cake dome or a plate covered with plastic wrap. If you prefer a container, choose one that is airtight. Glass or plastic containers work well. They keep the cake fresh and protect it from odors. If you have multiple layers, separate them with parchment paper to avoid sticking. To freeze your Chocolate Zucchini Cake, slice it first. Wrap each slice in plastic wrap tightly. Then, place the wrapped slices in a freezer-safe bag or container. This method helps keep the flavor and texture. You can freeze it for up to three months. When you're ready to enjoy it, thaw the slices in the fridge overnight. You can also heat them in the microwave for a warm treat. For the best taste, enjoy it within the first month after freezing. Yes, you can use frozen zucchini. Just make sure to thaw it first. Squeeze out excess water after thawing. This step keeps the cake from getting soggy. Frozen zucchini works well since it has a similar texture. You can check if the cake is done by using a toothpick. Insert the toothpick into the center of the cake. If it comes out clean or with a few moist crumbs, the cake is ready. Also, the top should look set and slightly springy to the touch. You can serve the cake plain or with a dusting of powdered sugar. Vanilla ice cream pairs well, too. Fresh berries add a nice touch. Whipped cream also makes a great topping. Each of these options enhances the chocolate flavor. Yes, you can use cocoa powder to boost the chocolate flavor. Just add an extra tablespoon or two to the batter. This addition will make the cake richer and more chocolatey. It blends well with the other ingredients. This cake truly shines with that extra touch! In this post, we explored making a delicious chocolate zucchini cake. You learned about the main and optional ingredients that make this cake special. I shared step-by-step instructions, important baking tips, and tricks to ensure a moist cake. You can also find variations and storage tips to enjoy your cake longer. Embrace your creativity in the kitchen. This cake is a fun and tasty treat for everyone. Enjoy baking!](https://stirredrecipes.com/wp-content/uploads/2025/07/40379092-4489-4ea4-b55e-e722bfcb8da6.webp)
Are you ready to indulge in a delicious treat that’s as easy to make as it is delightful? Chocolate Zucchini Cake combines rich chocolate flavor with the goodness of fresh …

Are you ready to enjoy a burst of flavor that’s both healthy and simple? Let me introduce you to the Easy Grilled Shrimp Bowl with Avocado Delight! This vibrant dish …
![To make this dish, you will need a few key items. Here’s what you need: - 4 boneless, skinless chicken breasts - 1 cup fresh parsley, chopped - 1/2 cup olive oil - 1/4 cup red wine vinegar - 4 cloves garlic, minced These main ingredients create a tasty and juicy chicken. Fresh parsley gives the dish a bright flavor. The chicken breasts are the star, soaking up all the flavor from the chimichurri sauce. Seasonings play a big role in this recipe. Here are the essential ones: - 1 teaspoon red pepper flakes - 1 teaspoon dried oregano - Salt and pepper to taste Red pepper flakes add a little heat, while oregano brings a warm, earthy taste. Salt and pepper enhance all the flavors, so don’t skip these! Garnishes add the final touch to your dish. You can use: - Lemon wedges for serving Serving with lemon wedges gives a zesty flavor. Squeeze fresh lemon juice over the chicken for an extra kick. For more details, check the Full Recipe. Start by gathering your fresh ingredients. You will need parsley, olive oil, red wine vinegar, garlic, red pepper flakes, and dried oregano. In a mixing bowl, add 1 cup of chopped parsley. Pour in 1/2 cup of olive oil and 1/4 cup of red wine vinegar. Next, add 4 cloves of minced garlic. Sprinkle in 1 teaspoon of red pepper flakes and 1 teaspoon of dried oregano. Season with salt and pepper to taste. Mix all the ingredients well. This sauce brings a bright, zesty flavor to your chicken. Now, take 4 boneless, skinless chicken breasts. Pat them dry using paper towels. This helps the seasoning stick better. Season both sides of the chicken generously with salt and pepper. Place the chicken breasts in a baking dish. Pour half of your chimichurri sauce over the chicken. Make sure each piece is well coated. Set aside the other half of the sauce for later. Preheat your oven to 400°F (200°C). Once the oven is hot, place your baking dish inside. Bake the chicken for 25 to 30 minutes. You want the chicken to reach an internal temperature of 165°F (75°C). This ensures it is safe to eat. After baking, remove the dish from the oven. Let the chicken rest for 5 minutes before slicing. This keeps the juices inside. Serve the chicken on a platter, drizzled with the reserved chimichurri sauce. Add lemon wedges on the side for a fresh touch. For the full recipe, check the recipe card above. To get juicy chicken, start with even pieces. Cut your chicken breasts to the same size. This helps them cook evenly. Use a meat thermometer to check the center. When it hits 165°F (75°C), it’s done. Let it rest for five minutes after baking. This keeps all the tasty juices inside. The chimichurri sauce makes this dish shine. Use fresh herbs for a bright taste. Chop parsley finely, and don’t skip the garlic. It adds great flavor. If you want more heat, add extra red pepper flakes. A splash of lemon juice boosts the freshness. Mix your sauce a few hours ahead for deeper flavor. Serve the chicken on a big platter. Drizzle the extra chimichurri sauce on top. This makes it look nice and adds flavor. Pair it with lemon wedges for a zesty kick. Add a side of rice or roasted veggies to complete the meal. This dish is perfect for family dinners or gatherings. Check out the Full Recipe to make it at home! {{image_2}} You can switch chicken breasts for thighs in this dish. Chicken thighs are juicier and have more flavor. They cook well with the chimichurri sauce, adding a rich taste. When you bake them, make sure they reach 165°F (75°C) just like the breasts. They may take a little longer to cook, about 30-35 minutes. Thighs will keep your meal tender and tasty. If you want a vegetarian option, use portobello mushrooms instead of chicken. Their meaty texture makes them a great choice. Just marinate the mushrooms in the chimichurri sauce for about 30 minutes. Then, bake them at 400°F (200°C) for 20-25 minutes. This gives them a deep flavor. You can serve them on a bed of rice or with a side salad for a full meal. You can customize the chimichurri sauce by adding different herbs. Try cilantro for a fresh twist or basil for a sweet taste. You can also mix in mint for a cool flavor. Each herb changes the sauce’s taste and makes it unique. Feel free to experiment with what you have at home. This way, you can create a dish that fits your personal taste. For the complete recipe, check the [Full Recipe]. After enjoying your baked chimichurri chicken, store leftovers in a safe way. Place the chicken in an airtight container. This keeps it fresh and tasty. You can keep it in the fridge for up to four days. Make sure to add some of the chimichurri sauce for extra flavor. When you want to reheat your chicken, there are easy steps to follow. Preheat your oven to 350°F (175°C). Place the chicken on a baking sheet. Cover it with foil to keep it moist. Heat for about 15-20 minutes or until warm. You can also use a microwave. Just heat for 1-2 minutes, checking often to avoid overcooking. If you want to save your chicken for later, freezing works well. Wrap each piece tightly in plastic wrap. Then, place them in a freezer bag. This helps avoid freezer burn. You can freeze the chicken for up to three months. When ready to eat, thaw it overnight in the fridge before reheating. For best results, use the chimichurri sauce within the same time frame. For the full recipe, please click [Full Recipe]. Yes, you can use dried herbs. They work well but have a different flavor. Use about one-third of the amount. For example, if the recipe calls for one cup of fresh parsley, use about one-third cup of dried parsley. Dried herbs are more concentrated, so you need less. Baked Chimichurri Chicken pairs well with many sides. Here are some ideas: - Rice or quinoa for a filling base. - Roasted vegetables for a colorful plate. - A fresh salad for a light touch. - Tortillas for a fun wrap option. You can also serve it with crusty bread to soak up the extra chimichurri sauce. Chimichurri sauce can be spicy, but it depends on how much red pepper you add. The recipe calls for one teaspoon of red pepper flakes, which gives a mild heat. If you want more spice, add more flakes or fresh chili peppers. Adjust the heat to your taste. The sauce should enhance the chicken, not overpower it. For the full recipe, check the detailed instructions above. Baked Chimichurri Chicken is easy to make and full of flavor. We covered the main ingredients, tips for cooking, and how to store leftovers. You learned how to make the sauce and bake the chicken perfectly. Don't forget to try different herbs or make a vegetarian version. Now, you can enjoy this dish anytime. It’s a great meal for busy days or special occasions. With this guide, cooking will feel fun and tasty. Get ready to impress with your new skills!](https://stirredrecipes.com/wp-content/uploads/2025/07/7a139eed-c40f-46ce-b1b7-991e9bd125dd.webp)
Are you craving a dish that bursts with flavor and is easy to prepare? Look no further than Baked Chimichurri Chicken! This savory recipe combines tender chicken with a zesty …

Are you ready to impress your family and friends with a sweet treat? This Mini Neapolitan Ice Cream Cake is a showstopper that combines three delicious flavors: chocolate, strawberry, and …
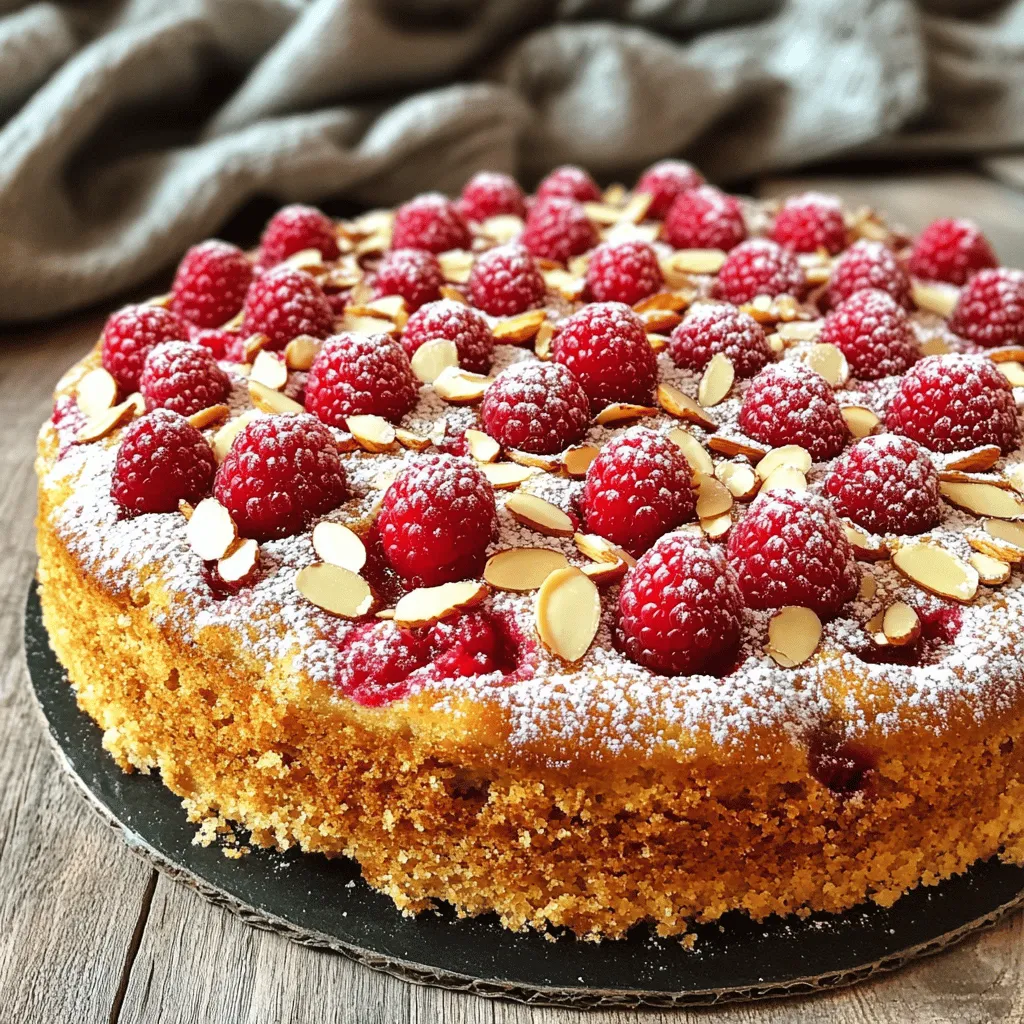
Are you ready to bake something simple yet delightful? This Raspberry Almond Cake is just what you need! With fresh raspberries and a hint of almond, each slice is a …
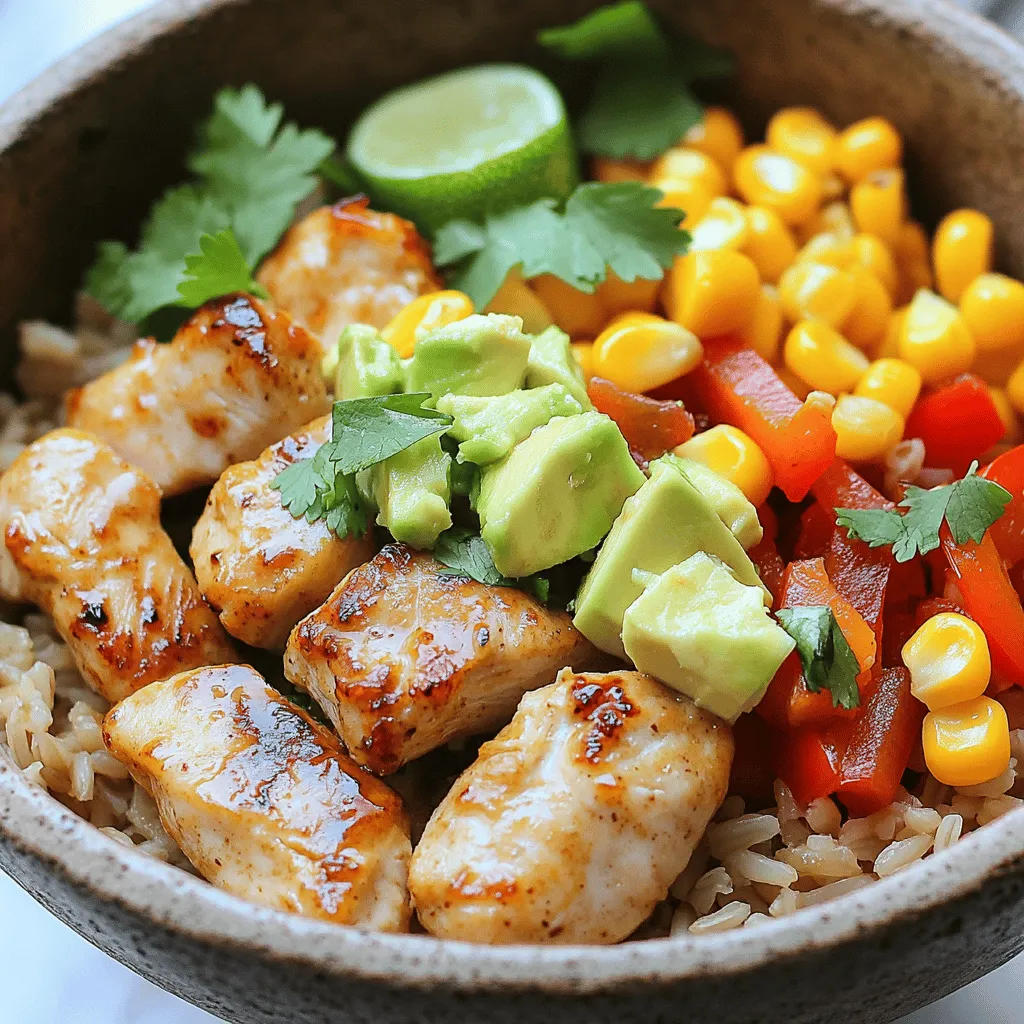
Looking for a quick, tasty meal that’s also good for you? The Healthy Chicken Bowl with Rice and Corn Delight is your solution! This easy recipe combines tender chicken, nutty …
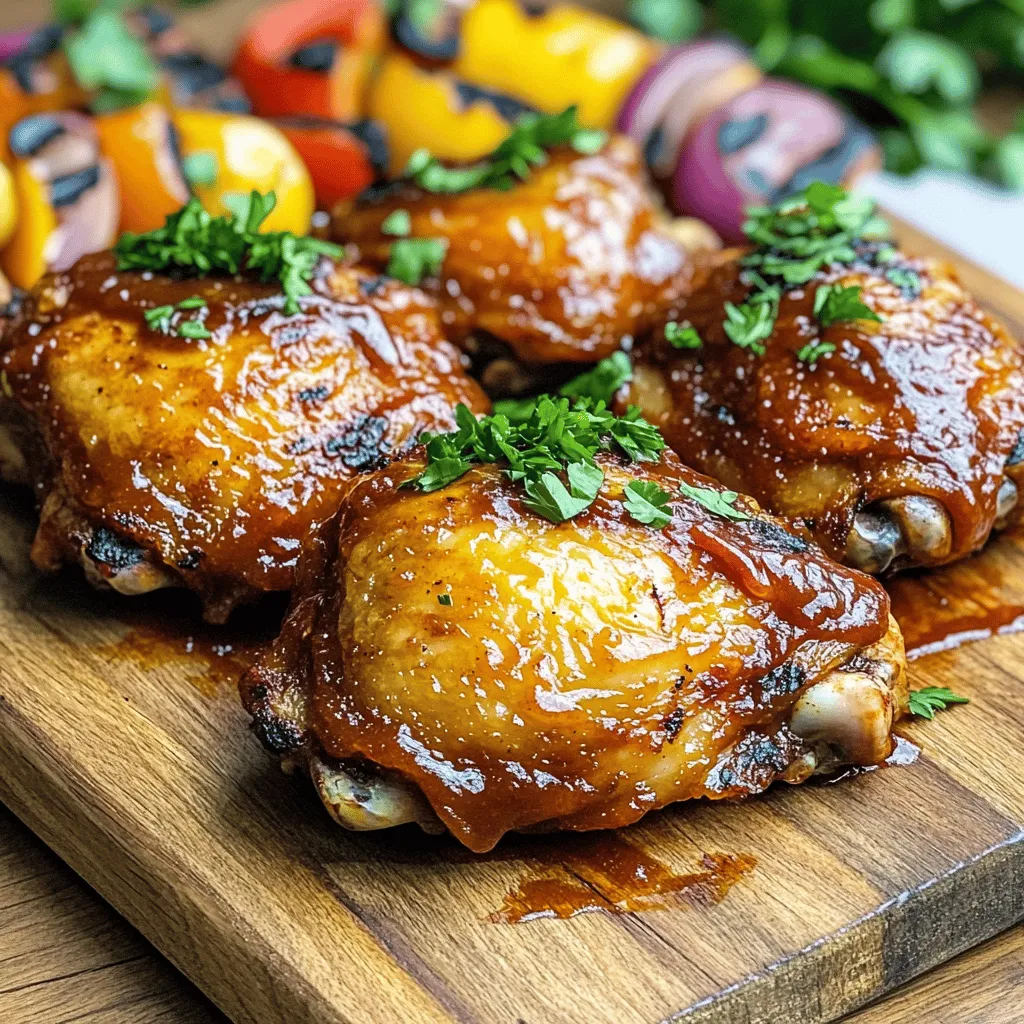
If you’re craving juicy, flavorful BBQ chicken thighs that won’t wreck your diet, you’re in the right place! This simple recipe not only features sugar-free BBQ sauce, but it’s also …