Skip to content
Stirred Recipes
  • Home
  • Appetizers
  • Desserts
  • Salads
  • Breakfast
  • Dinner
  • Privacy Policy
  • Contact
  • About

Chef Luca

Limoncello Cream Cake Delightful and Simple Recipe

July 16, 2025 by Chef Luca
To make the Limoncello Cream Cake, you need a few key ingredients. These ingredients blend together to create a delightful dessert packed with lemon flavor. Here’s what you will need: - 2 cups all-purpose flour - 1 ½ teaspoons baking powder - ½ teaspoon baking soda - ½ teaspoon salt - 1 cup unsalted butter, softened - 1 ½ cups granulated sugar - 4 large eggs - 1 tablespoon lemon zest - 1 teaspoon vanilla extract - ½ cup buttermilk - 1 cup heavy cream - ¼ cup powdered sugar - ¼ cup lemon juice - 1 cup mascarpone cheese - Fresh lemon slices and mint leaves for garnish These ingredients come together to create a cake that is light, fluffy, and bursting with lemon goodness. The mascarpone cheese adds a creamy touch, while the lemon zest and juice bring a fresh, bright flavor. You can find the full recipe [Full Recipe] to guide you through the steps. Enjoy the process of baking and the sweet rewards afterward! 1. Preheat your oven to 350°F (175°C). Grease and flour two 9-inch round cake pans. This step helps the cake release easily after baking. 2. Mix the dry ingredients in a bowl. Whisk together 2 cups of all-purpose flour, 1 ½ teaspoons of baking powder, ½ teaspoon of baking soda, and ½ teaspoon of salt. Set this mixture aside. 3. Cream the butter and sugar. In a large bowl, use a mixer to beat 1 cup of softened unsalted butter and 1 ½ cups of granulated sugar until light and fluffy. This takes about 3-5 minutes. Then, add 4 large eggs, one at a time. Mix well after each egg. Add 1 tablespoon of lemon zest and 1 teaspoon of vanilla extract, and mix until combined. 1. Combine dry and wet ingredients. Gradually add the dry mixture to the butter mix. Alternate this with ½ cup of buttermilk, starting and ending with the dry mix. Be careful not to overmix; stop when just combined. 2. Divide and bake the batter in the pans. Pour the batter evenly into the prepared pans. Bake for 25-30 minutes. Check with a toothpick in the center; it should come out clean. 3. Cool the cakes before frosting. Let the cakes cool in the pans for 10 minutes. Then carefully transfer them to wire racks to cool completely. 1. Whip the heavy cream. In a medium bowl, whip 1 cup of heavy cream with ¼ cup of powdered sugar until soft peaks form. This adds lightness to the cream. 2. Fold in mascarpone and lemon juice. Gently mix in 1 cup of mascarpone cheese and ¼ cup of lemon juice until well combined. Be gentle to keep the cream fluffy. 3. Assemble the cake layers. Once the cakes are cool, place one layer on a serving platter. Spread half of the limoncello cream over the top. Then, add the second cake layer and top with the remaining cream. This creates a stunning, layered effect. For the full recipe, check out the detailed instructions above. Enjoy your Limoncello Cream Cake! To get a great cake, avoid overmixing the batter. Mixing too much can make your cake dense. Only mix until the ingredients are just combined. This keeps the cake light and fluffy. Choosing the right baking pans is also key. Use 9-inch round pans to get even layers. Make sure to grease and flour them well. This helps the cake come out clean without sticking. Adding more lemon zest can really boost the flavor. The zest gives a bright and fresh taste. Just add a little more than the recipe calls for. Also, using high-quality Limoncello makes a big difference. Good Limoncello has a rich and smooth flavor. It will elevate your cake and make each bite delightful. If your cake turns out flat, check your baking powder. Old baking powder can lose its lift. Make sure it is fresh for the best results. For uneven baking, rotate your pans halfway through baking. This helps ensure even heat. If your cream breaks, don’t worry! You can fix it by re-whipping it. Just whip for a bit longer until it comes back together. For the full recipe, check out the detailed instructions above. {{image_2}} You can change the taste of your Limoncello Cream Cake by adding fruit purees or extracts. For example, try using raspberry or strawberry puree. This will add a fruity twist and a lovely color. You can also use almond or coconut extract for a unique flavor. Creative frosting alternatives can make your cake even more special. Instead of limoncello cream, consider a lemon buttercream or a light whipped cream. This can give you a different texture and taste. Pair your Limoncello Cream Cake with drinks that enhance its bright flavor. A light white wine or a sparkling water with lemon works great. You can also serve it with a scoop of lemon sorbet for a refreshing treat. When it comes to garnishing, fresh mint leaves and lemon zest can add color and aroma. You might even try edible flowers for a fancy touch. These simple changes can elevate your cake’s presentation. If you need a gluten-free cake, you can substitute all-purpose flour with a gluten-free blend. Make sure the blend has a good balance of starches. For a dairy-free option, use coconut cream instead of heavy cream and dairy-free butter. You can also replace mascarpone cheese with a dairy-free cream cheese. These swaps keep your cake delicious while catering to different diets. To keep your Limoncello Cream Cake fresh, use these simple tips: - Refrigeration: Place the cake in an airtight container. This helps prevent the cake from drying out. If you don’t have a container, cover the cake tightly with plastic wrap. This method keeps the cake moist and tasty. - Freezing Tips: If you want to save some for later, freeze individual slices. Wrap each slice in plastic wrap, then in aluminum foil. This keeps them safe from freezer burn. You can freeze the cake for up to three months. Your Limoncello Cream Cake will last a while if stored correctly: - Fridge Lifespan: In the fridge, the cake stays good for about five days. Make sure it is always covered. - Signs of Spoilage: Look for any mold or a sour smell. If the cake feels hard or dry, it may not taste good anymore. Always check before you eat! When it’s time to enjoy leftover cake, follow these tips: - Restoring Moisture: To warm the cake without drying it out, place a slice on a microwave-safe plate. Cover it with a damp paper towel. Heat for about 10-15 seconds. This keeps the cake soft and moist. - Best Ways to Serve: Serve the cake cold or warm. You can add a dollop of fresh whipped cream or a drizzle of Limoncello to enhance the flavors. Serve it with a slice of lemon or a sprig of mint for a nice touch. Enjoy your delightful cake! For the full recipe, please refer to the recipe section. Limoncello is a sweet lemon liqueur from Italy. It has a bright, zesty taste. This flavor shines in the cake, adding a lovely lemony kick. The liqueur also keeps the cake moist and rich. As you bake, the Limoncello brings warmth and depth to each slice. It creates a perfect balance with the creamy frosting. Yes, you can swap Limoncello for another citrus liqueur. Try using orange liqueur like Cointreau or Grand Marnier. You could also use a lemon extract for a non-alcoholic option. Just keep in mind that the taste will change slightly. The key is to choose something that complements the cake's lemony flavor. You can bake the cake a day before serving. Let it cool completely, then wrap it tightly in plastic wrap. Store it in the fridge. The cream can also be made ahead. Store it in the fridge in a sealed container. Just assemble the cake the day you plan to serve it. This way, it stays fresh and tasty. Serve the cake chilled for a refreshing treat. Cut slices and plate them with a garnish of lemon slices and mint leaves. This adds a nice touch and brightens the dessert. Pair it with coffee or tea for a delightful end to any meal. If you want to impress guests, drizzle some extra Limoncello on top. Yes, this recipe is already nut-free! The ingredients used, like flour and butter, do not contain nuts. However, always check labels to ensure no cross-contamination. If you want more flavor, consider adding some poppy seeds or lemon zest. This keeps the cake nut-free while still being tasty. For the full recipe, refer to the section above. This post covered how to make a delicious Limoncello Cream Cake. You learned about key ingredients, step-by-step baking, and making limoncello cream. I shared tips for perfect texture and flavor enhancement. Plus, you discovered ways to adjust the recipe for dietary needs and how to store leftovers. Now, you’re armed with all the tools to create this tasty treat. Enjoy baking your cake and impressing your friends and family!

If you love a sweet, tangy treat, you’ll adore my Limoncello Cream Cake. This delightful dessert is simple to make and perfect for any occasion. With bright flavors from fresh …

Read more

Categories Desserts

Lemon & Blueberry Traybake Cake Delightful Recipe

July 16, 2025 by Chef Luca
- 200g unsalted butter - 200g caster sugar - 4 large eggs - Zest of 2 lemons - 200g self-raising flour - 1 tsp baking powder - 100g fresh blueberries - 100ml milk - Pinch of salt - Icing sugar for dusting - Whipped cream for serving - Additional toppings (e.g., lemon zest, mint leaves) Gathering your ingredients is key to a great bake. You want everything fresh and ready. Unsalted butter gives the cake a rich flavor. Caster sugar blends well for that perfect sweetness. Large eggs add moisture and help the cake rise. Lemon zest brightens every bite and pairs nicely with blueberries. Self-raising flour helps the cake get fluffy. Baking powder gives it a boost, making sure it rises well. Fresh blueberries add a burst of flavor. Milk keeps the batter smooth and moist. A pinch of salt balances the sweetness. For serving, whipped cream makes each slice feel special. You can also add lemon zest or mint leaves for a fresh touch. I hope you enjoy this delightful recipe! For the complete guide, check out the Full Recipe. First, preheat your oven to 180°C (350°F). While it warms up, get your traybake tin ready. Line it with baking paper so the cake does not stick. This helps with easy serving later. Now, let’s make the batter. In a large bowl, cream together the softened butter and caster sugar. Use an electric mixer for about 3-5 minutes. You want it to be light and fluffy. This step is key for a soft cake texture. Next, beat in the eggs, one at a time. Make sure to mix well after each egg. Add a tablespoon of flour with the last egg. This helps prevent curdling. It keeps your batter smooth and creamy. Then, stir in the lemon zest. This adds a bright flavor that pairs well with blueberries. Now, sift in the self-raising flour, baking powder, and a pinch of salt. Fold these dry ingredients gently into the wet mixture. Be careful not to over-mix; you want it just combined. Finally, gradually fold in the milk until you have a smooth batter. Once that is ready, gently fold in the fresh blueberries. This step is fun, and it ensures they are evenly spread throughout the cake. Pour the batter into your prepared tin. Use a spatula to smooth the top. For a lovely touch, scatter a few extra blueberries on top. Place it in the preheated oven. Bake for 25-30 minutes. To check if it's done, insert a skewer into the center. If it comes out clean, your cake is ready! After baking, remove it from the oven. Let it cool in the tin for 10 minutes. Then, transfer it to a wire rack to cool completely. Once it is cool, dust the top with icing sugar. This adds a nice, sweet finish. Enjoy your Lemon & Blueberry Traybake! For the full recipe, check out the details above. Using room temperature ingredients helps your cake mix well. Cold butter or eggs can make the batter lumpy. Let butter and eggs sit out for about 30 minutes before you start. This small step makes a big difference. To prevent over-mixing, fold the batter gently. When you add the flour, mix just until combined. Over-mixing can lead to a dense cake. Use a spatula to carefully mix in the blueberries, too. This keeps them whole and juicy. Want more lemon flavor? Add extra lemon zest to the batter. You can also add a splash of lemon juice. This gives your cake a bright and fresh taste. If you want to try different fruits, go for raspberries or blackberries. Both pair well with lemon. They add a nice tartness and make the cake colorful. For a beautiful finish, garnish your cake with fresh blueberries. A sprinkle of lemon zest on top adds a nice touch, too. When serving, arrange the slices on a lovely platter. This makes your cake look inviting. If you like, add a dollop of whipped cream on the side. It adds creaminess and makes each bite even better. You can find the full recipe for this delightful Lemon & Blueberry Traybake Cake in the previous section. {{image_2}} You can switch up your Lemon & Blueberry Traybake to keep things fresh. Here are two tasty ideas: - Blueberry Lemon Loaf Cake: This recipe is similar but in loaf form. You bake it in a loaf pan instead of a traybake tin. The texture is denser and perfect for slicing. - Lemon & Raspberry Traybake: Swap blueberries for raspberries. This change offers a nice tartness that pairs well with lemon. The bright color makes it look fantastic! You can also adapt the recipe to fit your needs: - Gluten-free option: Use almond flour or a gluten-free blend instead of self-raising flour. This keeps the cake light and fluffy without gluten. - Vegan option: Substitute eggs with flax eggs or applesauce, and replace butter with coconut oil or vegan butter. This way, everyone can enjoy a slice! For the full recipe, check out the Lemon & Blueberry Bliss Traybake 🫐. To keep your Lemon & Blueberry Traybake fresh, store it in an airtight container. This will help prevent it from drying out. If you leave it at room temperature, it lasts about 3 days. However, if you put it in the fridge, it can last up to a week. Just remember, cold air can change the texture a bit. If you want to keep your traybake for longer, freezing is a great option. First, wrap the cooled cake tightly in plastic wrap. After that, put it in a freezer bag. This method helps keep out air. You can freeze it for about 2 to 3 months. When you’re ready to enjoy it, take it out and thaw in the fridge overnight. For best results, let it come to room temperature before serving. To check if your traybake is done, insert a skewer into the center. If it comes out clean, the cake is ready. You can also gently press the top. It should spring back. If it leaves an imprint, give it a few more minutes. Yes, you can use frozen blueberries. They hold up well in baking. However, they may make the batter a bit wet. This can change the cake's texture slightly. If you use frozen berries, do not thaw them first. Add them straight to the batter. This helps keep the color vibrant. Lemon and blueberry pair well with many flavors. Here are some great suggestions: - Lavender: Adds a floral note that enhances lemon. - Almond: A touch of almond extract can deepen the flavor. - Coconut: Adds a tropical twist that complements both flavors. - Mint: Fresh mint brings a bright touch to the cake. - White chocolate: For a sweet contrast to the tart lemon and blueberry. Feel free to mix and match these flavors to create your perfect cake! For the full recipe, check the details above. This article outlined how to make a delicious lemon and blueberry traybake cake. From gathering your ingredients to baking and storing, each step is easy to follow. I shared tips for improving texture and flavor, along with variations and storage advice. You now have a great recipe to impress your friends and family. Enjoy your baking adventure!

Are you ready to bake a delicious Lemon & Blueberry Traybake Cake? This recipe is perfect for any occasion. It combines the bright taste of lemon with sweet blueberries, making …

Read more

Categories Desserts

Cheesy Meatloaf Casserole Savory and Simple Dish

November 11, 2025July 16, 2025 by Chef Luca
To make Cheesy Meatloaf Casserole, you will need: - 1 lb ground beef - 1 cup breadcrumbs - 1 small onion, finely chopped - 1 green bell pepper, finely chopped - 2 cloves garlic, minced - 1 egg, beaten - 1/4 cup milk - 1 tablespoon Worcestershire sauce - 1 teaspoon salt - 1/2 teaspoon black pepper - 1 cup shredded cheddar cheese, divided - 1 can (15 oz) diced tomatoes with green chilies - 1 cup frozen mixed vegetables (peas, corn, carrots) - 1/2 cup ketchup You can easily swap some ingredients for others. Use ground turkey instead of ground beef. For a gluten-free option, choose gluten-free breadcrumbs. If you want more veggies, add chopped zucchini or mushrooms. You can use any cheese you love, like mozzarella or pepper jack. If you don’t have Worcestershire sauce, try soy sauce for a similar flavor. This dish may not suit everyone. It contains meat and dairy, so it’s not vegan. If you're lactose intolerant, use dairy-free cheese. For low-carb diets, skip the breadcrumbs and add more veggies instead. Always check for allergens in canned goods, like tomatoes, to ensure safe eating. {{ingredient_image_1}} To start, gather your ingredients. You need ground beef, breadcrumbs, onion, bell pepper, garlic, egg, milk, Worcestershire sauce, salt, and pepper. In a large bowl, add the ground beef and breadcrumbs first. Then, chop the onion and bell pepper finely. Add them to the bowl along with the minced garlic. Next, crack the egg into the bowl. Pour in the milk and Worcestershire sauce. Add salt and pepper too. Use your hands to mix everything well. You want it to feel sticky but not too wet. Finally, fold in half of the shredded cheddar cheese gently. Now, grab a greased 9x13 inch baking dish. Press the meat mixture evenly into the bottom of the dish. Make sure it covers the entire bottom. Next, open the can of diced tomatoes and spread them over the meat mixture. This adds great flavor. Sprinkle the frozen mixed vegetables on top of the tomatoes. They add color and nutrition. Now, take the ketchup and spread it over the top of the casserole. This gives it a nice glaze. Finally, sprinkle the remaining shredded cheddar cheese over everything. Preheat your oven to 350°F (175°C). Place the casserole in the oven and bake for 40 to 45 minutes. Check that the meat is cooked through. The cheese should be bubbly and golden brown. Once done, take it out of the oven. Let it cool slightly before slicing. Serve slices on plates and add fresh parsley for garnish. Pair it with a side salad for a colorful meal. Enjoy your cheesy meatloaf casserole! To get great flavor in your Cheesy Meatloaf Casserole, use fresh ingredients. Fresh herbs, like parsley or basil, can add a nice touch. The Worcestershire sauce brings a deep umami taste. Mix everything well to blend the flavors. Letting the meat mixture sit for a few minutes allows the flavors to deepen. To get cheese that melts well, use shredded cheddar cheese. Shredding yourself will help it melt evenly. Adding cheese in layers, like in the casserole, ensures that every bite has cheesy goodness. Bake the casserole until the cheese bubbles and turns golden. Keep an eye on it to prevent burning. Ovens can cook unevenly, so check your casserole often. If your oven runs hot, start checking it a bit early. If it’s cooler, it may need a few more minutes. A meat thermometer can help. The meat should reach 160°F for safety. Adjust your cooking time based on how your oven performs. Pro Tips Use lean ground beef: Opt for 80/20 ground beef for a balance of flavor and moisture without excessive grease, ensuring a well-textured meatloaf casserole. Customize your veggies: Feel free to substitute or add your favorite vegetables like mushrooms or zucchini to enhance flavor and nutrition in your casserole. Rest before slicing: Allow the casserole to rest for 5-10 minutes after baking. This helps the layers set and makes slicing easier without falling apart. Experiment with cheese: Try different cheese varieties, like mozzarella or pepper jack, for a unique twist on the classic cheddar flavor in your casserole. {{image_2}} You can easily make a vegetarian version of this cheesy casserole. Replace the ground beef with a mix of beans, lentils, or a meat alternative. Black beans work well here. Use 1 can of drained black beans or 1 cup of cooked lentils. It adds protein and texture. You can also add sautéed mushrooms for a hearty touch. For the cheese, stick with shredded cheddar or try a dairy-free cheese for a plant-based option. If you love spice, add some heat to your dish. Mix in 1-2 teaspoons of chili powder or cayenne pepper into the meat mixture. You can also use spicy diced tomatoes instead of regular ones. If you want more flavor, add chopped jalapeños or crushed red pepper flakes. Finish with a sprinkle of pepper jack cheese on top for an extra kick! Don’t hesitate to mix up the veggies in your casserole. You can add chopped spinach, zucchini, or even broccoli. Just make sure to chop them small so they cook well. Use 1-2 cups of your favorite frozen or fresh vegetables. This not only boosts nutrition but also adds color and flavor. Experiment with different combinations to keep it fresh and exciting! To store leftover casserole, let it cool first. Cover the dish tightly with plastic wrap. You can also use a lid if your dish has one. Place it in the fridge. It will stay fresh for up to three days. When you want to eat it again, just take it out and prepare to warm it up. You can freeze the casserole for later. First, let it cool completely. Then, cut it into portions. Wrap each piece in plastic wrap. Place the wrapped portions in a freezer bag. Label the bag with the date. It can last up to three months in the freezer. When you are ready to eat, thaw it in the fridge overnight. To reheat the casserole, preheat your oven to 350°F (175°C). Place the casserole in an oven-safe dish. Cover it with foil to keep it moist. Heat for about 20-30 minutes or until it is warm throughout. You can also use a microwave for quick reheating. Just warm it for a few minutes, stirring often for even heat. Enjoy your tasty leftovers! Yes, you can make Cheesy Meatloaf Casserole ahead. Prepare it and store it in the fridge. Cover it tightly to keep it fresh. You can bake it later. This dish tastes great the next day! If you want a substitute for ground beef, try ground turkey or chicken. Both options are leaner. You can also use plant-based meat for a vegetarian version. Just ensure the flavor stays rich. To know if the casserole is done, check the meat's temperature. It should reach 160°F (70°C). The cheese should be bubbly and golden too. If the meat is cooked and cheese is melted, it’s ready! To wrap it up, we explored how to make a delicious cheesy casserole. We covered the key ingredients and offered smart substitutions. You now know how to prepare, bake, and serve it perfectly. I shared tips for great flavor and noted how to adjust cooking times. If you want to mix it up, try the vegetarian or spicy options. Remember how to store extras for later. Enjoy making this tasty dish that suits your needs!

If you love comfort food, you’ll adore my Cheesy Meatloaf Casserole. This dish is both savory and simple to prepare. Packed with flavor and melty cheese, it’s a family favorite …

Read more

Categories Dinner

Delicious Sweet Cucumber Relish for Canning Recipe

July 15, 2025 by Chef Luca
- 6 cups cucumbers, finely chopped - 2 cups bell peppers (red and green), finely chopped - 1 cup onions, finely chopped - 3 cups granulated sugar - 2 cups apple cider vinegar - 1 tablespoon mustard seeds - 1 tablespoon celery seeds - 1 teaspoon ground turmeric - 2 teaspoons salt - 1 teaspoon black pepper - 1/4 teaspoon red pepper flakes (optional for spice) - 4 cups water (for soaking) When I prepare sweet cucumber relish, I start with fresh, crisp cucumbers. I chop them finely. This helps them soak up all the flavors. I mix in colorful bell peppers and onions for a tasty crunch. The bright colors make the relish look nice, too. Next, I focus on the flavor. Sugar and apple cider vinegar create a perfect balance of sweet and tangy. Mustard seeds and celery seeds add a nice pop. Then, I sprinkle in turmeric for a warm color and extra taste. Salt, black pepper, and red pepper flakes round out the flavor. The red pepper flakes are optional, but they can add a little kick if you like spice. For soaking, I use a simple solution of water and salt. Soaking the cucumbers for about two hours helps reduce moisture. This keeps the relish crisp and fresh. I encourage you to try this method for best results. You can find the full recipe with all these ingredients and more steps to make your relish. Enjoy making this delightful treat! 1. Rinse the cucumbers in cold water. This refreshes them and removes dirt. 2. Place the cucumbers in a large bowl. Sprinkle salt over them. 3. Add enough water to cover the cucumbers. Let them soak for about 2 hours. This helps reduce moisture and keeps them crunchy. 4. After soaking, drain the cucumbers well. Rinse them under cold water to get rid of excess salt. 1. In a large pot, combine the drained cucumbers, chopped bell peppers, and onions. Mix them well. 2. In a separate saucepan, prepare the vinegar mixture. Combine apple cider vinegar, sugar, mustard seeds, celery seeds, turmeric, black pepper, and red pepper flakes if you want spice. 3. Bring this vinegar mixture to a boil. Stir occasionally until the sugar dissolves. 1. Pour the hot vinegar mixture over the vegetables in the large pot. Stir to combine everything well. 2. Bring the mixture to a boil over medium heat. Then reduce to a simmer. Cook for about 10-15 minutes, stirring occasionally. 3. Sterilize your canning jars. Submerge them in boiling water for about 10 minutes. 4. Carefully ladle the hot relish into the sterilized jars. Leave about 1/2 inch of headspace at the top. 5. Wipe the rim of each jar with a clean cloth. Seal each jar with a sterilized lid and band. Tighten them just until snug. 6. Process the jars in a boiling water bath for 10 minutes. This helps ensure they seal well. 7. Remove the jars from the boiling water. Let them cool completely on a clean towel or cooling rack. For more detailed instructions, refer to the Full Recipe. Enjoy your delicious sweet cucumber relish! To achieve the best crunch in your sweet cucumber relish, try soaking your cucumbers. Use a mix of salt and water. Soak them for about 2 hours. This process draws out excess moisture, which helps keep them crisp. After soaking, drain and rinse the cucumbers well to remove extra salt. For cooking time, simmer your relish for just 10 to 15 minutes. This short time allows the vegetables to soften slightly while preserving their bite. Stir occasionally to make sure the flavors blend well. Properly sealing jars is key for safe canning. After you fill the jars with relish, wipe the rims clean. This step ensures a tight seal. Place the sterilized lids on top, and screw on the bands until they are snug but not too tight. Sterilization is very important. Before filling, submerge jars in boiling water for 10 minutes. This kills any germs and bacteria. After filling, process your jars in a boiling water bath for 10 minutes. This step ensures the jars seal well and keeps your relish safe. Label your jars with the date and ingredient list. This helps you keep track of freshness. For a fun touch, consider gifting your relish in jars wrapped with fabric covers and twine. It adds charm and makes a great gift for friends or family. Enjoy this relish on burgers, sandwiches, or as a side dish! {{image_2}} You can make your sweet cucumber relish unique by adding different spices. Try using spices like cinnamon, clove, or ginger. These will give your dish a warm, inviting flavor. If you want some heat, add red pepper flakes or crushed chili. Start with a little and taste as you go. This way, you control the spice level. You might want to change up the vegetables. Zucchini or carrots can work well in this recipe. These veggies add their own flavor and texture. You can also try using different vinegars. White wine vinegar or rice vinegar can give a new taste. Each vinegar brings its own twist to the relish. If you prefer less sweetness, you can reduce the sugar. Start by cutting the sugar in half. Taste the mixture and adjust further if needed. You can also use natural sweeteners like honey or maple syrup. These options add sweetness without being too overpowering. Just remember to balance the flavors so your relish stays delicious. To keep your sweet cucumber relish fresh, store it in a cool, dark place. A pantry or cupboard works well. Make sure the jars are sealed tightly. This helps keep out air and light, which can ruin the flavor. Always label your jars with the date. This way, you know when you made it. Also, check each jar for any signs of damage before storing. Homemade cucumber relish can last up to a year if stored well. However, for the best taste, try to use it within six months. Always check for signs of spoilage before using. Look for any bulging lids or unusual smells. If anything seems off, it’s best to toss it out. Your health is more important than saving a jar of relish. You can use leftover relish in many fun ways. Try adding it to sandwiches or burgers for a sweet crunch. It also makes a great dip for chips or veggies. You can mix it into potato salad for added flavor. If you have too much, consider using it as a marinade for grilled meats. This adds a unique taste that everyone will love. Don’t let any go to waste! Homemade cucumber relish can last up to one year when stored properly. Once you can the relish, it should stay fresh in a cool, dark place. If you open a jar, refrigerate it. Use it within three weeks for the best taste. Always check for signs of spoilage, like off smells or mold. Yes, you can reduce the sugar in the relish. However, sugar helps balance the flavors and acts as a preservative. If you cut back on sugar, the relish may taste more tart. You could use natural sweeteners, like honey or agave syrup, but adjust the amounts since they can vary in sweetness. For relish, pickling cucumbers are the best choice. Varieties like Kirby or Persian cucumbers work well. They are firm and have fewer seeds, making them perfect for relish. The crunchiness of these cucumbers helps keep the texture in your final product. Yes, it is safe to can homemade relish without preservatives if you follow good canning practices. Ensure everything is clean and sterilized. The high acidity from vinegar helps preserve the relish. Always process the jars in a boiling water bath to make sure they seal properly. You can freeze cucumber relish, but it may change in texture. To freeze, let the relish cool completely after cooking. Place it in airtight containers, leaving space for expansion. Enjoy your relish within six months for the best flavor. When ready to use, thaw it in the fridge overnight. Making sweet cucumber relish is easy and fun. We covered the key ingredients, including cucumbers, peppers, and spices. You learned step-by-step methods for preparing, cooking, and canning. Helpful tips helped you perfect the texture and seal jars properly. We explored variations, storage info, and answered common questions. Get creative with flavors and enjoy your relish with meals. This tasty treat can brighten any dish! Now, you have all the tools to make delicious and lasting cucumber relish. Happy cooking!

Are you ready to elevate your canning game? This Delicious Sweet Cucumber Relish recipe is the perfect balance of sweet and tangy. With simple ingredients like cucumbers, bell peppers, and …

Read more

Categories Dinner

Honey Soy Garlic Sauce with Chili Lime Recipe Delight

July 15, 2025 by Chef Luca
- 1/2 cup soy sauce - 1/4 cup honey - 3 cloves garlic, minced - 1 tablespoon fresh ginger, grated - 1 tablespoon rice vinegar - 1 tablespoon lime juice (freshly squeezed) - 1-2 red chili peppers, finely chopped (adjust for spice level) - 1 teaspoon sesame oil - 1 tablespoon cornstarch mixed with 2 tablespoons water (for thickening) - Lime wedges - Sesame seeds In making the honey soy garlic sauce with chili lime, I focus on fresh flavors. The soy sauce gives a salty base, while honey brings sweetness. I use fresh garlic and ginger for a robust taste. Lime juice and rice vinegar add a zesty punch. The chili peppers give the sauce heat. You can adjust the amount to suit your spice level. Finally, I add sesame oil for a nutty aroma. This combination creates a well-rounded sauce great for many dishes. For presentation, you might want to add lime wedges and sesame seeds. They make the dish look vibrant and inviting. You can find the full recipe details above to get started on this tasty journey! - In a medium saucepan, combine the following: - 1/2 cup soy sauce - 1/4 cup honey - 3 cloves garlic, minced - 1 tablespoon fresh ginger, grated - 1 tablespoon rice vinegar - 1 tablespoon lime juice (freshly squeezed) - 1-2 red chili peppers, finely chopped - 1 teaspoon sesame oil - Place the saucepan over medium heat. Bring the mixture to a gentle simmer. Stir it occasionally for even blending. - To thicken the sauce, mix 1 tablespoon cornstarch with 2 tablespoons water in a small bowl. - Slowly add this mixture to the saucepan while stirring constantly. This will help it thicken nicely. - Keep cooking for an additional 2-3 minutes. The sauce should reach your desired consistency. - Once done, remove the saucepan from heat. Let the sauce cool for a few minutes. - Pour it into a clean jar or container. Store it in the fridge for later use. - The sauce can last up to a week when refrigerated. Enjoy your flavorful creation! To get the best taste from your honey soy garlic sauce, balance is key. You want sweet from the honey and salty from the soy sauce. This mix makes your dish shine. Adjust the spice to fit your taste. If you love heat, add more chili. If you prefer less, use fewer peppers. This sauce is all about making it yours. Simmering is crucial for flavor. When you simmer, the heat helps the ingredients blend. It takes about 5-7 minutes for flavors to meld. Stir the sauce gently while it simmers. This keeps it from sticking and burning. Be sure to keep an eye on it while it cooks. This sauce pairs well with many proteins. Try it on grilled chicken, fish, or tofu. Drizzling it over these foods boosts flavor. You can also use it in stir-frys or as a marinade. For a visual pop, add lime wedges and sesame seeds on top. These garnishes make your dish look and taste amazing. You can find the full recipe in the main article. {{image_2}} You can swap the rice vinegar for other types. Try apple cider vinegar for a fruity kick. White wine vinegar adds a touch of sharpness. If you want a milder flavor, use red wine vinegar. Instead of honey, use maple syrup for a vegan twist. Agave nectar also works if you want a different sweetness. To boost the taste, add spices like black pepper or cumin. Fresh herbs like cilantro or basil can brighten the sauce. For a more complex flavor, try adding a dash of five-spice powder. Experiment with different chili types! Serrano peppers give a nice heat, while jalapeños add a milder spice. This sauce shines in stir-fries. Toss it with veggies and your choice of protein. It works great on grilled chicken or shrimp, too. You can also use it as a dressing for salads. Drizzle it over cold dishes like noodle salads for extra flavor. The sauce's versatility makes it a must-have in your kitchen. To keep your Honey Soy Garlic Sauce fresh, choose a clean glass jar or an airtight container. Glass is great because it does not absorb smells or flavors. You can store the sauce in the fridge for up to two weeks. Always let the sauce cool before sealing it. This step prevents moisture buildup inside the container. Yes, you can freeze the sauce! It is perfect for meal prep. To freeze, pour the cooled sauce into a freezer-safe container. Leave some space at the top for expansion. You can freeze it for up to three months. When you’re ready to use it, thaw it in the fridge overnight. You can also use the microwave in short bursts. Just be sure to stir it well after thawing. Check your sauce before using it. If you see any mold, it’s time to toss it. A bad smell is another sign that the sauce has gone bad. Always make sure the container is sealed tightly to keep air out. Proper sealing helps the sauce last longer and stay safe to eat. This sauce lasts for about one week in the fridge. Store it in a clean jar with a tight lid. Make sure to keep it cool. If you see any changes in color or smell, it’s best to toss it. Yes, you can adjust the spice levels easily. Use fewer chili peppers for a milder sauce. If you love heat, add more chili peppers. You can also try different types of peppers for unique flavors. This sauce is very versatile. You can drizzle it over grilled chicken, fish, and tofu. It also works well in stir-fries or as a marinade. Use it to add flavor to veggies or rice dishes. Enjoy experimenting! This blog post covered how to make a tasty Honey Soy Garlic Sauce with chili lime. You learned about key ingredients like soy sauce, garlic, and how to balance sweet and spicy flavors. I shared step-by-step instructions for preparation, thickening, and storing your sauce. Remember, you can try different ingredients or serve it with various dishes. Experimenting leads to the best flavors. Keep these tips handy, and enjoy making this versatile sauce at home!

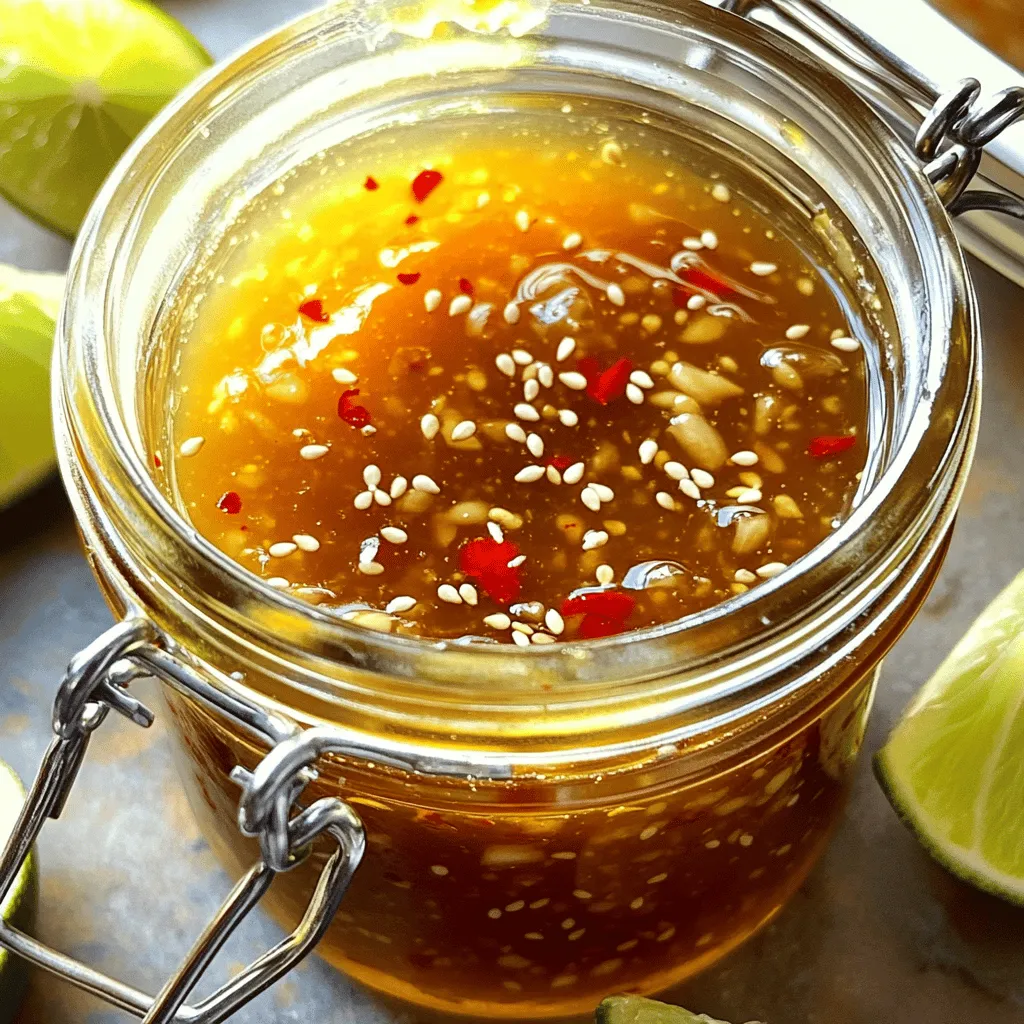
Are you ready to elevate your meals? Let me share my Honey Soy Garlic Sauce with Chili Lime recipe. This simple yet delicious sauce packs a punch of flavor. With …

Read more

Categories Dinner

Easy Strawberry Shortcake Sheet Cake Delightful Treat

July 15, 2025 by Chef Luca
To make an Easy Strawberry Shortcake Sheet Cake, you need some simple, tasty ingredients. Here’s what you will need: - 2 cups all-purpose flour - 1 ½ cups granulated sugar - ½ cup unsalted butter, softened - 1 cup whole milk - 3 ½ teaspoons baking powder - 1 teaspoon vanilla extract - ½ teaspoon salt - 3 large eggs - 4 cups fresh strawberries, hulled and sliced - 1 cup heavy whipping cream - 2 tablespoons powdered sugar - Extra strawberries for garnish Fresh strawberries are key for this dessert. They add sweetness and flavor. I always pick ripe strawberries to ensure the best taste. Quality ingredients make a big difference in your cake. If you can, use organic strawberries and real butter for a rich flavor. If you need alternatives, don't worry! For a gluten-free cake, try using a gluten-free flour blend. For dairy-free options, you can use almond milk and coconut cream instead of heavy cream. These swaps keep your dessert delicious while meeting your dietary needs. For the full recipe, check out the full recipe section to guide you through each step of creating this delightful treat. 1. Preheat the Oven: Start by preheating your oven to 350°F (175°C). This step is key for even baking. 2. Prepare the Baking Sheet: Grease and flour a 12x17-inch baking sheet. You can also line it with parchment paper. This makes it easy to remove the cake later. 3. Mix Ingredients: In a large bowl, cream together the softened butter and granulated sugar. Use a mixer to beat until it looks light and fluffy. 4. Add Wet Ingredients: Beat in the eggs, one at a time. Then, mix in the vanilla extract and whole milk. 5. Combine Dry Ingredients: In another bowl, whisk together the flour, baking powder, and salt. Slowly add this dry mix to the wet ingredients. Mix just until combined. 6. Bake the Cake: Pour the batter into the prepared sheet. Spread it evenly. Bake for 25-30 minutes. To check if it’s done, insert a toothpick in the center. If it comes out clean, it’s ready. 7. Cool the Cake: Remove it from the oven and let it cool completely on a wire rack. This keeps the cake from becoming soggy. 1. Hulling and Slicing: To hull the strawberries, use a small knife to remove the green tops. Then, slice them into thin pieces. This makes them easy to mix into the cake. 2. Macerating for Flavor: Place the sliced strawberries in a bowl. Sprinkle with ½ cup of granulated sugar. Let them sit for about 15-20 minutes. This draws out the juices and enhances the flavor. 1. Whip the Cream: In a large mixing bowl, add the heavy whipping cream and powdered sugar. Use an electric mixer to beat until soft peaks form. This means the cream holds its shape but is still soft. 2. Flavor Variations: If you want, you can add a splash of vanilla or almond extract for more flavor. Just mix it in before you finish whipping the cream. Once everything is ready, you can assemble your cake. For the full recipe, check out the details provided earlier. Enjoy making this delightful treat! Baking a sheet cake can be simple, but mistakes happen. Here are some common ones to avoid: - Overmixing the Batter: Mix just until combined. Overmixing can make the cake tough. - Incorrect Oven Temperature: Always preheat your oven. An oven thermometer can help. - Not Greasing the Pan: A well-greased or lined pan ensures easy cake removal. To keep your cake moist and flavorful, consider these tips: - Use Fresh Ingredients: Fresh eggs and milk enhance flavor and texture. - Macerate Strawberries: Let your strawberries sit with sugar. This draws out their juices and adds flavor. - Don’t Overbake: Check your cake a few minutes early. It’s done when a toothpick comes out clean. Presenting your Easy Strawberry Shortcake Sheet Cake can be fun! Here are some ideas: - Platter Presentation: Serve on a large platter with mint leaves around the cake. This adds color and freshness. - Individual Servings: Cut into squares and place on small plates. Garnish each with a strawberry on top. For pairing beverages, here are some recommendations: - Iced Tea: A sweet iced tea complements the cake’s flavors well. - Sparkling Water: This light drink cleanses the palate and balances sweetness. - Coffee: A warm cup of coffee contrasts nicely with the cold cake. For the full recipe of this delightful treat, check out the [Full Recipe]. {{image_2}} You can change the flavor of the Easy Strawberry Shortcake Sheet Cake by using different fruits. Blueberries and peaches are great options. They add a new twist while keeping the cake light and fresh. Mix the fruits in with the batter or use them as toppings. For frosting, you can try cream cheese or chocolate instead of whipped cream. Cream cheese adds a tangy taste, while chocolate gives a rich flavor. Both options create a fun change from the original. If you want a vegan version, you can replace the eggs and milk. Use flaxseed meal or applesauce instead of eggs. Almond or soy milk works well as a substitute for whole milk. For a gluten-free option, swap the all-purpose flour with a gluten-free blend. Make sure it includes xanthan gum to help the cake hold together. If you want to cut down on sugar, try using natural sweeteners like honey or maple syrup. You can also use less sugar in the cake and the strawberries. For the full recipe of Easy Strawberry Shortcake Sheet Cake, refer to the recipe section above. To keep your Easy Strawberry Shortcake Sheet Cake fresh, you have two options: refrigeration and freezing. - Refrigeration: Place leftover cake in an airtight container. This helps keep it moist. Store it in the fridge for best results. - Freezing: If you want to save it for later, wrap the cake tightly in plastic wrap. Then, place it in a freezer-safe bag. This keeps the cake safe for about three months. To prevent sogginess, avoid adding the strawberries until you're ready to serve. Store the whipped cream separately. This way, the cake stays fluffy and fresh. In the fridge, your cake can last for about 3 to 5 days. - Signs the Cake Has Gone Bad: Look for changes in smell or texture. If the cake feels dry or hard, it’s time to toss it out. Also, check for mold. If you see any, do not eat it. For the best taste and texture, enjoy your cake within the first few days. If you need to save it longer, freezing is your best bet! Can I use frozen strawberries for this recipe? Yes, you can use frozen strawberries. Just thaw them first. Drain excess liquid to avoid sogginess. Fresh strawberries provide better flavor and texture, but frozen works in a pinch. How do I prevent the cake from sticking to the pan? To prevent sticking, grease and flour the baking sheet well. Using parchment paper is also a great option. This helps the cake slide out easily when it’s cool. Can this recipe be doubled for a larger crowd? Yes, you can double the recipe. Use two baking sheets or one larger pan. Adjust baking time as needed. Keep an eye on the cake and check for doneness with a toothpick. What can I use instead of heavy cream for whipping? You can use coconut cream or a dairy-free whipped topping. These alternatives work well, but they may have different flavors. Experiment to find what you like best. How long does the cake need to chill after assembly before serving? Chill the cake for at least one hour after assembly. This allows the flavors to meld. It also helps the whipped cream firm up, making it easier to slice. Enjoy the Full Recipe for all the details! This guide covered everything you need for an Easy Strawberry Shortcake Sheet Cake. We discussed the essential ingredients, step-by-step instructions, and tips for perfect baking. I shared variations to try and how to store leftovers properly. Remember, using fresh ingredients elevates your dish. With a little care, you can make a treat everyone loves. Enjoy your baking journey!

Are you ready to treat your taste buds? This Easy Strawberry Shortcake Sheet Cake is the perfect dessert for any gathering. With fresh strawberries, a fluffy cake base, and luscious …

Read more

Categories Desserts

Irresistible Bruschetta Chicken Quick and Easy Recipe

July 15, 2025 by Chef Luca
To make bruschetta chicken, you need these main ingredients: - 4 boneless, skinless chicken breasts - 2 cups cherry tomatoes, quartered - 1 cup fresh basil, chopped - 1 cup mozzarella cheese, shredded - 2 tablespoons balsamic vinegar - 3 tablespoons olive oil - 3 cloves garlic, minced - Salt and pepper to taste - 1 teaspoon dried oregano These ingredients bring vibrant flavors and textures to the dish. The chicken serves as a hearty base, while the tomatoes and basil add brightness. You can enhance your bruschetta chicken with optional ingredients: - Balsamic glaze for drizzling - Fresh parsley for garnish - Red onion for a sharp flavor These ingredients can add a twist to your dish. Balsamic glaze gives a sweet finish, while parsley adds freshness. To cook bruschetta chicken, gather these tools: - Oven-safe skillet - Medium bowl for mixing - Knife and cutting board - Measuring spoons and cups Using the right tools makes cooking easier. An oven-safe skillet is key for seamless cooking from stovetop to oven. If you want to see the full recipe, check it out [here](Full Recipe). First, gather all your ingredients. You need: - 4 boneless, skinless chicken breasts - 2 cups cherry tomatoes, quartered - 1 cup fresh basil, chopped - 1 cup mozzarella cheese, shredded - 2 tablespoons balsamic vinegar - 3 tablespoons olive oil - 3 cloves garlic, minced - Salt and pepper to taste - 1 teaspoon dried oregano - Balsamic glaze for drizzling (optional) Preheat your oven to 400°F (200°C). In a bowl, mix the cherry tomatoes, basil, garlic, balsamic vinegar, 1 tablespoon of olive oil, salt, and pepper. Let this sit for a bit. It will enhance the flavors. Next, season both sides of the chicken breasts with salt, pepper, and oregano. Heat 2 tablespoons of olive oil in an oven-safe skillet over medium-high heat. When hot, add the chicken breasts. Sear each side for about 4-5 minutes until they turn golden brown. After browning, take the skillet off the heat. Spoon the tomato mixture over each chicken breast. Top with the shredded mozzarella cheese. Now, put the skillet in the preheated oven. Bake for 20-25 minutes until the chicken is cooked through and the cheese is melted and bubbly. Once it's done, remove the skillet from the oven and let it rest for 5 minutes. For a special touch, drizzle with balsamic glaze before serving. Enjoy your delicious bruschetta chicken! For the full recipe, you can refer back to the beginning. To cook chicken perfectly, start with even thickness. Pound the chicken breasts to about one inch thick. This helps them cook evenly. Season both sides well with salt, pepper, and oregano. For best results, use a hot skillet. Sear the chicken for 4-5 minutes on each side until golden brown. This gives it a nice crust. Finally, bake it in the oven to finish cooking. This method keeps the chicken juicy and tender. Marinades add great flavor to your chicken. Mix balsamic vinegar, olive oil, and minced garlic in a bowl. Add salt and pepper for taste. Let the chicken sit in this mix for at least 30 minutes. If you have time, marinate it overnight in the fridge. This allows the chicken to absorb more flavor. You can also toss in fresh herbs like basil. The longer it marinates, the tastier it becomes. Presentation matters when serving bruschetta chicken. Start with a warm plate for serving. Place the chicken in the center. Spoon some of the marinated tomato mixture over the top. Sprinkle fresh basil on for color. A drizzle of balsamic glaze adds a nice touch. Serve with a side of green salad or crusty bread. This makes for a beautiful and tasty meal. Check out the Full Recipe for more details! {{image_2}} You can switch up the chicken for other proteins. Try using turkey breasts or pork chops. These options cook similarly and hold the bruschetta toppings well. For a seafood twist, use salmon fillets. The rich flavor of salmon pairs nicely with the fresh toppings. Just adjust the cooking time to ensure everything cooks evenly. If you prefer a meatless meal, there are great options. Grilled portobello mushrooms make an excellent base. They are thick and juicy, perfect for holding toppings. You can also try firm tofu. Press the tofu to remove excess water, then grill or bake until golden. Top with the same fresh tomato mix for a satisfying dish. Get creative with your toppings! Besides the classic tomato and basil, consider using roasted red peppers or artichokes. They add a nice flavor and texture. You could also sprinkle some feta cheese for a tangy twist. For a kick, add jalapeños or a drizzle of hot sauce. Experiment with flavors to find what you love best! For the full recipe, check out the details above. To keep your leftover bruschetta chicken fresh, let it cool first. Then, place it in an airtight container. Store it in the fridge for up to three days. Make sure to keep the chicken and toppings separate if you want the best texture. If you want to prepare meals ahead, freezing is a great option. Wrap each piece of bruschetta chicken tightly in plastic wrap. Then, place them in a freezer-safe bag or container. This way, it can last up to three months. When you're ready to eat, just thaw it overnight in the fridge. To reheat bruschetta chicken, preheat your oven to 350°F (175°C). Place the chicken on a baking sheet. Cover it with foil to keep it moist. Heat for about 15 to 20 minutes, or until warmed through. You can also use the microwave, but it may make the chicken a bit dry. Enjoy your delicious leftovers! Yes, you can use different cheeses. Cheddar or feta can add a nice twist. You can also try goat cheese for a tangy flavor. Just remember to adjust the amount based on how strong you want the cheese taste to be. Experimenting with cheese can make your bruschetta chicken unique. To check if the chicken is done, use a meat thermometer. The internal temperature should reach 165°F (75°C). If you don’t have a thermometer, you can cut into the chicken. The meat should be white, not pink or red. Juices should run clear, too. Always check in the thickest part of the chicken for the best results. Bruschetta chicken pairs well with many sides. Here are some tasty options: - Garlic bread for a crunchy bite - A fresh garden salad for a light touch - Steamed vegetables like broccoli or green beans - Pasta with olive oil or marinara sauce These sides balance the flavors and make a complete meal. Enjoy your cooking adventure with the full recipe! Bruschetta chicken is simple and fun to make. You learned about key ingredients, tools, and steps to cook it perfectly. Remember to use marinades for extra flavor and try different toppings or proteins. Proper storage will keep leftovers fresh for later. This dish is great for any meal, and you can tailor it to fit your taste. Enjoy cooking and sharing your bruschetta chicken creations with loved ones. It’s a dish that brings joy and flavor to the table.

Looking for a quick and tasty meal? Try this Irresistible Bruschetta Chicken recipe! With fresh toppings and juicy chicken, it’s sure to please everyone. I’ll guide you through easy steps …

Read more

Categories Dinner

Chocolate Chip Zucchini Bread Savory Delight Recipe

July 15, 2025 by Chef Luca
- 1 ½ cups grated zucchini - 2 large eggs - ½ cup vegetable oil - ½ cup unsweetened applesauce - 1 cup granulated sugar - 1 teaspoon vanilla extract - 1 ½ cups all-purpose flour - 1 teaspoon baking powder - 1 teaspoon baking soda - ½ teaspoon salt - 1 teaspoon ground cinnamon - 1 cup semi-sweet chocolate chips - ½ cup chopped walnuts or pecans (optional) To make chocolate chip zucchini bread, gather all your ingredients first. The grated zucchini adds moisture and nutrition. Use a medium zucchini to get about 1 ½ cups. Eggs bind everything together. Vegetable oil and applesauce keep the bread soft and flavorful. Granulated sugar sweetens the mix, while vanilla extract adds a warm aroma. Next, all-purpose flour forms the base. Baking powder and baking soda help the bread rise. Salt enhances flavor, and ground cinnamon gives it a cozy taste. Lastly, chocolate chips bring in that sweet touch. If you like nuts, walnuts or pecans are great options to add a nice crunch. You can find the full recipe above. Enjoy the process of making this delightful treat! - Preheat your oven to 350°F (175°C). - In a large bowl, combine the grated zucchini, eggs, vegetable oil, applesauce, sugar, and vanilla extract. Mix well until smooth. - In another bowl, mix the flour, baking powder, baking soda, salt, and cinnamon. - Gradually add the dry mix to the wet mix. Stir gently until just combined. Don't overmix; lumps are okay. - Fold in the chocolate chips and nuts if you choose to use them. This adds great flavor and texture! - Pour the batter into your prepared loaf pan. Make sure it spreads evenly. - Bake for 50-60 minutes. Check doneness with a toothpick; it should come out clean. - Let the bread cool in the pan for about 10 minutes. Then, transfer it to a wire rack to cool fully. This method ensures your Chocolate Chip Zucchini Bread is moist and flavorful. For the full recipe, check the earlier section. Enjoy your baking adventure! - Ensure proper measurement of zucchini: Use a medium zucchini, which gives you about 1 ½ cups when grated. Squeeze out excess water for best results. - Avoid overmixing the batter: Mix the wet and dry ingredients gently. A few lumps are fine. Overmixing can make the bread tough. - Check doneness using a toothpick: Insert a toothpick in the center of the loaf. If it comes out clean, your bread is ready. If not, give it a few more minutes. - Presentation tips for serving: Slice the zucchini bread into even pieces. Place it on a rustic wooden board. Drizzle melted chocolate over the top for a fun touch. - Pairing ideas: Enjoy your chocolate chip zucchini bread with a cup of coffee or tea. The warm flavors are perfect for a cozy snack. {{image_2}} You can enjoy chocolate chip zucchini bread without gluten. Use gluten-free flour instead of all-purpose flour. Look for a blend that works well for baking. You may need to add a bit more liquid to keep the bread moist. For a vegan version, replace the eggs. You can use flaxseed meal mixed with water, or applesauce. Both work as great egg replacements. Choose maple syrup or coconut sugar for sweetening. Use coconut oil or vegetable oil instead of butter. To change up the flavor, add spices like nutmeg or ginger. A splash of almond extract can also give a nice twist. Try using dark chocolate chips or milk chocolate for variety. You can even mix in dried fruit or nuts for added texture. To keep your chocolate chip zucchini bread fresh for a week, store it at room temperature. Place it in an airtight container or wrap it tightly in plastic wrap. This way, it stays moist and tasty. Avoid putting it in the fridge, as this can make the bread dry. If you want to keep each slice fresh, cut it into pieces before wrapping. For long-term storage, freezing is your best option. To freeze, wrap the entire loaf or slices in plastic wrap, then place them in a freezer bag. This helps keep them fresh for up to three months. When you want to enjoy it, thaw the bread in the fridge overnight. For a quick thaw, leave it at room temperature for a few hours. To maintain texture, warm the bread in the oven for a few minutes before serving. This makes it taste fresh and soft, just like when it was baked. Can I use yellow squash instead of zucchini? Yes, you can use yellow squash. The taste will be slightly different, but it works great. Just make sure to grate it well, just like zucchini. How do I make zucchini bread less sweet? To reduce the sweetness, cut back on the sugar. Try using half a cup instead of a full cup. You can also add a pinch of salt to balance the flavors. What can I use instead of applesauce? If you don’t have applesauce, use mashed bananas or yogurt. Both will keep your bread moist and add flavor. How do I know when the zucchini bread is done baking? Insert a toothpick into the center. If it comes out clean or with a few crumbs, your bread is done. If it’s wet, bake a bit longer. Can I add other toppings or mix-ins? Yes! You can add nuts, dried fruits, or different kinds of chocolate. Get creative with spices too, like nutmeg or ginger, for extra flavor. For the complete recipe, check out the Full Recipe. This blog post guides you in making delicious zucchini bread. We covered ingredients, preparation steps, and baking tips. You can also explore options for gluten-free and vegan variations. Remember, proper measurements and avoiding overmixing are key. Store it right to enjoy it fresh or frozen. Baking is fun, and this recipe makes it easy. Enjoy your tasty creation!

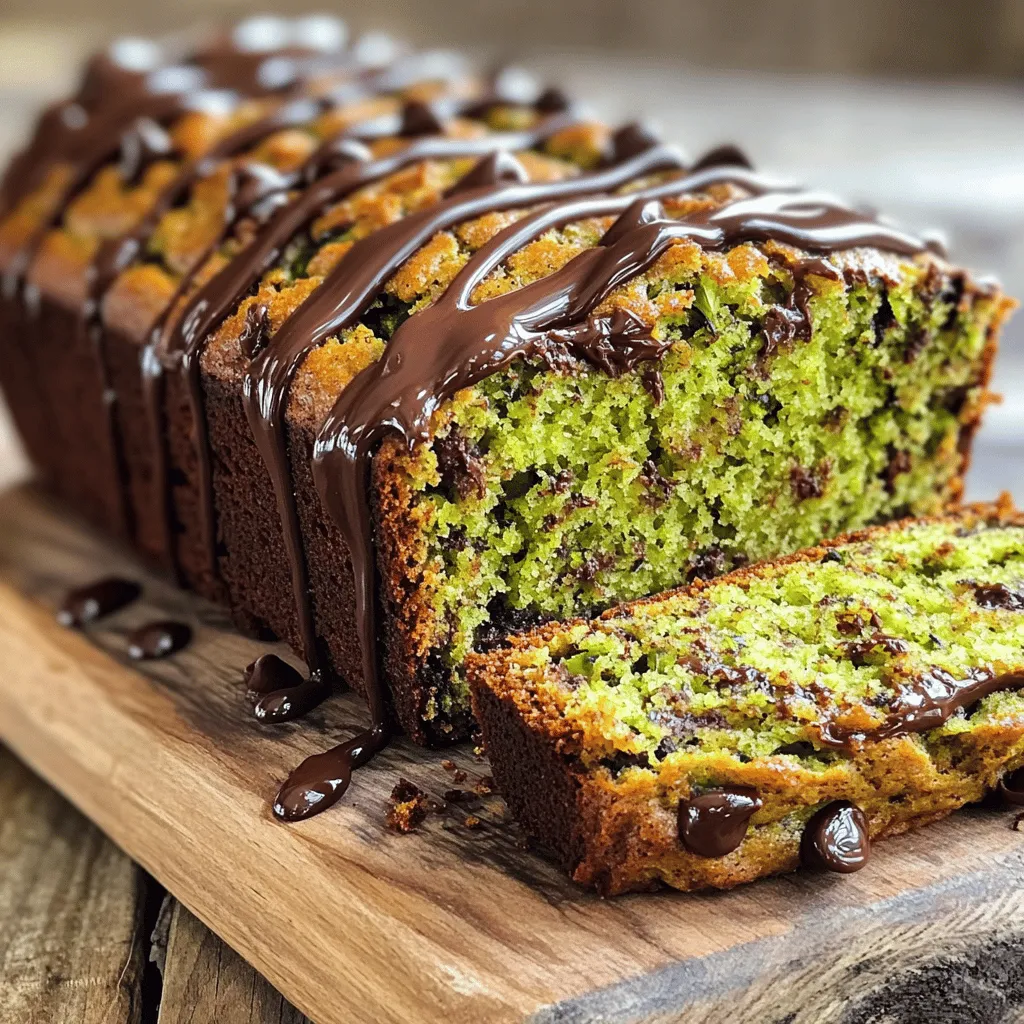
Are you ready to bake a treat that surprises everyone? This Chocolate Chip Zucchini Bread is a savory delight! It’s easy to make and tastes amazing. The secret? Grated zucchini …

Read more

Categories Desserts

Deep Dark Secret Chocolate Cake Irresistible Delight

July 14, 2025 by Chef Luca
To make the Deep Dark Secret Chocolate Cake, gather these key ingredients: - 1 ¾ cups all-purpose flour - 1 ¾ cups granulated sugar - ¾ cup unsweetened cocoa powder - 1 ½ teaspoons baking soda - 1 teaspoon baking powder - 1 teaspoon salt - 2 large eggs - 1 cup whole milk - ½ cup vegetable oil - 2 teaspoons pure vanilla extract - 1 cup boiling water - 1 teaspoon instant coffee granules (optional) - ½ cup dark chocolate chips These ingredients create a moist, rich cake with deep chocolate flavor. The flour, sugar, and cocoa powder form the base. The baking soda, baking powder, and salt help the cake rise and stay soft. The eggs add structure and moisture. Milk and oil keep the cake tender and rich. Vanilla adds warmth, while boiling water blends the batter and enhances the chocolate taste. Optional instant coffee boosts the chocolate flavor. The dark chocolate chips add extra richness and texture. For the full recipe, check the section below. Each ingredient plays a role in making this cake a delightful treat. To start, preheat your oven to 350°F (175°C). This step is vital. A hot oven helps the cake rise well. While the oven heats up, prepare your cake pans. Use two 9-inch round pans. First, grease them with butter or cooking spray. Then, sprinkle a little flour in each pan. This helps the cake come out easily after baking. In a large mixing bowl, combine the dry ingredients. Sift together the flour, sugar, cocoa powder, baking soda, baking powder, and salt. This helps break up any clumps. Next, add the wet ingredients. Crack in the eggs, pour in the milk, and add the oil and vanilla extract. Mix these on medium speed for about two minutes. You want a smooth, well-blended batter. Now, here’s the fun part! Gradually stir in the boiling water. The batter will look thin, but that’s okay. It helps keep the cake moist. If you want an extra kick, dissolve instant coffee granules in the boiling water before adding it. Finally, fold in the dark chocolate chips for an extra rich flavor. Divide the batter evenly between the two prepared pans. Place them in the oven and bake for 30-35 minutes. Keep an eye on them! To check if they’re done, insert a toothpick into the center of each cake. If it comes out clean, they are ready. If not, give them a few more minutes. Once baked, let the cakes cool in the pans for about 10 minutes. Then, transfer them to a wire rack to cool completely. For the complete recipe, check the section labeled Full Recipe. To keep your Deep Dark Secret Chocolate Cake moist, mix the batter gently. Overmixing can lead to a dry cake. When you add the dry ingredients to the wet ones, stir until just blended. It’s okay if some lumps remain. Using boiling water is key. It helps the cocoa powder dissolve and makes the cake rich. Add it last, mixing carefully. The batter will be thin, but that’s normal. Want to boost flavor? Consider adding a splash of espresso or coffee. This enhances the chocolate taste without making it taste like coffee. If you want a twist, add a teaspoon of almond extract. Quality cocoa powder matters! Choose a brand that is unsweetened and dark for the best results. The richer the cocoa, the better your cake will taste. For frosting, a rich chocolate ganache is a great choice. It’s easy to make and adds a glossy finish. You can also use buttercream for a lighter texture. When serving, stack the cake layers with ganache in between. Dust the top with cocoa powder for a nice look. For an extra touch, add chocolate shavings or fresh berries. This elevates the cake and makes it more appealing. You can find the Full Recipe for this delightful cake in the earlier section. {{image_2}} You can choose many frostings for this cake. Cream cheese frosting adds a tangy twist. Buttercream gives a sweet and smooth touch. Ganache, rich and glossy, is a favorite. To mix it up, add flavors to the frosting. Try orange zest for a citrus kick. Or add almond extract for a nutty flavor. For a touch of coffee, mix in espresso powder. Each option makes the cake even more special. Want to change things up? You can add nuts like walnuts or pecans. They add a nice crunch. Dried fruits, like cherries or apricots, give a sweet pop. You can also use different chocolate types, such as milk or white chocolate. If you want a layered cake, bake three or four thinner layers. Add fillings between each layer. Try whipped cream, fruit, or flavored custard. This turns a simple cake into a showstopper. Making this cake gluten-free is easy. Just swap all-purpose flour for a gluten-free blend. Look for blends that work well in baking. Many brands mix rice flour, potato starch, and tapioca flour. Check the package for a 1:1 ratio. This makes it easy to replace regular flour at the same amount. Your cake will be just as tasty and moist. Enjoy your gluten-free Deep Dark Secret Chocolate Cake! For the complete recipe, look at the Full Recipe section. To keep your leftover cake fresh, wrap it tightly in plastic wrap. Use an airtight container if you have one. This helps keep the moisture in. You can also use aluminum foil, but make sure it is not too tight. If you want to freeze the cake, slice it first. Wrap each slice in plastic wrap, then place them in a freezer bag. Remove as much air as possible before sealing. At room temperature, the cake stays fresh for about three days. Make sure it is in a cool, dry spot away from direct sunlight. If you keep it in the fridge, it can last up to a week. The cold air helps preserve the taste and texture. Just remember to cover it well so it does not dry out. To reheat cake slices, use the microwave. Place a slice on a microwave-safe plate and cover with a damp paper towel. Heat for about 10 to 15 seconds. If you want to use the oven, preheat it to 350°F (175°C). Wrap the slice in aluminum foil and heat for 10 minutes. This method keeps the cake soft and moist. Enjoy your delicious treat! For the complete recipe, check the Full Recipe. To check if your cake is done, use a toothpick. Insert it into the center of the cake. If it comes out clean, your cake is ready. You can also lightly touch the top. If it springs back, it’s done. Finally, the edges should pull away from the pan slightly. These signs help you know when to take the cake out. Yes, you can make this cake ahead of time. Bake the cakes and let them cool completely. Then, wrap them tightly in plastic wrap. Store them at room temperature for up to two days. For longer storage, freeze them. Just make sure to wrap them well to avoid freezer burn. Thaw them overnight in the fridge before decorating. Serve this cake with a rich ganache or creamy frosting. You can also add fresh berries for a pop of color. Dust the top with cocoa powder for a nice finish. If you want a drink pairing, try serving it with coffee or vanilla ice cream. These options enhance the cake’s deep chocolate flavor. Enjoy experimenting with your favorite toppings! In this post, we covered the core ingredients needed to make a rich chocolate cake. You learned how to prepare, mix, and bake your cake perfectly. We also shared tips for moisture and flavor enhancement, along with variations to suit your taste. Proper storage techniques ensure your cake stays fresh longer. Remember, practice makes perfect. Enjoy baking and experimenting with flavors. Your chocolate cake will impress everyone!

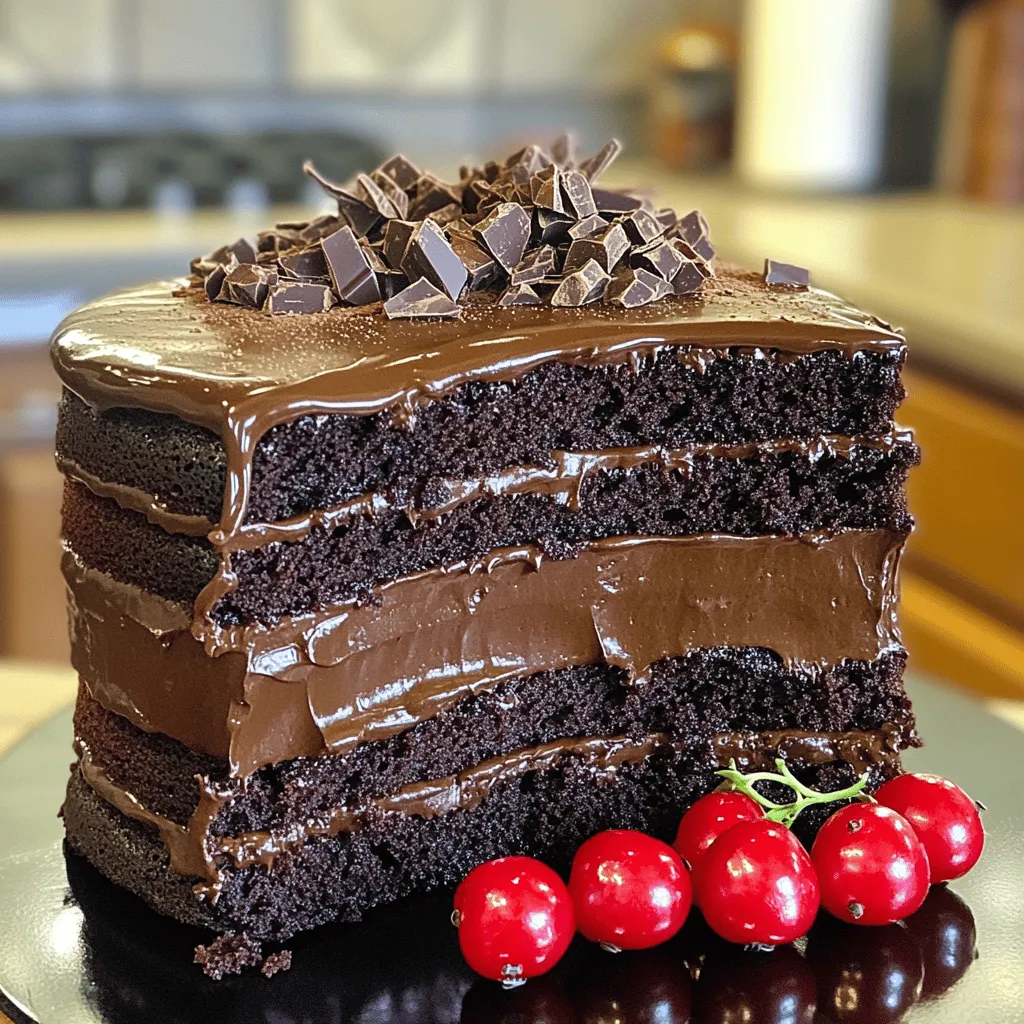
Dive into chocolate bliss with my Deep Dark Secret Chocolate Cake! This rich, velvety dessert is sure to impress. With simple ingredients and clear steps, you can create a cake …

Read more

Categories Desserts

Easy Carrot Cake Recipe Simple and Delightful Treat

July 14, 2025 by Chef Luca
To make this easy carrot cake, you will need: - 2 cups all-purpose flour - 2 cups granulated sugar - 1 teaspoon baking powder - 1 teaspoon baking soda - 1 teaspoon ground cinnamon - 1/2 teaspoon ground nutmeg - 1/2 teaspoon salt - 4 large eggs - 1 cup vegetable oil - 3 cups grated carrots (about 6 medium carrots) - 1 cup crushed pineapple, drained - 1/2 cup chopped walnuts (optional) - 1 teaspoon vanilla extract These ingredients come together to create a moist and flavorful cake. If you run out of an ingredient, don't worry! You can swap some items. Use whole wheat flour instead of all-purpose flour for a heartier cake. You can replace granulated sugar with brown sugar for a deeper flavor. If you want, use applesauce in place of vegetable oil. This will cut the fat and add moisture. For eggs, try using flaxseed mixed with water as a vegan option. To make your carrot cake even better, consider adding a few extras. You can mix in: - 1/2 cup raisins for sweetness - 1/2 cup shredded coconut for a tropical twist - 1 teaspoon grated orange zest for a citrusy kick These add-ins will give your cake a unique flavor and texture, making it truly special. If you want the full recipe, check back to see how to put everything together! Start by gathering all your ingredients. You’ll need flour, sugar, eggs, and more. Grate the carrots first since this takes time. Use a box grater to get nice, thin pieces. Drain the crushed pineapple well to avoid a soggy cake. If you want nuts, chop them up now. In a large bowl, whisk the dry ingredients together. Combine flour, sugar, baking powder, baking soda, cinnamon, nutmeg, and salt. In a separate bowl, beat the eggs. Add the oil and vanilla to the eggs and mix well. Slowly pour this mixture into the dry mix. Stir until it comes together, but don’t overmix. Fold in the carrots, pineapple, and nuts gently. Preheat your oven to 350°F (175°C). Grease and flour two round cake pans. Divide the batter evenly between the pans. Bake for 25-30 minutes. Check with a toothpick; it should come out clean. Let the cakes cool in the pans for 10 minutes. Then, move them to a wire rack to cool completely. This helps keep the cakes from getting soggy. Follow the Full Recipe for detailed instructions. When making carrot cake, avoid using too much flour. This can make your cake dry. Measure flour correctly. Use the spoon and level method. Also, do not skip grating the carrots finely. Large pieces can lead to uneven baking. Lastly, do not overmix your batter. This can make the cake tough. To get a soft and moist cake, use fresh ingredients. Fresh carrots give the best flavor. Make sure you add enough oil. This keeps the cake tender. Mixing in crushed pineapple adds moisture too. If you want a denser cake, try adding an extra egg. This helps with the structure. For a classic taste, use cream cheese frosting. It pairs well with the cake's spices. To make it, mix cream cheese, butter, powdered sugar, and vanilla until smooth. You can spread it thick or thin. Want to add some fun? Top your cake with chopped walnuts or shredded coconut. Edible flowers also make a nice touch. For a unique twist, drizzle caramel sauce over the top. {{image_2}} You can easily make this carrot cake vegan. Replace the eggs with flaxseed meal. Mix 1 tablespoon of flaxseed meal with 3 tablespoons of water. Let it sit for five minutes until it thickens. For gluten-free cake, use a gluten-free flour blend instead of all-purpose flour. The taste will still be great! You can switch up the spices in your carrot cake. Try adding ginger or allspice for extra warmth. If you love coconut, add shredded coconut to the batter. Raisins or dried cranberries also add nice sweetness and chewiness. Feel free to experiment with flavors that you enjoy! You can make this cake as a layered cake or cupcakes. For a layered cake, divide the batter between two round pans as stated in the Full Recipe. For cupcakes, fill cupcake liners about two-thirds full. Bake for 18-20 minutes. This makes the cake fun and easy to share at parties! To keep your carrot cake fresh, store it in an airtight container. This prevents it from drying out. If you used frosting, place wax paper between the cake and the lid. This helps avoid smudging. Keep the cake at room temperature for up to three days. If it’s hot or humid, put it in the fridge. You can freeze your carrot cake for up to three months. First, let it cool completely. Then, wrap it tightly in plastic wrap. After that, place it in a freezer-safe bag. To thaw, take it out and set it in the fridge overnight. This keeps it moist and tasty. To extend freshness, avoid cutting the cake until needed. Each slice exposes more of the cake to air. If you plan to eat it over time, consider slicing only what you need. Also, keep the cake away from strong smells. This keeps its flavor pure and delightful. Enjoy your delicious carrot cake any time! To make the best carrot cake, focus on fresh ingredients. Use ripe carrots and good-quality spices. Measure everything accurately. Mix dry and wet ingredients separately first. This helps the cake rise well. Fold in the carrots gently to keep the batter light. Bake at the right temperature. A toothpick test will tell you when it's done. Check for a clean pick before removing it from the oven. For a final touch, add cream cheese frosting for extra flavor. Follow the Full Recipe for detailed steps. Yes, you can use store-bought frosting if you're short on time. Choose a cream cheese frosting to match the cake's flavor. It is easy and saves effort. Just spread it on top once the cake is cool. You can add nuts or sprinkles on top for decoration. This makes your cake look more inviting and fun. The secret to moist carrot cake is using oil instead of butter. Oil keeps the cake tender. Adding crushed pineapple also adds moisture. Make sure to not overmix the batter. Overmixing can make the cake dense. Bake it until it’s just done, and allow it to cool properly. These steps will help you enjoy a soft, moist cake every time. This blog post covered how to make a great carrot cake. We explored essential ingredients and their measurements. Then, I shared step-by-step instructions for baking it. You learned tips to avoid common mistakes and achieve the best texture. We also discussed variations, like vegan options and storage tips. In closing, with the right ingredients and a bit of care, you'll create a delicious treat. Baking can be fun and rewarding. Enjoy your baking journey!

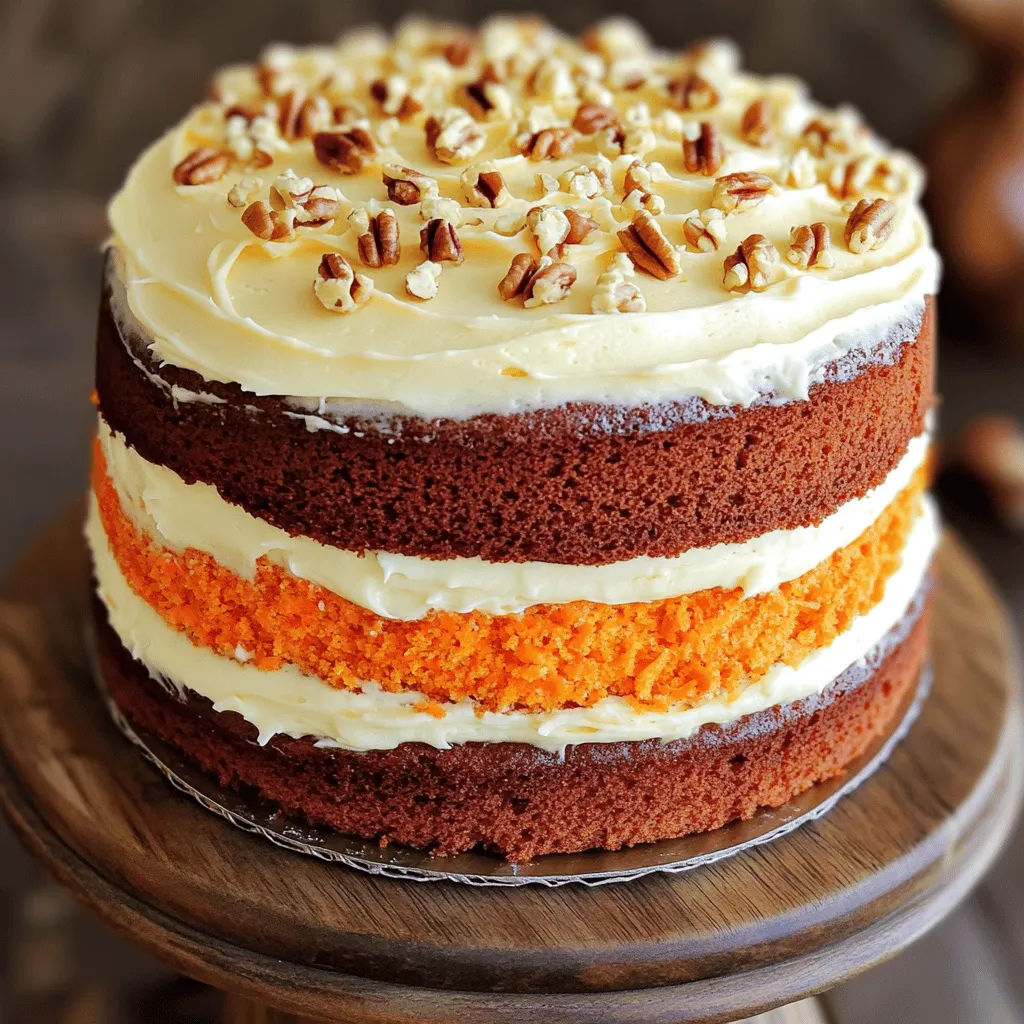
Looking for a sweet and simple treat? My Easy Carrot Cake Recipe is just for you! This cake is moist, flavorful, and easy to make. In this post, you’ll find …

Read more

Categories Desserts
Older posts
Newer posts
← Previous Page1 … Page70 Page71 Page72 … Page122 Next →

STIRRED RECIPES

Where every dish begins with a stir! 🍲✨

PAGES

Home About Contact Privacy Policy Terms & Conditions Cookie Policy GDPR Policy Copyright Policy Disclaimer

CATEGORIES

Appetizers Desserts Salads Breakfast Dinner

Contact

  • Pinterest
  • Mail
Copyright © 2026 Stirred Recipes. All rights reserved.