Skip to content
Stirred Recipes
  • Home
  • Appetizers
  • Desserts
  • Salads
  • Breakfast
  • Dinner
  • Privacy Policy
  • Contact
  • About

Chef Luca

Taco Stuffed Sweet Potatoes Flavorful and Easy Recipe

July 17, 2025 by Chef Luca
To make taco stuffed sweet potatoes, gather these ingredients: - Sweet potatoes - Ground turkey or beef - Olive oil - Onion and garlic - Taco seasoning (store-bought or homemade) - Black beans - Corn - Diced tomatoes - Shredded cheddar cheese - Avocado and cilantro for topping - Lime wedges for serving These ingredients create a great blend of flavors. Sweet potatoes give a soft, sweet base. Ground turkey or beef adds protein and richness. Olive oil helps cook the onion and garlic, giving the dish a nice aroma. Taco seasoning brings that classic taco flavor. Black beans and corn add texture and nutrients. Diced tomatoes bring juiciness and freshness. Shredded cheddar cheese melts to a perfect topping. Avocado and cilantro add a fresh touch. Lime wedges add zest when served. By using these simple ingredients, you can make a meal that is both tasty and healthy. For the full recipe, check out the detailed steps to prepare this dish. - Preheat your oven to 400°F (200°C). - Scrub 4 medium sweet potatoes well and pierce them with a fork. This helps steam escape while they bake. - Place the sweet potatoes on a baking sheet lined with parchment paper. Bake for 45-50 minutes or until they are soft. You can check by poking them with a fork. - In a large skillet, heat 1 tablespoon of olive oil over medium heat. - Add 1 small diced onion and 2 minced garlic cloves. Sauté these until soft, about 3-4 minutes. - Next, add 1 pound of ground turkey or beef. Break it up with a spatula and cook until browned, which takes about 5-7 minutes. - After the meat is cooked, stir in a packet of taco seasoning, 1 cup of rinsed black beans, 1 cup of corn, and 1 cup of diced tomatoes. - Mix everything well and let it simmer for about 5-10 minutes. This helps all the flavors come together nicely. - When the sweet potatoes are baked, take them out and let them cool for a bit. Cut each potato in half lengthwise. - Use a fork to fluff the insides of the sweet potatoes gently. - Spoon the taco mixture into each potato half. Top generously with 1 cup of shredded cheddar cheese. - Put the potatoes back in the oven for about 5-10 minutes, just until the cheese is melted. - Once done, remove them from the oven and top with diced avocado, fresh cilantro, and a squeeze of lime juice. For the full recipe, check out the detailed instructions above. Enjoy your tasty taco stuffed sweet potatoes! - To ensure sweet potatoes are tender, bake them at 400°F for 45-50 minutes. - Use a fork to pierce them before baking. This helps steam escape. - For taco filling, keep the mixture moist but not watery. Add just enough liquid from the tomatoes. - Present your taco stuffed sweet potatoes on a bright platter. - Garnish with lime wedges and fresh cilantro for color. - Pair with a refreshing side salad or corn salsa for extra crunch. - Sweet potatoes are rich in vitamins A and C, fiber, and potassium. - If you need to modify this dish, swap ground turkey for beans for a vegetarian option. - Use low-fat cheese or skip it for a lighter meal. {{image_2}} You can change the protein in this recipe easily. If you prefer chicken, use shredded rotisserie chicken. For a vegetarian option, try black beans or lentils instead of meat. Both choices taste great and are filling. Cheese is another area where you can mix things up. Instead of cheddar, try Monterey Jack or pepper jack for a kick. You can even use a dairy-free cheese if you want a vegan option. The cheese adds creaminess to the dish. Adjusting the spice level is simple. If you like heat, add cayenne pepper or chili flakes to the taco seasoning. For mild flavors, skip the heat altogether. This flexibility lets you customize each taco stuffed sweet potato to your liking. Adding toppings is a fun way to change the flavor. Try sliced jalapeños for extra spice or a dollop of sour cream for creaminess. You could also add salsa or guacamole for a fresh twist. The key is to make it your own! Serving taco stuffed sweet potatoes as a taco bowl is a great option. Just scoop out the sweet potato and mix it with the filling. Serve it in a bowl with toppings on the side. This style is fun and easy to share. If you want to use other vegetables, consider zucchini or bell peppers. These can become the vessel for your taco filling instead of sweet potatoes. Simply hollow them out and bake until tender. This option adds more color and different flavors to your meal. For the full recipe, you can refer to the beginning of the article. You can store leftover taco stuffed sweet potatoes in the fridge for about 3 to 5 days. To keep them fresh, place them in an airtight container. This helps prevent them from drying out or absorbing other odors. When you’re ready to eat, just take out the portion you want, and you’re all set. If you want to save the stuffed sweet potatoes for later, freezing is a great option. Wrap each sweet potato tightly in plastic wrap or aluminum foil. Then, place them in a freezer-safe bag. This way, they can stay good for up to 3 months. When you’re ready to eat, thaw them in the fridge overnight. Reheat in the oven at 350°F (175°C) for about 20 minutes. This will help keep the sweet potatoes warm and tasty. You can also microwave them, but the oven gives the best results for texture. For a quick meal, follow the [Full Recipe] and enjoy! Taco stuffed sweet potatoes last about 3 to 5 days in the fridge. Make sure to store them in an airtight container. This keeps them fresh and tasty for your next meal. Yes, you can prepare taco stuffed sweet potatoes ahead of time. Bake the sweet potatoes and make the filling. Store them separately in the fridge. When ready to eat, just assemble and heat them up. You can use regular potatoes, butternut squash, or even zucchini. Each option gives a different taste, but they all work well with taco flavors. Experiment to find your favorite! Yes, taco stuffed sweet potatoes are gluten-free. Just ensure your taco seasoning is gluten-free too. This makes them a great option for those with gluten sensitivities. Absolutely! You can use pinto beans, kidney beans, or chickpeas instead of black beans. Each bean brings a unique flavor and texture. Feel free to mix it up based on your taste. The best way to reheat stuffed sweet potatoes is in the oven. Preheat your oven to 350°F (175°C) and bake for about 15 to 20 minutes. This keeps the sweet potatoes soft and the filling warm. You can also use a microwave for quicker results, but the texture may change slightly. For the complete recipe, check out [Full Recipe]. Taco stuffed sweet potatoes are a tasty, fun dish. You bake sweet potatoes, cook ground turkey or beef, and mix in beans, seasoning, and cheese. Then you assemble and bake it all together. The dish is colorful and easy to customize. Feel free to swap ingredients or change flavors. Store leftovers well for tasty meals later. Enjoying this healthy dish can bring excitement to your table. Dive into making this recipe and impress your friends and family with your skills. It’s sure to be a hit!

Are you ready for a meal that’s both tasty and easy? Taco Stuffed Sweet Potatoes are the answer! Packed with flavor and nutrients, this recipe combines sweet potatoes with savory …

Read more

Categories Dinner

Crockpot Creamy Ranch Chicken Flavorful Comfort Meal

July 17, 2025 by Chef Luca
To make Crockpot Creamy Ranch Chicken, gather these essential ingredients: - 4 boneless, skinless chicken breasts - 1 packet (1 oz) ranch dressing mix - 1 can (10.5 oz) cream of chicken soup - 1 cup low-sodium chicken broth - 1 cup sour cream - 1 cup shredded cheddar cheese - 1 cup baby spinach leaves - 1 teaspoon garlic powder - Salt and pepper to taste - Fresh chives or parsley for garnish Each ingredient plays a key role in the dish. The chicken breasts are the main protein, providing a tender base. The ranch dressing mix adds a zesty flavor that makes your taste buds dance. Cream of chicken soup brings creaminess, while low-sodium chicken broth keeps it moist. Sour cream and cheddar cheese mix for a rich, creamy texture. Baby spinach adds some color and nutrients. Remember, fresh herbs like chives or parsley not only brighten the dish but also add a fresh finish. For the full recipe, check out the detailed cooking instructions. Enjoy the process, and let the aromas fill your kitchen! - Start by placing the chicken breasts in the bottom of the crockpot. - In a bowl, whisk together the ranch dressing mix, cream of chicken soup, chicken broth, garlic powder, salt, and pepper until smooth. - Carefully pour the ranch sauce over the chicken breasts. Make sure they are well coated. - For low heat, cook for 6-8 hours. This makes the chicken very tender. - If you are short on time, use high heat for 3-4 hours. - About 30 minutes before serving, shred the chicken using two forks. - Stir in the sour cream and shredded cheddar cheese until melted and creamy. - Add the baby spinach leaves and stir until they wilt slightly. This process transforms simple ingredients into a rich, creamy dish that warms your heart. For the full recipe, check the main section! To make your Crockpot Creamy Ranch Chicken pop, try these tips: - Add fresh herbs like thyme or rosemary for extra aroma. - Increase garlic powder for a bolder taste. - Use smoked paprika for a smoky flavor twist. When cooking chicken in a crockpot, follow these best practices: - Always place the chicken in a single layer for even cooking. - Avoid overcrowding; too much chicken can lead to uneven heat. - Use low-sodium broth to control salt levels while keeping flavor. If you want to double the recipe, simply multiply each ingredient by two. - Make sure your crockpot is large enough to hold it all. - For larger batches, adjust your cook time by adding an hour on low. - Always check the chicken for doneness before serving. For delicious sides, consider these ideas: - Serve over fluffy rice or pasta for a filling meal. - Pair with steamed vegetables like broccoli or green beans. - A light salad can add freshness to your plate. Presentation can make a big impact. Try these tips: - Garnish with fresh chives or parsley for a pop of color. - Use a large platter to serve, allowing guests to help themselves. - Drizzle a little extra ranch dressing on top for flair. For the full recipe, be sure to check out the detailed instructions. {{image_2}} You can change up the cheese for fun. Try mozzarella or pepper jack for a twist. Each cheese adds a new taste. You can also swap the spinach for other veggies. Kale or broccoli work well here. These changes keep the dish fresh and exciting. If you want a gluten-free meal, choose gluten-free ranch mix. Use gluten-free cream of chicken soup too. For a dairy-free option, swap sour cream for coconut cream. Nutritional yeast can replace cheese for a cheesy flavor. These swaps make it easy to fit your diet. Want some heat? Add chili powder or a splash of hot sauce. This gives the dish a spicy kick. You can also try different dressings. Using Italian or French dressing changes the flavor. Each option makes the meal unique and tasty. After enjoying your Crockpot Creamy Ranch Chicken, let any leftovers cool down. This helps keep them fresh. Once cooled, put the chicken in airtight containers. This step prevents air from spoiling the dish. Make sure to seal them tightly. You can store them in the fridge for quick meals later. To freeze your creamy ranch chicken, first let it cool completely. Then, place it in a freezer-safe container. Make sure to leave some space at the top for expansion. When you are ready to eat it, pull it out of the freezer. Let it thaw in the fridge overnight. Reheat it gently in a pot or microwave. Stir well to make it creamy again. Refrigerated leftovers last for about three to four days. For frozen meals, they stay good for about three months. To keep the best flavor, try to eat them sooner. Always check for any signs of spoilage before eating. Enjoy your meal with peace of mind! Can I use frozen chicken breasts? Yes, you can use frozen chicken breasts. Just add an extra hour to the cook time. The chicken will still turn out tender and juicy. What can I serve with Crockpot Creamy Ranch Chicken? I love serving it over rice or pasta. You can also pair it with steamed veggies. Fresh salad adds a nice touch, too. How do I know when the chicken is fully cooked? Check the internal temperature with a meat thermometer. It should reach 165°F. If you don’t have one, cut into the chicken. It should be white and juicy inside. Can I make it without sour cream? Yes, you can leave out sour cream. Use Greek yogurt instead for a creamy texture. You can also add a splash of milk for moisture. What size crockpot should I use for this recipe? A 6-quart crockpot works best. It gives enough space for the chicken and sauce. If you have a smaller one, you may need to adjust the amounts. How to prevent the chicken from drying out? Keep the crockpot covered during cooking. Adding enough liquid, like broth, keeps the chicken moist. You can also shred the chicken halfway through. Can I substitute other soups for cream of chicken? Yes, you can use cream of mushroom or cream of celery. These will change the flavor but still taste great. You can also try a homemade version for a fresh twist. This blog post outlined key ingredients and steps for making Crockpot Creamy Ranch Chicken. You learned how to layer and cook chicken with ranch sauce, ensuring a tasty meal. I shared tips for enhancing flavor and adapting the recipe. Storage info helps keep leftovers fresh. With variations to switch things up, you can make this recipe your own. Enjoy cooking this dish, and don't hesitate to experiment for new flavors. Your kitchen adventure starts now, so get started and have fun!

Looking for a warm, comforting meal that’s easy to make? Let me share my Crockpot Creamy Ranch Chicken recipe! This dish combines tender chicken, creamy ranch, and rich flavors for …

Read more

Categories Dinner

Chocolate Zucchini Cake Delightful and Moist Recipe

July 17, 2025 by Chef Luca
- 1 ½ cups grated zucchini - 1 ½ cups all-purpose flour - 1 cup granulated sugar - ½ cup unsweetened cocoa powder These four ingredients are key to making your chocolate zucchini cake rich and moist. The grated zucchini adds moisture without a strong taste, making it perfect for baking. - ½ cup semi-sweet chocolate chips - ½ tsp ground cinnamon Adding chocolate chips gives the cake a nice texture and extra sweetness. Ground cinnamon brings warmth and complements the chocolate flavor well. - Mixing bowls - Whisk - Baking pan Using the right tools helps you mix and bake evenly. A good whisk will blend the wet and dry ingredients well. A sturdy baking pan will hold the batter and create the perfect cake shape. For the full recipe, check out the detailed steps to create this delightful treat! - Preheat the oven to 350°F (175°C). - Grease and flour an 8-inch square baking pan. This helps the cake not stick. - In a large bowl, combine the dry ingredients: flour, sugar, cocoa powder, baking soda, baking powder, and salt. Mix well to break any lumps. - In another bowl, mix the wet ingredients: eggs, vegetable oil, and vanilla extract. Whisk until fully blended. - Fold the grated zucchini into the wet mixture. This adds moisture and a healthy touch. - Gradually combine the wet and dry mixtures. Stir gently until just mixed. If you want, fold in chocolate chips for extra sweetness. - Pour the batter into your prepared pan. Spread it out evenly. - Bake in the oven for 30-35 minutes. Check with a toothpick; it should come out clean. - Once baked, let it cool in the pan for about 10 minutes. Then, move the cake to a wire rack to cool completely before serving. You can find the Full Recipe for a more detailed guide. Enjoy your baking! How to avoid overmixing To keep your cake soft, mix gently. Stir until the dry and wet ingredients blend. If you see some flour pockets, that’s okay! Don’t worry about lumps. Overmixing can make the cake tough. Importance of using fresh zucchini Fresh zucchini gives the best flavor and moisture. Choose firm and bright green zucchini. If it feels soft or has dark spots, avoid it. Grate the zucchini just before using. This keeps it vibrant and adds great texture. Tips for adding spices Adding spices can make your cake special. Cinnamon is a great choice. It adds warmth and depth. You might also try nutmeg or ginger for a twist. Just a pinch can change the taste. Suggestions for frosting and toppings Consider a simple cream cheese frosting. It pairs well with chocolate. You can also use whipped cream for a light touch. For a crunch, sprinkle chopped nuts or chocolate shavings on top. Not measuring ingredients properly Use measuring cups and spoons for accuracy. Too much flour can make the cake dry. Always level off your measuring cups for the best results. Baking time adjustments Every oven is different. Start checking your cake at 30 minutes. Insert a toothpick in the center. If it comes out clean, it’s done. If not, give it a few more minutes. This way, you avoid overbaking. For more details, check the Full Recipe. {{image_2}} You can make this cake gluten-free with some easy swaps. Use 1 ½ cups of gluten-free all-purpose flour instead of regular flour. Look for blends that include xanthan gum, which helps with texture. You may need to bake the cake a bit longer. Check for doneness with a toothpick. For a vegan version, replace the eggs with 1 cup of unsweetened applesauce or 1/4 cup of ground flaxseed mixed with 3/4 cup of water. Use a dairy-free milk like almond or oat milk instead of regular milk. This keeps the cake moist and tasty. You can jazz up your cake with nuts or fruits. Try adding 1/2 cup of chopped walnuts or pecans for crunch. You can also mix in 1/2 cup of raisins or diced pineapple. For a twist, use dark cocoa powder instead of regular cocoa powder. This change gives the cake a richer taste. Don't be afraid to experiment! To keep your chocolate zucchini cake fresh, store it in the fridge. Wrap it well in plastic wrap or foil. This helps to seal in moisture. You can also place it in an airtight container. This keeps the cake from drying out and protects it from strong smells in the fridge. You can freeze the cake for later enjoyment. First, let it cool completely. Then, wrap it tightly in plastic wrap. After that, place it in a freezer-safe bag. To thaw, simply move it to the fridge overnight. This helps maintain its soft texture. Avoid microwaving it directly from the freezer. That can make it soggy. The cake stays fresh for about a week in the fridge. After that, it may start to lose taste and texture. Signs that the cake has gone bad include an off smell or mold. If it feels dry or crumbly, it's best to discard it. Keeping an eye on these signs helps you enjoy your cake at its best. For the full recipe, check earlier sections! Yes, you can use other types of squash. Yellow squash works well. You might also try butternut squash. Each will give a slightly different taste. Grate the squash just like you do with zucchini. This keeps the cake moist and delicious. Zucchini adds moisture to the cake. This makes it soft and tender. The grated zucchini blends in well, so you won’t even notice it. It also keeps the cake fresh longer. This is great if you want to enjoy it over a few days. Yes, this cake is great for kids. It has a rich chocolate taste that they love. Plus, it has hidden veggies! Zucchini adds nutrients like vitamins A and C. This makes it a bit healthier than a regular cake. Just keep an eye on portion sizes. You want to balance treats with healthy food. For more ideas, check out the Full Recipe for delicious ways to serve it. This blog post guides you through making a delicious zucchini cake. We covered the essential and optional ingredients, tools, and clear steps. I shared tips to perfect your cake, avoid common mistakes, and even suggested fun variations. In closing, experimenting with this recipe can lead to unique flavors. Enjoy baking and feel proud of your tasty creation!

Are you ready to bake something truly amazing? This Chocolate Zucchini Cake is both delightful and moist. With simple ingredients like grated zucchini and cocoa powder, you create a treat …

Read more

Categories Desserts

Caprese Salad with Balsamic Glaze Fresh and Tasty Dish

July 17, 2025 by Chef Luca
- Ripe heirloom tomatoes - Fresh mozzarella cheese - Fresh basil leaves - Balsamic glaze - Extra virgin olive oil - Salt and freshly cracked black pepper To make a great Caprese salad, you need fresh and simple ingredients. First, ripe heirloom tomatoes are key. They are sweet and juicy. Their colors make the salad pop. Next, you need fresh mozzarella cheese. Look for soft, creamy cheese that melts in your mouth. Fresh basil leaves add a bright flavor. They smell amazing and taste even better. Balsamic glaze gives the salad a rich, sweet touch. It drizzles beautifully and adds depth. Extra virgin olive oil is a must for drizzling too. It makes everything taste better. Lastly, don’t forget salt and freshly cracked black pepper. They bring out the flavors in each bite. For the full recipe, refer to the Caprese Salad with Balsamic Kiss. This dish is not only tasty but also very easy to prepare. You will love how vibrant it looks and how fresh it tastes! To make a great Caprese salad, start with the tomatoes. Use ripe heirloom tomatoes. Slice them into thick rounds, about half an inch. This keeps them juicy and flavorful. Next, take fresh mozzarella cheese. Slice this too, aiming for the same thickness as the tomatoes. Now it's time to layer the salad. On a large platter, arrange the tomato slices first. Add a slice of mozzarella on top of each tomato. Place a basil leaf between them. Keep repeating this until you’ve used all your ingredients. This pattern makes for a beautiful display. Next, focus on drizzling. Take extra virgin olive oil and drizzle it lightly over the salad. Use a spoon or small container for control. This oil adds richness and depth to the flavors. Now, it’s time for the balsamic glaze. Carefully drizzle it over the entire salad. Try to create patterns as you drizzle. This adds visual appeal and enhances the taste. After drizzling, sprinkle salt and freshly cracked black pepper over the salad. These simple seasonings bring out the best flavors in the ingredients. If you want a cooler taste, chill the salad. Let it sit in the fridge for about 10-15 minutes. This helps all the flavors meld together. Enjoy your fresh Caprese salad! For the full recipe, check out the detailed instructions above. Choose ripe heirloom tomatoes for the best flavor. Look for ones that feel heavy and firm. They should have a rich color and a slight give when pressed. Quality mozzarella is key too. Fresh mozzarella should be soft and moist. It should not feel rubbery or dry. Pairing these ingredients makes your salad shine. Serve your Caprese salad on a rustic wooden platter. This adds a natural touch. You can also use a white plate to make the colors pop. For garnishing, add extra basil leaves on top. A light drizzle of balsamic glaze enhances the look. You want it to appear fresh and inviting. Consider adding optional ingredients for extra flavor. You can use avocados for creaminess. Slices of ripe peaches or nectarines add sweetness. A sprinkle of crushed red pepper flakes gives a nice kick. Fresh herbs like oregano or thyme can brighten the dish. Each addition can create a unique twist on this classic salad. For the full recipe, refer to the Caprese Salad with Balsamic Kiss. {{image_2}} If you can't find fresh mozzarella, try burrata cheese. Burrata adds a creamy texture that tastes wonderful. You can also use goat cheese for a tangy twist. For balsamic glaze, you can use regular balsamic vinegar. Just reduce it in a pan until it thickens. This will give you a similar flavor. To keep your Caprese salad fresh, use seasonal ingredients. In summer, add ripe peaches or strawberries for sweetness. In fall, try roasted butternut squash for a warm flavor. These additions bring new tastes and colors to your dish. They make it even more appealing and delicious. You can spice up your Caprese salad by adding herbs. Try fresh oregano or thyme for a different aroma. If you like heat, sprinkle in some red pepper flakes. They add a nice kick. For a zesty touch, squeeze fresh lemon juice over the top. These adjustments let you create a unique dish every time. For the complete recipe, check out the [Full Recipe]. To keep your Caprese salad fresh, store it in an airtight container. First, separate the layers of tomatoes, mozzarella, and basil. This helps keep everything crisp. Place a paper towel inside to absorb excess moisture. This way, the salad stays tasty longer. - Heirloom tomatoes: Last about 3-5 days in the fridge. - Fresh mozzarella: Stays good for about 5-7 days once opened. - Basil leaves: Keep them fresh for about 2-3 days in the fridge. - Balsamic glaze: Can last for months if stored properly. - Olive oil: Should be used within 1-2 months once opened. Reheating isn't needed for this salad. Instead, if your leftovers look a bit sad, you can refresh them. Add a drizzle of balsamic glaze or a splash of olive oil. Toss in some fresh basil leaves too. This will revive the flavors and keep the salad enjoyable. What is the origin of Caprese Salad? Caprese Salad comes from Italy, specifically the island of Capri. This dish showcases fresh, local ingredients. It highlights the bright flavors of tomatoes, mozzarella, and basil. The simplicity of the dish is what makes it special. Enjoying it in warm weather is a must! Can I make this salad in advance? You can prepare parts of the salad ahead of time. Slice the tomatoes and mozzarella in advance. However, wait to add the basil and drizzle the balsamic glaze until just before serving. This keeps the salad fresh and vibrant. What pairs well with Caprese Salad? Caprese Salad goes well with many dishes. Serve it with grilled chicken or fish for a light meal. You can also enjoy it with crusty bread or bruschetta. A chilled glass of white wine complements this dish perfectly. Is there a vegan alternative for mozzarella? Yes, you can use vegan cheese made from nuts or soy. Look for brands that mimic the taste and texture of mozzarella. Another option is using avocado slices for creaminess. These alternatives still provide a delicious taste in your Caprese Salad. For the full recipe, check out the Caprese Salad with Balsamic Kiss ! In this blog post, we explored the delicious world of Caprese Salad. We discussed key ingredients like heirloom tomatoes, fresh mozzarella, and basil. You learned step-by-step how to prepare and layer this dish, along with tips for drizzling oil and balsamic glaze. We also covered how to enhance flavors and presented variations to keep things fresh. Finally, we touched on storage and answered common questions. With these insights, you can now create a vibrant Caprese Salad that impresses. Enjoy your cooking and share your tasty creations!

Looking to whip up a fresh and delicious dish? Let’s dive into the vibrant world of Caprese Salad with Balsamic Glaze! This no-cook delight features ripe heirloom tomatoes, creamy mozzarella, …

Read more

Categories Salads

Savory Honey Garlic Chicken with Sweet Potatoes Recipe

July 17, 2025 by Chef Luca
For a delicious Honey Garlic Chicken with Sweet Potatoes, gather these items: - 4 chicken thighs, bone-in and skin-on - 2 tablespoons honey - 4 cloves garlic, minced - 1 tablespoon soy sauce - 1 tablespoon olive oil - 2 medium sweet potatoes, peeled and cubed - 1 teaspoon paprika - Salt and pepper to taste - Fresh parsley, for garnish You can swap some ingredients for what you have on hand: - Chicken Thighs: Use chicken breasts or drumsticks instead. - Honey: Maple syrup works well as a sweetener. - Soy Sauce: Coconut aminos serve as a great gluten-free option. - Sweet Potatoes: Regular potatoes or butternut squash are good alternatives. - Paprika: Chili powder can add a different kick. This dish is not only tasty but also nutritious. Each serving contains: - Calories: 350 - Protein: 26g - Carbohydrates: 30g - Fat: 15g - Fiber: 4g - Sugars: 8g Enjoy this meal, knowing it's packed with flavor and good nutrition! For the full recipe, refer to the section above. To start, gather your ingredients for the marinade. You need honey, minced garlic, soy sauce, and olive oil. In a bowl, whisk these together. The mixture should blend well. Next, take your chicken thighs and place them in the bowl. Use your hands or a spoon to coat each piece with the marinade. Make sure they are covered on all sides. Let the chicken marinate for at least 30 minutes. For better flavor, marinate it overnight in the fridge. Now, preheat your oven to 400°F (200°C). While waiting, prepare the sweet potatoes. Peel and cube them into bite-sized pieces. In another bowl, add the cubed sweet potatoes, olive oil, paprika, salt, and pepper. Toss them until they are well-coated. Then, take a baking sheet and arrange the marinated chicken thighs on it, skin side up. Scatter the seasoned sweet potatoes around the chicken. Pour any leftover marinade over everything for extra flavor. Place the baking sheet in the oven and bake for 35-40 minutes. The chicken should be cooked through, reaching an internal temperature of 165°F (75°C). The sweet potatoes will become tender and golden. Once done, remove the baking sheet from the oven. Let the chicken rest for about 5 minutes before serving. To serve, transfer the chicken and sweet potatoes to a serving platter. Garnish the dish with fresh parsley for color and freshness. You can also drizzle some extra honey on top for a sweet touch. This dish pairs well with a side of steamed veggies or a simple salad. Enjoy your meal, and savor the rich flavors of honey garlic chicken with sweet potatoes. For the full recipe, refer to the section above. To keep your chicken juicy, always start with bone-in, skin-on thighs. The skin locks in moisture and flavor. Marinating is key. I suggest marinating your chicken for at least 30 minutes, but overnight gives the best results. This allows the flavors to soak in deeply. When cooking, avoid overcooking. Use a meat thermometer to check for an internal temperature of 165°F (75°C). Let the chicken rest for a few minutes before serving. This helps the juices redistribute, making every bite tender and flavorful. For perfect sweet potatoes, cut them into even cubes. This ensures they cook at the same rate. Toss them in olive oil, salt, and paprika for flavor. Spread them in a single layer on the baking sheet. Crowding the pan can lead to steaming instead of roasting. Roast at 400°F (200°C) for about 25-30 minutes. Check for doneness by poking them with a fork. They should be tender and slightly caramelized. For added flavor, mix in some herbs like rosemary or thyme before roasting. Meal prep can save you time during busy weeks. Consider marinating the chicken the night before. You can also chop the sweet potatoes ahead of time. Store them in water in the fridge to keep them fresh. When you're ready to cook, just drain and season them. If you have extra honey garlic sauce, you can store it for later use. This sauce works well on other proteins or veggies. By prepping ahead, you make cooking this dish quick and easy. For the full recipe, check the details above. {{image_2}} If you like heat, add chili flakes or hot sauce. This twist makes the dish exciting. Mix in one to two teaspoons of red pepper flakes into the marinade. You can adjust the spice to your taste. The sweet honey balances the heat perfectly. Serve it with cool yogurt or sour cream to calm the fire. For a plant-based option, swap the chicken for tofu. Choose firm tofu for the best texture. Press the tofu to remove excess water. Cut it into cubes and marinate it just like the chicken. Bake it for about 25-30 minutes. This version pairs well with the sweet potatoes. You still get all those tasty honey garlic flavors. You can change up the sweet potatoes based on what's fresh. In spring, try asparagus or green beans. In the fall, use butternut squash for a sweeter taste. These swaps keep the dish fun and fresh. Just adjust the cooking time as needed. Enjoy the variety with each season! For the complete recipe, check out the Full Recipe. To store your honey garlic chicken with sweet potatoes, let it cool completely. Then, place it in an airtight container. This keeps your meal fresh and tasty. You can store it in the fridge for up to three days. When you are ready to eat, check for any signs of spoilage before reheating. If you want to keep this dish longer, freezing is a great option. Allow the chicken and sweet potatoes to cool. Place them in a freezer-safe container or bag. Make sure to remove as much air as possible. This helps prevent freezer burn. You can freeze it for up to three months. When you’re ready to eat, thaw it in the fridge overnight for the best results. To reheat, use the oven for the best flavor. Preheat your oven to 350°F (175°C). Place the chicken and sweet potatoes on a baking sheet. Cover with foil to keep moisture. Heat for about 20-25 minutes or until warmed through. You can also use a microwave, but the oven keeps the chicken crispy. Enjoy your delicious meal again! For the full recipe, check out the Honey Garlic Chicken Delight. You should marinate the chicken for at least 30 minutes. If time allows, marinate it overnight. This longer time helps the flavors soak in well. Yes, you can use chicken breasts. They will cook faster, so keep an eye on them. Adjust the cooking time to around 25-30 minutes, or until they reach 165°F. Honey garlic chicken pairs nicely with many sides. Here are some great options: - Steamed broccoli - Roasted Brussels sprouts - Rice or quinoa - A simple green salad - Garlic bread These sides will balance the sweet and savory flavors of the chicken. For the full recipe, check back to ensure you have all the steps! This blog post covered key ingredients for honey garlic chicken, including substitutes and nutrition. We explored step-by-step marinating and baking instructions, plus tips for juicy chicken. Variations like spicy options and vegetarian choices add to the dish’s appeal. Finally, we discussed storage practices and answered common questions. Now, you have all the tools to create a delicious meal. Enjoy cooking and impress your loved ones.

Get ready to delight your taste buds with my Savory Honey Garlic Chicken with Sweet Potatoes recipe! This dish offers a perfect blend of sweet and savory flavors that you …

Read more

Categories Dinner

Bruschetta Chicken Pasta Flavorful Dinner Delight

July 16, 2025 by Chef Luca
- Chicken breasts - Fettuccine pasta - Cherry tomatoes - Fresh basil - Mozzarella cheese - Olive oil - Garlic - Balsamic vinegar - Salt and pepper - Parmesan cheese - Additional herbs The main ingredients in bruschetta chicken pasta create a balance of flavors. Chicken breasts provide lean protein. Fettuccine pasta adds a hearty base. Cherry tomatoes give sweetness and color. Fresh basil brings a fragrant touch, while mozzarella cheese adds creaminess. For seasoning and cooking essentials, olive oil is key for sautéing. Garlic adds a bold flavor. Balsamic vinegar introduces acidity, which brightens the dish. Salt and pepper are essential for enhancing the overall taste. You may choose to garnish your pasta with Parmesan cheese. Additional herbs can add freshness and flavor. This simple yet vibrant meal is a great way to impress friends and family. For the full recipe, check out the details and instructions in the [Full Recipe]. First, season the chicken breasts with salt and pepper. This simple step adds great flavor. Next, heat olive oil in a large skillet over medium heat. Place the chicken in the skillet and cook for 6-7 minutes on each side. Ensure the chicken is cooked through and no longer pink inside. Once done, take the chicken out and let it cool. Slice it into strips for later. Now, let’s make the bruschetta base! In the same skillet, add minced garlic. Sauté it for about a minute until it smells great. Be careful not to burn the garlic, as it can become bitter. Afterward, add halved cherry tomatoes and chopped basil to the skillet. Cook for 3-4 minutes until the tomatoes soften. Drizzle balsamic vinegar over the mix and stir gently. While the bruschetta base cooks, bring a pot of water to a boil. Add the fettuccine and cook according to the package instructions until it is al dente. This means it should be firm to the bite. Once cooked, drain the pasta but save a little pasta water. This water can help with the sauce later. It’s time to bring everything together! Add the cooked pasta to the skillet with the tomato and basil mix. Toss gently to combine all the flavors. If the mix looks dry, add some reserved pasta water to moisten it. Finally, fold in the sliced chicken and sprinkle shredded mozzarella cheese on top. Mix everything well until the cheese melts slightly. This adds a lovely creaminess to the dish. Enjoy making this bruschetta chicken pasta. For the full recipe, check out the details! To keep your chicken tender and juicy, start with good seasoning. Use salt and pepper on both sides of the chicken breasts. Searing the chicken in hot olive oil helps lock in moisture. Cook each side for about 6-7 minutes. Make sure it reaches 165°F inside for safety. Remove the chicken and let it rest before slicing. This keeps it juicy. For the sautéed tomatoes, use fresh cherry tomatoes. Cut them in half to release their juices. Sauté them with minced garlic for about 3-4 minutes. This method brings out their natural sweetness. Add chopped basil and drizzle balsamic vinegar in the last minute of cooking. This adds a bright touch to the dish. For a stunning plate, choose vibrant dinnerware. A white plate really makes the colors pop. Serve the pasta in a generous portion. Top it with grated Parmesan cheese and a sprig of fresh basil. A drizzle of balsamic vinegar looks great too. You can also add a side salad or garlic bread for a full meal. This adds more flavors and textures to your dinner. If you have extra chicken or tomatoes, don’t waste them. Shred leftover chicken for a tasty sandwich. Toss extra tomatoes into a salad for a fresh bite. For meal prep, you can cook a big batch of pasta. Store it in the fridge for quick meals. Mix it with different veggies or proteins each day to keep it exciting. This way, you enjoy the flavors of bruschetta chicken pasta all week long! {{image_2}} You can switch up the pasta. Try penne or whole wheat pasta for a different taste. If you want a lighter option, use zucchini noodles or spaghetti squash. For proteins, chicken is great, but shrimp or tofu also work well. Tofu adds a nice texture and absorbs flavors well. To make it spicier, add red pepper flakes while cooking. You can also try smoked paprika for a smoky flavor. Different cheeses can change the dish, too. Use goat cheese for a tangy twist or feta for a salty kick. If you follow a gluten-free diet, choose gluten-free pasta made from rice or quinoa. For a vegan version, swap the chicken for chickpeas and use vegan cheese or nutritional yeast. These substitutes keep the dish tasty and satisfying without dairy or meat. If you want to see how I make this dish, check out the Full Recipe for step-by-step instructions! To store bruschetta chicken pasta, let it cool first. Place it in an airtight container. This keeps it fresh and tasty. You can store it in the fridge for up to three days. Make sure to label the container with the date. This helps you remember when you made it. For reheating, you can use the microwave or the stovetop. The microwave is quick but may dry the dish. Heat it in short bursts and stir in between. The stovetop keeps the pasta moist. Just add a splash of water and heat on low. Stir gently to keep the texture nice. Yes, you can freeze bruschetta chicken pasta! First, let it cool completely. Then, place it in a freezer-safe container. It can last up to three months in the freezer. When you’re ready to eat, thaw it in the fridge overnight. Reheat it on the stovetop for the best flavor and texture. Bruschetta Chicken Pasta is a tasty dish that combines cooked chicken and pasta with fresh tomatoes and basil. This meal has roots in Italian cooking. It celebrates the classic bruschetta flavor, which is a mix of tomatoes, garlic, and basil. The warmth of the cooked pasta and chicken pairs well with the bright, fresh topping. This dish brings a vibrant taste with every bite. Making Bruschetta Chicken Pasta takes about 30 minutes. Here’s how that time breaks down: - Prep time: 15 minutes - Cook time: 15 minutes This quick time makes it perfect for busy weeknights or a fun dinner with friends. Yes, you can make this dish ahead of time! Here are some tips for meal prep and storage: - Cook the chicken and pasta in advance. - Keep the bruschetta topping separate until ready to serve. - Store everything in airtight containers in the fridge for up to three days. This way, you can enjoy a quick meal any time! To make Bruschetta Chicken Pasta from scratch, follow these steps: 1. Cook the chicken: Season and cook chicken breasts in olive oil. 2. Sauté garlic: Add minced garlic to the skillet until fragrant. 3. Mix in tomatoes and basil: Add halved cherry tomatoes and fresh basil. 4. Prepare fettuccine: Cook fettuccine until al dente, then drain. 5. Combine everything: Toss the pasta with the tomato mixture. 6. Add chicken and cheese: Stir in sliced chicken and shredded mozzarella. 7. Serve: Plate and sprinkle with Parmesan cheese. For more details, check out the Full Recipe. Bruschetta Chicken Pasta pairs well with several side dishes and drinks: - A crisp green salad with vinaigrette - Garlic bread or crusty bread for dipping - White wine, like Pinot Grigio, enhances the meal These sides will complete your dining experience and elevate the flavors. Bruschetta Chicken Pasta combines tasty ingredients like chicken, fresh tomatoes, and mozzarella. You can cook it easily with simple steps, tips, and variations. Whether you’re making it for a family meal or using leftovers, it's a great dish. Remember, you can adjust it to match your needs. Don’t be afraid to try new flavors or substitutes. Enjoy your cooking adventure with this delicious and versatile meal!

Craving a delicious and easy dinner? Look no further! Bruschetta Chicken Pasta is a vibrant dish that brings fresh flavors to your table. With juicy chicken, ripe tomatoes, and creamy …

Read more

Categories Dinner

Easy Zucchini Chocolate Layer Cake Deliciously Simple

July 16, 2025 by Chef Luca
To make this delicious cake, gather these key ingredients: - 2 cups grated zucchini - 1 ¾ cups all-purpose flour - ½ cup unsweetened cocoa powder - 1 cup granulated sugar - ½ cup brown sugar - ¾ cup vegetable oil - 3 large eggs - 2 teaspoons vanilla extract - 1 cup semi-sweet chocolate chips - Additional ingredients for frosting These ingredients create a rich and moist cake that packs a chocolate punch. The grated zucchini adds moisture without a strong flavor. You won’t even taste the zucchini, but you’ll love the texture it gives. - You can replace vegetable oil with applesauce or melted coconut oil for a different taste. - If you need gluten-free options, use a blend of gluten-free flour with xanthan gum. These swaps help customize the cake to fit your dietary needs. It’s nice to know you can adapt recipes easily. I have made this cake in many ways, and it always comes out great. Check the Full Recipe for more details on preparation. Start by preheating your oven to 350°F (175°C). This step is key for even baking. While the oven warms up, grease two 9-inch round cake pans. Greasing the pans helps the cake slide out easily later. It also prevents sticking, so your cake stays intact. In a medium bowl, whisk together the flour, cocoa powder, baking soda, baking powder, and salt. This step is important for a smooth texture. Whisking ensures that all dry ingredients mix well. If you skip this, you might end up with clumps in your batter. In a large bowl, mix the granulated sugar, brown sugar, and oil. Blend them until they look uniform. Next, add the eggs one at a time, mixing well after each. Stir in the vanilla extract. This helps to combine the flavors and gives the cake a rich taste. Now, gently fold in the grated zucchini and chocolate chips. Be careful not to overmix; you want to keep the batter light. Check the consistency. It should be thick but pourable. This mix adds moisture and sweetness to the cake. Pour the batter evenly into the prepared cake pans. Bake in your preheated oven for 25-30 minutes. To check if the cakes are done, insert a toothpick into the center. If it comes out clean, the cakes are ready. Let them cool in the pans for 10 minutes before moving them to wire racks. This cooling time is key for perfect frosting later. For the full recipe, check out the details. To keep your cake moist, use fresh zucchini. Grate it and pack it lightly. The moisture from the zucchini adds a rich texture. Avoid squeezing out the water, as it helps keep the cake tender. Mix the batter gently. Overmixing can make your cake dense. Stir until the dry and wet ingredients are just combined. This way, your cake stays light and fluffy. For your frosting, start with powdered sugar and cocoa powder in a bowl. Add milk slowly to get a smooth mix. If it's too thick, add a little more milk until you reach the right consistency. To make your cake look great, add chocolate chips on top or a sprinkle of grated zucchini. These touches make your cake pop and look inviting! Prevent your cake from sticking to the pans by greasing them well. Use butter or cooking spray to coat the bottom and sides. This makes for easy removal after baking. Ensure even baking by placing the pans in the center of the oven. Rotate them halfway through baking to help them cook evenly. This will give you a perfectly baked cake every time. For the full recipe of Easy Zucchini Chocolate Layer Cake, check out the section above. {{image_2}} You can add spices to give the cake a warm touch. Cinnamon and nutmeg work well. They add depth to the chocolate flavor. You might also want to try adding nuts like walnuts or pecans. They create a nice crunch. Dried fruits like raisins or cranberries can add sweetness and texture. If you love cream cheese, try that for the frosting. Mix cream cheese with powdered sugar for a tangy taste. You can also swap that for a vegan frosting. Use coconut cream or cashew cream for a dairy-free option. Flavored extracts can enhance these frostings, too. Want to make a smaller version? You can bake this cake as cupcakes. Just adjust the baking time to about 18-20 minutes. For a mini cake, use smaller pans. Check for doneness with a toothpick. It should come out clean. To store leftover cake, let it cool completely. Wrap the cake in plastic wrap. This keeps it fresh. You can also place it in an airtight container. This helps to preserve moisture. If you have cut slices, stack them with parchment paper between each slice. This prevents sticking. For freezing cake layers, first wrap them tightly in plastic wrap. Then, place the wrapped layers in a freezer bag. Squeeze out as much air as possible. This helps to prevent freezer burn. When you’re ready to use them, move the layers to the fridge overnight. For best results, let them thaw slowly. The cake lasts up to three days at room temperature. If you store it in the fridge, it can last up to a week. Look for signs of spoilage, such as a sour smell or mold. If the cake feels dry or crumbly, it’s past its prime. For the best taste, eat the cake while it’s still fresh. For the full recipe, check the details above. Yes, you can use frozen zucchini. First, thaw it completely and drain any excess water. This helps keep your cake from getting too wet. After draining, you can use it just like fresh zucchini in the recipe. To check if the cake is done, use the toothpick test. Insert a toothpick into the center of the cake. If it comes out clean or with a few crumbs, the cake is ready. Look for a firm top and slightly pulled edges from the pan. These are good signs too. Yes, you can bake this cake ahead of time. Let the cake cool completely, then wrap it tightly in plastic wrap. Store it in the fridge for up to three days. This keeps it fresh until you are ready to serve. Pair this cake with a glass of milk or a scoop of vanilla ice cream. You can also serve it with fresh berries or a drizzle of chocolate sauce. These flavors work well together and add a nice touch to your dessert. You can create a delicious Zucchini Chocolate Layer Cake with simple steps and ingredients. Remember to prep your oven and greased pans for the best results. Mix your dry and wet ingredients carefully to ensure a smooth batter. Avoid common mistakes, like overmixing, to achieve the perfect texture. Explore flavor variations and frosting options to make it unique. With proper storage, your cake stays fresh and tasty. Enjoy baking this treat for friends and family; they'll love it!

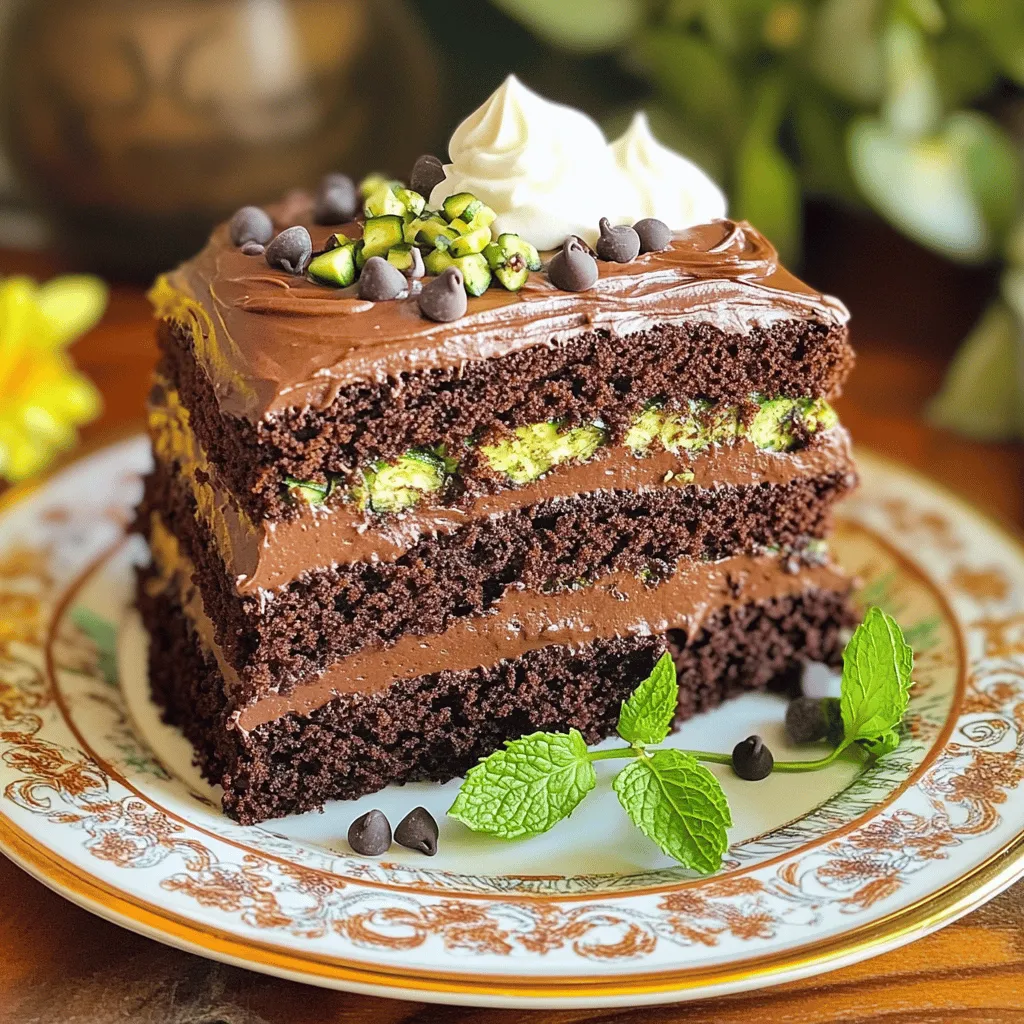
Are you ready to surprise your taste buds with a twist on dessert? This Easy Zucchini Chocolate Layer Cake is not only simple to make, but it’s also a delicious …

Read more

Categories Desserts

Rich Dark Chocolate Zucchini Cake Perfectly Moist Delight

July 16, 2025 by Chef Luca
When making a rich dark chocolate zucchini cake, the right ingredients matter. They create a moist and tasty cake that everyone loves. Here’s what you need: - 1 medium zucchini, grated (about 1 cup) - 1 cup all-purpose flour - 1/2 cup unsweetened cocoa powder - 1 teaspoon baking soda - 1/2 teaspoon baking powder - 1/2 teaspoon salt - 1 cup granulated sugar - 1/2 cup brown sugar - 1/2 cup vegetable oil - 2 large eggs - 1 teaspoon vanilla extract - 1/2 cup dark chocolate chips - 1/4 cup chopped walnuts (optional) Using fresh zucchini adds moisture without changing the flavor much. The cocoa powder gives the cake its rich color and deep taste. The mix of sugars helps to balance the cake, making it sweet but not too sweet. For a special touch, add dark chocolate chips. They melt in the cake and create small pockets of rich chocolate. If you like a little crunch, toss in walnuts. They add a nice texture to each bite. This combination makes the cake moist and fluffy. If you want more details, check out the full recipe. Enjoy creating this delicious dessert! 1. Preheat your oven to 350°F (175°C). This step warms the oven for even baking. 2. Grease a 9-inch round cake pan. Line the bottom with parchment paper. This helps the cake come out easily. 3. In a large bowl, whisk together the flour, cocoa powder, baking soda, baking powder, and salt. Mixing these dry ingredients first helps blend them well. 4. In another bowl, combine the granulated sugar, brown sugar, vegetable oil, eggs, and vanilla extract. Beat until fluffy. This step adds air to the batter. 1. Gradually add the dry ingredients into the wet mixture. Stir until just combined. Be careful not to overmix; this keeps the cake tender. 2. Fold in the grated zucchini, dark chocolate chips, and walnuts if you like nuts. This adds flavor and texture to the cake. 1. Pour the batter into the prepared cake pan. Spread it evenly across the pan. 2. Bake for 30-35 minutes. Check for doneness by inserting a toothpick in the center. It should come out clean. If it isn’t clean, bake a few more minutes. 3. Let the cake cool in the pan for about 10 minutes. Then, transfer it to a wire rack to cool completely. Enjoy your delicious cake! For the full recipe, refer to the previous section. To keep your cake tender, avoid overmixing. When you combine your wet and dry ingredients, stir gently. Mix just until you see no dry flour; lumps are okay. This keeps the cake soft and moist. For even baking, check your oven temperature. Use an oven thermometer to make sure it is correct. Place the cake pan in the center of the oven. This helps the heat reach all sides of the cake equally. You can add spices to boost the flavor. A teaspoon of cinnamon gives warmth, while espresso powder adds deep richness. Both enhance the chocolate taste in your cake. To increase the chocolate richness, use high-quality cocoa powder. You can also add an extra 1/4 cup of dark chocolate chips. This makes each bite even more decadent. After cooling, dust the cake with powdered sugar. This gives it a beautiful look. You can also serve it with a dollop of whipped cream on top. A sprinkle of grated chocolate adds a nice touch. Fruits like raspberries or strawberries pair well too. They add freshness and color to your plate. Enjoy making your cake look as good as it tastes! {{image_2}} You can easily make this rich dark chocolate zucchini cake gluten-free. Just swap all-purpose flour with almond flour or a gluten-free mix. This change keeps the cake moist and tender. For dairy-free options, use plant-based milk like almond or oat milk instead of regular milk. This keeps the flavor intact while catering to different diets. Want to add a bit of crunch? Toss in some chopped nuts or seeds. Walnuts or pecans work great and add texture. You can also mix in dried fruits, like raisins or cherries. These add a sweet burst of flavor that pairs well with chocolate. You can transform your cake into cupcakes or mini desserts. This makes them fun for parties or kids. Just adjust the baking time to about 20 minutes. Pair your cake with a scoop of ice cream or a dollop of fruit compote. This can elevate the dessert and make it even more delightful. For the full recipe, check back to make sure you’re on track! To keep your rich dark chocolate zucchini cake fresh, wrap it tightly in plastic wrap. You can also place it in an airtight container. This helps keep the moisture in and prevents it from drying out. At room temperature, the cake lasts about three days. If you store it in the fridge, it can last up to a week. Just note that refrigeration may alter the texture slightly. Freezing slices of the cake is easy and great for later enjoyment. First, let the cake cool completely. Then, slice it into pieces. Wrap each slice in plastic wrap and place them in a freezer bag. Remove as much air as possible to avoid freezer burn. You can freeze it for up to three months. When you're ready to enjoy it, take a slice out and thaw it in the fridge overnight. For a quicker method, you can leave it at room temperature for a couple of hours. To reheat the cake and give it a fresh taste, place a slice in the microwave for about 10-15 seconds. This warms it up without making it dry. If you want to keep it moist, cover it with a damp paper towel while reheating. You can also warm it in the oven at 350°F for about 5-10 minutes. This method helps keep the cake tender and delicious. Enjoy your cake as if it were just baked! For the full recipe, check out the details above. Can I use frozen zucchini for this recipe? Yes, you can use frozen zucchini. Just thaw it first and drain excess water. This helps keep the cake moist. What can I substitute for vegetable oil? You can use melted coconut oil or applesauce. Both options keep the cake moist and add flavor. How do I know when the cake is done baking? Check if a toothpick comes out clean from the center. The edges should pull away slightly from the pan, too. Can I make this cake ahead of time? Absolutely! You can bake it one day ahead. Just store it covered at room temperature to keep it fresh. What drinks pair well with chocolate zucchini cake? Coffee and milk are great choices. You can also serve it with a glass of cold milk for a classic treat. Ideas for garnishing the cake before serving Dust the cake with powdered sugar for a nice touch. You can also top it with whipped cream and grated chocolate. This blog post covered how to make a delicious chocolate zucchini cake. You learned the key ingredients and step-by-step instructions. We discussed baking tips and tasty variations to personalize your cake. Storing and reheating methods ensure your cake stays fresh. In the end, this recipe is simple and fun. You can easily impress your family and friends with it. Enjoy experimenting with flavors and make it your own!

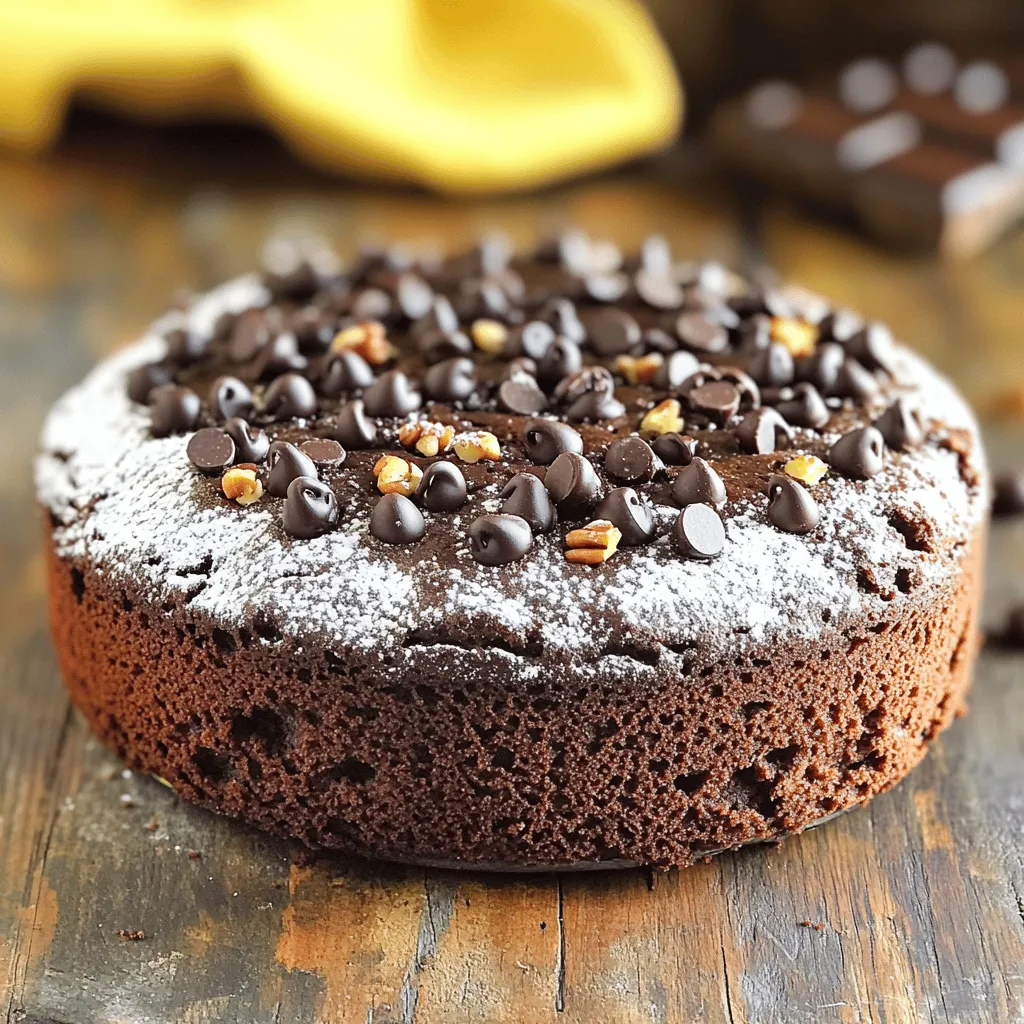
Craving something sweet but want a healthy twist? Dive into my Rich Dark Chocolate Zucchini Cake! This moist delight is packed with flavor and surprises. You won’t believe it’s made …

Read more

Categories Desserts

Moist Vanilla Cake with Strawberry Filling Delight

July 16, 2025 by Chef Luca
- 2 ½ cups all-purpose flour - 2 ½ teaspoons baking powder - ½ teaspoon baking soda - ½ teaspoon salt - 1 cup unsalted butter, softened - 2 cups granulated sugar - 4 large eggs - 1 tablespoon vanilla extract - 1 cup buttermilk - 2 cups fresh strawberries, hulled and sliced - ½ cup powdered sugar (for the filling) - Whipped cream (for frosting) To create a perfect Moist Vanilla Cake with Strawberry Filling, you need quality ingredients. The dry ingredients form the base of your cake. Flour gives it structure, while baking powder and baking soda help it rise. The salt balances sweetness. The wet ingredients add moisture and flavor. Butter makes the cake rich. Sugar adds sweetness and helps the cake to brown. Eggs bind everything, while vanilla extract adds a warm, inviting flavor. Buttermilk keeps the cake soft and moist. For the strawberry filling, fresh strawberries are key. They bring bright flavor and a pop of color. Mixing them with powdered sugar enhances their natural sweetness. This filling adds a delightful surprise in every bite. You can find the full recipe in the linked section. Enjoy gathering these ingredients and let’s get started on making a cake that will wow everyone! - Preheat the oven to 350°F (175°C). - Grease and flour two 9-inch round cake pans. Start by preheating your oven. This step is key for a well-baked cake. While the oven heats, prepare your pans. Greasing and flouring them ensures our cake won’t stick. Use a bit of butter or oil for greasing, then sprinkle flour over it. Tap the pan to remove any excess flour. - Whisk together the dry ingredients. - Cream butter and sugar until fluffy. - Add eggs and vanilla extract. Next, mix the dry ingredients. In a bowl, whisk together the flour, baking powder, baking soda, and salt. This helps spread the leavening agents evenly. In another bowl, beat the softened butter and sugar. Mix until it’s light and fluffy. This should take about 3 to 4 minutes. Now add the eggs, one at a time. Make sure each egg mixes in well before adding the next. Stir in the vanilla extract. This gives the cake its sweet aroma and flavor. - Combine wet and dry ingredients. - Divide batter into pans and bake. - Cool the cakes after baking. Slowly add the dry mix to the butter mix. Alternate with the buttermilk, starting and ending with the flour mix. Mix until just combined. This keeps your cake airy. Pour the batter evenly into the prepared pans. Smooth the tops with a spatula. Bake for about 25 to 30 minutes. Check for doneness with a toothpick. It should come out clean when inserted into the center. When baked, let the cakes cool for about 10 minutes in the pans. After that, remove them from the pans and let them cool completely on a wire rack. This cooling step is important for the final texture of the cake. For the full recipe, check out the recipe section above. Enjoy each step and get ready for a delicious treat! To get a moist cake, start with room temperature ingredients. Cold butter or eggs can change how well your cake rises. Next, do not overmix your batter. Mix just until combined. This keeps your cake light and fluffy. For a tasty filling, let the strawberries sit with sugar. This helps them release their juices. You can adjust the sweetness based on your taste. If you want it sweeter, add more sugar. If you prefer it tart, use less. Use chilled whipped cream for better spreading. Cold cream holds its shape well. When frosting, apply it in layers. This helps create an even and smooth look. It makes your cake look as good as it tastes. {{image_2}} To make this cake a bit healthier, you can try a few easy swaps. First, substitute whole wheat flour for the all-purpose flour. This change adds fiber and nutrients. You can also use coconut sugar instead of granulated sugar for a lower glycemic index. Coconut sugar gives a nice caramel flavor to the cake. Want to jazz up your cake? Consider incorporating lemon zest into the batter. This small addition brings a bright, fresh taste. You can also add almond extract. Just a teaspoon will deepen the flavor and give the cake a unique twist. If you need gluten-free options, almond flour works well. It creates a lovely texture and taste. For those avoiding dairy, use plant-based butter in place of regular butter. This will keep your cake just as moist and delicious while meeting dietary needs. To store leftover cake, wrap it well in plastic wrap. This keeps moisture in. You can also place it in an airtight container. Store the cake at room temperature for the best taste. Keep it away from direct sunlight or heat. This helps it stay fresh and moist. You can freeze the cake for later use. First, let it cool completely. Then, wrap it in plastic wrap. After that, wrap it in aluminum foil. This protects it from freezer burn. When ready to eat, remove it from the freezer. Let it thaw in the fridge overnight for the best results. In the fridge, the cake stays fresh for about 5 days. Always check for signs of spoilage. Look for mold or an off smell. If any signs appear, it’s best to throw it out. Enjoy your moist vanilla cake with strawberry filling while it’s fresh! For the full recipe, check out the detailed sections above. To keep your cake moist, use fresh ingredients. I recommend room temperature eggs and butter. This helps the batter blend well. Tips for testing doneness: - Insert a toothpick into the center of the cake. - If it comes out clean, your cake is done. - Check around the 25-minute mark for best results. Recommended baking times: - Bake your layers for 25-30 minutes at 350°F (175°C). - The exact time may vary based on your oven. Yes, you can! Many fruits work well in cake fillings. Other fruit alternatives for the filling: - Try raspberries for a tart taste. - Blueberries add a sweet burst. - Peaches bring a juicy flavor. Adjusting sweetness based on fruit type: - Taste your fruit to know its sweetness. - You may need to add more sugar if your fruit is tart. Frosting can make or break your cake's look. Techniques for a uniform look: - Use a cake turntable for easy access. - Start with a thin layer, then add more. - Apply frosting in a circular motion for smoothness. Choosing the right type of frosting: - Whipped cream is light and fluffy. - Buttercream is rich and holds shape well. - Cream cheese frosting adds a tangy touch. For the full recipe and details, check out the section above. This recipe covers all you need for a delicious strawberry cake. You learned about dry and wet ingredients, step-by-step mixing, and baking. I shared tips to ensure moistness and perfect filling. We also explored health alternatives and storage tips to keep your cake fresh. Remember, the key to success lies in the details. Trust your techniques and have fun experimenting with flavors. Enjoy every bite of your homemade cake!

Are you ready to bake a delightful dessert that will impress everyone? This Moist Vanilla Cake with Strawberry Filling is the perfect treat for any occasion. With its fluffy layers …

Read more

Categories Desserts

Best Strawberry Cake – Fresh Cream Cake Delight

July 16, 2025 by Chef Luca
To make the best strawberry cake, you need the following ingredients: - 2 cups all-purpose flour - 1 ½ cups granulated sugar - ½ cup unsalted butter, softened - 1 cup whole milk - 3 ½ teaspoons baking powder - 1 teaspoon vanilla extract - ½ teaspoon salt - 4 large egg whites - 2 cups fresh strawberries, hulled and sliced - 1 cup heavy whipping cream - 2 tablespoons powdered sugar - Fresh mint leaves for garnish (optional) These ingredients come together to create a delightful cake. Each one plays a role in the taste and texture. For those with dietary restrictions, you can make some substitutions: - Gluten-Free: Use a gluten-free flour blend instead of all-purpose flour. - Dairy-Free: Swap butter and whole milk for coconut oil and almond milk. - Vegan: Replace egg whites with aquafaba, the liquid from canned chickpeas. Feel free to experiment with these options. The goal is to enjoy a slice of strawberry goodness while staying true to your dietary needs. 1. Preheat your oven to 350°F (175°C). Grease and flour two 9-inch round cake pans. This helps the cake come out easily. 2. In a mixing bowl, cream together ½ cup of softened butter and 1 ½ cups of granulated sugar. Mix until it is fluffy and light. 3. Add 4 large egg whites to the mixture, one at a time. Mix well after each addition to ensure they blend. 4. In a separate bowl, whisk together 2 cups of all-purpose flour, 3 ½ teaspoons of baking powder, and ½ teaspoon of salt. 5. Gradually add this dry mix to the creamed butter and sugar. Alternate with 1 cup of whole milk. Mix until everything is well combined. 6. Stir in 1 teaspoon of vanilla extract until fully mixed in. 7. Gently fold in 2 cups of sliced fresh strawberries. Reserve a few slices for decoration later. 1. Divide the batter evenly between the two prepared pans. Smooth the tops with a spatula for an even surface. 2. Bake in your preheated oven for 25-30 minutes. 3. To check for doneness, insert a toothpick into the center. If it comes out clean, your cake is ready. 1. Allow the cakes to cool in the pans for 10 minutes. Carefully transfer them to a wire rack to cool completely. 2. Once cooled, whip 1 cup of heavy cream with 2 tablespoons of powdered sugar until soft peaks form. 3. For layering, place one cake layer on a serving plate. Spread a layer of whipped cream on top and add a few strawberry slices. 4. Top with the second cake layer. Spread the remaining whipped cream on top. Decorate with the reserved strawberries and mint leaves if you like. This process leads you to a delightful strawberry cake that is fresh and full of flavor. For the complete recipe, check out the [Full Recipe]. Using room temperature ingredients is key. When your butter and eggs are warm, they mix better. This step helps create a light and fluffy cake. If your ingredients are cold, your cake may turn out dense. To avoid baking mistakes, measure your flour correctly. Don't pack it into the cup. Instead, spoon it in and level it off with a knife. Over-measuring can make your cake dry. Also, be careful not to overmix the batter. Mix until just combined for the best texture. Whipping heavy cream is simple when you follow a few tips. Start with chilled cream and a cold bowl. This helps the cream whip faster. Use a hand mixer or a stand mixer for the best results. Beat until soft peaks form, which means it will hold its shape but still be smooth. You can flavor your whipped cream easily. Try adding vanilla extract or a bit of almond extract. For a fruit twist, mix in a few tablespoons of strawberry puree. This option adds a nice touch to your cake. Presenting your cake can be fun and creative. Place the cake on a nice serving plate. Use a cake stand if you have one. This adds elegance. You can slice the cake into wedges for serving. Garnishing makes a big difference too. Use fresh mint leaves and whole strawberries on top. They add color and charm. Arrange the strawberries in a circle around the whipped cream. This will impress your guests. For more details, check out the Full Recipe. Enjoy making your cake beautiful! {{image_2}} You can make this cake even more tasty by adding a little citrus zest. Try lemon or orange zest to give it a fresh kick. The zest adds brightness and pairs well with strawberries. Another fun option is to mix in different berries. Blueberries or raspberries can add color and flavor. Each berry brings its own sweet twist, making your cake unique and delicious. If you need a gluten-free option, substitute all-purpose flour with a gluten-free blend. Many brands work well, so choose one you like. This change keeps the cake soft and tasty. For those who prefer vegan options, replace eggs with flaxseed meal mixed with water. Use almond milk or coconut milk instead of whole milk. You’ll still get a moist cake that everyone can enjoy. Different cultures have their own takes on strawberry cake. In some places, they add cream cheese to the frosting for a rich taste. Others might use whipped coconut cream for a lighter touch. Each region brings its flavors, adding a special twist to the cake. Try out these variations to find your favorite version. You can even mix and match to create something new and exciting. To keep your Best Strawberry Cake fresh, store it in the fridge. Wrap it tightly in plastic wrap or place it in an airtight container. This prevents the cake from drying out. If you have leftovers, refrigeration is the best choice. If you want to store the cake for longer, consider freezing it. To do this, slice the cake and wrap each slice in plastic wrap. Then, place the wrapped slices in a freezer-safe bag. When you are ready to enjoy, thaw the slices in the fridge overnight. In the fridge, your strawberry cake will stay fresh for about 3 to 5 days. Just remember to keep it covered well. The whipped cream might soften after a few days, so try to eat it sooner for the best taste. For leftovers, it’s best to store them in individual slices. This way, you can grab a slice whenever you want. Plus, it makes sharing easier! Can I use frozen strawberries instead of fresh? Yes, you can use frozen strawberries. Just thaw them and drain excess liquid. Fresh strawberries taste better, but frozen works well in a pinch. How can I improve the flavor of my cake? To boost flavor, add a splash of lemon juice or zest. You can also mix in a little almond extract. These small changes make a big difference. Is it possible to make this cake in advance? Absolutely! You can bake the cake a day early. Just store it in an airtight container. Add whipped cream and strawberries right before serving. What to do if the cake is too dry or dense? If your cake is dry, check your oven's temperature. Use an oven thermometer for accuracy. You can also brush the cake with simple syrup for moisture. Why did my whipped cream deflate? Whipped cream can deflate if it’s over-mixed or not cold enough. Start with chilled cream and mix just until soft peaks form. How can I make this cake more visually appealing? To enhance the look, use a piping bag for whipped cream. Add fresh strawberries in a decorative pattern. Mint leaves add a nice touch as well. For the full recipe, check out the Best Strawberry Cake to create this delightful treat! In this post, we explored making the best strawberry cake. We covered key ingredients, precise steps, and helpful tips. Remember to use fresh strawberries and check your cake for doneness. Don't shy away from making variations to fit your taste or dietary needs. Proper storage keeps your cake fresh longer. With a little care, your cake will impress everyone. Happy baking!

Are you ready to bake the best strawberry cake of your life? This fresh cream delight will wow your friends and family. With juicy strawberries and light whipped cream, it’s …

Read more

Categories Desserts
Older posts
Newer posts
← Previous Page1 … Page69 Page70 Page71 … Page122 Next →

STIRRED RECIPES

Where every dish begins with a stir! 🍲✨

PAGES

Home About Contact Privacy Policy Terms & Conditions Cookie Policy GDPR Policy Copyright Policy Disclaimer

CATEGORIES

Appetizers Desserts Salads Breakfast Dinner

Contact

  • Pinterest
  • Mail
Copyright © 2026 Stirred Recipes. All rights reserved.