Gluten-Free Pumpkin Donuts Tasty and Simple Recipe

If you crave a tasty treat that’s both easy to make and gluten-free, you’re in the right place! This Gluten-Free Pumpkin Donuts recipe combines the warm flavors of fall with …
If you crave a tasty treat that’s both easy to make and gluten-free, you’re in the right place! This Gluten-Free Pumpkin Donuts recipe combines the warm flavors of fall with …
![- 1.5 lbs boneless, skinless chicken thighs, cut into bite-sized pieces - 2 tablespoons olive oil - 1 medium onion, diced - 3 cloves garlic, minced - 1-2 fresh green chiles (jalapeño or serrano), diced (adjust for heat preference) - 2 cups roasted green chiles, peeled and chopped (canned or fresh) - 4 cups chicken broth - 1 large potato, peeled and diced - 1 bell pepper (green or red), chopped - 1 cup corn kernels (frozen or fresh) Chicken is the star of this stew. I use thighs for their rich flavor and tender texture. You can use breasts, but they may dry out. Green chiles add heat and depth. I love using a mix of fresh and roasted for that smoky taste. If you want more heat, add more fresh chiles. Vegetables complete the dish. Onions and garlic build a flavorful base. Potatoes and bell peppers add heartiness. Corn brings sweetness and color. - 1 teaspoon ground cumin - 1 teaspoon smoked paprika - Salt and pepper to taste Cumin gives a warm, earthy flavor. It pairs well with chiles. Smoked paprika adds a nice smokiness and enhances the stew's depth. Salt and pepper are key. They boost all the flavors. Taste and adjust as you cook to get it just right. - Fresh cilantro, chopped (for garnish) - Lime wedges (for serving) Fresh cilantro adds brightness and freshness. A squeeze of lime lifts the flavors. These garnishes make the stew pop! For the full recipe, check out the [Full Recipe] section above. To make this green chile chicken stew, follow a simple sequence. First, gather all your ingredients. Next, chop the vegetables and chicken. Then, heat your pot and start cooking the base. Finally, let it simmer to blend all the flavors. This method ensures each step builds on the last, leading to a tasty dish. Start by heating 2 tablespoons of olive oil in a large pot over medium heat. Add 1 diced onion and sauté it for about 5 minutes. You want the onion to turn soft and clear. Next, stir in 3 minced garlic cloves and 1-2 diced fresh green chiles. Cook this mix for another 2 minutes until you smell the flavors come alive. Now, add the chicken. Cook it for 5-7 minutes until it turns white and is no longer pink. This step builds a rich base for the stew. After the base is ready, add the rest of your ingredients. Stir in 2 cups of roasted green chiles, 4 cups of chicken broth, and 1 diced potato. Don’t forget 1 chopped bell pepper and your spices: 1 teaspoon of ground cumin and 1 teaspoon of smoked paprika. Season with salt and pepper to taste. Bring everything to a boil. Then, reduce the heat to low and cover the pot. Let it simmer for 25-30 minutes. This timing allows the chicken to cook fully and the potatoes to soften. Finally, stir in 1 cup of corn kernels and let it cook for another 5 minutes. Taste and adjust the seasoning as needed. Enjoy the warm, hearty stew! For the full recipe, check the earlier section. Using fresh ingredients can boost flavor. Fresh green chiles bring heat and zest. They add a crisp taste that canned chiles may lack. Canned chiles are still good. They are easy to use and save time. When you choose, think about your taste. Want more spice? Go fresh. Prefer milder? Canned works just fine. This stew is easy to make gluten-free. Just check your broth for gluten. Most chicken broths are gluten-free. If you want a low-carb option, swap potatoes for cauliflower. Cauliflower gives a nice texture and absorbs flavor well. You can feel good about these choices while enjoying a hearty meal. To avoid overcooking chicken, watch the time. Cook it just until it is no longer pink. This keeps the chicken juicy. For potatoes, cut them into even pieces. This helps them cook evenly. If they cook too long, they can become mushy. Keep an eye on the clock for the best results. {{image_2}} You can make this stew even spicier. Try using different green chiles. For a milder taste, use poblano chiles. They add flavor without too much heat. If you want more heat, use serrano chiles. You can also mix different chiles for a unique flavor. Just remember to taste as you go! If you want vegetarian or vegan options, you can swap the chicken. Use hearty veggies like mushrooms or butternut squash instead. You can also use plant-based protein, such as tofu or tempeh. These swaps keep the dish tasty and filling. For a more robust flavor, use vegetable broth instead of chicken broth. Pair your stew with tasty sides. Serve it with warm tortillas or crusty bread. You can also add toppings like avocado or shredded cheese. For a fresh touch, sprinkle lime juice over the stew. Fresh cilantro makes a great garnish too! These pairings bring out the flavors in the stew and make it even better. You can find the Full Recipe to help you create this delicious meal. To store leftovers, first let the stew cool to room temperature. Then, place it in an airtight container. You can keep it in the fridge for up to three days. If you want to save it longer, consider freezing it instead. Always label the container with the date to track freshness. For freezing, pour the cooled stew into freezer-safe bags or containers. Leave some space at the top to allow for expansion. This will help keep the flavor and texture intact. It’s best to use the stew within three months. When you want to eat it, thaw it overnight in the fridge before reheating. To reheat, pour the stew into a pot and warm it over medium heat. Stir it often to help it heat evenly. If the stew is too thick, add a bit of broth or water to reach your desired consistency. You can also microwave it in a covered bowl, stirring every minute until hot. Enjoy your warm, comforting bowl of Green Chile Chicken Stew! For the full recipe, check out the earlier section. You can use canned green chiles or poblano peppers. If you want a milder flavor, use bell peppers. For a spicy kick, try serrano or Anaheim peppers. These options work well and still add great taste. Add more fresh green chiles. You can also sprinkle in some cayenne pepper or red pepper flakes. Adjust the heat slowly. Taste as you go. This way, you can find the perfect spice level for you. Yes, you can use chicken breasts. They are leaner and cook faster. However, they can dry out if overcooked. Chicken thighs have more fat, making them juicy and tender. Choose based on your taste and cooking style. This stew will last about 3 to 4 days in the fridge. Store it in an airtight container. Make sure it cools before putting it in the fridge. This helps keep the flavor fresh. Serve it with warm tortillas, rice, or cornbread. A fresh salad or avocado slices make great sides too. You can also add sour cream or cheese on top for extra creaminess. These pairings enhance the stew's flavors and make a full meal. In this post, we covered how to make Green Chile Chicken Stew. We discussed essential ingredients like chicken, green chiles, and decisive spices. You learned the cooking steps, from sautéing to simmering, to build flavor. I also shared tips for adjusting the recipe to fit your needs. Remember, you can customize this stew to your taste. Whether spicy or mild, it’s a great meal. Enjoy making it your own!](https://stirredrecipes.com/wp-content/uploads/2025/07/001b0af0-ccf0-4410-9c3d-f51643bf757c.webp)
Looking for a tasty way to warm up? My Green Chile Chicken Stew is perfect for you! It’s hearty, easy to make, and packed with flavor. With just a few …

Are you ready to satisfy your sweet tooth? These Pecan Pie Bars are simple and incredibly delicious! They combine the rich flavors of classic pecan pie with the convenience of …

Welcome to the world of Chai Cake! This simple and flavorful recipe combines warm spices with a soft cake, creating a dessert that’s perfect for any occasion. I’ll guide you …
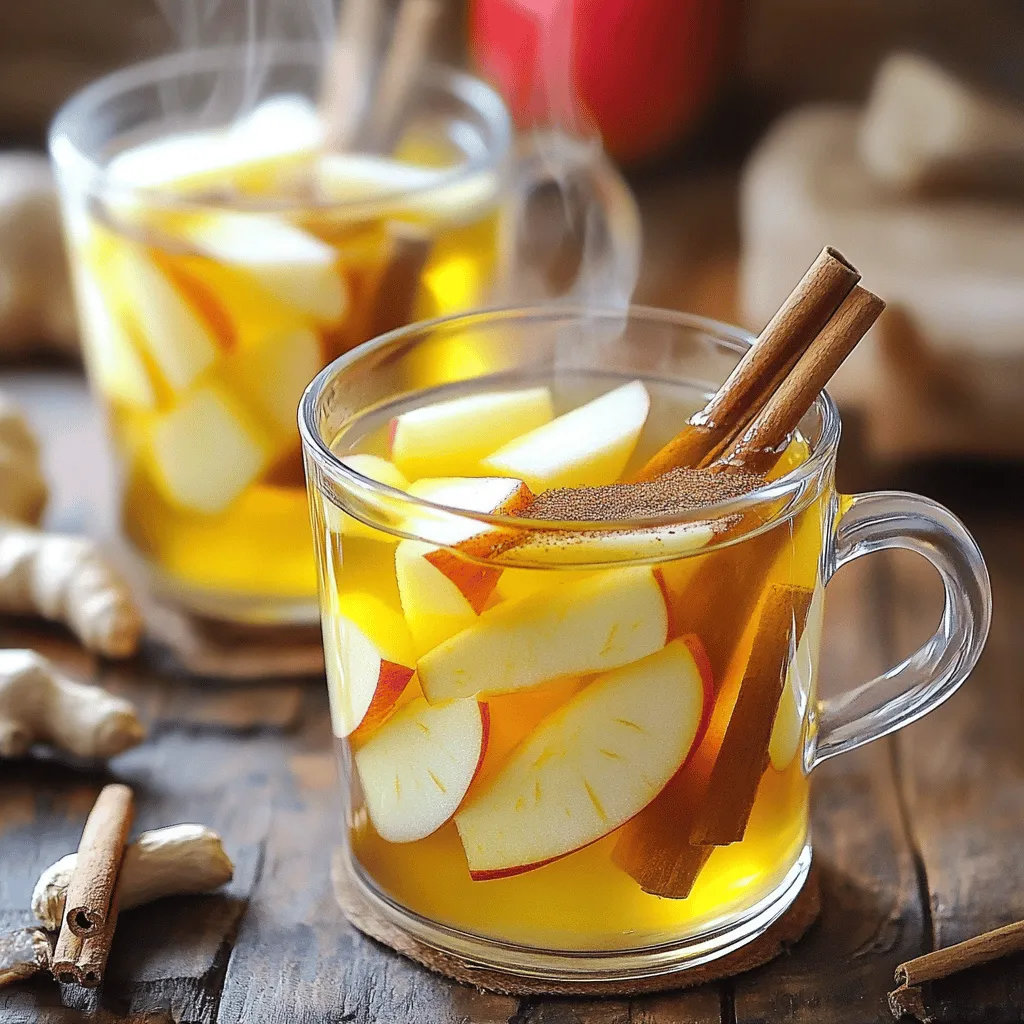
When the weather turns chilly, warm up with a cup of Cozy Cinnamon Apple Tea with Ginger. This comforting brew combines vibrant apples, zesty ginger, and aromatic cinnamon to create …
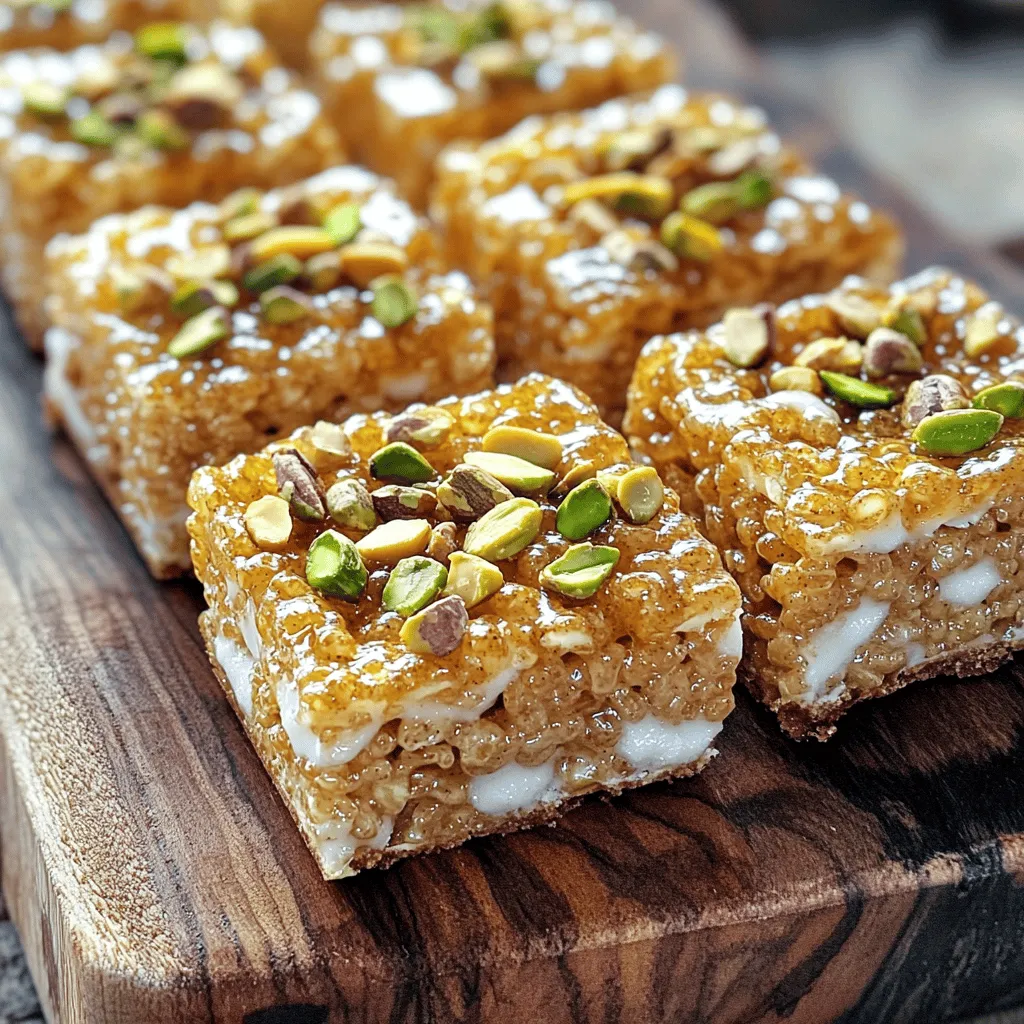
Are you ready to elevate your snack game? Chai Spiced Rice Krispie Treats combine the classic marshmallow delight with warm, aromatic chai spices. In this post, I’ll guide you through …
![- 2 cups all-purpose flour - 1 tablespoon baking powder - 1/2 teaspoon baking soda - 1 teaspoon salt - 1/2 teaspoon garlic powder - 1/2 cup cold unsalted butter, cubed - 1 cup shredded sharp cheddar cheese - 1 cup canned green chiles, drained and chopped - 3/4 cup buttermilk - 1 tablespoon fresh cilantro, chopped (optional, for garnish) - Choosing the right cheese: Use sharp cheddar for bold flavor. It melts well and adds richness. - Freshness of green chiles: Opt for good-quality canned chiles. Fresh or roasted chiles can work too. - Importance of cold butter: Cold butter makes the biscuits flaky. It creates air pockets that help the biscuits rise. Using fresh and quality ingredients makes a big difference in the taste. I always recommend using the best cheese and fresh chiles when you can. You can find the Full Recipe to guide you through the steps. Enjoy making biscuits that are both tasty and comforting! First, preheat your oven to 425°F (220°C). Line a baking sheet with parchment paper. This step helps prevent sticking and makes cleanup easy. Next, in a large mixing bowl, whisk together the dry ingredients: 2 cups of all-purpose flour, 1 tablespoon of baking powder, 1/2 teaspoon of baking soda, 1 teaspoon of salt, and 1/2 teaspoon of garlic powder. Make sure they mix well. This creates a strong base for your biscuits. Now, let’s add the butter. Take 1/2 cup of cold unsalted butter and cube it. Add the cubes to the flour mix. Use a pastry cutter or your fingers to cut the butter into the flour. You want the mixture to look like coarse crumbs. This step gives the biscuits their flaky texture. Next, gently fold in 1 cup of shredded sharp cheddar cheese and 1 cup of drained, chopped green chiles. Be careful and don’t overmix. Once your mixture is ready, pour in 3/4 cup of buttermilk. Stir gently until the dough comes together. Turn the dough out onto a lightly floured surface and pat it into a rectangle about 1-inch thick. Use a biscuit cutter or a round glass to cut out biscuits. Place them on your prepared baking sheet. Gather any dough scraps, press again, and cut out more biscuits. Bake in the preheated oven for 12-15 minutes until they are golden brown. Enjoy the warm, cheesy aroma filling your kitchen! For the full recipe, check the earlier section. To get the best dough, look for these signs: - It should feel soft, not sticky. - The dough should hold its shape well. Avoid overmixing. Overmixing makes biscuits tough. Mix only until the ingredients combine. A few lumps are okay. This keeps your biscuits light and fluffy. Spices can add a great kick. Try adding a pinch of cayenne pepper or smoked paprika. These spices give a nice, spicy flavor. Using different types of cheese can change the taste. Try pepper jack for more heat or gouda for a rich flavor. Mixing cheeses can make the biscuits even better. For golden brown biscuits, follow these tips: - Bake at 425°F (220°C) for best results. - Keep an eye on them. They should take about 12-15 minutes to bake. Oven temperature is key. An even temperature helps biscuits rise and brown nicely. Use an oven thermometer to check if your oven runs hot or cold. This small step ensures your biscuits turn out perfect every time. Be sure to check out the Full Recipe for all the details! {{image_2}} You can easily switch up the flour in this recipe. Whole wheat flour adds a nuttier taste. Gluten-free flour works well, too, for those avoiding gluten. Just be sure to use a blend made for baking. Cheese is another fun area to explore. You could swap sharp cheddar for pepper jack for a spicy kick. Or try mozzarella for a milder flavor and gooey texture. Each cheese brings its own charm to these biscuits. Want more heat? Add diced jalapeños to the mix. They give a nice zing to every bite. If you want a different twist, try adding herbs like thyme or rosemary. A sprinkle of smoked paprika can add depth and richness, too. Feel free to experiment with spices such as cumin or oregano. Each spice can change the flavor profile in exciting ways. Get creative and find what suits your taste! These biscuits work great alongside soups and stews. Their fluffy texture complements creamy and hearty dishes. You can also serve them with chili for a comfort food feast. If you have leftovers, don’t worry! Use them to make a breakfast sandwich. Just add an egg and some avocado for a tasty morning bite. You could also crumble them over a salad for an unexpected crunch. For more tips and the full recipe, check out the [Full Recipe]. To keep your green chile cheddar biscuits fresh, store them in the fridge. Place the biscuits in an airtight container. This helps keep them soft. You can also wrap them in plastic wrap before putting them in the container. If you want to save them for longer, freeze them. Wrap each biscuit in foil and place them in a freezer bag. They can last up to three months in the freezer. To enjoy your biscuits warm again, reheat them in the oven. Preheat the oven to 350°F (175°C). Place the biscuits on a baking sheet and heat for about 10 minutes. This will keep them nice and fluffy. You can also microwave them for a quick option. Just heat them for 15-20 seconds. For a fun twist, serve them with a drizzle of honey or a spread of butter. These biscuits last about 2 to 3 days in the fridge. After that, they may start to dry out. Look for signs of spoilage, like a hard texture or an off smell. If they become too hard, you can crumble them into a soup or salad for extra flavor. Enjoy your green chile cheddar biscuits fresh for the best taste! For the full recipe, check out the detailed instructions. Look for a few clear signs. First, the biscuits should be golden brown on top. Second, a toothpick inserted in the center should come out clean. Lastly, the biscuits will have a nice rise and feel firm to the touch. For the best results, aim for an internal temperature of 190°F (88°C). This means they are fully baked and ready to enjoy! Yes, you can! You can prepare the dough a day ahead. Just wrap it tightly in plastic wrap and store it in the fridge. When you’re ready to bake, take it out and let it sit at room temperature for about 15 minutes. For optimal texture when reheating, bake the biscuits fresh. If you have leftovers, store them in an airtight container for up to three days. If you want a different flavor, consider using jalapeños or roasted red peppers. Each option brings a unique taste. Jalapeños add more heat, while roasted red peppers offer a sweet touch. You can also try using diced bell peppers for a milder flavor. Just keep in mind, each substitute will change the final taste of the biscuit. Yes, you can modify this recipe for various diets. For gluten-free options, use a gluten-free flour blend. This works well in most baking recipes. If you need a dairy-free version, replace the buttermilk with almond milk and use dairy-free cheese. These changes keep the flavor nice without losing the comfort of the biscuits. In this post, we explored how to make delicious green chile cheddar biscuits. You learned about the key ingredients, step-by-step instructions, and tips for perfecting texture and flavor. We also covered variations, storage, and answers to common questions. These biscuits are not just tasty; they are easy to make and customize. Try them for your next meal, and enjoy the warmth and flavor they bring. You’ll impress everyone, including yourself, with these simple yet delightful snacks.](https://stirredrecipes.com/wp-content/uploads/2025/07/38fc21af-7931-4dec-a9ac-1975f8ee84b5.webp)
If you’re looking for a tasty twist on classic biscuits, you’ve landed in the right spot! My Green Chile Cheddar Biscuits are bursting with flavor and perfect for any meal. …

Looking for a fun and tasty snack? Try my Dipped Apple Slices on a Stick! This delight combines juicy apples with creamy chocolate and your favorite toppings. In just a …
![- 6 medium apples (Granny Smith or Honeycrisp), peeled, cored, and diced - 1/4 cup unsalted butter - 1/4 cup brown sugar - 1 teaspoon ground cinnamon - 1/4 teaspoon nutmeg (optional) - 1 tablespoon lemon juice - Pinch of salt Choosing the best apples for flavor For this recipe, I love using Granny Smith or Honeycrisp apples. These apples give a nice sweet-tart balance. Their firm texture holds up well in cooking, ensuring a great sauce. Best butter options for richness Unsalted butter is key for this dish. It lets you control the salt level. If you prefer a richer taste, use a quality European-style butter. It has a higher fat content, making the sauce even creamier. Substitutes for brown sugar If you run out of brown sugar, you can use white sugar with a bit of molasses. A tablespoon of molasses mixed with white sugar gives a similar flavor. You could also try maple syrup or honey for a unique twist. Both will add sweetness and a hint of flavor. For the full recipe, visit [Full Recipe]. 1. Preparing the apples: Start by peeling each apple. Use a sharp peeler for ease. Next, core the apples to remove the seeds. Finally, dice them into small pieces. This helps them cook evenly. 2. Melting the butter in a saucepan: Place a large saucepan on medium heat. Add 1/4 cup of unsalted butter to the pan. Let it melt completely. Watch for bubbling; this means it’s ready for the apples. 1. Sautéing the apples: Once the butter melts, add the diced apples to the pan. Stir gently so they coat in butter. Cook for about five minutes until they start to soften. 2. Adding ingredients for flavor: Now, it’s time to spice things up! Stir in 1/4 cup of brown sugar and 1 teaspoon of ground cinnamon. If you like, add a pinch of nutmeg. Don’t forget the tablespoon of lemon juice and a pinch of salt. Mix well to combine. 3. Achieving desired sauce consistency: Keep cooking the mixture for 10 to 15 minutes. Stir occasionally. The apples will soften, and the sauce will thicken. You can mash the apples with a potato masher for a chunkier texture or blend it for a smooth sauce. This Hot Buttered Apple Sauce With Cinnamon is now ready to enjoy. For the complete recipe, check out the [Full Recipe]. To make your hot buttered apple sauce shine, think about adding more spices. Try a pinch of ginger for warmth or a bit of cloves for depth. You could even add a splash of vanilla extract for a sweet touch. Each spice brings a new twist to the flavor. If you want it sweeter, consider your options. You can add more brown sugar or use maple syrup. Honey is a great choice too! Taste the sauce as you go. This way, you can get it just right for your liking. When serving your apple sauce, consider using a cute bowl or jar. A sprinkle of cinnamon on top makes it look nice. You can even add a dollop of whipped cream for extra fun. This apple sauce goes well with many dishes. Serve it warm over pancakes or waffles for breakfast. It’s also tasty with pork or chicken as a side. You can mix it into yogurt for a quick snack. The possibilities are endless! For the full recipe, check out the [Full Recipe]. {{image_2}} You can switch things up with healthier options. Try coconut oil instead of butter. It adds a light flavor and is a great choice for health-conscious cooks. Instead of brown sugar, you can use honey. It gives the sauce a natural sweetness and a unique taste. You can also play with different fruits. Instead of just apples, add diced pears for a softer texture. You can even mix in berries, like blueberries or raspberries, for a fruity twist. Each fruit brings its own taste, making the sauce exciting. As the seasons change, so can your apple sauce! In the fall, add cranberries for a tart kick. Chopped walnuts also add a nice crunch and a rich flavor. These additions make the sauce perfect for cozy fall meals. In summer, blend in fresh peaches or plums. They add a juicy sweetness that brightens the dish. You can enjoy this sauce warm or cold, making it a great treat for any season. For the full recipe, check out the Hot Buttered Apple Sauce With Cinnamon recipe. To keep your hot buttered apple sauce fresh, start by letting it cool completely. Transfer the sauce to an airtight container. Store it in the refrigerator for up to one week. If you want to enjoy it longer, freezing works great. Just pour the cooled apple sauce into freezer-safe bags or containers. Leave some space at the top, as liquids expand when frozen. Label the bags with the date for easy tracking. Apple sauce can last quite a while if stored properly. In the fridge, it stays fresh for about seven days. If you freeze it, you can enjoy it for about six months. After that, the flavor may fade. Always check for signs of spoilage, like off smells or changes in color. Use your senses; they are your best guide. Can I make hot buttered apple sauce ahead of time? Yes, you can make hot buttered apple sauce in advance. Just cook it and let it cool. Store it in the fridge for up to a week. When you want to eat it, simply reheat in a pan or microwave. How do I make apple sauce more cinnamon-flavored? To boost the cinnamon flavor, add extra ground cinnamon. Start with half a teaspoon more, then taste. You can also try adding cinnamon sticks while cooking for a deeper flavor. What are some serving suggestions for this recipe? Serve hot buttered apple sauce with pancakes or waffles. It pairs well with oatmeal or yogurt too. You can even use it as a topping for ice cream or as a side for roasted meats. Can I use a slow cooker for this recipe? Yes, you can use a slow cooker. Just combine all the ingredients and cook on low for about 4 hours. This will give you a different texture but still delicious flavor. What if I don’t have nutmeg or lemon juice? If you don’t have nutmeg, you can skip it. For lemon juice, try using a splash of vinegar for some acidity. It won't taste the same, but it will still enhance the flavor. What to do if the sauce is too thin or too thick? If the sauce is too thin, cook it longer to evaporate some liquid. For a thicker sauce, you can mash the apples more or add a bit of cornstarch mixed with water. How to restore flavor if too sweet or bland? For a sweet sauce, add a pinch of salt or a dash of lemon juice to balance the taste. If it’s bland, boost the spices—more cinnamon or a hint of vanilla can work wonders. This blog post covered making delicious apple sauce. You learned about the best ingredients, preparation steps, and cooking methods. We also explored tips for enhancing flavor and creative variations. With proper storage advice, your apple sauce can stay fresh longer. To wrap up, remember to experiment with different fruits and spices to find your favorite flavor. Making apple sauce can be fun and rewarding, so enjoy the process!](https://stirredrecipes.com/wp-content/uploads/2025/07/975cb29c-ef77-4580-a247-446208d5e30a.webp)
Are you ready to savor a warm, sweet treat that brings comfort with every bite? My Hot Buttered Apple Sauce with Cinnamon recipe is your go-to for a delightful dessert …

If you crave a warm, savory dish that fills your home with amazing aromas, this Satisfying Slow Cooker French Onion Soup recipe is for you. I’ll guide you through each …