Baked Pumpkin Donuts Irresistible Fall Treat

Fall is the perfect time to enjoy warm, baked pumpkin donuts. These tasty treats blend pumpkin puree and warm spices, giving you that cozy, autumn feel in every bite. You …
Fall is the perfect time to enjoy warm, baked pumpkin donuts. These tasty treats blend pumpkin puree and warm spices, giving you that cozy, autumn feel in every bite. You …
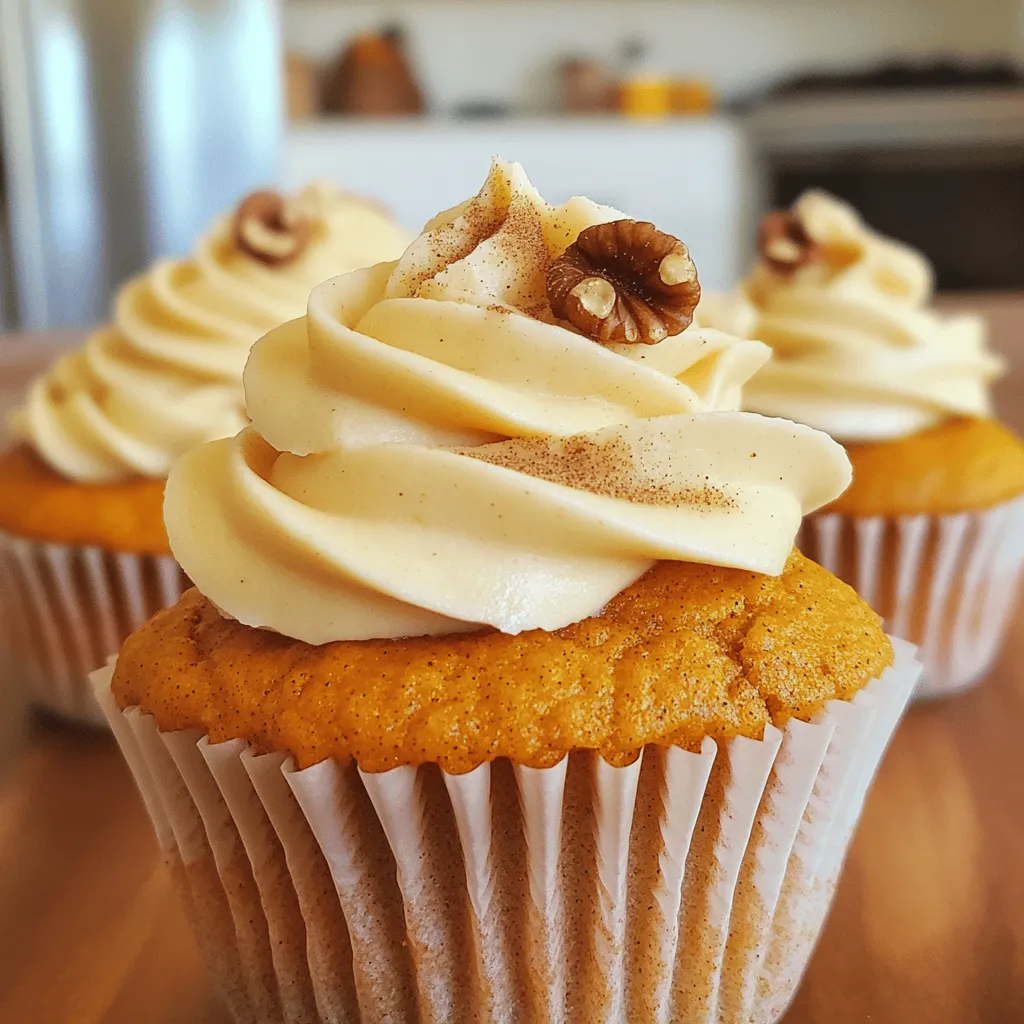
Get ready to savor the taste of fall with my Pumpkin Cupcakes with Cinnamon Frosting! These cupcakes blend moist pumpkin goodness with a creamy frosting that has just the right …
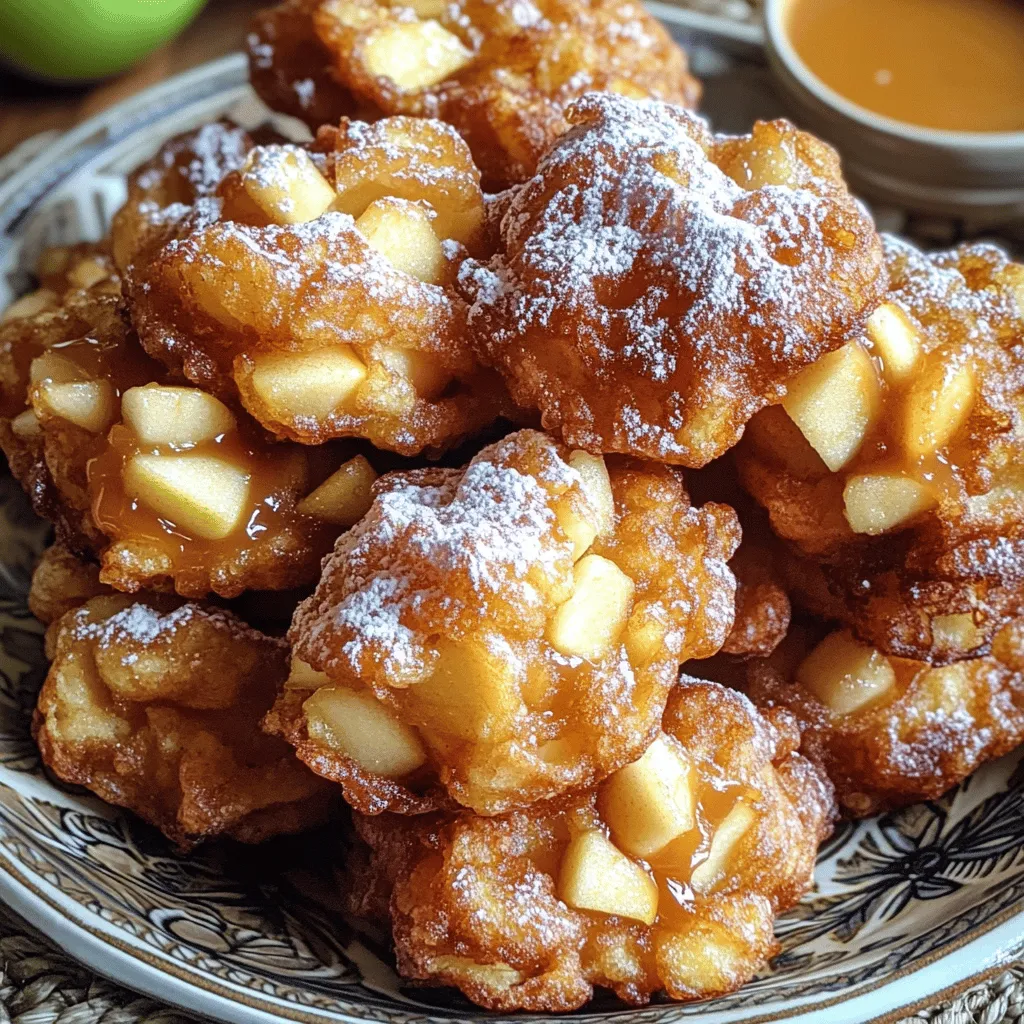
If you crave a sweet treat, Big Apple Fritters are a must-try! These donuts boast juicy apples and a crispy outer layer. In this post, I’ll guide you through simple …
![For the best flavor, choose fresh mushrooms. I like to use button and shiitake mushrooms. Button mushrooms are mild and soft. Shiitake mushrooms add a rich, earthy taste. Slice them evenly for a nice texture in the soup. You need about 2 cups total of these mushrooms, sliced. This mix creates a great depth of flavor. Spices make the soup pop. Use smoked paprika for a deep, smoky taste. It gives the soup warmth and richness. Dried thyme adds a hint of earthiness. You only need 1 teaspoon of each spice. Don’t forget to add salt and pepper to taste. These simple spices transform the dish into a comforting bowl of goodness. For creaminess, you can use milk or a dairy-free alternative. I recommend whole milk for a rich flavor. If you prefer dairy-free, almond or oat milk works well. You will need 1 cup in total. Flour helps thicken the soup for a hearty texture. Use 2 tablespoons of flour mixed with a bit of milk to create a slurry. This step makes sure your soup is smooth. For the complete recipe, check out [Full Recipe]. Start by washing your mushrooms well. I like to use both button and shiitake mushrooms for a mix of flavors. Slice them thinly. Next, finely chop the onion and mince the garlic. This step is key for a good base. The onion adds sweetness, while the garlic gives it depth. Heat olive oil in a large pot over medium heat. Once hot, add the chopped onion. Sauté for about five minutes until it turns translucent. Then, add the minced garlic. Stir for about a minute until you smell that lovely aroma. Now, toss in the sliced mushrooms. Cook them for about 7-10 minutes. Stir occasionally to brown them evenly. The mushrooms will release water, which helps build flavor. Sprinkle in smoked paprika and dried thyme. These spices give the soup its signature taste. Pour in the vegetable broth and soy sauce. Bring the mixture to a gentle simmer and let it cook for around 10 minutes. To thicken the soup, grab a small bowl. Mix the flour with a bit of milk to make a slurry. This helps avoid lumps. Slowly whisk this mixture back into the pot, followed by the rest of the milk. Stir continuously to blend everything well. Now, reduce the heat to low. Allow the soup to thicken for another 5-7 minutes. Season with salt and pepper to taste. After that, remove the pot from the heat and let it sit for a few minutes. Your hearty Hungarian mushroom soup is almost ready! Remember to check out the Full Recipe for all the details. Choose fresh mushrooms for the best taste. I like a mix of button and shiitake mushrooms. Button mushrooms add a mild flavor. Shiitake mushrooms bring a rich, earthy taste. Look for firm mushrooms with no dark spots. Fresh mushrooms should smell pleasant, not sour. You can change the soup's thickness easily. For a thicker soup, add more flour when cooking. Mix flour with a bit of milk first to avoid lumps. For a creamier texture, use more milk. If you want a lighter soup, use less milk or a dairy-free option. To boost flavor, I suggest adding fresh herbs like thyme or parsley. A splash of lemon juice can brighten the taste too. If you like spice, add a pinch of cayenne pepper. You can also use a splash of soy sauce for depth. Experiment with these tips to find your perfect flavor balance. For the full recipe, check out Mushroom Delight: Hungarian Comfort Soup. {{image_2}} If you want a vegan version of Hungarian mushroom soup, you can easily make some swaps. First, use vegetable broth instead of chicken broth. Replace the milk with a dairy-free option like almond or oat milk. These alternatives will keep the soup creamy and rich while being kind to your diet. You can also skip the flour or use cornstarch to thicken the soup. This way, you can enjoy all the flavors without any dairy. To change up the flavor, think about using different mushrooms. Try adding portobello or enoki mushrooms for a new twist. You can also mix in some fresh herbs like dill or tarragon to add depth. If you like heat, toss in a pinch of cayenne pepper or some red pepper flakes. For a more savory taste, consider adding a splash of balsamic vinegar. Each ingredient can give your soup a fresh touch. Seasonal ingredients can make this soup even better. In the fall, add some pumpkin or squash for sweetness. In the spring, throw in some fresh peas or asparagus for a pop of color and freshness. You can also mix in some cooked grains like barley or quinoa to make it heartier. These add-ins not only boost the nutrition but also make the dish more filling. By using seasonal ingredients, you can enjoy the soup all year round, each time with a new flavor. After making Hungarian mushroom soup, let it cool. Cooling helps keep it safe to eat later. Place the soup in a shallow bowl to cool quickly. Once it is at room temperature, cover it well. Use an airtight container or plastic wrap. Store the soup in the fridge. It will stay fresh for about three days. If you want to save the soup for longer, freezing is a great option. First, let the soup cool down completely. Then, pour it into freezer-safe containers. Leave some space at the top for expansion. You can also use freezer bags for easy storage. When you are ready to eat, simply thaw it overnight in the fridge. It will stay good for up to three months in the freezer. To reheat your soup, use a pot on the stove. Heat it over medium-low heat. Stir it often to keep it from sticking. You can also use the microwave. Pour the soup into a microwave-safe bowl. Heat it in short bursts, stirring in between. If the soup seems too thick, add a splash of water or broth. This will help bring back its creamy texture. Always taste it before serving to adjust the seasoning if needed. Enjoy this flavorful dish again! Check out the full recipe for more tips. I prefer using fresh button and shiitake mushrooms. Button mushrooms add a mild taste. Shiitake mushrooms bring a rich, earthy flavor. Together, they create a well-rounded base for the soup. You can also try cremini mushrooms for a deeper flavor. Mixing different types adds more depth to your dish. Yes, you can make this soup ahead of time. It tastes even better after resting. Make the soup, let it cool, and store it in the fridge. You can keep it for up to three days. Just reheat on the stove before serving. If you want, you can also freeze it for later use. Thaw it overnight in the fridge before reheating. This soup pairs well with crusty bread or a simple salad. A fresh garden salad can balance the richness of the soup. You can also serve it with a sprinkle of fresh parsley for color. For a heartier meal, add a side of roasted vegetables. This combination makes for a comforting and satisfying experience. You can find the full recipe and more tips to enhance your meal. In this blog post, we explored the key ingredients for Hungarian Mushroom Soup. I shared how to select fresh mushrooms and essential herbs. You learned step-by-step instructions on preparing and cooking, plus tips for thickening the soup. Finally, I highlighted variation ideas, storage tips, and answered common questions. Making this soup is fun and rewarding. Enjoy trying new flavors and techniques in your kitchen. Your next batch of soup will be a hit!](https://stirredrecipes.com/wp-content/uploads/2025/07/a05edf02-1e0d-4e96-b0ee-3bb73f441e91.webp)
Looking for a warm and tasty dish? Hungarian Mushroom Soup is the answer! This soup offers rich flavors and comforting textures, making it perfect for any meal. I will guide …

Are you ready to bake something amazing? Crumbl Banana Bread Cookies are the perfect blend of soft and sweet. With just a few simple ingredients, you can whip these up …
![To make this delicious cake, gather these key ingredients: - 1 cup pecan halves - 1/2 cup unsalted butter - 1 cup brown sugar - 1/4 cup maple syrup - 1 cup all-purpose flour - 1 teaspoon baking powder - 1/2 teaspoon baking soda - 1/4 teaspoon salt - 1/2 cup granulated sugar - 1/2 cup buttermilk - 2 large eggs - 1 teaspoon vanilla extract These ingredients blend together to create a rich and tasty cake. The pecans add crunch, while the maple syrup lends a warm flavor. If you’re missing an ingredient, here are some easy swaps: - Unsalted Butter: Use coconut oil or margarine. - Brown Sugar: You can use white sugar mixed with molasses. - Buttermilk: Mix milk with lemon juice or vinegar for an easy substitute. - Granulated Sugar: You can replace it with coconut sugar for a more natural option. These substitutes keep the cake tasty while making it easier for you to bake. For this recipe, you will need: - 9-inch round cake pan - Small saucepan - Mixing bowls - Whisk - Measuring cups and spoons - Toothpick for testing doneness Having the right tools makes baking smooth and fun. A sturdy cake pan ensures even baking, and good mixing bowls help combine ingredients well. Follow the [Full Recipe] for step-by-step instructions, and enjoy your baking! To start, you need to prepare the base and topping for the cake. First, preheat your oven to 350°F (175°C). Grease a 9-inch round cake pan and set it aside. In a small saucepan, melt 1/2 cup of unsalted butter over medium heat. Add 1 cup of brown sugar and 1/4 cup of maple syrup. Stir this mixture until it combines and bubbles, which takes about 2-3 minutes. Once done, pour it into the bottom of your prepared pan. Now, evenly arrange 1 cup of pecan halves on top of this caramel mixture. Next, it’s time to mix and bake the cake. In a mixing bowl, whisk together 1 cup of all-purpose flour, 1 teaspoon of baking powder, 1/2 teaspoon of baking soda, and 1/4 teaspoon of salt. Set this bowl aside. In another bowl, beat 1/2 cup of granulated sugar with the remaining 1/2 cup of butter until creamy, about 3 minutes. Add 2 large eggs, mixing well after each. Stir in 1 teaspoon of vanilla extract. Now, gradually mix in the dry ingredients, alternating with 1/2 cup of buttermilk. Start and end with the flour. Mix until smooth. Carefully pour this cake batter over the pecans in the pan, smoothing the top. Bake for 30-35 minutes. Check for doneness by inserting a toothpick into the center. If it comes out clean, your cake is ready! After baking, let the cake cool in the pan for about 10 minutes. Then, carefully invert it onto a serving plate. You’ll see the beautiful caramelized pecans on top. Allow the cake to cool for another 10-15 minutes before slicing. For extra delight, serve it warm with whipped cream or a scoop of vanilla ice cream. Enjoy this delicious treat! For the full recipe, click here. One common mistake is overcooking the cake. Keep an eye on the time. Check it at 30 minutes. Insert a toothpick to see if it comes out clean. If it does, the cake is done. Another mistake is not letting the cake cool before inverting it. This can lead to a messy presentation. Also, be careful when pouring the batter. If you pour too fast, it may disturb the pecans. To get that perfect caramel layer, heat the butter, brown sugar, and maple syrup slowly. Stir it until it bubbles. This can take about 2-3 minutes. Don’t rush this step. If you cook it too long, it can burn. Pour the caramel into the pan while it's hot. This helps the pecans stick well and creates a nice glaze. For a moist cake, use room temperature ingredients. This includes butter, eggs, and buttermilk. Mix the batter gently. Overmixing can lead to a tough cake. It’s better to mix until just combined. Lastly, let the cake cool in the pan for a few minutes. This keeps it moist and helps it hold together better. For a detailed guide, check the Full Recipe. {{image_2}} You can swap pecans for other nuts. Walnuts work well and add a nice crunch. Almonds bring a light taste and a different texture. Hazelnuts also make a great choice. Just chop them roughly and add them to the cake. The caramel topping will be just as tasty with these nuts. Add a splash of orange juice or zest for a bright twist. You can also mix in spices like cinnamon or nutmeg for warmth. Dark chocolate chips can bring richness and depth. For a tropical touch, try adding shredded coconut. Each of these add-ins makes the cake unique and exciting. To make this cake gluten-free, use a gluten-free flour blend. This keeps the texture light and airy. For a vegan version, replace eggs with flaxseed meal or applesauce. Use plant-based butter and almond milk instead of buttermilk. These swaps keep the cake delicious while meeting dietary needs. For the full recipe, check the earlier section. Enjoy exploring these fun variations! To keep your cake fresh, wrap it tightly in plastic wrap. You can also place it in an airtight container. Store it at room temperature for up to three days. If you want it to last longer, refrigeration is a good option. Just remember, refrigeration can change the cake's texture a bit. For long-term storage, freezing is best. Slice the cake into pieces for easy serving later. Wrap each slice in plastic wrap, then place them in a freezer bag. Label the bag with the date. The cake can last up to three months in the freezer. When you're ready to enjoy it, simply thaw it in the fridge overnight. To reheat your cake, preheat the oven to 350°F (175°C). Place the cake on a baking sheet and cover it with foil to keep it moist. Heat it for about 10-15 minutes. You can also microwave a slice for 15-20 seconds. Just be careful not to overheat it, as it can dry out. Enjoy your warm, gooey cake! For the full recipe, check out the details above. You can bake the cake a day or two in advance. Once it cools, cover it tightly. Store it at room temperature. This keeps the cake moist and fresh. When you are ready, you can warm it slightly in the oven. This step brings back its delicious flavor. Yes, you can! While pecans are great, walnuts or almonds work well too. Just keep the same amount. Each nut gives a unique flavor and texture. Try mixing nuts for added taste, too! If your cake turns out dry, try these tips. Serve it warm with a drizzle of syrup or cream. You can also add a scoop of ice cream. The moisture will help balance the dryness. Next time, check your baking time. Overbaking can lead to dryness. To check if your cake is done, use a toothpick. Insert it into the center of the cake. If it comes out clean, your cake is ready. If there’s batter on the toothpick, bake it a bit longer. The cake should also spring back when touched lightly. This cake pairs well with many treats. A dollop of whipped cream adds lightness. Vanilla ice cream is a classic choice, too. You can also serve it with fresh fruit or a hot coffee. Each option enhances the cake's rich flavors. For the full recipe, refer to the earlier section. You learned how to make a delicious Caramelised Pecan Upside Down Cake. We covered all the ingredients, tools, and step-by-step instructions to ensure your success. I shared tips to avoid common mistakes and achieve great flavors. Plus, I offered storage advice and answers to your most pressing questions. Remember, cooking is about pleasure and creativity. Enjoy making this cake, and don’t hesitate to try new flavors and extras. Your kitchen is a space for fun and taste. Happy baking!](https://stirredrecipes.com/wp-content/uploads/2025/07/fbf028e5-0d44-4739-96bb-636f3d4b8e56.webp)
Craving a sweet treat that wows? Let me introduce you to the Caramelised Pecan Upside Down Cake. This cake shines with golden pecans soaked in rich caramel and a soft, …

Looking for a dessert that combines creamy cheesecake with a sweet, crunchy topping? You’re in the right place! My Irresistible Apple Crumble Cheesecake Recipe is a game-changer. It’s easy to …

Are you ready to elevate your dinner game with a mouthwatering dish? Air Fryer Korean Soy Garlic Chicken Thighs are your answer! With juicy, flavorful thighs marinated in a savory …
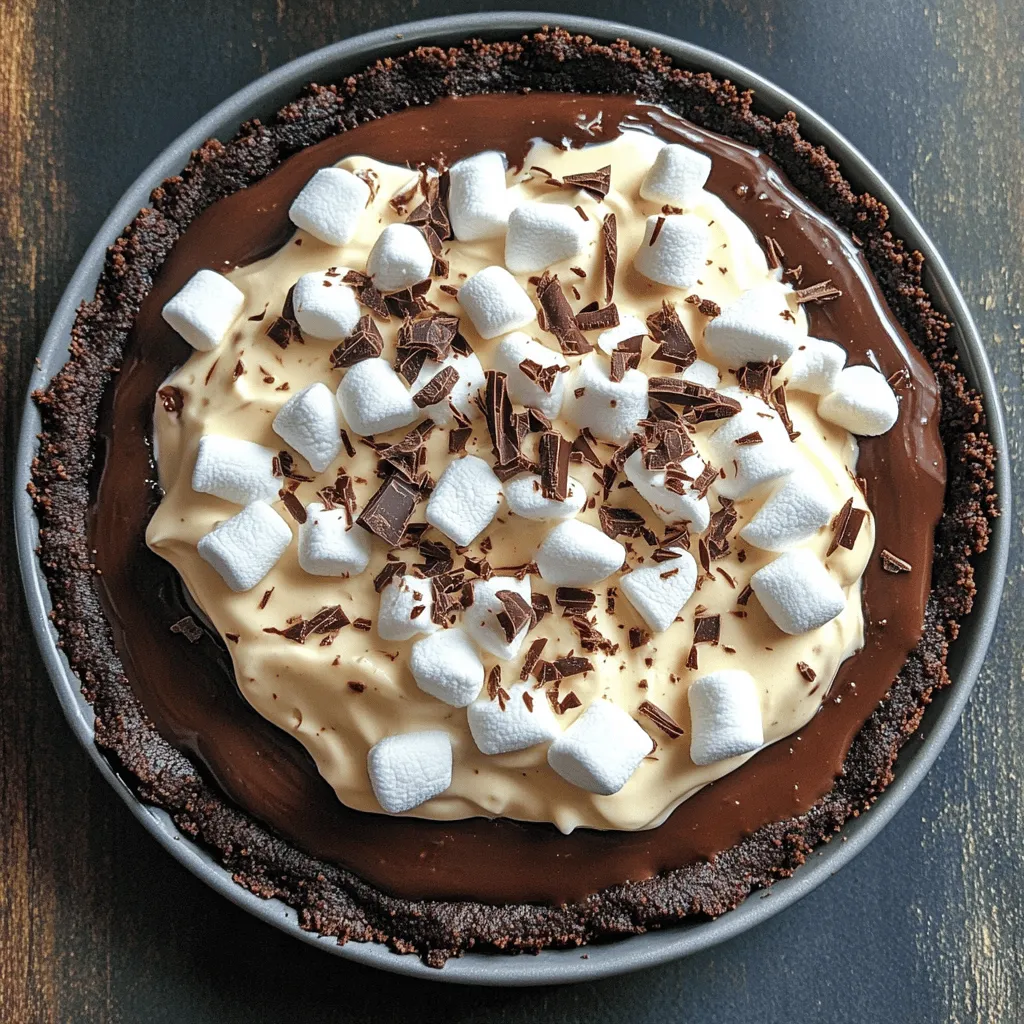
Are you ready to indulge in a creamy treat that packs a chocolate punch? Mississippi Mud Pie is the perfect dessert to impress your friends and family. With its rich …
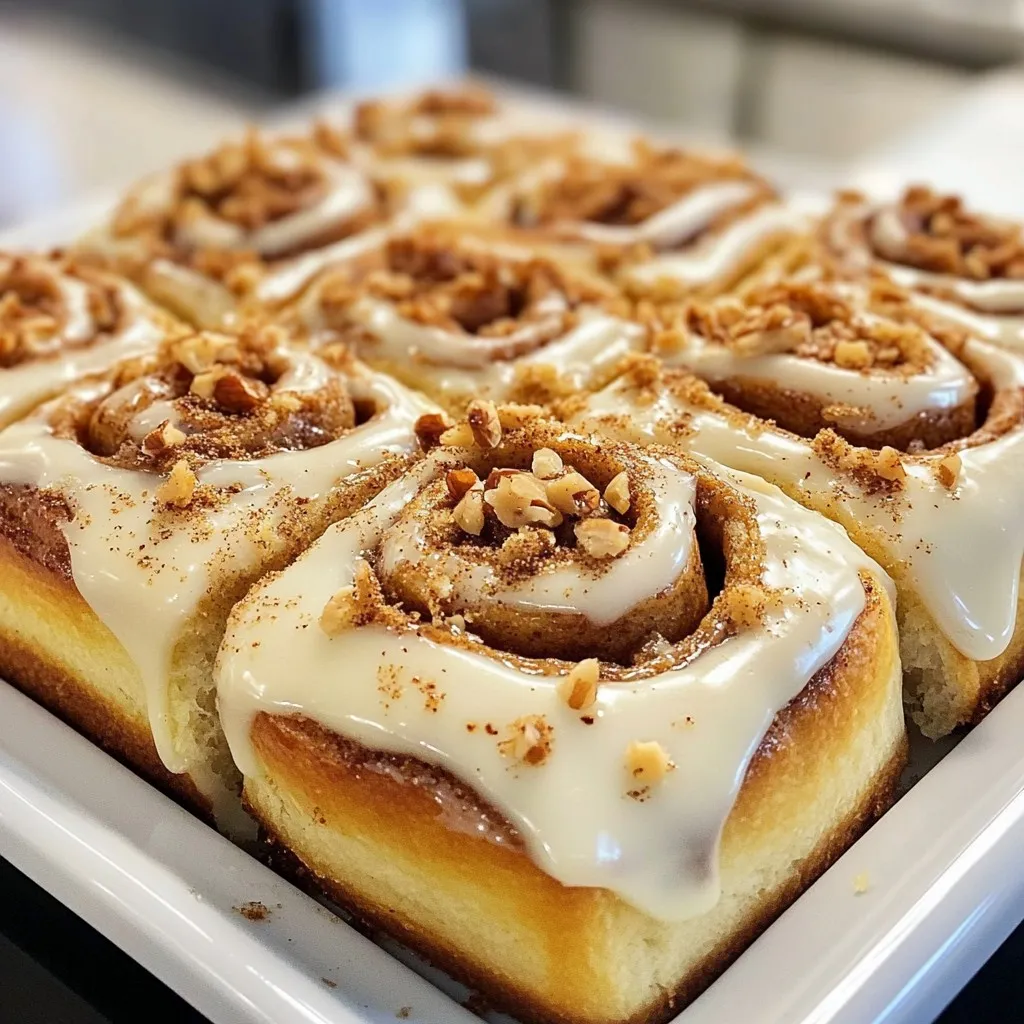
Are you ready to indulge in the warm, sweet aroma of homemade cinnamon rolls? In this guide, I’ll show you step-by-step how to create soft and luscious rolls that melt …