Authentic Mexican Chile Rellenos Easy Enjoyable Recipe
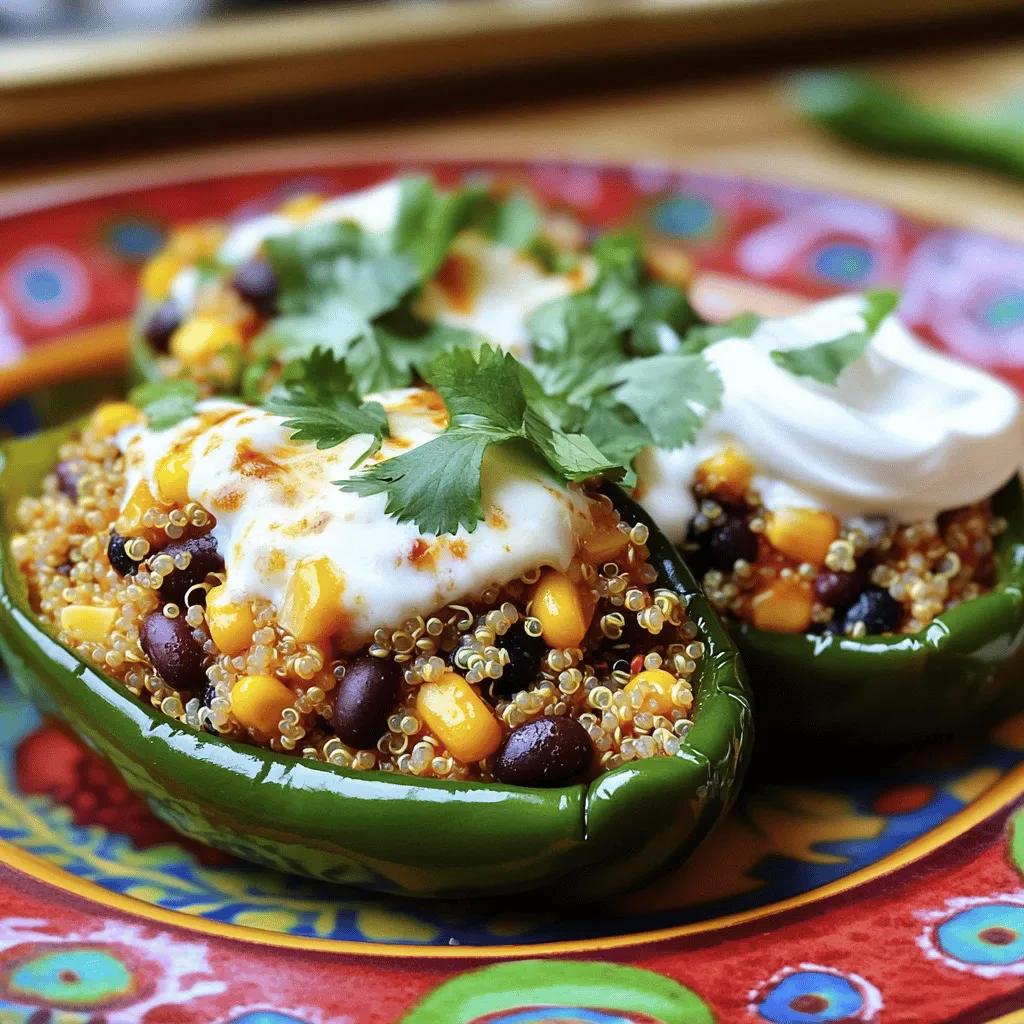
Are you ready to spice up your dinner table? This easy and enjoyable recipe for Authentic Mexican Chile Rellenos will take your taste buds on a flavorful journey. With roasted …
Are you ready to spice up your dinner table? This easy and enjoyable recipe for Authentic Mexican Chile Rellenos will take your taste buds on a flavorful journey. With roasted …
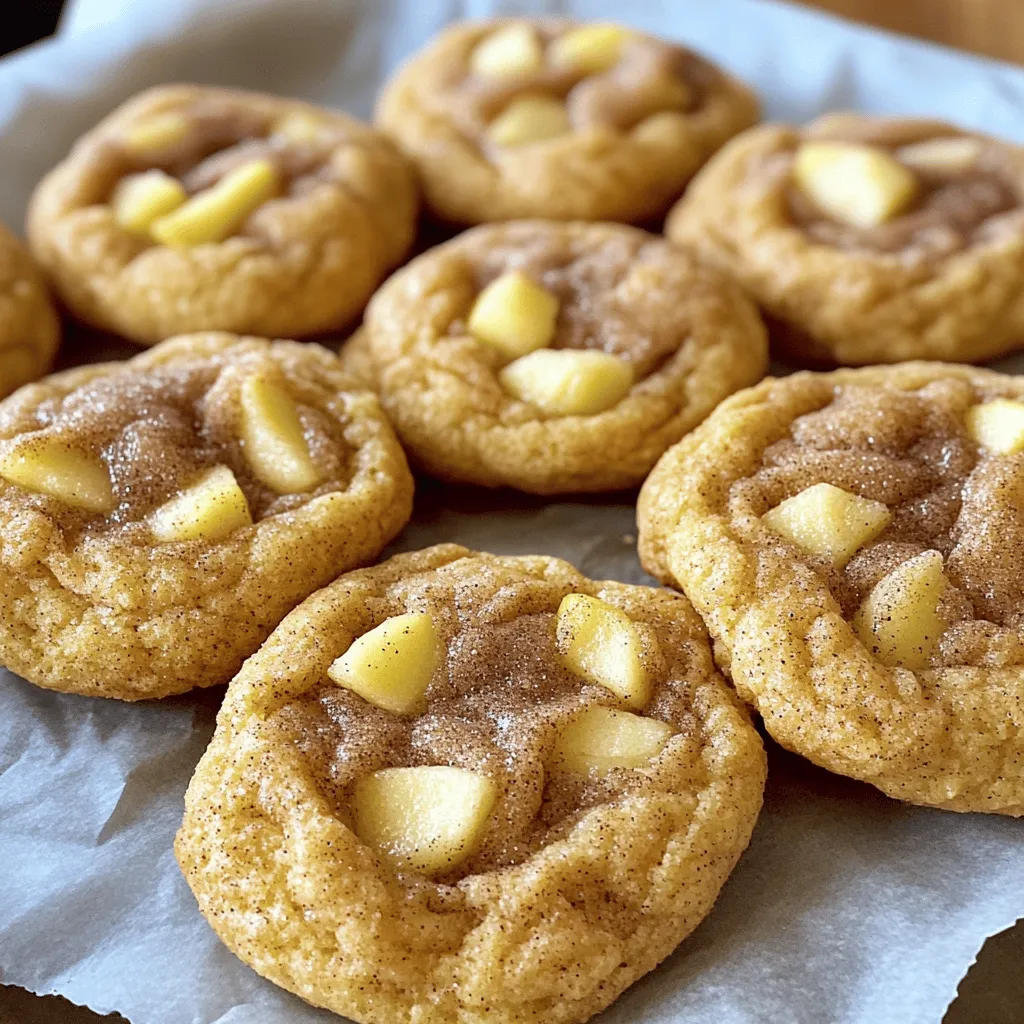
Apple Pie Snickerdoodles are a game-changer for your dessert lineup! Imagine soft, chewy cookies, bursting with flavors of warm spices and sweet apples. I’ll share my secrets to nailing this …
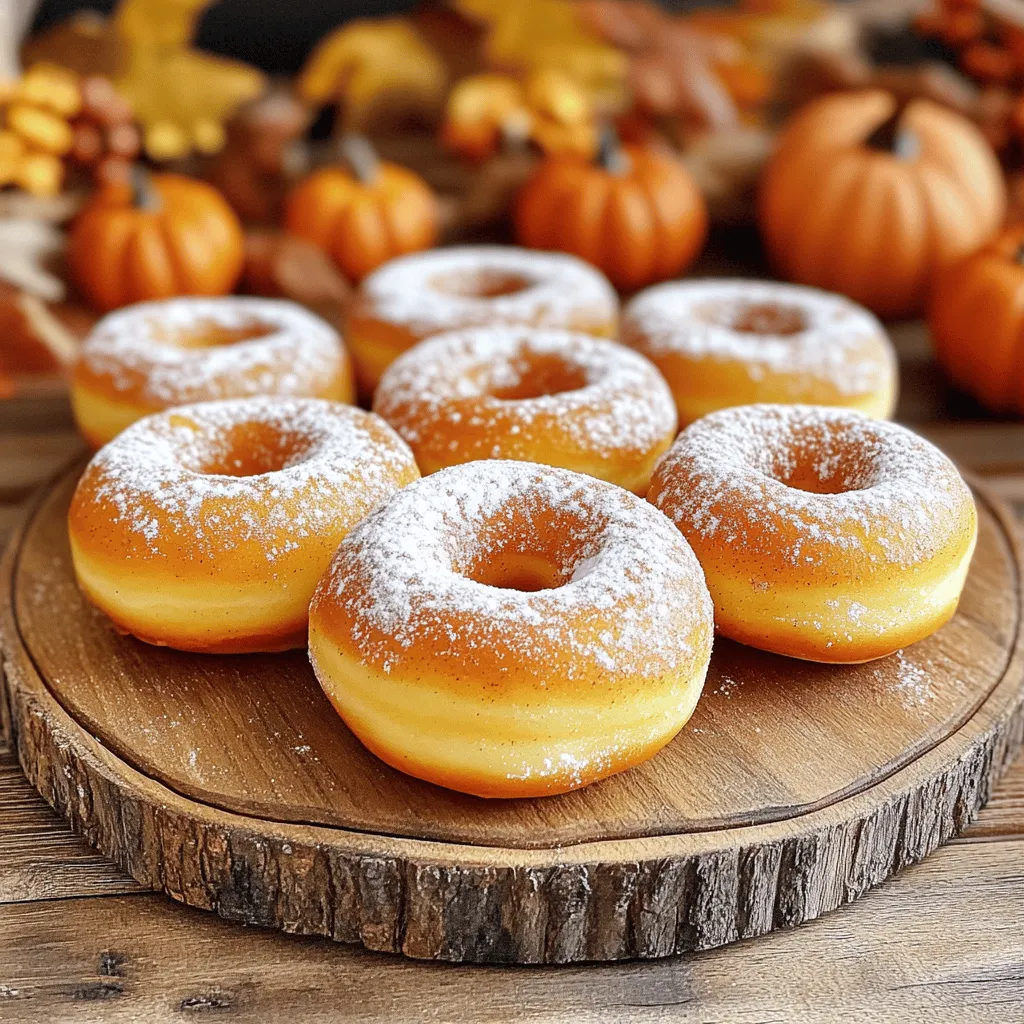
Are you ready to dive into fall with a sweet treat? This Pumpkin Spice Donuts recipe will fill your kitchen with the warm, cozy flavors of autumn. With simple ingredients …
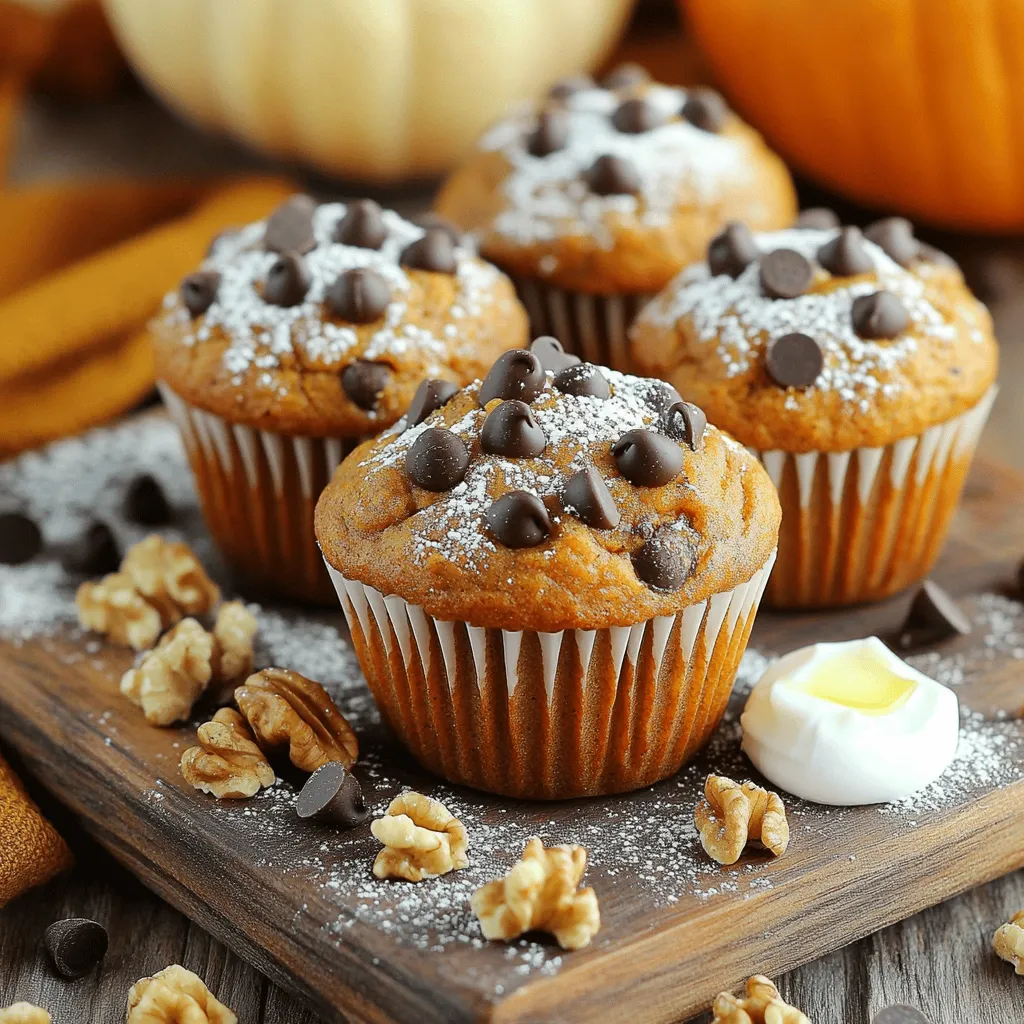
Are you ready to enjoy a tasty and nutritious treat? Pumpkin protein muffins are your answer! Packed with flavor and wholesome ingredients, these muffins are perfect for breakfast or a …
![- Strawberries: 1 cup, hulled and sliced - Blueberries: 1 cup - Raspberries: 1 cup - Granulated sugar: ¾ cup - Cornstarch: 2 tablespoons - Lemon juice: 1 tablespoon - Vanilla extract: 1 teaspoon - Pie crust options (pre-made or homemade) - Butter: 1 tablespoon, cut into small pieces - Milk for brushing: 1 tablespoon - Coarse sugar for sprinkling: 1 tablespoon For this Triple Berry Pie, I love using fresh berries. They bring bright color and great taste. Strawberries, blueberries, and raspberries make a perfect mix. You can use any type of pie crust, homemade or store-bought. Now, let’s talk about the sugar and cornstarch. The sugar adds sweetness, while the cornstarch helps thicken the filling. Lemon juice gives a nice zing, and vanilla makes everything taste better. You can add butter if you want a richer filling. Brushing the crust with milk gives it a nice shine. Sprinkling coarse sugar on top adds a little crunch. If you want to see the full recipe, check out the [Full Recipe]. - Preheat your oven to 425°F (220°C). This step is key to a perfect pie. - In a large bowl, combine 1 cup of sliced strawberries, 1 cup of blueberries, and 1 cup of raspberries. Mix gently to avoid breaking the berries. - Roll out your pie crust and fit it into a 9-inch pie pan. Trim any extra crust hanging over the edges. - Pour the berry mixture into the pie crust. Spread it evenly to avoid gaps. - For the top, you can create a lattice crust or cover it with a whole crust. If using a whole crust, cut slits for steam. - Brush the top with 1 tablespoon of milk and sprinkle with 1 tablespoon of coarse sugar. This gives a lovely shine. - Bake the pie for about 45-50 minutes. Look for a golden crust and bubbly filling. - After baking, let the pie cool for at least 2 hours. This helps the filling set. For the complete recipe, check the Full Recipe. Enjoy! To make a great pie, let the berries sit with sugar. This will draw out their juices. It makes the filling juicy and sweet. After you mix the berries with sugar, let them rest for about 15 minutes. This step is simple but key to a tasty pie. Next, ensure your crust is properly rolled out. A thin, even crust bakes better. If it is too thick, it may not cook well. Aim for about 1/8 inch thickness. Use flour to prevent sticking while you roll. While baking, check for bubbling filling. Bubbles mean the pie is cooking well. If you don’t see bubbles, it may need more time. The filling should thicken and bubble at the edges. To prevent overflow, place a baking sheet under the pie. This catches any spills. It saves your oven from a sticky mess. Just place the sheet on the rack below the pie. Serve your pie warm or at room temperature. A dollop of whipped cream or a scoop of vanilla ice cream makes it even better. This adds a creamy texture and rich flavor. For a beautiful finish, use fresh berries as garnishments. Place them on top of the pie or around it. This adds color and makes the dish look inviting. For the best taste and look, check the Full Recipe for all details! {{image_2}} You can mix different berries to change the flavor. Blackberries add a rich, tart taste. Cherries offer a sweet and juicy twist. If you prefer, you can adjust the sugar, depending on the berry's tartness. For sweeter berries, cut back on the sugar. This way, your pie will always taste just right. Your crust choice can change the pie's texture. Try a graham cracker crust for a crunchy base. If you want something nutty, use almond flour for a gluten-free option. There are many brands that offer gluten-free pie crusts in stores. These can save time and still taste great. You can elevate the pie with simple flavors. Adding a pinch of cinnamon or nutmeg gives it warmth. A little orange zest brightens the filling. This zest enhances the berries’ natural sweetness. Experiment with these additions to make the pie your own. Enjoy the creativity! For the full recipe, check the complete guide. To keep your triple berry pie fresh, store it in the fridge. Place it in an airtight container or cover it with plastic wrap. This helps to keep the filling juicy and the crust crisp. You want to avoid drying out the pie. If you want to save some pie for later, freezing is a great choice. Allow the pie to cool completely. Then, wrap it tightly in plastic wrap, followed by aluminum foil. This prevents freezer burn. When you’re ready to enjoy it, take the pie out and let it thaw in the fridge overnight. To reheat, bake it in a 350°F (175°C) oven for 15-20 minutes. This brings back the fresh taste. In the fridge, your pie lasts about 3-4 days. To check if it’s still good, look for signs like a dry crust or off smells. If the berries look mushy or have changed color, it’s best not to eat it. Always trust your senses! Yes, you can use frozen berries. Frozen berries work well in this pie. They keep their shape and flavor. However, they may add extra juice. This can make the filling a bit runny. If you use frozen berries, add a bit more cornstarch. This helps thicken the filling. To make a flakier crust, use cold butter. Cold butter helps create layers. You should also avoid overworking the dough. Mix just until combined. Use a light hand when rolling it out. If the dough feels warm, chill it before baking. This helps the crust puff up nicely. A runny filling can come from several issues. Too much juice from the berries is one reason. Make sure to drain excess liquid if needed. Another reason could be not enough cornstarch. Always measure your cornstarch carefully. Cook the pie long enough to allow the filling to thicken. Look for a golden-brown crust. The filling should be bubbling around the edges. You can also check the center. If it looks thick and bubbly, it's done. A toothpick inserted in the crust should come out clean. Remember to cool the pie for a bit before slicing. This helps the filling set properly. For the Full Recipe, check the earlier sections. In this article, we explored how to make a delicious triple berry pie. We covered essential ingredients, step-by-step instructions, tips for perfecting your pie, and variations for even more flavor. Remember, allowing your berries to sit with sugar before baking can enhance their taste. Use your favorite crust and serve with ice cream for a treat. Storing leftovers correctly helps maintain freshness. Now, you’re ready to bake a pie that impresses. Enjoy sharing this sweet delight!](https://stirredrecipes.com/wp-content/uploads/2025/07/203b8655-9ab0-4f2e-9f72-f958416ce585.webp)
Looking for the perfect dessert to wow your guests this holiday season? Look no further than my Triple Berry Pie! This delightful treat combines juicy strawberries, blueberries, and raspberries for …
![The base of our Easy Fresh Tomato Vinaigrette is simple and flavorful. You need: - 3 medium ripe tomatoes, diced - 1/4 cup extra-virgin olive oil - 2 tablespoons apple cider vinegar These fresh tomatoes bring a burst of sweetness. The olive oil adds richness, while apple cider vinegar gives a tangy kick. To enhance this dressing, add a few more ingredients: - 1 tablespoon Dijon mustard - 1 garlic clove, minced - 1 teaspoon honey (optional for sweetness) Dijon mustard adds depth and creaminess. Garlic gives it a nice zing, and honey balances the acidity if you prefer a sweeter taste. Seasoning elevates the flavor. You will need: - Salt and freshly ground black pepper to taste - Fresh basil leaves, chopped (for garnish) Salt and pepper bring out the natural flavors. Fresh basil adds a fragrant touch, making your vinaigrette look and taste fresh. For the Full Recipe, check the detailed steps to create this vibrant sauce. - Add diced tomatoes to a medium bowl. - Sprinkle with salt to release juices. Start by chopping your tomatoes. I like to use ripe ones for the best taste. Place the diced tomatoes into a bowl. Then, sprinkle salt over them. This step is key. The salt helps the tomatoes release their juices. Let them sit for about five minutes. This waiting time enhances the flavor of the tomatoes. - Whisk olive oil, vinegar, mustard, garlic, and honey. - Combine until well mixed. Next, grab a small bowl. In it, whisk together olive oil and apple cider vinegar. Add Dijon mustard, minced garlic, and honey. If you want a bit of sweetness, use the honey. Whisk until the mixture is smooth and creamy. This vinaigrette brings a nice balance of tangy and sweet flavors. - Pour vinaigrette over tomatoes. - Gently toss and adjust seasoning. - Allow the vinaigrette to sit for flavor melding. Now, pour the vinaigrette over your tomatoes. Gently toss them together. This mixes the flavors nicely. Taste and adjust the seasoning with more salt or pepper if needed. Let the vinaigrette sit for about ten minutes. This waiting allows the flavors to meld. For a touch of fresh flavor, fold in chopped basil just before serving. You can find the full recipe above for more details on preparation. To make your Easy Fresh Tomato Vinaigrette shine, let it rest for at least 10 minutes. This time allows the flavors to blend beautifully. You will notice a big difference in taste. High-quality extra-virgin olive oil makes a huge impact too. It adds depth and richness that lower-quality oils can’t match. Always choose the best you can find. Your vinaigrette deserves it! Serve your vinaigrette in a clear glass jar or bowl. This way, you can show off the vibrant colors of the tomatoes and basil. A little garnish can go a long way. Add a basil sprig on top for a pop of green. It makes the dish look fresh and inviting. This small touch can impress your guests! Fresh tomatoes are packed with vitamins. They provide vitamin C, potassium, and antioxidants. These nutrients are great for your health! Olive oil is also a star player. It has healthy fats that can support heart health. Plus, this vinaigrette is low in calories. You can enjoy it without guilt. It’s a delicious way to add flavor and nutrition to your meals! {{image_2}} You can easily change this sauce. Swap tomatoes for other fresh veggies, like cucumbers or bell peppers. Each option gives a new taste and texture. You can also add herbs like oregano or parsley. Fresh herbs add a bright flavor that lifts the sauce. Adjust the sweetness to fit your taste. You can increase or decrease honey based on what you like. If you prefer a tangy twist, try different vinegars. Balsamic or red wine vinegar can add depth and a unique flavor profile. Consider adding capers or shallots for an extra twist. Capers bring a salty kick, while shallots add a mild onion flavor. If you want some heat, sprinkle in red pepper flakes. This gives the vinaigrette a spicy bite that pairs well with summer dishes. For more ideas, check out the Full Recipe. To keep your Easy Fresh Tomato Vinaigrette fresh, store it properly. - Place it in an airtight container in the fridge. - Use it within a week for the best taste and freshness. - Freezing this vinaigrette is not a good idea. - The texture changes when frozen, making it less enjoyable. - It’s best enjoyed fresh to savor all the flavors. - When using leftovers, shake or whisk the vinaigrette well. - If the flavor seems dull, add a splash of vinegar. - This little trick gives it a nice flavor boost. Enjoy your Easy Fresh Tomato Vinaigrette as a delightful summer sauce! For the complete recipe, check out the [Full Recipe]. Easy Fresh Tomato Vinaigrette lasts about one week in the fridge. Store it in an airtight container. The flavors will stay fresh for a good while, but it’s best to use it in that time frame. After a week, the taste might change, and the texture could become watery. Yes, you can make this vinaigrette in advance. Just prepare it a few hours before you plan to serve. Making it ahead of time allows the flavors to blend better. If you want to prep it even earlier, you can store it for up to three days. Just remember to give it a good stir before serving. Yes, this vinaigrette is very versatile. It is gluten-free and vegan. You can enjoy it on salads, grilled veggies, or even as a dip. If you're watching carbs, this vinaigrette fits that diet too. The ingredients are simple and healthy, making it a great choice for many eating styles. This blog post highlighted how to make a fresh tomato vinaigrette with simple steps. We started with fresh ingredients, then moved to making the vinaigrette, and ended with tips and variations. Remember, allow your vinaigrette to rest for flavor and present it well. Enjoy the health benefits and delicious taste of your creation. With these ideas, you can customize the vinaigrette to fit your taste. Keep it fresh and tasty for the best results. Happy cooking!](https://stirredrecipes.com/wp-content/uploads/2025/07/c9f11df3-091a-4635-ac2d-aec285d3b99f.webp)
Summer is the perfect time for fresh flavors, and nothing beats an Easy Fresh Tomato Vinaigrette! This vibrant sauce is quick to make and bursting with taste. With just a …
![- 1 cup pumpkin puree - 1/2 cup sweetened condensed milk - 1/3 cup brown sugar - 1/2 teaspoon ground cinnamon - 1/4 teaspoon ground nutmeg - 1/4 teaspoon ground ginger - 1/8 teaspoon salt - 1 large egg - 1 package pre-made mini phyllo pastry shells - Optional toppings: whipped cream, crushed pecans To create these mini pumpkin pies, you need simple ingredients. First, pumpkin puree gives the pies their rich flavor. Sweetened condensed milk adds creaminess and sweetness. Brown sugar brings a deeper sweetness, while cinnamon, nutmeg, and ginger add warmth. The salt enhances all the flavors. An egg helps bind everything together. I love using pre-made mini phyllo pastry shells. They save time and add a nice crunch. You can top your pies with whipped cream or crushed pecans for a special touch. For the full recipe, check out the complete guide. - Preheat oven to 350°F (175°C). - In a mixing bowl, combine: - 1 cup pumpkin puree - 1/2 cup sweetened condensed milk - 1/3 cup brown sugar - 1/2 teaspoon ground cinnamon - 1/4 teaspoon ground nutmeg - 1/4 teaspoon ground ginger - 1/8 teaspoon salt - 1 large egg Whisk these ingredients until smooth. This mix creates the filling for your pies. Next, place the mini phyllo pastry shells on a baking sheet. Pour the pumpkin mixture into each shell, filling them about 3/4 full. Be careful not to overfill; this keeps the pies from spilling over. Bake your mini pumpkin pies for 25-30 minutes. The filling should set and the edges of the pastry should be golden. Check for doneness by gently shaking the baking sheet; the filling should be firm but still jiggle slightly. Let the pies cool for a few minutes before moving them to a wire rack. This cooling time helps the flavors meld. You can serve the mini pumpkin pies warm or at room temperature. They taste great either way! For a fun twist, top each pie with a dollop of whipped cream. If you like extra crunch, sprinkle crushed pecans on top. This adds flavor and texture, making each bite even better. You can find the full recipe for more details. To get the best filling, start with smooth pumpkin puree. You can use canned or make your own. If you make your own, roast the pumpkin first. This helps develop its flavor. For the filling, mix all ingredients well. Whisk until there are no lumps. A smooth mix helps your pies set nicely. Avoid overfilling the shells. Fill them about three-quarters full. This allows room for the filling to puff up while baking. Set your oven to 350°F (175°C). This temperature helps the filling cook evenly. Use the middle rack for the best results. To check if the pies are done, gently shake the pan. If the filling jiggles slightly, they are ready. You can also insert a toothpick. If it comes out clean, your pies are cooked. For garnishing, add a dollop of whipped cream. It makes the pies look fancy and adds creaminess. You can also sprinkle crushed pecans on top. This adds a nice crunch. Pair your mini pumpkin pies with warm cider or coffee. The flavors blend well and create a cozy treat. For the full recipe, check here: [Full Recipe]. {{image_2}} You can make vegan Mini Pumpkin Pies using plant-based substitutes. Replace the sweetened condensed milk with coconut milk. Use flaxseed meal mixed with water instead of the egg. This way, you can enjoy the same great taste without animal products. For gluten-free options, choose a gluten-free pie crust mix. Many brands offer good alternatives. You can also use almond flour to make a tasty crust. Just mix the flour with melted coconut oil and a bit of water. Press it into your muffin tins for a unique take. To switch up the flavor, try adding chocolate chips or caramel to the filling. Just sprinkle some chocolate chips before pouring in the pumpkin mixture. This adds a sweet twist that kids love. Drizzling caramel sauce on top makes it even better. You can also experiment with spices. Instead of just cinnamon, try adding cardamom or cloves. Each spice brings its own warmth and depth. Mixing different spices can create a whole new taste experience. If you want a different look, turn these pies into mini pumpkin pie bars. Just pour the filling into a greased baking dish instead of individual shells. Bake it like you would normally. Once cooled, cut into bars for easy serving. Another fun idea is to make a pumpkin pie tart. Use a larger crust and pour in the filling. Bake it until set, then slice it like a pie. This gives you a lovely presentation for gatherings. For the full recipe, check out the details above. To keep your mini pumpkin pies fresh, store them in the fridge. Place them in an airtight container. This helps keep them moist and tasty. If you plan to enjoy them later, freezing is a great option. Wrap each pie tightly in plastic wrap and then place them in a freezer bag. This way, they stay safe from freezer burn. Baked mini pumpkin pies can last about 3 to 4 days in the fridge. If you freeze them, they can last up to 2 months. Always check for spoilage before eating. Signs include a strange smell or mold. If you see any, it’s best to toss the pies. When you want to enjoy your mini pumpkin pies again, reheating is key. Use the oven for the best results. Preheat it to 350°F (175°C). Place the pies on a baking sheet for about 10-15 minutes. This method keeps the crust crispy and the filling warm. Avoid using the microwave, as it can make the crust soggy. Enjoy your mini pumpkin pies warm or at room temperature! For the full recipe, check the earlier sections. What can I substitute for sweetened condensed milk? You can use evaporated milk mixed with sugar. Combine 1/2 cup of evaporated milk with 1/4 cup of sugar. This mix gives a sweet touch similar to sweetened condensed milk. Can I make mini pumpkin pies in advance? Yes, you can! Make the filling and store it in the fridge. You can fill the shells right before baking. This helps keep the shells crisp. Is it necessary to use fresh pumpkin puree? No, it's not necessary. Canned pumpkin puree works well and saves time. It has a rich flavor, making your pies delicious. Can I use other types of pumpkins? Absolutely! You can use sugar pumpkins or pie pumpkins. These types have a sweeter taste and smoother texture. They make great mini pumpkin pies. How do I know when my mini pumpkin pies are done? Check the filling. It should be set and slightly firm. A toothpick inserted into the center should come out clean. The edges of the pastry should look golden. What are some alternatives to phyllo pastry shells? You can use graham cracker crusts for a different flavor. Mini tart shells are also a great option. Both will give your pies a tasty twist. You now have a complete guide to making mini pumpkin pies. We covered ingredients, steps, and tips for success. You learned about variations for different diets and how to store them properly. Remember, these bites of pumpkin goodness can be customized and enjoyed in many ways. Keep experimenting with flavors and serving styles. With this knowledge, you can impress friends and family at your next gathering. Happy baking!](https://stirredrecipes.com/wp-content/uploads/2025/07/8fc89573-d508-4fa8-8c71-7bd97f8c47c4.webp)
Are you ready to impress your family and friends with a sweet, bite-sized treat? Mini Pumpkin Pies are not only delightful but also easy to make! With just a few …

Welcome to the world of loaded potato soup—a comforting and creamy delight! If you’re looking for a warm bowl that feels like a hug, you’ve come to the right place. …
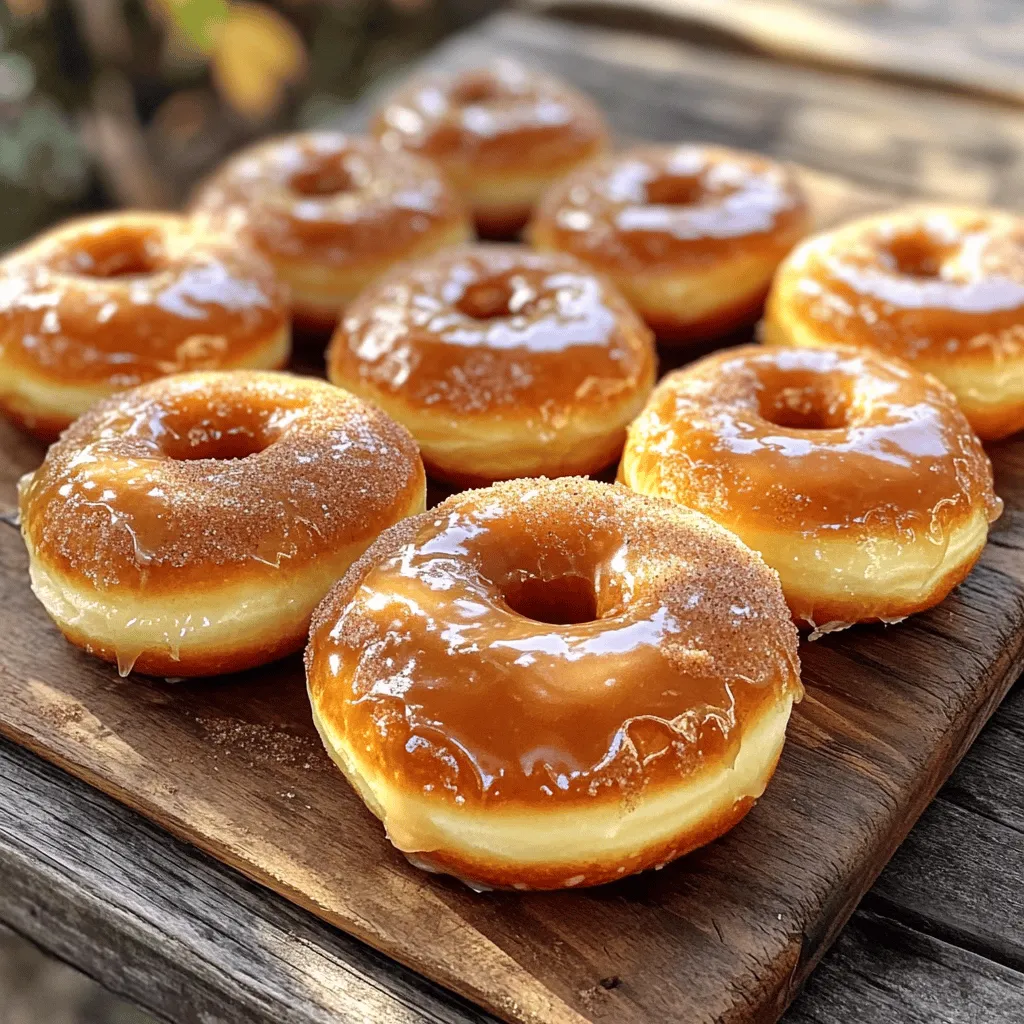
Get ready to elevate your Thanksgiving feast with my simple and delicious brioche donuts! These sweet treats are fluffy, flavorful, and perfect for sharing. In this post, I’ll guide you …

Looking for a cozy meal that packs a punch? My One Pot Hatch Green Chile Stew is just what you need! With juicy chicken thighs, roasted Hatch chiles, and hearty …