Pumpkin Baked Oatmeal Nourishing and Simple Recipe
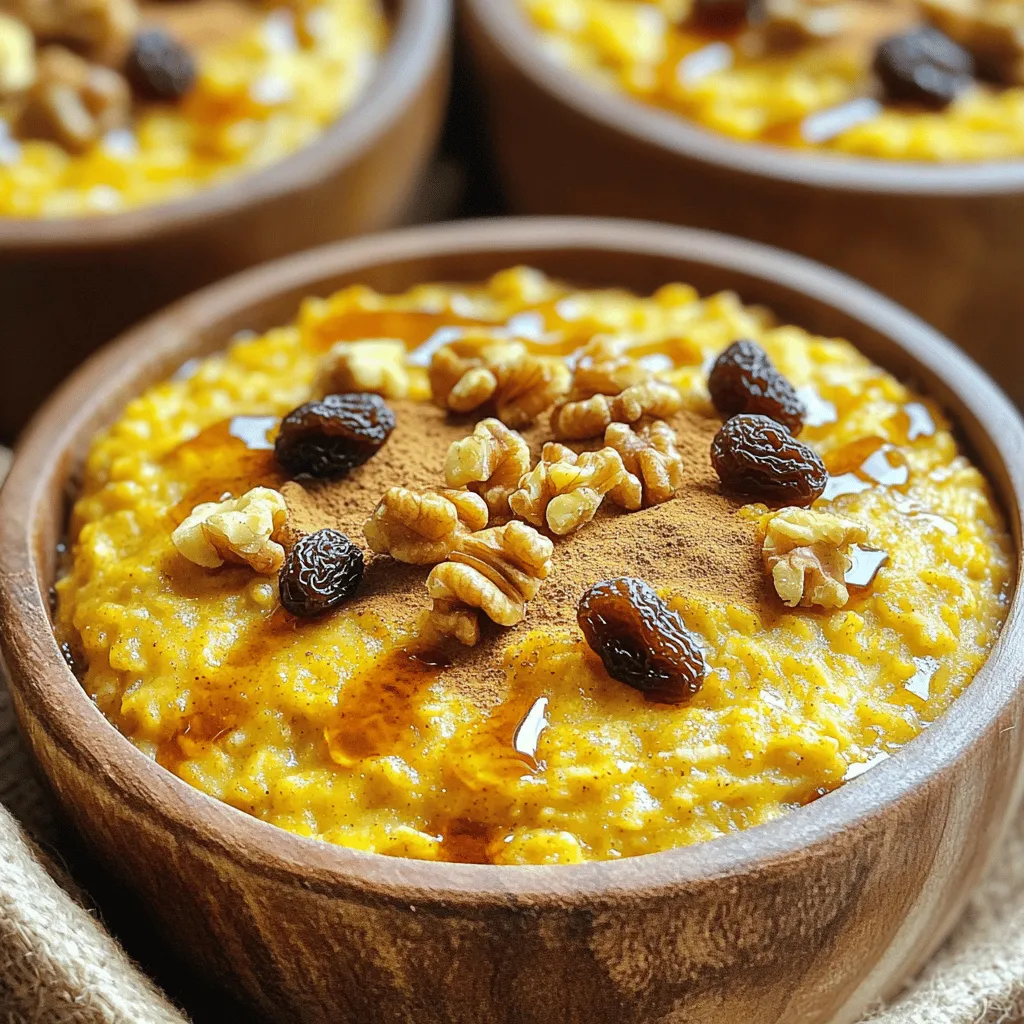
Are you ready for a warm, hearty breakfast that’s both easy and nourishing? My Pumpkin Baked Oatmeal is perfect for chilly mornings or any time you crave comfort. With simple …
Are you ready for a warm, hearty breakfast that’s both easy and nourishing? My Pumpkin Baked Oatmeal is perfect for chilly mornings or any time you crave comfort. With simple …
![- 2 cups all-purpose flour - 1 cup apple cider - ½ cup vegetable oil The basic ingredients are the backbone of your Apple Cider Donut Bread. Start with 2 cups of all-purpose flour. This will give your bread structure. Next, add 1 cup of apple cider. Fresh cider brings out the best flavor. Use ½ cup of vegetable oil to keep the bread moist. This helps balance the sweetness and adds a nice texture. - 1 teaspoon ground cinnamon - ½ teaspoon ground nutmeg - 1 teaspoon vanilla extract Now, let’s make it special! Add 1 teaspoon of ground cinnamon. This gives warmth and spice. Use ½ teaspoon of ground nutmeg for a little kick. It really enhances the apple flavor. Finally, add 1 teaspoon of vanilla extract. This will add a lovely aroma and depth. - ½ cup brown sugar (for topping) - 1 teaspoon ground cinnamon (for topping) To finish, mix ½ cup of brown sugar with 1 teaspoon of ground cinnamon for the topping. This creates a sweet, crunchy layer. Sprinkle it on before baking. It adds a beautiful finish and extra sweetness to each bite. For the full recipe, remember to check the complete steps. Enjoy making this cozy treat! - Preheat the oven to 350°F (175°C). - Grease a 9x5 inch loaf pan. - In a medium bowl, whisk together: - 2 cups all-purpose flour - 1 teaspoon baking powder - 1 teaspoon baking soda - 1 teaspoon ground cinnamon - ½ teaspoon ground nutmeg - ½ teaspoon salt - Set this mixture aside for later use. - In a large bowl, mix together: - 1 cup apple cider - ½ cup vegetable oil - ¾ cup granulated sugar - 2 large eggs - 1 teaspoon vanilla extract - Blend these until smooth. - Gradually add the dry ingredients to the wet mix. - Stir gently until just combined. Do not overmix. - Fold in 1 cup of chopped apples gently. - Pour the batter into the prepared pan and smooth the top. - For the topping, mix: - ½ cup brown sugar - 1 teaspoon ground cinnamon - Sprinkle this topping over the batter. - Bake for 55-65 minutes. - Check with a toothpick; it should come out clean. Now you have a delicious Apple Cider Donut Bread ready to enjoy! For the full recipe, refer to the earlier sections. - Use fresh apple cider for best flavor. This makes a big difference. - Don’t overmix the batter to keep a tender crumb. A gentle hand works wonders. - Serve warm with honey or maple syrup. It adds a nice touch. - Dust with extra cinnamon sugar for more flavor. It makes the bread shine. - Using too much flour can make the bread dense. Measure carefully for lightness. - Not allowing the bread to cool can affect texture. Patience pays off here. Follow these tips, and your Apple Cider Donut Bread will turn out great every time! For the full recipe, check out the [Full Recipe]. {{image_2}} You can make Apple Cider Donut Bread even better. Consider adding nuts or raisins for extra texture. Walnuts or pecans give a nice crunch. Raisins add a sweet burst. You can also substitute different types of apples. Try Honeycrisp or Fuji for a sweeter flavor. Each apple brings its own taste, so feel free to mix! A simple glaze can take this bread to the next level. Drizzle a mix of powdered sugar and apple cider on top. This adds sweetness and shine. If you want something richer, try a cream cheese glaze. Just blend cream cheese, powdered sugar, and a bit of apple cider. It gives a creamy contrast to the bread. Let’s get creative with toppings! You can experiment with a streusel topping for added crunch. Mix flour, sugar, and butter until crumbly, then sprinkle it on. Or, for a decadent twist, use a caramel drizzle. It pairs perfectly with the apple flavor. These options let you customize your bread to suit your taste! You can store your apple cider donut bread wrapped in plastic wrap. It will stay fresh at room temperature for up to 3 days. I recommend keeping it in an airtight container to help maintain its freshness. This way, you can enjoy it for breakfast or as a snack! If you want to keep your bread for longer, freeze it. Wrap slices individually in plastic wrap. They can last up to 3 months in the freezer. When you're ready to enjoy a slice, you can thaw it in the microwave or let it sit at room temperature. It’s an easy fix for a sweet craving! To warm up your bread, use the oven. Set it to a low temperature, around 250°F (120°C), and place the slices inside for a few minutes. This method keeps the bread moist and tasty. If you're in a rush, you can microwave a slice for just a few seconds. It's a quick way to enjoy that delicious, warm flavor again! For the full recipe to make this delightful treat, check out the [Full Recipe]. Slicing and serving with honey or maple syrup is popular. This adds a sweet touch. You can also sprinkle some extra cinnamon sugar on top for fun. Yes, you can substitute all-purpose flour with gluten-free flour blend. This keeps the bread tasty and allows everyone to enjoy it. A toothpick inserted in the center should come out clean or with a few crumbs. If it comes out wet, bake a bit longer. It lasts up to 3 days at room temperature. You can also freeze it for up to 3 months. Just wrap it well to keep it fresh. Yes, you can double the ingredients and use two pans for larger batches. This is great for parties or family gatherings. You can use apple juice or make your own quick apple cider substitute. Mixing water with a bit of apple juice works well too. This blog post guides you through making delicious Apple Cider Donut Bread. We covered the essential ingredients, step-by-step instructions, tips for baking, and storage options. Final thoughts: Enjoy this recipe as a warm treat. Customize it with your favorite add-ins. Whether you serve it fresh or freeze it for later, it’s a simple way to savor fall flavors all year. Happy baking!](https://stirredrecipes.com/wp-content/uploads/2025/07/77ff83b8-583c-4cf2-9a70-f861930caedb.webp)
Get ready to fall in love with the perfect fall treat: Apple Cider Donut Bread! It combines the cozy flavors of apple cider, cinnamon, and nutmeg in a simple loaf …

Fall is the perfect time for a fun kitchen project, and Apple Cider Whoopie Pies are just the treat you need! These delicious pies blend warm spices and sweet apple …

Are you ready to indulge in a sweet delight? Imagine sinking your teeth into a cloud-like vanilla donut: fluffy, fresh, and simply irresistible. In this post, I’ll guide you through …

Get ready for a Halloween treat that’s as spooky as it is delicious! In this “Spooky Black Velvet Halloween Cake Delight Recipe,” I’ll guide you through making a rich, dark …
![To make salted caramel apple pie cookies, you need the following ingredients: - 2 cups all-purpose flour - 1 teaspoon baking soda - 1/2 teaspoon salt - 1 teaspoon cinnamon - 1/4 teaspoon nutmeg - 1 cup unsalted butter, softened - 3/4 cup brown sugar, packed - 1/2 cup granulated sugar - 1 large egg - 1 teaspoon vanilla extract - 1 cup granny smith apples, peeled and diced - 1/2 cup salted caramel sauce (store-bought or homemade) - Sea salt flakes for garnish Gathering these ingredients is the first step to making a delightful treat. Each one plays a key role. The flour gives structure, while the butter adds richness. The sugars sweeten and help the cookies spread. Using granny smith apples gives a nice tartness that balances the sweet caramel. The spices, like cinnamon and nutmeg, bring warmth and depth to the flavor. Finally, the sea salt flakes on top elevate the sweet and savory notes of the cookies. For the full recipe, you can refer to the details above. Enjoy experimenting with these ingredients to create something special! - Preheat the oven to 350°F (175°C). - Line baking sheets with parchment paper. - In a bowl, whisk together the flour, baking soda, salt, cinnamon, and nutmeg. - In a large bowl, cream the softened butter, brown sugar, and granulated sugar until fluffy. - Mix in the egg and vanilla extract until well combined. - Gradually add the dry mixture to the butter mixture, mixing just until combined. - Gently fold in the diced apples and 1/4 cup of salted caramel sauce. - Using a cookie scoop, drop heaping tablespoons of dough onto the prepared sheets. - Drizzle a small amount of the remaining salted caramel sauce over each cookie. - Bake for 10-12 minutes until the edges are golden brown and the centers are soft. For the full recipe, check out the Salted Caramel Apple Pie Cookies section. To make soft and chewy cookies, keep a few tips in mind. First, do not overbake your cookies. Bake them until the edges turn golden brown, but the centers should still look soft. They will continue to cook on the baking sheet after you take them out. Next, measuring your ingredients accurately is key. Use the spoon-and-level method for flour. Spoon flour into your measuring cup and level it off with a knife. This method helps avoid dense cookies. There are many great ways to enjoy salted caramel apple pie cookies. Serve them warm with a scoop of vanilla ice cream for a tasty treat. You can also pair them with a cup of hot apple cider, enhancing the apple flavor. For a fun twist, try crumbling a cookie over yogurt or oatmeal. It adds a sweet crunch and a burst of flavor. When baking cookies, avoid common mistakes. One mistake is using cold butter. Always soften your butter first. Cold butter makes it hard to cream with sugars, leading to dense cookies. If you find your cookies are overbaked, there is a fix. You can create a cookie sundae. Place a scoop of ice cream on top of a cookie and drizzle with warm salted caramel sauce. It makes a delicious dessert. For the full recipe, check out the complete instructions that guide you through each step for perfect cookies. {{image_2}} You can easily change the flavors in your cookies. Adding nuts like walnuts or pecans gives a nice crunch. You can also mix in chocolate chips for a sweet twist. They blend well with the caramel and apple. For apples, try using Fuji or Honeycrisp. These apples add a different taste and sweetness to the cookies. Mixing apple types can create a unique flavor profile. If you need a gluten-free option, you can swap all-purpose flour with gluten-free flour. Look for blends that work well for baking. You may need to add a bit more liquid to the dough. Keep an eye on the baking time, as it may change. Start checking your cookies a couple of minutes earlier than the recipe states. Feel like mixing things up? You can make mini pies instead of cookies. Just use the same dough and fill small pie tins. Bake until golden and the filling bubbles. Another fun idea is to turn the recipe into a cookie bar. Spread the dough in a baking pan, layer with apples and caramel, and bake. Slice into bars for a delightful treat. You can find the full recipe to get started on these variations. To keep your salted caramel apple pie cookies fresh, place them in an airtight container. This helps to lock in moisture and flavor. You can also layer parchment paper between cookies to avoid sticking. Always store the cookies at room temperature. Avoid the fridge, as it can dry them out. To freeze cookies, first let them cool completely. Then, place them in a single layer on a baking sheet and freeze for about an hour. Once frozen, transfer them to a freezer-safe bag or container. Make sure to remove as much air as possible to prevent freezer burn. To thaw, simply take them out and let them sit at room temperature for 30 minutes. Cookies can last about one week at room temperature if stored properly. Look for signs of spoilage, such as a dry or hard texture. If they smell off or have an unusual taste, it’s best to discard them. For the best flavor and texture, enjoy them fresh within the first few days. Don't forget to check the [Full Recipe] for more guidance! The best way to soften butter is to leave it out. Let it sit at room temperature for about 30 minutes. This warms it up without melting it. If you need it faster, cut the butter into small pieces. You can also use a microwave. Heat for about 5 to 10 seconds, but watch closely. Yes, you can use different types of caramel sauce. Store-bought sauces work well and save time. You can also make your own for a fresh taste. Just ensure the sauce is thick enough for drizzling. A thinner sauce might make the cookies soggy. To make these cookies vegan, replace the butter with a vegan butter substitute. You can use flaxseed meal mixed with water instead of the egg. Mix one tablespoon of flaxseed meal with three tablespoons of water. Let it sit until it thickens. Use a plant-based caramel sauce to keep it dairy-free. If you overmix the dough, the cookies can turn out tough. This happens because too much mixing develops gluten. Gluten gives structure, but not in a cookie. Mix until just combined for soft and chewy cookies. Yes, you can add more apples. Just be mindful of the dough's moisture. More apples can make the cookies wetter. You might need to add a bit more flour to balance it. Aim for one and a half cups of apples for a nice flavor boost without ruining the dough. These salted caramel apple pie cookies combine classic flavors for a tasty treat. We covered ingredients, step-by-step instructions, and tips for perfect cookies. You learned about storage, variations, and common baking mistakes. Now, you have everything you need to bake delicious cookies at home. Enjoy making these cookies just right, and feel free to experiment! Happy baking!](https://stirredrecipes.com/wp-content/uploads/2025/07/582b9038-22aa-4af2-ab40-6c589f9b3f9f.webp)
Are you ready to sweeten your baking game? These Salted Caramel Apple Pie Cookies are a delightful treat that combines the warmth of apple pie with the indulgence of salted …

Looking for a warm, hearty meal that’s bursting with flavor? This Green Chile Chicken Chili is packed with fresh ingredients and easy to make. With just a few steps, you …
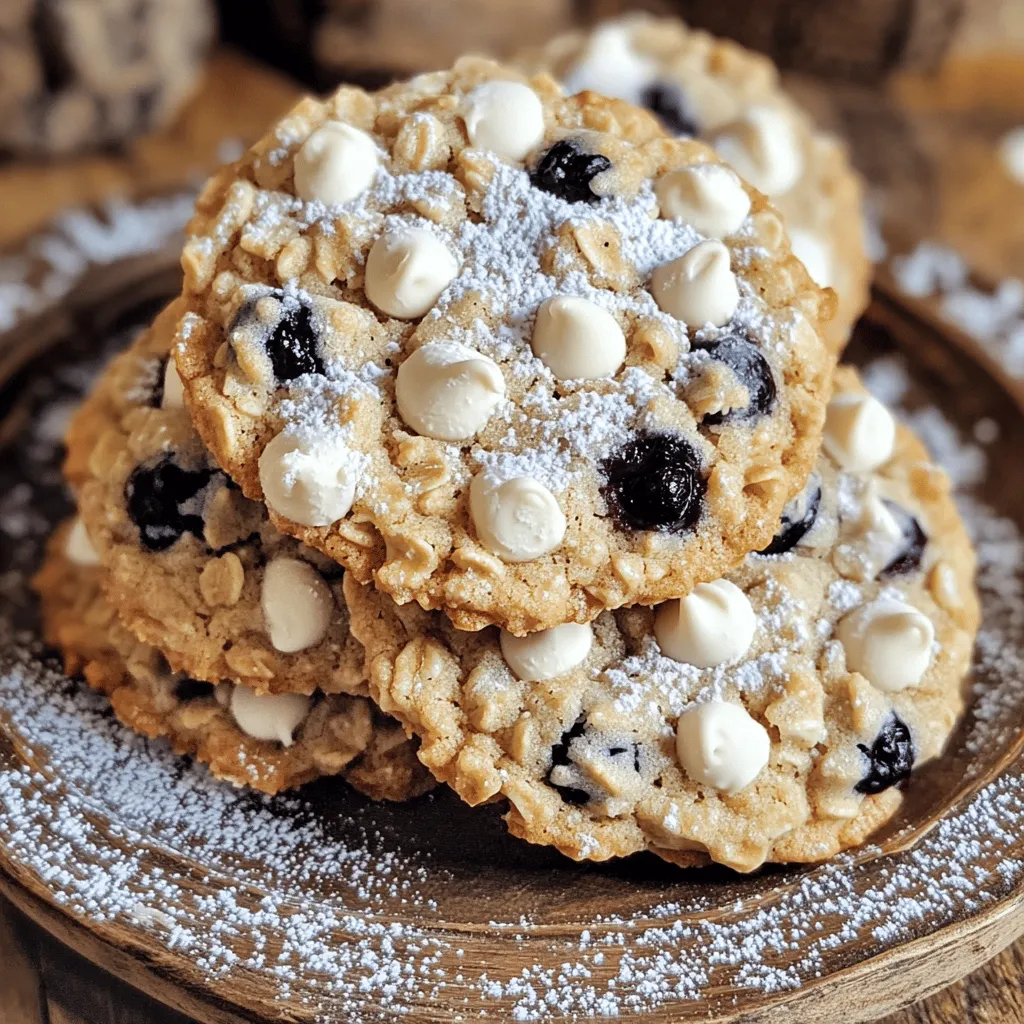
If you’re craving a sweet treat that combines juicy blueberries with creamy white chocolate, look no further! My White Chocolate Blueberry Oatmeal Cookies are not just delicious; they are easy …
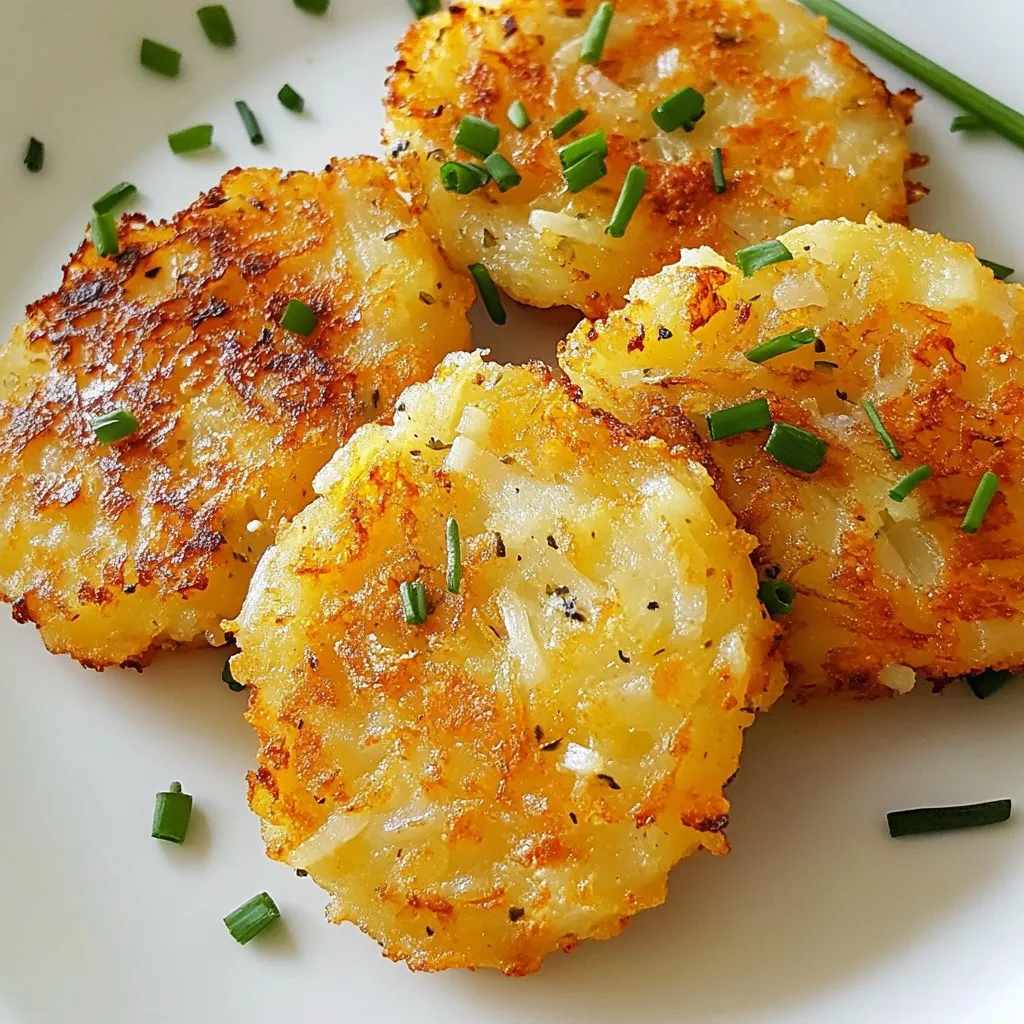
Craving crispy hash browns without the guilt? You’re in the right place! These low-calorie hash browns are easy to make and pack a crunch that satisfies. With just a few …

Fall is here, and it’s time to celebrate with an irresistible treat: Impossible Pumpkin Pie Cupcakes! These delightful bites mix the cozy flavor of pumpkin pie with the fun of …