Chocolate Turtle Apple Slices Irresistible Sweet Treat
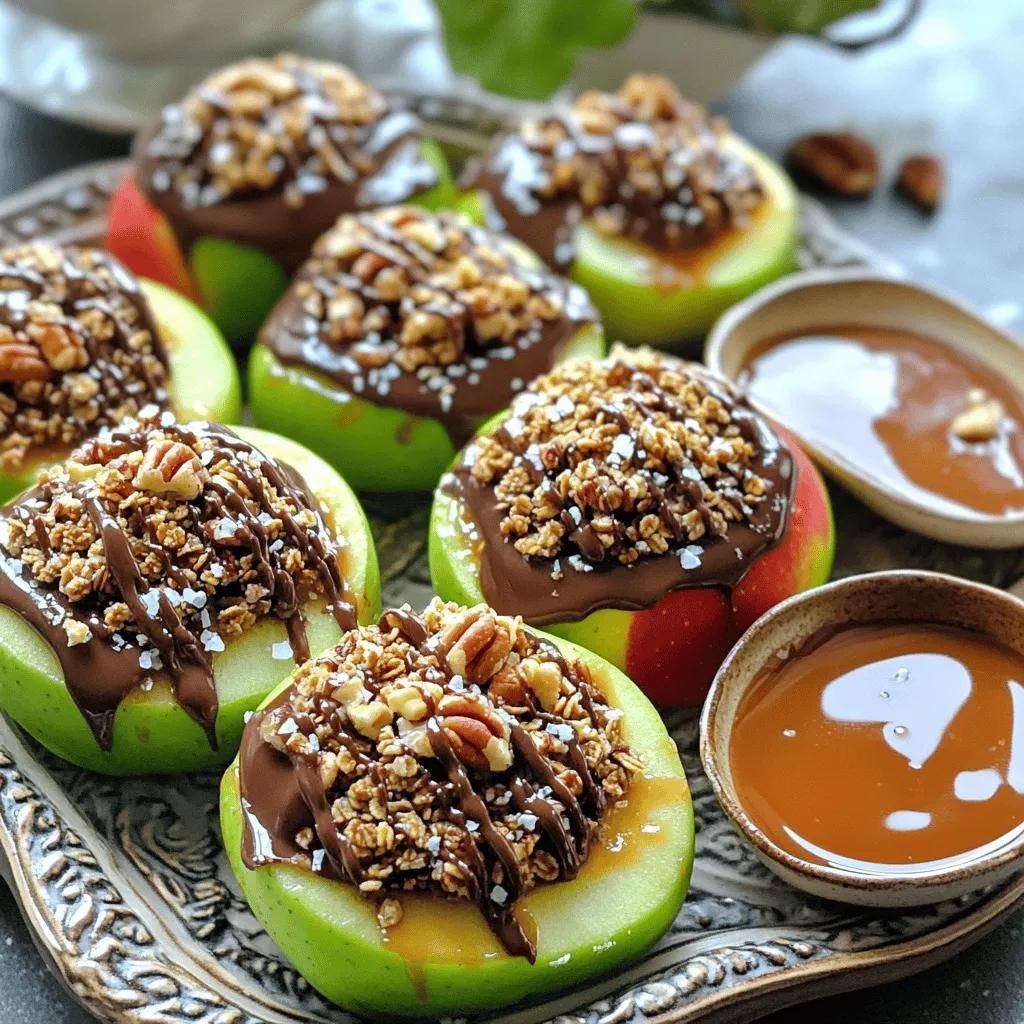
If you love sweet treats, you’ll adore my Chocolate Turtle Apple Slices! This fun recipe combines fresh apples, rich chocolate, and gooey caramel for the perfect dessert. Trust me, you …
![For the perfect pumpkin cake pops, you need simple ingredients that blend well together. Here’s what you’ll need: - 1 cup pumpkin puree - 1 1/2 cups all-purpose flour - 1 cup granulated sugar - 1/2 cup brown sugar - 1/2 cup vegetable oil - 3 large eggs - 1 teaspoon vanilla extract - 1 teaspoon baking powder - 1/2 teaspoon baking soda - 1 teaspoon ground cinnamon - 1/2 teaspoon ground nutmeg - 1/4 teaspoon ground cloves - 1/2 teaspoon salt - 8 oz cream cheese, softened - 2 cups white chocolate chips (for coating) - Sprinkles or crushed pecans for decoration These ingredients create a moist cake that’s full of flavor. Pumpkin puree gives a rich, warm taste, while the spices add a cozy touch. The cream cheese blends perfectly with the cake to make the pops smooth and creamy. For the coating, white chocolate chips melt beautifully to create a sweet shell. You can explore the [Full Recipe] for a detailed guide. Happy baking! First, preheat your oven to 350°F (175°C). While it heats, grease and flour a 9x13 inch baking pan. This helps the cake come out easily. In a large mixing bowl, combine the pumpkin puree, granulated sugar, brown sugar, vegetable oil, eggs, and vanilla extract. Whisk these wet ingredients well until smooth and blended. Next, take another bowl and whisk together the dry ingredients. Combine the all-purpose flour, baking powder, baking soda, ground cinnamon, ground nutmeg, ground cloves, and salt. Mixing these separately helps ensure even flavor and texture in your cake. Now, gradually add the dry mixture to the wet ingredients. Mix until just combined. Be careful not to overmix. Pour the batter into your prepared baking pan, spreading it evenly. Bake for 30-35 minutes. Check if it’s done by inserting a toothpick into the center. If it comes out clean, your cake is ready. Let it cool completely in the pan. Once cooled, crumble the cake into a large bowl until it resembles fine crumbs. Add the softened cream cheese to the crumbled cake and mix thoroughly. You want it to be smooth and well combined. Then, roll the mixture into small balls, about 1 inch in diameter. Place these on a parchment-lined baking sheet. Chill them in the refrigerator for at least 1 hour. This helps them firm up, making them easier to dip later. To make your pumpkin cake pop base perfect, start with the right baking method. First, ensure your oven is preheated to 350°F (175°C). This helps the cake rise evenly. Use a greased and floured 9x13-inch pan. This way, the cake comes out easily. Do not overmix the batter. When you combine wet and dry ingredients, mix until just blended. Overmixing can make your cake tough. A gentle hand keeps it light and fluffy. Melting chocolate is key for a great coating. Use a microwave-safe bowl and heat the chocolate chips in 30-second bursts. Stir in between heating until smooth. This prevents burning and clumping. For coating your cake pops, dip each one in the melted chocolate. Allow any excess chocolate to drip off. This gives a nice finish and avoids a thick layer. Get creative with toppings! You can use sprinkles, crushed pecans, or even a drizzle of chocolate. Each option adds its own charm and flavor. For a fun display, use colorful stands. You can also place your cake pops in a foam block or a cup filled with rice. This keeps them upright and shows off their beauty. Find the full recipe for more detailed steps and enjoy making your pumpkin cake pops! {{image_2}} You can change your cake pops' taste in many fun ways. Adding spices makes a big difference. For instance, try adding ginger or allspice for a warm kick. You can also mix in some orange zest for a fresh twist. When it comes to coatings, white chocolate is popular, but don’t stop there! Dark chocolate gives a rich flavor, while milk chocolate is sweet and creamy. You could even drizzle different types of chocolate on top for a fancy look. Each choice offers a new taste adventure. If you need gluten-free cake pops, use gluten-free flour. This swap works well and keeps the cake moist and tasty. Just make sure the other ingredients, like baking powder, are also gluten-free. For vegan cake pops, swap eggs with flaxseed meal or applesauce. Use a plant-based cream cheese for the filling. You can also choose dairy-free chocolate for coating. These changes keep your treats yummy while meeting dietary needs. Check out the Full Recipe for all the details on making these delightful pumpkin cake pops! To keep your pumpkin cake pops fresh, store them in the fridge. Place them in an airtight container. This helps maintain their moisture and flavor. If you stack them, add parchment paper between layers. This prevents them from sticking together. For long-term storage, you can freeze cake pops. First, chill them in the fridge for about an hour. Then, wrap each pop in plastic wrap. Place them in a freezer-safe bag or container. They can last up to three months in the freezer. When you're ready to enjoy, thaw them in the fridge overnight. These pumpkin cake pops stay fresh for about a week in the fridge. After that, they may dry out. Look for signs they have gone bad. If they smell off or have a slimy texture, it’s best to toss them. Always check before you bite! For more details on making these tasty treats, check the Full Recipe. To keep your cake pops from cracking, follow these tips: - Cool the cake completely before crumbling. Warm cake can lead to cracks. - Chill the cake balls for at least an hour. This helps them hold their shape. - Dip them slowly in the melted chocolate. Swirl gently to avoid breaking. - Use a thin coat of chocolate. A thick layer can add weight and cause cracks. Maintaining a smooth finish is key. If you see cracks, you can cover them with sprinkles or nuts. Yes, you can use store-bought cake mix for your pumpkin cake pops. This shortcut saves time and effort. Just choose a spice or yellow cake mix for best results. Using a mix changes the flavor slightly. It may taste less homemade but is still delicious. Add pumpkin puree and spices to enhance the flavor profile. Pumpkin cake pops fit many occasions. They shine at fall gatherings and Halloween parties. Their cute shape makes them fun for kids and adults alike. Serve them at Thanksgiving as a fun dessert. They are also great for birthdays or fall festivals. Their festive look and flavor make them a perfect treat for any celebration. We’ve covered how to make delicious pumpkin cake pops from scratch. We started with the essential ingredients and detailed step-by-step instructions. I shared baking tips to avoid common mistakes and suggested fun variations to keep things fresh. Remember, proper storage keeps your cake pops at their best longer. As you try these recipes, have fun exploring your creativity. Enjoy every bite of your tasty treats!](https://stirredrecipes.com/wp-content/uploads/2025/07/a8c7080e-92cd-45b9-b3a8-b86c1fdc4902.webp)
![To make baked pumpkin donuts, you need fresh flavors and simple items. Here’s what you will need: - 1 cup canned pumpkin puree - 1/2 cup granulated sugar - 1/4 cup brown sugar - 1/4 cup vegetable oil - 1/4 cup milk (dairy or non-dairy) - 1 large egg - 1 teaspoon vanilla extract - 1 1/2 cups all-purpose flour - 1 teaspoon baking powder - 1/2 teaspoon baking soda - 1 teaspoon ground cinnamon - 1/2 teaspoon ground nutmeg - 1/4 teaspoon ground ginger - 1/2 teaspoon salt These ingredients blend to create a rich, moist donut. The pumpkin puree gives flavor and keeps the donuts soft. The sugars add sweetness, while the spices bring warmth and depth. The maple glaze adds a sweet finish to the donuts. For the glaze, gather these items: - 1 cup powdered sugar - 2 tablespoons maple syrup - 1 tablespoon milk (dairy or non-dairy) Mixing these together gives you a smooth, shiny glaze. The maple syrup offers a natural sweetness that pairs perfectly with pumpkin. You can adjust the recipe based on your taste or what you have. Here are some ideas: - Use fresh pumpkin instead of canned for a different texture. - Swap granulated sugar for coconut sugar for a healthier option. - Try almond milk or oat milk in place of regular milk for a unique flavor. - Add chocolate chips or nuts to the batter for extra crunch. These substitutions keep the spirit of the recipe but let you play with flavors. For the complete recipe, check the [Full Recipe]. To start, gather all your ingredients. You need pumpkin puree, sugars, oil, milk, egg, and vanilla. In a large bowl, mix the wet ingredients. Whisk until smooth. This step is key for a good texture. In another bowl, sift together the dry ingredients. Use flour, baking powder, baking soda, and spices. Mix well to combine. Next, add the dry mix to the wet mix slowly. Stir gently until just combined. Don’t overmix; it’s okay to have some lumps. This keeps the doughnuts fluffy. Now, preheat your oven to 350°F (175°C). Grease your donut pan with non-stick spray. Using a piping bag or spoon, fill each cavity about two-thirds full with batter. This allows room for rising. Bake the donuts for 10 to 12 minutes. Check doneness with a toothpick. If it comes out clean, they are ready. Let the donuts cool in the pan for five minutes, then transfer them to a wire rack. Cooling them fully is important for the glaze. While the donuts cool, prepare the maple glaze. In a small bowl, mix powdered sugar, maple syrup, and milk. Whisk until smooth and pourable. If you want a thinner glaze, add more milk. For a thicker glaze, add more sugar. Once the donuts are cool, dip the tops into the glaze. Let the extra glaze drip off. Place them back on the rack to set. Enjoy this sweet touch atop your baked pumpkin donuts! For the full recipe, check the recipe section. When baking pumpkin donuts, a few mistakes can happen. Here are key points to remember: - Overmixing the batter: Mixing too much can lead to tough donuts. Stir gently until just combined. - Not measuring ingredients: Accurate measurements are crucial. Use a scale for precision. - Skipping the cooling step: Let the donuts cool before glazing. Warm donuts can make the glaze runny. - Ignoring oven temperature: Always preheat your oven. An unheated oven can cause uneven baking. Getting the glaze right is vital. Follow these tips for the best results: - Use powdered sugar: This sugar dissolves easily for a smooth glaze. - Check the consistency: Adjust with more milk for a thinner glaze or more sugar for thickness. - Dip, don’t pour: Dip the tops of the donuts into the glaze. This gives an even coat. - Let it set: Allow the glaze to sit for a few minutes. This helps it firm up nicely. Having the right tools makes baking easier. Here are my must-haves: - Donut pan: Choose a non-stick pan for easy removal. - Mixing bowls: Use large bowls for mixing wet and dry ingredients separately. - Whisk: A whisk helps blend ingredients smoothly. - Piping bag: This tool makes filling the donut pan easier and less messy. - Cooling rack: A cooling rack allows air to circulate around the donuts, preventing sogginess. For the full recipe, check out the complete guide I shared. {{image_2}} You can spice up your baked pumpkin donuts in many ways. Adding a pinch of allspice or cloves can deepen the flavor. You might also try a dash of cardamom for a unique twist. For extra richness, a splash of maple extract boosts the maple flavor. Vanilla bean paste offers a lovely aroma and taste. Mix and match these spices to find your perfect combo. If you need a gluten-free option, you can use a gluten-free flour blend. This will swap easily with all-purpose flour. Look for blends that include xanthan gum, as it helps with texture. Almond flour is another great choice, but combine it with coconut flour for balance. Be sure to check your baking powder for gluten-free labeling. Toppings can make your donuts even more fun. Try chopped nuts, like pecans or walnuts, for a crunchy texture. You can also sprinkle some coarse sea salt for a sweet and salty mix. If you love chocolate, mini chocolate chips are a tasty addition. For a fruity touch, mix in dried cranberries or raisins. Get creative and make each batch a new treat! To keep your baked pumpkin donuts fresh, store them in an airtight container. This helps prevent them from drying out. If you plan to eat them within a few days, you can leave them at room temperature. For longer storage, place them in the fridge. Just remember to let them cool completely before storing. This keeps the glaze from becoming soggy. You can freeze these donuts for up to three months. Wrap each donut tightly in plastic wrap. Then, place them in a freezer bag. When you’re ready to enjoy them, take the donuts out and let them thaw at room temperature. You can also reheat them in the oven. This will bring back some of their original texture. Just heat at 350°F (175°C) for about 5-7 minutes. These donuts are best eaten within a week. After that, they might lose some flavor and texture. The maple glaze can also harden over time. If you notice they are getting dry, try warming them up a bit before eating. This adds back some moisture and makes them taste better. For the best experience, enjoy them fresh from the oven. Check out the Full Recipe for more tips on keeping these yummy treats at their best! Yes, you can use fresh pumpkin. Roast the pumpkin, then puree it. This makes a rich flavor. Just ensure the puree is smooth and not too watery. Fresh pumpkin adds a nice touch to the donuts. These donuts stay fresh for about 2-3 days at room temperature. Store them in an airtight container. You can also refrigerate them for up to a week. However, they taste best fresh! Absolutely! Replace the egg with a flax egg or applesauce. Use non-dairy milk and oil instead. The donuts will still be soft and full of flavor. You won’t miss the egg at all. To make mini donuts, use a mini donut pan. Bake them for about 8-10 minutes. Keep an eye on them to avoid overcooking. Mini donuts are cute and perfect for sharing! You can use chocolate glaze, vanilla glaze, or even a cream cheese glaze. Each adds a different flavor twist. Experiment with flavors like maple or honey for a fun change. Get creative! Baked pumpkin donuts are a fun treat that anyone can make. We covered the key ingredients, steps to bake perfectly, and tips to avoid common mistakes. You can even explore different flavors and storage methods. Remember, these donuts can fit any diet. Experiment with toppings and glazes to make them your own. Enjoy the baking process, and savor each bite of your delicious creation. With these guidelines, you will bake like a pro.](https://stirredrecipes.com/wp-content/uploads/2025/07/1b126a6b-197e-4c71-8964-700e6b0a7a09.webp)
 for more details on how to make this treat! Let your pumpkin cinnamon roll bake cool for about 10 minutes after baking. This cooling time lets the flavors settle and makes it easier to slice. Use a large cutting board to transfer the bake. A good choice for storage is an airtight container. You can also use a baking dish with a lid. To refrigerate, cover your bake tightly with plastic wrap or foil. It keeps the moisture in and prevents drying. For freezing, cut the bake into portions. Wrap each piece in plastic wrap, then place them in a freezer bag. This way, you can enjoy it later. When ready to eat, thaw in the fridge overnight. Reheat in the oven at 350°F for about 10-15 minutes. In the fridge, your pumpkin cinnamon roll bake stays fresh for about 3-4 days. Watch for any signs of spoilage, like an off smell or mold. If the texture becomes hard or dry, it’s time to toss it. Always trust your senses; they guide you well in the kitchen. Pumpkin Cinnamon Roll Bake is a warm, sweet dish that combines cinnamon rolls and pumpkin. This bake has a soft texture and a rich flavor. The pumpkin adds moisture and a hint of earthiness. You get sweet notes from cinnamon, brown sugar, and creamy icing. Each bite is a cozy mix of spices and sweetness that feels like a warm hug. Yes, you can make it ahead! Prepare the dish, but do not bake it right away. Cover the baking dish and store it in the fridge overnight. When you are ready to bake, let it sit at room temperature for about 30 minutes. Then, bake it as the recipe states. This way, you save time and enjoy warm cinnamon rolls in the morning. To help your cinnamon rolls rise, use fresh dough from the fridge. Let it come to room temperature for about 30 minutes before baking. Make sure your oven is preheated to the right temperature. Also, avoid opening the oven door too much while it bakes. A warm environment helps the dough rise well. These small steps make a big difference in getting fluffy rolls! This blog post covered how to make a delicious Pumpkin Cinnamon Roll Bake. You learned about key ingredients like cinnamon roll dough, pumpkin puree, and cream cheese. I shared steps for preparation, assembly, and baking. You also found tips for festive touches, perfecting texture, and flavor variations. Remember to store your bake properly to keep it fresh. Enjoy experimenting with this recipe for breakfast or dessert. With the right ingredients and techniques, you'll create a treat everyone will love!](https://stirredrecipes.com/wp-content/uploads/2025/07/ddfdf615-f50d-4c0b-a55d-51ee130d8da7.webp)
![- 1 cup sweet potato puree - 1/2 cup almond butter - 1/3 cup maple syrup To make sweet potato cookies, you need key ingredients. First, sweet potato puree adds moisture and flavor. You can make this by baking or steaming sweet potatoes until soft, then mashing them. Next, almond butter brings richness and a nutty taste. It also helps bind the cookies together. Maple syrup sweetens the dough naturally, giving it a warm flavor. - 1/2 cup dark chocolate chips - 1/4 cup chopped pecans - Spices and seasonings You can enhance your cookies with optional ingredients. Dark chocolate chips add a sweet and creamy touch. Chopped pecans give a nice crunch and nutty flavor. For extra warmth, consider adding spices like cinnamon or nutmeg. These spices work well with sweet potatoes and make the cookies even more delightful. - Mixing bowls - Baking sheet - Parchment paper You will need some basic tools to bake these cookies. Mixing bowls help combine the wet and dry ingredients easily. A baking sheet is where the cookies will bake, so choose one that fits your oven. Parchment paper prevents the cookies from sticking and makes cleanup easy. With these tools, you are ready to create delicious sweet potato cookies! Mixing wet ingredients Start by cooking and mashing your sweet potatoes. You need 1 cup of sweet potato puree. In a large bowl, mix the puree with 1/2 cup of almond butter, 1/3 cup of maple syrup, and 1 teaspoon of vanilla extract. Stir until everything is smooth. Combining dry ingredients In another bowl, whisk together 1 cup of rolled oats, 1/2 cup of whole wheat flour, 1 teaspoon of baking powder, 1/2 teaspoon of cinnamon, 1/4 teaspoon of nutmeg, and 1/4 teaspoon of salt. This mix adds flavor and texture to your cookies. Scooping dough onto the baking sheet Now, use a tablespoon to scoop the dough. Place the scoops on your baking sheet lined with parchment paper. Make sure to leave about 2 inches between each scoop. This gives them room to spread. Flattening the dough After scooping, flatten the dough slightly. You can use the back of the scoop for this. Flattening helps the cookies bake evenly and gives them a nice shape. Preheating the oven Before baking, preheat your oven to 350°F (175°C). This step is key for good baking. A hot oven helps the cookies rise and turn golden. Baking time and techniques Bake your cookies for 12-15 minutes. Keep an eye on them. They are done when the edges turn golden brown. After baking, let them cool on the sheet for 5 minutes. Then transfer them to a wire rack to cool completely. Enjoy the sweet aroma filling your kitchen while they bake! To get the best texture for your sweet potato cookies, focus on the dough. You want it to be moist but not too wet. Adding enough flour helps firm the dough. Avoid overmixing; this can make cookies tough. Mix until ingredients just blend. To prevent cookies from spreading, chill the dough. Allowing it to rest for 30 minutes in the fridge works wonders. Using parchment paper also helps keep the shape. This way, your cookies stay thick and chewy. How do you store leftover cookies? Place them in an airtight container. This keeps them fresh and soft. You can also layer parchment paper between cookies to avoid sticking. For freezing options, let cookies cool completely first. Then, place them in a freezer bag. They can stay good for up to three months. Just thaw them at room temperature before enjoying! Sweet potatoes offer many nutritional advantages. They are high in fiber, vitamins, and antioxidants. This makes them a great choice for a snack. Swapping traditional ingredients for sweet potatoes boosts any recipe. They add natural sweetness without refined sugar. Plus, they help keep cookies moist and delicious. This makes your sweet potato cookies a healthier treat! {{image_2}} You can easily change the flavor of your sweet potato cookies. Adding nuts or seeds can change the texture and taste. Try using chopped pecans or walnuts. They provide a nice crunch and extra nutrients. You can also add sunflower seeds or pumpkin seeds for a fun twist. Swapping sweeteners is another way to customize your cookies. If you like a different taste, try honey or agave syrup instead of maple syrup. Each sweetener brings a unique flavor. Adjust the amount based on your preference. If you need gluten-free options, using gluten-free flour is simple. Almond flour or coconut flour works well in this recipe. Make sure to check the labels. These flours can keep the cookies soft and delicious. For a vegan version, swap almond butter with a seed butter like sunflower seed butter. You can also use flaxseed meal mixed with water instead of eggs if you need to add moisture. This keeps your cookies plant-based and tasty. Pairing your sweet potato cookies with drinks can elevate your snack time. A warm cup of tea or coffee complements the flavors perfectly. You can also serve them with a glass of almond milk for a fun twist. For gatherings, arrange them on a colorful plate. Dust lightly with powdered sugar for a nice touch. This makes them look even more inviting. They are perfect for parties or casual get-togethers. Enjoy these sweet potato cookies with friends and family! For the complete recipe, check the [Full Recipe]. Each cookie has about 120 calories. The fat content is roughly 6 grams. You get around 3 grams of protein and 16 grams of carbs. These cookies have a good balance of healthy fats and carbs. They also provide fiber, which is great for digestion. Sweet potatoes are rich in Vitamin A and C. They also offer potassium and magnesium. Almond butter adds Vitamin E and healthy fats. Maple syrup brings some zinc and antioxidants to the mix. Each cookie packs a nutrient punch that fuels your body. Sweet potatoes are a superfood. They are full of vitamins and antioxidants. They help with eye health and boost your immune system. Almond butter is a great source of protein. It helps keep you full and satisfied. Maple syrup gives natural sweetness without refined sugar. It’s a better choice for those looking to cut processed sugar. I suggest having one or two cookies as a snack. They are a healthy treat that satisfies sweet cravings. You can share them with friends or family too. They are great for kids and adults alike. Enjoy these cookies with a glass of milk or tea for a tasty combo. Can I use fresh sweet potatoes instead of puree? Yes, you can use fresh sweet potatoes. Just cook them first. Bake or steam them until soft. Then mash them well. This gives a great texture and flavor. How do I know when the cookies are done baking? Check the edges of the cookies. They should be golden brown. The centers may look a bit soft, but they will firm up as they cool. What can I substitute for almond butter? You can use peanut butter or sunflower seed butter. Both work well and add nice flavor. Just make sure to check for allergies if you're sharing. Can I make this recipe nut-free? Yes! Just swap almond butter for a seed butter like sunflower. You can also use coconut oil as a fat option in the recipe. How do I store sweet potato cookies? Store cookies in an airtight container. They stay fresh for about a week. You can also layer them with parchment paper to prevent sticking. Can I reheat cookies after storing them? Yes, you can reheat them. Just pop them in the microwave for a few seconds. This makes them warm and soft again. Enjoy your sweet potato cookies! Sweet potato cookies are a tasty treat. We explored essential and optional ingredients, like sweet potato puree and dark chocolate chips. I shared step-by-step instructions for making the dough, shaping, and baking. Helpful tips covered texture, storage, and health benefits. You can customize flavors and adjust for dietary needs. With nutritious sweet potatoes and almond butter, these cookies are easy to make and enjoy. Try this delightful recipe for a healthy snack or dessert.](https://stirredrecipes.com/wp-content/uploads/2025/07/31b51d12-3fe5-4128-8e25-2568f23e1fb4.webp)
