Skip to content
Stirred Recipes
  • Home
  • Appetizers
  • Desserts
  • Salads
  • Breakfast
  • Dinner
  • Privacy Policy
  • Contact
  • About

Chef Luca

Non-Sandwich Lunch Ideas for a Flavorful Meal

July 30, 2025 by Chef Luca
For a tasty non-sandwich lunch, you need simple, fresh ingredients. Here’s what to gather: - 1 cup quinoa, rinsed - 2 cups vegetable broth - 1 can (15 oz) chickpeas, drained and rinsed - 1 cup cherry tomatoes, halved - 1 cucumber, diced - 1 bell pepper (any color), diced - 1 small red onion, finely chopped - 1 avocado, sliced - 1/4 cup fresh parsley, chopped - 3 tablespoons tahini - 2 tablespoons lemon juice - 1 tablespoon olive oil - Salt and pepper to taste This colorful quinoa and chickpea bowl is packed with nutrients. It is rich in protein, fiber, and healthy fats. Quinoa provides complete protein, while chickpeas add more protein and fiber. The veggies bring vitamins and minerals. Each serving contains about: - Calories: 350 - Protein: 12g - Carbs: 45g - Fats: 15g - Fiber: 10g To get the best flavor and texture, follow these tips: - Rinse quinoa well to remove bitter saponins. - Use vegetable broth instead of water for more flavor when cooking quinoa. - Drain and rinse chickpeas to reduce sodium and improve taste. - Chop veggies into even sizes for a nice look and even cooking. - Slice avocado just before serving to keep it fresh and green. These steps help you create a vibrant and tasty meal. For the full recipe, refer to the earlier section. Enjoy your cooking! To make the Colorful Quinoa & Chickpea Bowl, start by cooking the quinoa. In a medium pot, combine 1 cup quinoa and 2 cups vegetable broth. Bring it to a boil, then lower the heat. Cover the pot and let it simmer for about 15 minutes. The quinoa will be fluffy when done. While the quinoa cooks, you can prepare the dressing. In a small bowl, mix 3 tablespoons tahini, 2 tablespoons lemon juice, 1 tablespoon olive oil, and some salt and pepper. Feel free to add water if it’s too thick. Next, gather a large bowl. Add the cooked quinoa, 1 can of drained chickpeas, 1 cup halved cherry tomatoes, 1 diced cucumber, 1 diced bell pepper, and 1 finely chopped red onion. Toss these ingredients gently. Finally, drizzle the tahini dressing over the bowl and mix to coat everything evenly. Top it off with sliced avocado for a creamy touch. Enjoy your meal right away or pack it for lunch! If you want to try other non-sandwich lunches, here are some easy recipes. 1. Pasta Salad: Cook 2 cups of your favorite pasta according to the package. Once cooked, drain and cool it. Mix it with diced veggies like bell peppers, cucumbers, and olives. Add Italian dressing for flavor. 2. Stuffed Peppers: Halve bell peppers and remove seeds. Fill with a mix of cooked rice, beans, corn, and salsa. Bake at 375°F for 25 minutes. 3. Veggie Wraps: Use a large lettuce leaf or a tortilla. Fill with hummus, sliced veggies, and protein like chicken or tofu. Roll it up and enjoy. To save time in the kitchen, try these tips: - Prep Ahead: Cut veggies and cook grains in advance. Store them in the fridge for quick access. - Use Canned Beans: Canned beans save time and still provide great nutrition. - Batch Cooking: Make larger portions of meals. Store leftovers for quick lunches later in the week. - One-Pot Meals: Cook everything in one pot to reduce cleanup time. These methods make meal prep easy and enjoyable. With a bit of planning, you’ll have tasty non-sandwich lunches ready in no time! To boost flavor in your non-sandwich meals, think about fresh herbs. Fresh herbs like basil or cilantro add a nice touch. Use spices to enhance the taste too. A pinch of cumin or paprika can change things up. Don't forget about acids! A squeeze of lemon or lime brightens dishes. Marinating your proteins or veggies in a simple mix of oil, acid, and spices also works wonders. This adds depth and makes everything taste better. One common mistake is overcooking your grains or veggies. Watch the clock and check for doneness. Another issue is not seasoning properly. Always taste your dish before serving. If it needs more salt or spice, add it! Also, avoid making boring combinations. Mix colors, textures, and flavors for a more fun meal. Lastly, don’t skip the dressing! A good dressing can transform a plain bowl into something special. Serve non-sandwich meals in bowls for a trendy look. A colorful quinoa and chickpea bowl is a great choice. You can layer grains, proteins, and veggies for a feast for the eyes. Add a drizzle of dressing for that extra flair. For a more casual feel, use a wrap with lettuce leaves instead of bread. This adds crunch and freshness. Pair your meal with a side of fruit or nuts for a complete lunch. {{image_2}} You can change this bowl to fit your taste. Try adding roasted sweet potatoes for a sweet twist. You can also mix in some spinach or kale for extra greens. If you like a kick, add jalapeños or red pepper flakes. This makes the dish exciting and fun. You can even switch the dressing! Use yogurt or a spicy salsa for different flavors. If you follow a specific diet, there are great swaps. For a gluten-free option, use rice instead of quinoa. If you want a lower-carb meal, try cauliflower rice. For a vegan twist, replace tahini with sunflower seed butter. This keeps it creamy without dairy. You can also choose different beans. Black beans or lentils work well and add protein. Looking for more ideas? Here are a few that I love. A colorful veggie stir-fry is quick and tasty. Just toss your favorite veggies in a pan with some soy sauce. Another option is a hearty grain salad with farro or barley. Add nuts for crunch and some feta for creaminess. Lastly, consider making a warm pasta salad with seasonal veggies. Toss it with a light olive oil dressing. These meals are full of flavor and keep you full! For a detailed recipe, check out the Full Recipe. To keep your meals fresh, store leftovers in airtight containers. Use glass or plastic containers with tight lids. Make sure to cool the food to room temperature before sealing. Label each container with the date. This helps you track how long it has been in the fridge. When reheating, use the microwave or stovetop. For the microwave, cover the bowl with a lid or a damp paper towel. This keeps moisture in and prevents drying out. If using the stovetop, add a splash of water or broth. Heat on low to avoid burning. Stir frequently for even cooking. Most cooked meals last about three to four days in the fridge. Quinoa and chickpeas should stay fresh for this time. Fresh veggies like tomatoes and cucumbers last about two to three days. Use the Full Recipe as a guide. Always check for signs of spoilage before eating. You can make a colorful quinoa and chickpea bowl. Simply cook quinoa and mix it with chickpeas, veggies, and a tasty dressing. Another idea is a rice bowl topped with stir-fried veggies and protein like chicken or tofu. Pasta salads with fresh veggies and a light vinaigrette are also great. Try a wrap using lettuce instead of bread. Fill it with your favorite meats, beans, and sauces. To boost nutrition, add more vegetables to your meals. Leafy greens, bell peppers, and tomatoes are full of vitamins. Use whole grains like quinoa or brown rice for fiber. Include lean proteins such as chicken, fish, or legumes. Healthy fats from avocados, nuts, or seeds can also help. Experiment with herbs and spices to enhance flavor without adding calories. Yes, you can prepare many non-sandwich lunches in advance. Cook quinoa or rice in bulk for the week. Chop veggies and store them in the fridge for quick assembly. Dressings can be made ahead of time and kept in jars. Just be sure to keep wet and dry ingredients separate until you're ready to eat. This keeps meals fresh and tasty. For a delicious option, check out the Full Recipe for the colorful quinoa and chickpea bowl. This blog covered tasty non-sandwich lunch ideas, focusing on ingredients and recipes. You learned how to prepare a colorful quinoa and chickpea bowl, among other meals. I shared tips on flavor, storage, and avoiding common mistakes. By customizing your meals, you can cater to different diets and preferences. Keep these ideas in mind for quick and nutritious lunches. Embrace variety in your meals to make lunchtime fun and interesting!

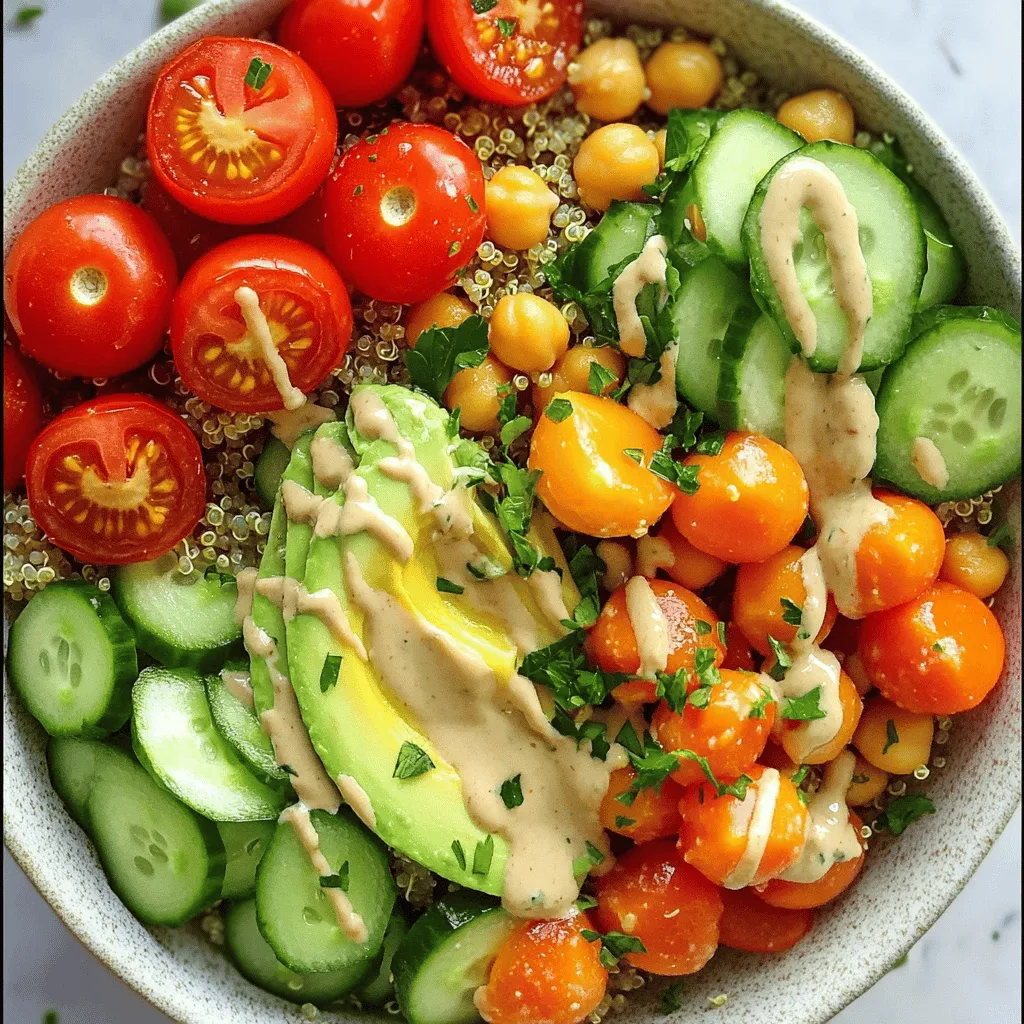
Tired of the same old sandwich for lunch? You’re not alone! Let’s explore exciting non-sandwich lunch ideas that burst with flavor and nutrition. From colorful quinoa bowls to yummy wraps, …

Read more

Categories Salads

White Chocolate Raspberry Cake Delightful and Easy Recipe

July 30, 2025 by Chef Luca
Here’s a detailed list of the ingredients you need for this delightful White Chocolate Raspberry Cake: - 1 ½ cups all-purpose flour - 1 cup granulated sugar - ½ cup unsalted butter, softened - 2 large eggs - 2 teaspoons baking powder - ½ teaspoon salt - 1 cup milk - 1 teaspoon vanilla extract - 1 cup white chocolate chips - 1 cup fresh raspberries - ½ cup raspberry puree - Whipped cream, for topping - Optional: fresh mint leaves for garnish You can find the full recipe, which guides you step by step, right here. Each ingredient plays a key role in making this cake rich and flavorful. The white chocolate chips add a creamy sweetness, while the fresh raspberries provide a tart contrast. This balance makes every bite a true delight. Using fresh ingredients will ensure that your cake tastes amazing. Don't forget to gather everything before you start for a smooth baking experience! - Preheat your oven to 350°F (175°C). - Prepare two 9-inch round cake pans. Grease and flour them well. - In a bowl, whisk together the flour, baking powder, and salt. - In another bowl, cream the softened butter and sugar until light. - Add the eggs one at a time, then mix in the vanilla. - Gradually add the dry ingredients to the butter mix, alternating with the milk. - Start and end with the dry mix. Stir gently just until combined. - Fold in the white chocolate chips and fresh raspberries. Be gentle to keep the raspberries whole. - Divide the batter evenly between the prepared pans. - Bake for about 25-30 minutes. Check doneness with a toothpick. - Once done, let the cakes cool in the pans for 10 minutes. Then, move them to wire racks to cool completely. - Place one cake layer on a serving platter. - Drizzle raspberry puree over the first layer, then add a dollop of whipped cream. - Top with the second cake layer. - Frost the entire cake with whipped cream. Drizzle more raspberry puree on top. - Garnish with fresh mint leaves for a nice touch. You can find the Full Recipe in the previous section. Enjoy every bite of this delightful treat! To get the best cake, start with the right oven temperature. Preheat your oven to 350°F (175°C). This helps the cake rise evenly. If your oven runs hot or cold, it can change the bake time and texture. Next, properly grease and flour your cake pans. Use unsalted butter to grease the pans. Then, add a light dusting of flour. This prevents sticking and helps the cakes come out smoothly. To boost flavor, consider adding different extracts. Almond or coconut extract can add a nice twist to your cake. Just a teaspoon can make a big difference. Using premium chocolate is also key. High-quality white chocolate chips melt better and provide richer taste. Look for brands with high cocoa butter content for the best flavor. When it comes to presenting your cake, creativity shines. You can layer fresh raspberries on top for a pop of color. Drizzling raspberry puree over the whipped cream adds a beautiful touch. For alternative toppings, consider crushed pistachios or toasted coconut. These add texture and flavor. Fresh mint leaves also make a lovely garnish, giving your cake an elegant finish. {{image_2}} You can try fun twists on this cake. One great idea is a white chocolate and almond cake. Just add almond extract to the batter. It pairs well with the sweet white chocolate. Another tasty option is a lemon raspberry twist. Add lemon zest and lemon juice to the batter. This brightens the cake and adds a nice zing. It also enhances the raspberry flavor. Both variations give you new ways to enjoy this cake. You might need a gluten-free option. You can swap the all-purpose flour for a gluten-free blend. Make sure it has a good mix of starches. This will give you a nice texture. For a dairy-free cake, use coconut milk instead of regular milk. You can also try dairy-free butter. This helps keep the cake moist and tasty. Both options let everyone enjoy the cake, no matter their diet. Serving this cake with ice cream is a hit. A scoop of vanilla or raspberry ice cream adds creaminess. It balances the sweetness of the cake. Fresh fruits like strawberries or blueberries also make a lovely pair. They add freshness and color to your plate. For drinks, serve with sparkling water or a fruity lemonade. These drinks enhance the cake’s flavors and keep things light. You can also try a nice cup of tea. It makes for a cozy treat. Explore the [Full Recipe] for more tips and details on making this cake. To keep your white chocolate raspberry cake fresh, store it in the fridge. Place it in an airtight container. This helps prevent it from drying out. You can also cover it tightly with plastic wrap. If you have leftover slices, you can freeze them. Wrap each slice in plastic wrap and place them in a freezer bag. This keeps them tasty for later. When you're ready to enjoy a slice, reheating is easy. Take a slice from the fridge or freezer. If it’s frozen, let it thaw at room temperature for about 30 minutes. For warm cake, use a microwave. Heat each slice for about 10-15 seconds. Check to see if it’s warm enough for your taste. If not, heat it for a few more seconds. When stored properly, your cake will stay fresh for about 3 to 4 days in the fridge. If you freeze it, the cake can last for up to 3 months. Just remember, the sooner you eat it, the better it will taste! Keeping track of these tips helps you enjoy your cake at its best. To make this cake from scratch, follow these steps: 1. Preheat your oven to 350°F (175°C) and prepare two cake pans. 2. Mix the dry ingredients in a bowl. 3. Cream butter and sugar until light. 4. Add eggs and vanilla, and mix well. 5. Alternate adding dry mix and milk to the batter. 6. Fold in white chocolate chips and fresh raspberries. 7. Divide the batter, bake for 25-30 minutes, and let cool. These steps create a soft and tasty cake. For the full recipe, check out the Full Recipe section. Yes, you can use frozen raspberries. They work well in the cake. However, they may add more moisture. This could make the cake a bit denser. If you use them, try not to thaw them first. Fold them in gently to keep some shape. The secret lies in the ingredients and methods. Use fresh milk and butter. Eggs add richness too. Do not overmix the batter. This can make the cake tough. Also, check for doneness early. It helps keep the cake moist. For great layers, ensure even baking. Tap the pans before baking to remove air bubbles. Bake until a toothpick comes out clean. Let the layers cool fully before stacking. This helps avoid sliding or breaking. Look for local bakeries that specialize in gourmet cakes. Many offer creative flavors. You can also check online for delivery options. Websites like Yelp or Google can help you find the best-rated spots in your area. To make this cake gluten-free, swap the all-purpose flour for a gluten-free blend. Ensure the blend has xanthan gum for structure. This keeps the cake light and fluffy. Always check labels to avoid hidden gluten in other ingredients. We covered everything you need to make a delicious White Chocolate Raspberry Cake. From gathering easy ingredients to baking and decorating, this cake is fun to create. Remember to use fresh raspberries for the best taste. Don’t hesitate to try variations and tips for extra flavor. Proper storage will keep your cake fresh for longer. Enjoy every slice, and share with friends and family. This cake is sure to impress!

Looking to impress your guests with a stunning dessert? This White Chocolate Raspberry Cake is both delightful and easy to make. With its rich white chocolate and tart raspberries, each …

Read more

Categories Desserts

Delicious Apple Fritter Bread Easy and Homemade Recipe

July 30, 2025 by Chef Luca
- 2 cups all-purpose flour - 1 tablespoon baking powder - 1 teaspoon ground cinnamon - 1/2 teaspoon salt - 1/2 cup granulated sugar - 1/4 cup brown sugar, packed - 1/2 cup unsalted butter, melted - 2 large eggs - 1 teaspoon vanilla extract - 1/2 cup milk - 2 cups apples, peeled, cored, and diced - 1/2 cup powdered sugar - 2 tablespoons milk I love to use fresh ingredients when making apple fritter bread. The apples add a sweet and juicy bite. You can choose any apple you like; I prefer Granny Smith for their tartness. The mix of sugars gives the bread depth. I use both granulated and brown sugar. Brown sugar adds a hint of caramel flavor. For the glaze, simple is best. Just mix powdered sugar with milk until smooth. This glaze adds a lovely shine and sweetness. It makes the bread look fancy too! Each slice will be a treat for the eyes and taste buds. You can find the full recipe to follow these steps easily. Enjoy making this delightful bread! - Preheat your oven to 350°F (175°C). - Grease and flour a 9x5-inch loaf pan. This step helps the bread release easily after baking. Make sure to cover all sides well. - Combine flour, baking powder, ground cinnamon, salt, granulated sugar, and brown sugar. Mix these dry ingredients in a large bowl. This ensures the flavors blend well. The cinnamon adds warmth, while the sugars give sweetness. - Whisk together melted butter, eggs, vanilla extract, and milk. In another bowl, whisk until smooth. This step brings rich flavor and moisture to the bread. The butter adds richness, while vanilla gives a lovely aroma. - Pour wet ingredients into dry ingredients and stir until just combined. - Gently fold in the diced apples into the batter. Mix carefully to avoid over-stirring. You want a tender bread, not tough. The diced apples add juicy bites throughout the loaf. - Pour batter into the prepared loaf pan and bake for 50-60 minutes. Check the bread at 50 minutes by inserting a toothpick in the center. When it comes out clean, the bread is ready. - Prepare the glaze while the bread is baking. - Drizzle the glaze over the warm bread before serving. Mix powdered sugar with milk to make the glaze. Drizzling while warm lets it soak in, adding extra sweetness. This step makes your bread look and taste amazing! For the full recipe, check the details above. - Use room temperature ingredients for better mixing. This helps create a smooth batter. - Check doneness using a toothpick inserted into the center of the bread. If it comes out clean, your bread is ready! - Add nuts such as walnuts or pecans for extra crunch. This gives a lovely texture and taste. - Incorporate a pinch of nutmeg for an aromatic twist. It brings warmth to the flavor profile. - Allow the butter to cool slightly before adding to the mixture. This prevents cooking the eggs and helps the batter mix well. These tips will help you create the best Apple Fritter Bread. For the full recipe, check out the instructions above. Enjoy your baking! {{image_2}} You can have fun with this recipe! Instead of apples, try pears or plums. They add a sweet twist and change the flavor a bit. Just chop them up like you would with apples. The texture will still be lovely, and the taste will surprise you. Mixing fruits keeps things fresh and exciting. If you need a gluten-free choice, use a gluten-free flour blend. Many blends work well in baking. Just swap it for the all-purpose flour in the recipe. Your bread will still taste great, and no one will know it’s gluten-free! This option helps everyone enjoy this treat. Want a vegan version? It's simple! Replace eggs with flax eggs. To make flax eggs, mix 1 tablespoon of ground flaxseed with 2.5 tablespoons of water. Let it sit for a few minutes. Also, switch to plant-based milk and butter. This way, you can enjoy the same delicious bread without any animal products. Everyone can enjoy this tasty treat! Feel free to explore these variations and find what works best for you. You might discover a new favorite way to enjoy apple fritter bread! For the full recipe, check out the earlier section. Store your Apple Fritter Bread tightly wrapped at room temperature. It stays fresh for up to 2 days. This way, you can enjoy a slice whenever you crave something sweet. You can refrigerate the bread for up to a week. Just place it in an airtight container. If you want to keep it longer, freeze it for up to 3 months. Make sure it is tightly sealed. To serve, thaw the frozen bread at room temperature. This method keeps the bread moist and tasty. A toothpick inserted should come out clean when the bread is fully baked. This means the center cooked well and is ready to enjoy. If the toothpick has wet batter, bake it a bit longer. Check every few minutes until it’s done. Yes, the bread can be made ahead and stored as mentioned in the storage info. You can bake it and let it cool. Wrap it tightly to keep it fresh. You can also freeze it for later use. Just thaw it before serving. It pairs well with a dollop of whipped cream or a scoop of vanilla ice cream. This adds a nice touch of creaminess. You could also sprinkle some cinnamon on top for extra flavor. Enjoy it warm for the best taste! Apple Fritter Bread is a delightful treat that combines warm apples and spices. You learned how to prepare the ingredients and bake this bread step-by-step. Remember to experiment with flavors and textures for a unique twist. With the right storage, you can enjoy it fresh or save it for later. This recipe is simple and rewarding, whether you share it or keep it all for yourself! Enjoy baking your new favorite bread!

Craving a sweet treat that’s easy and homemade? Look no further than my Delicious Apple Fritter Bread! This warm, moist loaf bursts with apple flavor, making it perfect for breakfast …

Read more

Categories Desserts

Feta Chicken Salad Fresh and Flavorful Recipe

January 5, 2026July 30, 2025 by Chef Luca
- 2 cups cooked chicken breast, diced - 1 cup cherry tomatoes, halved - 1 cucumber, diced - 1/2 red onion, thinly sliced These main ingredients form the heart of your feta chicken salad. The cooked chicken provides protein, while cherry tomatoes add sweetness. The cucumber gives a fresh crunch, and the red onion adds a mild bite. Together, they create a tasty base for your salad. - 1 cup Kalamata olives, pitted and halved - 1 cup feta cheese, crumbled - 1/4 cup fresh parsley, chopped Next, we bring in Kalamata olives, which add a briny flavor. Crumbled feta cheese introduces a creamy, tangy element. Fresh parsley adds a pop of color and a hint of earthiness. These toppings elevate the dish and make it more exciting. - 3 tablespoons olive oil - 2 tablespoons lemon juice - Salt and pepper to taste The dressing is simple yet effective. Olive oil gives richness, while lemon juice adds brightness. Salt and pepper enhance all the flavors. Together, these ingredients create a light and zesty dressing that ties everything together. This combination of ingredients makes the feta chicken salad fresh and flavorful. The balance of textures and tastes ensures every bite is enjoyable. {{ingredient_image_1}} To start, you need to mix the salad base. Grab a large mixing bowl. In it, combine 2 cups of diced cooked chicken, 1 cup of halved cherry tomatoes, 1 diced cucumber, and 1/2 of a thinly sliced red onion. This mix brings a fresh crunch. Next, incorporate flavor with olives and cheese. Add 1 cup of pitted and halved Kalamata olives and 1 cup of crumbled feta cheese to the bowl. Gently mix these ingredients together. You want everything to blend well, so the flavors can shine. Now, let’s make the dressing. In a small bowl, whisk together 3 tablespoons of olive oil, 2 tablespoons of lemon juice, and a pinch of salt and pepper. Whisk until the ingredients combine smoothly. The dressing should be well mixed and slightly thick. Now it’s time to assemble the salad. Pour the dressing over the chicken salad mixture. Toss gently so every ingredient gets coated. This step is key for flavor. Finally, stir in 1/4 cup of fresh chopped parsley. This adds a bright touch to the salad. Let the salad rest for at least 10 minutes. This waiting time helps the flavors meld together, making each bite delicious. To perfect your feta chicken salad, balance the flavors well. Use salt and pepper to enhance the taste. Add lemon juice for brightness. You can also try a pinch of garlic powder for more depth. For serving, present the salad in a large bowl or on individual plates. Garnish with extra parsley and whole Kalamata olives. This adds flair and makes it look fresh. You can save time by pre-cooking chicken. Use leftover chicken or buy rotisserie chicken. It cuts your prep time significantly. Also, consider using pre-chopped vegetables. Many grocery stores offer diced cucumbers and tomatoes. This can help you whip up your salad even faster. To enhance the flavor, use fresh herbs like parsley or dill. These herbs add a nice touch. You can also try a sprinkle of oregano for a Mediterranean twist. When selecting ingredients, choose ripe cherry tomatoes and firm cucumbers for crunch. Freshness makes a big difference in taste. Always opt for high-quality feta cheese; it elevates the whole dish. Pro Tips Fresh Ingredients: Always use the freshest ingredients possible for the best flavors in your salad. Chill Before Serving: For an even more refreshing taste, chill the salad in the refrigerator for 30 minutes before serving. Customizable Add-Ins: Feel free to add your favorite ingredients like avocado or bell peppers to make the salad your own. Perfect Pairing: This salad pairs wonderfully with crusty bread or pita chips for a complete meal. {{image_2}} To make a Mediterranean twist, add roasted red peppers. They bring a sweet and smoky flavor. You can use jarred or fresh peppers. Just chop them up and mix them in. Incorporating artichoke hearts also enhances this salad. They add a unique taste and chewy texture. Canned artichokes work well. Just drain and chop them before adding. Mixing in baby spinach gives the salad a fresh crunch. Spinach pairs great with feta and chicken. You get added nutrients and flavor in every bite. You can also substitute with grilled chicken. This gives a smoky flavor. Just grill the chicken until it’s fully cooked and slice it up. It adds a nice charred taste. Including bell peppers and capers makes this salad Greek-inspired. Bell peppers add sweetness and crunch. Capers bring a salty bite. Just chop and toss them in for a vibrant mix. Switching up the cheese options can also change the salad. Try goat cheese for a tangy twist. Or use a dairy-free feta for a lighter choice. This lets you enjoy the salad your way. To store your leftover feta chicken salad, use an airtight container. This keeps the salad fresh. Place the salad in the container and seal it tightly. Store it in the fridge. It can stay fresh for up to three days. After that, the flavors may fade, and the texture may change. You can make this salad ahead of time. Just prepare all the ingredients and mix them. It tastes even better after a few hours. If you want to freeze it, be careful. Freezing can change the texture of the chicken and veggies. I suggest keeping the dressing separate if you freeze it. This way, the salad stays fresh when you thaw it. When you reheat the salad, do it slowly. Use the microwave or a stovetop pan on low heat. Take care not to overheat it. You want to keep the chicken tender and the veggies crisp. If you can, add a little fresh parsley after reheating. This helps keep the flavor bright and fresh. You can try several options for feta cheese. Goat cheese mimics the tangy flavor well. For a creamy texture, use ricotta or cream cheese. If you need a dairy-free option, try tofu or cashew cheese. They can provide a similar texture but will change the taste slightly. Yes, Feta Chicken Salad is quite healthy. It has lean protein from chicken, healthy fats from olives and olive oil, and vitamins from veggies. The salad is low in calories and high in nutrients. Each ingredient adds to your overall health without many empty calories. You can make this salad ahead of time. To keep it fresh, store the dressing separately. Mix the salad and dressing just before serving. This keeps the veggies crisp and prevents sogginess. You can prepare the ingredients a day ahead and combine them when you are ready to eat. This Feta Chicken Salad blends simple, fresh ingredients for a tasty dish. You learned how to combine chicken, veggies, olives, and cheese. We discussed making a zesty dressing and serving options. Remember, balance your flavors and store leftovers properly. These tips help you enjoy it longer. Whether you stick to the classic or try variations, this salad fits many tastes. Embrace your creativity and enjoy every bite!

Looking to liven up your meals? This Feta Chicken Salad is fresh, flavorful, and easy to make! Packed with juicy chicken, crisp veggies, and tangy feta, it brings a burst …

Read more

Categories Salads

Easy Caramel Apple Bites Fun and Delicious Treat

July 29, 2025 by Chef Luca
To make easy caramel apple bites, you will need: - 2 medium apples (any variety, preferably Granny Smith or Honeycrisp) - 1 cup of caramel candies - 2 tablespoons of milk or cream - 1 cup of assorted toppings (chopped nuts, mini chocolate chips, sprinkles, or crushed Oreos) - Wooden skewers or toothpicks for dipping Choose firm apples for the best bites. Granny Smith apples work well for their tartness. Honeycrisp apples offer a sweet crunch. Look for apples without bruises or soft spots. Fresh apples hold their shape better when dipped in caramel. You want them to provide a nice contrast to the sweet caramel. Accurate measuring matters in this recipe. Use a measuring cup for the caramel candies and milk. For the toppings, you can mix and match. Keep a 1-cup measure handy. This helps ensure you have enough toppings for all your bites. Feel free to adjust the amount based on your taste. To start, you need to prepare your apples. Wash them well and dry them completely. Then, cut each apple into small wedges or cubes. This makes them easy to eat. Insert a wooden skewer or toothpick into each piece. This step is important for easy handling later. Next, melt the caramel. Take a microwave-safe bowl and add your caramel candies. Pour in two tablespoons of milk or cream. This helps the caramel stay smooth. Microwave the bowl for 30 seconds. Stir the caramel each time you check. Keep doing this until it melts fully. It should be smooth and glossy. Now the fun part begins! Dip each apple piece into the warm caramel. Make sure one side gets fully coated. The warmth helps the caramel stick well. Once coated, roll or sprinkle your apple bites in the toppings you chose. Do this quickly while the caramel is still sticky. Finally, place the apple bites on a tray lined with wax paper. Let them cool for 15 to 20 minutes. This way, the caramel will set nicely. You can find the full recipe in the earlier section for more details. Sticky caramel can be a hassle. To keep it smooth, use a microwave. Heat the caramel candies with milk in short bursts. Stir in between to avoid burning. If your caramel cools too fast, it will get sticky. You can reheat it in the microwave again. Aim for a warm, smooth texture. This makes it easier to dip your apple bites. Presentation is key to making your treats pop. Start by using a clean, decorative plate. Arrange your caramel apple bites in a neat pattern. Drizzling melted caramel over them adds a nice touch. You can also scatter extra toppings around the plate. This adds color and makes it look more inviting. Use small bowls for toppings if you want to let guests choose their favorites. Toppings can make or break your caramel apple bites. For a classic feel, try chopped nuts. They add crunch and flavor. Mini chocolate chips bring sweetness and fun. Sprinkles add color and excitement. Crushed Oreos give a nice twist. Mix and match your toppings to find your favorite blend. I suggest using what you love most to make it special. Experimenting is part of the fun! For a complete guide, check out the Full Recipe. {{image_2}} You can mix things up with different flavors. Try adding a pinch of sea salt to your caramel. This will create a sweet and salty treat. Another option is to use flavored caramel, like chocolate or vanilla. You can also drizzle melted chocolate on top for a richer taste. Combine caramel and chocolate for a delicious duo! If you want a healthier option, think about using dried fruit. Chopped dates or apricots work well. They add natural sweetness and chewiness. You can also use seeds like pumpkin or sunflower for a crunch. Nut butter is another great choice. Drizzle a little peanut or almond butter for extra flavor! Seasonal toppings can make your caramel apple bites special. In fall, use crushed candy corn or pumpkin spice. For winter, add crushed peppermint or white chocolate. In spring, fresh berries can add a pop of color and flavor. In summer, sprinkle some toasted coconut or citrus zest for a tropical twist! You can find the Full Recipe to get started on these fun variations. To keep your caramel apple bites fresh, store them in an airtight container. Line the container with parchment paper to prevent sticking. Place a layer of wax paper between each layer of apple bites. This helps avoid a gooey mess. Store in a cool, dry place away from sunlight. Yes, you can freeze caramel apple bites! However, freezing changes their texture. To freeze, wrap each piece in plastic wrap. Then, place them in a freezer bag. Remove as much air as possible. This helps prevent freezer burn. When you're ready to eat them, let them thaw in the fridge. At room temperature, caramel apple bites last about 2-3 days. In the fridge, they can last up to a week. If you freeze them, they can stay good for 1-2 months. Always check for any signs of spoilage before enjoying. Yes, you can use store-bought caramel sauce. It saves time and effort. Just warm it slightly in the microwave. This will help it coat the apples better. Store-bought sauce is often smooth and creamy. It works well for dipping, just like homemade caramel. I recommend using Granny Smith or Honeycrisp apples. These apples are crisp and tart. Their flavor balances the sweetness of the caramel. You can also try Fuji or Gala apples for a sweeter taste. Make sure the apples are firm and fresh for the best results. To make caramel apple bites without added sugar, use natural sweeteners. For example, you can use dates or pureed fruit. Melt down unsweetened chocolate with coconut oil for a different coating. You can also skip the caramel and use yogurt. This creates a healthier treat without losing flavor. In this blog post, we explored how to make delicious caramel apples. We covered the essential ingredients, from selecting the best apples to measuring them correctly. The step-by-step instructions guided you through preparation and coating techniques for perfect results. We shared tips to avoid sticky caramel and ways to present your treats beautifully. You can even mix flavors or choose healthy toppings for a twist. Finally, you learned how to store your caramel apple bites. Enjoy making these sweet snacks, and share them with friends and family!

Craving a fun treat that’s easy to make? You’re in the right place! My Easy Caramel Apple Bites are a simple way to combine sweetness and crunch. They’re perfect for …

Read more

Categories Desserts

Moist & Healthy Turkey Meatloaf Recipe Made Simple

July 29, 2025 by Chef Luca
To make a moist and healthy turkey meatloaf, you will need: - 1 lb ground turkey - 1 cup rolled oats - 1/2 cup finely chopped onion - 2 cloves garlic, minced - 1/2 cup grated zucchini (squeeze out excess moisture) - 1/2 cup grated carrot - 1/4 cup low-sodium chicken broth - 1 large egg - 2 tablespoons Worcestershire sauce - 1 tablespoon Dijon mustard - 1 teaspoon dried thyme - 1 teaspoon dried oregano - Salt and pepper to taste - 1/4 cup ketchup (for topping) These ingredients create a tasty and healthy meatloaf. The ground turkey keeps the dish lean, while oats add fiber for extra nutrition. The veggies, like zucchini and carrot, provide moisture and flavor. You can enhance your turkey meatloaf with these optional ingredients: - 1/2 cup bell pepper, finely chopped - 1/4 cup fresh parsley, chopped - 1 teaspoon smoked paprika - 1 tablespoon hot sauce Adding these items gives your meatloaf a personal touch. The bell pepper adds crunch. Fresh parsley brings brightness, while smoked paprika gives a nice depth of flavor. If you want to make this dish even healthier, consider these substitutes: - Replace ground turkey with lean ground chicken. - Use quinoa instead of rolled oats. - Swap ketchup for a homemade tomato sauce. These changes keep the meatloaf moist while reducing calories and sodium. Every bite can still be delicious and nutritious, letting you enjoy guilt-free comfort food. For the full recipe, check out the complete details. To start, gather all your ingredients. You will need: - 1 lb ground turkey - 1 cup rolled oats - 1/2 cup finely chopped onion - 2 cloves garlic, minced - 1/2 cup grated zucchini (squeeze out excess moisture) - 1/2 cup grated carrot - 1/4 cup low-sodium chicken broth - 1 large egg - 2 tablespoons Worcestershire sauce - 1 tablespoon Dijon mustard - 1 teaspoon dried thyme - 1 teaspoon dried oregano - Salt and pepper to taste - 1/4 cup ketchup (for topping) Preheat your oven to 350°F (175°C). In a large bowl, mix the turkey, oats, onion, and garlic. Add in the zucchini and carrot. Then, pour in the chicken broth, egg, Worcestershire sauce, and mustard. Season with thyme, oregano, salt, and pepper. Use your hands or a spatula to combine everything, but don’t over mix. This keeps the meatloaf moist. Once mixed, shape the mixture into a loaf in a loaf pan. Smooth the top for even baking. Spread the ketchup on top for a tasty glaze. Place the loaf pan in the preheated oven. Bake for 50 to 60 minutes. The meatloaf should be golden brown and firm. This step is key to locking in flavor and moisture. To ensure your meatloaf is cooked, use a meat thermometer. Insert it into the center of the loaf. It should read 165°F (74°C). If you don’t have a thermometer, cut into the meatloaf. The juices should run clear, not pink. Let the meatloaf cool in the pan for about 10 minutes. This helps it set up for easier slicing. Try this recipe for a delicious meal! For the full recipe, check out the details above. To keep your turkey meatloaf moist, use the right ingredients. Ground turkey can be dry, so add grated zucchini and carrot for moisture. The rolled oats also help hold in liquid. Make sure to squeeze out excess moisture from the zucchini. This step is key to avoid a soggy loaf. Mixing in low-sodium chicken broth adds flavor and helps with texture. Lastly, avoid overmixing the meatloaf; it can make it tough. There are a few common mistakes I see often. First, don’t skip the egg. It binds the loaf and adds moisture. Next, be careful with the salt. Too much can dry out the meat. Also, check the oven temperature. If it’s too high, the outside will cook too fast, leaving the inside raw. Lastly, don’t forget to let it rest after baking. This helps the juices redistribute and keeps it juicy. For serving, slice the meatloaf and place it on a nice platter. Garnish with fresh parsley for color. Pair it with steamed broccoli or a garden salad for a balanced meal. Mashed potatoes or quinoa also work well. If you want a fun twist, serve it in a sandwich with whole grain bread. Enjoy your delicious creation! For the full recipe, check out the [Full Recipe]. {{image_2}} You can make your turkey meatloaf even tastier. Add-ins can boost flavor and texture. Try mixing in: - 1/2 cup chopped bell peppers for sweetness. - 1/4 cup diced mushrooms for earthiness. - 1/2 cup shredded cheese for creaminess. - Fresh herbs like parsley or basil for a bright touch. These add-ins can change the flavor profile. They also make your meatloaf unique. Experiment with your favorites to find the best mix. If you need gluten-free options, you can replace oats with almond flour. It keeps the texture light while cutting carbs. For a low-carb twist, try using cauliflower rice instead of oats. This option adds moisture without extra carbs. Both swaps will keep your meatloaf healthy and delicious. Meatloaf muffins are a fun twist on the classic recipe. They cook faster and are perfect for meal prep. To make them, use a muffin tin instead of a loaf pan. Portion the meat mixture into each muffin cup. Bake them for about 25-30 minutes. This method gives you perfectly sized portions. Plus, kids love them! After you enjoy your moist and healthy turkey meatloaf, let any leftovers cool down. Once cool, wrap the meatloaf tightly in plastic wrap or foil. You can also place it in an airtight container. This helps keep it fresh and tasty. Store it in the fridge for up to four days. Make sure to label your container with the date. This way, you can track how long it has been stored. If you want to keep your turkey meatloaf longer, freezing is a great option. Slice the meatloaf into pieces for easy serving later. Wrap each slice in plastic wrap, then place them in a freezer-safe bag. Be sure to remove as much air as possible. You can freeze it for up to three months. When you’re ready to enjoy it, just thaw it in the fridge overnight. To reheat your turkey meatloaf, preheat your oven to 350°F (175°C). Place the slices in a baking dish and cover with foil. Heat for about 20-25 minutes or until the meatloaf is warm throughout. You can also reheat it in the microwave. Use a microwave-safe plate and cover it with a damp paper towel. Heat in 30-second intervals until it’s warm. Enjoy your meal again with the same great taste! You can use ground chicken as a substitute for ground turkey. Both meats are lean and cook well. If you want to try something different, ground beef works too. Choose a lean cut to keep it healthier. Ground pork offers a richer taste but has more fat. Always check the fat content to fit your diet. To make meatloaf without breadcrumbs, use rolled oats. They add texture and help bind the meat. You can also use mashed potatoes or cooked quinoa. Both options keep the meatloaf moist and tasty. Just remember to adjust the liquid in your recipe to avoid excess moisture. Meatloaf lasts about three to four days in the fridge. Store it in an airtight container to keep it fresh. If you want to keep it longer, freeze it. Frozen meatloaf can last up to three months. Just thaw it in the fridge before reheating. For the best taste, eat it within a week. You learned how to make a tasty turkey meatloaf. We discussed the key ingredients and some healthy swaps. You now know how to prepare, bake, and check for doneness. I shared tips to keep it moist and common mistakes to avoid. You can even try fun variations, like meatloaf muffins. Proper storage keeps your leftovers fresh. Overall, turkey meatloaf is simple and full of flavor. Enjoy making it your own!

Are you tired of dry, boring meatloaf? You’re in the right place! My Moist & Healthy Turkey Meatloaf Recipe Made Simple is your solution. This dish packs flavor and nutrition, …

Read more

Categories Dinner

Super Easy Toddler Lunch Ideas for Busy Parents

July 29, 2025 by Chef Luca
- 4 whole wheat tortillas - 1 cup hummus (any flavor) - 1 small cucumber, thinly sliced - 1 red bell pepper, thinly sliced - 1 small carrot, grated - 1 avocado, sliced - 1 cup baby spinach The main star of this recipe is the whole wheat tortillas. They are soft, easy to roll, and healthy for your toddler. Hummus adds creaminess and flavor. You can choose any flavor your child likes. Fresh veggies make the wrap colorful and crunchy. Sliced cucumber, red bell pepper, grated carrot, avocado, and baby spinach bring great nutrition and taste. - 1 tablespoon olive oil - Salt and pepper to taste A drizzle of olive oil adds richness. You can also sprinkle some salt and pepper to enhance flavor. These simple additions elevate the taste of the veggies without overpowering them. - Health advantages for toddlers - Importance of variety in meals These wraps offer many health benefits. Whole wheat tortillas provide fiber, which helps digestion. Hummus is packed with protein, making it filling. Fresh veggies add vitamins and minerals vital for growth. Offering a variety of foods helps toddlers develop healthy eating habits. It exposes them to different flavors and textures. The colorful nature of these wraps can make meals exciting. You can find the full recipe for Rainbow Veggie Wraps in the provided details. 1. Laying out tortillas Start by laying out your whole wheat tortillas. Place them on a clean surface. This makes it easy to spread the hummus. 2. Spreading hummus Next, spread an even layer of hummus on each tortilla. Leave a small border around the edges. This keeps the filling from spilling out when you roll. 1. Layering the vegetables On one side of each tortilla, layer your fresh veggies. Add sliced cucumber, red bell pepper, grated carrot, avocado slices, and baby spinach. This mix adds color and crunch. 2. Rolling the wraps Carefully roll the tortilla tightly from the veggie side. Tuck in the fillings as you go. This helps keep everything inside. 1. Slice options Once rolled, slice each wrap into bite-sized pieces or halves. This makes it easier for little hands to grab. 2. Presentation tips for a fun meal Arrange the veggie wraps on a colorful plate. Serve with a small bowl of extra hummus for dipping. Add a few cherry tomatoes on the side for a pop of color. Kids love fun food! Involving toddlers in meal prep makes lunch exciting. Let them wash veggies or spread hummus. This gives them a sense of ownership. You can also let them pick their favorite colors for the wraps. For colorful presentation, use a bright plate. Cut the wraps into fun shapes with cookie cutters. Add extra veggies or fruits on the side. Cherry tomatoes and apple slices add color and taste. Meal prepping saves time during busy weeks. Make wraps in bulk on weekends. Store them in the fridge for quick lunches. You can also chop veggies ahead of time. Keep them in a sealed container for freshness. For quick assembly, have all ingredients ready. Lay out the tortillas and the fillings. Let your toddler choose what goes in their wrap. This makes lunch quick and fun. Dairy-free alternatives make the wraps suitable for everyone. Use avocado or dairy-free cheese instead of regular cheese. These options add creaminess and flavor. Adding protein options keeps your toddler full. Include sliced turkey, chicken, or beans. These foods are tasty and healthy. You can also mix in nuts for extra crunch. For more details on how to make these wraps, check the Full Recipe. {{image_2}} You can switch up the tortillas for fun. Try spinach, tomato, or even rice paper. Each one offers a unique taste and color. You can also use pita bread for a different shape. It adds a fun twist to every bite. When it comes to spreads, hummus is great, but you can try other options too. Cream cheese or guacamole are tasty choices. Nut butter adds a sweet touch. Just ensure there are no nut allergies first. Using seasonal veggies can make your wraps more exciting. In spring, add fresh asparagus or radishes for crunch. Summer brings ripe tomatoes and zucchini. Fall is perfect for sweet bell peppers and squash. Winter can feature carrots and hearty greens like kale. Local produce is always a good idea. It’s fresher and often tastier. Check your local farmers' market for what's in season. Supporting local farms is also great for the community. Adding sweet items can make your wraps even better. Try slices of strawberries or apple for a fruity touch. Dried cranberries or raisins can also add sweetness. Zesty sauces can bring out more flavor. A splash of lemon juice wakes up the taste. You can use yogurt-based ranch or a mild salsa for added zest. Just make sure the flavors are kid-friendly. For a full recipe, check out the Rainbow Veggie Wraps 🥬. These ideas will help you keep lunch fun and tasty! To keep your Rainbow Veggie Wraps fresh, wrap them tightly in foil or plastic wrap. This helps keep the ingredients crisp and tasty. You can also use reusable containers with tight lids. Choose containers that fit the wraps snugly to avoid movement. These wraps can last up to three days in the fridge. Look for wilting veggies or a sour smell to spot spoilage. If they look or smell off, it's best to toss them. Yes, you can freeze these wraps! Wrap them in foil and place them in a freezer bag. They can last up to three months in the freezer. When you're ready to eat, thaw them overnight in the fridge. For a quick thaw, leave them out at room temperature for a couple of hours. Enjoy your easy lunch! For the full recipe, check out Rainbow Veggie Wraps 🥬. You can add protein and healthy fats to these wraps. Try adding cooked chicken, beans, or cheese. You can also include seeds like chia or hemp. These extras boost the fiber and protein levels. This helps keep your toddler full and happy. There are many fun fillings to try! You can use sliced turkey or cheese for a savory twist. For a sweet option, try adding bananas or strawberries. You can also mix in some cooked quinoa or lentils for extra texture. Kids love variety, so keep it fresh! Yes, you can use gluten-free tortillas! Look for brands made from rice or corn. These options are tasty and safe for those with gluten allergies. Just check the label to ensure they fit your needs. Your toddler will love them just as much! Make it a game! Let your toddler pick veggies at the store. You can also use fun shapes with cookie cutters. Try to serve new veggies with a dip they like, like hummus or yogurt. Praise them when they try something new. Make it fun and stress-free! In this post, I covered how to make nutritious wraps for toddlers using whole wheat tortillas, hummus, and fresh veggies. I shared tips on prep, assembly, and serving ideas. Remember to involve your little ones to make meal prep fun. Don't forget to explore variations and seasonality for exciting flavors! Proper storage will keep your wraps fresh and tasty. These healthy choices will help your toddlers enjoy diverse meals. Embrace creativity in their food and set the stage for lifelong healthy eating habits.

Finding quick and easy lunch ideas for your toddler can feel like a challenge. As a busy parent, you want meals that are not only simple but also nutritious. In …

Read more

Categories Appetizers

Healthy Vegan Pecan Pie Bars Rich and Delicious Treat

July 29, 2025 by Chef Luca
To make these tasty bars, gather the following items: - 1 cup almond flour - 1/2 cup rolled oats - 1/4 cup coconut oil, melted - 1/4 cup maple syrup - 1/4 teaspoon salt - 1/2 teaspoon vanilla extract - 1 cup pecans, roughly chopped - 1/2 cup medjool dates, pitted and chopped - 1/4 cup almond butter - 1/4 cup unsweetened almond milk - 1 teaspoon ground cinnamon - 1/2 teaspoon nutmeg - Pinch of sea salt These ingredients combine to create a crust and filling that are rich in flavor and nutrients. You can adjust the recipe to suit your taste. Here are some fun options: - Add dark chocolate chips for extra sweetness. - Use walnuts instead of pecans for a different nutty flavor. - Mix in dried fruit like cranberries or raisins for added texture. - Try different nut butters, like cashew or peanut butter. Feel free to explore and make this recipe your own! Many ingredients in these bars offer health perks: - Almond flour is low in carbs and high in protein. It helps keep you full longer. - Rolled oats provide fiber, which aids digestion and keeps your heart healthy. - Pecans are rich in healthy fats and antioxidants. They support brain health and reduce inflammation. - Medjool dates are natural sweeteners. They add fiber, potassium, and energy to your bars. - Maple syrup is a better alternative to refined sugar, offering a lower glycemic index. Using these ingredients not only makes your bars delicious but also healthy! For the complete recipe, check out the Full Recipe section. Start by preheating your oven to 350°F (175°C). Line an 8x8 inch baking dish with parchment paper. Leave some paper hanging over the edges for easy removal later. In a large bowl, mix the almond flour, rolled oats, melted coconut oil, maple syrup, and salt together. Stir until the dough feels crumbly. Press this mixture firmly into the bottom of your prepared dish. This forms a solid crust. Bake the crust for 10 minutes. Once done, take it out and let it cool a bit. For the filling, grab another bowl. Blend the pitted medjool dates, almond butter, almond milk, cinnamon, nutmeg, and a pinch of sea salt together. You want it smooth and creamy. This creamy mix is the heart of the bars. Once blended, fold in the chopped pecans. Mix until everything is well combined. The pecans give a nice crunch to the filling. Spread the pecan filling evenly over your cooled crust. Make sure it covers the crust all the way to the edges. Now, pop the dish back in the oven. Bake for another 20 to 25 minutes. You want the filling set and the edges slightly golden. After baking, let the bars cool completely in the pan. Use the parchment paper to lift them out. Cut into squares or bars. Enjoy your healthy vegan pecan pie bars as a sweet treat! For the full recipe, check out the details above. When making these bars, watch out for a few common mistakes. First, do not skip the cooling step for the crust. If the crust is warm, the filling will spread too much. Second, blend the filling well. You want it smooth and creamy. Lumpy filling can ruin the texture. Lastly, let the bars cool completely before cutting. This helps them hold their shape. To get a great crust, use almond flour and rolled oats. This mix gives a nice texture. Make sure to press the dough firmly into the pan. This helps it stay together when baked. Bake it just long enough. About 10 minutes at 350°F is perfect. This gives a light golden color without overcooking. Presentation can make a big difference. Dust your bars with powdered sugar for a sweet touch. You can also add a dollop of coconut cream on top. This adds creaminess and looks beautiful. Serve them on a nice plate, and cut them into squares. You can also add fresh pecans on top for added flair. Enjoy these Healthy Vegan Pecan Pie Bars as a tasty treat! For the full recipe, check the earlier section. {{image_2}} You can easily make these bars gluten-free. The main ingredient, almond flour, is naturally gluten-free. If you want a different texture, use oat flour instead of almond flour. Just make sure your oats are certified gluten-free. This way, everyone can enjoy the bars without worry. If you need nut-free options, use sunflower seed butter instead of almond butter. You can also swap out the pecans for seeds like pumpkin seeds. These swaps keep the bars tasty and safe for nut-free diets. They still pack a great crunch and flavor! To boost flavor, add chocolate chips or dried fruit, like cranberries or raisins. You can mix in a touch of orange zest for a bright twist. For a spicier kick, toss in some cayenne pepper or ginger. These small tweaks make your pecan pie bars even more exciting and unique. For the complete recipe, check the section titled Full Recipe. To keep your healthy vegan pecan pie bars fresh, store them in an airtight container. Layer parchment paper between the bars to prevent sticking. Place the container in the fridge for up to one week. This way, the bars maintain their texture and flavor. If you plan to eat them within a few days, they can stay at room temperature. Just make sure it is a cool spot away from sunlight. Freezing is a great option for longer storage. First, cut the bars into squares. Wrap each square in plastic wrap. Then, place them in a freezer-safe bag or container. You can freeze them for up to three months. When you're ready to enjoy, just take out what you need and let them thaw in the fridge overnight. If you prefer your bars warm, you can reheat them. Place a bar on a microwave-safe plate. Heat it for about 15-20 seconds. Check if it's warm enough for your taste. You can also use the oven. Preheat the oven to 350°F (175°C). Place the bars on a baking sheet and heat for about 5-7 minutes. This helps revive the flavors and makes them taste fresh. Enjoy them as a special treat! Yes, you can swap maple syrup for agave nectar or brown rice syrup. Both options work well. Just remember that they may change the taste slightly. If you want a sugar-free choice, use stevia or monk fruit. These can help keep your bars sweet without adding sugar. These bars can last up to a week in the fridge. Store them in an airtight container to keep them fresh. If you want to save them longer, you can freeze them. Just wrap each bar in plastic wrap and place them in a freezer bag. They stay good for about three months in the freezer. Yes, these bars are gluten-free! The main ingredients are almond flour and oats. Be sure to use certified gluten-free oats to avoid any cross-contamination. This makes the bars safe for anyone with gluten sensitivities. You can serve these bars as a snack or dessert. They taste great on their own but are even better with toppings. Try adding coconut cream or a scoop of vegan ice cream. A sprinkle of cinnamon on top adds a nice touch too. For more fun, pair them with fresh fruit or nuts. You can find the full recipe for Healthy Vegan Pecan Pie Bars in the article above. Enjoy making these rich and delicious treats! In this post, we explored how to make healthy vegan pecan pie bars. We discussed key ingredients that boost health, along with optional choices for customization. I shared step-by-step instructions for crafting the crust and filling, plus tips to avoid common mistakes. These bars make a tasty and wholesome treat. Remember, with a few tweaks, you can create your perfect version. Enjoy experimenting with flavors and sharing these bars with friends. They’ll love them as much as you do.

Looking for a delicious treat that’s kind to your body? Try my Healthy Vegan Pecan Pie Bars! These bars pack all the rich, nutty flavor of traditional pecan pie but …

Read more

Categories Desserts

Pumpkindoodle Cookies Delightful and Cozy Treat

July 29, 2025 by Chef Luca
To make Pumpkindoodle cookies, you will need some simple ingredients. Here is the list: - 1 cup pumpkin puree - 1/2 cup unsalted butter, softened - 1 cup brown sugar, packed - 1/2 cup granulated sugar - 1 large egg - 1 teaspoon vanilla extract - 2 cups all-purpose flour - 1 teaspoon baking soda - 1 teaspoon ground cinnamon - 1/2 teaspoon ground nutmeg - 1/4 teaspoon ground ginger - 1/4 teaspoon salt - 1/2 cup white chocolate chips (optional) - 1/2 cup chopped pecans or walnuts (optional) These ingredients create a cozy and warm flavor. The pumpkin puree gives the cookies a lovely color and taste. Butter adds richness. Brown sugar makes them soft and chewy. Granulated sugar helps them spread nicely. The egg binds everything together. Vanilla adds a sweet touch. Spices like cinnamon and nutmeg bring warmth. You can choose to add white chocolate or nuts for extra texture. Both options make the cookies even more delightful. For the full recipe, check the instructions later in this article. Enjoy gathering your ingredients; each one plays a role in making these cookies special! Start by preheating your oven to 350°F (175°C). This step is key for even baking. While the oven heats, line a baking sheet with parchment paper. This keeps the cookies from sticking. In a large bowl, combine 1/2 cup softened butter, 1 cup brown sugar, and 1/2 cup granulated sugar. Use an electric mixer to beat them together until light and fluffy. This should take about 2-3 minutes. Next, add 1 cup pumpkin puree, 1 large egg, and 1 teaspoon vanilla extract. Mix until everything is well combined. In another bowl, whisk together 2 cups all-purpose flour, 1 teaspoon baking soda, 1 teaspoon ground cinnamon, 1/2 teaspoon ground nutmeg, 1/4 teaspoon ground ginger, and 1/4 teaspoon salt. Gradually add this dry mixture to the wet ingredients. Stir just until everything is mixed. Don’t overmix, or your cookies may be tough. Use a cookie scoop or a spoon to drop tablespoon-sized balls of dough onto your prepared baking sheet. Leave about 2 inches between each ball. Bake in your preheated oven for 10-12 minutes. The edges should be set, and the centers will look soft. After baking, let the cookies cool on the baking sheet for about 5 minutes. Then, transfer them to a wire rack to cool completely. Enjoy your cozy treat! For the full recipe, check out the details above. To get the best texture, start with room temperature butter. This helps the butter mix well with sugar. Cream the butter and sugars until light and fluffy. This step adds air and keeps cookies soft. Don’t overmix the dough. Mix just until you see no dry flour. This helps the cookies stay tender. You can swap pumpkin puree for applesauce if you want a lighter cookie. For a dairy-free option, use coconut oil instead of butter. If you need to avoid gluten, use a gluten-free flour blend. You can also use maple syrup instead of sugars for a unique flavor. Set your oven to 350°F (175°C) for even baking. Bake the cookies for 10-12 minutes. Watch closely as baking times can vary by oven. The edges should be set, but the centers can look soft. This will create a chewy texture. Let them cool on the sheet for a few minutes before moving them. {{image_2}} You can make your pumpkindoodle cookies even more fun! Adding mix-ins gives each cookie a unique taste. Consider using: - White chocolate chips - Dark chocolate chips - Chopped pecans - Chopped walnuts - Dried cranberries - Raisins These mix-ins add texture and surprise. Just fold them in gently after mixing your dough. This step makes your cookies special and personal. If you have dietary needs, don't worry! You can still enjoy these cookies. For a gluten-free version, replace all-purpose flour with a gluten-free blend. Many blends work well. Just ensure it has a binding agent. For a vegan option, swap the butter with coconut oil or vegan butter. Use a flax egg instead of a regular egg. To make a flax egg, mix one tablespoon of ground flaxseed with three tablespoons of water. Let it sit for a few minutes until it thickens. You can play with spices to make these cookies your own. If you like a stronger kick, add more cinnamon or nutmeg. For a twist, try adding: - Pumpkin spice mix - Allspice - Cardamom These spices bring warmth and depth to the cookies. You can also experiment with extracts. A splash of almond or maple extract can create a whole new flavor profile. Feel free to try your ideas! Each change can lead to a new favorite cookie. Discover the joy of personalizing your pumpkindoodle cookies! For the full recipe, check out the earlier section. You want to keep your pumpkindoodle cookies fresh and tasty. Let them cool completely first. Then, place them in an airtight container. This keeps them soft and chewy. You can store them at room temperature for up to five days. If you live in a humid area, use the fridge. It helps prevent them from getting too soft. Freezing is a great way to save extra cookies. Start by cooling the cookies as before. Then, place them on a baking sheet in a single layer. Freeze them for about an hour. After that, move them to a freezer-safe bag. They can last up to three months in the freezer. When you want to eat one, just take it out and let it thaw. To keep your cookies fresh, avoid mixing them with other types. Different cookies can share their flavors. If you want to keep them longer, use parchment paper between layers. This helps prevent sticking. Check your cookies often to make sure they stay soft. For the full recipe, refer back to the ingredients and steps listed earlier. Pumpkindoodle cookies stand out due to their warm fall flavors. They blend pumpkin puree with spices like cinnamon and nutmeg. This mix creates a cozy taste perfect for autumn. The soft texture makes each bite feel like a hug. Adding white chocolate chips or nuts adds a delightful crunch. This combination of flavors gives these cookies a unique twist on classic snickerdoodles. Yes, you can make these cookies ahead of time! Prepare the dough and chill it in the fridge for up to 24 hours. Chilling helps the flavors meld, making the cookies even better. You can also freeze the dough in balls for up to three months. When ready to bake, just pop them in the oven from frozen. This makes it easy and fun to enjoy fresh cookies anytime! Pumpkindoodle cookies pair well with several drinks. A warm cup of chai tea complements the spices nicely. Hot apple cider adds to the fall vibe. You could also enjoy these cookies with a scoop of vanilla ice cream for a treat. For a cozy snack, serve them with a glass of milk. Each combo enhances the cookie's cozy flavors. To know when your cookies are done, look for golden edges. The centers should be slightly soft and look puffy. If the cookies start to crack on top, they are almost ready. Bake them for about 10-12 minutes at 350°F. The aroma will fill your kitchen, making it hard to wait! For the best results, let them cool slightly before enjoying. You learned how to make delicious Pumpkindoodle cookies. We covered the key ingredients, step-by-step instructions, and tips for perfecting your cookies. Remember, you can always add your own twist with mix-ins or try gluten-free options. Storing them well keeps your treats fresh longer. Enjoy baking these tasty cookies for yourself or to share with others. Happy baking!

Craving a sweet treat that captures the essence of fall? Let me introduce you to Pumpkindoodle Cookies! These cozy cookies blend the flavors of pumpkin, spices, and a hint of …

Read more

Categories Desserts

Chewy Apple Cider Cookies Irresistible Flavor Await

July 29, 2025 by Chef Luca
These cookies shine with simple yet flavorful ingredients. Here is what you will need: - 2 cups all-purpose flour - 1 teaspoon baking soda - 1 teaspoon ground cinnamon - 1/2 teaspoon ground nutmeg - 1/2 teaspoon salt - 1 cup unsalted butter, softened - 1 cup brown sugar, packed - 1/2 cup granulated sugar - 1 large egg - 1 tablespoon pure vanilla extract - 1/2 cup apple cider - 1 cup chopped dried apples (or fresh diced, if preferred) - 1/2 cup walnuts, chopped (optional) The flour gives the cookies structure. Baking soda helps them rise. Cinnamon and nutmeg add warmth. Salt enhances all the flavors. The butter makes them rich and chewy. Brown sugar adds moisture and depth, while granulated sugar gives a nice crunch. The egg binds everything together. Vanilla brings out the sweetness. Apple cider infuses a lovely autumn flavor. Dried apples offer chewiness, and walnuts provide a nice crunch. You can boost the cookies with some fun add-ins. Here are a few ideas: - Chopped pecans for a different nutty flavor. - A pinch of ginger for added warmth. - White chocolate chips for a sweet touch. - A sprinkle of sea salt on top for contrast. These additions can change the flavor and texture. Feel free to mix and match based on your taste! Using high-quality ingredients is key. Here are some helpful tips: - Choose fresh spices. Old spices lose flavor. - Use real vanilla extract. It has better taste than imitation. - Opt for unsalted butter for better control of salt levels. - If you go for dried apples, pick ones without added sugar or preservatives. Good ingredients make a big difference in taste. Always look for the best quality you can find. For the full recipe, check the section above. Start by getting everything ready. Gather your ingredients and tools. You will need a medium bowl, a large mixing bowl, a whisk, and a cookie scoop or tablespoon. Measure out your ingredients carefully. You want to have: - 2 cups all-purpose flour - 1 teaspoon baking soda - 1 teaspoon ground cinnamon - 1/2 teaspoon ground nutmeg - 1/2 teaspoon salt - 1 cup unsalted butter, softened - 1 cup brown sugar, packed - 1/2 cup granulated sugar - 1 large egg - 1 tablespoon pure vanilla extract - 1/2 cup apple cider - 1 cup chopped dried apples - 1/2 cup walnuts, chopped (optional) This step sets you up for success in making chewy apple cider cookies. Now, let's mix. In the medium bowl, whisk the flour, baking soda, cinnamon, nutmeg, and salt. Set this dry mix aside. In your large bowl, beat the softened butter, brown sugar, and granulated sugar together. Blend them until creamy. Then, add the egg and vanilla extract. Mix until it's smooth and combined. Slowly pour in the apple cider while mixing. This adds great flavor and moisture. Next, combine your dry mix with the wet mixture. Stir until just combined. Avoid overmixing to keep your cookies chewy. Finally, fold in the chopped dried apples and walnuts if you're using them. You want these flavors to mix evenly throughout the dough. Preheat your oven to 350°F (175°C) while you prepare the cookies. Line a baking sheet with parchment paper. Using a cookie scoop or tablespoon, drop rounded dough onto the sheet. Space them about 2 inches apart. This helps them bake evenly. Bake for 12-15 minutes. Look for lightly golden edges and soft centers. This is the sweet spot for chewy cookies. Once baked, remove the cookies from the oven. Let them cool on the baking sheet for 5 minutes. This helps them set before you move them. Transfer the cookies to wire racks to cool completely. For a delightful presentation, serve them on a rustic wooden platter. A sprinkle of cinnamon and thin apple slices can add a lovely touch. Enjoy your chewy apple cider cookies! To get chewy apple cider cookies, focus on the right balance of wet and dry. Use room-temperature butter for a creamy mix. This helps the sugars blend well, adding to the chewiness. The apple cider brings moisture, making the cookies soft. Bake them just until the edges turn light brown. This keeps the centers soft and chewy. One common mistake is overmixing the dough. This can lead to tough cookies. Mix just until the dry ingredients combine. Also, watch your baking time closely. If you bake too long, the cookies will harden. Remember, they will continue to cook a bit after you take them out. If you have dietary needs, you can make easy swaps. For gluten-free cookies, use a gluten-free flour blend. If you need a vegan option, replace the egg with a flax egg or applesauce. You can also use coconut oil instead of butter for a dairy-free version. Adjust the sugar based on your taste or use alternatives like maple syrup for a different flavor. For the full recipe, check the earlier section. {{image_2}} You can make gluten-free chewy apple cider cookies. Use a gluten-free flour blend instead of regular flour. Look for a mix that includes xanthan gum. This helps to bind the dough. You can find many good options in stores. Just measure the same amount as the recipe calls for. The flavor and texture will still shine through. If you want vegan chewy apple cider cookies, swap out a few ingredients. Replace the egg with a flax egg. Mix 1 tablespoon of ground flaxseed with 2.5 tablespoons of water. Let it sit for five minutes to thicken. Use coconut oil instead of butter. This keeps the cookies moist. Also, choose a plant-based milk for the apple cider. Your cookies will still taste great! Boost the flavor of your chewy apple cider cookies with spices and extracts. Add more cinnamon or nutmeg for a stronger taste. A pinch of ginger can add warmth. You can also use maple extract for a sweet twist. If you love nuts, try adding pecans or almonds. Each choice brings a new layer of flavor to your cookies. To keep your chewy apple cider cookies fresh, store them in an airtight container. Make sure the cookies are cool before you place them in the container. This will prevent moisture from making them soggy. Layer parchment paper between the cookies to stop them from sticking together. Store the container in a cool, dry place away from sunlight. Your cookies will stay fresh for about one week this way. If you want to save some cookies for later, freezing is a great option. To freeze, first, let the cookies cool completely. Then, place them in a single layer on a baking sheet. Freeze them for about one hour. Once they are firm, transfer them to a freezer bag or container. Remove as much air as possible to prevent freezer burn. You can freeze them for up to three months. When you're ready to enjoy your cookies, you might find they need a little refresh. If they are soft, just pop them in a preheated oven at 350°F for about five minutes. This will bring back their chewy texture. If they are too hard, place them in a container with a slice of bread for a few hours. The bread will add moisture and soften the cookies. Enjoy your delicious chewy apple cider cookies! Yes, you can use fresh apples in this recipe. Just chop them into small pieces. Keep in mind that fresh apples add moisture. This can make the cookies softer. If you prefer a chewier texture, use dried apples instead. They offer great flavor and a wonderful chew. To know if your cookies are done, look for golden edges. The centers should be set but soft. They will firm up as they cool. A good rule is to bake them for 12-15 minutes. If you prefer them soft, take them out closer to 12 minutes. There are many fun ways to change up your cookies! Here are a few ideas: - Add spices: Try using ginger or allspice for more warmth. - Mix in nuts: Chopped pecans or almonds work great in the dough. - Use different fruits: You can swap in dried cranberries or raisins for a twist. - Ice them: A simple glaze can add a sweet touch on top. For the complete instructions and ingredient list for Chewy Apple Cider Cookies, check out the [Full Recipe]. This will guide you through every step to make these delicious treats. You now have all the tools to make chewy apple cider cookies. We covered key ingredients, mixing methods, and baking tips. You learned how to achieve the perfect texture and avoid common mistakes. Explore variations like gluten-free or vegan to suit your needs. Follow storage tips to keep your cookies fresh. With this knowledge, you can enjoy delicious cookies any time. Happy baking!

Get ready to indulge in the warm, sweet taste of fall with Chewy Apple Cider Cookies! With just a few simple ingredients, you can create cookies that are soft and …

Read more

Categories Desserts
Older posts
Newer posts
← Previous Page1 … Page57 Page58 Page59 … Page122 Next →

STIRRED RECIPES

Where every dish begins with a stir! 🍲✨

PAGES

Home About Contact Privacy Policy Terms & Conditions Cookie Policy GDPR Policy Copyright Policy Disclaimer

CATEGORIES

Appetizers Desserts Salads Breakfast Dinner

Contact

  • Pinterest
  • Mail
Copyright © 2026 Stirred Recipes. All rights reserved.