The Tasty Pumpkin Swirl Cheesecake Bars Recipe
![- Cream Cheese: This is key for a rich and creamy texture. Use full-fat cream cheese for the best results. - Pumpkin Puree: Choose pure pumpkin puree, not pumpkin pie filling. This gives the bars their wonderful flavor. - Spices and Flavorings: Ground cinnamon, nutmeg, ginger, and vanilla extract create a warm, cozy flavor. These spices make this dessert feel like fall. - Substitutions for Dietary Restrictions: If you need a gluten-free option, use gluten-free graham cracker crumbs. For dairy-free, try vegan cream cheese. - Toppings and Garnishes: You can add a dusting of powdered sugar, whipped cream, or even a drizzle of caramel. These extras make your bars look and taste even better. For the full recipe, check out the details above. Enjoy making these delicious bars! 1. Preheating the Oven and Preparing the Pan First, preheat your oven to 350°F (175°C). This step is key for even baking. Next, take an 8x8 inch baking pan. Line it with parchment paper, letting some hang over the edges. This makes it easy to lift out the bars later. 2. Making the Crust In a medium bowl, mix 1 ½ cups of graham cracker crumbs, ½ cup of melted unsalted butter, and 2 tablespoons of granulated sugar. Stir until it looks like wet sand. Firmly press this mixture into the bottom of your baking pan. Bake the crust for 10 minutes. Once done, remove it from the oven and let it cool a bit. 1. Cream Cheese and Sugar Base In a large bowl, beat 16 oz of softened cream cheese until it’s smooth. Use an electric mixer for this. Slowly add in 1 cup of granulated sugar. Mix until it’s well combined and creamy. 2. Adding Eggs and Sour Cream Add 2 large eggs one by one. Mix well after each egg. Then, blend in ½ cup of sour cream and 1 teaspoon of vanilla extract. Keep mixing until the mixture is smooth and creamy. 1. Pumpkin Mixture and Swirling Technique In a separate bowl, mix 1 cup of pumpkin puree, 1 teaspoon of ground cinnamon, ½ teaspoon of ground nutmeg, ¼ teaspoon of ground ginger, and ¼ teaspoon of salt. Stir until everything is well blended. Take half of the cream cheese mixture and pour it over the cooled crust. Then, dollop half of the pumpkin mixture on top. 2. Baking the Cheesecake Bars Grab a knife or skewer and gently swirl the two mixtures together. This creates a beautiful marbled effect. Pour the rest of the cream cheese mixture on top, followed by the rest of the pumpkin mixture. Swirl again to combine lightly. Bake in the oven for 35-40 minutes. The center should be set but still jiggle slightly. After baking, turn off the oven and let the cheesecake cool inside for about an hour with the door slightly open. Refrigerate for at least 4 hours, or overnight for the best taste. When ready, lift the bars out using the parchment paper and cut them into squares. For the full recipe, check out the details above! - Avoiding Cracks in the Cheesecake: To keep your cheesecake smooth, avoid overmixing. This adds too much air. Also, bake your bars at a lower temperature. A slow bake helps prevent cracks. After baking, let the bars cool in the oven with the door slightly open. This gradual cooling also helps. - Optimal Baking Times: Keep an eye on your cheesecake bars. Bake them for about 35 to 40 minutes. They should look set but still jiggle a bit in the center. This way, they stay creamy without being too soft. - Using Quality Ingredients: The taste of your bars depends on the ingredients. Use fresh cream cheese and real pumpkin puree. These make a big difference. High-quality spices like fresh cinnamon and nutmeg add depth, too. - Incorporating Additional Spices: Want to boost the flavor? Try adding a pinch of allspice or cloves. These spices mix well with pumpkin and give your bars a warm taste. You can even add some vanilla bean paste for extra richness. For the complete recipe, check out the [Full Recipe]. Enjoy your baking! {{image_2}} One fun way to change these bars is by adding chocolate or caramel swirls. You can melt chocolate or caramel and drizzle it over the cheesecake layer. Use a knife to create a swirl pattern. This adds a rich taste that pairs well with pumpkin. Another option is to infuse different flavors. Try using maple syrup instead of some sugar for a maple twist. You can even add a splash of bourbon for a warm kick. These changes can make your bars unique and fun. For those who need gluten-free options, you can make a simple swap. Use gluten-free graham cracker crumbs for the crust. This keeps the recipe delicious while making it safe for those with gluten issues. If you want dairy-free cheesecake bars, use dairy-free cream cheese. There are many good brands available now. You can also substitute the sour cream with a dairy-free version. This way, everyone can enjoy these tasty pumpkin swirl cheesecake bars! You can find the full recipe to guide you through these variations. Enjoy your baking! To keep your pumpkin swirl cheesecake bars fresh, use these tips: - Refrigeration: Store the bars in the fridge. They need to stay cool. Place them in an airtight container. This helps avoid drying out. - Freezing: You can freeze these bars too. Wrap each piece in plastic wrap, then put them in a freezer bag. This keeps them tasty for later. - Best Containers: Use glass or plastic containers with tight lids. This ensures the bars stay fresh and safe from odors. How long do these bars last? - Refrigeration: In the fridge, they last about 5 days. After that, the taste may change. - Freezing: If frozen, they can last up to 3 months. Just remember to label the bag with the date. How do you reheat them? - Reheating: To maintain the texture, let them thaw in the fridge overnight. When ready, microwave for 10-15 seconds. This warms them without losing their creamy texture. Enjoy these tasty treats anytime! You can find the full recipe above. Can I make this recipe ahead of time? Yes, you can make these bars a day before. They taste even better after chilling overnight. Store them in the fridge. The flavors will blend nicely, making them more delicious. How do I know when the cheesecake is done baking? The cheesecake is done when the edges look set, but the center jiggles slightly. It should not be liquidy. After baking, let it cool in the oven with the door ajar. This helps prevent cracks. What is the best way to slice cheesecake bars? To slice the bars neatly, use a sharp knife. Dip it in hot water, then wipe it dry. This method helps make clean cuts. You can also score lines before cutting for even squares. Can I use fresh pumpkin instead of canned? Yes, you can use fresh pumpkin. Roast or steam the pumpkin first, then puree it until smooth. Make sure it is not too watery. Fresh pumpkin adds a nice flavor and can make the bars more special. For the complete recipe, check the Full Recipe section. Pumpkin Swirl Cheesecake Bars blend creamy cheese, pumpkin, and spices for a tasty treat. Follow my step-by-step guide for a smooth crust, rich filling, and perfect baking. Remember, quality matters for the best flavor. Try different toppings and variations to suit your taste. Store these bars well to keep them fresh. Whether for a holiday or just because, these bars are a delight. Enjoy creating your perfect dessert!](https://stirredrecipes.com/wp-content/uploads/2025/08/74f4a388-d1fd-4a4a-819c-3a3df71aff1e.webp)
Are you ready to fall in love with dessert? These Pumpkin Swirl Cheesecake Bars blend smooth cream cheese with rich pumpkin puree for a flavor that screams autumn. My easy …
Are you ready to fall in love with dessert? These Pumpkin Swirl Cheesecake Bars blend smooth cream cheese with rich pumpkin puree for a flavor that screams autumn. My easy …
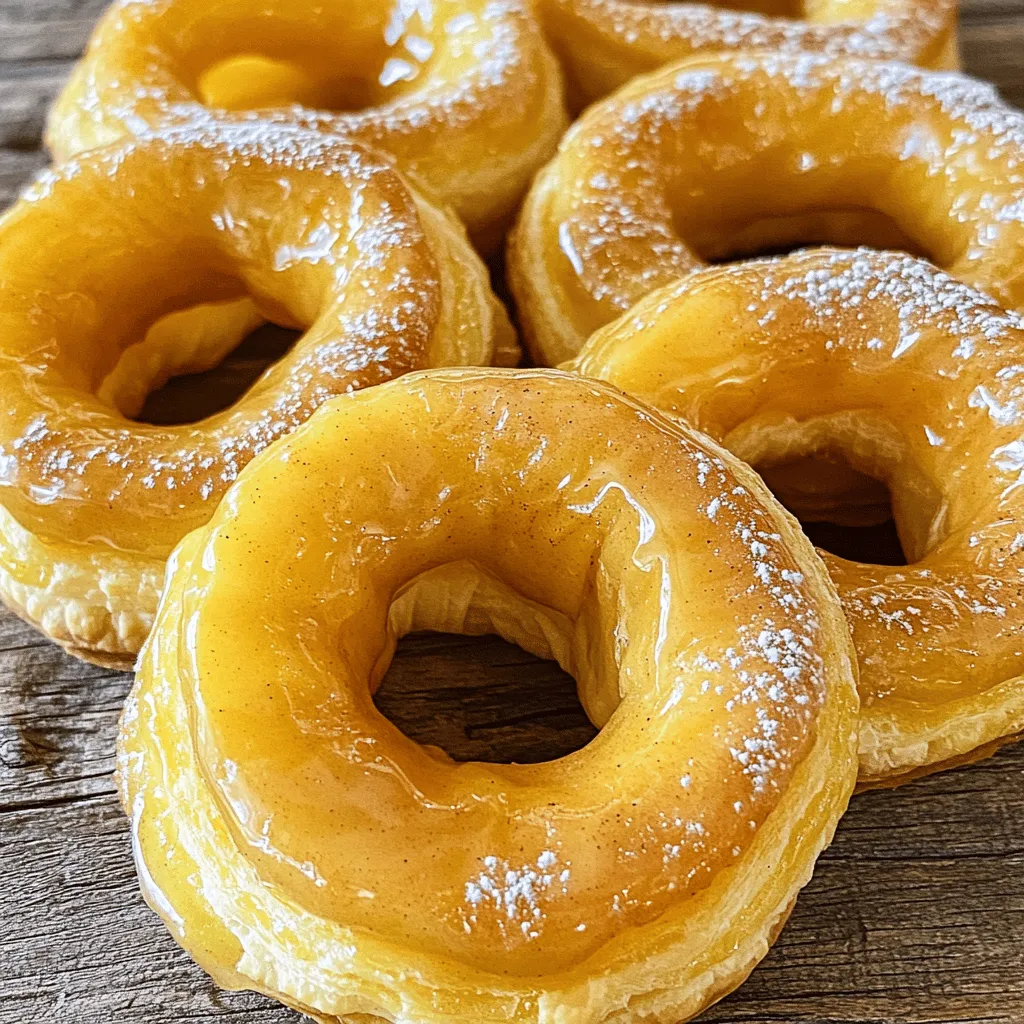
Are you ready to impress at your next gathering? Puff Pastry Apple Rings are easy to make and delightfully tasty! With just a few ingredients like sweet apples and flaky …
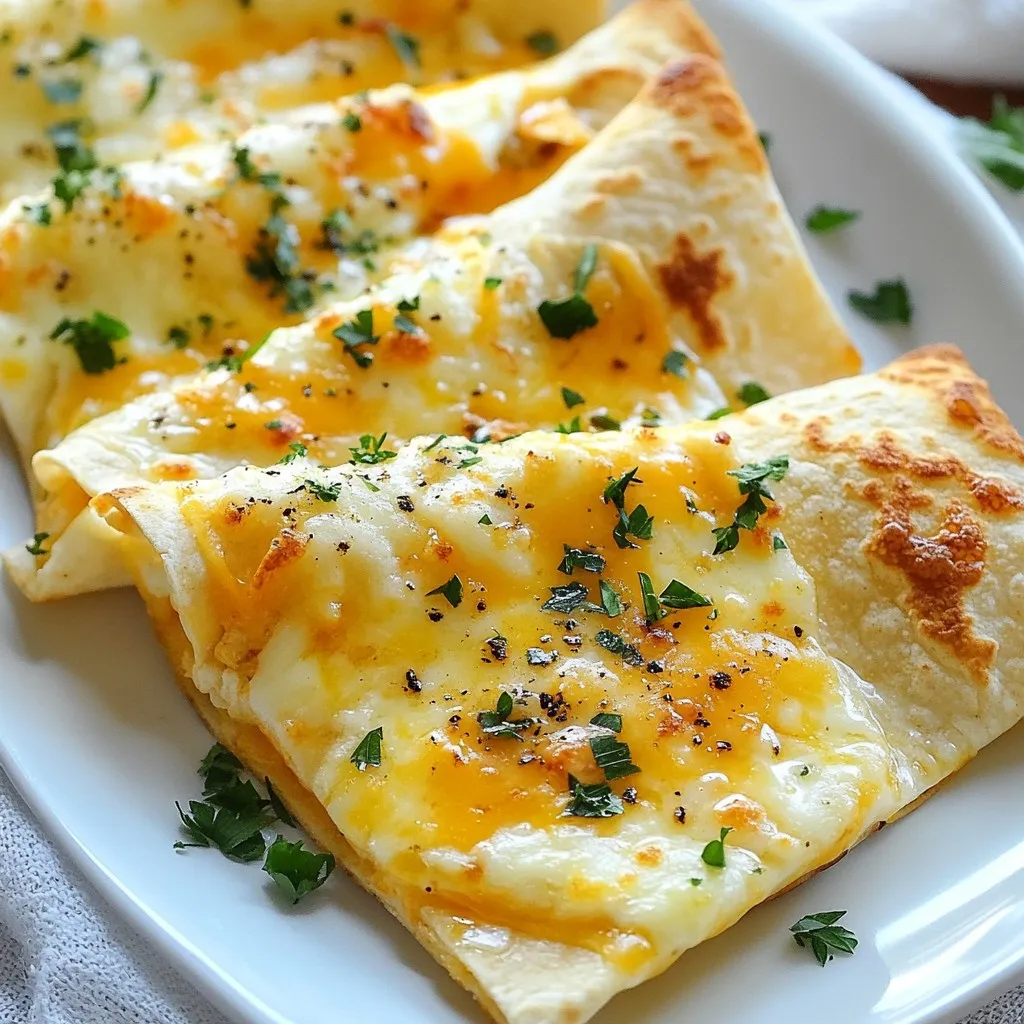
Are you ready to elevate your snack game? In this post, I’ll show you how to make Air Fryer Cheesy Tortilla Garlic Bread that’s melty, crispy, and bursting with flavor! …
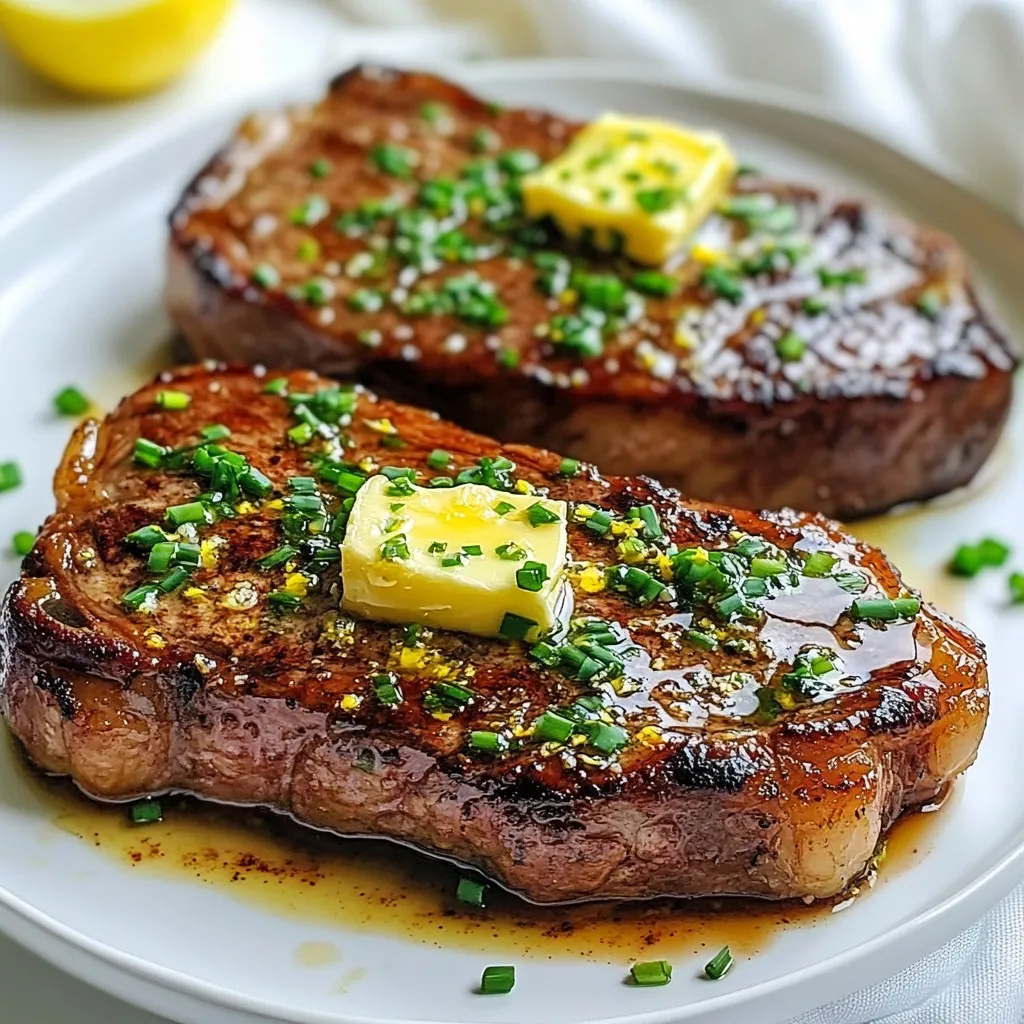
Get ready to take your steak night to the next level with Cowboy Butter Steak. This dish combines juicy ribeye steaks with a rich, zesty cowboy butter that packs a …
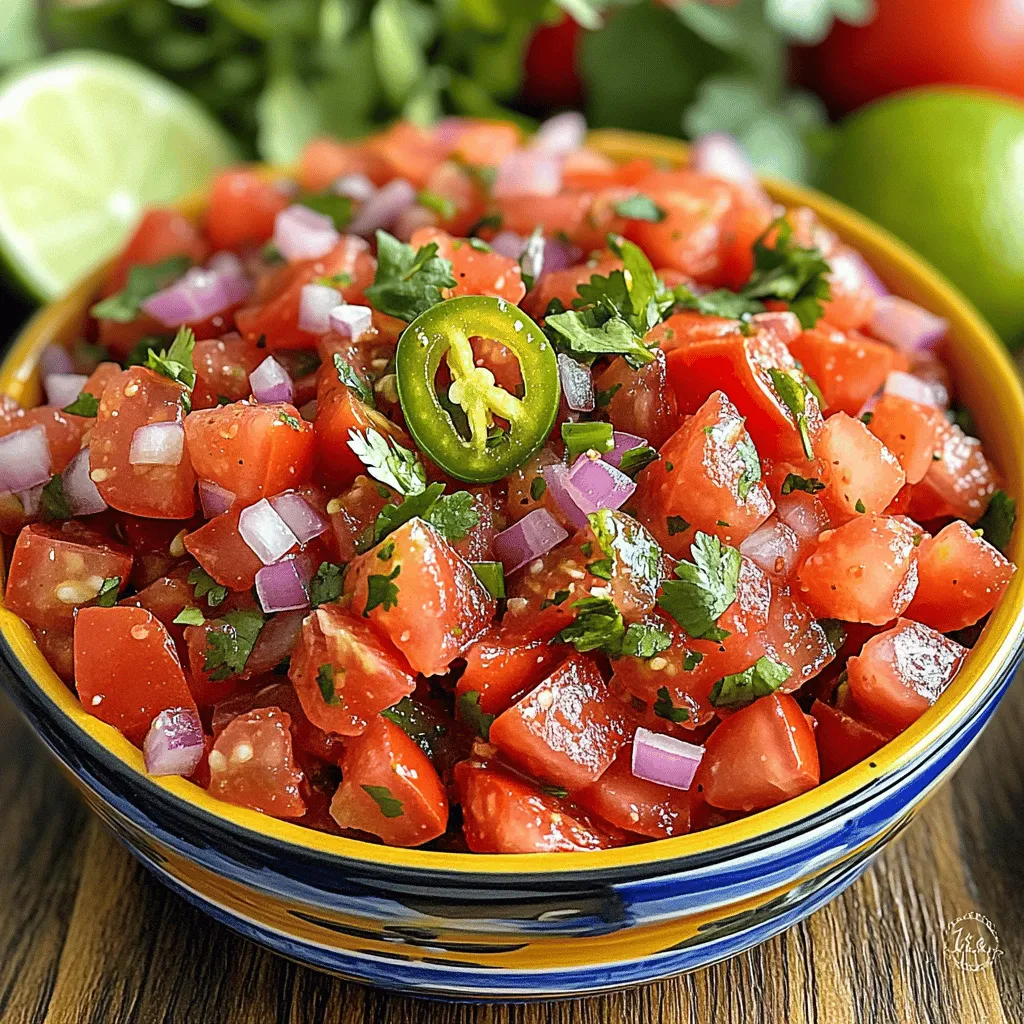
If you’re craving a burst of fresh flavor, our favorite garden salsa recipe will hit the spot. Made with ripe tomatoes, crisp red onion, and just the right amount of …

Get ready to bake the softest pumpkin snickerdoodles you’ve ever tasted! This simple and delicious treat combines the warm flavors of pumpkin and spices to create a cookie that melts …
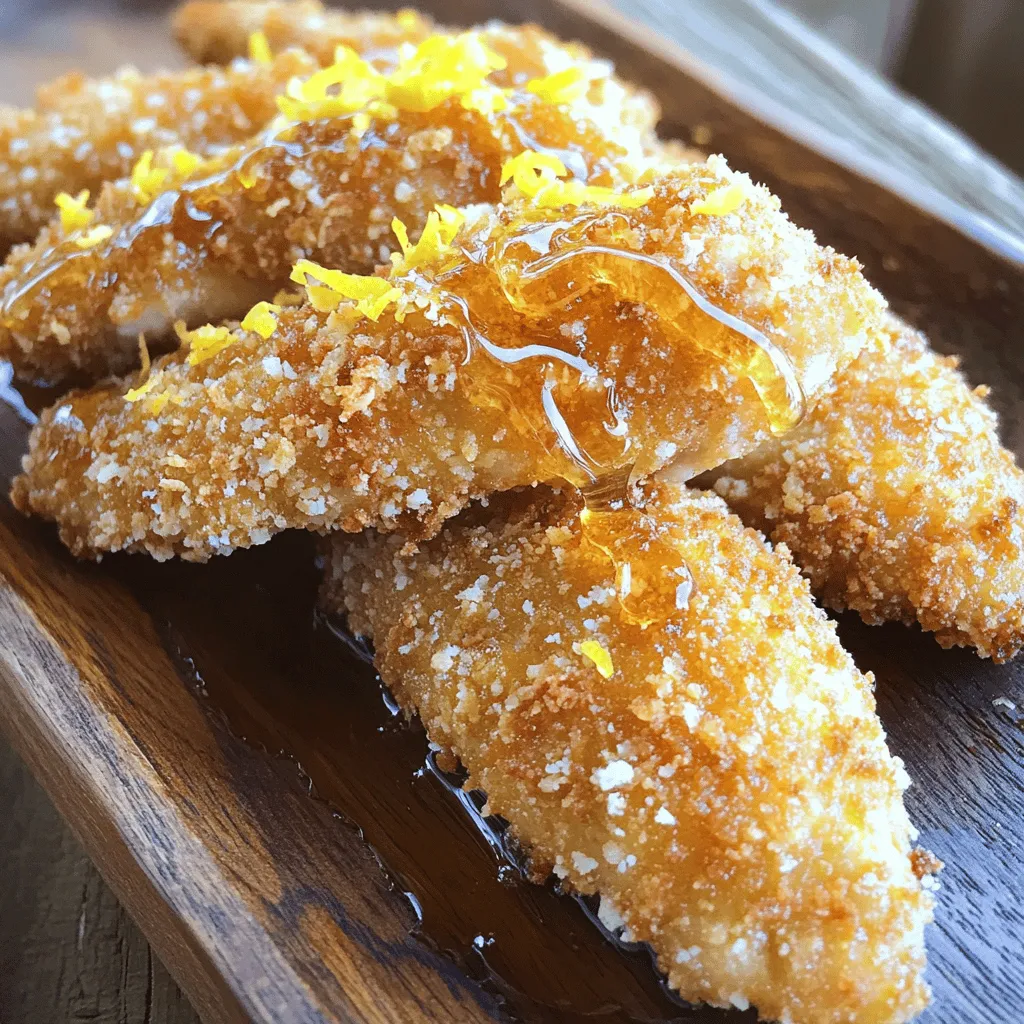
If you crave a crispy, golden treat, chicken tenders are a must-try! In this easy recipe, I’ll guide you step-by-step to make the perfect chicken tenders at home. Whether you’re …
![- 1 ½ cups pumpkin puree - ½ cup unsalted butter, melted - 1 cup brown sugar - ½ cup granulated sugar - 3 large eggs - 1 teaspoon vanilla extract Pumpkin puree gives the bread its rich flavor and moist texture. Unsalted butter adds a creamy base. The mix of brown and granulated sugars creates sweetness and depth. Eggs help bind everything together and add fluffiness. Vanilla extract brightens the overall taste. - 2 cups all-purpose flour - 1 teaspoon baking soda - ½ teaspoon baking powder - 1 teaspoon ground cinnamon - ½ teaspoon ground nutmeg - ½ teaspoon salt - 1 cup chopped walnuts (optional) All-purpose flour is essential for structure. Baking soda and baking powder help the bread rise. Spices like cinnamon and nutmeg add warmth and flavor. Salt balances the sweetness. If you like nuts, chopped walnuts add a lovely crunch. - 4 tablespoons unsalted butter - ½ cup powdered sugar - 2 tablespoons pure maple syrup - 1-2 tablespoons milk (as needed for consistency) Unsalted butter is used for the glaze to keep it rich. Powdered sugar dissolves easily and gives a smooth finish. Pure maple syrup adds a sweet, earthy taste. Milk helps adjust the glaze's thickness, making it perfect for drizzling. For the complete recipe, check out the [Full Recipe]. - Preheat the oven to 350°F (175°C). - Grease and flour a 9x5 inch loaf pan. This helps the bread slide out easily. - In a large bowl, combine the pumpkin puree, melted butter, brown sugar, granulated sugar, eggs, and vanilla extract. - Beat this mixture until smooth and creamy. This gives your bread a rich flavor. - In a separate bowl, whisk together the flour, baking soda, baking powder, ground cinnamon, ground nutmeg, and salt. - Make sure there are no lumps in the mix. This helps the bread rise evenly. - Slowly fold the dry ingredients into the wet mixture. - Stir gently until just combined. Overmixing can make the bread tough. - Pour the batter into the prepared loaf pan. Smooth the top with a spatula. - Bake for 55-65 minutes. Check with a toothpick; it should come out clean. - Let the bread cool in the pan for about 10 minutes. Then, transfer it to a wire rack. - In a small saucepan, melt the butter for the glaze over medium heat. Cook until it turns brown and smells nutty. This takes about 4-5 minutes. Be careful not to burn it. To make the best pumpkin bread, avoid overmixing the batter. Overmixing can make your loaf tough. Mix just until you see no dry flour. This ensures a tender and fluffy texture. Use a toothpick to test if the bread is done. Insert it into the center of the loaf. If it comes out clean or with a few moist crumbs, your bread is ready. This simple test helps you avoid undercooking or overcooking the bread. Brown the butter carefully to get that rich flavor. Heat it over medium heat and watch closely. When it turns golden brown and smells nutty, it’s ready. Be cautious; burnt butter tastes bitter. When mixing the glaze, add milk a little at a time. You want it to be pourable but not too thin. If it feels too thick, just add more milk until you reach the right consistency. To slice and serve the bread, wait until it cools completely. Use a sharp knife for neat slices. Serve each piece with a sprinkle of cinnamon on top for added flavor. For a decorative touch, drizzle extra glaze over each slice. You can also add a few chopped walnuts on top. This not only looks great but also adds more texture and taste to your dish. For the complete recipe, check out the Full Recipe. {{image_2}} You can make your butter pumpkin bread even more exciting with fun add-ins. Consider nuts like pecans or almonds for a crunchy bite. Chopped walnuts work well too. If you like chocolate, add in some chocolate chips. They melt and create gooey pockets of joy. Dried fruits like cranberries or raisins offer a sweet surprise. Just sprinkle them in the batter before baking. If you need gluten-free options, swap the all-purpose flour for a gluten-free blend. Many brands work well in baking. For a vegan version, replace the eggs with flax eggs. Mix one tablespoon of ground flaxseed with three tablespoons of water. Let it sit until it thickens. Use melted coconut oil instead of butter for the moisture. This keeps the bread rich and tasty without animal products. Want more flavor? You can tweak the spices to your liking. Try adding ginger or cloves for a warm touch. Some people love a hint of cardamom too. As for the maple syrup, different types bring unique tastes. Dark maple syrup offers a bolder flavor. Light syrup has a milder sweetness. Experiment to find what you like best. I recommend storing your leftover pumpkin bread at room temperature. It keeps the bread soft and tasty. Wrap it well in plastic wrap or aluminum foil. This prevents it from drying out. You can also put it in an airtight container. If you live in a warm area, consider refrigerating it. Just remember that it may dry out a bit in the fridge. To freeze your pumpkin bread, first, let it cool completely. Then, wrap it tightly in plastic wrap. You can also use aluminum foil for extra protection. Place the wrapped loaf in a freezer bag. This helps keep out air and moisture. When you want to enjoy it, take it out and thaw it in the fridge overnight. For a quick method, you can leave it at room temperature for a few hours. Your pumpkin bread can last up to four days at room temperature. If stored in the fridge, it can last about a week. Signs of spoilage include a dry texture or a strange smell. If you see mold, throw it away. Always trust your senses to make sure it’s safe to eat. What is the best way to tell if the bread is done baking? To check if the bread is done, insert a toothpick in the center. If it comes out clean, your bread is ready. If it has batter on it, bake a bit longer. The bread should also feel firm to the touch. Can I use fresh pumpkin instead of puree? Yes, you can use fresh pumpkin. Just cook and puree it until smooth. Make sure to drain any excess water. This way, you keep the flavor and moisture right for the bread. How do I thicken the maple brown butter glaze? To thicken the glaze, add more powdered sugar. Mix it in slowly until you reach your desired thickness. If it's too thick, add a little milk to loosen it up. Can I make the glaze ahead of time? Yes, you can make the glaze ahead of time. Just store it in the fridge. Reheat gently when ready to use. Stir well before drizzling over the bread. Can I make mini loaves instead of one large loaf? Absolutely! You can make mini loaves. Just adjust the baking time to about 25-30 minutes. Check with a toothpick to ensure they are done. What are the best spices to use for flavoring pumpkin bread? The classic spices are cinnamon and nutmeg. You can also add ginger or allspice for a warm flavor. Experiment with what you like best! In this blog post, we explored how to make delicious butter pumpkin bread. We covered key ingredients, step-by-step instructions, tips for perfecting your bread, and variations. This recipe is easy and fun. You can customize it with nuts or spices to match your taste. Remember to store leftovers properly to keep them fresh. Enjoy sharing this treat with family and friends, or savor it yourself. Baking can create joy and warmth in your home. Happy baking!](https://stirredrecipes.com/wp-content/uploads/2025/07/cbbb0237-dd19-4873-87ad-af7382062d15.webp)
Are you ready to bake something special? This Butter Pumpkin Bread with Maple Brown Butter Glaze is a must-try. With its soft texture and warm spices, it screams comfort. Plus, …
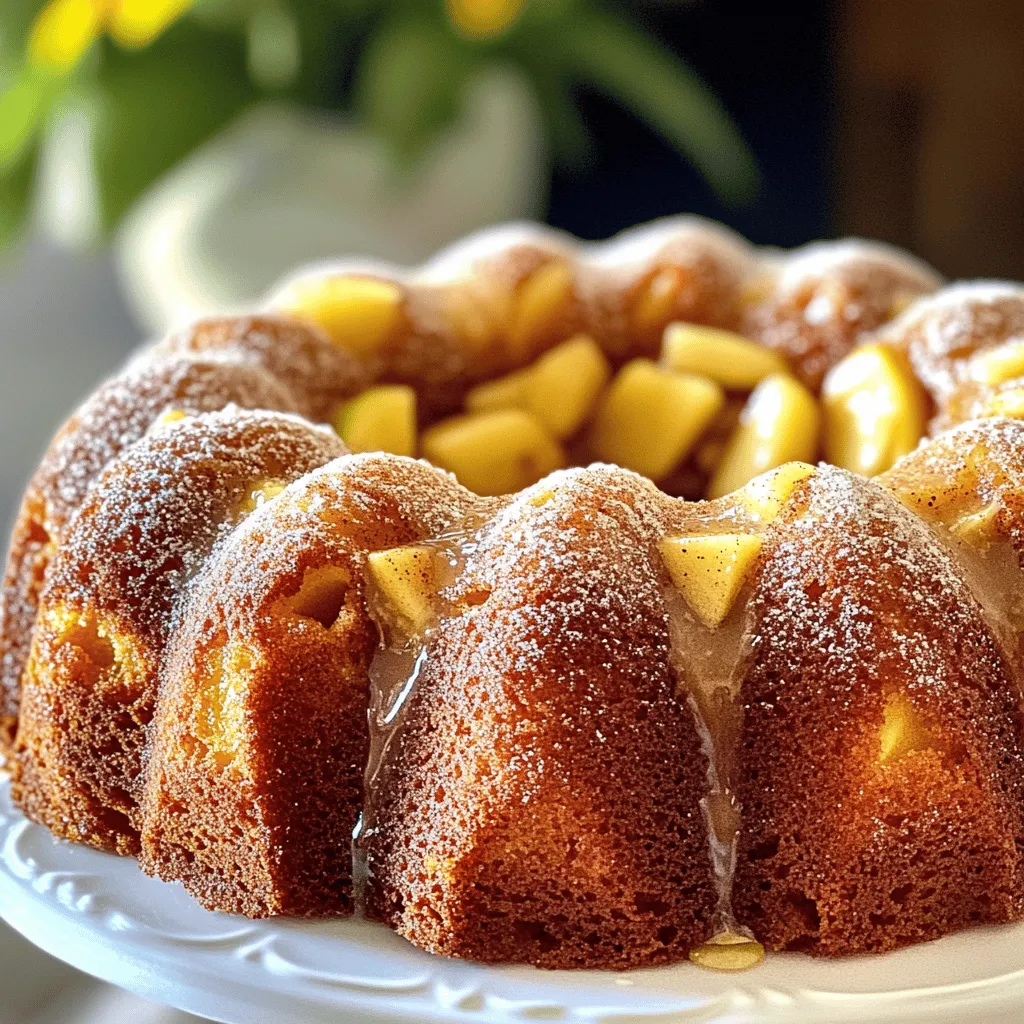
Craving a warm, delicious dessert that’s perfect for fall? Look no further! This easy Apple Cider Donut Cake is a sweet way to capture the season. In this guide, you’ll …
![- 1 cup all-purpose flour - 1 tablespoon baking powder - 1 teaspoon ground cinnamon - 1/2 teaspoon ground nutmeg - 1/2 teaspoon ground ginger - 1/4 teaspoon salt - 1 cup pumpkin puree - 2 large eggs - 1/4 cup brown sugar - 1/2 cup milk (or plant-based milk) - 1/4 cup melted butter (plus more for greasing the waffle iron) - 1/2 cup unsalted butter - 1/2 cup maple syrup - 1/4 teaspoon ground cinnamon In this recipe, I use a mix of dry and wet ingredients to create a rich batter. The dry ingredients give structure, while the wet ingredients add moisture and flavor. The key spices, like cinnamon and nutmeg, give the waffles a warm, cozy taste. When choosing your pumpkin puree, I recommend using canned for ease. It saves time and tastes great. For the brown butter syrup, watch the butter closely as it cooks. It turns a lovely golden brown and adds a nutty flavor that pairs perfectly with the pumpkin. This combination of ingredients makes for a delightful breakfast. You can find the full recipe to guide you through the steps to make these delicious spiced pumpkin waffles with brown butter syrup. Enjoy the process and the wonderful smells that fill your kitchen! First, preheat your waffle iron. Make sure to grease it well with melted butter. This helps the waffles not stick. In a large bowl, get your dry ingredients ready. Whisk together the flour, baking powder, cinnamon, nutmeg, ginger, and salt. This mix gives the waffles their warm spice flavor. In another bowl, combine the wet ingredients. Mix the pumpkin puree, eggs, brown sugar, milk, and melted butter until smooth. Now, pour the wet mix into the dry mix. Gently fold them together until just combined. Don't worry if there are a few lumps; it’s okay! Now it’s time to cook! Pour about 1/2 cup of batter into the preheated waffle iron. Close the lid and let it cook until golden brown and crispy. This usually takes around 3-5 minutes, but check your iron's instructions. Repeat until all the batter is used. The smell will be amazing! While the waffles cook, let's make the brown butter syrup. Start by melting the butter in a saucepan over medium heat. Watch it closely as it turns golden brown. This step takes about 3-5 minutes. The nutty smell means it’s ready! Once browned, take the pan off the heat. Stir in the maple syrup and cinnamon. Mix well and set aside to cool slightly. This syrup pairs perfectly with your waffles. For the full recipe, check out the details above. Enjoy your delicious spiced pumpkin waffles! To make the best spiced pumpkin waffles, follow some simple tips. First, avoid overmixing the batter. If you mix too much, your waffles can turn out tough. Instead, mix until just combined. A few lumps are okay! Second, always use a preheated waffle iron. A hot iron helps your waffles become crispy and golden brown. When it's time to serve, stack your waffles high. You can sprinkle some cinnamon on top for a warm touch. A dollop of whipped cream adds a creamy finish. Want to add more flavor? Toss on some chopped pecans or walnuts. These give a nice crunch and extra taste. You can switch out some ingredients for a healthier twist. Try using whole wheat flour or gluten-free flour instead of all-purpose flour. This makes the waffles more nutritious. You can also play with spices. Add cloves or allspice for a unique flavor. This gives your waffles a special touch and keeps things interesting. {{image_2}} Want to mix things up? Adding chocolate chips to your pumpkin waffles makes them sweet and fun. The little bursts of chocolate add joy to every bite. You can also toss in cranberries or walnuts. These ingredients add a nice crunch and a tart flavor that contrasts the sweet pumpkin. Both options are perfect for a cozy fall breakfast. If you want to make these waffles vegan, swap the eggs and milk for plant-based options. Try using flax eggs or applesauce as a binder. For milk, almond or oat milk works well. You can also use sugar substitutes for a low-calorie version. Options like stevia or coconut sugar give you sweetness without the extra calories. To make your meal even better, serve the waffles with fresh fruit. Sliced bananas or berries add a burst of flavor and color. You could also include a yogurt dip, which adds creaminess. Pair your waffles with a warm drink, like chai or hot cocoa. These drinks keep you warm and add to the cozy vibe. Enjoy your tasty treat! You can store leftover waffles in the fridge for up to 3 days. Place them in an airtight container to keep them fresh. When you're ready to enjoy them, reheat in the toaster or oven for the best results. This way, they stay crispy and delicious. Freezing these waffles is a great option. First, cook them and then lay them flat on a baking sheet. Separate each waffle with parchment paper to avoid sticking. Once frozen, transfer them to a freezer bag. You can reheat them straight from frozen. Use the toaster for a crispy finish or microwave for a quick warm-up. The brown butter syrup can be stored in the fridge for up to a week. Let it cool before pouring it into a jar. When you want to use it again, reheat gently in a saucepan or microwave. This syrup will add a sweet touch to your waffles every time! For the full recipe, check the earlier section. Cooking time varies by waffle iron; generally 3-5 minutes is ideal. You want to check the color. The waffles should be golden brown. If your waffles are not brown after 5 minutes, you might need to adjust your iron's settings. Yes, canned pumpkin puree is perfect for these waffles. It saves time and gives great flavor. Just make sure you use plain pumpkin puree, not pumpkin pie filling. The filling has added sugar and spices that may change the taste. Ensure the waffle iron is preheated well and do not overmix the batter. Overmixing can make the waffles tough. A few lumps in the batter are fine. The preheated iron helps create a nice crispy outside. For extra crunch, you can add a bit of cornstarch to your flour mix. Enjoy the texture! For the full recipe, check [Full Recipe]. These pumpkin waffles combine simple dry and wet ingredients for a delicious treat. You prepare a rich brown butter syrup to top them off. I shared tips for perfecting your waffles and offered fun variations. You can store leftovers easily or even freeze them for later. Enjoy experimenting with toppings or dietary swaps. These waffles are more than a meal; they bring joy and comfort. Now, gather your ingredients and start making some homemade fun!](https://stirredrecipes.com/wp-content/uploads/2025/07/80977165-b6c0-4977-ba58-e45c55d9ccf0.webp)
Get ready to impress your taste buds with my Spiced Pumpkin Waffles with Brown Butter Syrup! These warm, fluffy waffles packed with seasonal spices are perfect for cozy mornings. Drizzled …