Strawberry Balsamic Vinaigrette Fresh and Simple Recipe

Are you ready to elevate your salads with a burst of flavor? This Strawberry Balsamic Vinaigrette is fresh, simple, and perfect for any dish. With just a few basic ingredients, …
Are you ready to elevate your salads with a burst of flavor? This Strawberry Balsamic Vinaigrette is fresh, simple, and perfect for any dish. With just a few basic ingredients, …
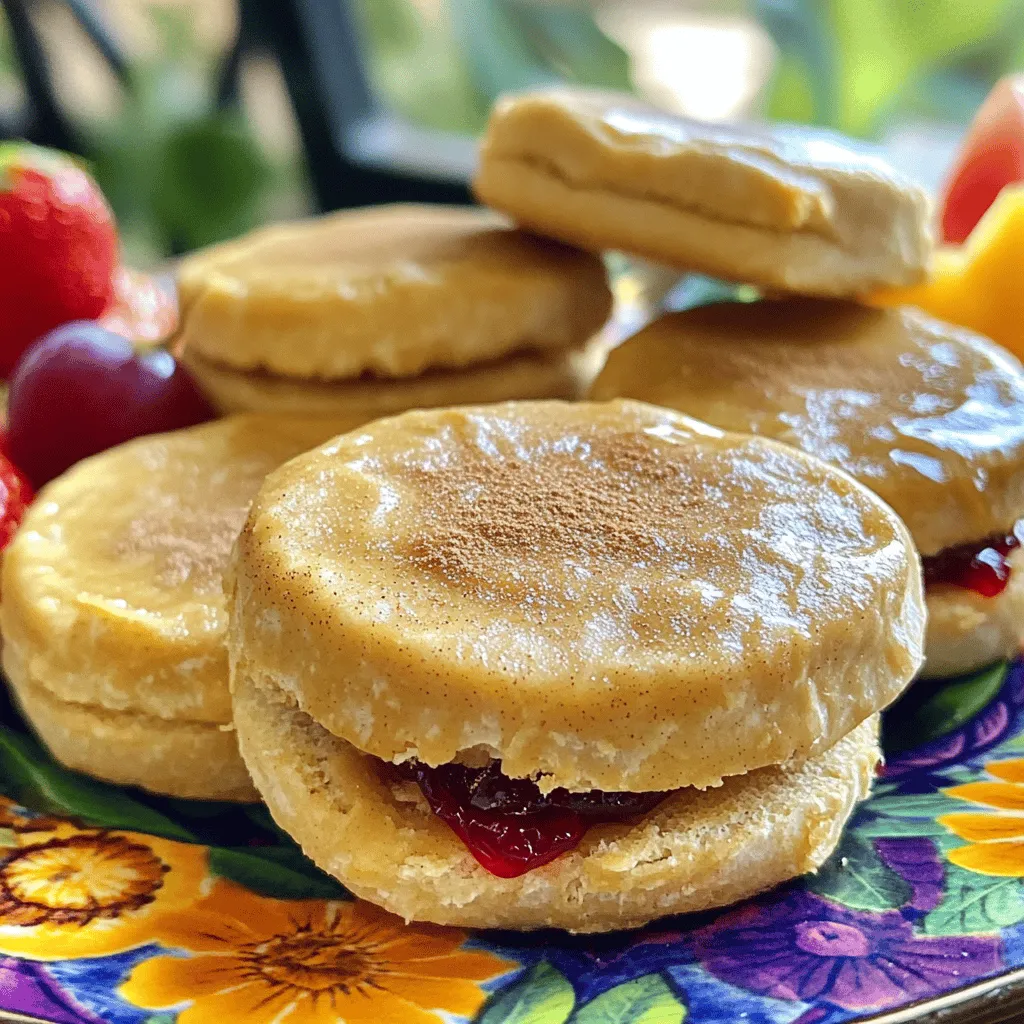
Looking for a fun and easy lunch idea? Homemade Uncrustables are the perfect solution! Packed with peanut butter and jelly, these sandwiches are quick to make and great for kids. …
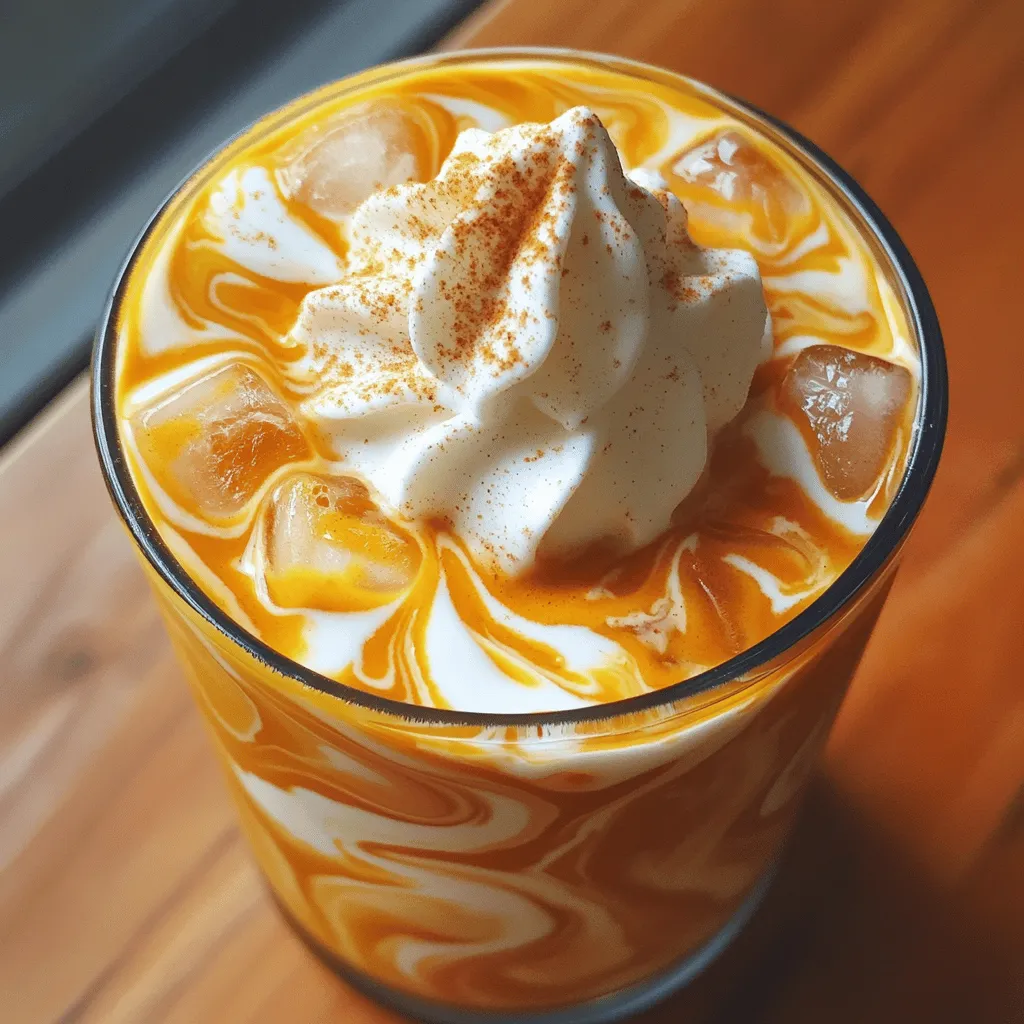
If you’re craving a delightful fall drink, you’re in the right place! This Pumpkin Cream Cold Brew recipe is easy to follow and full of flavor. You’ll learn how to …
![The right ingredients make your pumpkin pancakes tasty and fluffy. Here’s what you need: - 1 cup all-purpose flour - 1/2 cup canned pumpkin puree - 2 tablespoons brown sugar - 1 tablespoon baking powder - 1 teaspoon pumpkin pie spice - 1/2 teaspoon salt - 1 cup milk (or dairy-free alternative) - 1 large egg - 2 tablespoons melted butter (or coconut oil for a dairy-free option) - Maple syrup and crushed walnuts for serving All-purpose flour gives structure to the pancakes. It helps them rise and hold shape. Canned pumpkin puree adds moisture and a rich flavor. It also brings that lovely orange color. Brown sugar adds sweetness and a hint of caramel flavor. You can swap it with white sugar if needed. Baking powder is essential for fluffiness. It helps the pancakes rise as they cook. Pumpkin pie spice gives those warm, cozy flavors. If you don’t have it, mix cinnamon, nutmeg, and ginger. Salt enhances all the flavors in your pancakes. Milk keeps the batter smooth. You can use almond or soy milk for a dairy-free option. Egg adds richness and helps bind the ingredients together. Melted butter adds flavor and moisture. Coconut oil works well if you want to skip dairy. For toppings, maple syrup and crushed walnuts add sweetness and crunch. You can try honey or pecans too! With this ingredient list, you can create a delightful breakfast. They are simple and fun to make! For the Full Recipe, check the earlier section to ensure you don’t miss anything. To make easy pumpkin pancakes, follow these steps carefully. Each step helps ensure your pancakes taste great! 1. Mix Dry Ingredients: In a large bowl, add 1 cup of all-purpose flour, 2 tablespoons of brown sugar, 1 tablespoon of baking powder, 1 teaspoon of pumpkin pie spice, and 1/2 teaspoon of salt. Whisk these together well. This helps the pancake rise and be fluffy. 2. Combine Wet Ingredients: In another bowl, mix 1 cup of milk, 1/2 cup of canned pumpkin puree, 1 large egg, and 2 tablespoons of melted butter. Stir until smooth. This mixture adds moisture and flavor. 3. Combine Wet and Dry: Pour the wet mix into the dry mix. Use a spatula to stir gently. Mix just until you see no dry flour. Some lumps are perfectly fine. Overmixing can make your pancakes tough. 4. Heat the Skillet: Place a non-stick skillet or griddle on medium heat. Lightly grease it with butter or oil. Make sure it’s hot enough before you pour in the batter. 5. Cook the Pancakes: Pour about 1/4 cup of batter onto the skillet for each pancake. Cook until bubbles form on the top, about 2 to 3 minutes. This shows they are ready to flip. 6. Flip and Finish: Carefully flip the pancakes. Cook for another 2 to 3 minutes on the other side. They should be golden brown. 7. Repeat Cooking: Continue with the rest of the batter. Adjust the heat as needed to avoid burning. 8. Serve Warm: Enjoy your pancakes warm! Drizzle with maple syrup and sprinkle with crushed walnuts for crunch. These steps will help you create perfect pumpkin pancakes every time. For the full recipe, check out the earlier section. To make the best pumpkin pancakes, focus on cooking time and temperature. I cook them on medium heat for even browning. Each pancake takes about 2-3 minutes on one side. You know they’re ready to flip when bubbles form on the surface. Avoid common mistakes to keep your pancakes fluffy. Overmixing can make them tough. Stir the batter gently, leaving some lumps. Also, keep an eye on the heat. If the pan is too hot, pancakes may burn before cooking through. Get creative with toppings to enhance your pancakes. Maple syrup is classic, but try adding crushed walnuts for crunch. Fresh fruits like sliced bananas or berries also work well. Pair these pancakes with other breakfast items for a full meal. Consider serving them with yogurt or scrambled eggs. This combo makes for a balanced breakfast that is both tasty and satisfying. For the complete recipe, check out Easy Pumpkin Pancakes. {{image_2}} You can easily change the taste of your pumpkin pancakes. Try adding spices like cinnamon or nutmeg for extra warmth. You can also mix in chocolate chips or nuts for a fun twist. If you want a gluten-free version, replace the all-purpose flour with a gluten-free flour blend. For a vegan option, use flax eggs instead of a regular egg and almond milk in place of dairy milk. Both swaps keep the pancakes delicious and fluffy. When serving, you can choose a sweet or savory style. For sweet, drizzle maple syrup and sprinkle crushed walnuts on top. You might also add fresh fruit like bananas or apples for a burst of flavor. For a savory twist, try adding crispy bacon or a dollop of Greek yogurt. You can serve pancakes stacked high or lay them out on a platter for a fun brunch display. Mixing these styles can make breakfast exciting and delicious. To keep your leftover pancakes fresh, place them in an airtight container. Stack them with parchment paper between each pancake. This method helps prevent sticking. Store the container in the fridge for up to three days. When you're ready to eat, just reheat them. For reheating, use a skillet on low heat. This keeps the pancakes soft and warm. You can also microwave them for 20-30 seconds. Just cover them with a damp paper towel to keep moisture in. Freezing pancakes is easy and a great way to save time. Start by letting your pancakes cool completely. Once they are cool, lay them flat on a baking sheet. Make sure they do not touch each other. Freeze the pancakes for about one hour. After they freeze, transfer the pancakes into a freezer bag. Remove as much air as possible before sealing. Label the bag with the date. You can keep them in the freezer for up to two months. To reheat frozen pancakes, just pop them in the toaster or microwave. If using a microwave, heat them for 1-2 minutes. This will help them taste fresh again. Enjoy your Easy Pumpkin Pancakes anytime! For the full recipe, check out the [Full Recipe]. What can I substitute for pumpkin puree? If you don’t have pumpkin puree, you can use mashed bananas or applesauce. Both add moisture and sweetness. You can also try butternut squash puree for a similar flavor. Just make sure your substitute is smooth and not too watery. Can I make the batter ahead of time? Yes, you can make the batter ahead of time. Store it in the fridge for up to 24 hours. Just remember to stir it gently before cooking. The batter may thicken as it sits, so add a splash of milk if needed. How do I know when pancakes are done cooking? Pancakes are done when they are golden brown on both sides. Look for bubbles forming on the surface. Once the bubbles pop and leave holes, it’s time to flip. Cook for another 2-3 minutes after flipping. Enjoy your pancakes warm! This article covered making easy pumpkin pancakes from the ground up. We explored key ingredients and their roles, plus swaps for dietary needs. I shared step-by-step instructions for smooth mixing and perfect cooking techniques. Helpful tips keep texture right and avoid mistakes. You got ideas for tasty toppings and serving styles, along with how to store and freeze leftovers safely. In short, these pancakes are versatile and easy. You can enjoy them anytime. Make your kitchen come alive with great flavors!](https://stirredrecipes.com/wp-content/uploads/2025/08/7930d034-0b87-43f6-839a-962f119ed83d.webp)
Are you craving a warm and tasty breakfast that’s quick to make? Look no further! My Easy Pumpkin Pancakes are the perfect way to enjoy fall flavors any time of …
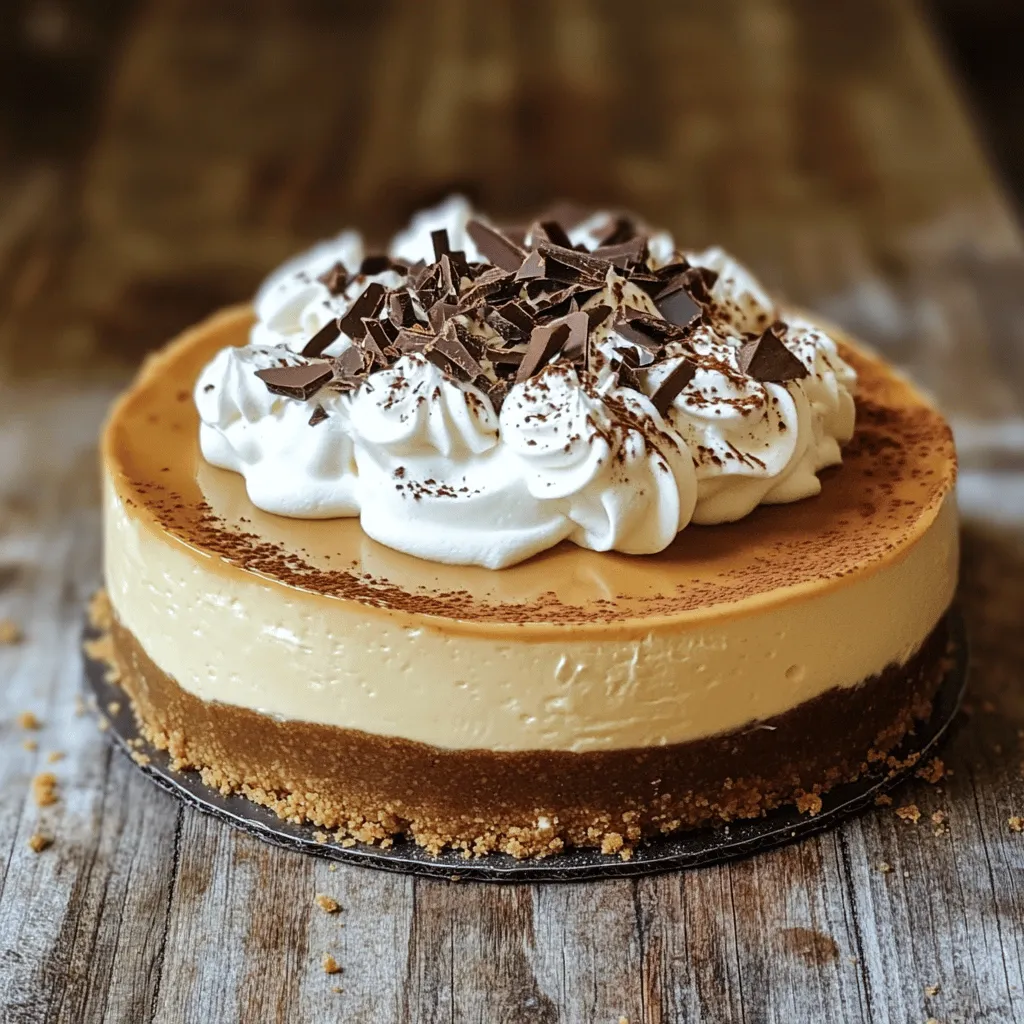
If you crave a dessert that is rich, creamy, and full of coffee flavor, this Delicious Espresso Cheesecake is for you. I’ll guide you through an easy recipe that brings …
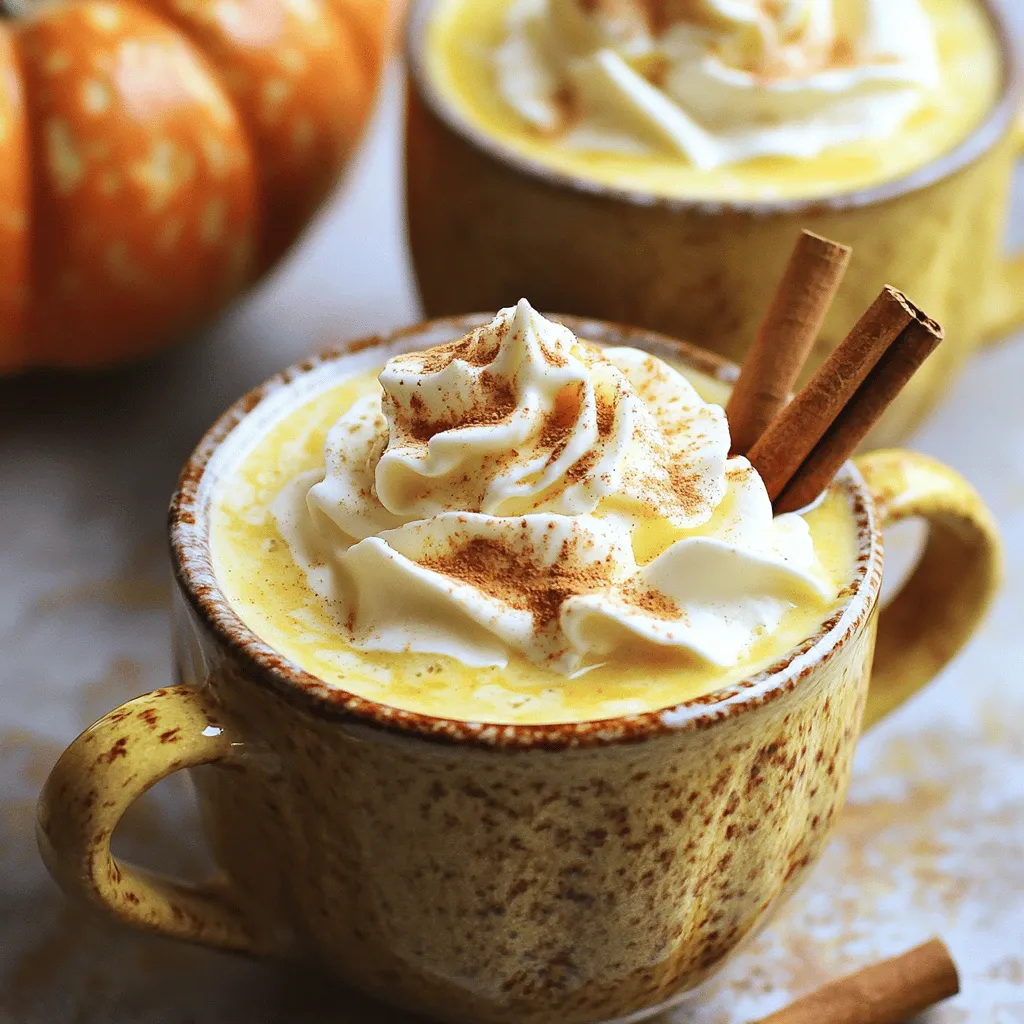
If you’re craving a cozy, sweet drink that embraces the spirit of fall, look no further! This Pumpkin White Hot Chocolate recipe offers creamy bliss in every sip. You can …
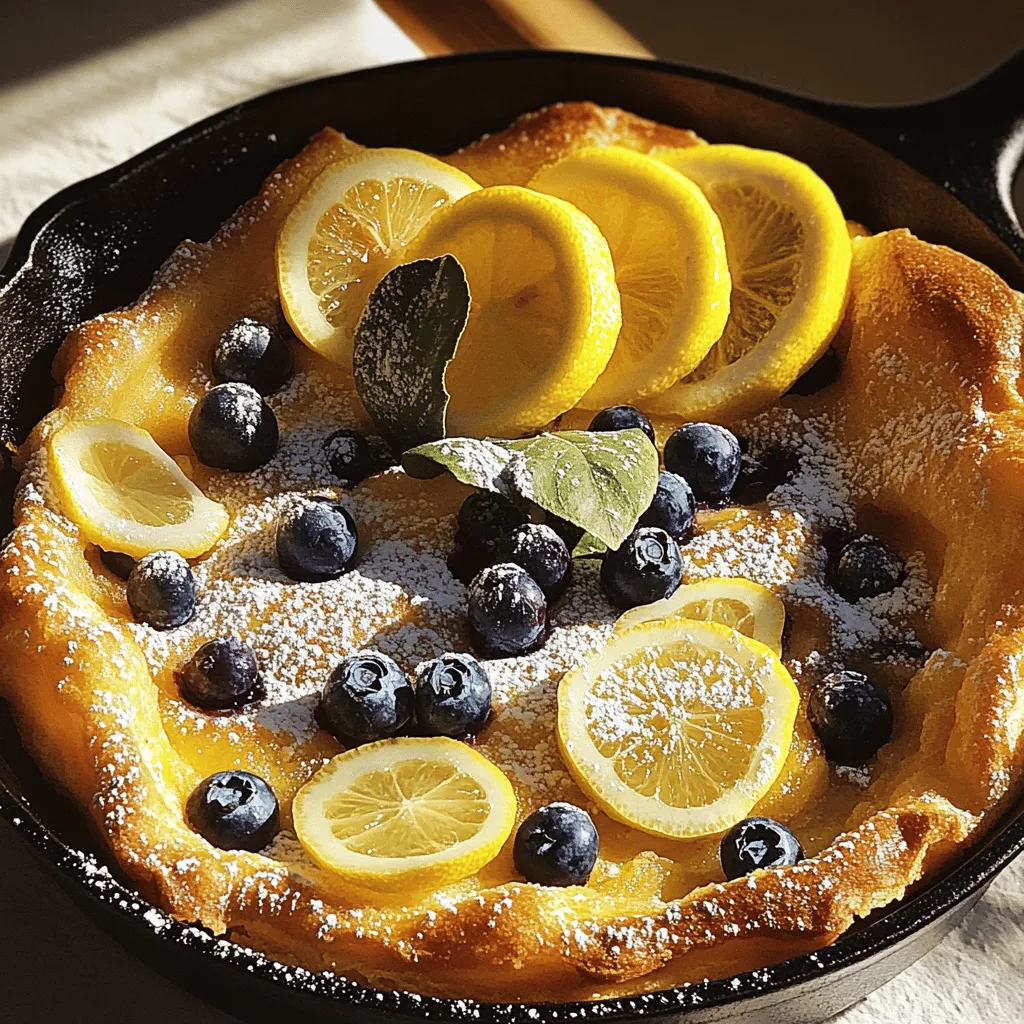
Are you ready to whip up a delightful treat that will wow your family and friends? The Perfect Lemon Blueberry Dutch Baby is not just a pancake; it’s a fluffy, …
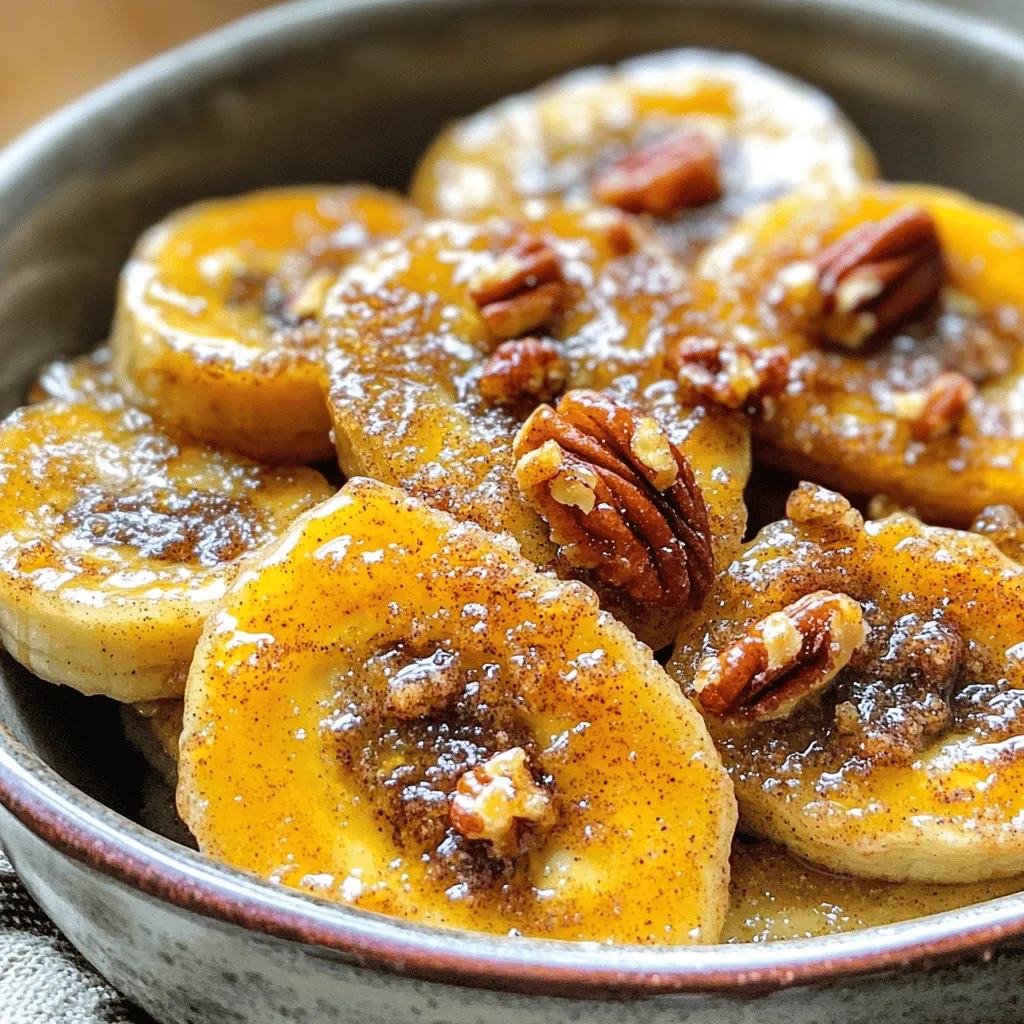
Are you ready for a sweet, easy treat? Pan Fried Cinnamon Bananas are the perfect dessert or snack. These warm, caramelized bananas are simple to make with just a few …
![To make Texas-Style Blueberry Cobbler, you need just a few simple items. Here are the main ingredients: - 4 cups fresh blueberries (or frozen, thawed) - 1 cup granulated sugar, divided - 2 tablespoons lemon juice - 1 tablespoon cornstarch - 1 teaspoon vanilla extract - 2 cups all-purpose flour - 1 tablespoon baking powder - 1/2 teaspoon salt - 1/2 cup unsalted butter, melted - 1 cup milk - 1 teaspoon cinnamon - 1 tablespoon sugar (for topping) - Whipped cream or vanilla ice cream (for serving) These ingredients create a sweet and tangy filling with a soft, buttery topping. You can add some optional ingredients to enhance the flavor: - A pinch of nutmeg for warmth - Fresh mint leaves for garnish - A splash of almond extract for a nutty note These extras can make your cobbler unique and even tastier. If you don’t have an ingredient, don’t worry! Here are some swaps you can try: - Substitute honey or maple syrup for granulated sugar. - Use coconut flour instead of all-purpose flour for a gluten-free option. - Swap in non-dairy milk like almond or oat milk for a vegan choice. These substitutions allow you to customize the recipe to fit your needs while keeping it delicious. Don’t forget to check the [Full Recipe] for detailed guidance on making your cobbler shine! Start by preheating your oven to 350°F (175°C). This step is key for even baking. Grease a 9x13 inch baking dish with butter or cooking spray. This helps prevent sticking. In a large bowl, mix together 4 cups of blueberries, 3/4 cup of granulated sugar, 2 tablespoons of lemon juice, 1 tablespoon of cornstarch, and 1 teaspoon of vanilla extract. Stir well until everything is combined. Pour this blueberry mixture into your greased baking dish. In another bowl, whisk together 2 cups of all-purpose flour, 1 tablespoon of baking powder, 1/2 teaspoon of salt, and 1 teaspoon of cinnamon. This dry mix adds flavor and structure. In a separate bowl, mix 1/2 cup of melted unsalted butter with 1 cup of milk. Then, add this to your dry ingredients. Stir gently until just combined. Remember, do not overmix; lumps are okay! Next, drop spoonfuls of the batter over the blueberry layer. Try to cover as much surface as possible. This creates a lovely crust. Now, sprinkle 1 tablespoon of sugar on top for extra sweetness and crunch. Place your dish in the preheated oven. Bake for 45-50 minutes. You want it to be golden brown and bubbly. To check if your cobbler is ready, use a toothpick. Insert it into the batter part, not the blueberries. If it comes out clean, your cobbler is done! Let it cool for about 15 minutes before serving. This waiting time helps the flavors meld. Serve warm with whipped cream or a scoop of vanilla ice cream for a delightful treat. For the full recipe, check out the details in the previous sections. To make a great Texas-style blueberry cobbler, use fresh blueberries. They add the best flavor. If you use frozen ones, let them thaw first. This helps keep the cobbler from being too watery. Mix the blueberries gently with sugar and lemon juice. This will help release their juices. Don’t overmix the batter. It should be lumpy for the best texture. One common mistake is not greasing the baking dish. Greasing helps the cobbler come out easily. Another error is baking at the wrong temperature. Always preheat your oven to 350°F (175°C). If you bake it too long, the top can burn. Check the cobbler after 45 minutes. Use a toothpick to test if it’s done. If it comes out clean, it’s ready! Serve your cobbler warm for the best taste. Top it with whipped cream or vanilla ice cream for a treat. You can also sprinkle a few fresh blueberries on top. This adds color and makes your dish look nice. For a fun twist, serve it with a scoop of yogurt. This pairs well with the sweetness of the cobbler. Check out the Full Recipe for more details! {{image_2}} You can change the fruit in your cobbler. Try blackberries, raspberries, or peaches. Each fruit adds a unique taste. Mix and match for fun flavors. Just keep the same amount of sugar and cornstarch. This way, your cobbler stays sweet and thick. You can even use a mix of berries for a colorful treat. You can make this cobbler vegan. Use plant milk instead of regular milk. Swap butter for coconut oil or vegan butter. For gluten-free, use a gluten-free flour blend. These changes keep the taste while fitting your diet. You won't miss the regular ingredients at all. Toppings can change your cobbler's look and taste. Try adding nuts for crunch or oats for texture. A sprinkle of cinnamon gives warmth and flavor. You can drizzle honey or maple syrup for added sweetness. Serve your cobbler with whipped cream or vanilla ice cream for a creamy finish. The options are endless, so get creative! For the full recipe, check out the Texas-Style Blueberry Cobbler section. To keep your leftover cobbler fresh, let it cool completely. Then, cover it with plastic wrap or foil. You can also place it in an airtight container. Store it in the fridge for up to three days. This helps keep the flavors and texture nice. If you want to save cobbler for later, freezing works well. First, allow the cobbler to cool completely. Cut it into portions for easy thawing. Wrap each piece tightly in plastic wrap, then place them in a freezer bag. Label the bag with the date. You can freeze it for up to three months without losing flavor. When you're ready to enjoy your cobbler again, preheat your oven to 350°F (175°C). Place the cobbler in an oven-safe dish. Cover it with foil to keep it from drying out. Heat for about 20 minutes, or until warmed through. You can also use the microwave. Just heat it in short bursts, checking often to avoid overheating. Enjoy your Texas-Style Blueberry Cobbler warm, just like the first time! For the full recipe, check the section above. Texas-style cobblers have roots in Southern cooking. They blend Native American, African, and European traditions. Early settlers made cobblers with fresh fruits. Texas cooks often used local ingredients, like blueberries. Cobbler became a staple at family gatherings and potlucks. The dish is known for its simple yet rich flavors. Each cook adds their unique twist, keeping traditions alive. Yes, you can use frozen blueberries! Just make sure to thaw them first. Frozen berries work well in cobblers, keeping their sweet flavor. They also save time and are easy to find. Use the same amount as fresh berries in the recipe. This means 4 cups of thawed blueberries for tasty results. Blueberry cobbler is perfect for many occasions. Serve it at family dinners or summer picnics. It shines at barbecues and holiday gatherings too. This dessert is great for birthdays or potlucks. You can enjoy it as a sweet treat after any meal. Pair it with whipped cream or ice cream for extra fun. For the full recipe, check out the [Full Recipe]. This article covered all you need to make a great Texas-style blueberry cobbler. I shared key ingredients and how to swap them for more flavor. You learned step-by-step instructions for preparation, baking, and checking doneness. Tips helped you avoid common mistakes and perfect your dish. We also explored fun variations and storage tips. Remember, the best cobbler comes from using fresh ingredients and enjoying the process. Now, you are ready to impress everyone with your baking skills!](https://stirredrecipes.com/wp-content/uploads/2025/08/4384a587-7e5f-4013-aa57-660214fe1c9f.webp)
If you crave a dessert that screams comfort, then Texas-style blueberry cobbler is for you! This simple and delicious recipe perfectly mixes juicy blueberries with a buttery topping. Impress your …
 for step-by-step instructions to create your Maple Walnut Muffins. Baking Maple Walnut Muffins is simple and fun. First, gather all your ingredients. This helps you stay organized. You will need about 15 minutes for prep time. Measuring ingredients accurately is key. It ensures your muffins rise well and taste great. 1. Preheat your oven to 350°F (175°C). This step is crucial for even baking. 2. Line a muffin tin with paper liners or grease it lightly. This keeps the muffins from sticking. 3. In a mixing bowl, whisk together the dry ingredients: all-purpose flour, whole wheat flour, baking powder, baking soda, salt, and cinnamon. Mix these well to combine. 4. In a separate bowl, cream the softened butter and maple syrup using an electric mixer. Beat for about 2-3 minutes until fluffy. 5. Add the eggs one at a time. Mix well after each egg. Then, stir in the vanilla extract. 6. Gradually add the dry mix to the wet mix, alternating with milk. Start and end with the flour mix. Mix until just combined; over-mixing can make muffins tough. 7. Gently fold in the chopped walnuts. Be careful not to over-mix the batter; this keeps them light. 8. Divide the mixture among the muffin cups, filling each about two-thirds full. This allows them to rise. 9. Top each muffin with a few chopped walnuts and a pinch of maple sugar. This adds a nice crunch and sweetness. 10. Bake for 18-20 minutes. Check for doneness by inserting a toothpick. It should come out clean. 11. Let the muffins cool in the tin for 5 minutes. Then, move them to a wire rack to cool completely. Using these steps, you will create delicious Maple Walnut Muffins. For a complete list of ingredients and instructions, check the Full Recipe. To make the best maple walnut muffins, focus on a few key details. Start with the right texture. Use a light touch when mixing the batter. Over-mixing can lead to dense muffins. Aim for a smooth blend, but don’t worry if small lumps remain. For even baking, fill each muffin cup about two-thirds full. This allows space for rising. Rotate the muffin tin halfway through baking. This helps all muffins bake evenly. The ideal baking time is 18 to 20 minutes. Test doneness with a toothpick; it should come out clean. Cooling is vital for freshness. Allow muffins to cool in the tin for five minutes. Then, transfer them to a wire rack. This prevents sogginess and keeps them fluffy. Maple walnut muffins pair well with coffee or tea. They make a great breakfast treat. Try serving them with almond butter or cream cheese. These spreads add a creamy texture and rich flavor. For special occasions, present the muffins in a rustic basket. Line the basket with a cloth napkin. Drizzle a little extra maple syrup on top. This simple touch makes them look beautiful and inviting. For more ideas, consider adding fresh fruit on the side. Sliced strawberries or bananas complement the muffins nicely. These pairings enhance the overall taste experience. Enjoy exploring these options! {{image_2}} You can easily change up the flavor of your Maple Walnut Muffins. Adding fruit can bring a new twist. Try mixing in blueberries for a burst of sweetness. Chopped bananas give a nice texture and flavor too. For added depth, think about using spices. A bit of nutmeg can add warmth. You can also add ginger for a nice kick. These spices work well with the maple flavor. If you want to make a vegan version, it’s simple. Swap eggs for flaxseed meal mixed with water. Use almond milk instead of regular milk. Replace the butter with coconut oil. These changes keep the muffins moist and tasty. For those with nut allergies, you can skip the walnuts. You might want to use sunflower seeds instead. They give a nice crunch without the nuts. If you have wheat sensitivities, there are options. Use a gluten-free flour blend in place of regular flour. This keeps the muffins light and fluffy. You can also switch up sweeteners. Try agave syrup or honey instead of maple syrup. This adds a different but still sweet flavor. For extra fun, mix in chocolate chips or dried fruits. These add sweetness and a hint of chewiness. You can be creative with your mix-ins to find what you love best. For the full recipe, check out the instructions above. To keep your maple walnut muffins fresh, store them in an airtight container. This helps prevent them from drying out. If you want to refrigerate, they last about five days. If you freeze them, they can stay good for up to three months. Just make sure to wrap them well to avoid freezer burn. When reheating, use the oven at 350°F for about 10 minutes. This keeps the muffins soft and tasty. Use a plastic or glass container with a tight lid for best results. You can also use freezer bags for freezing. To keep your muffins fresh, add a piece of bread to the container. It helps maintain moisture. It is smart to label your containers with the date so you know when you made them. Organize them by flavor or type for easy access when you're hungry! What can I use instead of maple syrup? If you want to swap maple syrup, try honey or agave nectar. They both add sweetness. You can also use brown sugar mixed with water for a similar flavor. How do I make muffins moist without adding extra fat? To keep muffins moist, use ingredients like yogurt or applesauce. They add moisture without extra fat. You can also avoid overmixing the batter, which helps keep muffins light. Can I make the batter ahead of time? Yes, you can make the batter ahead. Store it in the fridge for a few hours. Just remember to mix it gently before baking. Why are my muffins too dense or too dry? Dense or dry muffins often come from too much flour or overmixing. Always measure flour correctly and mix just until combined. This keeps muffins light and fluffy. How can I prevent my muffins from sticking to the tin? To prevent sticking, use paper liners or grease the muffin tin well. You can use cooking spray or butter. This helps muffins release easily after baking. What should I do if my muffins overflow? If muffins overflow, it may be because you filled them too high. Next time, fill each cup only two-thirds full. This gives them room to rise without spilling. Can I swap walnuts for another nut or seed? Absolutely! You can use pecans, almonds, or even sunflower seeds. Each nut adds a unique taste and texture to your muffins. How long do muffins generally last? Muffins stay fresh for about three days at room temperature. If you keep them in the fridge, they last a week. For longer storage, freeze them. What's the best way to know if my muffins are done baking? To check if muffins are done, insert a toothpick into the center. If it comes out clean or with a few crumbs, they are ready. If it’s wet, bake a few more minutes. Making Maple Walnut Muffins is a fun and rewarding task. We covered choosing the right ingredients and simple steps for baking. You learned tips for perfecting texture and how to store your muffins well. Remember, variations can make your muffins unique, so experiment with flavors and dietary needs. With these guidelines, you can create tasty treats for any occasion. Enjoy your baking journey and the delicious muffins you will share!](https://stirredrecipes.com/wp-content/uploads/2025/08/4ce55c9d-0dfd-4b66-8d23-2f903642a5aa.webp)
Welcome to the delightful world of Maple Walnut Muffins! If you crave a simple yet delicious treat, you’re in the right place. These muffins are perfect for breakfast or a …