Baked Apple Cider Donuts Simple and Delicious Recipe
![- 1 cup apple cider - 2 cups all-purpose flour - 1 teaspoon baking powder - 1/2 teaspoon baking soda - 1 teaspoon ground cinnamon - 1/2 teaspoon ground nutmeg - 1/2 teaspoon salt - 1/2 cup granulated sugar - 1/4 cup brown sugar, packed - 1/4 cup unsweetened applesauce - 2 large eggs - 1/4 cup vegetable oil - 1 teaspoon vanilla extract - Cinnamon sugar (for coating: mix 1/4 cup sugar with 1 teaspoon cinnamon) When I make baked apple cider donuts, I love using fresh apple cider. It adds a deep flavor. The spices like cinnamon and nutmeg give warmth to each bite. I use both granulated and brown sugar. This mix gives a nice sweetness and a slight caramel note. The applesauce keeps the donuts moist. Eggs help bind everything together. Vegetable oil adds richness, while vanilla extract brightens the taste. Make sure to have a donut pan ready. This recipe yields about 12 donuts. You can enjoy them warm, coated in cinnamon sugar. Trust me; they will disappear fast! For the full recipe, check the details above. 1. Preheat your oven to 350°F (175°C). Grab your donut pan and spray it with cooking spray. This helps the donuts come out easily. 2. Reduce the apple cider. Pour 1 cup of apple cider into a small saucepan. Heat it over medium heat. Bring it to a gentle boil. Then, lower the heat. Let it simmer until it reduces to about 1/2 cup. This takes about 10-15 minutes. After that, let it cool for a bit. 3. Mix your dry ingredients together. In a large bowl, add 2 cups of all-purpose flour. Then, mix in 1 teaspoon of baking powder, 1/2 teaspoon of baking soda, 1 teaspoon of ground cinnamon, 1/2 teaspoon of ground nutmeg, and 1/2 teaspoon of salt. Whisk all of this until it is well combined. 1. Whisk the wet ingredients until smooth. In another bowl, combine 1/2 cup of granulated sugar, 1/4 cup of brown sugar, 1/4 cup of unsweetened applesauce, and 2 large eggs. Add in 1/4 cup of vegetable oil and 1 teaspoon of vanilla extract. Whisk until the mixture is creamy. 2. Combine the wet and dry mixtures carefully. Add the cooled apple cider to the wet mixture. Mix well. Then, slowly add the dry ingredients. Stir gently until just combined. Be careful not to overmix. The batter should be thick. 1. Fill the donut pan and bake. Spoon the thick batter into the greased donut pan. Fill each cavity about 3/4 full. Bake for 10-12 minutes. Check if they are done by inserting a toothpick. It should come out clean. 2. Cool the donuts before serving. After baking, allow the donuts to cool in the pan for about 5 minutes. Gently remove them and roll them in cinnamon sugar while they are still warm. This gives them a sweet finish. For the full recipe, check out the complete instructions above. Enjoy your homemade baked apple cider donuts! To make the best baked apple cider donuts, you must avoid overmixing the batter. When you mix too much, the donuts can turn out tough. Just stir until the dry and wet ingredients blend. It is okay if a few lumps remain. Another key tip is to ensure even baking for a uniform texture. Fill each donut cavity about three-quarters full for consistent size and shape. Rotate your pan halfway through baking. This helps all the donuts bake evenly. Presentation is vital for a great display. Arrange your donuts on a pretty platter. Drizzle some leftover apple cider reduction on top for added flavor. Sprinkle a little extra cinnamon sugar around. This adds a nice touch and makes them look inviting. Pair these donuts with a warm cup of coffee or tea. The warmth of the drinks enhances the spices in the donuts. For a fun twist, serve them with a scoop of vanilla ice cream. It makes for a delightful dessert. If you want the full recipe, check it out in the article above! {{image_2}} You can make baked apple cider donuts even better! Try adding spices like ginger or cloves. These spices add warmth and depth to the flavor. Just a pinch can transform your donuts. You might also enjoy mixing in nuts or chocolate chips. Chopped walnuts or pecans add a nice crunch. If you crave sweetness, chocolate chips can create a delightful surprise in every bite. If you have dietary needs, don’t worry! You can easily substitute gluten-free flour for the all-purpose flour. This keeps your donuts just as tasty. For those who follow a vegan diet, try using egg replacements. Flax eggs or unsweetened yogurt work well. These swaps make the recipe friendly for everyone. Enjoy your baked apple cider donuts no matter your diet! Feel free to explore more ideas and tips in the Full Recipe for baked apple cider donuts! To keep your baked apple cider donuts fresh, follow these tips: - Cool Completely: Let the donuts cool before storing. This prevents moisture build-up. - Use Airtight Containers: Store them in an airtight container to keep them soft. - Room Temperature: Keep them at room temperature for up to three days. - Refrigeration: If you need them to last longer, you can refrigerate them. However, this may change their texture. Reheating donuts can bring back their warm, fresh taste. Here are some simple tips: - Microwave Method: Heat one donut for about 10-15 seconds. This warms it nicely. - Oven Method: Preheat your oven to 350°F (175°C). Place the donuts on a baking sheet for 5-7 minutes. - Taste Tips: Add a sprinkle of cinnamon sugar after reheating for extra flavor. For the full recipe, check out the details above. Enjoy your delicious donuts! Can I use fresh apple juice instead of cider? Yes, you can use fresh apple juice. However, cider has a deeper apple flavor. This adds more richness to the donuts. If using juice, opt for a thick, premium brand. How can I make these donuts healthier? To make the donuts healthier, try these tips: - Use whole wheat flour instead of all-purpose flour. - Replace granulated sugar with a natural sweetener like honey or maple syrup. - Swap applesauce for oil to cut down on fat. These changes can help boost nutrition while keeping the taste delicious. What is the best way to glaze or frost baked donuts? The best way to glaze or frost baked donuts is simple. Start with a basic glaze made of powdered sugar and a splash of milk. Mix until smooth. For a fun twist, add cinnamon or vanilla extract. Drizzle this glaze over the cooled donuts. You can also dip the tops in it for a thicker coat. Enjoy your tasty creation! For a full recipe, visit the [Full Recipe]. You learned how to make apple cider donuts from scratch. We covered the key ingredients, step-by-step instructions, tips for perfection, and tasty variations. Storing and reheating these donuts keeps them fresh and delightful. In the end, baking can be fun and rewarding. Enjoy these donuts while they are fresh and warm. Experiment with flavors to make your own version. Happy baking!](https://stirredrecipes.com/wp-content/uploads/2025/08/ae414916-bf9b-421b-9e37-ea5cc75eda50.webp)
Ready for a sweet treat that captures the essence of fall? My baked apple cider donuts are simple to make and bursting with flavor. This recipe uses everyday ingredients, creating …
Ready for a sweet treat that captures the essence of fall? My baked apple cider donuts are simple to make and bursting with flavor. This recipe uses everyday ingredients, creating …

Indulge yourself with my Decadent Double Chocolate Espresso Muffins! These rich, moist muffins blend bold espresso with deep chocolate flavors, creating a treat perfect for any occasion. In this article, …

Looking for a quick, tasty meal? My Crock Pot Southwest Chicken and Rice is perfect! It brings together tender chicken, hearty rice, and vibrant veggies for a dish that bursts …

Get ready to indulge in pure autumn bliss with my chewy pumpkin cookies! Made even better with rich brown butter, these treats will warm your heart. You’ll love the cozy …

Craving a cheesy comfort food that’s easy to make? You’ve found it! My Slow Cooker Four Cheese Mac and Cheese Delight brings together creamy cheeses for that perfect bite. This …
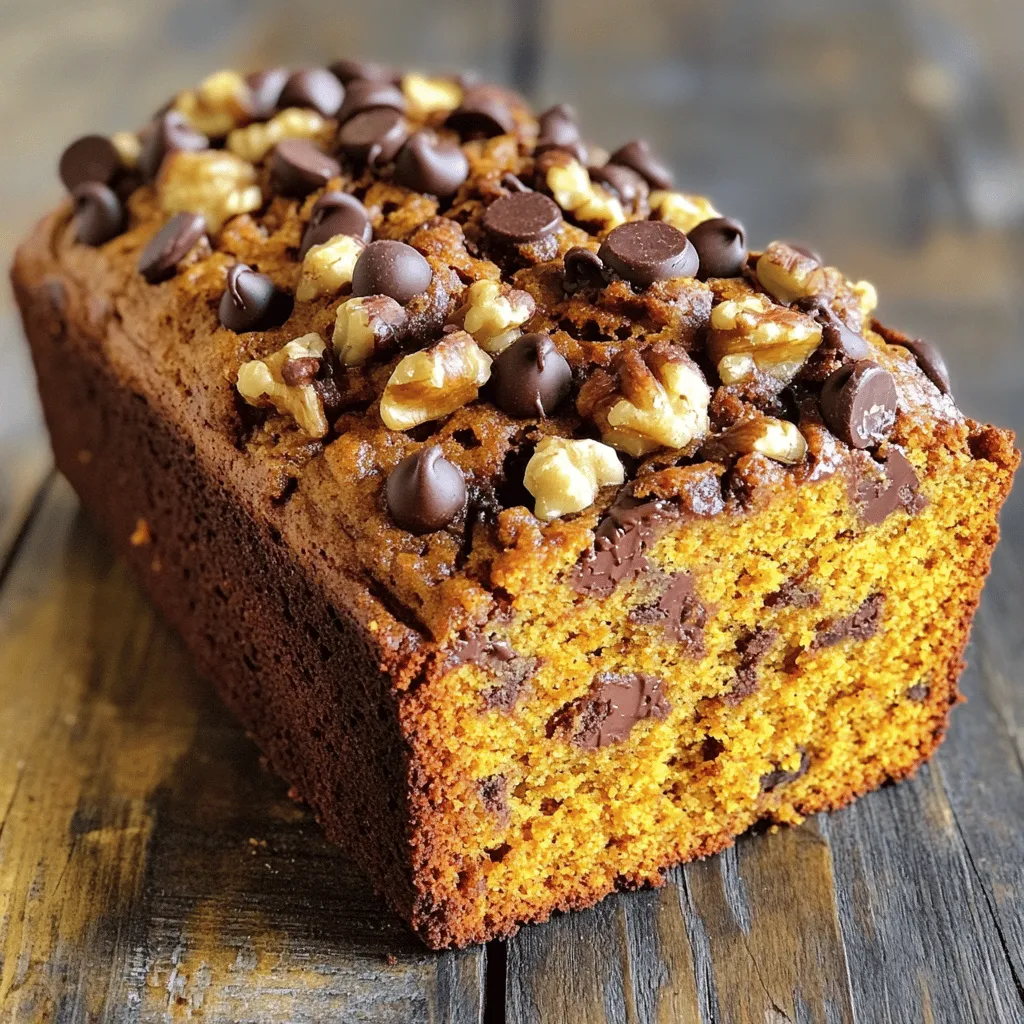
If you love the warm, cozy flavors of fall, you must try this Chocolate Chip Pumpkin Bread recipe! It’s a delightful blend of sweet chocolate and spicy pumpkin, perfect for …

Welcome to your ultimate guide on Mexican tacos! If you want to create simple and flavorful tacos that impress, you’ve come to the right place. In this guide, I’ll share …
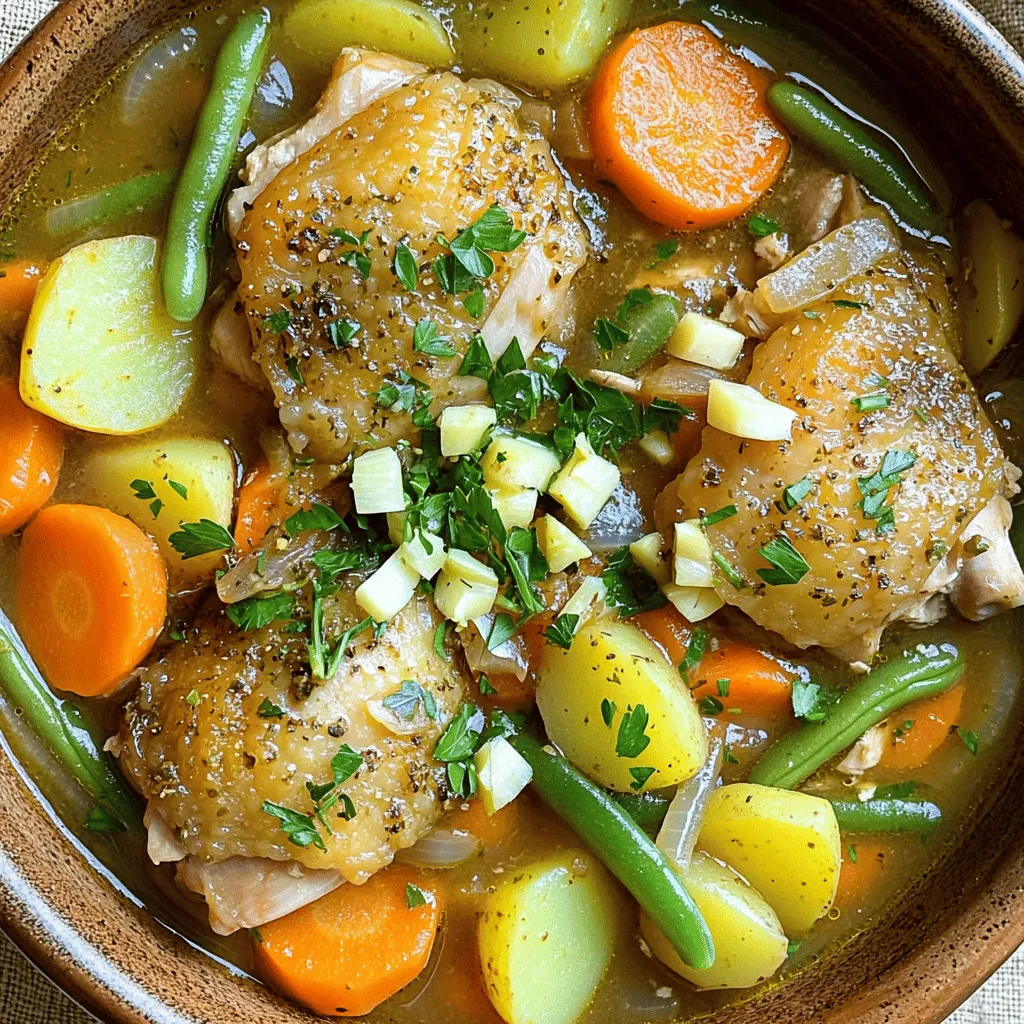
Want a warm, filling meal? Try my Savory Slow Cooker Chicken Stew! This dish is perfect for busy days. With just a few simple steps, you can create a comforting …
. Enjoy cooking this delightful meal! Start with chopping the onion, garlic, and ginger. These add depth to the dish. Use a sharp knife for clean cuts. This will help release their flavors. Next, cut the chicken into bite-sized pieces. This ensures even cooking and easy serving. Thighs work best here. They stay juicy and tender. In your slow cooker, layer the onion, garlic, and ginger mix first. This creates a fragrant base. Next, add the chicken pieces on top. Season them with a pinch of salt to enhance flavor. Now, prepare the sauce. In a separate bowl, mix the tomato sauce, coconut milk, and spices. Stir until it is well combined. Pour this mixture over the chicken and onion. Finally, add the stick of butter on top. Do not stir. The butter will melt and create a rich sauce as it cooks. You can cook on low or high settings. Cooking on low takes about 6-8 hours. This allows flavors to meld beautifully. If you’re short on time, use the high setting for 3-4 hours. In both cases, cook until the chicken is tender. It should easily shred apart with a fork. This method ensures you get a rich and creamy butter chicken that you will love. For the full recipe, check out the previous section! To make your butter chicken even better, start with the spices. Adjust the chili powder to fit your taste. If you love heat, add more. For a milder dish, use less. You can also add fresh herbs like cilantro or mint. These will brighten the flavors. Adding more ingredients can deepen the taste. Toss in some diced tomatoes or bell peppers. For a richer sauce, mix in more coconut milk. This will create a creamier texture. Feel free to play with these ideas and find your favorite mix. Sometimes the sauce can get too thick. If this happens, simply add a splash of coconut milk. Stir well and let it cook a bit longer. This will help thin it out while keeping the flavor. To avoid dry chicken, start with good-quality chicken thighs. They stay moist during cooking. Also, do not overcook them. Check the chicken at the end of the cooking time. If it feels tough, it may need less time next time. Serve your butter chicken with basmati rice or warm naan. Both soak up the sauce well. You can also add a side of steamed vegetables for balance. For drinks, a light white wine pairs well. Try a Sauvignon Blanc or a Riesling. If you prefer non-alcoholic options, serve it with mango lassi or a cool soda. These drinks will enhance your meal experience. {{image_2}} You can switch the chicken thighs for chicken breasts. Chicken breasts are leaner, but they may dry out faster. If you want a juicier meal, stick to thighs. For a vegetarian twist, try chickpeas or tofu. Both options soak up the rich sauce well. Do you like it spicy or mild? To make it milder, reduce the chili powder. You can also add more sugar to balance the heat. If you want more spice, add fresh chili or cayenne pepper. Feel free to explore other herbs like curry leaves or fresh mint for a fun twist. For a creamy sauce, stick with coconut milk. If you want a lighter option, use yogurt instead. Greek yogurt gives a nice texture. For non-dairy choices, almond or cashew milk works well too. Each option changes the flavor slightly, so choose what you prefer. For the complete recipe, check out the Full Recipe section above! After you enjoy your Slow Cooker Indian Butter Chicken, store leftovers in airtight containers. Glass or plastic containers work well. Allow the dish to cool before sealing it. This helps keep the chicken fresh. It can last in the fridge for 3 to 4 days. To reheat, use a microwave or a stovetop. If using a microwave, cover the dish to keep moisture in. Stir halfway through heating for even warmth. On the stovetop, heat over low heat and stir often. You can freeze leftovers for up to 3 months. Just make sure to use a freezer-safe container. Butter chicken is quite versatile. You can repurpose it in many ways! Try it in a quesadilla with cheese. Mix it with pasta for a creamy twist. Or, use it as a filling for wraps. You can also top a baked potato with it for a unique meal. Enjoy experimenting with these ideas! Indian Butter Chicken is a rich and creamy dish. It comes from North India. The dish features tender chicken in a spiced tomato sauce. The main flavors come from butter, cream, and spices like garam masala. The taste is both savory and slightly sweet. You can enjoy it with rice or naan. Yes, you can prepare it ahead of time. You can chop the onions, garlic, and ginger. Cut the chicken into bite-sized pieces. Mix the sauce ingredients and store them in the fridge. When you're ready, just add everything to the slow cooker. After cooking, store leftovers in the fridge for up to four days. Common sides include basmati rice and naan bread. You can also add a fresh salad for crunch. Other great options are roasted vegetables or raita. Raita is a yogurt-based side that cools the heat of the spices. Yes, this recipe is great for meal prep. You can make a big batch and store it in containers. Divide it into portions for easy meals during the week. Reheat it in the microwave or on the stove. It stays tasty for several days in the fridge. Absolutely! You can easily change the amount of chicken or sauce. If you want more servings, double the ingredients. For fewer servings, cut them in half. Just keep the same ratios for the spices and sauce. For the complete details, check the Full Recipe section. It will guide you step-by-step to make this delicious dish. Slow Cooker Indian Butter Chicken offers a blend of rich flavors and easy preparation. We discussed key ingredients like chicken, spices, and coconut milk. You learned step-by-step instructions for perfect results and tips to enhance the dish. Storage methods and variations allow for creativity. This recipe is perfect for meal prep or cozy dinners. With its versatility, you can enjoy this tasty dish again and again. Embrace the delicious flavors and make this dish your own!](https://stirredrecipes.com/wp-content/uploads/2025/08/f7eb7126-6a01-4499-aa7a-f0e4b92a5254.webp)
Are you ready to discover a dinner that’s full of rich flavors and warmth? My Slow Cooker Indian Butter Chicken is a game-changer. You’ll love how easy it is to …
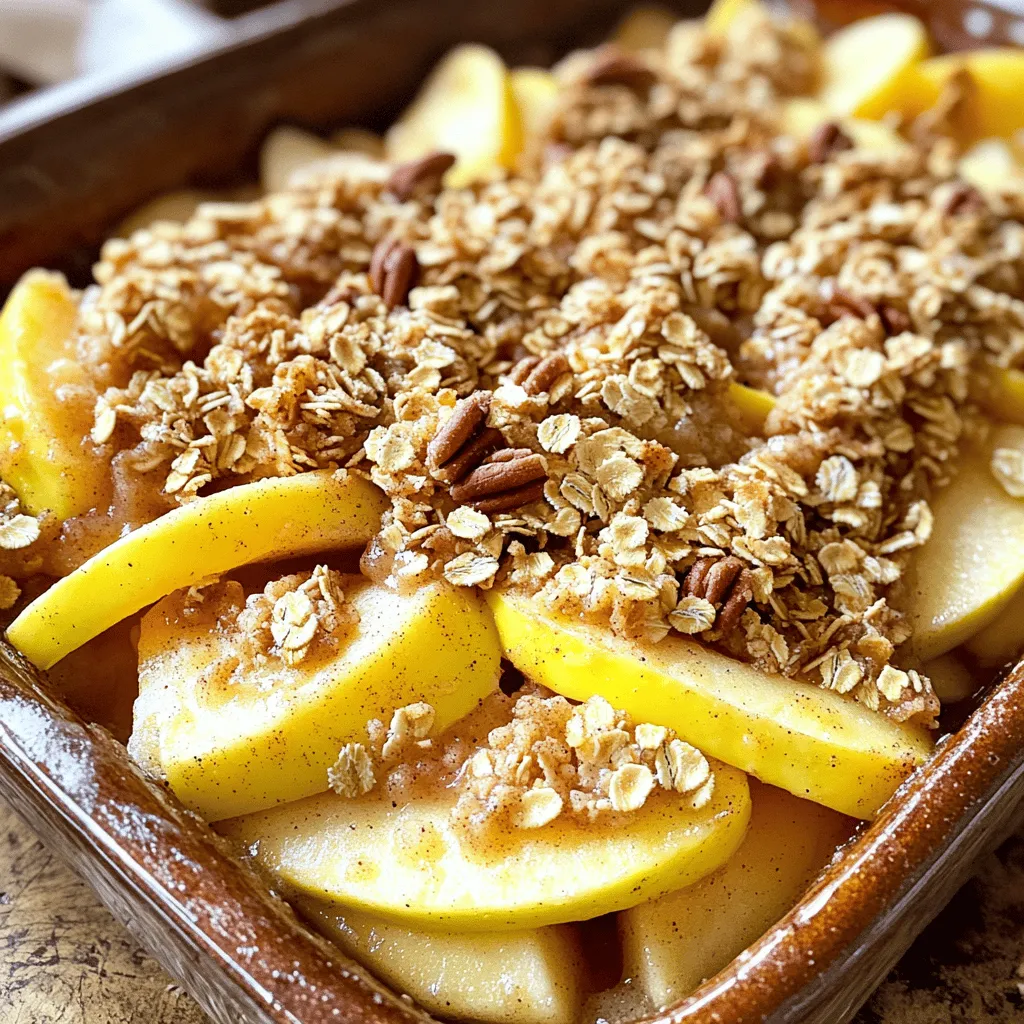
If you’re craving a warm, comforting dessert, you’ve found the perfect recipe! My Best Ever Apple Crisp is simple and delicious, making it an ideal treat for any occasion. Imagine …