Skip to content
Stirred Recipes
  • Home
  • Appetizers
  • Desserts
  • Salads
  • Breakfast
  • Dinner
  • Privacy Policy
  • Contact
  • About

Chef Luca

No-Bake Pumpkin Cheesecake Creamy and Simple Delight

August 15, 2025 by Chef Luca
To make a delicious No-Bake Pumpkin Cheesecake, you need a few simple ingredients. Here’s what you will need: - 1 ½ cups graham cracker crumbs - ⅓ cup sugar - ½ cup unsalted butter, melted - 2 cups cream cheese, softened - 1 cup pumpkin puree - ¾ cup powdered sugar - 1 teaspoon vanilla extract - 1 teaspoon ground cinnamon - ½ teaspoon ground nutmeg - ½ teaspoon ground ginger - 1 ½ cups whipped cream - Optional toppings: caramel sauce and pecans These ingredients create a rich and creamy cheesecake. The graham cracker crumbs give the crust a nice crunch. The pumpkin puree adds warmth and flavor. The spices make it taste like fall. Be sure to use fresh, high-quality ingredients for the best result. Using these ingredients, you can impress guests or enjoy a sweet treat at home. I always recommend keeping some of these staples on hand. You never know when a pumpkin craving will hit! To start, gather your graham cracker crumbs, sugar, and melted butter. In a mixing bowl, combine the graham cracker crumbs with the sugar. Stir in the melted butter until all crumbs are coated. This makes a tasty, buttery mix. Next, grab a 9-inch springform pan. Press the mixture firmly into the bottom of the pan. Make sure it is even. This crust will hold your cheesecake together. Place the pan in the fridge while you make the filling. Now, let’s make the filling. In a large bowl, beat the softened cream cheese with an electric mixer. Mix until it is smooth and creamy. This step is key for a rich texture. After that, add in the pumpkin puree and powdered sugar. Then, mix in the vanilla, ground cinnamon, nutmeg, and ginger. Beat until well combined. The spices will bring warmth and flavor to the cheesecake. The next step is folding in the whipped cream. Gently add the whipped cream to the pumpkin mix. Use a spatula to fold it in. Be careful not to deflate the whipped cream. This will keep your cheesecake light and fluffy. Once mixed, pour the pumpkin filling into the prepared crust. Smooth the top with your spatula. This will create a nice, even surface for chilling. Cover the cheesecake with plastic wrap. Place it in the refrigerator for at least 4 hours. For the best results, chill it overnight. This will help the cheesecake set perfectly. When ready to serve, carefully remove the sides of the springform pan. Slice the cheesecake into pieces. You can garnish it with caramel sauce and chopped pecans for extra flavor. Serve it on a decorative cake stand for a festive touch! To get a great crust, you need even crumbs. After mixing the graham cracker crumbs, sugar, and melted butter, press the mixture down firmly. Use your fingers or a measuring cup to pack it in tightly. This helps the crust hold together when you slice the cheesecake. You can change the crust too! If you want, use crushed cookies or even nuts. Try using vanilla wafers, gingersnaps, or almond flour for a new twist. Each option adds a unique flavor to your cheesecake. Softened cream cheese is key for a smooth filling. Take it out of the fridge about 30 minutes before mixing. This helps it blend well with other ingredients. If your cream cheese is cold, it will be lumpy. When folding in whipped cream, be gentle. Use a spatula to lift the cream from the bottom of the bowl and over the filling. This keeps the mixture light and fluffy. Avoid stirring too hard, or you might lose that airy texture. For a festive touch, serve the cheesecake on a pretty cake stand. Dust the top with cinnamon or sprinkle crushed pecans around it. These little details make a big difference. Pair your cheesecake with coffee or a spiced chai. You can also add a drizzle of caramel sauce and a few pecans on top for extra flavor. This adds a nice crunch and sweetness that everyone will love. {{image_2}} You can add more warmth to your pumpkin cheesecake by using extra spices. Consider adding: - ½ teaspoon ground cloves - ½ teaspoon ground allspice These spices can enhance the flavor. They add a nice depth and richness that pairs well with pumpkin. Just mix them in when you add the pumpkin puree. Want to make your cheesecake even more exciting? You can add layers of chocolate or caramel. - For a chocolate twist, swirl melted chocolate into the filling. - To add caramel, drizzle it on top before serving. These flavors create a fun contrast with the pumpkin. Your guests will love the surprise! You can easily adapt this recipe for different diets. Here are some options: - For a gluten-free version, use gluten-free graham cracker crumbs. - If you want it dairy-free, try using vegan cream cheese and coconut whipped cream. These swaps make the cheesecake accessible to more people. Enjoying dessert should be for everyone! To keep your no-bake pumpkin cheesecake fresh, place it in the fridge. Use an airtight container or cover it tightly with plastic wrap. This helps keep moisture in and prevents it from absorbing any other smells. Always store it in the coldest part of your fridge. For best taste, eat leftovers within three days. You can freeze this cheesecake if you want to save some for later. First, let it chill in the fridge for at least four hours. After it has set, wrap it tightly in plastic wrap. Then, put it in a freezer-safe container. This helps keep it fresh. To thaw, move it to the fridge for a few hours or overnight. Avoid thawing it at room temperature to keep the texture smooth. The cheesecake stays fresh for about five days in the fridge. If you freeze it, it will stay good for up to three months. Just remember, the longer it stays frozen, the more it may lose flavor and texture. So, enjoy your cheesecake while it's at its best! Yes, you can make this cheesecake ahead of time. It tastes great after chilling overnight. Prepare the crust and filling, then assemble it in the springform pan. Cover it tightly with plastic wrap to keep it fresh. This way, you save time on the day you serve it. You can use other pans if you don't have a springform pan. A regular cake pan works well, but you'll need to line it with parchment paper. This helps you lift out the cheesecake easily. You can also use individual ramekins for mini cheesecakes. To check if the cheesecake is set, look for a firm, even surface. The edges should hold their shape, while the center may jiggle slightly. Chill it for at least four hours or overnight for the best results. This helps the flavors blend and the textures firm up. Yes, fresh pumpkin is a great option. Start with a small pumpkin, peel it, and cut it into chunks. Steam or roast the pumpkin until soft, then blend it into a smooth puree. Use this in place of canned pumpkin for a fresh taste. This cheesecake combines simple ingredients to create a delicious dessert. We’ve covered the crust, filling, and how to chill it right. With tips and variations, you can make it your own. Remember, using softened cream cheese is key for the best texture. Store leftovers well and enjoy them later. Whether you choose to add spices or toppings, this cheesecake is sure to impress. Try it out and savor each bite!

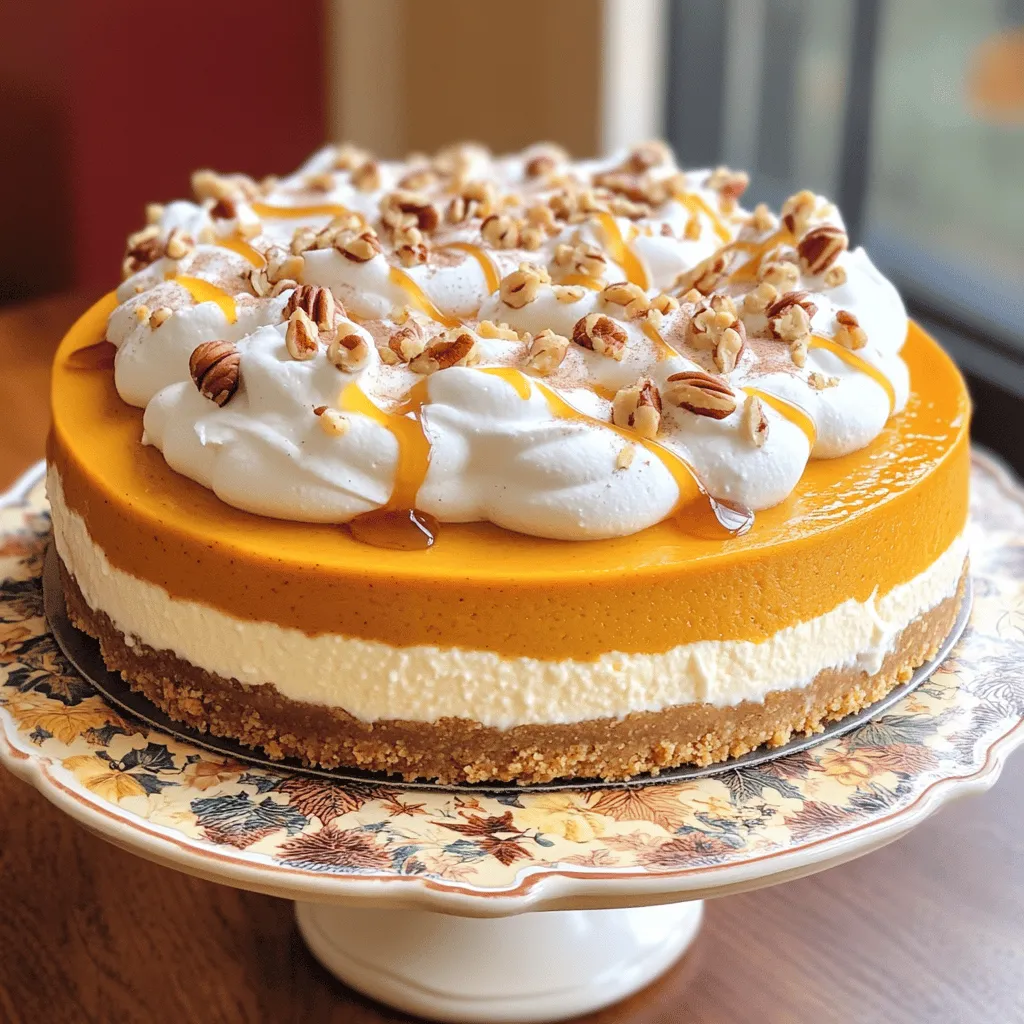
If you love pumpkin flavors and crave a creamy dessert, this No-Bake Pumpkin Cheesecake is for you! It’s simple to make and requires no baking. With its smooth texture and …

Read more

Categories Desserts

Garlic Parmesan Roasted Brussels Sprouts Delight

August 15, 2025 by Chef Luca
- 1 lb Brussels sprouts, trimmed and halved - 4 cloves garlic, minced - ¼ cup grated Parmesan cheese - 3 tablespoons olive oil - 1 teaspoon garlic powder - ½ teaspoon red pepper flakes (optional) - Salt and pepper to taste - 2 tablespoons fresh lemon juice - Fresh parsley for garnish These ingredients create a simple and tasty dish. The Brussels sprouts shine with garlic and cheese. The olive oil helps them get crispy. Each ingredient adds a unique flavor that makes this dish special. - ½ teaspoon smoked paprika for a smoky flavor - 2 tablespoons balsamic vinegar for a tangy twist - Chopped nuts like walnuts for added crunch These optional ingredients can change the taste. Try adding smoked paprika for depth. Balsamic vinegar gives a sweet kick. Nuts add a fun crunch that kids love. - Baking sheet for roasting - Parchment paper for easy cleanup - Large mixing bowl for combining ingredients - Chef's knife for chopping Using these tools makes cooking easier. A baking sheet helps the sprouts roast well. Parchment paper keeps the sheet clean. A good knife makes chopping fast and safe. Start with one pound of Brussels sprouts. Trim off the ends and cut them in half. This helps them cook evenly. You want them to be fresh and firm. In a big bowl, add the halved Brussels sprouts. Toss in four cloves of minced garlic, ¼ cup of grated Parmesan cheese, and three tablespoons of olive oil. Then add one teaspoon of garlic powder, ½ teaspoon of red pepper flakes (if you like heat), salt, and pepper. Mix it all well. Make sure every sprout gets coated. Preheat your oven to 425°F (220°C). Line a baking sheet with parchment paper for easy cleanup. Spread the Brussels sprouts in a single layer, cut-side down. This helps them get crispy. Roast them for 20 to 25 minutes. They should turn golden brown and crispy outside while staying tender inside. When they’re done, take them out and sprinkle the Parmesan on top. It will melt slightly. Drizzle two tablespoons of fresh lemon juice over them. Toss gently to mix. Lastly, add fresh parsley for color. To get your Brussels sprouts just right, start with fresh ones. Look for bright green, firm sprouts. Cut them in half to help them cook evenly. Toss them well with olive oil, salt, and pepper. Make sure they are cut-side down on the baking sheet. This helps them get crispy. Roast them at 425°F for 20-25 minutes. Keep an eye on them to avoid burning. They should be golden brown and tender inside. You can boost the flavor of your Brussels sprouts in many ways. Adding garlic gives a great taste. Use fresh minced garlic for a strong kick. Garlic powder works too if you need a shortcut. For a bit of heat, sprinkle in red pepper flakes. If you like herbs, add rosemary or thyme. A squeeze of lemon juice brightens the dish. Fresh parsley adds color and freshness. Mix and match these flavors to find your favorite. Presentation makes your dish stand out. Serve the sprouts on a large, colorful platter. Drizzle a bit of olive oil and lemon juice on top. This adds shine and flavor. Sprinkle extra Parmesan for a cheesy touch. Add fresh parsley leaves for a pop of color. You can also use a fun serving bowl. This makes the dish more inviting. Remember, we eat with our eyes first! {{image_2}} You can switch up the cheese for different flavors. Feta cheese adds a tangy bite. Goat cheese gives a creamy touch. Cheddar brings sharpness, while mozzarella gives a melty texture. Each option changes the taste and makes the dish your own. Want to make your Brussels sprouts heartier? Add proteins like bacon or chicken. Crispy bacon bits add a salty crunch. Cooked chicken pieces give protein and make the dish more filling. Just toss the cooked protein in at the end to blend flavors. You can mix in seasonal veggies for extra color and taste. Carrots bring sweetness and crunch. Sweet potatoes add creaminess and a hint of sweetness. Butternut squash offers a nutty flavor. Just remember to cut them to the same size as the Brussels sprouts for even cooking. After enjoying your Garlic Parmesan roasted Brussels sprouts, store leftovers properly. Cool them to room temperature first. Then, place them in an airtight container. This helps keep them fresh. Store in the fridge for up to three days. If you want to keep them longer, freezing is a great option. When it's time to eat leftovers, reheating them right makes a big difference. Preheat your oven to 350°F (175°C). Place the Brussels sprouts on a baking sheet. Cover them loosely with foil to prevent drying out. Heat for about 10-15 minutes until warm. You can also use a microwave, but the oven keeps them crispier. To freeze your Brussels sprouts, first, ensure they are fully cooled. Place them in a freezer-safe bag or container. Remove as much air as possible to avoid freezer burn. They can stay good for about two months in the freezer. When ready to eat, thaw overnight in the fridge before reheating. Yes, you can prep the Brussels sprouts in advance. Trim and halve them, then mix with oil, garlic, and spices. Store them in the fridge for up to a day. When you are ready to cook, just spread them on a baking sheet and roast. This makes your cooking time shorter when you want to serve them. Brussels sprouts are done when they turn golden brown and crispy outside. They should be tender inside. After roasting for 20-25 minutes, check them. You can poke one with a fork to see if it is soft. If they look golden and smell great, they are ready. These Brussels sprouts pair well with many dishes. They go great with roasted chicken or grilled steak. You can also serve them with pasta or a fresh salad. For a fun twist, try them with a tangy dipping sauce. The flavors mix well, making your meal even better. In this article, we explored the key ingredients for Garlic Parmesan Roasted Brussels Sprouts and how to prep them. We followed a clear, step-by-step guide on how to mix and roast for the best crispiness. I shared tips on achieving perfect roast and ideas for flavor and presentation. You can enjoy variations with different cheeses or proteins. Lastly, I covered storage tips for leftovers and reheating. Remember, these sprouts are not just tasty; they can be a versatile side dish in many meals. Enjoy experimenting!

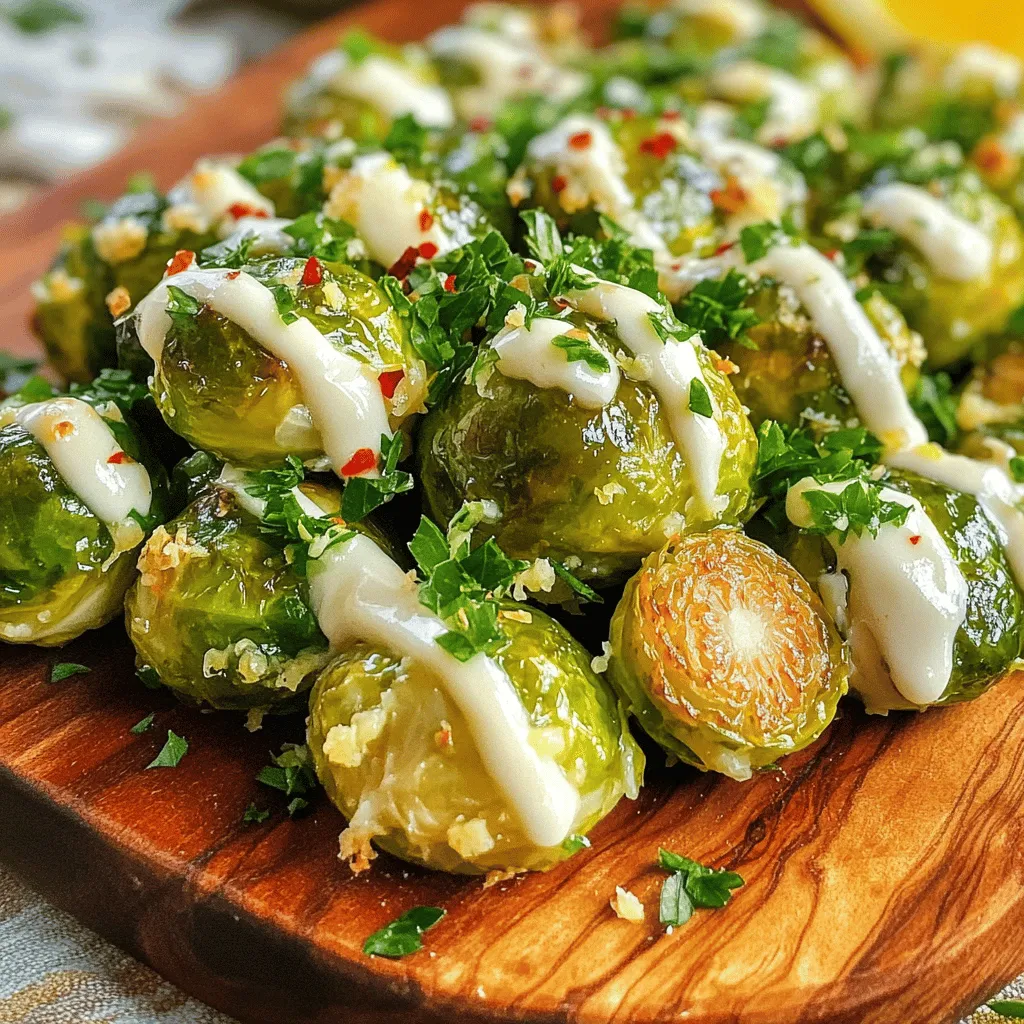
Get ready to elevate your vegetable game with Garlic Parmesan Roasted Brussels Sprouts Delight! This dish combines the rich flavors of garlic and cheese, making sprouts crispy and tasty. Whether …

Read more

Categories Appetizers

Cozy Butternut Squash Soup Wholesome and Creamy Meal

August 15, 2025 by Chef Luca
- 1 medium butternut squash - 1 large onion - 2 cloves garlic - 1 carrot - 1 celery stalk - 4 cups vegetable broth - Ground ginger and cinnamon - Olive oil - Salt and pepper - Coconut milk (optional) - Fresh parsley or chives - Croutons for topping - Chili flakes for heat - Other herbs like thyme or rosemary - Large pot - Immersion blender or countertop blender - Cutting board and knife When I make cozy butternut squash soup, I love using fresh ingredients. The squash gives the soup a sweet flavor and creamy texture. Start with a medium butternut squash. Peel and cube it to make it easy to cook. Next, grab a large onion and chop it finely. The onion adds depth to the soup. For a kick of flavor, I add two cloves of garlic, minced. A diced carrot and a celery stalk also enhance the taste. For the base, I pour in four cups of vegetable broth. This broth is key and makes the soup rich. To spice it up, I add ground ginger and cinnamon. A splash of olive oil helps the veggies cook nicely. Don’t forget salt and pepper to taste! Sometimes, I stir in half a cup of coconut milk. It makes the soup even creamier. For a fresh touch, I garnish with parsley or chives. If you want extra flavor, consider adding croutons on top. Chili flakes can add some heat if you like spice. Fresh herbs like thyme or rosemary can also boost the taste of the soup. To make this soup, you’ll need a large pot, an immersion blender, or a countertop blender. A cutting board and knife are also essential for prep work. Using these simple ingredients and tools, you’ll create a comforting and tasty soup. - Heat 1 tablespoon of olive oil in a large pot over medium heat. - Add 1 large chopped onion, 1 diced carrot, and 1 diced celery stalk. - Cook the mix for about 5-7 minutes until the veggies soften. - Stir in 2 minced garlic cloves. - Cook for another minute until you smell the garlic's warm aroma. - Add 1 medium cubed butternut squash to the pot. - Stir and sauté for about 3-4 minutes to mix the flavors. - Sprinkle in 1 teaspoon of ground ginger, 1 teaspoon of ground cinnamon, salt, and pepper. - Pour in 4 cups of vegetable broth. Bring it to a boil, then lower the heat to simmer for 20-25 minutes. The squash should become tender. - Remove the pot from heat. - Use an immersion blender to puree the soup until it is smooth. If using a countertop blender, blend carefully in batches. - For creaminess, stir in 1/2 cup of coconut milk if you want. - Heat the soup gently on low until it is warmed through. To get the right consistency for your soup, control the broth amount. If you want a thicker soup, use less broth. If you prefer it thinner, add more broth. This way, you can make it just how you like it. Blending the soup properly is key for smoothness. I recommend using an immersion blender. This tool lets you blend right in the pot. If you use a countertop blender, blend in batches. Make sure to cool the soup a bit first. This keeps it from splattering everywhere. Spices and herbs can make a big difference. Ground ginger and cinnamon add warmth and depth. You can also try adding nutmeg for a cozy twist. For an extra kick, roast some garlic. Roasting makes garlic sweet and rich. Just wrap it in foil and roast until soft. Then, squeeze it into the soup for a lovely flavor boost. Coconut milk gives the soup a rich, creamy flavor. If you like dairy, you can use heavy cream instead. Both options taste great, so choose what you like best. If you want a vegan option, stick with coconut milk. It keeps the soup creamy without any dairy. You can also use half the amount if you want it lighter. This way, you can enjoy a cozy bowl that fits your diet. {{image_2}} You can use different types of squash for this soup. Other winter squashes like acorn or kabocha work well. They have a similar sweetness and texture. You can also try sweet potatoes. Sweet potatoes add a rich, sweet flavor and a lovely orange color. Want to change things up? You can add beans for more protein. Black beans or cannellini beans fit nicely. They add heartiness to the soup. You can also toss in some greens. Spinach or kale adds color and nutrients. Just stir them in before blending. Seasonal spices can change the soup's vibe. In autumn, add nutmeg for a warm, cozy taste. For spring, fresh herbs like basil or cilantro brighten the flavor. Using seasonal ingredients helps you enjoy the soup all year. To store leftover soup, let it cool first. Pour the soup into airtight containers. Glass or BPA-free plastic containers work best. Make sure to leave some space at the top. This space allows the soup to expand if it freezes. To freeze the soup, follow these steps: 1. Cool the soup completely. 2. Use freezer-safe containers or bags. 3. Label them with the date. 4. Lay bags flat for easy stacking. When you're ready to eat, thaw the soup overnight in the fridge. For quick thawing, place the container in cold water. To reheat, either warm it on the stove or use the microwave. Stir well to ensure even heating. In the fridge, the soup lasts about 4-5 days. When frozen, it keeps well for 3 months. After this time, it may lose flavor and texture. Always check for signs of spoilage before eating. Butternut squash soup lasts about 3 to 5 days in the fridge. Store it in an airtight container for the best freshness. To keep it tasty, let the soup cool before putting it in the fridge. If you want to enjoy it later, just reheat on the stove or in the microwave. Yes, you can easily make butternut squash soup vegan. Instead of coconut milk, use almond or cashew milk for creaminess. For broth, use vegetable broth, which is already in the recipe. Just skip any dairy. The soup will still taste rich and delicious. Yes, frozen butternut squash works well. To use it, add the frozen cubes directly to the pot. You may need to cook it a bit longer. Check if it's tender by piercing it with a fork. Frozen squash saves prep time and still gives great flavor. Butternut squash soup pairs well with crusty bread or warm rolls. You can also serve it with a side salad for a complete meal. Try topping the soup with croutons or seeds for extra crunch. Enjoy it with a sprinkle of fresh herbs for added flavor. In this blog post, we explored how to make a delicious butternut squash soup. We covered key ingredients like squash, onion, garlic, and spices. I shared step-by-step instructions for cooking and blending the soup. We also looked at tips for flavor and ways to customize your dish. Finally, I discussed storage options to keep your soup fresh. Now, you can enjoy a tasty, warm bowl of soup anytime you want.

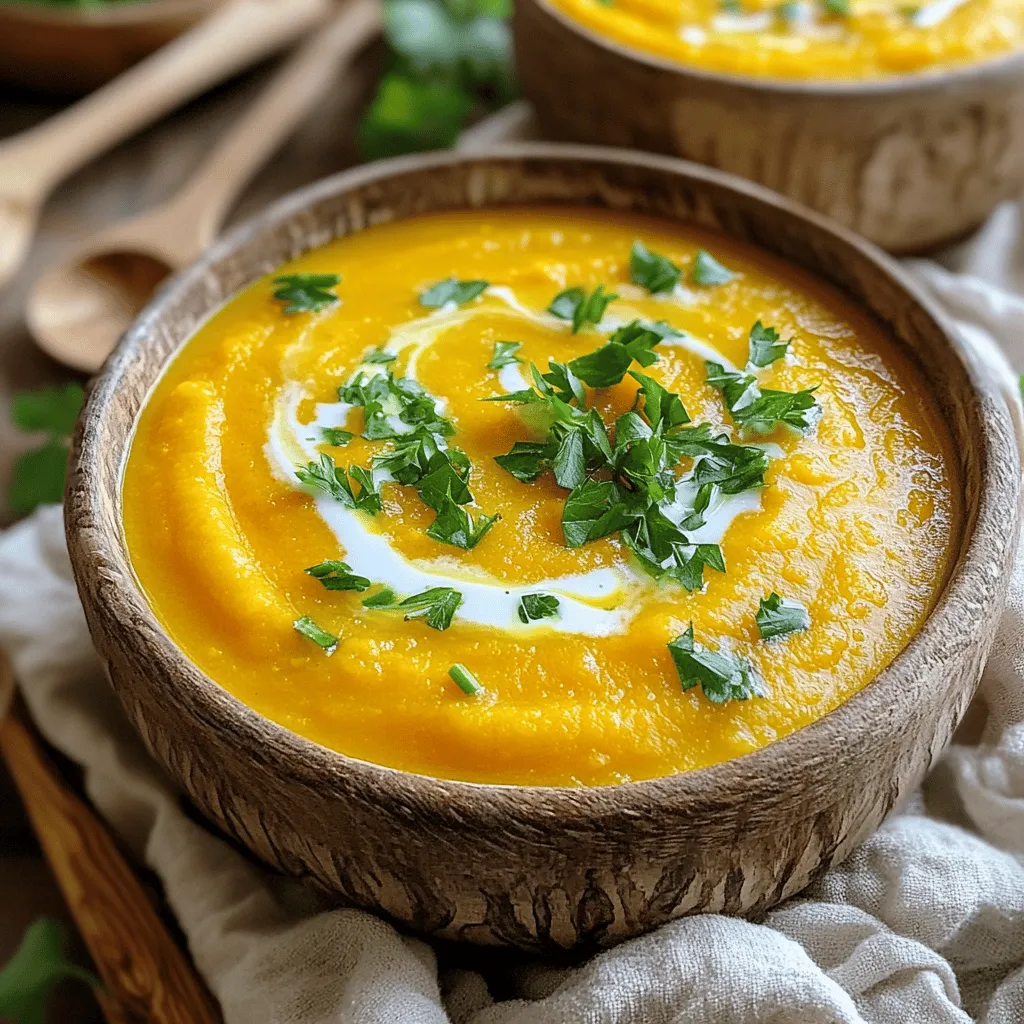
Cozy up with a warm bowl of butternut squash soup! This wholesome and creamy meal is not only delicious but also easy to make. With simple ingredients and straightforward steps, …

Read more

Categories Dinner

Irresistible Apple Crumb Cookies Simple and Tasty Treat

August 15, 2025 by Chef Luca
To make these delightful apple crumb cookies, gather the following: - 1 cup unsalted butter, softened - 1 cup brown sugar, packed - 1/2 cup granulated sugar - 1 large egg - 1 teaspoon vanilla extract - 2 cups all-purpose flour - 1 teaspoon baking soda - 1/2 teaspoon salt - 1 teaspoon ground cinnamon - 1 1/2 cups finely chopped apples (preferably Granny Smith) - 1/2 cup oats - 1/2 cup chopped walnuts or pecans (optional) - 1/4 cup granulated sugar (for topping) - 1 teaspoon ground cinnamon (for topping) If you need to swap some ingredients, here are good options: - Use coconut oil instead of butter for a dairy-free version. - Replace brown sugar with coconut sugar for a lower glycemic index. - Use gluten-free flour if you need a gluten-free option. - Apples can be swapped with pears or other tart fruits for a twist. To make your cookies even better, consider these add-ins: - Add 1/2 cup of raisins for extra sweetness. - Stir in some chocolate chips for a chocolatey treat. - Mix in a splash of caramel sauce for a rich flavor. - Top with a drizzle of icing for added sweetness and style. These simple yet tasty tweaks help you personalize your cookies. Enjoy experimenting with flavors! 1. Preheat the Oven: Start by preheating your oven to 350°F (175°C). This helps the cookies bake evenly. 2. Prepare the Baking Sheet: Line a baking sheet with parchment paper. This prevents the cookies from sticking. 3. Mix the Butter and Sugars: In a large bowl, cream together 1 cup of softened butter, 1 cup of brown sugar, and 1/2 cup of granulated sugar. Mix until it's light and fluffy. 4. Add Egg and Vanilla: Crack in 1 large egg and add 1 teaspoon of vanilla extract. Stir until fully combined. 5. Combine Dry Ingredients: In another bowl, whisk 2 cups of all-purpose flour, 1 teaspoon of baking soda, 1/2 teaspoon of salt, and 1 teaspoon of ground cinnamon. 6. Mix Wet and Dry Ingredients: Gradually add the dry mix to the wet mix. Stir until just combined. 7. Fold in Extras: Gently fold in 1 1/2 cups of finely chopped apples, 1/2 cup of oats, and 1/2 cup of chopped walnuts or pecans if you want. 1. Scoop the Dough: Use a spoon or cookie scoop to drop rounded tablespoons of dough onto the prepared baking sheet. Space them about 2 inches apart. 2. Prepare the Topping: In a small bowl, mix 1/4 cup of granulated sugar with 1 teaspoon of ground cinnamon. Sprinkle about a teaspoon on each cookie mound. 3. Bake the Cookies: Place the baking sheet in the oven. Bake for 12-15 minutes, or until the edges are golden and the center is set. 1. Cool on the Sheet: After baking, let the cookies cool on the baking sheet for 5 minutes. This helps them firm up. 2. Transfer to a Wire Rack: Carefully move the cookies to a wire rack to cool completely. This keeps them from getting soggy. Now you have delicious apple crumb cookies ready to enjoy! Serve your apple crumb cookies warm for the best taste. They pair well with vanilla ice cream or whipped cream. You can also add a drizzle of caramel sauce on top. For a fun twist, try serving them with a hot cup of cider. This adds a cozy touch that everyone will love. To make perfect cookies, use softened butter. It should be soft but not melted. Cream the butter and sugars until light and fluffy. This step helps create a nice texture. Always preheat your oven to 350°F (175°C). This ensures even baking. Space the cookie dough about 2 inches apart on the baking sheet. This gives them room to spread. Keep an eye on them, as baking times can vary. Aim for golden edges and a soft center. You can easily change this recipe to fit your taste. Try different types of apples, like Honeycrisp or Fuji, for a new flavor. You can add chocolate chips or dried fruit for more texture. If you love spices, add nutmeg or ginger for a warm kick. For a crunch, sprinkle extra oats or nuts on top. Feel free to mix and match to make these cookies your own! {{image_2}} You can make these cookies gluten-free. Replace all-purpose flour with a gluten-free blend. Many brands offer good options. Make sure the blend has xanthan gum. This helps the cookies hold together. The taste and texture will still be great! To make vegan apple crumb cookies, swap the butter and egg. Use coconut oil or vegan butter instead. For the egg, you can use flaxseed meal. Mix one tablespoon of flaxseed with three tablespoons of water. Let it sit for a few minutes to thicken. These changes keep the cookies tasty and soft. You can add fun flavors to your cookies. Consider mixing in chocolate chips for a sweet twist. Caramel bits can add a nice gooey texture. Dried cranberries or raisins work well too. Just remember to keep the total mix-ins at about one cup. This keeps the dough balanced and delicious. To keep your apple crumb cookies fresh, place them in an airtight container. Make sure they are cool before you store them. They stay good at room temperature for up to five days. For longer freshness, you can store them in the fridge. Just remember to seal them well to avoid drying out. If you want to keep your cookies for a while, freezing is a great option. First, let the cookies cool completely. Then, place them in a single layer on a baking sheet. Freeze them for about an hour. After they are firm, transfer the cookies to a freezer bag. They can last up to three months in the freezer. When you’re ready to enjoy, just thaw them at room temperature. To enjoy your cookies warm, reheating is easy. Preheat your oven to 350°F (175°C). Place the cookies on a baking sheet lined with parchment paper. Heat them for about 5 to 7 minutes, just until warm. You can also use a microwave. Heat each cookie for about 10 to 15 seconds. This keeps them soft and tasty. Yes, you can use other apples. Granny Smith apples work best for this recipe. They have a nice tartness. You can also try Honeycrisp or Fuji apples. Just make sure they are firm and not too soft. To avoid cakey cookies, do not overmix your dough. Mix just until the flour is combined. Also, keep an eye on your baking time. Remove the cookies when the edges are golden. This step helps keep them chewy, not cakey. Yes, you can make the dough ahead. After mixing, wrap it tightly in plastic wrap. Store it in the fridge for up to three days. You can also freeze it for longer. Just thaw it in the fridge before baking. This makes it easy to enjoy fresh cookies anytime! We explored how to make delicious apple crumb cookies from scratch. You learned the key ingredients, helpful substitutions, and fun add-ins. I shared step-by-step instructions for prep, baking, and cooling. With tips on serving and customizing, your cookies can shine. We discussed variations, storage, and answered common questions. Remember, you can adapt this recipe to fit your needs. Enjoy baking and sharing these treats with family and friends!

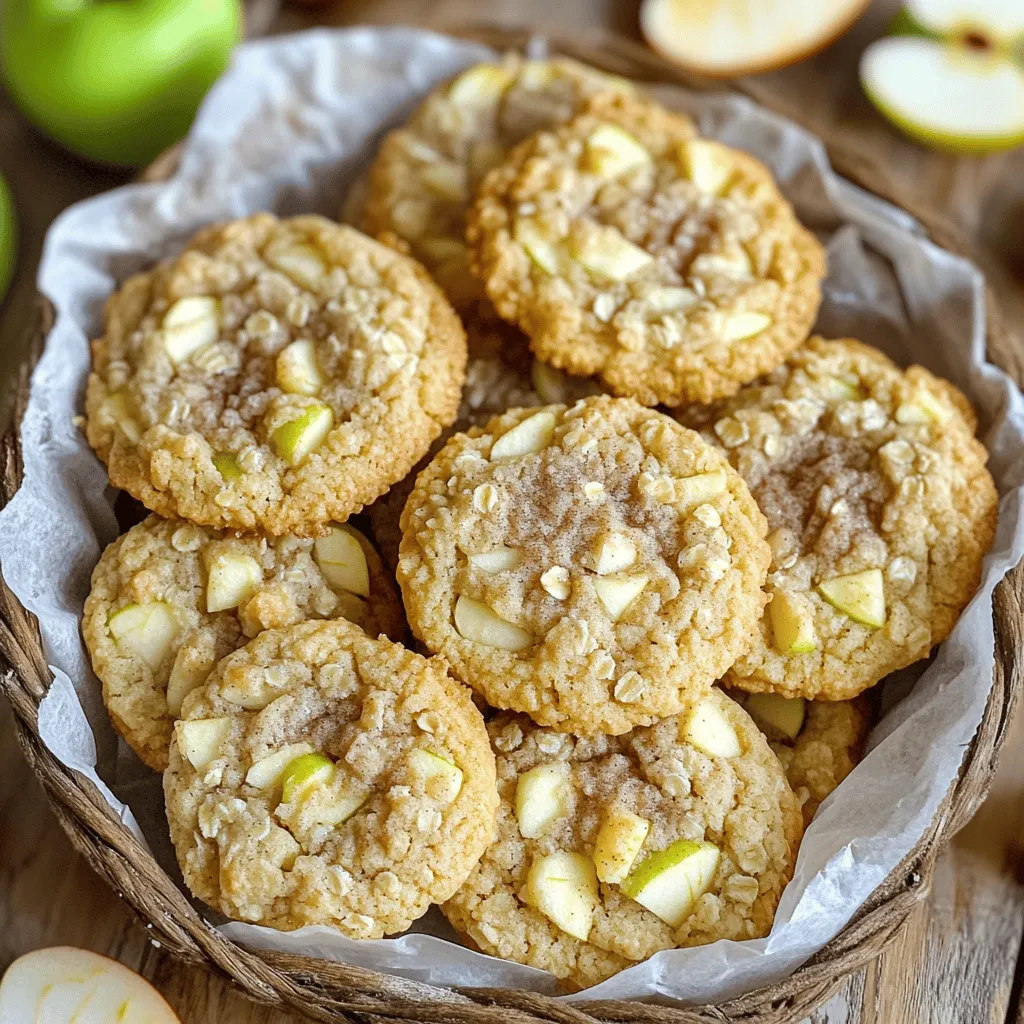
Do you crave a sweet, warm treat? You need to try these Irresistible Apple Crumb Cookies! With simple ingredients and easy steps, you can whip up this tasty dessert in …

Read more

Categories Desserts

Carne Asada Tostadas Flavorful Layered Delight

August 15, 2025 by Chef Luca
- 1 lb flank steak - 2 tablespoons olive oil - 3 cloves garlic, minced - 1 teaspoon cumin - 1 teaspoon chili powder - 1 teaspoon salt - 1/2 teaspoon black pepper - Juice of 2 limes - 8 tostada shells - 1 cup refried beans (canned or homemade) - 1 avocado, sliced - 1 cup pico de gallo (store-bought or homemade) - 1/2 cup crumbled queso fresco - 1/4 cup fresh cilantro, chopped You need fresh, quality ingredients for perfect carne asada tostadas. The flank steak shines here. It’s tender and packed with flavor. The marinade brings it all together. Olive oil adds richness, while garlic, cumin, and chili powder create warmth. Salt and black pepper enhance the steak's natural taste. Lime juice adds brightness. You’ll also need tostada shells. They provide a crunchy base. Refried beans help bind the toppings and add creaminess. For toppings, avocado gives a smooth texture. Pico de gallo adds freshness and zest. Crumbled queso fresco gives a salty kick. Finally, fresh cilantro brings a burst of color and flavor. If you like heat, consider adding sliced jalapeños. They spice things up nicely. Gather these ingredients, and you’re ready to create a delicious layered delight that will impress anyone! To start, mix the marinade in a bowl. You need 2 tablespoons of olive oil, 3 minced garlic cloves, 1 teaspoon cumin, 1 teaspoon chili powder, 1 teaspoon salt, and 1/2 teaspoon black pepper. Add the juice from 2 limes. This blend gives the steak great flavor. Next, add your flank steak to the bowl. Make sure it gets fully coated in the marinade. For the best taste, marinate for at least 30 minutes. If you have time, 1 to 2 hours is even better. This extra time helps the meat soak up all those flavors. Now, preheat your grill or grill pan to medium-high heat. This step is very important for cooking the steak properly. Once hot, take the steak out of the marinade. Place it on the grill carefully. Cook the steak for about 4 to 5 minutes on each side. If you want medium-rare, aim for an internal temperature of 130°F. Adjust your cooking time if you like it more or less done. After cooking, let the steak rest for 5 minutes. This resting time keeps it juicy. While the steak rests, it’s time to warm the tostada shells. You can do this in the oven or on a skillet. Just warm them until they are crisp. This step makes a big difference in the final dish. Crispy tostadas hold up better with the toppings. Now for the fun part—assembling the tostadas! Start by spreading a layer of refried beans on each tostada shell. This layer acts as a base and adds creaminess. Next, slice the rested steak against the grain into thin strips. This slicing method helps keep the meat tender. Place the steak strips on top of the beans. It’s time to add your favorite toppings! Start with slices of avocado. Then, add pico de gallo for brightness and flavor. Don’t forget to sprinkle crumbled queso fresco on top. If you like spice, add sliced jalapeños for an extra kick. Finally, garnish with fresh cilantro. This adds color and freshness to your tostadas. Serve them right away while the tostadas are still crispy! Marination techniques: To make the steak tasty, you need a good marinade. Mix olive oil, minced garlic, cumin, chili powder, salt, black pepper, and lime juice. Let the flank steak soak in this mix. I recommend at least 30 minutes, but 1-2 hours is even better. This gives the flavors time to soak in. Choosing the right grill temperature: Grill your steak on medium-high heat. This temperature helps the steak cook evenly without burning. If your grill is too hot, it can char the outside and leave the inside raw. Aim for about 4-5 minutes on each side. Check the internal temp for medium-rare, which should be 130°F. Suggestions for spice adjustments: If you want more heat, add extra chili powder or some cayenne pepper. You can also mix in smoked paprika for a deeper flavor. Adjust spices to match your taste. Remember, it’s all about what you enjoy. Ideas for additional toppings: Toppings can take your tostadas to the next level. Try adding sliced radishes for crunch or pickled onions for tang. You can also add different cheeses. Shredded cheddar or cotija can be great choices, too. Overcooking the steak: Cooking the steak too long makes it tough. Always check the internal temperature. Let it rest after cooking. This helps it stay juicy and tender. Under-preparing toppings: Don’t skip on toppings. Make sure your beans are warm and your pico de gallo is fresh. Slice your avocado just before serving. This keeps everything looking and tasting great. {{image_2}} You can switch out flank steak for grilled chicken or shrimp. Both options work well. For chicken, use the same marinade. Let it soak for about an hour. Grill until it reaches 165°F. For shrimp, marinate for just 15 minutes. Grill quickly, about 2-3 minutes per side. This gives you a fresh twist while keeping it delicious. If you want a meat-free option, try roasted vegetables or beans. Roasted peppers, zucchini, and onions can add great flavor. Toss them with olive oil and spices before roasting. For beans, you can use black beans or pinto beans. Heat them up and spread them on the tostadas just like the refried beans. This makes a filling and tasty dish! Mixing up spices can create a unique twist on carne asada tostadas. Try adding smoked paprika for a smoky flavor or chipotle powder for heat. You can also use fresh herbs like oregano or thyme in the marinade. This will change the taste and make your tostadas stand out. Experiment and find what you love! To keep your carne asada tostadas fresh, store them properly. First, separate the toppings from the tostada shells. This keeps them crispy. Place the tostada shells in an airtight container. For the meat and toppings, use another container. Refrigerate them within two hours of cooking. Consume the leftovers within three days to enjoy the best taste. To reheat without losing texture, avoid the microwave. Instead, use an oven or air fryer. Preheat the oven to 350°F. Place the tostada shells on a baking sheet. Heat for about 5-7 minutes until crispy. Warm the toppings in a skillet over low heat. Stir gently to keep the meat juicy. This method revives the crispy texture. You can freeze some components for later use. The carne asada and refried beans freeze well. Allow them to cool completely before freezing. Use freezer bags or airtight containers to prevent freezer burn. The tostada shells do not freeze well. They become soggy when thawed. Use your frozen carne asada and beans within three months for the best flavor. Carne asada is grilled meat, often flank steak. It is marinated in spices, lime juice, and garlic. After grilling, you slice the meat thinly. This method gives it a great flavor and tender texture, perfect for tacos or tostadas. Yes, you can! You can make tostadas ahead of time. Just store them in an airtight container. Keep them in a cool, dry place. When you are ready to serve, warm them up slightly for that crispiness. To make them spicier, add more chili powder to the marinade. You can also include sliced jalapeños as a topping. Try a spicy salsa instead of pico de gallo for an extra kick. Absolutely! Store-bought refried beans save time and still taste great. Just warm them up before spreading on the tostadas. You can also make them from scratch if you prefer. Some great sides include Mexican rice, corn salad, or black beans. You can also serve fresh guacamole or chips with salsa. These sides add variety and enhance your meal. In this article, we covered how to make delicious carne asada tostadas. You learned about the key ingredients, including flank steak and tasty toppings. I shared step-by-step instructions for marinating and grilling the steak. We also discussed assembling the tostadas with fresh ingredients and offered tips to avoid common mistakes. Final thoughts: Enjoy experimenting with different flavors and variations. You can make this dish your own with fun toppings and proteins!

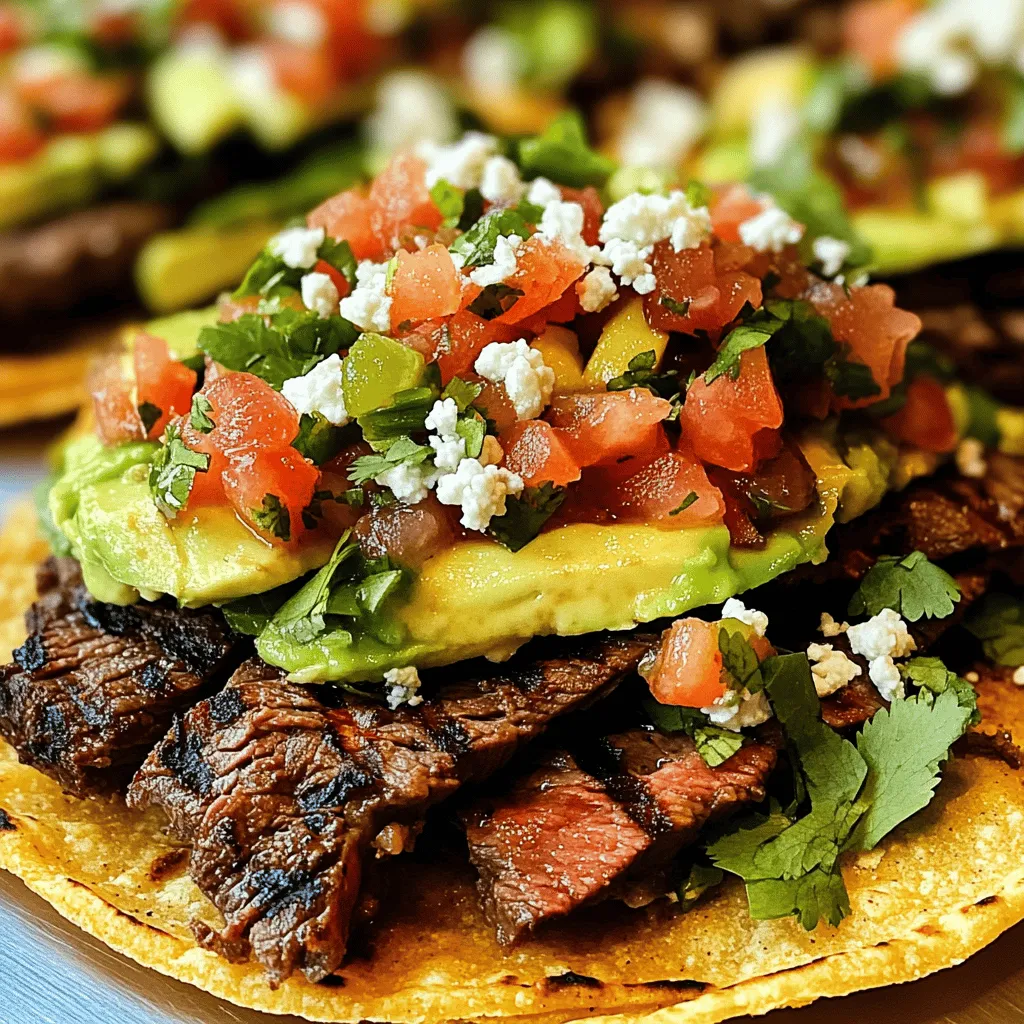
Are you ready to elevate your taco night? Carne Asada Tostadas are not just a dish—they’re a flavorful layered delight packed with spices, fresh ingredients, and vibrant toppings. In this …

Read more

Categories Dinner

Fig and Mascarpone Cold Brew Refreshing Coffee Treat

August 15, 2025 by Chef Luca
- 1 cup cold brew coffee - 2 fresh figs, sliced - 2 tablespoons mascarpone cheese - 1 tablespoon honey (or to taste) - 1/2 teaspoon vanilla extract - 1/4 cup milk (dairy or plant-based) - Ice cubes - Optional: crushed nuts for garnish For this refreshing drink, you'll need one cup of cold brew coffee. I like to make my cold brew a day before. It ensures it is nice and cold. You will use two fresh figs, sliced thin for easy blending. Mascarpone cheese, which gives a rich taste, needs two tablespoons. Sweeten it up with one tablespoon of honey, or adjust to your taste. A half teaspoon of vanilla extract adds a nice flavor. You can choose either dairy milk or a plant-based option for one-quarter cup. Lastly, don’t forget the ice cubes! They keep your drink cool. To make your drink look fancy, you can add crushed nuts. They add a crunchy texture that contrasts well with the creamy mascarpone. You can use walnuts, almonds, or even pistachios. Choose what you like best! To start, you need cold brew coffee. You can make it a day ahead. Use your favorite method or buy it ready-made. If you brew it, mix coarsely ground coffee with cold water. Let it steep for 12 to 24 hours. Then, strain the mix to get smooth coffee. This step is key for a smooth drink. Now, grab two fresh figs and slice them. Place the figs in a blender. Add one tablespoon of honey and half a teaspoon of vanilla extract. Pour in a splash of cold brew coffee. Blend everything until it is smooth. This mixture brings a sweet and fruity taste to your drink. In a large glass, add your blended fig mixture. Then, pour in the remaining cold brew coffee. Mix gently with a spoon. This step combines the flavors well. You want to see the beautiful color of the figs swirl in the coffee. Next, take two tablespoons of mascarpone cheese. In a small bowl, mix it with a quarter cup of milk. Whisk until the mix is smooth and creamy. Spoon dollops of this mix on top of your cold brew. This creates a lovely layered effect. Enjoy the rich taste of mascarpone with each sip. When you pick figs, look for ones that are soft but not mushy. They should smell sweet. Dark purple or green figs often taste better. Fresh figs are best for this recipe. If you can, buy local figs for the best flavor. Remember to wash them gently before using. This keeps them clean and fresh. If you have extra figs, keep them in the fridge. They last about three days. Place them in a paper bag to keep them dry. For leftover mascarpone, store it in an airtight container. It stays good for up to a week in the fridge. If you made extra cold brew, keep it in a sealed jar. It can last up to two weeks. To get a creamy texture, whisk the mascarpone with milk well. Use a fork or small whisk. This helps break up any lumps. If you want it creamier, add more milk slowly. You can also try using a blender for a super smooth mix. Spoon the mascarpone mixture gently on top of the cold brew. This makes a pretty layer that looks delicious. {{image_2}} You can easily make this drink dairy-free. Use coconut milk or almond milk instead of regular milk. For mascarpone, try cashew cream or a plant-based cream cheese. These options will keep the creamy texture while being dairy-free. Want to mix things up? You can add other fruits like berries or peaches. A dash of cinnamon or nutmeg gives a warm twist. You can also try flavored syrups, like caramel or hazelnut, for extra sweetness. This cold brew treat is great for any time. Serve it at brunch for a fun twist. It also works well as a post-dinner dessert. Add crushed nuts on top for a crunchy finish. You can even make mini versions in small glasses for parties. To store leftover cold brew, pour it into an airtight container. This keeps it fresh. Place the container in your fridge. The cold brew will stay tasty for up to two weeks. However, the sooner you drink it, the better the flavor. I recommend using it within five days for the best taste. To keep your mascarpone mixture fresh, store it in a sealed container. Place it in the fridge. Use it within three days for the best creaminess. If you need to hold it longer, try adding a little more milk. This helps it stay smooth. Avoid freezing it, as that can change the texture. For the ingredients in this recipe, here are some shelf-life tips: - Cold Brew Coffee: Up to two weeks in the fridge. - Fresh Figs: Best used within three days after purchase. They spoil quickly. - Mascarpone Cheese: Use within a week after opening, if stored correctly. - Honey: Lasts for years if kept in a cool, dark place. - Milk: Check the date on the carton, but it usually lasts about a week after opening. Keeping these tips in mind will help you enjoy your Fig and Mascarpone Cold Brew longer! Yes, you can use dried figs. They add a sweet flavor. Just soak them in warm water for about 15 minutes. This softens them and makes blending easier. However, fresh figs give a lighter taste and texture. You can change the sweetness by adding more or less honey. Start with one tablespoon. Taste it, then add more if you like. You can also use maple syrup or agave syrup for a different flavor. If you don’t have mascarpone, you can use cream cheese. Mix it with a little milk for creaminess. Ricotta cheese is another option. It has a mild flavor and works well in this drink. You’ve learned how to make a delicious cold brew with figs. We explored the key ingredients and their measurements, plus tips for ideal creaminess. You now know how to prepare, blend, and serve this treat perfectly. Don't forget the fun variations or how to store leftovers wisely. Whether you want dairy-free options or sweet adjustments, you have the info you need. Enjoy crafting this refreshing drink at home and impress your friends with your skills!

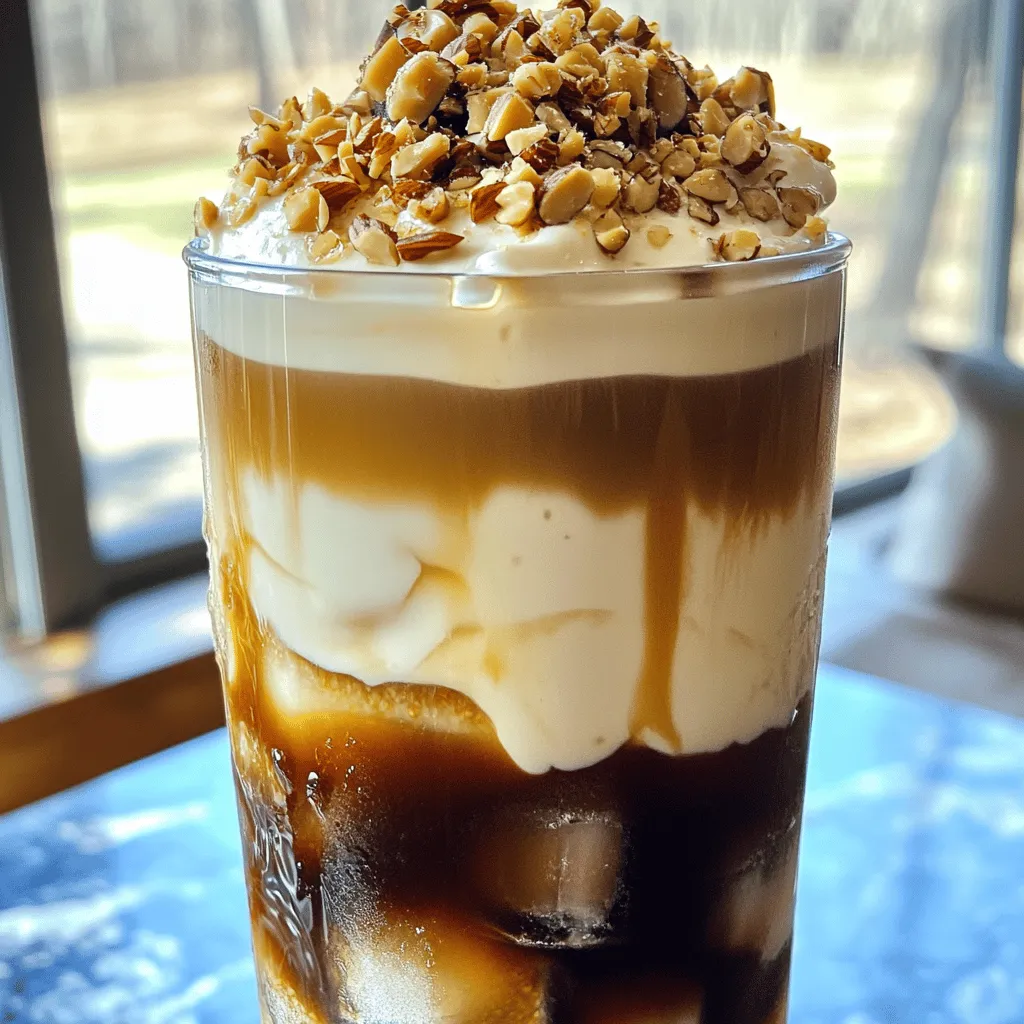
Looking for a cool coffee treat to impress your friends? The Fig and Mascarpone Cold Brew is just what you need! This delightful drink blends the rich flavor of coffee …

Read more

Categories Breakfast

Cinnamon Sugar Swirl Pumpkin Bread Simple and Tasty

August 15, 2025 by Chef Luca
- 1 ¾ cups all-purpose flour - 1 teaspoon baking soda - ½ teaspoon baking powder - ½ teaspoon salt - 1 teaspoon ground cinnamon - ½ teaspoon ground nutmeg - ½ teaspoon ground ginger - ½ cup unsalted butter, softened - 1 cup granulated sugar - 2 large eggs - 1 cup canned pumpkin puree - ½ cup buttermilk - 1 teaspoon vanilla extract - ½ cup packed brown sugar - 1 tablespoon ground cinnamon When I make this cinnamon sugar swirl pumpkin bread, I start with the dry ingredients. Mixing these well is key. You need flour, baking soda, baking powder, salt, and spices. The spices give the bread warmth and flavor. I use ground cinnamon, nutmeg, and ginger. These spices blend perfectly with pumpkin. Next, I focus on the wet ingredients. I use softened unsalted butter and granulated sugar, which I mix until fluffy. This makes the bread light. Then, I add eggs, pumpkin puree, buttermilk, and vanilla extract. Each of these adds moisture and richness. The pumpkin puree gives it a lovely color and taste. Finally, I make the cinnamon sugar mixture. This is simple: just brown sugar and ground cinnamon. It’s what makes the swirl so delightful. When you layer this mixture in the batter, it creates sweet pockets of cinnamon goodness. With all these ingredients prepped, you’re ready to bake a delicious loaf of cinnamon sugar swirl pumpkin bread! First, set your oven to 350°F (175°C). This helps the bread bake evenly. Next, take a 9x5-inch loaf pan. You can grease it with butter or line it with parchment paper. Lining the pan makes it easy to remove the bread later. In a medium bowl, mix the dry ingredients. Combine the flour, baking soda, baking powder, salt, and spices. Use a whisk for even mixing. In another large bowl, cream together the softened butter and granulated sugar. Use an electric mixer for about 2-3 minutes. It should be light and fluffy. Add the eggs one at a time, mixing well after each. Then, add the pumpkin puree, buttermilk, and vanilla extract. Mix until smooth. Gradually add the dry mixture into the wet mixture. Stir gently until just combined. Be careful not to overmix; this keeps the bread soft. In a small bowl, mix the brown sugar and cinnamon. This makes the cinnamon sugar mixture for swirling. Pour half of the pumpkin batter into the loaf pan. Next, sprinkle half of the cinnamon sugar on top. Pour the remaining batter over this layer. Finally, add the rest of the cinnamon sugar on top. To create the swirl, use a knife or toothpick. Gently move it through the batter and cinnamon sugar. This will give a nice marbled effect. Now, place the loaf pan in the preheated oven. Bake for 60-70 minutes. To check if it's done, insert a toothpick into the center. If it comes out clean, your bread is ready. Once baked, take it out of the oven. Let it cool in the pan for about 10-15 minutes. After that, move it to a wire rack to cool completely. Measuring ingredients is key. Use dry measuring cups for flour and sugar. Spoon flour into the cup, then level it off with a knife. This gives you the right amount. If your batter is too thick, add a splash more buttermilk. If it’s too thin, add a bit more flour. Overmixing can ruin your bread. Mix just until the dry and wet ingredients blend. Also, don’t rush the cooling process. Letting the bread cool in the pan helps it set. If you skip this step, it may fall apart when you slice it. Want to change the flavor? Add nuts like walnuts or pecans. Chopped chocolate chips can also make it sweeter. Just fold them into the batter before baking. You can also change the spices. Add more cinnamon or a pinch of cloves for a warm kick. Adjust the spices to fit your taste. {{image_2}} You can change your pumpkin bread to suit your taste. Here are two fun ideas: - Adding nuts: Chopped walnuts or pecans add a nice crunch. Just fold in about half a cup. This adds texture and flavor. You can toast the nuts first for a deeper taste. - Making it gluten-free: Use gluten-free flour blends instead of all-purpose flour. Look for blends that contain xanthan gum. This helps the bread rise and hold its shape. You can enjoy your pumpkin bread in different ways: - Warm or cold: Serve it warm right out of the oven. It’s also great cold for breakfast or a snack. - With spreads: Spread butter or cream cheese on a slice for richness. You can also try jam for a fruity twist. Each spread adds its own flavor, so mix and match! To keep your pumpkin bread fresh, store it at room temperature. Place it in an airtight container. This will help it stay moist for up to four days. If you notice it getting stale, you can slice it up. This makes it easy to grab a piece whenever you want. For longer storage, you can refrigerate it. Wrap the bread tightly in plastic wrap and then foil. This helps prevent fridge odors from getting in. It will last about a week this way. Freezing is a great way to save any leftover slices. Start by letting the bread cool completely. Then, slice it into pieces. Wrap each slice in plastic wrap. Then place them in a freezer bag. Make sure to remove as much air as possible. This helps to keep the bread fresh. When you want to enjoy a slice, take it out of the freezer. You can thaw it in the fridge overnight or at room temperature for a few hours. If you want it warm, pop it in the microwave for a few seconds. This keeps the bread soft and tasty. Yes, you can use fresh pumpkin! To do this, pick a small sugar pumpkin. Cut it in half and scoop out the seeds. Roast the halves cut-side down on a baking sheet at 350°F (175°C) for about 45 minutes. Once soft, scoop the flesh and mash it. You need about one cup of mashed pumpkin for this recipe. Fresh pumpkin has a different texture. It might be a bit wetter, so adjust your flour by a tablespoon if needed. Look for a few signs. First, the bread should rise and turn a golden brown. You can also gently press the top; it should spring back. If you insert a toothpick, it should come out clean or with a few crumbs. Another great sign is the aroma. If your kitchen smells amazing, your bread is likely done! Absolutely! Replace the eggs with flax eggs. Just mix one tablespoon of ground flaxseed with three tablespoons of water for each egg. Let it sit for five minutes to thicken. For the buttermilk, use plant-based milk with a splash of vinegar or lemon juice. You can also use vegan butter instead of regular butter. These swaps will keep your bread moist and tasty! You now have all the tools to create delicious pumpkin bread. We reviewed key ingredients, from dry spices to wet elements. I shared step-by-step instructions to mix and bake your bread perfectly. You learned baking tips to avoid common mistakes, and we explored fun variations. Finally, I offered storage info to keep your bread fresh. With these insights, you can bake with confidence and enjoy every slice.

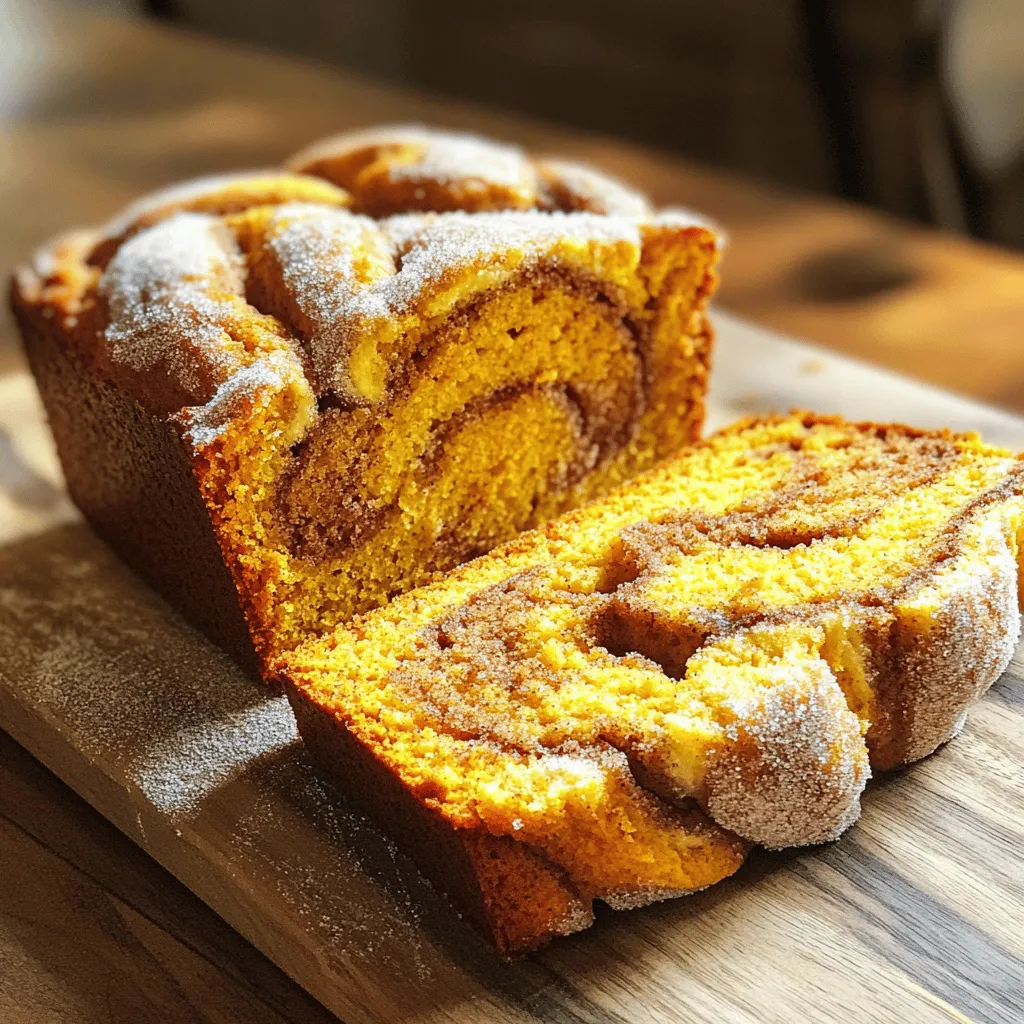
Are you ready for a delicious fall treat? My Cinnamon Sugar Swirl Pumpkin Bread is a simple and tasty way to celebrate the season. With the warm flavors of cinnamon …

Read more

Categories Desserts

Honey Garlic Chicken Bites Tasty and Easy Recipe

August 15, 2025 by Chef Luca
- 1 lb boneless, skinless chicken breasts - 1/2 cup honey - 1/4 cup soy sauce - 4 minced garlic cloves - 1 tablespoon grated ginger - 2 tablespoons cornstarch - 1 tablespoon vegetable oil - Seasonings: black pepper, red pepper flakes - Chopped green onions - Sesame seeds The main ingredients create a sweet and savory flavor. Chicken breasts are tender and juicy. Honey adds natural sweetness. Soy sauce gives it a salty kick. Minced garlic offers a strong, bold taste. For extra flavor, I like to add grated ginger. It adds warmth and spice. Cornstarch helps thicken the sauce, making it cling to the chicken. Vegetable oil keeps the chicken from sticking while cooking. When serving, I love to garnish with green onions and sesame seeds. They add color and a nice crunch. This simple touch enhances the dish’s appeal. Start by whisking together these ingredients in a medium bowl: - 1/2 cup honey - 1/4 cup soy sauce - 4 minced garlic cloves - 1 tablespoon grated ginger - 1/2 teaspoon black pepper - 1/4 teaspoon red pepper flakes (if you like spice) Mix until smooth. Next, toss in 1 lb of boneless, skinless chicken breasts cut into bite-sized pieces. Make sure every piece is well coated. Cover the bowl and let it marinate for at least 30 minutes. If you have more time, let it sit longer for better flavor. In a large skillet, heat 1 tablespoon of vegetable oil over medium-high heat. Once the oil is hot, add the marinated chicken in a single layer. Cook the chicken for about 5-7 minutes. Look for a golden brown color on the outside. This step seals in the flavors. After cooking, take the chicken out and set it aside. Remember to keep the reserved marinade; we will use it for our sauce. Now, it’s time to make the sauce. Pour the reserved marinade into the same skillet. Bring it to a boil. Lower the heat and let it simmer for about 5 minutes. This process intensifies the flavors. To thicken the sauce, mix 2 tablespoons of cornstarch with a small amount of water to create a slurry. Slowly add it to the simmering marinade, stirring as you go. You’ll notice the sauce will start to thicken. Finally, return the cooked chicken to the skillet. Toss it in the thickened sauce for another 2-3 minutes until everything is heated through. Your honey garlic chicken bites are ready to serve! Marinating the chicken is key for great flavor. I suggest marinating it for at least 30 minutes. If you can, try to marinate it longer, even overnight. This lets the chicken soak up all the tasty goodness. You can also mix things up with different marinades. Try adding citrus juice or even a bit of hot sauce for a kick. You could use teriyaki sauce instead of soy sauce for a sweet twist. To cook the chicken bites just right, use a large skillet. This helps the chicken cook evenly. Heat the pan over medium-high heat. Make sure the oil is hot before adding the chicken. Keep an eye on the chicken. Cook it for 5 to 7 minutes. You want it golden brown on the outside and fully cooked inside. If the heat is too low, the chicken will steam instead of sear. For a tasty meal, serve your honey garlic chicken bites with steamed rice. You can also pair it with fresh veggies like broccoli or snap peas. For a lovely presentation, arrange the chicken on a large platter. Drizzle extra sauce on top, and sprinkle with sesame seeds and green onions. This makes your dish look as good as it tastes! {{image_2}} To add a kick to your dish, try Spicy Honey Garlic Chicken. You can simply increase the red pepper flakes in the marinade. If you want more heat, add fresh chili peppers. Just chop them up and mix them in. This will make your chicken bites extra tasty and zesty. If you prefer a vegetarian option, use tofu instead of chicken. First, press the tofu to remove excess water. Then, cut it into bite-sized pieces. Follow the same marinade steps as for chicken. Cook the tofu in the skillet until golden brown. This version is just as yummy! For a seafood twist, you can make Honey Garlic Shrimp. Start by swapping the chicken for shrimp. Use medium or large shrimp, peeled and deveined. Marinate the shrimp just like the chicken, but reduce the cooking time to about 3-4 minutes. This keeps the shrimp tender and juicy. Enjoy these fun variations! To keep your honey garlic chicken bites fresh, store leftovers in an airtight container. Make sure the container seals well to prevent leaks and odors. You can keep them in the fridge for up to three days. When ready to eat, just take them out and check for any signs of spoilage. If you want to save some for later, freezing is a great option. Place the cooled chicken bites in a freezer-safe bag. Squeeze out as much air as you can before sealing. This helps prevent freezer burn. You can freeze them for up to three months. When you’re ready to eat, just thaw them in the fridge overnight. To reheat your honey garlic chicken bites without losing texture, use the stovetop. Heat a skillet over medium heat and add a splash of water or broth. This keeps the chicken moist. Heat for about 5-7 minutes, stirring occasionally. You can also use the oven. Preheat it to 350°F (175°C). Place the chicken on a baking sheet and cover with foil. Heat for 10-15 minutes until warm. Avoid the microwave if you want to keep the chicken crispy. Yes, you can use chicken thighs. They have more fat and flavor. Thighs also stay juicy. Cut them into bite-sized pieces like the breasts. Cook them for the same amount of time. You will still enjoy the sweet and sticky sauce. You can store honey garlic chicken bites in the fridge for up to four days. Make sure to put them in an airtight container. This keeps them fresh and safe to eat. If you want to keep them longer, freeze them. They can last for up to three months in the freezer. Just remember to reheat them well. Yes, you can make honey garlic chicken bites gluten-free. Use gluten-free soy sauce instead of regular soy sauce. You can find this in most grocery stores. It will give the same sweet and salty flavor without gluten. You can serve honey garlic chicken bites with many sides. Steamed rice pairs perfectly, soaking up the sauce. You can also try fresh vegetables or a simple salad. For a fun twist, serve them with crispy fries. These options will balance the sweet dish nicely. This blog post covers how to make delicious honey garlic chicken bites. You learned about the main and extra ingredients, step-by-step cooking, and tips to make it better. We explored tasty variations, storage advice, and answered common questions. Remember, simple tweaks can change this recipe to fit your taste. Try it with shrimp or tofu for a fun twist. Enjoy making and sharing this tasty dish!

Are you ready to impress your family with a quick and tasty dish? My Honey Garlic Chicken Bites recipe is both simple and delightful. Made with just a few basic …

Read more

Categories Dinner

No-Bake Oreo Pumpkin Cheesecake Delightful Treat

August 15, 2025 by Chef Luca
- 24 Oreo cookies (crushed) - 1/4 cup unsalted butter (melted) - 8 oz cream cheese (softened) - 1 cup pumpkin puree - 1 cup powdered sugar - 1 teaspoon vanilla extract - 1 teaspoon pumpkin pie spice - 1 cup heavy whipping cream - Extra crushed Oreos for garnish (optional) When choosing ingredients, go for the best quality. Look for fresh cream cheese. It should be smooth and creamy. For the pumpkin puree, buy canned or make your own. Canned puree is easy and saves time. Pick Oreo cookies that are fresh and crunchy. This adds the best flavor to your crust. Accurate measurements are key for great results. For dry ingredients like powdered sugar, use a dry measuring cup. Spoon the sugar in, then level it off with a knife. For butter, melt it in a small bowl first. Use a liquid measuring cup for the heavy cream. Pour it in, checking at eye level. This ensures your cheesecake is smooth and tasty. To start, take 24 Oreo cookies and crush them into fine crumbs. You can place them in a bag and use a rolling pin or pulse them in a food processor. Next, melt 1/4 cup of unsalted butter in the microwave. Combine the crushed cookies with the melted butter in a medium bowl. Mix well until all the crumbs are coated. Now, take a 9-inch springform pan and press the Oreo mixture firmly into the bottom. Make sure it is even, so each slice holds together well. Once done, place the pan in the refrigerator to set while you make the cheesecake filling. In a large mixing bowl, add 8 ounces of softened cream cheese. Use an electric mixer to beat it until smooth. This step is key, as it helps create a creamy texture. Now, add 1 cup of pumpkin puree, 1 cup of powdered sugar, 1 teaspoon of vanilla extract, and 1 teaspoon of pumpkin pie spice. Mix everything together until it is creamy and well combined. In another bowl, whip 1 cup of heavy whipping cream until it forms stiff peaks. This means it should hold its shape when you lift the whisk. Gently fold this whipped cream into your pumpkin mixture. Be careful not to deflate the whipped cream as you mix. This step adds lightness to your cheesecake. Now, pour the pumpkin cheesecake filling over the chilled Oreo crust. Use a spatula to smooth the top. Cover the cheesecake with plastic wrap and place it in the refrigerator. Let it chill for at least 4 hours, but overnight is best for a firmer texture. Once set, gently remove the sides of the springform pan. If you like, garnish the top with extra crushed Oreos. This adds a nice crunch and looks great when served. Enjoy your delightful no-bake Oreo pumpkin cheesecake! To keep your filling thick, use canned pumpkin puree. Fresh pumpkin can have too much water. Make sure to drain any excess liquid from the puree. Mixing the cream cheese well helps create a smooth base. If you notice extra liquid forming, fold in more whipped cream. This will help to balance the texture. Use cold heavy cream for the best results. Start by chilling your mixing bowl. Beat the cream until stiff peaks form. This takes a few minutes. Be careful not to overwhip, or it will turn grainy. Once ready, gently fold it into the pumpkin mixture. This keeps your filling light and fluffy. Chill your cheesecake for at least four hours. For the best flavor and texture, overnight is best. This allows the flavors to blend well. Keep the cheesecake covered while it chills. This prevents it from absorbing other smells from the fridge. When ready, carefully remove the springform pan. Enjoy your tasty creation! {{image_2}} You can make this cheesecake a bit healthier. Swap the cream cheese for Greek yogurt. This gives you protein and cuts fat. Use low-fat whipped cream, too. You can also try sugar substitutes like stevia. These swaps keep the taste while reducing calories. If you want a gluten-free option, use gluten-free Oreo cookies. They work just as well in the crust. Want to play with flavors? Add a layer of caramel sauce on the crust. This adds a sweet twist. You could mix in some chocolate chips for a fun crunch. If you love spice, add more pumpkin pie spice or even cinnamon. For a minty touch, use mint-flavored Oreos. Each variation can change the whole dessert! Serve this cheesecake with a dollop of whipped cream on top. A sprinkle of crushed Oreos makes it look fancy. You can pair it with a hot drink, like coffee or chai tea. A scoop of vanilla ice cream on the side is a great choice, too. For a fall-themed table, add small pumpkins or gourds around the dessert. These small touches make your dessert feel extra special! To keep your No-Bake Oreo Pumpkin Cheesecake fresh, cover it well. Use plastic wrap or foil. You can also place it in an airtight container. Store it in the fridge for up to five days. This helps keep it creamy and tasty. Avoid leaving it out at room temperature. Yes, you can freeze your cheesecake! First, let it cool completely in the fridge. Then, wrap it tightly in plastic wrap. After that, place it in a freezer-safe container. It can last for up to three months in the freezer. When you're ready to enjoy it, thaw it overnight in the fridge. The shelf life of your cheesecake depends on how you store it. In the fridge, it will last about five days. If you freeze it, you can keep it for three months. Always check for signs of spoilage, like off smells or changes in texture. Trust your senses to keep your treats safe! If you don’t have a springform pan, don’t worry! You can use a regular pie dish or an 8-inch round cake pan. Just make sure to grease the pan well. This helps the cheesecake come out easier. You may need to chill it longer if using a different pan. A regular pan may not hold the shape as well, but it will still taste great! Yes, you can! While Oreos add a rich flavor, you can use other cookies. Try chocolate wafers or graham crackers for a different taste. If you want a fun twist, use ginger snaps for a spiced flavor. Just crush them into fine crumbs, mix with melted butter, and press them into the pan. You can check if the cheesecake is set by gently shaking it. If the center jiggles a bit, it needs more time. It should look firm and not watery. After chilling for at least four hours, it should be ready to slice. If you have time, letting it chill overnight makes it even better! This blog post covered everything you need for the perfect pumpkin cheesecake. We shared ingredients, tips for measuring, and step-by-step instructions. You learned how to avoid watery filling and make the best whipped cream. We explored fun variations and how to store your cheesecake correctly. Remember, great cheesecake is all about careful prep and choosing the right ingredients. Enjoy making and sharing this tasty treat!

Get ready for a delicious twist on a classic dessert! This No-Bake Oreo Pumpkin Cheesecake is a dreamy mix of chocolatey Oreo crust and creamy pumpkin filling. It’s simple to …

Read more

Categories Desserts

Instant Pot Beef Stew Flavorful and Hearty Meal

August 15, 2025 by Chef Luca
To make a great beef stew, you need the right ingredients. Here’s what you’ll need: - 2 lbs beef chuck, cut into 1-inch cubes - 2 tablespoons olive oil - 1 onion, diced - 3 garlic cloves, minced - 4 medium carrots, chopped - 3 medium potatoes, diced - 2 cups beef broth - 1 cup diced tomatoes (canned or fresh) - 1 tablespoon Worcestershire sauce - 1 teaspoon dried thyme - 1 teaspoon dried rosemary - Salt and pepper to taste - 2 bay leaves - 1 tablespoon cornstarch (optional, for thickening) - Fresh parsley, chopped (for garnish) These ingredients work together to create a rich, hearty flavor. The beef chuck adds depth, while the vegetables bring in freshness. You can customize this stew to fit your taste. Here are some options: - Mushrooms for an earthy flavor - Peas for a pop of color and sweetness - Celery for extra crunch - Red wine for added richness - Other herbs like parsley or oregano Feel free to mix and match based on what you have at home or what you enjoy. If you are missing an ingredient, don’t worry! Here are some simple swaps: - Use chicken or pork instead of beef for a different protein. - Vegetable broth can replace beef broth for a lighter stew. - Sweet potatoes can take the place of regular potatoes for a sweeter taste. - Use onion powder if you don't have fresh onion. These swaps keep your stew tasty while using what you have on hand. First, we need to prepare the beef. Cut 2 pounds of beef chuck into 1-inch cubes. This size helps the beef cook evenly. Next, set your Instant Pot to the Sauté function. Add 2 tablespoons of olive oil and let it heat. Once hot, add the beef cubes in batches. Brown them on all sides for about 5 to 7 minutes. This step adds flavor. Remove the beef and set it aside. Now, let’s sauté the vegetables. In the same pot, add the diced onion and minced garlic. Cook for about 2 to 3 minutes. You want the onion to be soft and translucent. This makes the base of your stew tasty. The garlic adds a nice aroma too. Time to combine all the ingredients. Return the browned beef to the pot. Next, add 4 chopped carrots and 3 diced potatoes. Pour in 2 cups of beef broth and 1 cup of diced tomatoes. Add 1 tablespoon of Worcestershire sauce for depth. Sprinkle in 1 teaspoon each of dried thyme and rosemary. Don’t forget to season with salt and pepper. Stir everything well to mix. Then, secure the lid on the Instant Pot. Make sure the valve is set to Sealing. Set it to Manual or Pressure Cook for 35 minutes. Once the cooking time is up, allow the pressure to release naturally for 10 to 15 minutes. This step makes the beef tender. After that, switch the valve to Venting to let out any remaining pressure. If you want a thicker stew, remove 1 cup of the broth and mix it with 1 tablespoon of cornstarch. Stir this back into the pot. Use the Sauté function for an extra 5 minutes until thickened. Finally, remove the bay leaves and ladle the stew into bowls. Garnish with chopped fresh parsley before serving. Enjoy your hearty meal! To get the best flavor, season your beef generously with salt and pepper before cooking. The beef will absorb these flavors as it cooks. I also like to add Worcestershire sauce. It gives a rich, deep taste that enhances the stew. Dried thyme and rosemary are great herbs to add for extra flavor. If you want a kick, try adding a pinch of red pepper flakes. If you choose a tougher cut of beef, like brisket, you may need to cook it longer. For lean cuts like sirloin, reduce the cooking time. Tough cuts benefit from longer cooking. They will turn tender and flavorful. For beef chuck, 35 minutes works perfectly. It gives you that melt-in-your-mouth texture everyone loves. Always let the pressure release naturally for about 10-15 minutes. This step helps the meat stay tender. Quick releasing can toughen the beef. During natural release, the stew continues to cook a little, which adds more flavor. Patience here will pay off with a hearty, rich stew. {{image_2}} You can easily change the taste of your stew by adding different veggies. Try adding peas, green beans, or mushrooms. Sweet potatoes bring a nice sweetness. Zucchini adds a fresh crunch. Just remember to chop them into similar sizes so they cook evenly. If you want to switch things up, use chicken or pork instead of beef. Chicken thighs work well and stay juicy. For pork, use shoulder or loin. Adjust cooking times slightly; chicken needs about 25 minutes, while pork may take 30 minutes. Your stew will still taste great! Beef stew varies by region. In France, they add red wine and herbs. Irish stew uses lamb and root vegetables. In America, we often use a mix of spices and barbecue sauce for flavor. Try these styles to explore new tastes in your home cooking! After enjoying your beef stew, let it cool. Transfer it to an airtight container. Store it in the fridge. The stew stays fresh for up to three days. Make sure to label the container with the date. This helps you keep track of how long it has been stored. To reheat, pour the stew into a pot. Heat it over medium-low heat. Stir often to avoid sticking. You can also use the microwave. Place the stew in a microwave-safe bowl. Cover it with a lid or plastic wrap. Heat it in short bursts, stirring in between. Ensure it reaches a safe temperature of 165°F. If you want to freeze your beef stew, first let it cool completely. Use freezer-safe containers or bags. Leave some space at the top of the container, as the stew will expand. Label the container with the date. The stew can last for up to three months in the freezer. To thaw, place it in the fridge overnight. Reheat it as mentioned earlier. Cooking beef stew in an Instant Pot takes about 35 minutes. After this, allow 10-15 minutes for natural pressure release. This method saves time and keeps your beef tender. Yes, you can use frozen beef. Just add a few extra minutes to the cooking time. Make sure to check if the beef is cooked through after the pressure cycle. Beef stew pairs well with several sides. You can serve it with crusty bread, rice, or a simple salad. These options balance the rich flavors of the stew. To thicken beef stew, mix 1 tablespoon of cornstarch with a cup of broth. Stir this slurry back into the pot. Use the Sauté function to cook until thickened, about 5 minutes. Yes, you can make beef stew ahead of time. Store it in the fridge for up to three days. The flavors deepen as it sits, making it even tastier. We covered the key steps to make a great Instant Pot beef stew. You learned about essential ingredients, useful variations, and clever tips to enhance flavor. Remember, you can customize your stew with different meats and veggies. Proper storage will keep leftovers fresh. With this guide, you can create a tasty meal that warms hearts. Enjoy putting these ideas into action and share your delicious results!

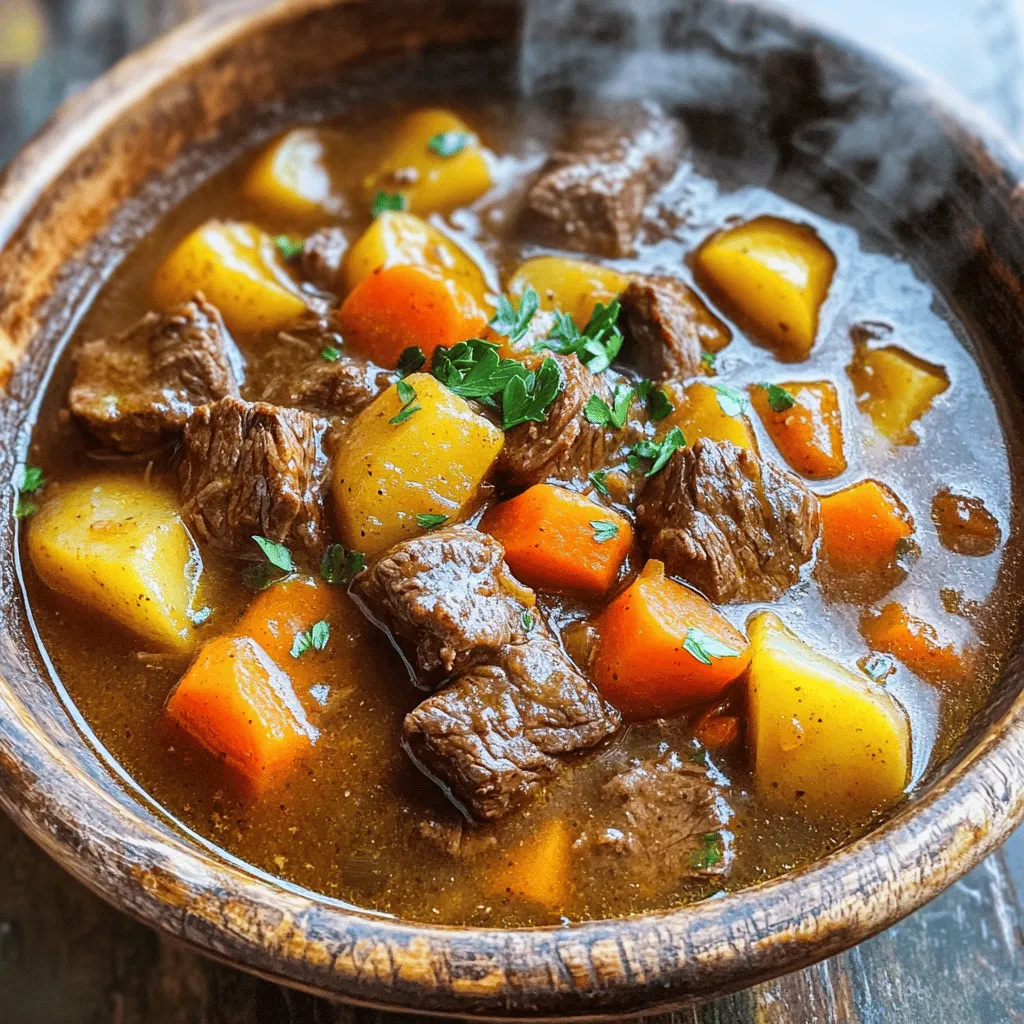
Looking for a comforting dish that warms both body and soul? My Instant Pot Beef Stew is rich, hearty, and bursting with flavor. In just under an hour, you can …

Read more

Categories Dinner
Older posts
Newer posts
← Previous Page1 … Page44 Page45 Page46 … Page122 Next →

STIRRED RECIPES

Where every dish begins with a stir! 🍲✨

PAGES

Home About Contact Privacy Policy Terms & Conditions Cookie Policy GDPR Policy Copyright Policy Disclaimer

CATEGORIES

Appetizers Desserts Salads Breakfast Dinner

Contact

  • Pinterest
  • Mail
Copyright © 2026 Stirred Recipes. All rights reserved.