Skip to content
Stirred Recipes
  • Home
  • Appetizers
  • Desserts
  • Salads
  • Breakfast
  • Dinner
  • Privacy Policy
  • Contact
  • About

Chef Luca

Churro Donut Bites Irresistible Sweet Treat Recipe

August 26, 2025 by Chef Luca
To make churro donut bites, gather these simple ingredients: - 1 cup all-purpose flour - 1/2 cup granulated sugar - 1 teaspoon baking powder - 1/4 teaspoon salt - 1/2 teaspoon ground cinnamon - 1/2 cup whole milk - 1 large egg - 2 tablespoons melted butter - Oil for frying - 1/2 cup granulated sugar mixed with 1 tablespoon cinnamon for coating These ingredients create a soft, sweet dough that fries up golden and crispy. If you need substitutes, here are some options: - Use almond milk instead of whole milk for a dairy-free version. - For the egg, try using a flaxseed meal mix (1 tablespoon flaxseed meal + 2.5 tablespoons water) as a binder. - You can swap all-purpose flour with gluten-free flour for a gluten-free treat. These substitutions keep the flavor while catering to your dietary needs. Want to jazz up your churro donut bites? Consider these add-ins: - Add 1/2 teaspoon vanilla extract to the wet mix for more depth. - Mix in chocolate chips or nuts for texture. - Try a pinch of nutmeg for a warm spice twist. These options let you customize your bites for a unique taste experience! To start, gather your ingredients. In a medium bowl, whisk together these dry items: - 1 cup all-purpose flour - 1/2 cup granulated sugar - 1 teaspoon baking powder - 1/4 teaspoon salt - 1/2 teaspoon ground cinnamon Mix them well until they look even. In another bowl, blend the wet items: - 1/2 cup whole milk - 1 large egg - 2 tablespoons melted butter Stir these together until smooth. Next, slowly add the wet mix to the dry mix. Use a spatula to fold gently. Be careful not to overmix; lumps are okay! Heat oil in a deep fryer or a large pot to about 350°F (175°C). This temperature is key for a crispy outside and soft inside. Use a small cookie scoop or a spoon to drop tablespoon-sized balls of batter into the hot oil. Fry a few at a time to keep the oil hot. Fry them for about 3-4 minutes. Turn them occasionally so they brown evenly. When they look golden brown, they are done! Remove the churro bites and let them drain on a paper towel-lined plate. While the donut bites are still warm, roll them in your cinnamon-sugar mix. For this, use: - 1/2 cup granulated sugar mixed with 1 tablespoon cinnamon Make sure each bite gets coated well. This step gives them that classic churro flavor! Enjoy them warm with chocolate or caramel sauce for dipping. To get that perfect churro donut bite, focus on the batter. Mix the dry and wet ingredients until just combined. Overmixing can make your bites tough. The right balance keeps them fluffy inside and crispy outside. Fry at 350°F (175°C). This temperature cooks them evenly and prevents greasiness. Many people crowd the pan when frying. This is a big mistake! Fry only a few at a time. It helps them cook evenly and stay fluffy. Also, remember to drain them on paper towels right after frying. This step removes excess oil and keeps them light. Serve churro donut bites warm. They taste best fresh out of the fryer. For fun, pair them with chocolate or caramel sauce for dipping. This adds a rich flavor that complements the cinnamon-sugar coating. You can also sprinkle a bit of extra cinnamon sugar on top for a delightful touch! {{image_2}} You can add new flavors to churro donut bites. For chocolate lovers, mix in cocoa powder with the dry ingredients. Use about 2 tablespoons. This gives your bites a rich chocolate taste. You can also add chopped nuts like walnuts or pecans. They add a nice crunch. Don't forget to sprinkle in some vanilla extract for a sweet twist. Just a teaspoon will do it! If you want a healthier treat, consider baking instead of frying. Preheat your oven to 375°F (190°C). Scoop the dough onto a baking sheet lined with parchment paper. Bake for about 10-12 minutes or until golden brown. You won't get the same crispy outside, but they will still taste great! You can also use whole wheat flour for more fiber. Coating makes a big difference! Instead of the classic cinnamon-sugar mix, try powdered sugar. It gives a sweet, soft touch. You can also roll your churro bites in crushed nuts for a fun crunch. Or drizzle them with chocolate or caramel sauce for an extra treat. Get creative and make each bite unique! To keep your churro donut bites fresh, store them in an airtight container. They will stay good for about two days at room temperature. If you want to keep them longer, place them in the fridge. Make sure to separate layers with parchment paper to avoid sticking. When you reheat churro donut bites, aim for the oven. Preheat your oven to 350°F (175°C). Place the bites on a baking sheet and heat for about 5-7 minutes. This will help them regain their crispiness. Avoid the microwave, as it can make them soggy. If you want to freeze churro donut bites, let them cool completely first. Then, place them in a single layer on a baking sheet. Freeze for about an hour. Once frozen, transfer them to a freezer-safe bag or container. They can last up to three months in the freezer. To enjoy, reheat them in the oven as described earlier. Churro donut bites are small, sweet treats that blend churros and donuts. They are fluffy on the inside and crispy on the outside. Each bite gets coated in a sweet cinnamon-sugar mix. These treats are perfect for sharing or enjoying on your own. Yes, you can prepare the batter a few hours ahead. Just keep it in the fridge. When you’re ready, heat the oil and fry the bites. This way, you’ll have fresh churro donut bites in no time. However, I recommend frying them just before serving for the best taste. Churro donut bites taste great with a range of dips. You can serve them warm with chocolate sauce or caramel sauce for extra sweetness. They also pair well with whipped cream or a scoop of ice cream. Don't forget a sprinkle of extra cinnamon-sugar for that added touch! You now have all the tools to create delicious churro donut bites. We explored the right ingredients, easy steps, and helpful tips for success. We also covered fun variations, storage tips, and common questions. These tasty bites are perfect for any gathering or treat. With a bit of practice, you’ll make these goodies shine. Enjoy your cooking and share your tasty results!

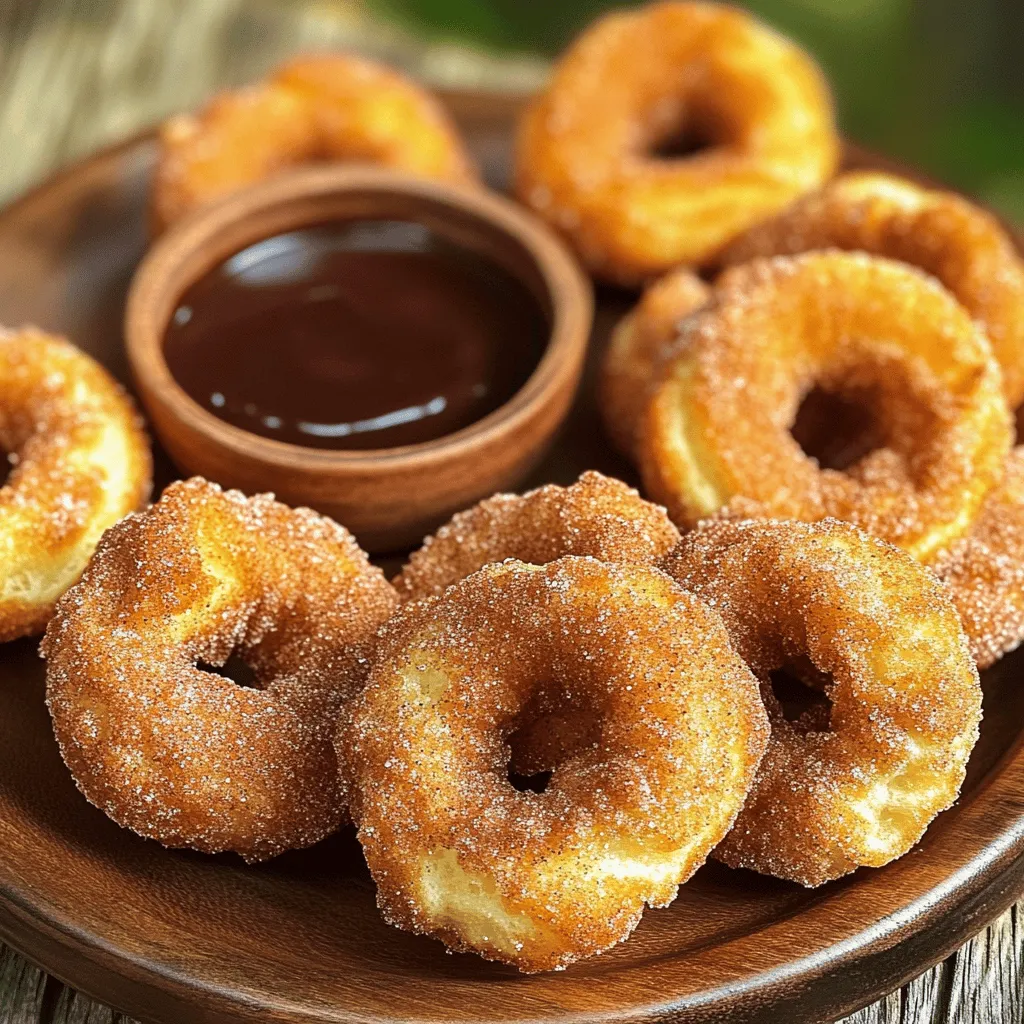
Craving a sweet treat that combines the best of churros and donuts? Look no further! In this blog post, I’ll share my irresistible recipe for Churro Donut Bites. These golden, …

Read more

Categories Desserts

Apple Fritter Bites Delightfully Simple Treat Recipe

August 26, 2025 by Chef Luca
To make tasty Apple Fritter Bites, you need simple ingredients. Here’s what you will use: - 2 medium apples, peeled and diced (preferably Granny Smith) - 1 cup all-purpose flour - 1/2 cup sugar - 1 tsp baking powder - 1/2 tsp baking soda - 1/2 tsp cinnamon - 1/4 tsp nutmeg - 1/4 tsp salt - 1/2 cup milk (or almond milk) - 1 large egg - 1 tsp vanilla extract - Vegetable oil for frying - Powdered sugar for dusting These ingredients mix well to create a sweet and soft batter. The apples add natural sweetness and a nice texture. You can adjust some ingredients for different diets. Here are a few swaps: - Use gluten-free flour instead of all-purpose flour for a gluten-free option. - Replace regular milk with almond milk or oat milk for a dairy-free treat. - If you want a vegan version, substitute the egg with a flax egg (1 tbsp ground flaxseed + 2.5 tbsp water). These alternatives keep the flavor while catering to dietary needs. When cooking, brand choice matters. Here are some trusted brands: - For flour, I recommend King Arthur Flour or Bob's Red Mill. - For sugar, try Domino or C&H. - If you choose almond milk, Silk and Califia Farms offer great flavors. - Use organic apples from Honeycrisp or Granny Smith for the best taste. Choosing quality brands helps your Apple Fritter Bites taste amazing. Start by peeling and dicing the apples. I prefer Granny Smith for their tartness. Next, grab a large mixing bowl. Combine the flour, sugar, baking powder, baking soda, cinnamon, nutmeg, and salt. Whisk these dry ingredients together until they mix well. In another bowl, whisk the milk, egg, and vanilla extract until smooth. Pour the wet mix into the dry mix. Stir gently until just combined. Overmixing can make the fritters tough. Now, fold in the diced apples. Make sure every piece gets coated in batter. Heat about 2 inches of vegetable oil in a deep skillet over medium heat. Use a thermometer to check the oil's temperature. You want it to reach 350°F (175°C). This is key for frying. Using a small cookie scoop or spoon, drop bites of batter into the hot oil. Cook in small batches to avoid overcrowding. Fry each fritter for 2-3 minutes per side. Look for a golden brown color. When done, remove them with a slotted spoon. Place them on paper towels to drain excess oil. To get the best crispiness, ensure your oil is hot enough. If the temperature drops, the fritters can absorb too much oil, making them soggy. Fry them in small batches. This keeps the oil temperature steady. After frying, dust the warm fritters with powdered sugar. This adds sweetness and makes them look beautiful. Serve them right away for the best taste and texture. When making apple fritter bites, avoid overmixing the batter. This makes the fritters tough. Also, do not skip the step of heating the oil to 350°F. If the oil is not hot enough, the fritters will absorb too much oil and turn soggy. Fry them in small batches to keep the temperature steady. To boost flavor, try using a mix of apple types. Granny Smith gives a tart bite, while Fuji adds sweetness. You can also add more spices. A pinch of cardamom or ginger can make a big difference. If you love citrus, adding a bit of lemon zest brightens the taste. For dipping sauces, keep it simple. A classic apple cider caramel pairs well with fritters. You can also mix plain yogurt with honey for a creamy dip. If you want something fun, try chocolate sauce or a simple vanilla glaze. Each adds a new twist to your apple fritter bites. {{image_2}} You can use many apple types for your fritter bites. Granny Smith apples are my top choice. They are tart and hold their shape well when cooked. Honeycrisp apples add a sweet crunch. If you like a softer bite, go for Fuji apples. Each apple brings its own flavor and texture, making your fritters unique. You can easily make these fritters gluten-free. Just swap all-purpose flour for a gluten-free blend. This works well and keeps the batter light. For a vegan version, use almond milk instead of regular milk. Replace the egg with a flax egg. Mix one tablespoon of ground flaxseed with two and a half tablespoons of water. Let it sit for a few minutes to thicken. These changes make the recipe friendly for everyone. Feel free to get creative with spices. You can add a pinch of ginger or cloves for warmth. A dash of nutmeg can bring extra flavor too. Want more texture? Toss in some chopped nuts like walnuts or pecans. You can also add chocolate chips for a sweet surprise. Mixing in dried fruit like raisins or cranberries can boost the taste. Each option gives your fritters a fun twist. To keep your Apple Fritter Bites fresh, let them cool first. Once cool, place them in an airtight container. This helps prevent moisture loss and keeps them soft. You can store them at room temperature for up to two days. If you want them to last longer, put them in the fridge for up to a week. When you're ready to enjoy your leftovers, reheat them for the best taste. The oven works great! Preheat your oven to 350°F (175°C). Place the fritters on a baking sheet and heat for about 5-7 minutes. This will help keep them crispy. You can also use a microwave for a quick fix. Just warm them for 10-15 seconds, but they might not be as crispy. If you want to save some fritters for later, freezing is a good option. First, let them cool completely. Next, place them in a single layer on a baking sheet. Freeze them for about an hour. Once they are firm, transfer them to a freezer bag. Remove as much air as you can before sealing. They can last in the freezer for up to three months. When you're ready to eat them, thaw in the fridge overnight and then reheat as described above. Yes, you can bake Apple Fritter Bites! To bake them, preheat your oven to 375°F (190°C). Line a baking sheet with parchment paper. Use a cookie scoop to drop the batter onto the sheet. Bake for about 15-20 minutes until they turn golden brown. Keep an eye on them to avoid burning. Baking makes them less oily but still tasty! Fritters are done when they are golden brown on all sides. Fry them for about 2-3 minutes on each side. Use a slotted spoon to check their color. If they look too light, give them more time. You can also check the inside by cutting one open. It should be fluffy and cooked through, not doughy. Apple Fritter Bites taste great on their own, but you can add some fun! Serve them with a side of caramel sauce or vanilla ice cream for dipping. A sprinkle of cinnamon adds warmth. Fresh apple slices or whipped cream can also be nice. Enjoy mixing and matching your favorites! We covered all you need for making apple fritter bites. We examined key ingredients and helpful tips. You learned ways to make them fit your diet. I shared how to prepare, fry, and ensure they are crispy. You now know about tasty dips and different flavors, too. In short, with the right steps, anyone can enjoy these bites. Get creative and have fun in the kitchen!

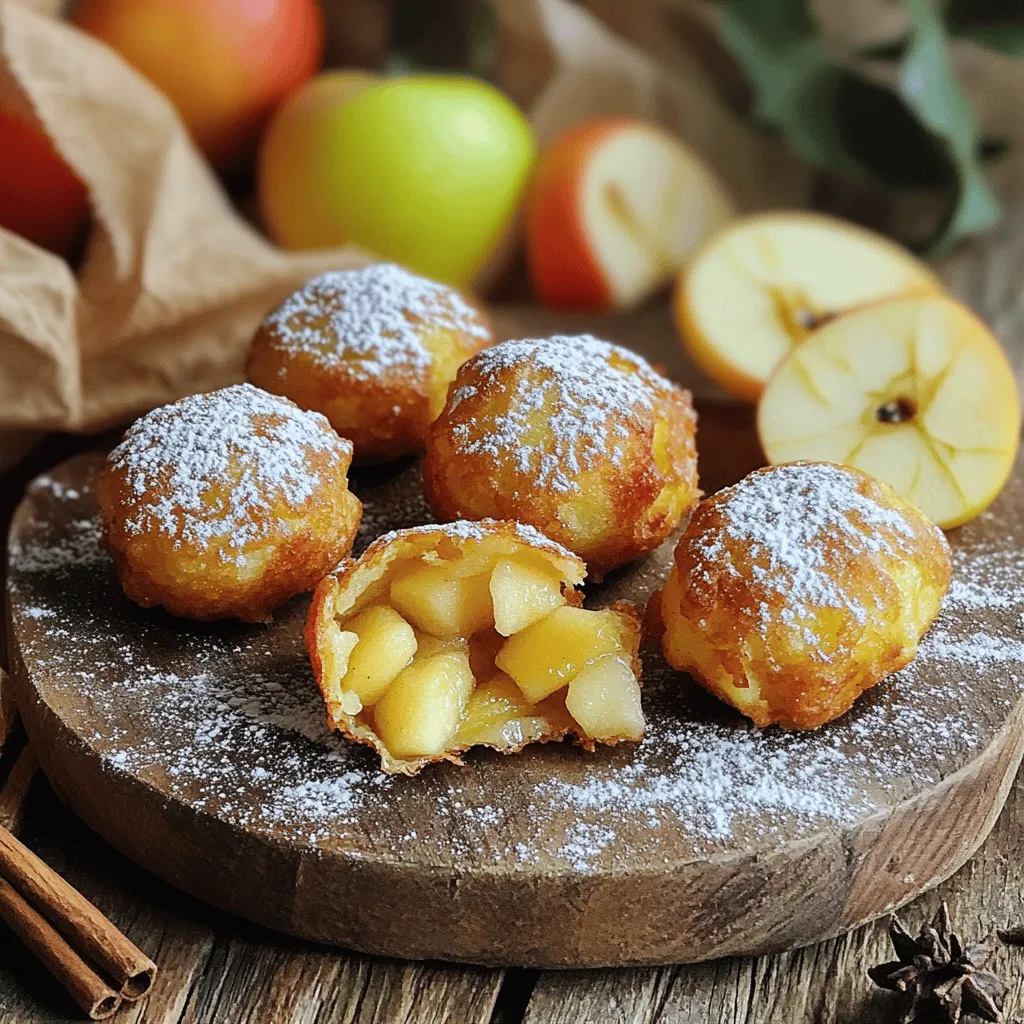
Craving a sweet, crunchy treat? Let’s make Apple Fritter Bites! This delightfully simple recipe transforms fresh apples into bites of joy. Easy and fun, you can whip these up in …

Read more

Categories Desserts

Award Winning Short Rib and Chorizo Chili Recipe

August 26, 2025 by Chef Luca
- 2 lbs beef short ribs, butchered into chunks - 1 lb spicy chorizo sausage, casing removed and crumbled - 2 cans (15 oz each) diced tomatoes with green chilies - 2 cups beef broth - 1 large onion, diced - 4 cloves garlic, minced - 2 bell peppers (red and green), diced - 1 cup canned kidney beans, drained and rinsed - 1 cup canned black beans, drained and rinsed - 2 tablespoons chili powder - 1 tablespoon cumin - 1 tablespoon smoked paprika - 1 teaspoon oregano - 1 teaspoon cayenne pepper (optional, for extra heat) - Salt and pepper to taste - 2 tablespoons olive oil - Fresh cilantro for garnish - Lime wedges for serving 1. Searing the beef short ribs: Start by heating 2 tablespoons of olive oil in a large pot over medium-high heat. Once hot, add 2 lbs of beef short ribs. Sear the meat on all sides until nicely browned. This step locks in flavor. After browning, remove the ribs and set them aside. 2. Cooking the chorizo sausage: In the same pot, add 1 lb of spicy chorizo sausage. Break it apart with a wooden spoon. Cook it until it is fully browned. This should take about 5 minutes. Once done, remove it from the pot and set it aside with the beef. 1. Softening the onions and bell peppers: Now, add 1 large diced onion and 2 diced bell peppers (one red, one green) to the pot. Sauté these for about 5 minutes. You want them softened but not mushy. 2. Adding garlic for flavor: After the veggies soften, stir in 4 cloves of minced garlic. Cook for an additional minute. This will make your kitchen smell amazing and build a great base for the chili. 1. Mixing in tomatoes and broth: Return the short ribs and chorizo to the pot. Next, add 2 cans of diced tomatoes with green chilies and 2 cups of beef broth. This mix adds depth to your chili. 2. Long cooking process for flavor development: Stir in 2 tablespoons of chili powder, 1 tablespoon of cumin, 1 tablespoon of smoked paprika, 1 teaspoon of oregano, and optional 1 teaspoon of cayenne pepper for heat. Bring everything to a boil, then lower the heat. Cover and let it simmer for 2 to 3 hours. This helps all the flavors meld together. 3. Final Steps: About 30 minutes before serving, stir in 1 cup of canned kidney beans and 1 cup of canned black beans. Season with salt and pepper to taste. Remove the short ribs, shred the meat, and return it to the pot. Discard any bones. Let it simmer for another 10 to 15 minutes before serving. This simple method guarantees a rich, hearty chili that packs a punch! Best practices for searing meat Searing meat is key for great flavor. First, heat your pot on medium-high. Add olive oil and let it shimmer. Place the short ribs in the pot without crowding them. Sear each side for 3-4 minutes. This builds a brown crust that locks in taste. Don’t rush; let the meat brown fully. How to achieve tender short ribs To get tender short ribs, slow cooking is essential. After searing, return the meat to the pot. Add the broth and spices, then cover and simmer. Cook for 2-3 hours on low heat. This breaks down the tough fibers and makes the meat melt-in-your-mouth tender. Adjusting spice levels to personal preference Chili can be as spicy as you want! Start with the basic spices like chili powder and cumin. Taste it after simmering. If you like heat, add cayenne pepper. For less spice, skip it or reduce the chili powder. You control the heat! Adding fresh ingredients for garnishing Garnishing your chili adds freshness and color. Use chopped cilantro and lime wedges. The lime brings brightness and cuts richness. You can also add diced avocado or sour cream for creaminess. These fresh touches make each bowl more vibrant. Utilizing a pressure cooker for faster results If you’re short on time, a pressure cooker can save you hours. After searing, add all ingredients to the pot. Seal it and cook under high pressure for about 45 minutes. This method tenderizes meat quickly while keeping all the flavors. Preparing ingredients in advance Prep can make cooking easier. Chop your onions, garlic, and peppers ahead of time. You can also brown the meats earlier in the day. Store them in the fridge until you’re ready to cook. This way, when it’s time to make chili, you can just combine everything. {{image_2}} You can switch up the meat in this chili. Instead of beef short ribs, try beef brisket. It has a nice texture and flavor. Ground beef is another option. It cooks faster and gives a different taste. If you want a vegetarian option, use plant-based meats. They mimic the taste and texture of real meat well. You can also add extra beans for protein. This keeps the chili hearty and filling. Feel free to swap out beans or veggies. If you prefer, use pinto beans or chickpeas instead of kidney or black beans. You can also add corn or zucchini for more texture and flavor. Adjust the spices based on your taste. If you like it mild, cut back on the chili powder and cayenne pepper. For a bolder flavor, add more cumin or smoked paprika. This way, you can make the chili your own. To enhance your chili meal, serve it with crusty bread or tortilla chips. These add a fun crunch. You can also top the chili with cheese, sour cream, or diced onions. Chili can be served in many ways. You can ladle it into bowls or serve it over rice. Both styles are delicious and satisfying. To store your leftover chili, let it cool down first. Transfer it to an airtight container. This keeps the chili fresh and tasty. In the fridge, your chili lasts about 3 to 4 days. Make sure you reheat it until it's hot all the way through. Check the smell and look before serving. To freeze your chili, first cool it completely. Then, pour it into freezer-safe bags or containers. Remove as much air as possible. This helps prevent freezer burn. Your chili can last in the freezer for up to 3 months. When you're ready to eat, thaw it in the fridge overnight. Reheat it on the stove or in the microwave until it’s warm. Making a large batch is a great idea. You can enjoy chili for a few days or share with friends. Use your chili in different ways, too. Try it as a filling for tacos or nachos. It can also be served over rice or pasta. This way, you can mix things up and enjoy the same dish in fun new ways. It takes about 3 hours to cook short rib chili. The prep time is around 20 minutes. After that, the chili simmers for 2 to 3 hours. This slow cooking helps the flavors mix well. The meat becomes tender, and you get a rich taste. Yes, you can make this chili in a slow cooker. First, sear the short ribs and chorizo in a pan. This step adds flavor. Next, place everything in the slow cooker. Add the vegetables, tomatoes, broth, and spices. Cook on low for 6 to 8 hours. If you are short on time, you can cook it on high for about 4 hours. This method makes it easy and hands-off. You can serve this chili with many tasty sides. Here are some great options: - Crusty bread for dipping - Tortilla chips for a crunch - Rice for a filling meal - A side salad for freshness These sides complement the chili well and add to your meal. Enjoy the mix of flavors! This blog post explored how to make a delicious short rib and chorizo chili. We covered the main ingredients, including beef, spices, and vegetables. I shared step-by-step instructions on preparing the meat, sautéing vegetables, and simmering everything together. You learned tips for cooking, enhancing flavors, and time-saving ideas. Consider variations and storage methods to enjoy later. With the right techniques, you can make a great chili that suits your taste. Enjoy creating and sharing this hearty dish!

Get ready for a flavor explosion with my Award Winning Short Rib and Chorizo Chili! This dish combines tender short ribs and spicy chorizo for the perfect mix of rich …

Read more

Categories Dinner

Cheddar Jalapeno Cornbread Waffles Flavorful Twist

August 26, 2025 by Chef Luca
To make Cheddar Jalapeno Cornbread Waffles, you will need: - 1 cup cornmeal - 1 cup all-purpose flour - 1 tablespoon baking powder - 1 teaspoon salt - 1/2 teaspoon cayenne pepper (optional) - 2 large eggs - 1 cup milk - 1/4 cup vegetable oil - 1 cup shredded sharp cheddar cheese - 1/2 cup jalapenos, diced (fresh or pickled) - 1 tablespoon honey (optional) Each ingredient plays a key role. The cornmeal adds texture, while the flour gives structure. Baking powder helps the waffles rise. Salt enhances the flavors, and cayenne adds heat if you choose to use it. This recipe makes about four servings. You can adjust the amounts based on how many people you are serving. If you want to skip the flour, use gluten-free flour instead. For a lighter option, you can replace the milk with almond milk or any plant-based milk. You can also try different cheeses, like pepper jack, for more spice. If you need gluten-free options, use gluten-free flour. For dairy-free waffles, use plant-based milk and dairy-free cheese. These swaps help make this dish fit various dietary needs, while still tasting great. Always check labels to ensure all ingredients meet your dietary requirements. First, you need to preheat your waffle maker. Follow the guide that comes with your machine. This step is key for crispy waffles. In a large bowl, mix the dry ingredients. Add 1 cup of cornmeal, 1 cup of flour, 1 tablespoon of baking powder, and 1 teaspoon of salt. If you want a kick, add 1/2 teaspoon of cayenne pepper. Stir well to blend all the dry items. In another bowl, crack 2 large eggs. Whisk them with 1 cup of milk, 1/4 cup of vegetable oil, and 1 tablespoon of honey if you like it sweet. Mix until smooth. This mixture adds moisture to your waffles. Pour the wet mix into the dry ingredients. Stir gently until just combined. It’s okay if you see small lumps; don’t overmix. Now, fold in 1 cup of shredded sharp cheddar cheese and 1/2 cup of diced jalapenos. This gives your batter a cheesy, spicy flavor. Lightly grease your waffle maker with cooking spray or oil. Pour about 1/2 to 2/3 cup of batter into the center. Close the lid and cook according to your machine's guide. This usually takes around 4 to 5 minutes. You want them golden brown and crispy. Carefully take out the waffles and keep them warm in a low oven. Repeat until all the batter is cooked. Enjoy your tasty Cheddar Jalapeno Cornbread Waffles warm with butter, honey, or hot sauce! To get the best texture in your Cheddar Jalapeno Cornbread Waffles, mix your dry and wet ingredients separately. This keeps the batter light and fluffy. When you combine them, stir gently until just mixed. Some lumps are okay! Overmixing will make the waffles tough. The key is to fold in the cheese and jalapenos carefully. This keeps the cheese melted and the jalapenos evenly spread. Cooking time matters a lot here. Preheat your waffle maker well before you start. This ensures even cooking and a crisp outside. Typically, cook the waffles for about 4 to 5 minutes. Check if they are golden brown and crispy. If they are not, give them another minute. Each waffle maker is a bit different, so keep an eye on them. Avoid these simple mistakes to nail your waffles! First, don’t skip greasing the waffle maker. It helps the waffles release easily. Second, watch the cooking time closely. If you open the lid too soon, the waffles might not cook through. Lastly, don’t use too much batter. A half to two-thirds cup is usually just right. Overfilling can cause a mess and uneven cooking. {{image_2}} You can switch up the cheese for more flavor. Try pepper jack for a spicy kick. Or use gouda for a smoky taste. Each type of cheese adds its own twist to the waffles. Mixing cheeses can also create a unique blend. Use a mix of sharp cheddar and mozzarella for a creamy texture. Feel free to add more veggies or spices to your batter. Corn adds sweetness and texture. Chopped green onions bring fresh flavor. You can also try diced bell peppers for a pop of color. If you love heat, add more jalapenos or some crushed red pepper. For a twist, try adding herbs like cilantro or chives. You can make these waffles sweet or savory. Add honey in the batter for a touch of sweetness. This pairs well with butter or syrup. If you prefer savory, skip the honey and focus on spices. Adding garlic powder or onion powder can make a big difference. Both versions offer a fun way to enjoy cornbread waffles! To store leftovers, let the waffles cool down first. Once cool, stack them with layers of parchment paper. Place them in an airtight container. This keeps them fresh and prevents sogginess. Store the container in the fridge for up to three days. You can also wrap individual waffles in plastic wrap for easy grabbing later. When you're ready to enjoy your leftovers, preheat your oven to 350°F (175°C). Place the waffles on a baking sheet. Heat them for about 10 minutes, or until warm and crispy. You can also use a toaster for a quicker option. Just pop the waffles in the toaster until they are hot and crisp. This method keeps the texture nice. Freezing is a great choice for longer storage. After cooling, wrap each waffle in plastic wrap. Place the wrapped waffles in a freezer bag or container. Be sure to squeeze out as much air as you can. They will stay fresh for up to three months. To reheat frozen waffles, just pop them in the toaster or oven. No need to thaw first! Yes, you can make these waffles ahead of time. Cook the waffles, then cool them on a rack. This helps keep them crisp. Once cool, store them in an airtight container. They last up to three days in the fridge. For longer storage, freeze them in a single layer. After they freeze, place them in a bag for easy access. Reheat in a toaster or oven for a quick meal. These waffles pair well with many tasty sides. Try serving them with butter and honey for a sweet touch. For a spicy kick, drizzle on your favorite hot sauce. They also taste great with chili or stew. You can even use them as a base for eggs and avocado. The options are endless and delicious! To change the heat level, add or reduce jalapenos. Use less for a milder taste. You can also skip the cayenne pepper for less heat. For more spice, add extra jalapenos or use spicy cheese. Another fun option is adding diced chipotle peppers. This gives a smoky flavor along with extra heat. Adjust to your taste for the perfect bite! We covered a lot about making Cheddar Jalapeno Cornbread Waffles. We looked at ingredients, tips for cooking, and ways to store leftovers. Each step helps you create tasty, fun waffles. You can add your favorite flavors, too. Don’t forget to experiment with serving ideas and ask if you have more questions. Enjoy your cooking, and let creativity guide your kitchen adventures!

Get ready to spice up your breakfast with Cheddar Jalapeno Cornbread Waffles! These waffles combine cheesy goodness and a kick of heat for a fun twist on a classic. Perfect …

Read more

Categories Breakfast

Pumpkin Cream Cheese Frosting Rich and Creamy Delight

August 25, 2025 by Chef Luca
- 8 oz cream cheese, softened - 4 oz unsalted butter, softened - 2 cups powdered sugar To start, the main ingredients form the base of this frosting. The cream cheese gives it a rich and tangy taste. The unsalted butter adds creaminess. Finally, the powdered sugar sweetens it up and gives it that fluffy texture. - 1/2 cup pumpkin puree (canned or fresh) - 1 tsp vanilla extract - 1 tsp ground cinnamon Next, we enhance the flavor. The pumpkin puree brings a lovely autumn taste. Vanilla extract adds warmth. Ground cinnamon gives a cozy spice that makes it perfect for fall treats. - 1/2 tsp ground nutmeg - 1/4 tsp ground ginger - 1/4 tsp salt Lastly, spices add depth. Ground nutmeg gives a nutty flavor. Ground ginger adds a touch of zest. A bit of salt helps balance the sweetness. Together, these spices create a well-rounded and delightful frosting. This combination makes pumpkin cream cheese frosting a rich and creamy delight, perfect for topping cakes or cupcakes. - Combine cream cheese and unsalted butter. - Beat until smooth and creamy. In a large mixing bowl, take your softened cream cheese and unsalted butter. These two ingredients form the base of your frosting. Using an electric mixer, beat them together for about 2-3 minutes. The goal is to make it smooth and creamy. This step is key for a fluffy texture. - Add pumpkin puree and vanilla. - Mix until well incorporated. Next, add 1/2 cup of pumpkin puree and 1 teaspoon of vanilla extract to the creamy mix. These add flavor and richness. Beat the mixture until it is well combined and smooth. You'll notice the color change to a lovely orange hue, and that’s a sign that it’s coming together nicely. - Gradually mix in powdered sugar. - Incorporate ground cinnamon, nutmeg, ginger, and salt. Now it’s time for the sweet part! Gradually mix in 2 cups of powdered sugar. Start on low speed to avoid a sugar cloud. Once combined, increase the speed to medium. This will help the frosting become fluffy and smooth. After that, add 1 teaspoon of ground cinnamon, 1/2 teaspoon of nutmeg, 1/4 teaspoon of ginger, and 1/4 teaspoon of salt. Beat the mixture for another 1-2 minutes until all the spices are fully blended. This blend of spices creates the warm, cozy flavor we love in pumpkin treats. Taste your frosting, and if you want more spice, feel free to adjust! To get the right thickness, you can add milk. Start with just a teaspoon at a time. Mix it in gently. If the frosting is too thick, this helps make it smooth and spreadable. For fluffy frosting, make sure your cream cheese and butter are soft. This keeps the texture light. Beat them well before adding other ingredients. It makes a big difference! You can customize the spices to match your taste. If you love cinnamon, add a bit more. For a kick, try extra ginger or nutmeg. Don't be afraid to taste as you go. For added flavor, consider mixing in a touch of maple syrup or a splash of orange juice. These can brighten the frosting and add depth. Use your electric mixer on low speed when adding sugar. This avoids a sugar cloud all over your kitchen. Once mixed, turn up the speed to medium. This ensures everything blends well and gets fluffy. If you want the best results, beat your frosting for a few extra minutes. This can really enhance the texture. Just remember to scrape down the bowl to mix all ingredients thoroughly. {{image_2}} If you want a dairy-free version of this frosting, you can swap the cream cheese and butter. For cream cheese, try using a dairy-free cream cheese made from nuts or soy. For butter, use a plant-based butter or coconut oil. These swaps keep the creamy texture while making it dairy-free. You can make this frosting even more fun. Adding a bit of melted chocolate gives it a rich taste. Swirl in some caramel for a sweet twist. You can also mix in chopped nuts for a crunchy texture. Spices like clove or allspice can enhance the flavor too. This frosting shines on many desserts. It pairs perfectly with pumpkin bread or spice cake. Try it on cupcakes or even pancakes for a special treat. If you have leftover frosting, use it as a dip for fruit or graham crackers. You can also spread it on toast for a quick snack. To store Pumpkin Cream Cheese Frosting, place it in an airtight container. This keeps it fresh and prevents it from absorbing other smells. The frosting can last up to one week in the fridge. Make sure to check for any signs of spoilage before using. If you want to save the frosting for later, you can freeze it. Scoop the frosting into a freezer-safe container. Leave some space at the top, as it may expand. It can last for about three months in the freezer. When you're ready to use it, move the container to the fridge to thaw overnight. If your frosting is too cold, it might be hard to spread. To fix this, leave it out at room temperature for about 30 minutes. You can also beat it with a mixer for a few seconds to soften it. This helps restore its creamy texture. Always check the texture before using it again. Pumpkin cream cheese frosting lasts about one week in the fridge. Store it in an airtight container. For longer storage, you can freeze it. It stays good for up to three months in the freezer. Make sure to thaw it in the fridge before using. Yes, you can make this frosting ahead of time. Make it up to two days before your event. Just keep it in the fridge in an airtight container. When you are ready to use it, let it sit at room temperature to soften. This will help it spread easily. If you need a substitute for cream cheese, try using Greek yogurt. It gives a similar taste and texture. You can also use ricotta cheese or a vegan cream cheese. Each option will change the flavor a bit but will work well. If your frosting is too thick, add milk to fix it. Start with one teaspoon of milk at a time. Mix well after each addition. Keep adding until you reach the right consistency. This will make your frosting smooth and easy to spread. This blog post shared a simple recipe for Pumpkin Cream Cheese Frosting. We covered key ingredients, from cream cheese to spices. Step-by-step instructions helped you make it creamy and flavorful. Tips for storage and variations ensured you can customize your frosting. In closing, this frosting is a delicious way to add fall flavor to your desserts. Try the ideas and make it your own! Enjoy the tasty results and happy baking!

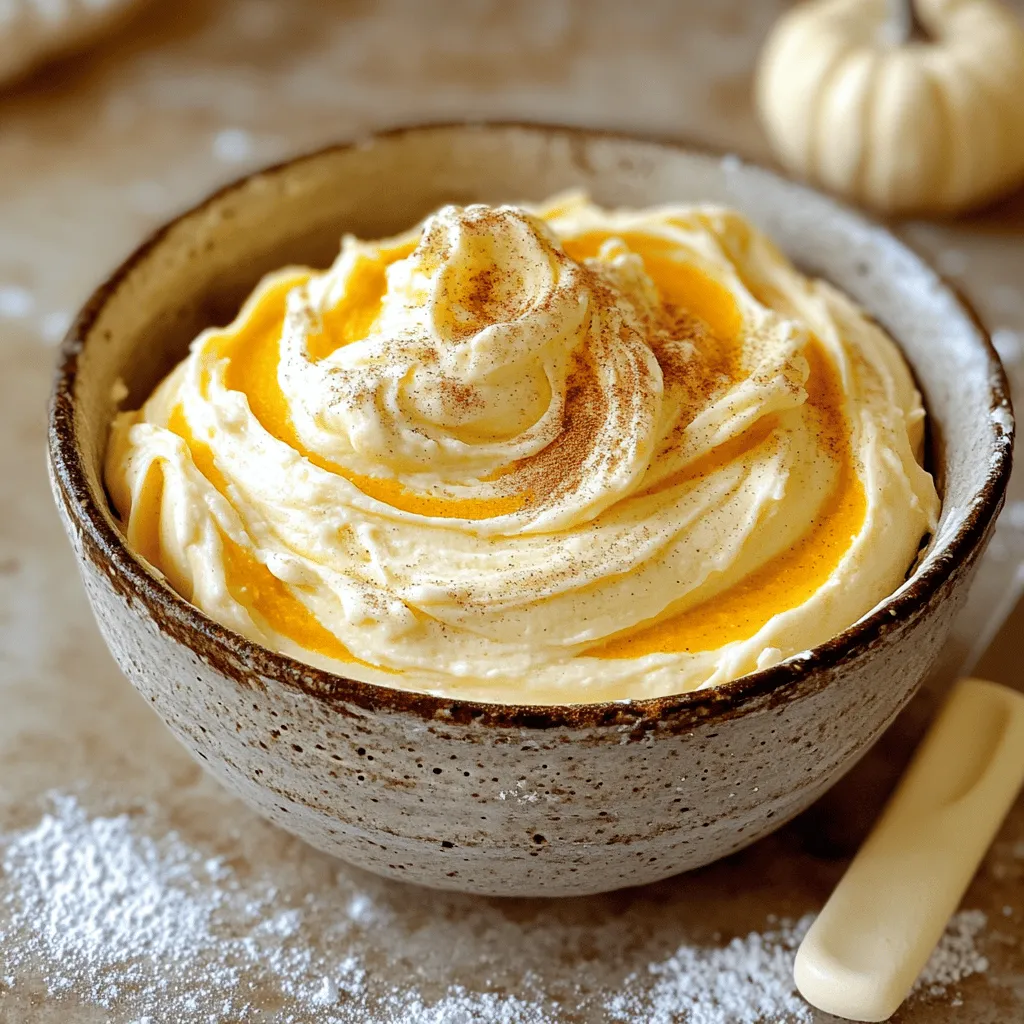
Are you ready to elevate your fall baking game? Pumpkin cream cheese frosting is here to add a rich and creamy delight to your treats. With just a few simple …

Read more

Categories Desserts

Chewy Pumpkin Cookies Delightful and Simple Treat

August 25, 2025 by Chef Luca
To make chewy pumpkin cookies, you need a few key ingredients. Here’s what to gather: - 1 cup pumpkin puree - 1/2 cup unsalted butter, softened - 1 cup brown sugar - 1/2 cup granulated sugar - 1 large egg - 1 teaspoon vanilla extract - 2 1/2 cups all-purpose flour - 1 teaspoon baking soda - 1 teaspoon baking powder - 1 teaspoon cinnamon - 1/2 teaspoon nutmeg - 1/4 teaspoon ginger - 1/4 teaspoon salt These ingredients work together to create a moist and flavorful cookie. The pumpkin puree gives the cookies their soft texture and rich flavor. The sugars add sweetness and help with browning. You can add extra flavors to your cookies. Here are some optional ingredients: - 1 cup chocolate chips - 1/2 cup chopped walnuts or pecans Chocolate chips add a sweet touch that pairs well with pumpkin. Nuts add crunch and nutty flavor, enhancing the overall experience. You can mix and match these to suit your taste. If you need to swap ingredients, here are some ideas: - Use coconut oil instead of butter for a dairy-free option. - Substitute almond flour for all-purpose flour for a gluten-free choice. - If you don’t have pumpkin spice, mix 1 teaspoon cinnamon, 1/4 teaspoon nutmeg, and 1/4 teaspoon ginger. These substitutions can help you cater to dietary needs. Just remember, changes may alter the cookie's texture or flavor slightly. Enjoy experimenting! Start by setting your oven to 350°F (175°C). This heat is perfect for baking. While it warms up, grab a baking sheet. Line it with parchment paper. This helps the cookies not stick. Make sure your workspace is clean. You want a tidy area to work. Gather your tools, including a mixing bowl and a whisk. A cookie scoop or spoon will help you shape the dough later. With everything ready, you are set to mix the dough. In a large mixing bowl, add 1/2 cup of softened unsalted butter. Then, pour in 1 cup of brown sugar and 1/2 cup of granulated sugar. Use a mixer or spoon to cream them together. Mix until it is light and fluffy. Now, add 1 cup of pumpkin puree, 1 large egg, and 1 teaspoon of vanilla extract. Beat these ingredients until they blend well. In another bowl, whisk together 2 1/2 cups of all-purpose flour, 1 teaspoon of baking soda, 1 teaspoon of baking powder, and spices: 1 teaspoon of cinnamon, 1/2 teaspoon of nutmeg, 1/4 teaspoon of ginger, and 1/4 teaspoon of salt. Gradually add this dry mix to the wet mix. Stir until just combined. Be careful not to overmix, or your cookies may get tough. If you like, fold in 1 cup of chocolate chips and 1/2 cup of chopped walnuts or pecans for added crunch and flavor. Using a cookie scoop or spoon, drop generous tablespoons of dough onto the prepared baking sheet. Space them about 2 inches apart. This space allows the cookies to spread while baking. Bake the cookies for 10-12 minutes. They should be lightly golden on the edges and look set in the center. Remember, they will continue to bake a bit after you take them out. Let the cookies cool on the baking sheet for 5 minutes. Then, transfer them to a wire rack to cool completely. Enjoy the warm, chewy goodness of your pumpkin cookies! To get that chewy texture, you need to mix carefully. Overmixing can make the cookies tough. When you add the dry ingredients, stir until just combined. This keeps air in the dough. The right amount of pumpkin puree also helps. It keeps the cookies moist and chewy! One big mistake is not measuring the flour correctly. Too much flour can dry out your cookies. Use the spoon and level method for best results. Another mistake is baking for too long. The cookies should be slightly soft in the middle when you pull them out. They will firm up as they cool. These cookies shine when served warm. You can stack them on a rustic wooden plate. For a special touch, add a sprinkle of powdered sugar. If you like, you can gift them in a decorative tin. They make a great treat for friends or family! {{image_2}} You can easily change your chewy pumpkin cookies. Adding chocolate chips makes them extra special. I like to use one cup of chocolate chips. They melt a bit and add a sweet touch. If you prefer nuts, try chopped walnuts or pecans. Half a cup works great. The nuts give a nice crunch and a rich flavor. Mix in either option when you combine the dough. This makes every bite a tasty surprise. You can also play with spices in your pumpkin cookies. While cinnamon, nutmeg, and ginger are classic choices, other spices can add fun flavors. Consider using allspice for a warm kick. You can also try cardamom for a unique twist. Just remember to use these spices in small amounts. Start with a quarter teaspoon and adjust to your taste. Experimenting with spices can lead to new favorite flavors. If you need a gluten-free option, swap all-purpose flour for a gluten-free blend. Many blends work well and keep the cookies chewy. For a vegan version, replace the egg with a flax egg. To make a flax egg, mix one tablespoon of ground flaxseed with three tablespoons of water. Let it sit for about five minutes until it thickens. Use vegan butter instead of regular butter. These changes keep your pumpkin cookies delicious while meeting dietary needs. Store your chewy pumpkin cookies in an airtight container. This keeps them soft and fresh. You can stack them with parchment paper between layers. This helps prevent sticking. Keep the container in a cool, dry place. They will stay fresh for up to one week. To freeze your cookies, let them cool completely first. Once cool, place them in a single layer on a baking sheet. Freeze them for about two hours until solid. After that, transfer the cookies to a freezer bag or container. Label the bag with the date. They can last for three months in the freezer. When you’re ready to eat them, just thaw them at room temperature. Reheat your cookies to bring back their soft texture. You can use the oven for this. Preheat it to 350°F (175°C). Place the cookies on a baking sheet and warm them for about five minutes. You can also use the microwave. Heat each cookie for about 10 to 15 seconds. Be careful not to heat them too long; you want them warm, not hot. Enjoy your cookies fresh again! To make chewy pumpkin cookies from scratch, gather these key ingredients: pumpkin puree, butter, brown sugar, granulated sugar, an egg, and vanilla extract. Mix the softened butter with both sugars until fluffy. Then, blend in the pumpkin puree, egg, and vanilla. In another bowl, whisk together flour, baking soda, baking powder, and spices like cinnamon and nutmeg. Combine the wet and dry mixes gently. Finally, drop spoonfuls of dough onto a lined baking sheet and bake at 350°F for 10-12 minutes. Yes, you can use fresh pumpkin! Start by cooking the pumpkin until soft, then mash it. Make sure to drain excess water for a thick puree. This will help maintain the right texture in your cookies. Fresh pumpkin gives a lovely taste and can be a fun twist on the classic recipe. To keep your pumpkin cookies moist, store them in an airtight container. Adding a slice of bread to the container can help retain moisture. Make sure to let them cool completely before storing. If you freeze them, wrap each cookie well in plastic wrap to prevent freezer burn. This way, they stay soft and chewy for longer! You learned how to make chewy pumpkin cookies step by step. We covered key ingredients, mixing dough, and baking tips to avoid common mistakes. You also discovered tasty variations and knew how to store your cookies well. In the end, baking cookies is fun and can bring joy. Try these tips to make every batch better. Enjoy sharing your delicious cookies with friends and family!

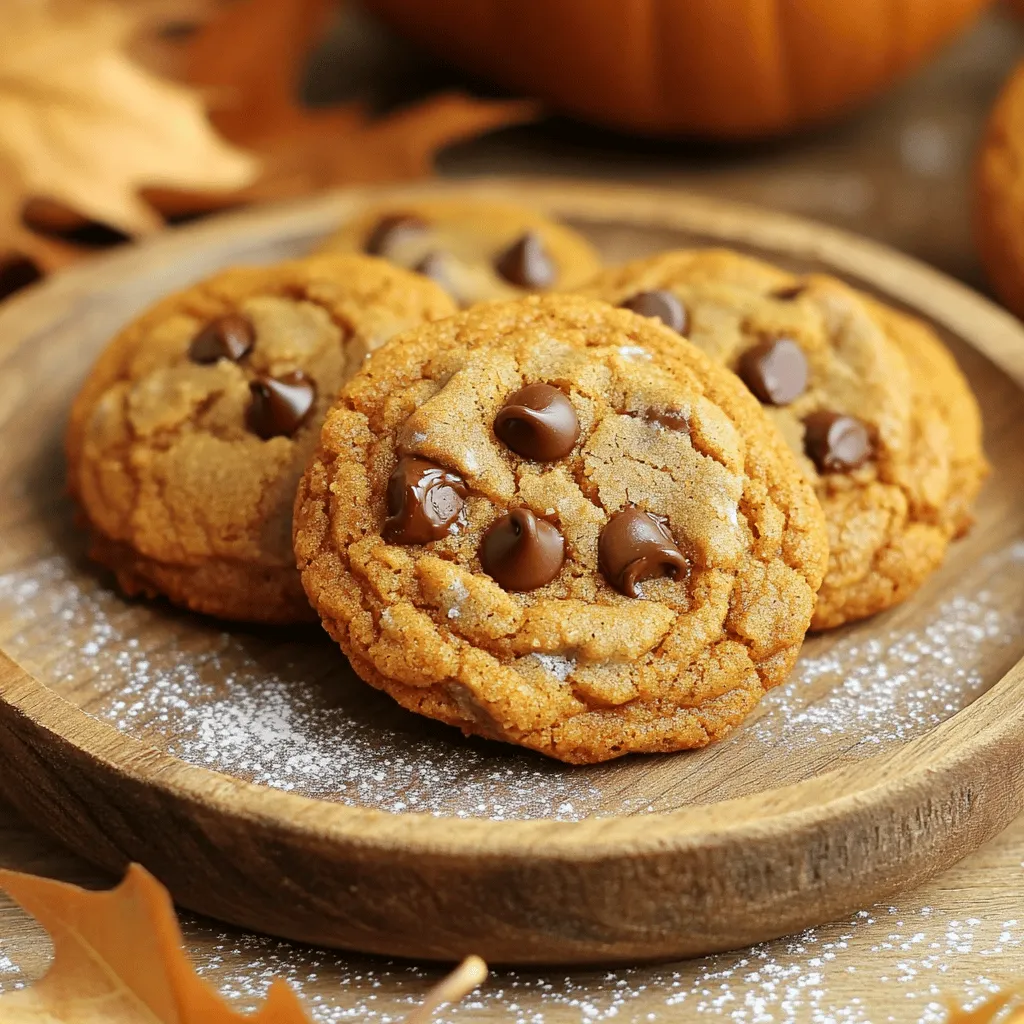
Fall is the perfect time to bake, and chewy pumpkin cookies are a must-try! With a warm, spiced flavor and soft texture, these cookies are an easy and delightful treat. …

Read more

Categories Desserts

Easy Slow Cooker Fajitas Flavorful and Quick Meal

August 25, 2025 by Chef Luca
- 1 lb chicken breast, sliced into strips - 1 red bell pepper, sliced - 1 green bell pepper, sliced - 1 yellow onion, sliced - 3 cloves garlic, minced These main ingredients form the base of your fajitas. The chicken adds protein, while the bell peppers and onion bring color and crunch. Garlic enhances the flavor, making each bite tasty. - 2 tablespoons olive oil - 1 teaspoon chili powder - 1 teaspoon cumin - 1 teaspoon smoked paprika - 1/2 teaspoon oregano - Salt and pepper to taste Spices are key to good fajitas. Chili powder gives heat, cumin adds depth, and smoked paprika offers a rich, smoky flavor. Oregano rounds it out with a hint of earthiness. Season with salt and pepper to boost all those flavors. - Flour or corn tortillas, for serving - Juice of 1 lime - Fresh cilantro, for garnish (optional) Tortillas are essential for wrapping your fajitas. Lime juice adds brightness, cutting through the richness of the chicken. Fresh cilantro gives a nice pop of flavor and color, but you can skip it if you prefer. With these ingredients, you set the stage for a fun and tasty meal. Each one plays a role in creating a delicious slow cooker fajitas dish that you and your family will love. To start, gather your ingredients. In a large bowl, I combine the chicken, red and green peppers, yellow onion, and minced garlic. Next, I drizzle olive oil over the mixture. Then, I season it with chili powder, cumin, smoked paprika, oregano, salt, and pepper. I toss everything well to coat the chicken and veggies with the spices. This step builds flavor and ensures each bite is tasty. Now, it's time to slow cook. I transfer the seasoned mixture to my slow cooker. I cover it and set the cooking time. For a low setting, I cook for 6-7 hours. If I'm in a rush, I set it on high for 3-4 hours. I know it's done when the chicken is tender and fully cooked. About 30 minutes before serving, I squeeze lime juice over the fajita mixture. Then, I gently stir to combine. Once cooked, I shred the chicken using two forks. I mix it back into the veggies for a perfect blend. This step adds a zesty flavor that brightens the dish. To make your fajitas taste just right, adjust the spices. You can add more chili powder for heat or extra cumin for depth. If you prefer less spice, cut back on the chili powder. Adjusting spices helps you create a dish that fits your taste. Slow cooking chicken is easy. Start with thin slices of chicken breast. This helps it cook evenly. Make sure to coat the chicken in olive oil and spices before cooking. This adds flavor throughout. Set your slow cooker to low for 6-7 hours. This will make the chicken tender and juicy. Serve your fajitas on warm tortillas. Warm them in a pan or microwave for a few seconds. After that, garnish with fresh cilantro and lime wedges. You can also add toppings like avocado, shredded cheese, and sour cream. Set these on a side platter. This way, each guest can customize their meal. {{image_2}} You can switch chicken for beef or tofu in this recipe. For beef, use flank steak or sirloin, cut into strips. Season it just like you would the chicken. If you prefer tofu, choose firm or extra-firm tofu. Press it to remove water, then cut it into strips. Marinate the tofu with the same spices. This way, you can enjoy fajitas no matter your diet. Fajitas taste great with many veggies. Try adding mushrooms for a meaty texture. Zucchini or squash adds a nice crunch. You can also use corn for a sweet touch. For a bit of heat, add sliced jalapeños. Mixing and matching these veggies can create a fun twist on your fajitas. If you need gluten-free options, use corn tortillas instead of flour tortillas. For low-carb choices, skip the tortillas. Instead, serve the fajita mix over a bed of lettuce or cauliflower rice. This keeps the dish light and fresh while still being tasty. You can enjoy fajitas in many ways that fit your needs. To store leftovers, let the fajitas cool first. Place them in an airtight container. Keep the container in the fridge. They stay fresh for up to three days. You can also store the chicken and veggies separately. This helps keep the tortillas from getting soggy. If you want to freeze fajitas, let them cool completely. Use a freezer-safe bag or container. Remove as much air as possible before sealing. They can last up to three months in the freezer. To save space, consider portioning them out. This makes it easy to thaw just what you need. To reheat fajitas, the microwave works well. Place them in a microwave-safe dish. Cover the dish with a damp paper towel. Heat in short bursts, stirring in between. For best results, use a skillet on low heat. This helps keep the chicken tender and the veggies crisp. Enjoy your delicious fajitas! Fajitas take about 6-7 hours on low or 3-4 hours on high. This gives the chicken time to become tender and juicy. I suggest checking them at the lower end of these times. When the chicken is no longer pink, it's done. Yes, you can make fajitas ahead of time. To prep, cut the chicken and veggies and store them in the fridge. You can also season them and put everything in the slow cooker the night before. Just set the cooker to start in the morning. This makes dinner super easy! Fajitas are great with many sides. You can serve them with: - Tortillas (flour or corn) - Guacamole - Sour cream - Shredded cheese - Salsa - Fresh cilantro for garnish Add some rice or beans on the side for a complete meal. Enjoy mixing and matching! This blog post covers all the key steps for making tasty slow cooker fajitas. You learned about the main ingredients, spices, and seasonings that bring flavor. I shared tips on cooking and presenting these fajitas beautifully. You also explored variations, storage tips, and answered common questions. Slow cooker fajitas are easy, fun, and customizable. Enjoy them any time, and share your creations!

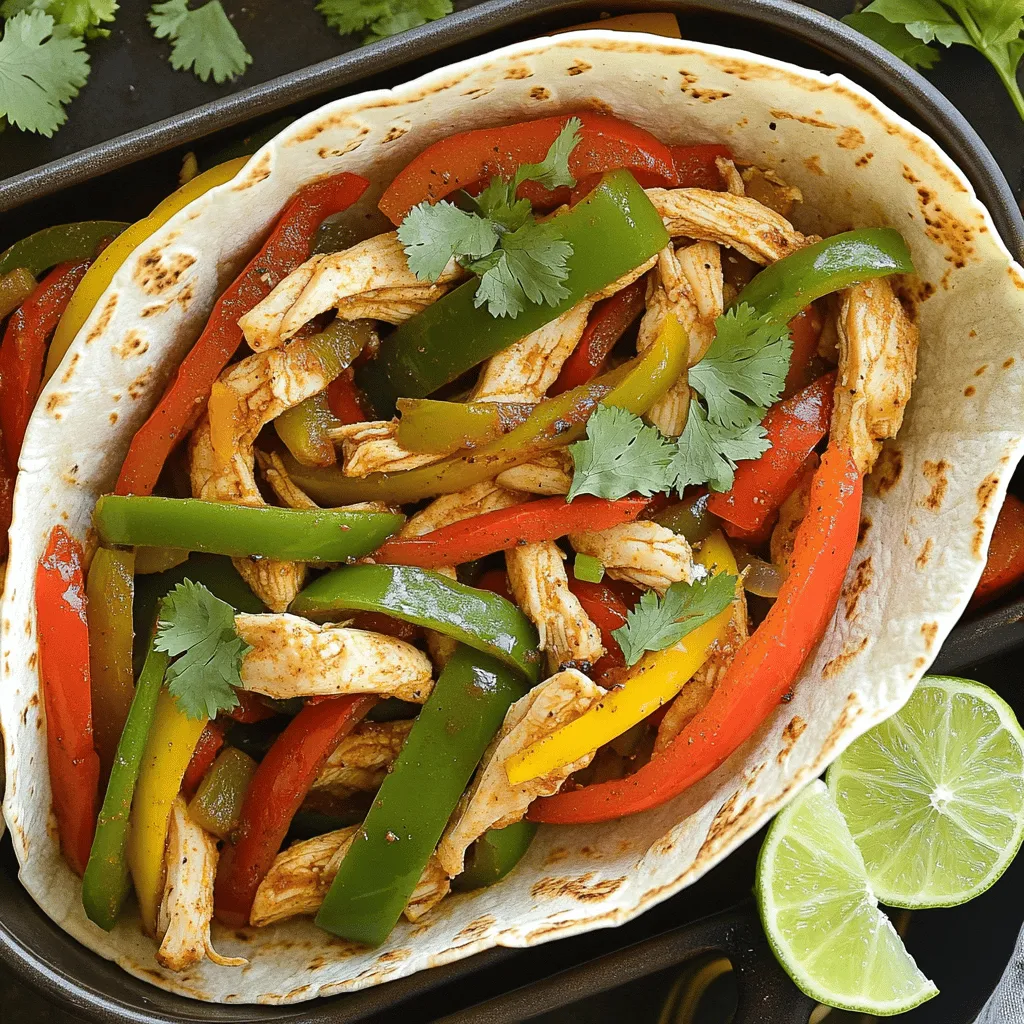
If you’re seeking a hassle-free, tasty meal, you’ve hit the jackpot with Easy Slow Cooker Fajitas! These flavorful fajitas pack a punch with simple ingredients like chicken, bell peppers, and …

Read more

Categories Dinner

Blueberry Greek Yogurt Parfait Energizing Easy Recipe

August 25, 2025 by Chef Luca
- Greek Yogurt: plain or vanilla - Fresh Blueberries: or mixed berries - Granola: store-bought or homemade - Honey: optional sweetener - Vanilla Extract: optional flavor enhancer - Fresh Mint Leaves: for garnish This recipe for a blueberry Greek yogurt parfait is simple and tasty. You will need a few key ingredients to make it shine. First, you need Greek yogurt. You can choose plain or vanilla, depending on your taste. Greek yogurt gives a nice, creamy base. Next, you will want fresh blueberries. You can also mix in other berries if you like. Berries add color and a burst of flavor. Granola is the next ingredient. You can use store-bought granola or make your own if you prefer. It adds a delightful crunch. If you like a touch of sweetness, honey is a great option. Just drizzle a bit to enhance the flavor. Vanilla extract is another choice for extra taste. It makes your yogurt even better. Finally, fresh mint leaves are perfect for garnish. They add a nice pop of color and freshness. Gather all these ingredients, and you are ready to create a delicious parfait! Start by taking your Greek yogurt. If you want to sweeten it, add honey and vanilla extract. Mix these together in a bowl. Stir until the mixture is smooth and creamy. This makes your yogurt tasty and ready for layers. Grab a tall glass or bowl. Add about 1/3 cup of the Greek yogurt as your first layer. Then, spoon in about 1/4 cup of fresh blueberries on top of the yogurt. These juicy berries add a burst of flavor. Next, sprinkle 1/4 cup of granola over the blueberries. This step gives your parfait a nice crunch. Now, repeat the steps for a second layer. Add more yogurt, followed by more blueberries, and another sprinkle of granola. Finish with one last dollop of yogurt on top. Add a few more blueberries and sprinkle some granola for decoration. Finally, garnish with fresh mint leaves to make it look pretty. Enjoy your parfait right away for the best crunch! To create the best Blueberry Greek Yogurt Parfait, choosing the right granola is key. Use a granola with oats and nuts for crunch. I love granola that has a good mix of flavors. It adds more character to your parfait. Adding honey and vanilla can make your yogurt taste better. Honey adds a touch of sweetness. Vanilla boosts the flavor of the yogurt. Mix both into the Greek yogurt until smooth. This gives a creamy texture that pairs well with the fruit. Seasonal fruits can elevate your parfait. In summer, fresh peaches or strawberries work well. In autumn, try apples or pears. These fruits add bright colors and different tastes. For serving, tall glasses or clear bowls show off your layers. It makes the dish look beautiful. Garnish with fresh mint leaves for an extra pop of color. This makes your parfait more inviting. Prepare ingredients ahead of time to save on busy mornings. You can wash and cut fruits a day before. Store them in the fridge until you need them. When layering for meal prep, keep the granola separate. This ensures it stays crunchy. Layer your yogurt and berries in the dish first. Add the granola right before eating for the best texture. {{image_2}} You can use other berries in your parfait. Strawberries add sweetness, while raspberries bring a tart flavor. Blackberries also work well, adding depth to the dish. You can mix berries for a fun twist. This gives your parfait a blend of textures and tastes. If you prefer dairy-free options, try almond or coconut yogurt. They have great flavors and can keep your parfait creamy. You can also explore flavored yogurts like berry or vanilla. These add more taste without extra steps. You can make your own granola at home. Use oats, honey, and nuts to create a mix you love. If you want a nutty crunch, try adding seeds like chia or pumpkin. This gives your parfait extra nutrition and flavor. To keep your parfait fresh, store ingredients separately. This way, the granola stays crunchy. Use airtight containers for yogurt and berries. Glass jars work well for this. They help you see the food and keep it fresh longer. Greek yogurt lasts about one week in the fridge after opening. Check the date on the label to be sure. Store granola in a cool, dry place. If you keep it sealed, it can last up to two months. This keeps the crunch you want in your parfait. You can prep ingredients up to two days in advance. Mix yogurt with honey and vanilla first. Keep granola and berries in separate containers. This helps maintain their texture. When ready to serve, layer them quickly for the best taste and look. Yes, you can use frozen blueberries. They are easy to find and often cheaper. Frozen blueberries help save time. They are picked at peak ripeness, so they still have great flavor. However, frozen berries can be softer than fresh ones. When you thaw them, they may release some juice. This can make your parfait a bit watery. To avoid this, use a slotted spoon when adding them. This way, you keep most of the juice out. To boost nutrition, add seeds or nuts. Chia seeds or flaxseeds provide healthy fats and fiber. Almonds or walnuts add crunch and protein. Just sprinkle a tablespoon or two in between the yogurt and berries. This small change can make your parfait more filling. It also gives you a nice mix of flavors and textures. Yes, you can prepare parfaits the night before. Just keep the granola separate until you serve. If granola sits in yogurt too long, it gets soggy. Layer the yogurt and berries in a container. Store them in the fridge. When ready to eat, add the granola. This keeps everything fresh and crunchy. This blog post covered how to make a delicious yogurt parfait. You learned about key ingredients like Greek yogurt, fresh berries, and granola. I shared easy steps for layering the parfait and tips for perfecting texture. You also discovered variations and storage tips to keep everything fresh. Now, get creative! Experiment with different flavors and ingredients. Enjoy making this healthy treat your own. You can impress friends or family with simple, tasty parfaits.

Looking for a quick, tasty breakfast or snack? This Blueberry Greek Yogurt Parfait is your answer! With creamy Greek yogurt, vibrant blueberries, and crunchy granola, it’s an energizing treat. In …

Read more

Categories Breakfast

Creamy Parmesan Chicken Pasta Simple and Tasty Meal

August 25, 2025 by Chef Luca
- Chicken and Pasta Essentials - 2 boneless, skinless chicken breasts, cubed - 8 oz penne pasta - Creamy Sauce Components - 1 cup heavy cream - 1 cup grated Parmesan cheese - 3 cloves garlic, minced - Seasoning and Garnish Options - 2 tablespoons olive oil - Salt and pepper to taste - 1 teaspoon Italian seasoning - ¼ teaspoon red pepper flakes (optional) - Fresh parsley, chopped (for garnish) For this dish, you need chicken, pasta, and a creamy sauce. The penne pasta is perfect for holding the sauce. The chicken adds protein, and the heavy cream and Parmesan cheese give it a rich flavor. You can spice it up with garlic, Italian seasoning, and red pepper flakes. Fresh parsley is great for garnish and adds color. Make sure to have all these ingredients ready. This will help you cook faster and enjoy your meal sooner. You can also try different cheeses or herbs if you want to mix things up. How to Cook Penne Pasta Perfectly To cook penne pasta, start by boiling a pot of water. Add a pinch of salt. This helps flavor the pasta. Add the penne to the boiling water. Cook it for about 10-12 minutes. You want it to be al dente, which means it should be firm but not hard. Drain the pasta in a colander. Reserve about half a cup of pasta water for later use. Tips for Reserving Pasta Water When you drain the pasta, be careful not to lose the water. Use a measuring cup to catch the water before it all goes down the drain. This water is starchy and helps thicken the sauce later. Set it aside in a safe spot. Seasoning and Cooking Chicken Breasts Take two boneless, skinless chicken breasts and cut them into cubes. Heat two tablespoons of olive oil in a large skillet over medium heat. Add the chicken cubes to the pan. Season them with salt, pepper, and one teaspoon of Italian seasoning. Cook the chicken for about 5-7 minutes. Look for a golden-brown color to know it’s done. Ensuring the Chicken is Cooked Through To check if your chicken is fully cooked, cut a piece in half. The inside should be white, not pink. If you see pink, cook it a bit longer. Once done, remove the chicken from the skillet and set it aside on a plate. Sautéing Garlic for Flavor In the same skillet, add three minced garlic cloves. Sauté them for about 30 seconds. You want to smell the garlic, but don’t let it burn. This step adds a lot of flavor to your sauce. Whisking in Heavy Cream and Parmesan Lower the heat to medium-low. Pour in one cup of heavy cream and stir well. Let it simmer gently for about 2-3 minutes. Then, gradually whisk in one cup of grated Parmesan cheese. Keep stirring until the cheese melts and the sauce is creamy. If it becomes too thick, add some of that reserved pasta water until it reaches your desired texture. Using Fresh Ingredients Using fresh ingredients makes a big difference. Fresh chicken tastes better than frozen. Fresh spinach adds bright color and flavor. Choose high-quality Parmesan for a richer taste. Fresh garlic gives a strong aroma and boosts flavor. Adjusting Seasoning to Taste Taste as you cook. Add salt and pepper bit by bit. This helps you find the right balance. If you like spice, add red pepper flakes. Fresh herbs like parsley can also brighten the dish. Adjusting Sauce Thickness You want a creamy sauce that clings to the pasta. If it’s too thick, add reserved pasta water. Start with a little, then stir well. This helps you control the texture. A good sauce coats but does not drown. Alternative Cheese Suggestions While Parmesan is great, try other cheeses too. Romano gives a sharper bite. For a milder taste, use mozzarella. Mixing cheeses can create unique flavors. Just remember to adjust salt if you use a salty cheese. Meal Prep Prep ingredients in advance to save time. Chop chicken and garlic ahead of time. Wash and dry spinach so it’s ready to go. Cooked pasta can be stored in the fridge for a quick meal later. Using Cooked Chicken Using cooked chicken can save even more time. You can use rotisserie chicken for flavor. Just shred it and add it to the sauce. This speeds up your cooking and makes it easier to enjoy your meal. {{image_2}} Gluten-Free Pasta Options If you need a gluten-free version, use rice or quinoa pasta. These options cook well and hold the sauce nicely. They also provide a similar texture to traditional penne. Dairy-Free Alternatives For a dairy-free dish, try coconut cream or almond milk instead of heavy cream. Nutritional yeast can replace Parmesan cheese for a cheesy flavor without dairy. Adding Vegetables (Mushrooms, Peas) You can add vegetables to boost nutrition. Sauté mushrooms with the garlic for a rich taste. Toss in peas for a sweet pop of flavor. Protein Alternatives (Shrimp, Tofu) If you want to swap proteins, shrimp cooks quickly and pairs well with the sauce. Tofu is a great plant-based choice. Just sauté it until golden and firm. Incorporating Other Herbs and Spices Feel free to mix herbs into the dish. Basil, oregano, or thyme can add fresh notes. Experimenting with different herbs makes the dish exciting and unique. Adding Heat with Red Pepper Flakes If you like a kick, add red pepper flakes. A little goes a long way. It adds warmth and balances the creaminess of the sauce. To store leftovers, place the creamy parmesan chicken pasta in an airtight container. Make sure it cools to room temperature before sealing. This helps keep it fresh longer. You can store it in the fridge for up to three days. When reheating, use a skillet for best results. Add a splash of water or cream to keep it moist. Heat over low to medium heat, stirring often until warmed through. To freeze creamy parmesan chicken pasta, let it cool completely. Transfer it to a freezer-safe container. Make sure to leave some space for expansion. You can freeze it for up to three months. When you're ready to eat it, thaw the pasta in the fridge overnight. For the best texture, reheat it on the stove. Add a little cream or water while heating. This helps restore the creamy sauce. In the fridge, creamy parmesan chicken pasta lasts about three days. In the freezer, it can stay good for up to three months. Always check for any off smells or changes in texture before eating. Keeping an eye on these signs helps ensure your meal stays tasty and safe. Can I use a different type of pasta? Yes, you can use any pasta you like. Penne works well, but spaghetti or fettuccine are great too. Just cook it al dente, like the recipe says. Is it possible to make this dish ahead of time? You can prep the chicken and sauce in advance. Just cook the pasta fresh when ready to serve. This keeps the pasta from getting mushy. What can I substitute for heavy cream? You can use half-and-half or whole milk mixed with butter. This will give you a creamy texture. Coconut cream is a good dairy-free option too. Can I bake this dish instead of cooking it on the stove? Yes, you can bake it! After mixing everything in an oven-safe dish, bake it at 350°F for 20 minutes. This adds a nice golden touch to the top. What goes well with Creamy Parmesan Chicken Pasta? A fresh salad pairs nicely. Garlic bread is also a favorite. You can even serve it with roasted vegetables for more color. How do I make this dish more filling? Add more protein like shrimp or sausage. You can also mix in veggies like broccoli or peas. This not only fills the dish but adds great flavor too. In this post, we explored making Creamy Parmesan Chicken Pasta. You learned the key ingredients, step-by-step cooking tips, and ways to enhance flavor. We also discussed variations, storage info, and answered common questions. Remember, this dish is versatile and easy to customize. Try different ingredients and flavors to make it your own. With these tips, you can enjoy a delicious meal that fits your needs perfectly. Happy cooking!

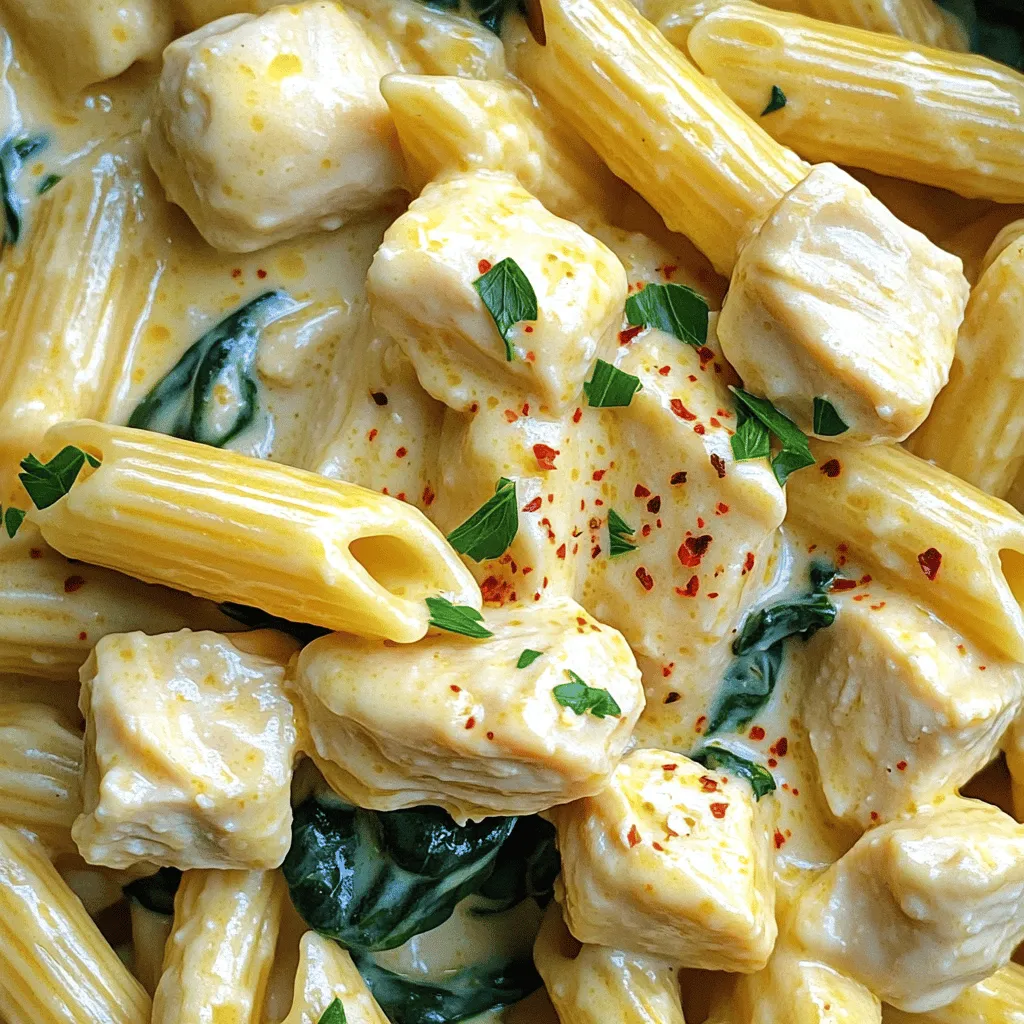
If you’re searching for a quick and tasty dinner, look no further! Creamy Parmesan Chicken Pasta is simple to make and absolutely delicious. With just a few ingredients, you can …

Read more

Categories Dinner

Gooey Apple Brownies Irresistible Homemade Delight

August 25, 2025 by Chef Luca
To make gooey apple brownies, you need these simple ingredients: - 2 large apples, peeled, cored, and diced - 1 cup unsalted butter (2 sticks) - 1 cup brown sugar, packed - 1 cup granulated sugar - 4 large eggs - 2 teaspoons vanilla extract - 1 cup all-purpose flour - 1 cup cocoa powder - 1 teaspoon baking powder - 1/2 teaspoon salt - 1 teaspoon ground cinnamon - 1/2 cup chopped walnuts (optional) - Powdered sugar for dusting (optional) Each ingredient plays a key role in creating the perfect texture and flavor. The apples bring moisture and sweetness. Butter adds richness, while sugars give that lovely sweetness. Eggs help bind everything together, creating a nice, chewy brownie. The cocoa powder gives a deep chocolate flavor, and the baking powder helps it rise. Cinnamon adds warmth and spice, making these brownies even more inviting. If you like a crunch, toss in some walnuts. For a sweet finish, powdered sugar is a lovely touch. Gather these ingredients, and you are ready to create a delicious treat! - Preheat your oven to 350°F (175°C). - Grease a 9x13-inch baking pan or line it with parchment paper. - In a medium saucepan, melt 1 cup of unsalted butter over low heat. - Once melted, take it off the heat and let it cool a bit. - Grab a large mixing bowl. Mix the melted butter, 1 cup of brown sugar, and 1 cup of granulated sugar. Stir until it is smooth. - Add 4 large eggs to the mixture, one at a time. - Mix well after each egg. - Then stir in 2 teaspoons of vanilla extract. - In a separate bowl, sift together 1 cup of all-purpose flour, 1 cup of cocoa powder, 1 teaspoon of baking powder, 1/2 teaspoon of salt, and 1 teaspoon of ground cinnamon. - Gradually add this dry mix into the wet ingredients. Stir until just combined. - Fold in 2 large apples, peeled, cored, and diced. - If you like, add 1/2 cup of chopped walnuts. Ensure both are evenly mixed in. - Pour the brownie batter into your prepared pan. Smooth the top using a spatula. - Bake for 25-30 minutes. Check with a toothpick. It should come out with a few moist crumbs. - Let the brownies cool in the pan for 15 minutes on a wire rack before cutting. - For a sweet touch, dust with powdered sugar before serving. To get that perfect gooey texture, follow these steps: - Use fresh apples: Fresh apples add moisture and flavor. - Do not overmix: Mix until just combined to keep brownies soft. - Check for doneness: Insert a toothpick; it should have a few moist crumbs. - Reduce baking time: If unsure, take them out early. Overbaking can ruin your brownies. They need to be soft in the center. Aim for a baking time of 25-30 minutes. Keep an eye on them! If you need alternatives, here are some easy swaps: - Brown Sugar: You can use coconut sugar or maple sugar instead. - Granulated Sugar: Try using honey or agave syrup for a healthier option. - Flour: Almond flour or oat flour work great for a gluten-free version. - Nuts: If you don't have walnuts, pecans or hazelnuts are fantastic. These swaps can change the flavor and texture, so feel free to experiment! How you serve your brownies can make them even more special: - Dust with Powdered Sugar: A light sprinkle adds charm and sweetness. - Serve warm: Warm brownies taste amazing with a scoop of ice cream. - Use fun plates: Present them on colorful dishes to make them pop. These simple tips help make your gooey apple brownies a hit at any gathering! {{image_2}} You can easily change the flavor of Gooey Apple Brownies. Adding chocolate chips makes them richer. Use about a cup of chocolate chips for a sweet twist. Caramel is another great option. Drizzle melted caramel on top before baking. This gives a nice sticky layer. You can also swap in seasonal fruits. Try diced pears or peaches for a fresh taste. Berries like raspberries or blueberries can add a zing. Always keep the diced fruit to about two cups. This ensures the brownies stay gooey and moist. If you need gluten-free brownies, you can make a simple switch. Use gluten-free flour instead of all-purpose flour. This helps keep the texture while avoiding gluten. Make sure to check the label for a good blend. For a vegan version, replace the eggs with flax eggs. To make one, mix one tablespoon of ground flaxseed with three tablespoons of water. Let it sit for five minutes until it thickens. You can also use coconut oil in place of butter. This adds a nice flavor while keeping it dairy-free. Pairing these brownies with ice cream is a great idea. Vanilla ice cream works well with the gooey texture. The cold ice cream melts into the warm brownies. This creates a delicious contrast. You can also make a brownie sundae. Start with a warm brownie, add ice cream, and drizzle chocolate sauce on top. Finish with whipped cream and a cherry. It makes a fun and tasty dessert for any occasion! To keep your gooey apple brownies fresh, store them in an airtight container. This helps lock in moisture and flavor. If you want to keep them longer, freeze them. To freeze, wrap each brownie tightly in plastic wrap and place them in a freezer bag. They can last up to three months in the freezer. To revive leftover brownies, preheat your oven to 350°F (175°C). Place brownies on a baking sheet and warm them for about 5 to 10 minutes. You can also use the microwave. Heat each brownie for about 15-20 seconds. Warm brownies taste best, but cold brownies can be good, too. It depends on your mood. At room temperature, brownies last about three to four days. Keep them in a cool, dry place. If you store them in the fridge, they can last up to a week. Just remember to seal them well to avoid drying out. What are the best apples for baking? The best apples for baking are firm and sweet. I recommend using Granny Smith, Honeycrisp, or Fuji apples. These apples hold their shape and add a nice flavor. Their sweetness balances well with the rich brownie taste. Can I make Gooey Apple Brownies ahead of time? Yes, you can make these brownies ahead of time. Bake them and let them cool completely. Store them in an airtight container. They stay fresh for up to four days at room temperature. You can also freeze them for longer storage. Why are my brownies too dry? Brownies can dry out for a few reasons. Overbaking is the most common issue. Always check for doneness using a toothpick. If it comes out with a few moist crumbs, they are ready. Also, make sure you use the right amount of butter for moisture. How can I tell when they are done baking? To check if your brownies are done, insert a toothpick into the center. If it comes out with moist crumbs, they are done. If it has wet batter, give them a few more minutes. Avoid overbaking to keep that gooey texture. Calories per serving Each brownie has about 250 calories. This can vary based on your ingredients. If you add walnuts or powdered sugar, the calorie count may rise. Allergens to be aware of These brownies contain common allergens. They have eggs, butter, and nuts. If someone has a nut allergy, you can skip the walnuts. Always check your ingredients for specific allergens. Gooey Apple Brownies combine the sweet crunch of apples with rich chocolate. We covered key ingredients, step-by-step mixing, and baking tips to ensure great texture. You learned about variations, storage, and how to adapt recipes for dietary needs. In closing, baking these brownies will surely delight everyone. Follow the tips, make it your own, and enjoy sharing this treat. Your kitchen adventures will yield warm memories alongside delicious brownies.

Are you ready to sink your teeth into a sweet, gooey treat? These Gooey Apple Brownies are an irresistible homemade delight that combines rich chocolate with tender apples. I’ll take …

Read more

Categories Desserts
Older posts
Newer posts
← Previous Page1 … Page39 Page40 Page41 … Page122 Next →

STIRRED RECIPES

Where every dish begins with a stir! 🍲✨

PAGES

Home About Contact Privacy Policy Terms & Conditions Cookie Policy GDPR Policy Copyright Policy Disclaimer

CATEGORIES

Appetizers Desserts Salads Breakfast Dinner

Contact

  • Pinterest
  • Mail
Copyright © 2026 Stirred Recipes. All rights reserved.