Skip to content
Stirred Recipes
  • Home
  • Appetizers
  • Desserts
  • Salads
  • Breakfast
  • Dinner
  • Privacy Policy
  • Contact
  • About

Chef Luca

Lemon Pepper Salmon & Green Beans Sheet Pan Delight

November 5, 2025 by Chef Luca
For this dish, you need four salmon fillets. Each fillet should weigh about six ounces. Look for fresh salmon with bright color and no strong smell. This ensures a tasty meal. You will need one pound of fresh green beans. Trim both ends before cooking. Fresh green beans provide a nice crunch and color to your plate. To make the dish shine, gather these items: - 3 tablespoons olive oil - 1 tablespoon lemon zest - 2 tablespoons fresh lemon juice - 1 teaspoon black pepper - 1 teaspoon garlic powder - Salt to taste - 1 teaspoon dried thyme - Lemon slices for garnish - Fresh parsley, chopped for garnish This mix of flavors creates a bright and zesty taste. The lemon juice and zest give it a fresh kick. Garlic powder adds depth, while thyme brings an earthy note. The olive oil keeps everything moist and adds richness. Start by gathering all your ingredients. You need: - 4 salmon fillets (about 6 oz each) - 1 lb fresh green beans, trimmed - 3 tablespoons olive oil - 1 tablespoon lemon zest - 2 tablespoons fresh lemon juice - 1 teaspoon black pepper - 1 teaspoon garlic powder - Salt to taste - 1 teaspoon dried thyme - Lemon slices (for garnish) - Fresh parsley, chopped (for garnish) Next, preheat your oven to 400°F (200°C). This step is key for the perfect roast. Line a large sheet pan with parchment paper. It makes cleanup easy and helps your food not stick. In a small bowl, combine olive oil, lemon zest, lemon juice, black pepper, garlic powder, salt, and dried thyme. Mix well. This mixture will add great flavor to your salmon and beans. Now, place the salmon fillets on one side of the sheet pan. Brush each fillet with the lemon pepper mixture. Make sure to coat them well for maximum flavor. In another bowl, take the trimmed green beans. Toss them with the remaining lemon pepper mixture. Ensure they are well-coated too. This step ensures the beans get that tasty lemon flavor. Spread the green beans on the other side of the sheet pan. Lay them out in a single layer. This allows them to roast nicely. Put the sheet pan in the preheated oven. Roast everything for about 15-20 minutes. The salmon should flake easily with a fork. The green beans should be tender-crisp. After cooking, take the sheet pan out and let it rest for about 2 minutes. This helps the flavors settle. Now it’s time to plate your dish. Serve the salmon and green beans together on a large plate. For a lovely touch, garnish with lemon slices and chopped fresh parsley. This adds color and makes the dish look fancy. Enjoy your Lemon Pepper Salmon & Green Beans! To cook salmon well, use high heat. I like roasting at 400°F (200°C). This method keeps the fish moist. It also gives a nice crust on the outside. Always check for doneness. Salmon should flake easily with a fork. If it does, it's ready! For green beans, start with fresh ones. Trim off the ends for a neat look. Toss them in the same lemon pepper mix as the salmon. Spread them out on the pan. This helps them cook evenly. Roast them until they are tender but still crisp. A bright green color means they are perfect! Lemon zest and juice add bright flavor. Black pepper gives a nice kick. Garlic powder adds depth. Dried thyme brings earthiness. You can also use fresh herbs for more taste. Try adding dill or basil for a twist. Don't forget to garnish with lemon slices and parsley! They make the dish look great too. {{image_2}} You can swap out green beans for other veggies. Try asparagus, zucchini, or bell peppers. These veggies cook well and taste great with lemon and salmon. Just cut them to a similar size as the green beans. This way, they all cook evenly. Toss them in the same lemon pepper mix for extra flavor. If you want to change the flavor, try different spices. You can use smoked paprika for a warm taste. Or add some cumin for a bit of earthiness. You could even use fresh herbs like dill or basil. These changes will give you new flavors without much effort. Just remember to keep the lemon for that fresh zing. You don't have to use the oven for this dish. You can grill the salmon for a smoky flavor. Preheat the grill and cook the salmon for about 6-8 minutes per side. You can also pan-sear the salmon for a crispy skin. Use a hot skillet and add some oil before placing the salmon in. Each method brings out unique tastes. Choose what fits your mood best! After enjoying your Lemon Pepper Salmon and green beans, proper storage is key. First, let the dish cool to room temperature. This helps prevent condensation in your storage container. Use an airtight container to keep the salmon and green beans fresh. If you store them together, they can last for up to three days in the fridge. Make sure to keep the salmon away from strong-smelling foods. This helps keep its flavor intact. When you are ready to enjoy leftovers, you have a few options. The best way to reheat is in the oven. Preheat it to 350°F (175°C). Place the salmon and beans on a baking sheet. Heat for about 10-15 minutes or until warmed through. You can also use a microwave. Just place the food on a microwave-safe plate. Heat it for 1-2 minutes. Check to ensure it is hot all the way through. If you want to keep your meal longer, freezing is a great option. Wrap each salmon fillet and green beans separately in plastic wrap. Then, place them in a freezer bag. Squeeze out as much air as you can. This helps prevent freezer burn. You can store them in the freezer for about three months. When you are ready to eat, thaw them overnight in the fridge. Then, reheat them following the instructions above. You should cook the salmon for about 15 to 20 minutes. This timing works well at 400°F (200°C). The salmon is done when it flakes easily with a fork. Keep an eye on it to avoid overcooking. It can dry out if left too long. Yes, you can use frozen salmon fillets. Just make sure to thaw them first. You can do this by leaving them in the fridge overnight or using cold water. After thawing, pat them dry to remove excess moisture. This helps the seasoning stick better. Then, follow the same recipe steps. You can serve many sides with this dish. Here are some ideas: - Rice or quinoa for a hearty base - A fresh salad for a light touch - Roasted potatoes for extra flavor - Garlic bread for a tasty crunch These options can help round out your meal and add variety. Enjoy mixing and matching to find your favorite pairings! In this post, I covered how to prepare a delicious meal with salmon and green beans. We discussed ingredients, cooking steps, and plating tips. I also shared tricks for perfecting your salmon and green beans. Don’t forget about variations and storage options to keep meals fresh and flavorful. Cooking can be fun and easy with the right approach. Try these tips and enjoy a tasty and healthy dish any night of the week.

Are you ready for a quick and tasty meal? My Lemon Pepper Salmon & Green Beans Sheet Pan Delight is the answer! This dish combines juicy salmon with fresh green …

Read more

Categories Dinner

Caramel Apple Cheesecake Overnight Oats Delight

November 5, 2025 by Chef Luca
- 1 cup rolled oats - 1 cup unsweetened almond milk (or any milk of choice) - 1 medium apple, diced (preferably a sweet variety like Honeycrisp) - 1/2 cup cream cheese, softened - 1/4 cup Greek yogurt - 2 tablespoons maple syrup (or honey) - 1/2 teaspoon vanilla extract - 1/4 teaspoon cinnamon - Pinch of salt - 3 tablespoons caramel sauce (store-bought or homemade) - Chopped nuts for topping (walnuts or pecans, optional) You can change the flavor and look of your oats easily. Here are some ideas: - Use different apples like Granny Smith for a tart taste. - Swap maple syrup for agave nectar for a lighter sweetness. - Add dried fruits such as raisins or cranberries for extra chewiness. - Mix in a scoop of protein powder to boost the nutrients. This recipe makes two servings. Each serving has roughly: - Calories: 300 - Protein: 9 grams - Fat: 12 grams - Carbs: 40 grams - Fiber: 5 grams These oats are a great start to your day. They give you energy and keep you full! You can enjoy them knowing they provide good nutrition. First, grab a large mixing bowl. In this bowl, combine 1 cup of rolled oats, 1 cup of unsweetened almond milk, and 1 medium diced apple. I like to use a sweet apple, like Honeycrisp, for the best flavor. Stir the mixture well until everything blends together nicely. Next, take another bowl to prepare the cream cheese layer. Add 1/2 cup of softened cream cheese, 1/4 cup of Greek yogurt, 2 tablespoons of maple syrup, 1/2 teaspoon of vanilla extract, 1/4 teaspoon of cinnamon, and a pinch of salt. Mix these ingredients until the mixture is smooth and creamy. Now, gently fold the cream cheese mixture into the oat and apple mixture. Make sure everything blends well without over-mixing. This step is key to having a light texture. Divide the mixture into individual jars or containers. Leave some space at the top for the toppings. Drizzle 3 tablespoons of caramel sauce evenly over each jar. Save some caramel for later, as it adds a lovely touch when serving. Cover the jars tightly with lids or plastic wrap. Place them in the fridge overnight, or at least for 4 hours. This chilling time allows the oats to soften and the flavors to meld together. When mixing, start slow. This way, you avoid splashes and mess. Use a spatula to fold in the cream cheese mixture. This helps keep the oats light. If you find any lumps in the cream cheese, just keep mixing gently until smooth. Add a bit of patience here. It’s worth it for a creamy texture. If you want to add more flavor, feel free to toss in some chopped nuts or extra spices. After chilling, take the jars out of the fridge. Give the oats a quick stir to mix everything back together. For serving, top with more diced apples, a drizzle of leftover caramel sauce, and some chopped nuts if you like. For a fun presentation, serve the oats in clear jars. This shows off the beautiful layers of apple, cream, and caramel. You can also add a sprig of mint or a small apple slice on top for a nice touch. Enjoy your delicious caramel apple cheesecake overnight oats! To get creamy oats, always soak them long enough. Use rolled oats for the best texture. They absorb the liquid well and stay chewy. If you prefer a thicker mix, add a bit more oats. For extra creaminess, use full-fat milk or add more yogurt. Stir the mix well to avoid clumps. Store leftovers in airtight jars or containers. Keep them in the fridge for up to three days. If you want to save some for later, don't add toppings yet. Just keep the oats plain, and add toppings when ready to eat. This keeps the nuts crunchy and the apples fresh. A common mistake is not letting the oats soak long enough. They need time to soften. Don't skip the salt; it enhances the flavors. Avoid using too much caramel sauce right away. It can make your oats too sweet if you add it all before serving. Lastly, don’t forget to mix well! It helps blend all the flavors together. {{image_2}} You can easily change the flavor of your overnight oats. For a pumpkin spice twist, add 1/4 cup of pumpkin puree. Mix in 1 teaspoon of pumpkin pie spice instead of cinnamon. This gives a warm and cozy taste. If you love chocolate, try adding 2 tablespoons of cocoa powder. You can also top with chocolate chips for a sweet finish. You can swap almond milk for other types of milk. Try oat milk, coconut milk, or regular cow's milk. Each will give a different taste. For sweeteners, use honey, agave syrup, or even stevia. Adjust the amount based on your sweetness preference. This way, you can enjoy your oats just how you like them. If you have nut allergies, skip the nuts on top. You can use sunflower seeds or pumpkin seeds instead. For a dairy-free option, replace cream cheese with a dairy-free version or use mashed banana to keep it creamy. Greek yogurt can also be swapped with a dairy-free yogurt. This keeps your oats tasty while meeting dietary needs. To keep your caramel apple cheesecake overnight oats fresh, store them in the fridge. They can last up to 5 days in the refrigerator. Make sure to cover them well with lids or plastic wrap. This helps to lock in the flavors and keeps them creamy. You can freeze your overnight oats, but the texture may change. If you want to freeze them, place the oats in freezer-safe containers. They can stay fresh for up to 3 months. When you're ready to eat, thaw them in the fridge overnight. I recommend using glass jars or BPA-free plastic containers. Clear jars are great because you can see the layers of oats, apple, and caramel. Make sure the jars have tight lids. This helps keep your oats fresh and prevents any spills. You can store overnight oats in the fridge for up to five days. This makes them a great option for meal prep. Just ensure you keep them in a sealed jar or container. The flavors deepen as they sit, making them even more delicious. Yes, you can use quick oats instead of rolled oats. Quick oats will soften faster, so your oats might be creamier. Just keep in mind that they may not hold their shape as well as rolled oats. If you like a smoother texture, quick oats work great in this recipe. If you want a substitute for cream cheese, try using Greek yogurt or silken tofu. Both options will give you a creamy texture. Greek yogurt adds protein, while silken tofu makes it dairy-free. Mix them well to ensure a smooth consistency. We covered the key ingredients and steps to make creamy oats. You learned how to customize flavors and store leftovers. I shared tips to avoid common mistakes. Experiment with different flavors and enjoy the benefits of perfect oats. With these insights, you can make delicious overnight oats that suit your taste. Happy cooking!

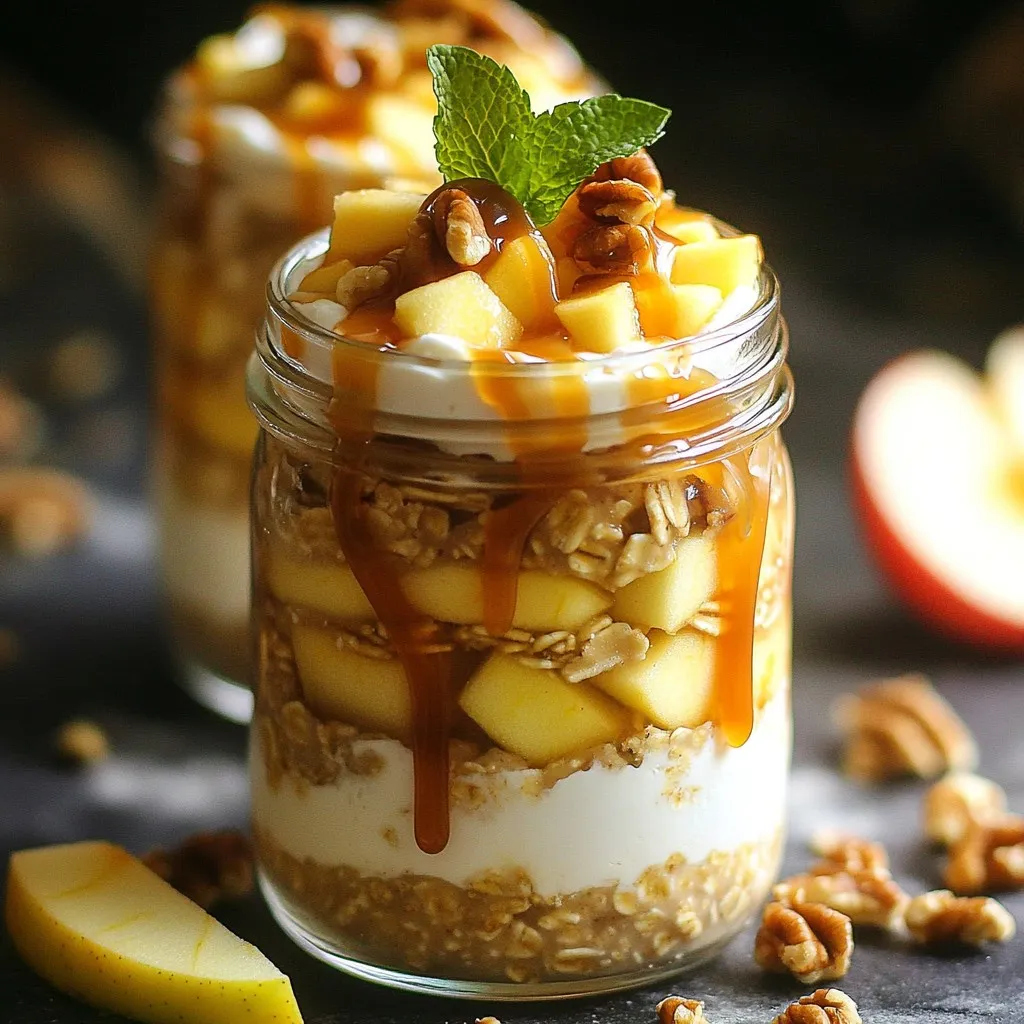
Are you ready to whip up a delicious breakfast that tastes like dessert? My Caramel Apple Cheesecake Overnight Oats Delight is the perfect blend of sweet and creamy flavors. With …

Read more

Categories Breakfast

No-Bake Lemon Blueberry Cheesecake Bars Delight

November 3, 2025 by Chef Luca
- 1 ½ cups graham cracker crumbs - ½ cup unsalted butter, melted - 1 cup cream cheese, softened - ½ cup powdered sugar - 2 tablespoons lemon juice - Zest of 1 lemon - 1 cup heavy cream - 1 cup fresh blueberries - 1 tablespoon honey (optional, for drizzling) Gather these ingredients before you start. The graham cracker crumbs form a tasty crust. Unsalted butter helps bind them. Cream cheese gives that rich, creamy texture. Powdered sugar adds sweetness. Lemon juice and zest bring a bright, fresh flavor. Heavy cream adds lightness. Fresh blueberries add a pop of color and taste. Honey is optional but can enhance sweetness. - Mixing bowls - Spatula - Electric mixer - 8x8 inch baking pan - Parchment paper You’ll need a few tools for this recipe. Mixing bowls help you combine ingredients. A spatula is perfect for spreading the cream cheese mix. An electric mixer makes beating the cream cheese easy. The 8x8 inch baking pan holds the bars. Parchment paper helps with easy removal after chilling. Having these items ready will make your cooking process smooth. To start, gather your graham cracker crumbs and melted butter in a bowl. Mix them until crumbly. This step is key for a great crust. Next, press the mixture firmly into the bottom of a parchment-lined 8x8 inch baking pan. Make sure it’s even and compact. This forms the base for your tasty bars. In a new bowl, beat together the softened cream cheese and powdered sugar. Mix until smooth and creamy. This creates a rich base for the filling. Now, add the lemon juice and zest. Stir until combined and airy. In another bowl, whip the heavy cream until stiff peaks form. This adds lightness to your filling. Gently fold the whipped cream into the cream cheese mix. Take your time here; you want it smooth and well blended. Once your filling is ready, pour it over the prepared crust. Use a spatula to spread it evenly. This is where the magic begins! Sprinkle the fresh blueberries on top. Gently press them into the cheesecake layer. This adds flavor and color to your bars. Now it’s time to cover your pan with plastic wrap. Refrigerate the bars for at least 4 hours, but overnight is best. This helps them set properly. Once set, take them out and cut into squares. If you like, drizzle honey on top before serving. Enjoy your delicious no-bake lemon blueberry cheesecake bars! To achieve a smooth cheesecake filling, start with softened cream cheese. If it’s cold, your filling will be lumpy. Beat the cream cheese and powdered sugar well until it’s creamy. Add the lemon juice and zest next, mixing until smooth. For whipped cream, whip it until stiff peaks form. This makes your bars light and fluffy. When folding in the whipped cream, do it gently. This keeps the air in, giving you that perfect texture. Present your cheesecake bars on a nice platter. This makes them look more appetizing. You can garnish with extra blueberries and lemon zest. These add color and freshness. For extra sweetness, drizzle honey over the top just before serving. It looks pretty and tastes great. A common mistake is using a dry crust. Make sure to mix the graham cracker crumbs and melted butter well. Press it firmly into the pan to avoid a crumbly base. Another mistake is overmixing the filling. This can make it too thin. Mix just until combined to keep it thick and creamy. Avoid undermixing too; it can leave lumps. Aim for a nice balance to get the best results. {{image_2}} You can switch things up with different fruits. Try strawberries or raspberries for a new taste. Each fruit brings its own flavor, making the bars unique. You can also add chocolate or vanilla extract. A little chocolate can give a rich twist. Vanilla extract adds warmth and depth to the cheesecake flavor. If you need a gluten-free option, use gluten-free graham crackers for the crust. This keeps the bars tasty for everyone. You can also try alternative sweeteners. For less sugar, use honey, maple syrup, or stevia. Just adjust the amount based on your taste. These changes help you enjoy the bars while meeting different dietary needs. To keep your no-bake lemon blueberry cheesecake bars fresh, store them in the refrigerator. Use an airtight container to prevent them from absorbing any odors. If you want to freeze them, wrap each bar in plastic wrap and then place them in a freezer-safe bag. This method helps keep them tasty for longer. These cheesecake bars will last about five days in the fridge. Be sure to check for any signs of spoilage before eating. If frozen, they can last up to three months. Just thaw them in the fridge overnight before enjoying. Yes, you can make these cheesecake bars ahead of time. In fact, it helps the flavors meld well. Prepare the bars and refrigerate them for at least four hours. For best results, let them chill overnight. This makes the bars firm and easy to cut. You can also store them covered in the fridge for up to three days before serving. If you plan to serve them later, do not add any toppings until just before serving. If your filling isn't setting, there could be a few reasons. First, ensure you whipped the heavy cream until stiff peaks form. This helps provide structure. If you under-mix the filling, it may not set well. Another reason could be the cream cheese. It should be softened but not too warm. If it’s too soft, the filling will be runny. Lastly, make sure you let the bars chill long enough. They need at least four hours, but overnight is best. Yes, you can use different types of cream cheese. Low-fat cream cheese works well if you want fewer calories. It may alter the texture slightly but should still taste great. You can also try flavored cream cheese, like strawberry or blueberry. This adds a fun twist to the bars. Just keep in mind that flavored cream cheese might change the taste. You now have a full guide to making delicious cheesecake bars. We covered everything from the needed ingredients to tips for perfecting the texture. Remember to mix well but avoid overdoing it. Try variations with different fruits or gluten-free crusts if you need options. Keep these bars in the fridge for up to one week. Enjoy your cheesecake bars with fresh toppings to impress everyone. Making these treats is simple and fun; now it's time to share them with friends and family!

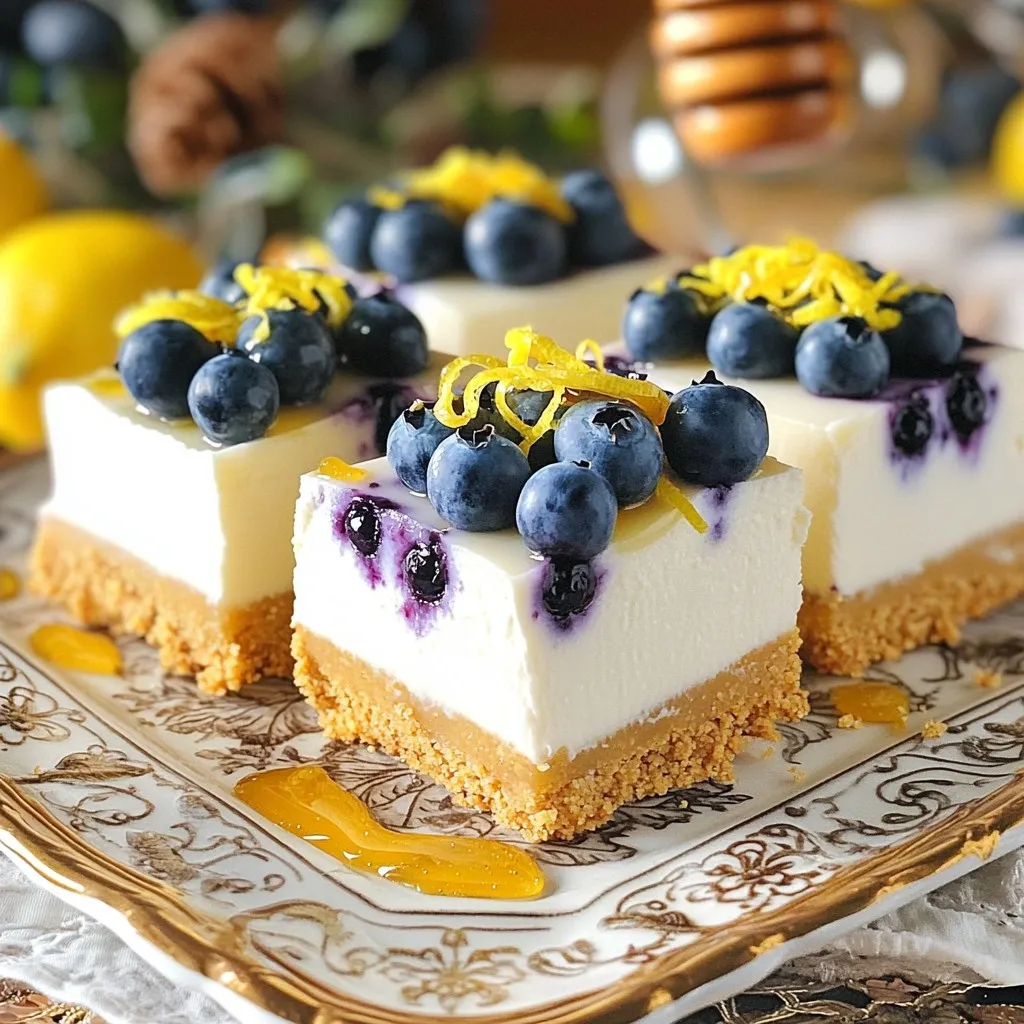
If you’re craving a sweet, refreshing treat with a burst of flavor, you’re in for a real delight! These No-Bake Lemon Blueberry Cheesecake Bars combine creamy, tangy cheesecake with fresh …

Read more

Categories Desserts

Instant Pot Creamy Chicken Alfredo Simple Dinner Recipe

November 3, 2025 by Chef Luca
- 1 lb chicken breast, diced - 2 tablespoons olive oil - 3 cloves garlic, minced - 4 cups chicken broth - 1 pound fettuccine pasta - 1 cup heavy cream - 1 cup grated Parmesan cheese - 1 teaspoon salt - ½ teaspoon black pepper - 1 teaspoon Italian seasoning - Fresh parsley, chopped (for garnish) The base of this dish is simple yet flavorful. Start with 1 pound of chicken breast, diced into small pieces. This chicken adds protein and makes the meal filling. The olive oil, 2 tablespoons, helps brown the chicken. Next, we use 3 cloves of minced garlic. Garlic gives this dish its rich aroma and taste. A key flavor booster is 4 cups of chicken broth, which keeps everything moist while cooking. The pasta you need is 1 pound of fettuccine. It pairs perfectly with creamy sauces. For the creamy goodness, 1 cup of heavy cream is essential. Don’t forget the cheese! 1 cup of grated Parmesan cheese brings that classic Alfredo flavor. For seasoning, you'll need 1 teaspoon of salt, ½ teaspoon of black pepper, and 1 teaspoon of Italian seasoning. Finally, for a touch of freshness, add chopped parsley as a garnish. This not only looks nice but also adds a pop of flavor. Each ingredient plays a role in creating a delicious creamy chicken Alfredo. Enjoy gathering these simple ingredients for a great meal! - Set Instant Pot to sauté mode - Brown diced chicken for 5 minutes First, I turn on the Instant Pot and set it to sauté mode. I add two tablespoons of olive oil to the pot. Next, I toss in one pound of diced chicken breast. I let it cook for about five minutes. I stir it occasionally until it turns nice and brown. This step adds flavor and texture to the chicken. - Sauté minced garlic for 1 minute After the chicken is browned, I add three cloves of minced garlic. I sauté the garlic for just one minute. This step fills the kitchen with a lovely smell. It makes the dish even more delicious. - Pour in chicken broth and add pasta Now, I pour in four cups of chicken broth. Then, I add one pound of fettuccine pasta. I make sure the pasta is fully submerged in the broth. I avoid stirring at this point to keep the pasta from clumping together. - Close lid, set to sealing, cook for 8 minutes Next, I close the Instant Pot lid and set the valve to sealing. I select the manual or pressure cook option and set the timer for eight minutes. This cooking time is perfect for the pasta and chicken to become tender. - Quick release the pressure, open lid When the cooking cycle is complete, I carefully perform a quick release of the pressure. I wait for the steam to escape before I open the lid. This step is important for safety. - Mix in heavy cream, Parmesan, salt, and spices Once the lid is off, I switch the Instant Pot back to sauté mode. Then, I stir in one cup of heavy cream and one cup of grated Parmesan cheese. I also add one teaspoon of salt, half a teaspoon of black pepper, and one teaspoon of Italian seasoning. I mix well until the cheese melts and the sauce becomes smooth. - Add broth or cream to adjust the sauce If the sauce seems too thick, I can add a splash of chicken broth or cream. This helps reach my desired sauce consistency. I want it creamy but not too heavy. - Garnish with parsley and serve hot Finally, I serve the dish hot. I garnish it with freshly chopped parsley for color and flavor. This adds a nice touch to my creamy chicken Alfredo. To get a smooth and creamy sauce, add the heavy cream slowly. This helps it mix well. If you pour it all at once, it may clump. Stir gently as you add it in. This keeps the sauce silky and lovely. When cooking the pasta, make sure it is fully submerged in the broth. Do not stir it right away. This step helps avoid clumping. If you do mix it, the pasta may stick together. You can adjust the cooking time based on how you like your pasta. If you want it softer, add a minute or two. For firmer pasta, stick to the eight minutes. Also, if you prefer a thicker sauce, use less broth. If you like it thinner, add a splash more of broth or cream. Find the balance that works for you. Always check that the lid is sealed properly before cooking. This ensures the pot builds pressure. For a quick release, turn the valve carefully. Keep your hands clear of the steam. Avoid common mistakes, like not adding enough liquid. This can cause the pot to burn food. Always follow the recipe's liquid guidelines for the best results. {{image_2}} You can swap chicken for shrimp or tofu. Shrimp cooks quickly, just a few minutes. For shrimp, cook for about 2-3 minutes on high pressure. Tofu needs a bit longer, around 5 minutes, to soak up flavors. Always ensure proteins cook until safe. Adding vegetables makes this dish even better. Spinach and mushrooms work great. Just add them before the pressure cooking step. You can also enhance flavors with sun-dried tomatoes or artichokes. These extras give your dish a tasty twist. You can try different cheeses for a new taste. Mozzarella or goat cheese can add creaminess. If you need non-dairy options, use cashew cream or nutritional yeast. These can mimic the taste without dairy, perfect for those with dietary needs. To store leftovers, let them cool first. Place the creamy chicken Alfredo in an airtight container. Glass or plastic containers work well. Make sure to seal the lid tightly. This keeps the dish fresh for up to three days. You can freeze creamy chicken Alfredo, but it may change texture. Use freezer-safe containers or bags. To freeze, let the dish cool completely. Label the container with the date. When ready to eat, thaw it in the fridge overnight. Reheat on the stove or in the microwave. Add a splash of cream or broth to help restore creaminess. For best taste and safety, use leftovers within three days. If you freeze it, use it within three months. Signs of spoilage include an off smell or changes in color. If you see mold, throw the dish away. Always check your food before eating. Yes, you can make this ahead! To keep it creamy, store the dish in an airtight container. When reheating, use low heat. Stir in a bit of extra cream or broth. This helps maintain the sauce's smoothness. If you lack an Instant Pot, no problem! You can cook this on the stovetop. Start by sautéing the chicken in a large pot. Then add garlic, broth, and pasta. Cook until the pasta is tender. Stir in cream and cheese as in the original recipe. Absolutely! You can add spices and herbs for extra flavor. Try garlic powder, red pepper flakes, or basil. Experiment with your favorites to make the sauce your own! Yes, you can swap heavy cream for lighter options. Use half-and-half or milk for fewer calories. You can also try cashew cream for a dairy-free version. Adjust the amount for desired creaminess. Fettuccine is classic, but you can use other pasta types. Penne or rotini work well too! Just ensure your pasta cooks evenly in the broth. Choose what you love! This blog post showed you how to make creamy chicken alfredo in an Instant Pot. We covered the key ingredients, cooking steps, and tips for the best results. The recipe is easy to follow and allows for plenty of tasty variations. You can even customize this dish to suit your taste. Don't forget to store leftovers properly for later enjoyment. Enjoy cooking and eating this creamy delight!

Looking for a quick and creamy dinner idea? You’ve stumbled upon the perfect recipe! My Instant Pot Creamy Chicken Alfredo is not just simple; it’s packed with rich flavors that …

Read more

Categories Dinner

Cinnamon Apple Crumble Breakfast Bowl Delightful Start

November 3, 2025 by Chef Luca
To create a delicious Cinnamon Apple Crumble Breakfast Bowl, gather these key ingredients: - 2 large apples, peeled and diced - 1 teaspoon ground cinnamon - 2 tablespoons maple syrup - 1 cup rolled oats - ½ cup almond milk (or any milk of choice) - 1 tablespoon chia seeds - ¼ cup walnuts, chopped - 2 tablespoons almond butter (or peanut butter) - 1 tablespoon coconut oil - 1 tablespoon brown sugar (or coconut sugar) - A pinch of salt - Fresh berries (for topping, optional) These ingredients blend well to create a warm, comforting breakfast. The apples provide a sweet and tart base. Ground cinnamon adds a warm spice that makes everything feel cozy. Maple syrup brings natural sweetness, while rolled oats offer a hearty base. You can choose almond milk or any milk you like. Chia seeds boost nutrition and help thicken the oatmeal. The walnuts add a nice crunch, and almond butter gives a creamy touch. Coconut oil adds richness and flavor. Brown sugar enhances sweetness, and a pinch of salt balances the taste. Finally, fresh berries on top add a pop of color and flavor. This mix of ingredients makes each bite a delightful experience. Enjoy the fun of creating this breakfast bowl! Start by melting 1 tablespoon of coconut oil in a medium saucepan over medium heat. Once the oil is melted, add 2 large diced apples to the pan. Stir in 1 teaspoon of ground cinnamon and 2 tablespoons of maple syrup. This mix gives the apples a sweet, warm flavor. Cook the apples for about 5 to 7 minutes. Stir them often until they become soft and caramelized. If you want extra caramelization, let them cook a bit longer. Just keep an eye on them! In another pot, combine 1 cup of rolled oats, ½ cup of almond milk, 1 tablespoon of chia seeds, and a pinch of salt. Bring the mix to a gentle boil on medium heat. Once it starts boiling, lower the heat to low and let it simmer. Stir occasionally for about 5 minutes. You want the oatmeal to be creamy but not too thick. If it gets too thick, you can add a splash more almond milk. While the oatmeal cooks, grab a small bowl. Mix ¼ cup of chopped walnuts with 1 tablespoon of brown sugar. This will create a crunchy topping. For the best crunch, use a fork to break up any big clumps of walnuts. You want even bits for the perfect texture. Once the oatmeal is ready, spoon it into serving bowls. Layer the caramelized apples on top. Then, sprinkle the walnut crumble over everything. For a finishing touch, add a dollop of 2 tablespoons of almond butter on each bowl. If you like, you can also add fresh berries on top for color and flavor. This makes your breakfast bowl look and taste amazing! To get the best caramelized apples, you need the right heat. Start cooking on medium heat. This will help the apples soften but not burn. Stir them often. Cook for about 5 to 7 minutes. You want them soft and golden. If they cook too fast, lower the heat. A gentle simmer works wonders for flavor. For creamy oatmeal, almond milk is your friend. Use ½ cup for this recipe. If you want thicker oatmeal, reduce the milk slightly. If you like it runnier, add more milk. Stir it while it cooks to keep it smooth. Let it simmer for about 5 minutes. This helps the oats absorb the milk well. For a pretty breakfast bowl, use rustic bowls. Start with a base of oatmeal. Then, layer the caramelized apples on top. Next, sprinkle the walnut crumble over everything. A dollop of almond butter adds richness. For color, add fresh berries on top. A light sprinkle of cinnamon finishes it off nicely. This makes your bowl not just tasty but also beautiful! {{image_2}} You can swap out maple syrup for honey or agave syrup. These sweeteners add a nice flavor. If you have nut allergies, use sunflower seed butter instead of almond or peanut butter. This keeps the dish safe while still tasty. Try adding sliced bananas, strawberries, or blueberries on top. These fruits add freshness and flavor. You can also use cashew butter or tahini as different nut butter options. Each adds a unique twist to your bowl. To keep it vegan, ensure your milk choice is plant-based. Almond milk works great, but oat milk can be yummy too. For gluten-free options, choose certified gluten-free oats. They are safe and full of fiber, making your breakfast bowl wholesome and hearty. To keep your Cinnamon Apple Crumble Breakfast Bowl fresh, store it in an airtight container. Place it in the fridge if you plan to eat it within two days. This keeps the oats and apples tasty. If you want to keep it longer, consider freezing components instead. When reheating, do it gently. Use a microwave or a saucepan over low heat. Add a splash of almond milk if it seems dry. Stir often, so it warms evenly. This helps maintain a good texture. You want soft oats and tender apples, not mushy. You can freeze both the apples and the oats. To freeze apples, cool them first. Then, place them in a freezer-safe bag. For oats, let them cool too, then store in a separate bag. When ready to eat, thaw overnight in the fridge before reheating. This method preserves flavor and texture well. I recommend using sweet apples like Fuji or Gala. They add natural sweetness and flavor. Tart apples like Granny Smith can work too, but they will give a different taste. Choose based on your preference for sweet or tangy. Yes, you can! Prepare the apples and oatmeal in advance. Store them in the fridge. When you're ready, just heat them up. This makes busy mornings easier. You can add vanilla extract or nutmeg for extra flavor. If you like it sweeter, add more maple syrup. For a nutty taste, try different nuts or seeds in the crumble. Absolutely! This breakfast bowl is great for meal prep. You can make multiple servings. Just store them in containers. It stays fresh for a few days in the fridge. Yes, you can boost the protein! Add Greek yogurt or protein powder to the oatmeal. Chia seeds also add protein and fiber. This makes your breakfast more filling and nutritious. This breakfast bowl combines delicious and healthy ingredients, like apples, oats, and nuts. We explored step-by-step instructions to cook the apples, prepare oatmeal, and create a crunchy topping. I shared tips for making your dish perfect and suggested tasty variations. Lastly, we covered storage info to keep leftovers fresh. Remember, this breakfast is easy to customize. Feel free to switch ingredients and find what you love. Enjoy making this meal your own!

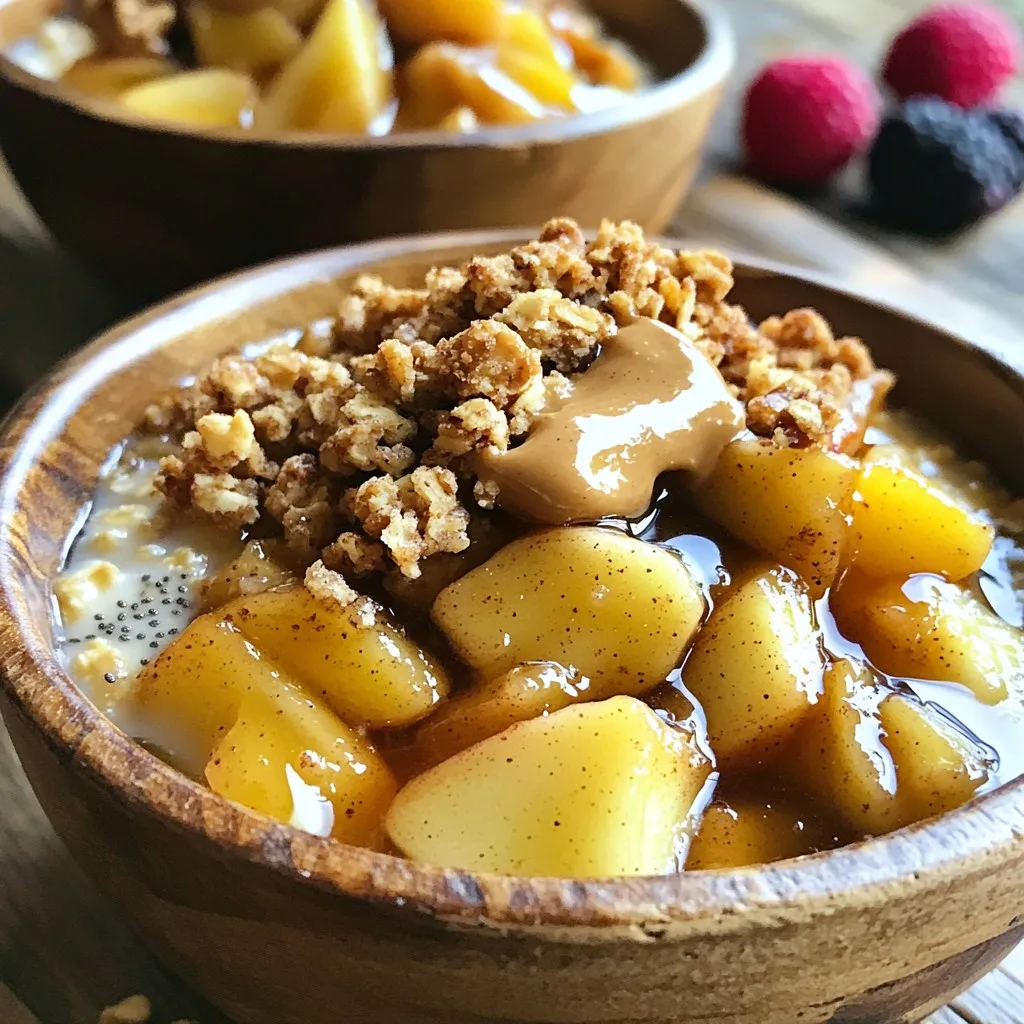
Wake up to a delicious treat with my Cinnamon Apple Crumble Breakfast Bowl! This hearty dish combines sweet apples, warm spices, and creamy oats for the perfect start to your …

Read more

Categories Breakfast

Slow Cooker Tuscan Gnocchi Soup Flavorful and Easy Dish

November 3, 2025 by Chef Luca
This soup is full of flavor and easy to make. Here are the main ingredients you'll need: - 1 lb (450g) potato gnocchi - 4 cups vegetable broth - 1 can (15 oz) diced tomatoes, undrained - 2 cups fresh spinach, chopped - 1 cup carrots, diced - 1 cup kale, chopped (or other leafy greens) - 1 medium onion, diced - 3 cloves garlic, minced - 1 teaspoon dried basil - 1 teaspoon dried oregano - ½ teaspoon red pepper flakes (optional) - Salt and pepper to taste - ½ cup heavy cream (or coconut milk for a dairy-free option) - Grated Parmesan cheese for serving (optional) These ingredients blend well together. The gnocchi adds heartiness. The spinach and kale give it color and nutrition. The tomatoes add a hint of sweetness. You can switch things up in this soup. Here are some ideas: - Add other vegetables like zucchini or bell peppers for more flavor. - Use different greens, like Swiss chard or collard greens. - For a spicy kick, increase the red pepper flakes. - Swap heavy cream for coconut milk for a lighter soup. - Top with fresh herbs like basil or parsley for extra freshness. These options let you make the soup your own. Feel free to mix and match based on what you have at home. Choosing fresh produce makes a big difference. Here’s how to pick the best: - For spinach and kale, look for bright green leaves without brown spots. - Choose carrots that are firm and smooth. Avoid ones that are limp or cracked. - Select tomatoes that feel heavy and have a rich color. - Check onions for dry, papery skin and a heavy feel. Fresh ingredients boost the flavor and nutrition of your soup. Always aim for quality when you shop. Start by chopping the onion, garlic, carrots, and kale. Place them in your slow cooker. Add the canned tomatoes without draining them. This gives the soup extra flavor. Pour in the vegetable broth. It's the base of our soup. Then, add the dried basil, oregano, and optional red pepper flakes. Don't forget to season with salt and pepper. Stir everything well to mix the flavors. Cover the slow cooker with the lid. Set it to low for 6-7 hours or high for 3-4 hours. Cooking on low lets the flavors blend nicely. If you're short on time, the high setting works well too. Just make sure to check the soup toward the end. This way, you can ensure the vegetables are tender. About 30 minutes before serving, stir in the potato gnocchi and chopped spinach. The gnocchi will float when they are ready. This shows they are cooked through. After the gnocchi are done, mix in the heavy cream. Let it cook for an extra 10 minutes. This will make your soup rich and creamy. Taste the soup and adjust the seasoning if needed. To make your Slow Cooker Tuscan Gnocchi Soup pop with flavor, focus on fresh herbs. Fresh basil adds a bright taste. Try adding it at the end for the best flavor. Also, use a good vegetable broth. A rich broth adds depth to the soup. If you like heat, add more red pepper flakes. They boost the soup’s warmth. You can also mix in a splash of lemon juice. This adds a nice zing to the creamy soup. One common mistake is adding the gnocchi too early. They should go in about 30 minutes before serving. If you add them too soon, they may get mushy. Also, don’t skip the heavy cream. It brings a rich texture to the soup. Another mistake is not seasoning enough. Taste your soup before serving. Adjust salt and pepper to make it just right. Serve your soup hot in deep bowls. Add a sprinkle of grated Parmesan cheese on top. It adds a savory touch. You can also garnish with fresh basil or parsley. This gives a pop of color. For a complete meal, pair it with crusty bread. The bread is perfect for dipping. You can even serve a simple salad on the side. A light salad balances the rich soup. Enjoy your meal with a warm drink to make it cozy! {{image_2}} You can easily make this soup gluten-free. Just use gluten-free gnocchi. Many stores sell it now. For a dairy-free twist, swap heavy cream with coconut milk. The coconut milk adds a nice creaminess without any dairy. Feel free to mix up the veggies! You can add zucchini, bell peppers, or even mushrooms. If you want a sweeter taste, try adding sweet potatoes. The soup remains tasty and colorful with any veggie you choose. Need some extra protein? Add cooked chicken, turkey, or sausage. You could also use white beans. They add protein and make the soup filling. Just stir them in about 30 minutes before serving. Each option boosts the flavor and makes your meal more satisfying. To store leftover Slow Cooker Tuscan Gnocchi Soup, let it cool first. Pour the soup into an airtight container. Make sure to leave some space at the top. This helps avoid spills when freezing. Label the container with the date. Store it in the fridge if you plan to eat it soon. For longer storage, put it in the freezer. You can freeze this soup for up to three months. When you're ready to eat, thaw it in the fridge overnight. Once thawed, heat the soup on the stove over low heat. Stir it gently to warm it evenly. If the soup seems thick, add a splash of broth or water. This will help bring back its creamy texture. To keep your soup fresh, use high-quality ingredients. Fresh greens like spinach and kale taste best. If you add cream, use it right before serving. Cream can curdle if frozen. For the best flavor, consume the soup within a week when stored in the fridge. Remember to taste and adjust the seasonings after reheating. Yes, you can use frozen gnocchi. Just add them to the soup about 30 minutes before serving. They will cook perfectly in the hot broth. Frozen gnocchi saves time and gives great results. The soup lasts about 3 to 4 days in the fridge. Make sure to store it in an airtight container. If you want it to last longer, freeze it instead. I love serving this soup with crusty bread. You can also pair it with a simple salad. A sprinkle of grated Parmesan on top adds a nice touch. Enjoy it as a cozy meal! This blog post covered how to make slow cooker Tuscan gnocchi soup. You learned about key ingredients, from the base to optional add-ins. I shared tips for cooking and enhancing flavor. You also found storage tips and common questions. Tuscan gnocchi soup is flexible and fun to make. Enjoy playing with the flavors and textures. Happy cooking!

Looking for a warm, comforting dish that’s simple to make? I’ve got you covered with my Slow Cooker Tuscan Gnocchi Soup. This tasty soup is packed with flavor, and it …

Read more

Categories Dinner

Broccoli Potato Cheese Soup Creamy and Comforting Dish

November 12, 2025October 31, 2025 by Chef Luca
- 2 cups broccoli florets - 2 large potatoes, peeled and diced - 1 medium onion, chopped - 2 cloves garlic, minced - 4 cups vegetable broth - 1 cup milk or dairy-free alternative - 2 cups shredded sharp cheddar cheese - 2 tablespoons olive oil - 1 teaspoon thyme - Salt and pepper to taste - Fresh parsley for garnish (optional) In this recipe, I use fresh broccoli. It gives the soup a vibrant color and great taste. The potatoes add a creamy texture, while the cheese brings in richness. I recommend sharp cheddar for a bold flavor, but you can choose your favorite cheese. You may notice I include thyme in the list. It adds a warm, earthy note that pairs well with the other ingredients. Don’t skimp on the garlic and onion; they create a savory base that makes the soup so comforting. Feel free to adjust the milk according to your preference. If you want a dairy-free soup, use almond or oat milk instead. The fresh parsley is optional but adds a lovely touch when you serve the soup. This mix of ingredients creates a hearty, satisfying bowl of broccoli potato cheese soup that warms the soul on any day. {{ingredient_image_1}} - Heat 2 tablespoons of olive oil in a large pot over medium heat. - Add 1 medium chopped onion and sauté until it turns translucent, about 5 minutes. - Next, add 2 cloves of minced garlic. Cook for another minute until it smells great. - Stir in 2 large diced potatoes and 4 cups of vegetable broth. - Bring the mixture to a boil. Lower the heat and let it simmer for about 10 minutes. - Cook until the potatoes become tender. - Now, add 2 cups of broccoli florets and 1 teaspoon of thyme to the pot. - Cook for 5 to 7 minutes until the broccoli stays bright green and tender. - Using an immersion blender, blend the soup until smooth. If you don’t have one, be careful with transfers to a blender. - Return the blended soup to the pot and stir in 1 cup of milk. - Heat the soup on low before adding 2 cups of shredded sharp cheddar cheese. - Gradually mix in the cheese until it melts and the soup is creamy. - Finally, season with salt and pepper to taste. Adjust thickness as needed with water or broth. To get a smooth texture in your soup, use an immersion blender. This tool blends the soup right in the pot. If you do not have one, pour the soup into a regular blender. Blend it in small batches to avoid spills. For a thicker soup, add less broth or water. If you want it thinner, stir in more broth until you reach your preferred consistency. To boost flavor, try adding spices like garlic powder or smoked paprika. Fresh herbs like basil or chives also add a nice touch. For toppings, consider crispy bacon bits or a dollop of sour cream. You can switch up the cheese, too. Use gouda for a smoky taste or pepper jack for a kick. Adjust the cheese to find the flavors you love best! Pro Tips Use Fresh Ingredients: Fresh broccoli and potatoes will enhance the flavor and texture of your soup significantly. Look for vibrant green broccoli and firm, smooth potatoes for the best results. Adjust Creaminess: For a creamier soup, add more cheese or use heavy cream instead of milk. You can also blend in a few extra potatoes for added thickness. Spice It Up: If you want to add a little heat, consider adding a pinch of red pepper flakes or a few dashes of hot sauce to the soup for a flavorful kick. Storage Tips: This soup can be stored in the refrigerator for up to 3 days. Reheat on the stove and add a splash of broth or milk to restore its creamy consistency. {{image_2}} If you want a dairy-free soup, you have great choices. Use almond milk or oat milk instead of regular milk. For cheese, try a non-dairy cheese. Look for brands made from nuts or soy. They melt well and give a nice flavor. Feel free to add other veggies to your soup. Carrots and cauliflower work great. They add color and crunch. You can also mix in cooked chicken or crispy bacon for added protein. Both options make the soup heartier and more satisfying. Use what you have on hand, and get creative. To keep your broccoli potato cheese soup fresh, you have two main options. First, let the soup cool to room temperature. Then, pour it into an airtight container. You can store it in the fridge for up to three days. If you want to keep it longer, freezing is a great choice. Just make sure to leave some space in the container, as soup expands when frozen. It can last up to three months in the freezer. When you're ready to eat it, just thaw it in the fridge overnight. For the best flavor when reheating, use the stove. Pour the soup into a pot and heat it over low to medium heat. Stir it often to prevent sticking. This way, you keep the creamy texture. If you need to use a microwave, transfer the soup to a microwave-safe bowl. Heat in short bursts of one to two minutes, stirring in between. This helps the soup heat evenly. Always taste before serving to check if it needs more seasoning. Yes, you can use fresh broccoli instead of frozen. Fresh broccoli has a bright flavor and a nice crunch. It adds a fresh taste to your soup. Make sure to wash and cut it into small florets. You will want to add fresh broccoli to the pot later than frozen since it cooks faster. This way, it stays bright green and tender but not mushy. You can make this soup vegan with a few easy swaps. First, replace the milk with a plant-based milk like almond or oat milk. For cheese, use a dairy-free cheese that melts well. You can also skip the cheese entirely and add nutritional yeast for a cheesy flavor. Lastly, check that your vegetable broth is vegan too. These changes keep the soup creamy and full of flavor without using animal products. The best cheese for this soup is sharp cheddar. It gives a rich flavor that pairs well with broccoli and potatoes. Other good choices include Gruyère or Monterey Jack for a milder taste. If you want a stronger kick, try adding a bit of blue cheese. Each cheese adds its unique flavor, so feel free to mix and match to find your favorite blend. This article shares a simple recipe for broccoli potato cheese soup. You learned about the key ingredients, cooking steps, and tips for perfecting your soup. We also explored tasty variations and storage methods. Now, you can enjoy this comforting dish any time. Customize it to fit your taste and dietary needs. Happy cooking!

Cozy up with a bowl of Broccoli Potato Cheese Soup, where comfort meets creamy goodness. This dish is packed with wholesome broccoli, tender potatoes, and melty cheddar cheese, perfect for …

Read more

Categories Dinner

No-Bake Biscoff Truffle Balls Decadent and Easy Treat

October 29, 2025 by Chef Luca
To make No-Bake Biscoff Truffle Balls, you need: - 1 cup Biscoff cookies, finely crushed - 1/2 cup cream cheese, softened - 1/4 cup Biscoff spread (cookie butter) - 1/2 cup powdered sugar - 1 teaspoon vanilla extract - 1/2 cup semi-sweet chocolate chips - 1 tablespoon coconut oil (for melting) - Optional: extra crushed Biscoff cookies for coating You can add a twist to your truffles. Consider using: - A pinch of sea salt for contrast - Chopped nuts for crunch - Dried fruits like raisins or cranberries for sweetness - Different chocolate for coating, like white or dark chocolate If you’re short on ingredients, here are some swaps: - Use mascarpone cheese instead of cream cheese for a richer flavor. - Try graham crackers instead of Biscoff cookies for a different base. - Swap Biscoff spread with almond or peanut butter for a nutty taste. - Use maple syrup instead of powdered sugar for a natural sweetness. These swaps can help you customize your treat. Adjust based on what you have at home! To start, gather your ingredients. You'll need 1 cup of finely crushed Biscoff cookies, 1/2 cup of softened cream cheese, 1/4 cup of Biscoff spread, 1/2 cup of powdered sugar, and 1 teaspoon of vanilla extract. Place the crushed cookies in a large mixing bowl. Add the cream cheese, Biscoff spread, powdered sugar, and vanilla extract. Now, mix everything together. You can use a spatula or your hands. Keep mixing until the dough is smooth and well combined. Next, scoop out tablespoon-sized portions. Roll each portion into a ball and place them on a parchment-lined baking sheet. After rolling the truffle balls, it’s time to chill them. Place the baking sheet in the freezer for about 30 minutes. This helps them firm up nicely. While the truffles chill, melt the chocolate. Take 1/2 cup of semi-sweet chocolate chips and combine them with 1 tablespoon of coconut oil in a microwave-safe bowl. Heat the mixture in the microwave. Do this in 20-second intervals. Stir in between each interval until the chocolate is smooth and melted. Once your truffles have chilled, remove them from the freezer. Dip each truffle into the melted chocolate. Use a fork to help lift them out. Tap the fork against the bowl to shake off any excess chocolate. If you want, roll the dipped truffles in extra crushed Biscoff cookies for added flavor. Place the coated truffles back on the parchment-lined sheet. Let the chocolate set at room temperature or pop them in the fridge for about 15 to 20 minutes. Enjoy your delightful no-bake Biscoff truffle balls! To get the right texture for your truffles, start with finely crushed Biscoff cookies. This helps them mix well with cream cheese and Biscoff spread. Make sure your cream cheese is at room temperature. Soft cream cheese blends easily, giving a smooth dough. Mix until everything is well combined. If your dough feels too dry, add a bit more Biscoff spread. For a firmer truffle, chill them longer. Avoid using cold cream cheese. It makes mixing hard and leads to lumps. If your dough is too sticky, you might need more powdered sugar. Don't skip the chilling step. It firms up the truffles, making them easier to dip. Also, be careful not to overheat the chocolate. Melt it slowly and stir often to keep it smooth. If you rush, it might burn. For a fun serve, place your truffles on a pretty platter. You can dust them with cocoa powder or extra crushed Biscoff cookies for color. If you want to impress, use cupcake liners. They make each truffle feel special. Pair these truffles with coffee or tea for a sweet treat. You can also add a drizzle of melted white chocolate on top for a touch of elegance. {{image_2}} You can change the flavor of your truffles easily. Instead of Biscoff spread, try peanut butter or Nutella. You can also use different cookie flavors. Think chocolate or ginger snaps for a new twist. Each will give a unique taste to the truffles. If you want to make these truffles vegan, swap cream cheese for a plant-based option. Use coconut cream or cashew cream for great results. For a gluten-free treat, choose gluten-free cookies. Make sure to check labels for any hidden gluten. Want to make your truffles even better? Add in some nuts. Chopped almonds or walnuts add crunch and flavor. Dried fruits like raisins or cranberries also work well. They give a sweet touch and a chewy texture, making each bite special. To keep your no-bake Biscoff truffle balls fresh, store them in an airtight container. You can use a glass or plastic container with a tight lid. Layer the truffles with parchment paper to prevent them from sticking together. This will help maintain their shape and texture. These truffles last about one week in the fridge. If you freeze them, they can last up to three months. Just make sure to wrap them well in plastic wrap before placing them in a freezer-safe bag. When you’re ready, let them thaw in the fridge for a few hours. You don’t need to heat these truffles, but if the chocolate gets too hard, let them sit at room temp for a bit. This will soften them and make them easier to enjoy. If they lose some of their flavor, you can also roll them again in crushed Biscoff cookies for a fresh taste. Yes, you can use regular cream cheese. However, softened cream cheese mixes better. Softening it makes it easier to blend with the other ingredients. To soften cream cheese, leave it out for about 30 minutes or microwave it for 10 seconds. This keeps the truffles smooth and creamy. You can use graham crackers or digestive biscuits. They give a similar sweet and crunchy texture. If you want a different flavor, use chocolate cookies. Just crush them finely like the Biscoff cookies. This swap keeps the recipe delicious and fun. Truffles are set when they feel firm to the touch. After chilling, they should not feel soft or sticky. You can also dip one in chocolate to see if it holds its shape. If it does, they are ready to coat. Let them rest until the chocolate hardens. You learned about the key ingredients for making delicious truffles, including substitutes. I shared step-by-step instructions to ensure your truffles turn out great. We discussed tips to avoid mistakes and ideas for perfect texture. I also offered fun variations and storage tips for your treats. With this knowledge, you can make tasty truffles your way. Enjoy creating and sharing these sweet delights. Happy truffle-making!

Craving a sweet treat that’s simple to make? Let’s dive into these No-Bake Biscoff Truffle Balls! They’re decadent, packed with rich flavors, and require no baking skills at all. In …

Read more

Categories Desserts

Air Fryer Parmesan Zucchini Fries Crispy and Tasty Snack

October 29, 2025 by Chef Luca
To make Air Fryer Parmesan Zucchini Fries, you will need: - 2 medium zucchinis, sliced into fries - 1 cup breadcrumbs (panko works great for extra crunch) - 1/2 cup grated Parmesan cheese - 1 teaspoon garlic powder - 1 teaspoon onion powder - 1 teaspoon Italian seasoning - Salt and pepper to taste - 1 large egg - Olive oil spray You can swap the zucchini for other veggies like carrots or eggplant. If you don’t have breadcrumbs, crushed crackers or cornmeal can work too. For a dairy-free option, try nutritional yeast in place of Parmesan cheese. You’ll need an air fryer for this recipe. A sharp knife and cutting board will help you slice the zucchini evenly. Use mixing bowls for coating and an olive oil spray bottle to keep it quick and easy. A spatula will help you flip the fries during cooking. Start with two medium zucchinis. Wash them well to remove dirt. Cut each zucchini into fry shapes. Aim for pieces about the same size. This helps them cook evenly. In a bowl, mix the dry ingredients. Combine one cup of breadcrumbs, half a cup of grated Parmesan cheese, one teaspoon of garlic powder, one teaspoon of onion powder, and one teaspoon of Italian seasoning. Add salt and pepper to taste. In a separate bowl, beat one large egg until smooth. Dip each zucchini fry into the egg, letting excess drip off. Then, coat each fry in the breadcrumb mix. Press gently to help it stick. Keep going until all fries are coated. Preheat your air fryer to 400°F (200°C) for five minutes. Spray the air fryer basket with olive oil to stop sticking. Place the zucchini fries inside in a single layer. Avoid crowding them to ensure crispiness. Lightly spray the tops of the fries with olive oil. Air fry for 10 to 12 minutes. Flip them halfway through for even cooking. They should turn golden brown and crispy. Once done, take them out and let cool for a moment before serving. Enjoy these tasty snacks with marinara or ranch for dipping! To get your zucchini fries crispy, use panko breadcrumbs. They add great crunch. Make sure to coat each fry well in the egg and breadcrumb mix. This helps the coating stick better. Lightly spray olive oil on the fries before cooking. It boosts crispiness too. The air fryer needs to be hot. Preheat it to 400°F for five minutes. This helps cook the fries evenly. You can add more flavor to your fries. Try mixing in some smoked paprika or cayenne pepper for a kick. Fresh herbs like basil or oregano can also make them tastier. For a cheesy twist, mix in extra Parmesan or even some mozzarella in the breadcrumb mix. This adds a melty texture that is so delicious. One big mistake is overcrowding the air fryer basket. This can lead to soggy fries. Always keep the fries in a single layer. If needed, cook in batches. Another mistake is not seasoning enough. Zucchini can be bland on its own. Be sure to add salt and pepper to the breadcrumb mix. Don't skip the preheating step either. It ensures the fries cook properly. {{image_2}} You can switch up the coating for your zucchini fries. Try using crushed cornflakes for a different crunch. If you want a gluten-free option, use ground almonds or gluten-free breadcrumbs. You can also add some grated cheddar cheese to the mix for extra flavor. Feel free to explore with spices. Instead of Italian seasoning, try taco seasoning for a fun twist. You can also use smoked paprika for a hint of smokiness. For more heat, add cayenne pepper or chili powder to the breadcrumbs. Serving your zucchini fries can be fun! Serve them with marinara sauce for a classic touch. You can also try a yogurt ranch dip for a creamy contrast. For a fresh twist, add a squeeze of lemon juice over the fries. Garnish with parsley for a pop of color. To keep your leftover zucchini fries fresh, place them in an airtight container. Make sure they cool down first. Store them in the fridge for up to three days. This way, they stay tasty and safe to eat. When you're ready to eat your leftovers, preheat your air fryer to 350°F (175°C). Place the fries in the basket in a single layer. Heat them for about 5 to 7 minutes. This helps them regain their crispiness. You can also use a regular oven. Just make sure to keep an eye on them so they don't burn. If you want to save some fries for later, freezing is a great option. First, allow the cooked fries to cool completely. Then, place them in a freezer-safe bag. Squeeze out the air before sealing. You can freeze them for up to 2 months. When you're ready to enjoy, just reheat them straight from the freezer. Yes, you can use other vegetables for this recipe. Carrots, sweet potatoes, or eggplants work well. Cut them into fry shapes just like the zucchini. You may need to adjust cooking times based on the vegetable. For thicker veggies, increase the air frying time until they are tender and crispy. To keep your zucchini fries crispy, avoid stacking them. Serve them right away. If you need to wait, keep them in a single layer on a wire rack. This allows air to circulate and keeps them crunchy. You can also reheat them in the air fryer. Set the temperature to 350°F (175°C) for about 5 minutes. Several sauces go great with zucchini fries. Marinara sauce is a classic choice. Ranch dressing adds a creamy touch. You might also enjoy a yogurt ranch for a tangy twist. Try garlic aioli for a bold flavor. Each dip enhances the taste of the crispy fries. This blog post covered how to make tasty zucchini fries. We explored the ingredients, their substitutes, and the right tools for cooking. I shared step-by-step instructions for prepping and air frying your fries. We also discussed tips for crispiness and flavor. There are many variations to try, plus ways to store leftovers. Remember, you can use other veggies too! Enjoy creating your own delicious zucchini fries, and don’t hesitate to experiment with flavors and coatings. Happy cooking!

Craving a snack that’s both crispy and tasty? Try my Air Fryer Parmesan Zucchini Fries! These golden bites pack a punch of flavor while being light and healthy. Whether you’re …

Read more

Categories Appetizers

One-Pot Creamy Tuscan Orzo Easy and Delicious Meal

October 29, 2025 by Chef Luca
- 1 cup orzo pasta - 2 cups vegetable broth - 1 cup cherry tomatoes, halved - 1 cup fresh spinach, chopped Orzo is a small pasta that cooks quickly. It absorbs flavors well, making it perfect for this dish. Vegetable broth gives a rich taste and keeps it light. Cherry tomatoes add sweetness and color. Fresh spinach is a great green that wilts down nicely. - 1/2 cup heavy cream - 1/2 cup grated Parmesan cheese Heavy cream adds a rich, smooth texture. Parmesan cheese gives a salty, nutty flavor. Together, they create a creamy sauce that blends perfectly with the orzo. - 2 cloves garlic, minced - 1 teaspoon dried Italian herbs (oregano, basil, thyme) - 2 tablespoons olive oil - Salt and pepper to taste Garlic adds a strong, inviting aroma. Dried Italian herbs bring classic flavor and warmth. Olive oil is key for sautéing and adds healthy fat. Salt and pepper enhance all the tastes, making each bite exciting. - Heat 2 tablespoons of olive oil in a large pot over medium heat. - Add 2 cloves of minced garlic and sauté for 1 minute. - Stir in 1 cup of halved cherry tomatoes and cook for 3 to 4 minutes. They should start to soften. - Add 1 cup of orzo pasta and 1 teaspoon of dried Italian herbs to the pot. - Stir well to mix the orzo with the garlic and tomatoes. - Pour in 2 cups of vegetable broth, making sure the orzo is covered. - Bring the pot to a boil, then reduce the heat. - Let it simmer for 8 to 10 minutes, stirring now and then. The orzo should be tender and soak up most of the broth. - Lower the heat and add 1/2 cup of heavy cream and 1/2 cup of grated Parmesan cheese. - Stir until the mixture is creamy and well blended. - Toss in 1 cup of chopped spinach and mix until it wilts. - Season with salt and pepper to taste. For a creamier dish, add more broth or cream. To prevent orzo from overcooking, follow these simple steps: - Stir the orzo often while it simmers. This keeps it from sticking together. - Test the orzo a minute or two before the time is up. It should be al dente, firm but not hard. If you want a creamier dish, add more cream or broth slowly. Start with small amounts and mix well. This helps you reach the perfect texture without making it too runny. Fresh herbs make the dish pop. Basil, parsley, or thyme can uplift the flavors. Add them right at the end of cooking to keep their taste bright. If you want to switch up the cheese, consider using goat cheese or feta. These cheeses will add a tangy kick. They can change the whole flavor profile of your orzo while keeping it creamy. When serving, a nice bowl makes a big difference. Use shallow bowls to show off the vibrant colors. Garnish with fresh basil leaves for a touch of green. You can also sprinkle extra cheese on top for added flavor. Another fun idea is to pair it with crusty bread. It’s perfect for dipping into the creamy orzo! {{image_2}} If you want to switch things up, consider using gluten-free orzo. Many brands offer this option, and it cooks similarly. You can also swap out vegetables based on what you have. Bell peppers, zucchini, or even peas work great. These changes can add color and nutrients. To add protein, you can mix in cooked chicken or shrimp. Just make sure they are cooked before adding them to the pot. For a vegetarian or vegan option, try chickpeas or lentils. They add protein and make the dish heartier. You can enhance the flavor by adding different herbs and spices. Fresh thyme or basil works well. If you want a bolder taste, consider adding red pepper flakes for some heat. Experimenting with various broth flavors can also change the dish. Try using chicken broth or mushroom broth for a new twist. These small changes can make your creamy Tuscan orzo feel fresh and exciting each time you make it! After enjoying your One-Pot Creamy Tuscan Orzo, you might have some left. To keep it fresh, follow these tips: - Cool it down: Let the orzo cool to room temperature. - Use airtight containers: Store it in containers that seal tightly. Glass or plastic containers work well. - Label and date: Write the date on the container for easy tracking. When you want to enjoy your leftovers, reheating correctly helps keep the texture nice. Here’s how: - Stovetop method: Add the orzo to a pot. Stir in a splash of broth or cream. Heat it over low heat, stirring often. This keeps it creamy. - Microwave method: Place orzo in a microwave-safe bowl. Add a little broth or cream and cover it. Heat for 1-2 minutes, stirring halfway through. Can you freeze creamy orzo? Yes, you can! Here’s how to do it: - Cool completely: Make sure the orzo is cool before freezing. - Portion it out: Divide it into serving sizes. This makes it easy to thaw later. - Use freezer-safe bags or containers: Remove as much air as possible to avoid freezer burn. To thaw, place it in the fridge overnight. Reheat using the stovetop or microwave when you’re ready to enjoy it again. Can I make this dish ahead of time? Yes, you can make creamy Tuscan orzo ahead of time. Just cool it and store it in the fridge. It tastes great after a day or two. Reheat it gently on the stove, adding a splash of broth if needed. What can I serve with creamy Tuscan orzo? Creamy Tuscan orzo pairs well with grilled chicken, shrimp, or a fresh salad. You can also serve it with crusty bread for a hearty meal. What to do if the orzo is too sticky? If your orzo is too sticky, add a bit of olive oil and stir. This will help separate the pasta. You can also add a splash of broth to loosen it up. How can I adjust the recipe for a larger serving? To make a larger batch, simply double the ingredients. Use a bigger pot to avoid spills. Make sure to adjust the cooking time as needed, checking the orzo for doneness. Is this recipe suitable for meal prep? Yes, this recipe is great for meal prep. It keeps well in the fridge for a few days. Just store it in airtight containers to maintain freshness. Can I make this dish dairy-free? You can make this dish dairy-free by using coconut cream instead of heavy cream. For cheese, try a dairy-free Parmesan. The flavors will still be rich and tasty! This blog post shared a delicious creamy Tuscan orzo recipe. We covered main ingredients like orzo and spinach, along with dairy and seasonings. You learned step-by-step instructions for preparation and cooking. We also shared tips on flavor and storage. In closing, this dish is adaptable and easy. You can make it suit your taste or dietary needs. Enjoy your cooking adventure and share this recipe with others!

Are you ready to impress your taste buds with a delightful dish? One-Pot Creamy Tuscan Orzo is not just easy; it’s a meal that bursts with flavor! In this blog …

Read more

Categories Dinner
Older posts
Newer posts
← Previous Page1 … Page3 Page4 Page5 … Page113 Next →

STIRRED RECIPES

Where every dish begins with a stir! 🍲✨

PAGES

Home About Contact Privacy Policy Terms & Conditions Cookie Policy GDPR Policy Copyright Policy Disclaimer

CATEGORIES

Appetizers Desserts Salads Breakfast Dinner

Contact

  • Pinterest
  • Mail
Copyright © 2025 Stirred Recipes. All rights reserved.