Skip to content
Stirred Recipes
  • Home
  • Appetizers
  • Desserts
  • Salads
  • Breakfast
  • Dinner
  • Privacy Policy
  • Contact
  • About

Chef Luca

Baked Apple Fritters Delightful and Easy Recipe

August 26, 2025 by Chef Luca
- 2 large apples (Granny Smith or Honeycrisp), peeled and diced - 2 cups all-purpose flour - 1/2 cup sugar - 1 tablespoon baking powder - 1 teaspoon cinnamon - 1/2 teaspoon nutmeg - 1/4 teaspoon salt - 1/2 cup buttermilk (or milk + 1/2 tablespoon vinegar) - 1/4 cup unsweetened applesauce - 2 large eggs - 1 teaspoon vanilla extract - 1/4 cup powdered sugar - 1 tablespoon milk - You can use applesauce instead of fresh apples for a softer fritter. - For a dairy-free option, try almond milk or coconut milk in place of buttermilk. These ingredients make a delightful treat. The apples add natural sweetness and moisture. The spices bring warmth and flavor. The batter holds everything together, making each bite fluffy and delicious. If you want to switch things up, feel free to get creative with your ingredients! 1. First, preheat your oven to 375°F (190°C). This step is key for getting golden fritters. 2. Next, line a baking sheet with parchment paper. This helps the fritters not stick. 1. In a large mixing bowl, combine 2 cups of all-purpose flour, 1/2 cup of sugar, 1 tablespoon of baking powder, 1 teaspoon of cinnamon, 1/2 teaspoon of nutmeg, and 1/4 teaspoon of salt. 2. Whisk these dry ingredients together until they blend well. 1. In a separate bowl, mix together 1/2 cup of buttermilk, 1/4 cup of unsweetened applesauce, 2 large eggs, and 1 teaspoon of vanilla extract. 2. Stir until this mixture is nice and smooth. 1. Pour the wet mixture into the dry ingredients. 2. Gently fold them together with a spatula. 3. Be careful not to overmix. Just combine until you see no dry flour. 4. Now, add in the diced apples. Use 2 large apples, peeled and diced. 1. Use a spoon or small ice cream scoop to drop heaping tablespoons of batter onto the prepared sheet. 2. Space them about 2 inches apart. This gives them room to rise. 3. Bake in the preheated oven for 15-18 minutes. They should be golden brown. 4. Test with a toothpick; it should come out clean from the center. 1. While the fritters bake, whisk together 1/4 cup of powdered sugar and 1 tablespoon of milk in a small bowl. 2. Keep whisking until the glaze is smooth and ready to use. Now, you're all set to enjoy these delicious baked apple fritters! To get your fritters nice and crispy, focus on two key steps. First, ensure you bake them for the right time. You want them golden brown, usually about 15 to 18 minutes. Keep an eye on them. Second, avoid overmixing the batter. Gently fold the wet and dry ingredients together. This helps keep the fritters light and airy. You can really boost the flavor of your fritters. Adding a teaspoon of vanilla gives a sweet touch. If you love spice, sprinkle in a bit more cinnamon. You can also play with apple varieties. Granny Smith adds tartness, while Honeycrisp offers sweetness. Mixing varieties can create a delightful blend. To serve your apple fritters best, let them cool slightly first. This helps the glaze set well. Drizzle the glaze right before serving for a fresh look. Pair these fritters with warm cider or a cold glass of milk. Both drinks enhance the apple flavor and make for a perfect treat. {{image_2}} You can easily change the flavor of baked apple fritters. One great way is by adding chocolate chips. Just fold in a cup of semi-sweet chocolate chips into the batter. This makes each bite rich and sweet. Another option is to incorporate nuts. Chopped walnuts or pecans add a nice crunch. Mix in about half a cup for a tasty twist. These sweet variations make your fritters even more fun. Savory fritters are another exciting way to enjoy this dish. You can create them by adding cheese. Grated sharp cheddar or feta works great. Just mix in about half a cup into the batter. This gives your fritters a rich, creamy taste. Serve them with a dip for an added flavor boost. You can adapt this recipe for different seasons. In fall, add pumpkin spice for a warm flavor. Just mix in a teaspoon of pumpkin spice with your dry ingredients. In summer, try adding fresh berries. Blueberries or raspberries can brighten your fritters. Fold in about a cup of these berries into the batter. Seasonal twists keep your fritters fresh and exciting all year round. To keep your baked apple fritters fresh, store them in an airtight container. Line the container with paper towels to absorb moisture. You can also wrap each fritter in plastic wrap. This method helps keep them soft. When you want to enjoy your fritters again, use a toaster oven for the best results. Preheat it to 350°F (175°C). Place the fritters inside for about 5 minutes. This keeps them warm and crispy. Avoid the microwave, as it makes them soft. If you want to freeze the fritters, let them cool completely first. Place them in a single layer on a baking sheet. Freeze until solid, then transfer to a freezer bag. To thaw, let them sit at room temperature for about 30 minutes. Reheat in the toaster oven to regain that crispy texture. Yes, you can! I recommend using Granny Smith or Honeycrisp apples. Granny Smith provides a nice tartness that contrasts well with the sweet glaze. Honeycrisp adds a juicy sweetness that makes the fritters delicious. You can also try Fuji or Gala apples for a sweeter taste. Check the fritters at 15 minutes. They should be golden brown. Insert a toothpick into the center of a fritter. If it comes out clean, your fritters are done. If not, bake for a few more minutes. Keep an eye on them to avoid overbaking. Absolutely! You can use a gluten-free flour blend instead of all-purpose flour. Look for a blend that includes xanthan gum for the best results. You might also try almond flour or coconut flour. Just remember to adjust the liquid as needed, since these flours absorb moisture differently. Making apple fritters is simple and fun. We covered the key ingredients, and they include apples, flour, and spices. I provided step-by-step instructions and tips for perfect results. You learned about fun variations, from sweet to savory, and how to store your fritters. Remember, you can easily tweak ingredients based on your needs. Enjoy serving these tasty treats for a gathering or just a snack. With the right methods, you’ll bake fritters that everyone loves. Your kitchen will smell amazing, and the taste will delight. Happy baking!

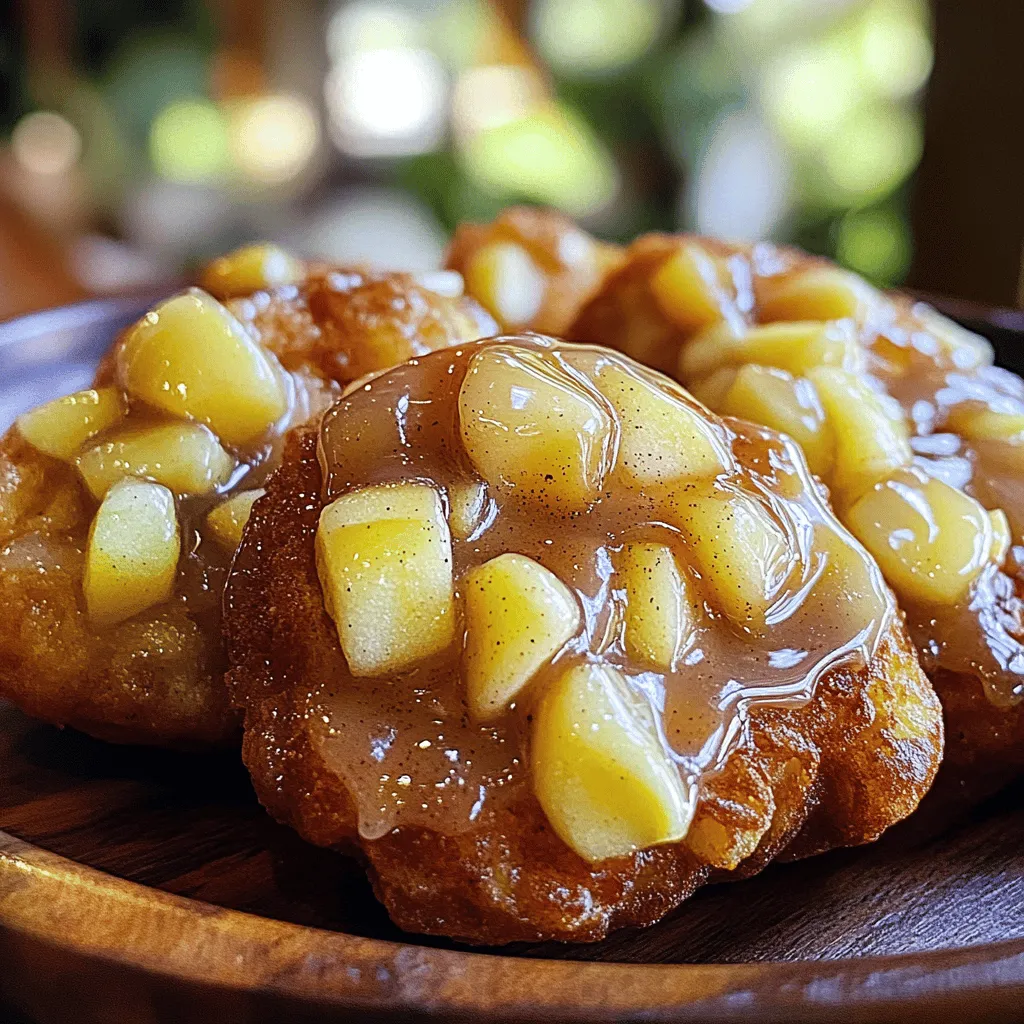
Welcome to your new favorite recipe: Baked Apple Fritters! These delightful treats are easy to make and delicious to eat. Packed with fresh apples, warm spices, and a sweet glaze, …

Read more

Categories Desserts

Pumpkin Pie Crisp Delicious Fall Dessert Recipe

August 26, 2025 by Chef Luca
For a rich base, I use: - 2 cups pumpkin puree - 1 cup brown sugar Pumpkin puree gives a deep flavor. Brown sugar adds sweetness and depth. You can also swap brown sugar for maple syrup if you want a twist. To spice things up, I add: - 1 teaspoon ground cinnamon - 1 teaspoon ground ginger - 1/2 teaspoon ground nutmeg - 1/4 teaspoon ground cloves - 1/2 teaspoon salt These spices create warmth and comfort. Cinnamon and nutmeg are classics in fall desserts. Ginger and cloves add a nice kick. Salt enhances all these flavors. For the crunchy topping, I mix: - 1 cup oats - 1 cup all-purpose flour - 1/2 cup unsalted butter, melted - 1/2 cup chopped pecans or walnuts The oats and flour make the topping crispy. The butter binds everything together. Nuts provide crunch and richness. You can use any nuts you like. Start by preheating your oven to 350°F (175°C). Grease a 9-inch square baking dish with cooking spray. In a large bowl, mix together 2 cups of pumpkin puree, 1 cup of brown sugar, 1 teaspoon of ground cinnamon, 1 teaspoon of ground ginger, 1/2 teaspoon of ground nutmeg, 1/4 teaspoon of ground cloves, and 1/2 teaspoon of salt. Add 2 large eggs and 1 teaspoon of vanilla extract. Stir until everything is well combined. Pour this rich mixture into the prepared baking dish and spread it evenly. In another bowl, combine 1 cup of oats, 1 cup of all-purpose flour, and 1/2 cup of melted butter. Add 1/2 cup of chopped pecans or walnuts for a nice crunch. Mix these ingredients until they become crumbly. This mixture will create a great texture on top of your pumpkin layer. Now, sprinkle the crumb topping evenly over the pumpkin mixture in the baking dish. Place it in the preheated oven and bake for 35 to 40 minutes. The pumpkin layer should be set, and the top will turn golden brown and crispy. After baking, let it cool for about 10 minutes before serving. Enjoy your pumpkin pie crisp warm, topped with whipped cream or vanilla ice cream for an extra treat! To get the best texture, focus on the pumpkin layer. Ensure your pumpkin puree is smooth. Mix it well with sugar and eggs, avoiding lumps. The topping should be crumbly, not too wet. Use melted butter to help it crisp up nicely. Bake until the top is golden brown. This means your crisp will be crunchy and the pumpkin layer soft. Serve your pumpkin pie crisp warm right from the oven. A scoop of vanilla ice cream adds a creamy touch. You can also use whipped cream for a lighter topping. For added flair, sprinkle some extra nuts or cinnamon on top. This small change makes it look great and taste even better. Pair your pumpkin pie crisp with hot drinks like coffee or chai tea. The warm flavors of pumpkin blend well with these drinks. You can also enjoy it with a rich caramel sauce. The sweet and salty mix adds depth to each bite. This dessert works well for fall gatherings or cozy nights in. {{image_2}} You can easily make this pumpkin pie crisp gluten-free. Simply replace the all-purpose flour with a gluten-free flour blend. Look for one that works well in baking. This swap keeps the texture light and tasty. You can also check your oats. Make sure they are labeled gluten-free, as some may be cross-contaminated. If you want different nuts, try using almonds or cashews. They add a nice crunch and unique flavor. You can even leave out the nuts if you prefer. Just make sure to adjust the topping mix to maintain the right texture. If you want a nut-free option, consider using seeds like pumpkin or sunflower seeds. For a fun twist, add chocolate chips to the topping mix. They melt and create a rich taste. You could also drizzle caramel over the crisp before serving. This adds a sweet layer that pairs well with the pumpkin. If you like spice, try adding a touch of cayenne for a kick. Experiment with flavors to find your perfect version! To keep your Pumpkin Pie Crisp fresh, let it cool completely. Then, cover it with plastic wrap or aluminum foil. You can also place it in an airtight container. This way, it stays moist and tasty for up to three days in the fridge. If you want to store it longer, freezing is a great option. Cut the crisp into squares and place them in a single layer on a baking sheet. Freeze them for about an hour. Once frozen, transfer the squares to a freezer-safe bag. Squeeze out excess air before sealing. Pumpkin Pie Crisp can last up to three months in the freezer. When you're ready to enjoy leftovers, preheat your oven to 350°F (175°C). Place the crisp in an oven-safe dish and cover with foil. Heat for about 15-20 minutes, or until warm. You can also microwave a single piece for about 30 seconds. Enjoy it with whipped cream or ice cream for extra delight! Yes, you can use canned pumpkin. It makes the process easier. Just make sure to choose pure pumpkin puree, not pumpkin pie filling. Canned pumpkin has a smooth texture and rich flavor. It saves time and keeps your dish tasty. You can use white sugar or coconut sugar. Both options work well in this recipe. If you want a deeper flavor, try maple syrup or honey. Each alternative will change the taste slightly, but your pumpkin pie crisp will still be delicious. To make this dessert dairy-free, use coconut oil or a dairy-free butter. Both options will give you a great texture. You can also use almond milk or oat milk for the whipped cream. These changes keep the sweet dish creamy and tasty. In this post, we explored a tasty pumpkin crisp recipe. We covered ingredients like pumpkin puree, sweeteners, spices, and toppings. I shared step-by-step instructions for the mixture, crisp topping, and baking. You learned key tips for texture, serving, and variations, such as gluten-free options. Lastly, I provided storage methods and answered common questions. Now, you can enjoy this dish with those you love. Happy baking!

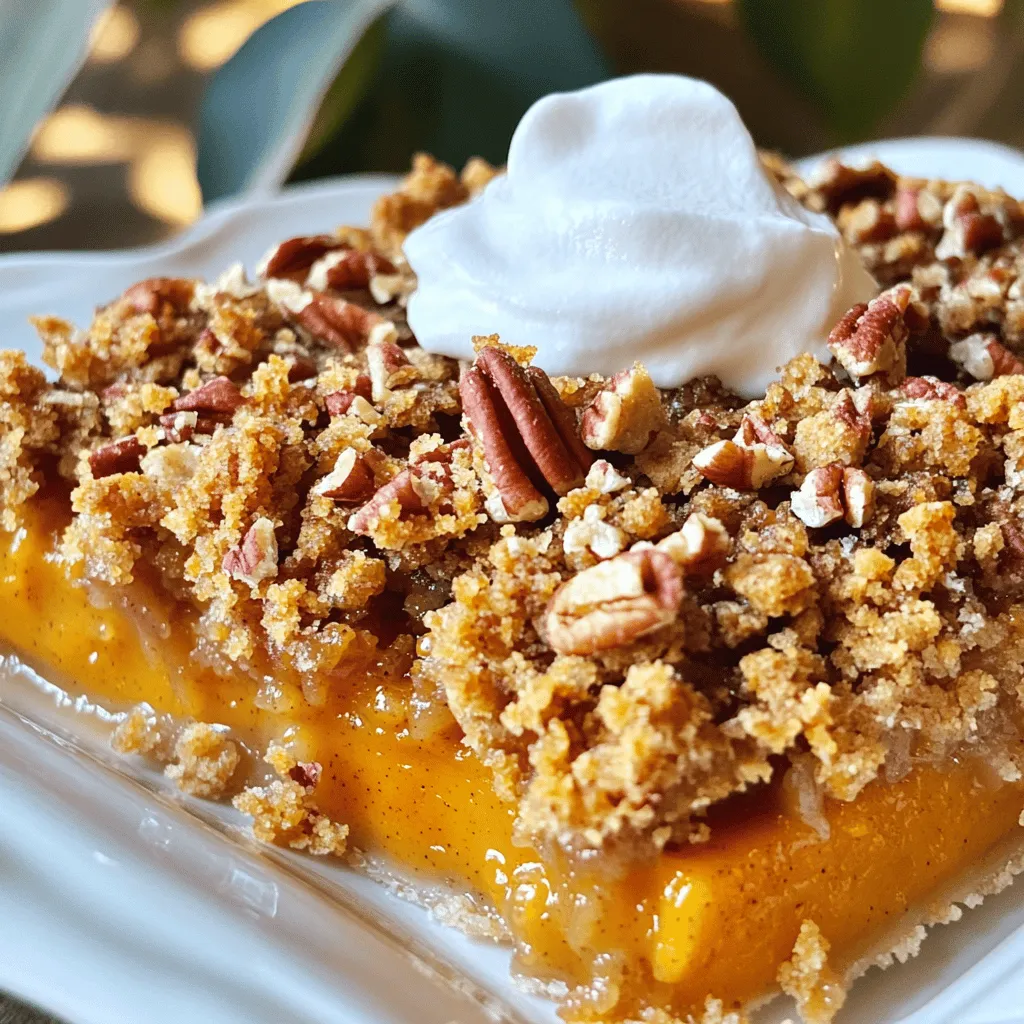
If you love fall flavors, you’ll adore this Pumpkin Pie Crisp recipe. It combines pumpkin puree, warm spices, and a crunchy topping for a dessert that is simple and sweet. …

Read more

Categories Desserts

Cinnamon Honey Roasted Sweet Potatoes Easy Recipe

August 26, 2025 by Chef Luca
To make cinnamon honey roasted sweet potatoes, you need some simple ingredients. Here’s what you’ll need: - 4 medium sweet potatoes, peeled and cut into 1-inch cubes - 3 tablespoons honey - 2 tablespoons olive oil - 1 teaspoon ground cinnamon - 1/2 teaspoon nutmeg - 1/4 teaspoon salt - 1/4 teaspoon black pepper - Optional: Fresh thyme leaves for garnish These ingredients work well together. Sweet potatoes bring a creamy texture. Honey adds a touch of sweetness, while cinnamon and nutmeg give warmth. Olive oil helps the sweet potatoes roast nicely. The salt and pepper round out the flavors. You can add fresh thyme for a hint of herbal taste. When you choose your sweet potatoes, look for firm ones with smooth skin. Avoid any that feel soft or have blemishes. The honey can be wildflower or clover, depending on your taste. Olive oil should be extra virgin for the best flavor. Each ingredient plays a key role in making this dish tasty and comforting. Get ready to enjoy these sweet potatoes! To start, let’s peel and cut the sweet potatoes. First, take four medium sweet potatoes. Use a vegetable peeler to remove the skin. Make sure to get all the tough bits. After peeling, cut each sweet potato into 1-inch cubes. This size helps them cook evenly. Next, we need to mix the honey glaze. In a large mixing bowl, add three tablespoons of honey. Then, pour in two tablespoons of olive oil. Add one teaspoon of ground cinnamon, half a teaspoon of nutmeg, a quarter teaspoon of salt, and a quarter teaspoon of black pepper. Whisk these ingredients together until they are well blended. This glaze will make the sweet potatoes shine! Now it’s time to roast the sweet potatoes. Preheat your oven to 400°F (200°C). This high temperature helps caramelize the sugars in the sweet potatoes. Spread the cubed sweet potatoes in a single layer on a baking sheet lined with parchment paper. Make sure they are not crowded. This step is key. An even coating of the honey mixture will ensure every piece gets flavor. Roast the sweet potatoes in the oven for about 25 to 30 minutes. Halfway through, turn them to ensure even cooking. They should be tender and golden-brown when done. Once the sweet potatoes are ready, let them cool for five minutes. Transfer them to a serving platter. You could serve them warm as a side dish. For a special touch, sprinkle fresh thyme leaves on top. This adds a nice pop of color and flavor. Enjoy your tasty cinnamon honey roasted sweet potatoes! To get sweet potatoes just right, check for doneness. You want them tender but not mushy. Poke a cube with a fork. If it slides in easily, they are done. For great caramelization, use high heat. Roasting at 400°F (200°C) helps them brown nicely. Also, spread them out on the baking sheet. This way, hot air can reach all sides. You can change up the flavors too! Try adding ginger or allspice for a kick. If you want a different sweetener, maple syrup works well. For a twist, mix in some fresh herbs like rosemary or sage. These will give your sweet potatoes a whole new taste. {{image_2}} You can switch out honey for maple syrup. Maple syrup adds a rich, earthy taste. It has a unique flavor that pairs well with sweet potatoes. You might enjoy this twist for a different experience. Another option is brown sugar. Brown sugar gives a nice caramel flavor. You can mix it with a bit of water to make a syrup. This adds moisture and sweetness to the sweet potatoes. Try using it if you want a quick change! Adding nuts or seeds gives a nice crunch. Chopped pecans or walnuts work well. Just sprinkle them on top before roasting. You will love the texture they add. You can also toss in vegetables like carrots. Cut the carrots into small pieces so they cook evenly. Carrots add color and sweetness. This makes your dish even more exciting and nutritious! To store leftover sweet potatoes, first let them cool completely. Place them in an airtight container. You can keep them in the fridge for up to four days. This way, they stay fresh and tasty. If you notice any signs of spoilage, like an off smell, it's best to throw them away. For reheating, the oven works best. Preheat your oven to 350°F (175°C). Spread the sweet potatoes on a baking sheet. Heat them for about 10-15 minutes, or until warm. You can also use a microwave. Place the sweet potatoes in a microwave-safe dish. Cover it with a lid or a microwave-safe wrap. Heat for 1-2 minutes, checking in between. They should be hot but not dried out. Enjoy your sweet potatoes with their delicious flavors intact! Cinnamon honey roasted sweet potatoes stay fresh for about 4 to 5 days. Store them in an airtight container in the fridge. They might lose some crispness over time, but they still taste great. You can also freeze them for about 2 to 3 months. Just remember to let them cool completely before freezing. When you want to eat them, thaw them in the fridge overnight. Yes, you can use different types of potatoes. While sweet potatoes are the star of this recipe, regular potatoes work too. Try using Yukon Gold or red potatoes for a different taste. Just keep in mind that cooking time might vary. Regular potatoes may take a bit longer to roast until they are tender. This recipe is not vegan because it uses honey. However, you can easily make it vegan. Just swap honey with maple syrup or agave nectar. These alternatives provide a similar sweetness without using animal products. The rest of the recipe remains the same, so your dish will still be tasty and satisfying. In this post, we explored how to make delicious cinnamon honey roasted sweet potatoes. We covered the simple ingredients needed, step-by-step cooking instructions, and how to enhance the flavors. Remember to test for the right texture and try variations with different sweeteners or vegetables. Whether you choose to serve them as a side or snack, these sweet potatoes are sure to impress. Enjoy these tasty, healthy bites!

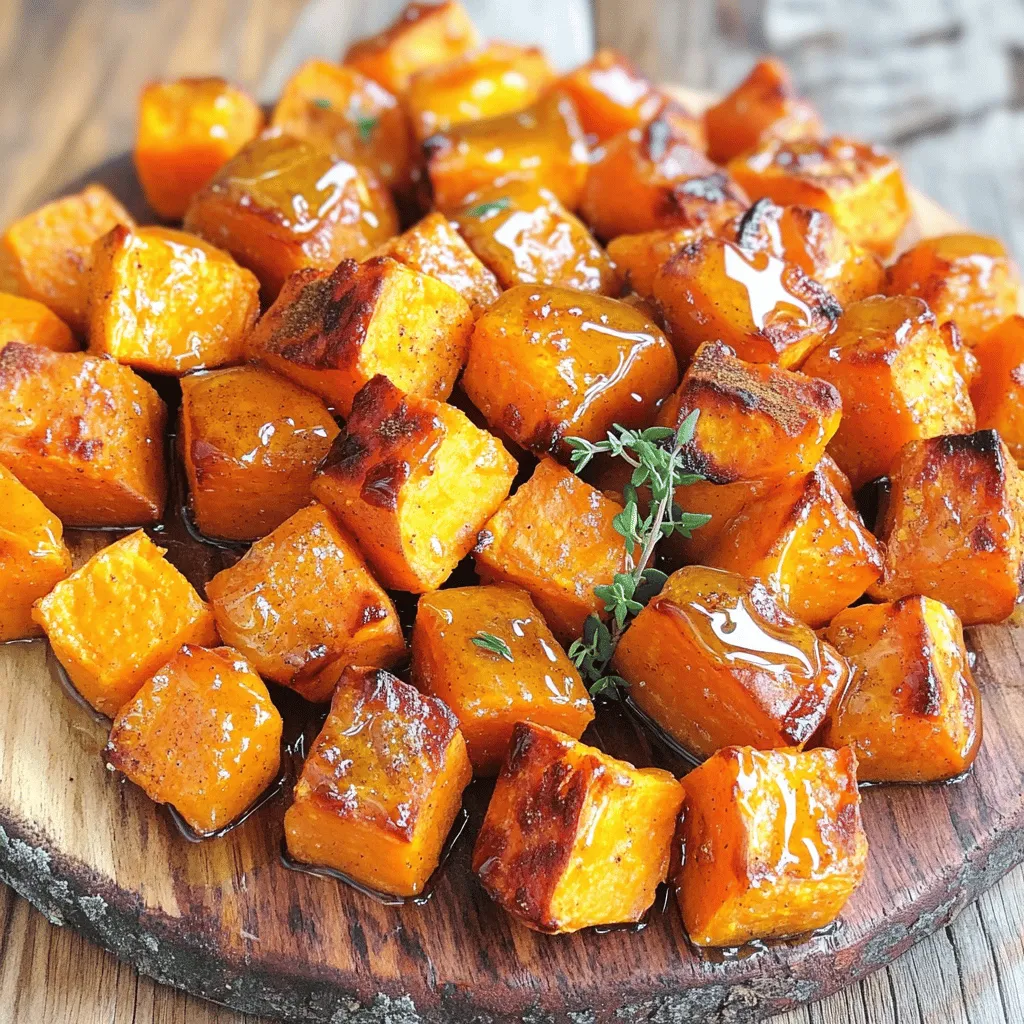
Are you ready to enjoy a sweet and savory side dish? Cinnamon honey roasted sweet potatoes are a delight for the senses! This easy recipe is perfect for any meal. …

Read more

Categories Dinner

Best Ever Pumpkin Muffins Simple and Tasty Recipe

August 26, 2025 by Chef Luca
To make the best ever pumpkin muffins, gather these simple ingredients: - 1 cup pumpkin puree (fresh or canned) - 1/2 cup granulated sugar - 1/2 cup brown sugar, packed - 1/3 cup vegetable oil - 2 large eggs - 1 teaspoon vanilla extract - 1 1/2 cups all-purpose flour - 1 teaspoon baking powder - 1 teaspoon baking soda - 1 teaspoon ground cinnamon - 1/2 teaspoon ground nutmeg - 1/4 teaspoon ground ginger - 1/4 teaspoon salt - Optional add-ins: 1/2 cup walnuts or pecans, chopped; 1/2 cup chocolate chips These ingredients work together to create muffins that are moist and flavorful. The pumpkin puree gives the muffins their rich taste and vibrant color. The sugars add sweetness and help with browning. Using a mix of granulated and brown sugar enhances the flavor and texture. Vegetable oil keeps the muffins tender. Eggs provide structure and moisture. Vanilla extract adds a lovely aroma. All-purpose flour is the base of the muffins, while baking powder and baking soda help them rise. Spices like cinnamon, nutmeg, and ginger give these muffins a warm, cozy flavor. Salt balances the sweetness. If you like, add walnuts or chocolate chips for extra texture and taste. Enjoy the process of gathering these ingredients, as it sets the stage for a delightful baking experience! 1. Preheat your oven to 350°F (175°C). This is important for even baking. 2. Prepare your muffin tin by lining it with paper liners or lightly greasing it. This helps the muffins come out easily. 3. In a large bowl, combine 1 cup of pumpkin puree, 1/2 cup of granulated sugar, 1/2 cup of brown sugar, and 1/3 cup of vegetable oil. Mix well until the sugars dissolve completely. 1. In another bowl, sift together 1 1/2 cups of all-purpose flour, 1 teaspoon of baking powder, 1 teaspoon of baking soda, 1 teaspoon of ground cinnamon, 1/2 teaspoon of ground nutmeg, 1/4 teaspoon of ground ginger, and 1/4 teaspoon of salt. This helps mix and aerate the dry ingredients. 2. Gradually add the dry mixture to the wet mixture. Stir gently until just combined. It’s okay if there are a few lumps; don’t overmix! 1. If you want extra flavor, fold in 1/2 cup of chopped walnuts or pecans and/or 1/2 cup of chocolate chips. This adds texture and taste. 2. Portion the batter evenly into the prepared muffin cups. Fill each cup about two-thirds full to allow for rising. 1. Bake in the preheated oven for 18-20 minutes. Check doneness by inserting a toothpick into the center of a muffin. If it comes out clean, they are done! 2. Allow the muffins to cool in the tin for 5 minutes. Then, transfer them to a wire rack to cool completely. Enjoy the warm, cozy smell of pumpkin while they cool! To make the best pumpkin muffins, focus on mixing. Avoid overmixing the batter. Stir gently until just combined. A few lumps are okay; they help keep the muffins light. Accurate measuring is also key. Use measuring cups and spoons for each ingredient. This ensures the right balance of flavors and textures. You can boost the flavor of your muffins easily. Add spices like allspice or cloves for warmth. Consider mixing in extras like chopped apples, dried cranberries, or sunflower seeds. If you like nuts, stir in walnuts or pecans. You can also add chocolate chips for a sweet surprise. Serve your muffins warm for the best taste. A light dusting of powdered sugar adds a nice touch. You can also serve them with cream cheese frosting or a pat of butter. For a special touch, place muffins on a pretty plate. Garnish with a sprinkle of cinnamon or a few nuts on top. This makes them look as good as they taste! {{image_2}} You can make your pumpkin muffins healthier with a few easy swaps. First, try using whole wheat flour instead of all-purpose flour. Whole wheat adds fiber and nutrients. It also gives a nutty taste that pairs well with pumpkin. Next, you can reduce the sugar. Use less granulated sugar or brown sugar. You can also try a sugar substitute, like honey or maple syrup. Just remember, these options may change the taste and texture a bit. To switch up the flavor, consider replacing granulated sugar with maple syrup. This adds a rich, warm taste. You can also add fun ingredients to your muffins. Try chopped apples, cranberries, or raisins for a fruity touch. You might like chocolate chips for a sweet surprise, too! You can make pumpkin muffins for holidays, too. For Halloween, add spooky sprinkles on top. For Thanksgiving, mix in warm spices like cloves or allspice. These spices really bring out the cozy flavors of fall. You can also use pumpkin pie spice for a festive twist! Store your pumpkin muffins in an airtight container. This keeps them fresh. You can use a plastic or glass container. Line the bottom with a paper towel to absorb moisture. Place a layer of muffins in the container. Add another paper towel on top before sealing. This helps them stay soft and flavorful. Keep your muffins at room temperature for up to three days. If you need them to last longer, consider freezing. If you want to save muffins for later, freezing is great. Allow the muffins to cool completely. Wrap each muffin tightly in plastic wrap. Then, place them in a freezer bag. Remove as much air as possible before sealing. You can freeze muffins for up to three months. When ready to eat, take out a muffin and let it thaw at room temperature. For a warm treat, you can microwave it for about 15-20 seconds. Enjoy your muffins fresh and tasty! Can I use fresh pumpkin instead of canned? Yes, you can! Just cook and puree the fresh pumpkin. Make sure it is smooth. This can add a fresh taste to your muffins. How can I make these muffins gluten-free? To make these muffins gluten-free, swap all-purpose flour with a gluten-free blend. Check the package for the right amount. What can I substitute for vegetable oil? You can use melted coconut oil or applesauce. Both work well and keep the muffins moist. How long do the muffins stay fresh? These muffins stay fresh for about 3 days at room temperature. Store them in an airtight container to keep them soft. Batter is too thick, what to do? If your batter is too thick, add a bit of milk or water. Start with one tablespoon and mix well. Muffins didn’t rise, potential reasons? If your muffins didn’t rise, check your baking powder and baking soda. They may be old and less effective. Also, make sure you mixed well but not too much. In this article, we explored how to make delicious pumpkin muffins step by step. We covered essential ingredients like pumpkin puree and spices, followed by clear mixing instructions. I shared tips for perfecting your muffins, including how to enhance flavors and present them nicely. We also discussed variations for healthier options and seasonal twists. Finally, we included storage tips to keep your muffins fresh. With these insights, you can create tasty treats that impress. Get baking and enjoy your wonderful pumpkin muffins!

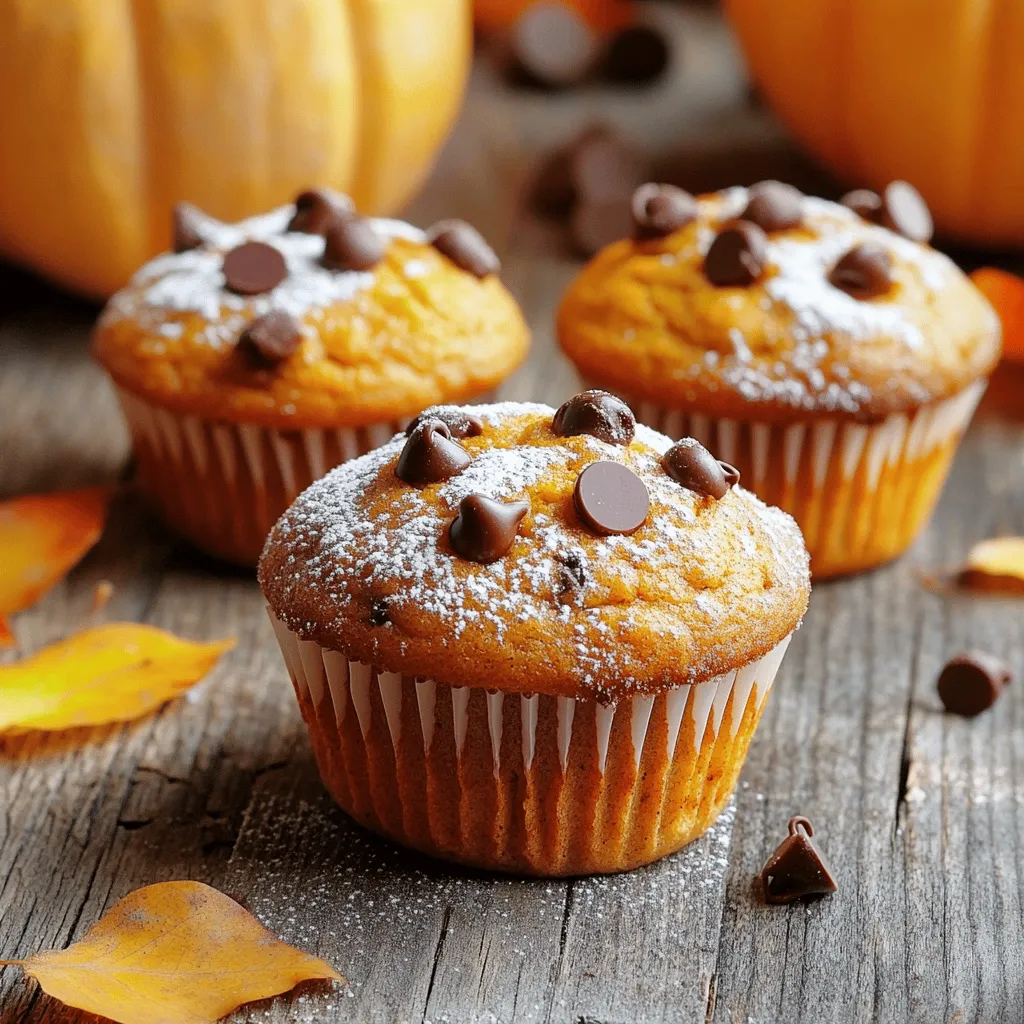
Are you ready to bake the best ever pumpkin muffins? This simple recipe combines sweet pumpkin puree with warm spices, making a treat you can’t resist. Whether you’re a first-time …

Read more

Categories Desserts

Easy Apple Crumble Delightful and Simple Dessert

August 26, 2025 by Chef Luca
- 4 medium apples (Granny Smith or Honeycrisp) - 1 tablespoon lemon juice - 1 teaspoon ground cinnamon - 1/2 cup brown sugar - 1/2 cup rolled oats - 1/3 cup all-purpose flour - 1/4 teaspoon salt - 1/4 cup unsalted butter, melted - 1/4 cup chopped walnuts or pecans (optional) You can use different apples like Fuji or Gala. These apples also work well. If you need gluten-free options, try almond flour or oat flour instead of all-purpose flour. For a dairy-free version, use coconut oil or a dairy-free spread in place of unsalted butter. Each choice can change the flavor slightly, but they all taste great. 1. Preheat your oven to 350°F (175°C). This step is key for even baking. 2. In a large bowl, slice four medium apples. I like Granny Smith or Honeycrisp. 3. Add one tablespoon of lemon juice to the apples. This keeps them fresh. 4. Sprinkle one teaspoon of ground cinnamon and half a cup of brown sugar over them. Stir well. This mix adds great flavor. 1. In another bowl, combine half a cup of rolled oats, one-third cup of all-purpose flour, and a quarter teaspoon of salt. 2. Add a quarter cup of melted unsalted butter. Mix until it becomes crumbly. 3. If you want, stir in a quarter cup of chopped walnuts or pecans. They give a nice crunch! 1. Spread the apple mixture evenly in a greased 9-inch pie dish or baking pan. 2. Evenly distribute the crumble topping over the apples. Make sure to cover them well. 3. Bake for 30-35 minutes. Look for a golden brown top and tender apples. 4. After baking, let it cool for 5-10 minutes. Enjoy it warm! How to select the best apples Choose apples that are firm and crisp. I like using Granny Smith or Honeycrisp. These apples balance sweetness and tartness well. Avoid soft or bruised apples; they won’t hold up in baking. Ensuring even baking Cut your apples into uniform slices. This helps them bake evenly. Spread the apple mixture in the dish without piling too high. A single layer cooks best. Make sure your oven is preheated before you bake. Serve your apple crumble warm. It pairs nicely with a scoop of vanilla ice cream. Whipped cream is also a great choice. A drizzle of caramel sauce adds a sweet touch. You can also sprinkle some nuts on top for extra crunch. Overcooking apples Keep an eye on your apples while baking. If they cook too long, they turn mushy. Bake just until they are tender but still hold their shape. Skipping the lemon juice Don’t skip the lemon juice! It adds a bright flavor and helps keep the apples fresh. It also balances the sweetness of the brown sugar. Use one tablespoon for the best results. {{image_2}} You can boost the flavor of your apple crumble easily. Try adding spices like nutmeg or ginger. These spices add warmth and depth. You can mix in chopped nuts too. Walnuts or pecans add a nice crunch. Each nut brings its own taste. Experiment to find what you love most. If you want a healthier version, reduce the sugar. Use natural sweeteners like honey or maple syrup. These options give a nice taste without too much sugar. For a vegan crumble, swap the butter. Use coconut oil or a vegan butter substitute. These choices keep your dessert tasty and friendly for all diets. You can change your crumble based on the season. Mix apples with berries like blueberries or strawberries. Pears also pair well with apples. This mix adds color and taste. Each fruit brings a unique flavor. Don't hesitate to try new combos; they can make your crumble even better. To keep your apple crumble fresh, cover it tightly with plastic wrap or foil. You can also place it in an airtight container. In the fridge, it lasts about 3 to 4 days. If you want to save it longer, freeze it. In the freezer, it can last up to 3 months. Just make sure to label the container with the date. To reheat, I recommend using the oven for the best texture. Preheat your oven to 350°F (175°C). Place the crumble in an oven-safe dish. Heat for about 15 to 20 minutes until it is warm and the topping is crisp again. You can also microwave it, but it may become soggy. If you use a microwave, heat in short bursts and check often. When serving stored apple crumble, warm it up for a cozy treat. Adding a scoop of vanilla ice cream or a dollop of whipped cream makes it even better. You can also drizzle some caramel sauce on top for a sweet touch. Warm apple crumble is always a hit! Granny Smith and Honeycrisp apples shine in apple crumble. Granny Smith adds a nice tartness. Honeycrisp offers sweetness and crunch. You can also use Fuji or Gala apples. They bring a different flavor and texture. A mix of these apples can create a more complex taste. Yes, you can make apple crumble ahead of time. Prepare the apple filling and topping separately. Store them in the fridge for up to a day. When ready, layer them in your dish and bake. This saves time and stress on busy days. To check if the crumble is ready, look for a golden top. The apples should be tender too. You can poke them with a fork to test. If they give easily, it’s done. The aroma will fill your kitchen, tempting your taste buds. Absolutely! To make it gluten-free, swap all-purpose flour for gluten-free flour. Almond flour or oat flour are great options. Ensure your oats are certified gluten-free if using them. This way, everyone can enjoy this delightful dessert without worry. This blog post covered everything you need to create a delightful apple crumble. We discussed the key ingredients, helpful substitutions, and each step in preparing this dish. I shared tips to perfect your crumble and avoid common mistakes. Remember, selecting the right apples and using the best baking methods will enhance your dish. With variations and storage tips, you can tailor your crumble to any occasion. Enjoy making it for friends or family. Your homemade apple crumble will surely impress.

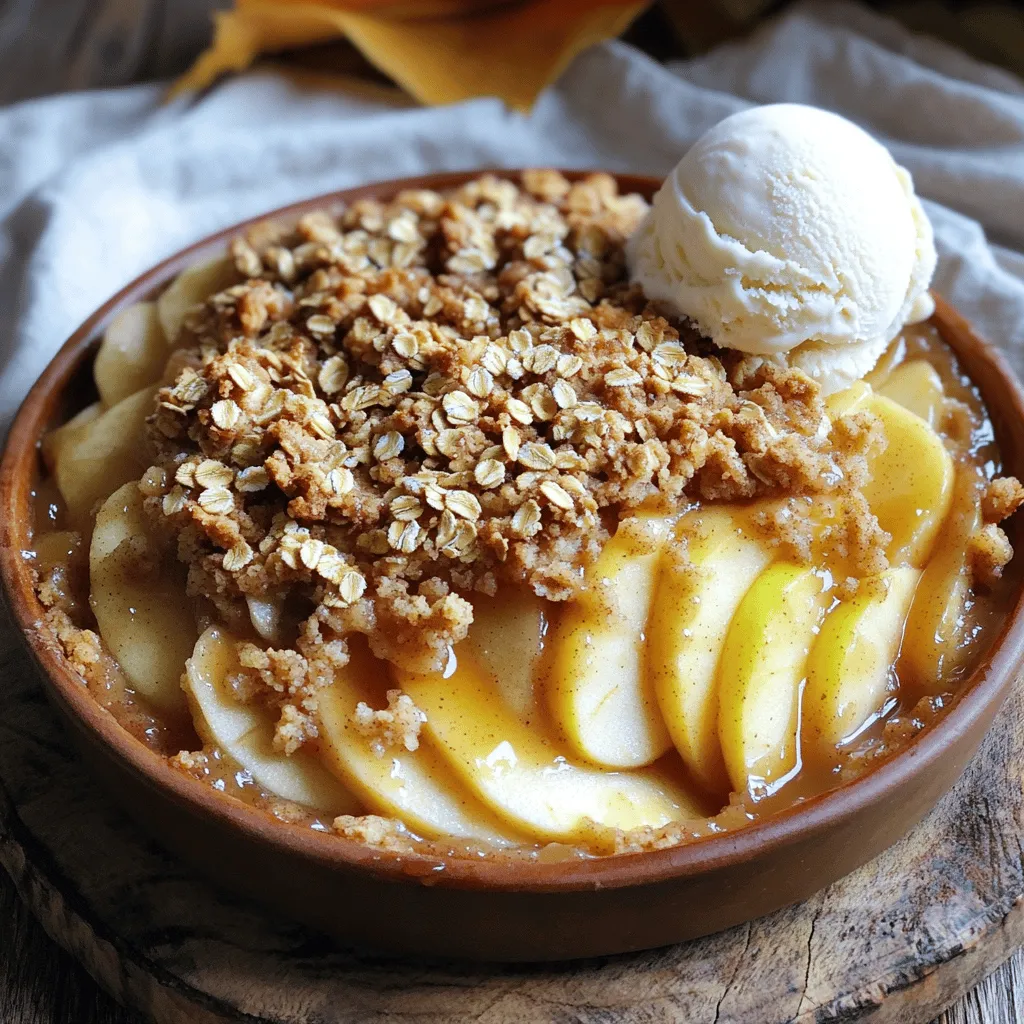
Are you craving a warm dessert that’s simple to whip up? Try my Easy Apple Crumble! With just a few fresh ingredients, you can create a delightful treat that bursts …

Read more

Categories Desserts

Pumpkin Spice Tiramisu Delicious Fall Dessert Delight

August 26, 2025 by Chef Luca
- 1 cup strong brewed coffee - 1 tablespoon pumpkin spice blend - 1 cup heavy cream - 1 cup mascarpone cheese - 1/2 cup powdered sugar - 1 cup pumpkin puree - 12 ladyfinger cookies - Cocoa powder for dusting - Optional: Whipped cream and dark chocolate shavings Gathering the right ingredients makes a big difference in your pumpkin spice tiramisu. Use fresh pumpkin puree for the best flavor. You can make your own by roasting and blending pumpkin. The strong brewed coffee gives depth to the dessert. Choose a brand you love for the best taste. For the pumpkin spice blend, you can buy it or mix cinnamon, nutmeg, and ginger. This blend gives warmth and comfort to the dish. Heavy cream and mascarpone cheese create a rich, creamy texture. This is key for a perfect tiramisu. Don’t forget the ladyfinger cookies! They soak up the coffee and add a light crunch. Use the best quality cocoa powder for dusting. It adds a nice touch to the final look. You can also add whipped cream and dark chocolate shavings for an extra treat. Each ingredient plays a role in creating this delicious fall dessert. Enjoy this process as you prepare for a lovely treat! To start, you need to combine the brewed coffee and pumpkin spice blend. Take one cup of strong brewed coffee and add one tablespoon of pumpkin spice. Stir it well and then set this mixture aside. Letting it sit will help the flavors meld together, giving your tiramisu a warm, cozy taste. Next, we move on to making the cream mixture. In a large bowl, whip one cup of heavy cream until you see soft peaks forming. This step is key for a light texture. In another bowl, mix one cup of mascarpone cheese with half a cup of powdered sugar. Stir this until it's smooth and creamy. Now, gently fold the whipped cream into the mascarpone mixture. Be careful not to deflate the cream. Finally, add one cup of pumpkin puree and fold it in gently until it is well blended. This creamy mixture brings the pumpkin spice flavor to life. Now it's time to assemble your tiramisu. First, quickly dip each ladyfinger into the coffee mixture. Make sure they soak but don't get too soggy. Place a layer of soaked ladyfingers in a rectangular dish. Then, spread half of the pumpkin mascarpone cream over this layer. Repeat by adding another layer of dipped ladyfingers and the rest of the mascarpone mixture on top. Smooth the top layer with a spatula. Finally, dust the top generously with cocoa powder. Cover the dish with plastic wrap and refrigerate it for at least four hours, but overnight is best. This allows all the flavors to blend beautifully. To get soft peaks in whipped cream, start with cold cream. Use a clean bowl and beaters. Whip the cream until it thickens but still flows. You want it to hold its shape but not be too stiff. This ensures a light texture in your tiramisu. Folding ingredients is key to keeping air in the mixture. Use a spatula and scoop from the bottom. Gently lift and turn the mixture until combined. Be careful not to stir too hard. This keeps the whipped cream fluffy. For a rich flavor, play with your pumpkin spice blend. You can mix cinnamon, nutmeg, and ginger, but don’t stop there. Try adding allspice, cloves, or even a pinch of cardamom for depth. Presentation matters! For a lovely touch, add optional garnishes. A dollop of whipped cream on top looks great. Dust with cocoa powder and sprinkle dark chocolate shavings for extra flair. These little details make your dessert stand out. {{image_2}} You can easily swap some ingredients to fit your needs. - For a dairy-free option, use coconut cream instead of heavy cream. Use vegan cream cheese in place of mascarpone. - If you need a gluten-free dessert, look for gluten-free ladyfingers. They are easy to find at many stores. These swaps keep the flavors rich and tasty while catering to your dietary needs. Want to mix things up? You can add fun flavors to your tiramisu! - Try adding a drizzle of chocolate or caramel. This gives your dessert a sweet twist and a rich taste. - You can also incorporate nuts like pecans or walnuts. They add a lovely crunch. - For an extra kick, mix in spices like cardamom or allspice. These spices pair well with pumpkin and make it unique. These variations let you create a pumpkin spice tiramisu that is all your own! To store leftovers, place the tiramisu in an airtight container. Cover it tightly to keep it fresh. You can also use plastic wrap if you prefer. This dessert stays good in the fridge for about 3 to 5 days. The flavors will blend more the longer it sits, so you might enjoy it even more on the second day! Yes, you can freeze Pumpkin Spice Tiramisu! To do this, wrap it well in plastic wrap and then foil. This extra layer helps prevent freezer burn. It can stay in the freezer for up to 2 months. When you're ready to eat it, thaw it in the fridge overnight. Avoid thawing it at room temperature, as that may change the texture. Enjoy your delicious dessert when it's ready! What is the origin of tiramisu? Tiramisu comes from Italy. It means "pick me up." This dessert uses coffee and layers of cream. It became popular in the 1960s. Now, people love many flavors of tiramisu, including pumpkin spice. Can I make tiramisu without alcohol? Yes, you can make tiramisu without alcohol. Traditional recipes often use coffee liqueur. For this pumpkin spice version, we skip the alcohol. Just use strong brewed coffee for flavor. It still tastes great! How long does Tiramisu last in the fridge? Tiramisu lasts about 3 to 4 days in the fridge. Keep it covered with plastic wrap. This helps keep it fresh. The flavors get better over time, so enjoy it soon! What to do if your mascarpone mixture is too runny? If your mascarpone mixture is runny, chill it for a bit. Place it in the fridge for 15 to 30 minutes. This helps it firm up. You can also add more powdered sugar to thicken it. How to fix soggy ladyfingers? If your ladyfingers are soggy, don't soak them too long. Quickly dip each one in the coffee mixture. They should be moist, not soaked. If they are already soggy, you can layer them with less cream for balance. In this blog post, we explored how to make a delicious Pumpkin Spice Tiramisu. We covered essential ingredients, step-by-step instructions, and tips for perfect texture and flavor. You learned about variations to suit your taste and proper storage methods to keep it fresh. Remember, this dessert blends classic flavors with a fall twist. Enjoy making this treat for yourself and your friends!

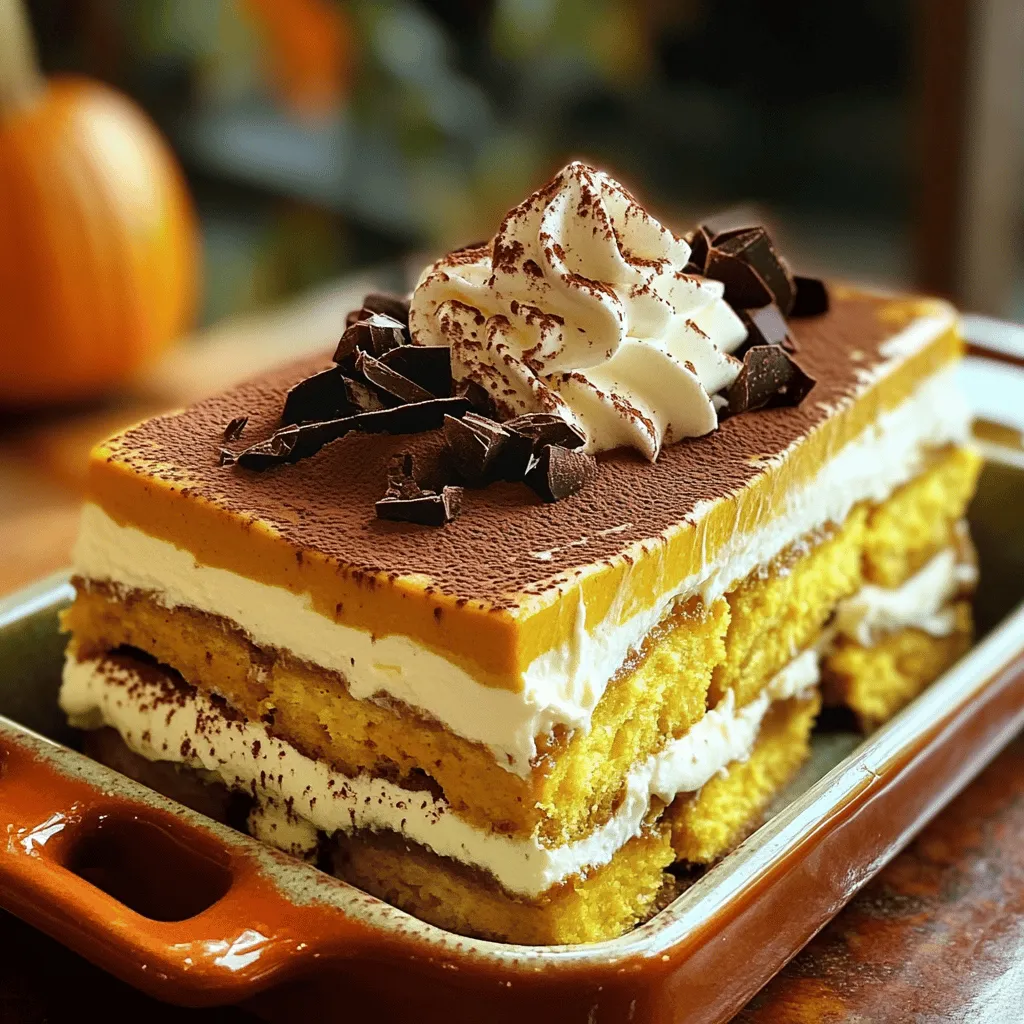
Fall is here, and what better way to celebrate than with Pumpkin Spice Tiramisu? This delightful dessert combines rich flavors of coffee, pumpkin, and cream, making it perfect for cozy …

Read more

Categories Desserts

Mini Pumpkin Bread with Cinnamon Swirl Delight

August 26, 2025 by Chef Luca
To make mini pumpkin bread, you need some key ingredients. These give the bread its moistness and flavor. Here’s what you need: - 1 cup canned pumpkin puree - 1/2 cup granulated sugar - 1/2 cup brown sugar, packed - 1/3 cup vegetable oil - 1/3 cup unsweetened applesauce - 2 large eggs - 1 teaspoon vanilla extract - 1 1/2 cups all-purpose flour - 1 teaspoon baking soda - 1/2 teaspoon baking powder - 1 teaspoon ground cinnamon - 1/2 teaspoon ground nutmeg - 1/4 teaspoon ground ginger - 1/4 teaspoon salt These ingredients work together to create a soft and tasty bread. The pumpkin gives it a lovely color and moistness. The spices add warmth and flavor. You can add some extras to your mini pumpkin bread. These are not needed, but they add great crunch and taste: - 1/2 cup chopped walnuts or pecans Nuts give a nice texture and flavor. You can choose either walnuts or pecans based on your taste. If you don’t have some ingredients, you can replace them. Here are a few ideas: - For vegetable oil, you can use melted coconut oil or melted butter. - You can swap applesauce with more pumpkin puree if you want. - For the flour, you can use a gluten-free blend if needed. These swaps keep the flavor and texture of the bread intact. Just ensure you measure correctly for the best results. First, set your oven to 350°F (175°C). This is the perfect temperature for baking. Next, get your mini loaf pans ready. You can grease them with butter or oil. Then, sprinkle some flour inside. This helps the bread come out easily. If you prefer, you can use silicone molds, which are easy to work with. In a large bowl, combine these wet ingredients: - 1 cup canned pumpkin puree - 1/2 cup granulated sugar - 1/2 cup brown sugar, packed - 1/3 cup vegetable oil - 1/3 cup unsweetened applesauce - 2 large eggs - 1 teaspoon vanilla extract Mix them until they are smooth and well blended. This step creates the base for your bread. Now, grab another bowl and whisk together the dry ingredients: - 1 1/2 cups all-purpose flour - 1 teaspoon baking soda - 1/2 teaspoon baking powder - 1 teaspoon ground cinnamon - 1/2 teaspoon ground nutmeg - 1/4 teaspoon ground ginger - 1/4 teaspoon salt Make sure everything is mixed well. This helps the bread rise and ensures great flavor. In a small bowl, mix together: - 2 tablespoons brown sugar - 1 teaspoon ground cinnamon This mixture will give your bread a lovely sweet swirl. Set it aside for later. Now, pour half of the pumpkin batter into each mini loaf pan. Take half of your cinnamon swirl mixture and sprinkle it over the batter. Use a knife or a skewer to swirl it gently. This creates beautiful patterns in the bread. Then, top with the remaining pumpkin batter. Sprinkle the rest of the cinnamon mixture on top and swirl again. Place the pans in the oven. Bake for 25-30 minutes. To check if they are done, poke a toothpick into the center. If it comes out clean, the bread is ready. Once baked, let the mini loaves cool in the pans for about 10 minutes. Then, transfer them to a wire rack to cool completely. Enjoy the warm, sweet aroma filling your kitchen! To ensure your mini pumpkin bread stays moist, use canned pumpkin puree. It has more moisture than fresh pumpkin. Mix the wet ingredients well before adding dry ones. This helps keep the bread soft. Don’t over-mix the batter. Just stir until it is combined. Over-mixing can make the bread tough. Adding a bit of applesauce also helps keep it moist. One common mistake is skipping the greasing of the pans. Always grease and flour your mini loaf pans or use silicone molds. This prevents sticking. Another mistake is not checking the oven temperature. Ovens can be off by a few degrees. Use an oven thermometer to be sure. Avoid opening the oven door too often. This lets heat escape and can affect baking time. For a beautiful cinnamon swirl, sprinkle the mixture evenly over the batter. Use a knife or skewer to create gentle swirls. Don’t mix it all in. You want to see the swirl in the finished bread. If you want a stronger flavor, add more cinnamon to the swirl mix. Aim for a balance of pumpkin and cinnamon flavors in every bite. {{image_2}} You can make your mini pumpkin bread even more tasty! Here are some fun ideas: - Nuts: Add 1/2 cup of chopped walnuts or pecans for a crunchy bite. - Chocolate Chips: Try 1/2 cup of chocolate chips for a sweet surprise. - Dried Fruits: Add raisins or cranberries for a fruity twist. - Spices: Mix in a pinch of cloves or allspice for extra warmth. These additions can make each loaf unique and fun to share! Want to make this recipe gluten-free? It’s easy! Just swap all-purpose flour with a gluten-free blend. Look for a blend that includes xanthan gum for best results. Use the same amount, and mix it well with your dry ingredients. You will still get a soft and tasty loaf that everyone can enjoy! You don’t have to stick to mini loaves! You can use different pan sizes: - Standard Loaf Pan: Bake for 50-60 minutes. - Muffin Pan: Fill the cups halfway and bake for 15-20 minutes. Keep an eye on them! Use a toothpick to check if they are done. Adjust the baking time as needed for perfect results. To keep your mini pumpkin bread fresh, store it in an airtight container. Place the cooled loaves in the container and seal it tight. You can also wrap each loaf in plastic wrap before placing it in the container. This helps to keep moisture in and prevents the bread from drying out. If you want to save some for later, freezing is a great option. First, let the mini loaves cool completely. Then, wrap each loaf tightly in plastic wrap. After wrapping, place them in a freezer-safe bag or container. This helps to keep them fresh for a longer time. When you want to enjoy a loaf, simply thaw it in the fridge overnight. For the best taste and texture, try to eat the mini pumpkin bread within a week if stored at room temperature. If frozen, the bread can last for up to three months. However, for optimal flavor, I recommend consuming it within one month. Yes, you can use fresh pumpkin. First, cook and puree the pumpkin. Bake it until soft. Then, let it cool before using it in the recipe. Fresh pumpkin gives a nice flavor and texture. Check the bread with a toothpick. Insert it into the center of the loaf. If it comes out clean, the bread is done. If it has batter on it, bake a few more minutes. Yes, you can make it ahead. Bake the mini pumpkin bread and let it cool. Then, wrap it in plastic wrap. Store it in the fridge for up to three days. Mini pumpkin bread tastes great with many things. Try serving it with whipped cream or vanilla ice cream. A light dusting of powdered sugar works well too. You can also pair it with coffee or tea for a cozy treat. This guide covers all you need for mini pumpkin bread. You learned about essential and optional ingredients, plus measurements. I walked you through the steps for mixing, baking, and swirling. Remember the tips for moist bread and avoid common mistakes. Explore variations for taste and size. Proper storage keeps your bread fresh. You can even answer questions like using fresh pumpkin. With this knowledge, you can bake delicious mini pumpkin bread every time. Enjoy your baking journey!

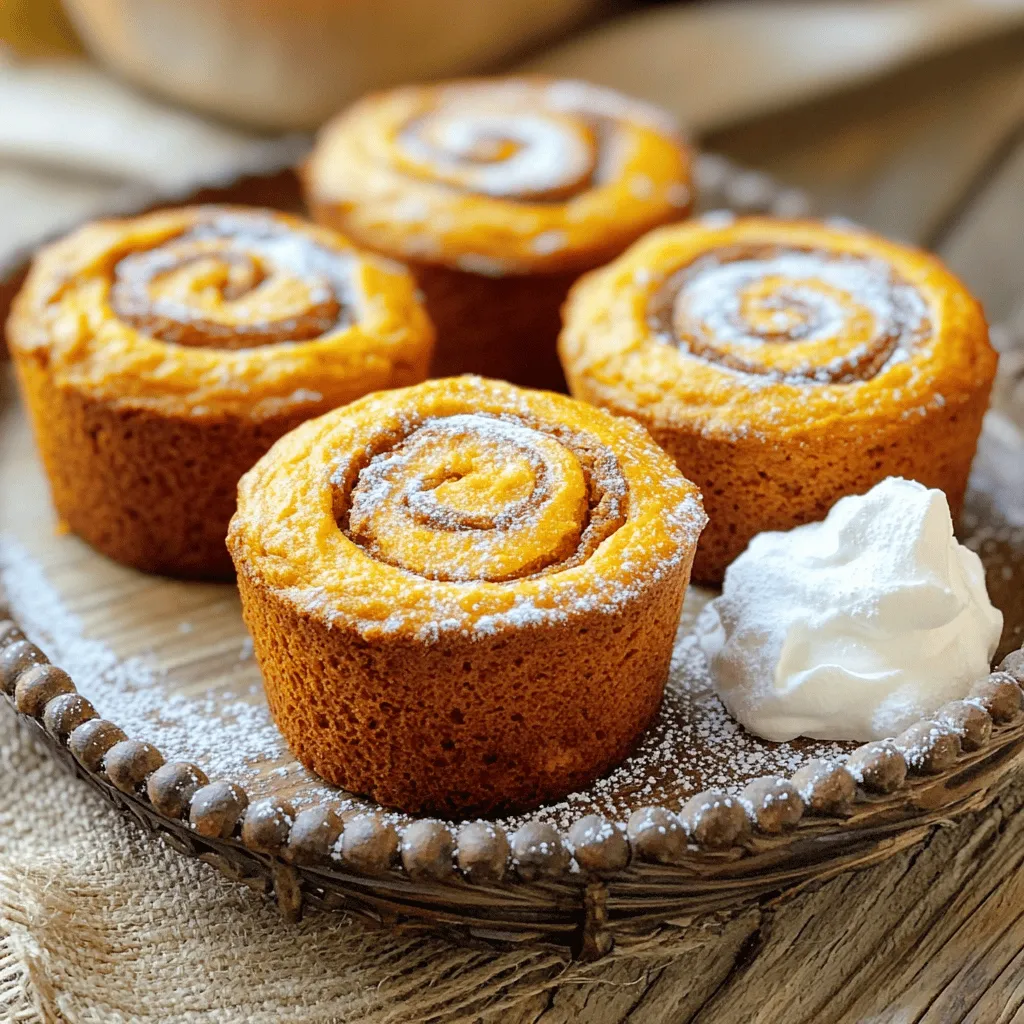
Get ready to spice up your baking with my Mini Pumpkin Bread with Cinnamon Swirl Delight! This recipe is simple, fun, and perfect for any season. You’ll learn how to …

Read more

Categories Desserts

One Pot Creamy Sun Dried Tomato Pasta Delight

August 26, 2025 by Chef Luca
- 12 oz. (340g) pasta of choice (fusilli or penne work well) - 1 cup sun-dried tomatoes, chopped (in oil, drained) - 4 garlic cloves, minced - 1 medium onion, diced - 2 cups vegetable broth - 1 cup heavy cream or coconut cream for a lighter version - 1/2 cup grated Parmesan cheese (or nutritional yeast for a vegan option) - 2 cups fresh spinach - 1 teaspoon dried basil - 1 teaspoon dried oregano - Salt and pepper to taste - 2 tablespoons olive oil - Fresh basil leaves for garnish You can easily adapt this dish to fit your needs. Here are some options: - Gluten-Free: Use gluten-free pasta such as brown rice or quinoa pasta. - Dairy-Free: Substitute heavy cream with coconut cream and use nutritional yeast instead of Parmesan. - Vegan: Use all plant-based ingredients, including nutritional yeast for cheese. These swaps keep the dish tasty while meeting different diet needs. For the best results, precise measuring is key. Here’s how: - Pasta: Use a kitchen scale to ensure you have the right amount. - Liquid Ingredients: Use measuring cups for broth and cream to avoid excess. - Cheese: Grate your Parmesan before measuring for even distribution. Accurate measuring will give you a perfect texture and flavor. Start by gathering all your ingredients. You need: - 12 oz. pasta (like fusilli or penne) - 1 cup sun-dried tomatoes, chopped - 4 garlic cloves, minced - 1 medium onion, diced - 2 cups vegetable broth - 1 cup heavy cream or coconut cream - 1/2 cup grated Parmesan cheese or nutritional yeast - 2 cups fresh spinach - 1 teaspoon dried basil - 1 teaspoon dried oregano - Salt and pepper to taste - 2 tablespoons olive oil - Fresh basil leaves for garnish Chop the sun-dried tomatoes and mince the garlic. Dice the onion to get everything ready. In a large pot, heat the olive oil over medium heat. Add the diced onion and cook until it turns clear, about 3-4 minutes. Then, stir in the minced garlic and cook for one more minute. This step builds a great base flavor. Next, add the chopped sun-dried tomatoes. Cook them with the onions and garlic for about 2 minutes. This allows the flavors to blend. Now, pour in the vegetable broth and bring it to a gentle boil. Once boiling, add the pasta. Lower the heat and let it simmer. Cook the pasta according to the package instructions, usually around 10-12 minutes. Stir occasionally to keep it from sticking. Once the pasta is al dente, mix in the heavy cream or coconut cream, grated Parmesan or nutritional yeast, dried basil, and oregano. Stir until everything is creamy and well combined. Finally, add the fresh spinach. Stir until it wilts. Season with salt and pepper to taste. Let it sit for a couple of minutes off the heat to thicken before serving. To check if your pasta is done, taste a piece. It should be firm but not hard. This is called "al dente." If it's too soft, you have cooked it too long. Remember, the pasta will continue to cook a bit after you take it off the heat. So, check it just before the time is up. Enjoy your creamy sun-dried tomato pasta! To boost flavor, add fresh herbs. Fresh basil is a great choice. You can also try parsley or thyme. These herbs brighten the dish and add a nice aroma. If you want more depth, consider adding a pinch of red pepper flakes. This will give a slight kick without overpowering the dish. Creaminess is key for this pasta. Use heavy cream for a rich texture. If you prefer a lighter version, coconut cream works well too. To keep the sauce creamy, stir well after adding the cream and cheese. If it seems too thick, add a bit more vegetable broth until you reach the desired consistency. Avoid overcooking the pasta. Cook it until it's al dente, which means firm but tender. This keeps the pasta from becoming mushy. Always stir the pasta while it cooks. This helps prevent it from sticking together. Lastly, taste as you go. Adjust the salt and pepper to fit your taste. This way, your dish will be just right! {{image_2}} You can easily make this dish vegan. Swap the heavy cream for coconut cream. Use nutritional yeast instead of Parmesan cheese. Both choices keep the creaminess while adding a nice flavor. You can also add more veggies. Try bell peppers or mushrooms for extra texture and taste. If you need gluten-free options, use gluten-free pasta. Many brands offer great choices like brown rice or chickpea pasta. Just cook them according to the package. The flavors from sun-dried tomatoes and spices will still shine through. Enjoy the same creamy goodness without the gluten! For a heartier meal, you can add proteins. Cook diced chicken or shrimp in the pot before the onions. Sauté them until they are fully cooked. This adds protein and makes the dish more filling. Just mix them in with the pasta toward the end. It’s a simple way to boost flavor and nutrition! After enjoying your One Pot Creamy Sun Dried Tomato Pasta, store leftovers in an airtight container. Make sure it cools down to room temperature first. This helps keep the pasta fresh and tasty. Store it in the fridge for up to three days. If you want to keep it longer, consider freezing it. To reheat, place the pasta in a pot over low heat. Add a splash of vegetable broth or water to help restore the creaminess. Stir often to heat evenly. You can also use a microwave. Cover the dish lightly and heat in short bursts, stirring in between. This keeps the pasta from drying out. For long-term storage, freeze the pasta in individual portions. Use freezer-safe bags or containers. Squeeze out as much air as possible to prevent freezer burn. You can freeze it for up to three months. When ready to eat, thaw it overnight in the fridge. Then, reheat as explained above for the best results. Yes, you can use many kinds of pasta for this dish. Fusilli and penne work great, but you could also try spaghetti or farfalle. The key is to adjust the cooking time based on the pasta you choose. Check the package for how long to cook it. Just remember to stir often to keep it from sticking! To make this recipe dairy-free, swap the heavy cream for coconut cream. Use nutritional yeast instead of Parmesan cheese. Both options give a good creamy texture and taste. You won't miss the dairy at all, and the dish stays rich and flavorful! This pasta pairs well with simple side dishes. A fresh green salad adds a nice crunch. Roasted vegetables also complement the creamy sauce. If you want bread, garlic bread is a perfect choice. These sides balance the meal and make it even more enjoyable! This blog post covered key steps for a delicious pasta dish. We discussed the best ingredients, cooking methods, and flavor tips. I also shared options for various dietary needs, including vegan and gluten-free choices. Plus, we explored storage and reheating practices to keep your dish fresh. In cooking, you can always adjust and innovate. Use this guide to create your perfect pasta every time. Happy cooking!

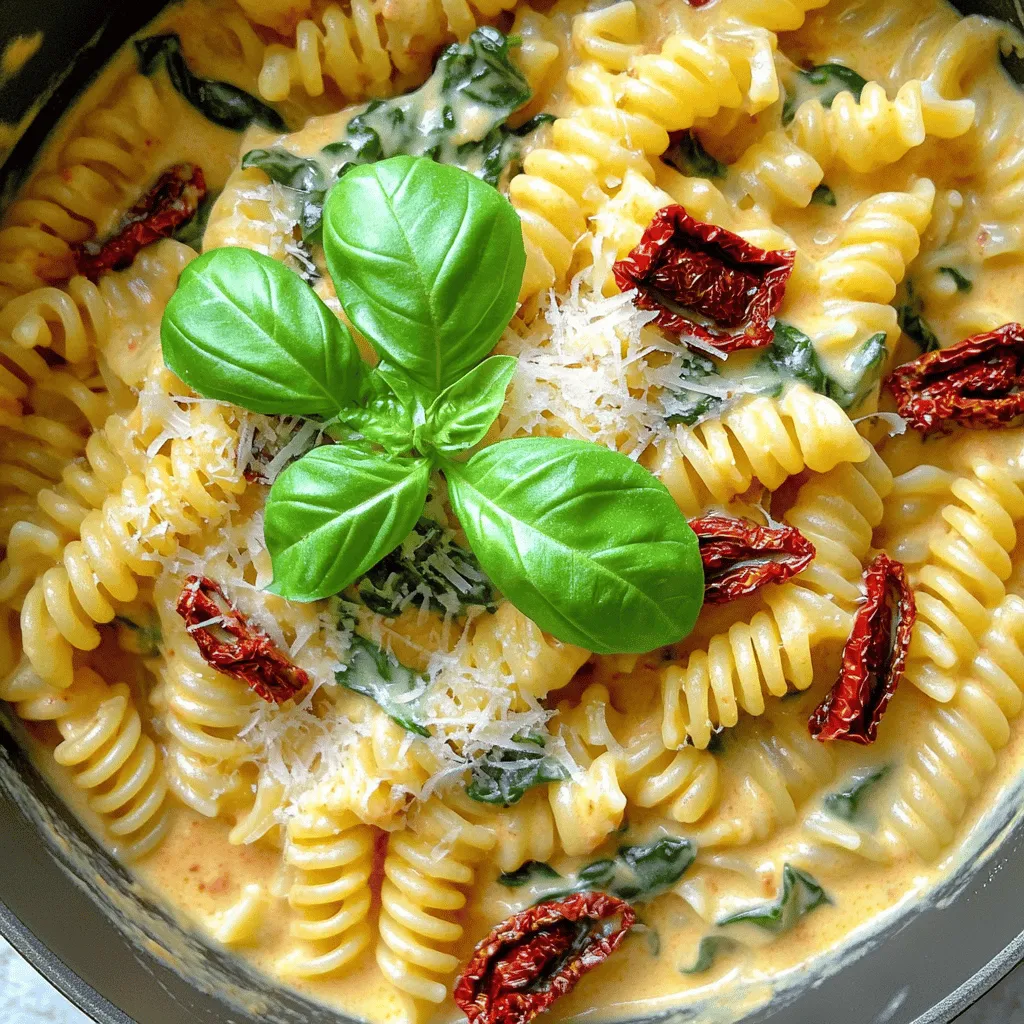
Looking for a quick and tasty dinner? You’ve found it with my One Pot Creamy Sun Dried Tomato Pasta Delight! This dish is simple, creamy, and bursting with flavor. Best …

Read more

Categories Dinner

Caramel Apple Cookies Delightful and Easy Recipe

August 26, 2025 by Chef Luca
To make caramel apple cookies, you need the following: - 2 cups all-purpose flour - 1 teaspoon baking soda - 1/2 teaspoon salt - 1 teaspoon cinnamon - 3/4 cup unsalted butter, softened - 1 cup brown sugar, packed - 1/2 cup granulated sugar - 1 large egg - 1 teaspoon vanilla extract - 1 1/2 cups diced apples (preferably Granny Smith) - 1 cup caramel bits or soft caramel, cut into small pieces - 1/2 cup chopped walnuts or pecans (optional) You can swap some ingredients if needed. Use whole wheat flour instead of all-purpose flour for a nutty taste. Coconut oil works well instead of butter. For the sugars, try using coconut sugar for a deeper flavor. If you lack eggs, a flax egg (1 tablespoon flaxseed meal mixed with 2.5 tablespoons water) can work too. To make your cookies even better, consider adding some extra goodies. You can mix in: - 1/2 cup chocolate chips for sweetness - Dried cranberries for a tart twist - A sprinkle of oats for added texture These add-ins can make your cookies unique and fun! First, you need to prepare the oven. Preheat it to 350°F (175°C). This step is key for even baking. While the oven heats, line two baking sheets with parchment paper. This will stop the cookies from sticking. Now, grab a bowl and whisk together the dry ingredients. Combine 2 cups of all-purpose flour, 1 teaspoon of baking soda, 1/2 teaspoon of salt, and 1 teaspoon of cinnamon. Mixing these first helps the cookies rise and adds great flavor. In a large mixing bowl, cream 3/4 cup of softened unsalted butter with 1 cup of brown sugar and 1/2 cup of granulated sugar. Use a mixer to blend until it looks light and fluffy. This step gives your cookies a nice texture. Next, add 1 large egg and 1 teaspoon of vanilla extract to the butter and sugar mix. Beat these in well until everything is fully combined. The egg adds moisture and helps bind the dough together. Now, it’s time to mix the dry ingredients with the wet. Gradually add the dry mix to the wet ingredients. Stir gently until just combined. Be careful not to overmix, or your cookies may turn out tough. Fold in 1 1/2 cups of diced apples and 1 cup of caramel bits. If you like, add 1/2 cup of chopped walnuts or pecans too. Use a cookie scoop or a tablespoon to drop rounded balls of dough onto your baking sheets. Space them about 2 inches apart. Bake for 10-12 minutes. The edges should be golden, and the centers might look a bit soft. They will firm up as they cool. Let them rest on the baking sheets for 5 minutes before moving them to wire racks. To make the best caramel apple cookies, follow these tips: - Use fresh apples. Granny Smith apples add a great tartness. - Measure carefully. Use a kitchen scale for precise flour measurement. - Soften your butter. Room-temperature butter mixes better with sugars. - Don’t over-mix. Stir just until combined for soft and chewy cookies. - Chill the dough. Refrigerate for 30 minutes to enhance flavors and texture. Here are some mistakes to watch out for: - Skipping the salt. It enhances flavors, so don’t leave it out. - Underbaking. Cookies may look done but will set as they cool. - Too much flour. Spoon flour into the cup and level it off. - Not spacing the cookies. Leave enough room for them to spread. - Using cold ingredients. They can lead to uneven mixing and texture. Cooling and presenting your cookies well makes a big difference: - Cool on wire racks. This prevents sogginess and helps them firm up. - Drizzle caramel. Melt caramel and drizzle it on the cooled cookies. - Sprinkle sea salt. A pinch adds contrast and enhances flavor. - Use a rustic platter. Serve on wood for a cozy autumn vibe. - Add a touch of cinnamon. Dust with cinnamon for a beautiful finish. {{image_2}} To make these cookies nut-free, simply skip the chopped walnuts or pecans. This keeps the cookies safe for those with nut allergies. The cookies will still be soft and delicious without the nuts. You can add more caramel bits or apples for extra flavor. You can switch the apples for other fruits. Try using diced pears or peaches. They bring a sweet twist to the cookies. Make sure the fruit is firm so it holds up well when baked. You can also use dried fruits like cranberries for a chewy texture. For a gluten-free version, use a gluten-free flour blend. This keeps the texture light and fluffy. If you're vegan, swap the egg for a flax egg. Mix one tablespoon of ground flaxseed with three tablespoons of water. Let it sit for a few minutes until it thickens. You can also replace the butter with coconut oil or a vegan butter alternative. These swaps make the cookies suitable for all diets while keeping them tasty. To keep your caramel apple cookies fresh, place them in an airtight container. Line the bottom with parchment paper to absorb moisture. Store at room temperature for up to a week. This helps keep them soft and tasty. You can freeze your cookies for later. Allow them to cool completely first. Then, place them in a single layer on a baking sheet. Freeze for about 2 hours until firm. Once frozen, transfer them to a freezer-safe bag. Remove as much air as possible. They will stay good for up to three months. To maximize freshness, eat your cookies within a week if stored at room temperature. If frozen, eat them within three months for the best flavor. Always check for signs of freezer burn if stored for a long time. Enjoy your cookies while they are at their best! You can tell your cookies are done when the edges turn golden brown. The centers may seem soft, but they will firm up as they cool. To be sure, set a timer for 10-12 minutes. Check them closely. If they look a bit underbaked in the center, that’s okay. They will bake more off the heat. Yes, you can use different apples. Granny Smith apples work best for their tartness. You can also try Honeycrisp or Fuji apples. Just remember, sweeter apples will make your cookies sweeter. Adjust sugar if needed. If you don’t have caramel bits, use soft caramel candy. You can chop it into small pieces. Another option is to use homemade caramel sauce. Just drizzle it on top after baking. To make chewier cookies, try adding an extra egg yolk. This will add moisture and richness. You can also reduce the baking time by a minute or two. This keeps the center soft and chewy. Yes, these cookies freeze well. Let them cool completely before freezing. Place them in a freezer bag or container. They can last up to three months in the freezer. Just thaw them at room temperature when you want to enjoy them! In this post, we explored key ingredients and step-by-step baking tips for perfect cookies. We discussed ingredient substitutions and optional add-ins to suit your taste. I shared best practices, common mistakes, and how to store your cookies for freshness. With these insights, you can avoid pitfalls and create delicious treats for any occasion. Baking cookies can be fun and easy. Enjoy your baking journey and make every batch special!

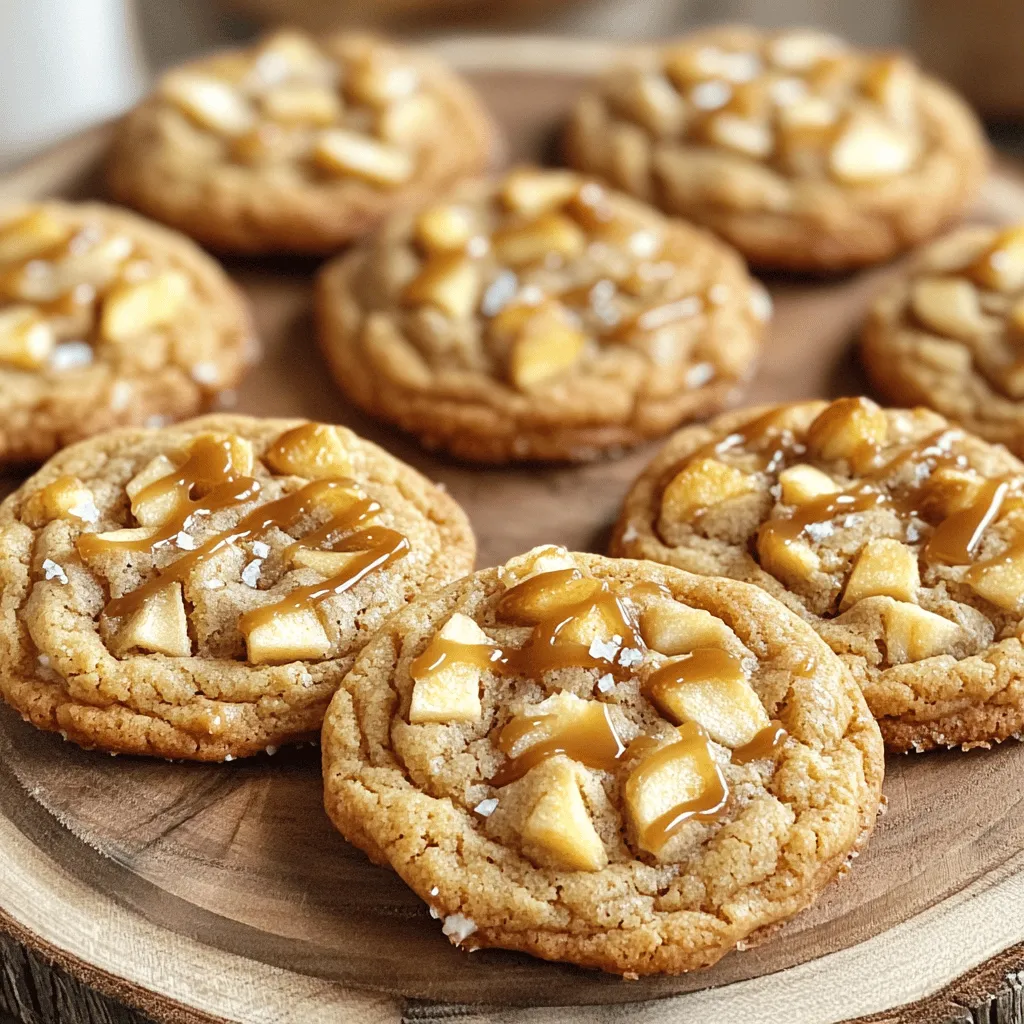
Are you ready to enjoy a sweet twist on a classic treat? In this article, I’ll share my simple and delicious recipe for Caramel Apple Cookies. These soft, chewy cookies …

Read more

Categories Desserts

Protein Packed Greek Yogurt Pumpkin Muffins Delight

August 26, 2025 by Chef Luca
Creating Protein Packed Greek Yogurt Pumpkin Muffins is simple and fun. You will need these key ingredients: - 1 cup canned pumpkin puree - 1 cup Greek yogurt (plain, unsweetened) - 1/2 cup honey or maple syrup - 2 large eggs - 1 tsp vanilla extract - 1 1/2 cups whole wheat flour - 1 tsp baking powder - 1 tsp baking soda - 1 1/2 tsp ground cinnamon - 1/2 tsp nutmeg - 1/2 tsp salt - 1/2 cup chopped nuts (walnuts or pecans) - 1/2 cup dark chocolate chips (optional) Each ingredient serves a purpose. The pumpkin puree adds moisture and flavor. Greek yogurt boosts protein and makes muffins fluffy. Honey or maple syrup sweetens without refined sugar. Eggs bind everything together for a perfect texture. Whole wheat flour gives you whole grains, making them heartier. Baking powder and baking soda help the muffins rise. The spices, like cinnamon and nutmeg, add warmth and a fall vibe. Finally, nuts and chocolate chips bring crunch and sweetness. Using these ingredients, you can create a tasty treat that is also healthy. Enjoy baking! Preheat your oven to 350°F (175°C). While the oven warms up, grab a muffin tin. You can line it with paper liners or lightly grease it. This step helps to ensure that your muffins come out easily after baking. In a large mixing bowl, mix the pumpkin puree, Greek yogurt, and honey or maple syrup. Add the eggs and vanilla extract. Stir until the mixture is smooth and well blended. This blend adds moisture and gives your muffins a rich flavor. In another bowl, whisk together the whole wheat flour, baking powder, baking soda, ground cinnamon, nutmeg, and salt. This mix adds structure and flavor to your muffins. Be sure to break up any clumps in the flour for an even texture. Gradually add the dry mix to the wet mix. Stir gently until just combined. Be careful not to overmix; this keeps the muffins light and fluffy. Now, fold in the chopped nuts and dark chocolate chips if you want a sweet twist. This adds a nice crunch and flavor. Using a scoop or spoon, fill each muffin cup about 3/4 full with the batter. Bake in the preheated oven for 18-22 minutes. Check if they are done by inserting a toothpick into the center. If it comes out clean, your muffins are ready! Let the muffins cool in the pan for about 5 minutes. Then, transfer them to a wire rack to cool completely. For a nice touch, serve them warm with a drizzle of honey or a dollop of Greek yogurt. You can also sprinkle some pumpkin seeds on top before baking for extra crunch and a beautiful look. - Recommended baking times and temperature: Set your oven to 350°F (175°C). Bake the muffins for 18-22 minutes. Check them with a toothpick. It should come out clean when done. - How to avoid overmixing: When you mix the wet and dry ingredients, stir gently. Stop mixing as soon as you see no dry flour. This keeps your muffins light and fluffy. - Alternative sweeteners: You can swap honey with maple syrup. Agave nectar also works well if you prefer. Adjust the amount based on your taste. - Gluten-free options: Use a gluten-free flour blend in place of whole wheat flour. Make sure it has a good binding agent for best results. - Additional spices or add-ins for more flavor: Try adding a pinch of ground ginger or allspice for warmth. Chopped apples or cranberries can add sweetness. A handful of oats can give a nice texture, too. {{image_2}} You can easily switch up the flavors of your muffins. Try a pumpkin spice variation. Just add more cinnamon, ginger, or cloves. These spices give a warm taste that feels like fall. For fun add-ins, think about using chopped apples or cranberries. They add sweetness and a tart kick. You can also sprinkle in some pumpkin seeds for extra crunch. If you want to cut back on sugar, you can use ripe bananas or applesauce. They add sweetness without extra sugar. This keeps your muffins tasty and healthy. You can also use low-fat Greek yogurt. This helps reduce the fat content while keeping protein high. Your muffins will stay soft and moist, but be lighter. These muffins are great for breakfast or as a snack. They are easy to grab on the go. Pair them with a glass of milk or a cup of coffee for a nice start to your day. If you're feeling creative, top them with a dollop of Greek yogurt. A drizzle of honey adds a sweet touch too. You can serve them warm or at room temperature. Enjoy them however you like! Store your muffins in an airtight container. This keeps them fresh for up to three days. If you want to enjoy them longer, place parchment paper between layers. This helps prevent sticking. You can also wrap them individually in plastic wrap. To freeze your muffins, first let them cool completely. Wrap each muffin in plastic wrap. Then place them in a freezer bag. This method keeps them fresh for up to three months. When you're ready to enjoy them, just take one out and let it thaw in the fridge overnight. You can also warm them in the microwave for a quick treat. To reheat your muffins, use the microwave or oven. If using the microwave, heat for 15-20 seconds. This warms them without drying them out. For the oven, preheat to 350°F (175°C) and place muffins in for 5-10 minutes. This method makes them taste freshly baked again. Enjoy your protein-packed Greek yogurt pumpkin muffins warm! These muffins stay fresh for about 3 to 5 days at room temperature. Store them in an airtight container. You can also put them in the fridge, where they will last up to a week. If you want to keep them longer, freeze them. They can stay in the freezer for up to three months. Yes, you can use fresh pumpkin. To do this, roast a small pumpkin. Cut it in half, remove the seeds, and bake it until soft. Then, scoop out the flesh and puree it. Make sure to drain any excess water, as fresh pumpkin can be more watery than canned. This will help your muffins stay fluffy. These muffins are high in protein due to Greek yogurt and eggs. Greek yogurt adds creaminess and protein. Eggs also provide essential amino acids. Together, they give your muffins a protein boost. Whole wheat flour adds a bit more protein, too. Yes, you can make these muffins vegan. Replace Greek yogurt with a plant-based yogurt. Use flaxseed meal or chia seeds mixed with water instead of eggs. Use maple syrup in place of honey. This way, you can enjoy these muffins without animal products. Absolutely! You can add chopped nuts like walnuts or pecans for crunch. Dried fruits, like cranberries or raisins, can add sweetness. You can also mix in seeds or coconut flakes. If you like chocolate, dark chocolate chips are a great addition, too. Feel free to get creative! This blog covers all you need for delicious pumpkin muffins. We discussed key ingredients like pumpkin puree, Greek yogurt, and spices. I shared steps to mix and bake, plus tips on storing and serving. You can enjoy these muffins for breakfast, snacks, or even seasonal gatherings. Remember, you can customize them to fit your taste. Whether you want added nuts or chocolate chips, the choice is yours. Enjoy baking these tasty treats that bring comfort and joy!

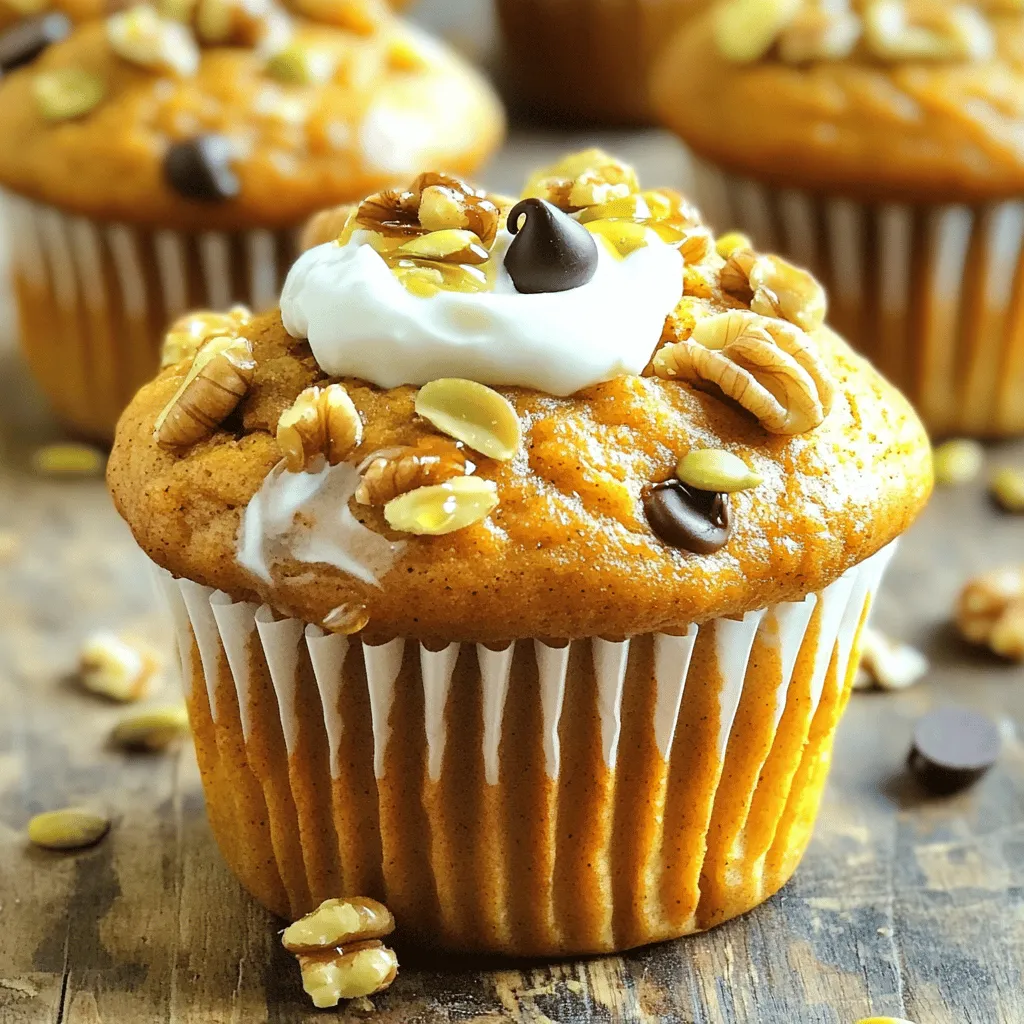
Looking for a delicious, healthy snack? Try my Protein Packed Greek Yogurt Pumpkin Muffins! These muffins are easy to make and loaded with protein from Greek yogurt and eggs. They’ll …

Read more

Categories Desserts
Older posts
Newer posts
← Previous Page1 … Page38 Page39 Page40 … Page122 Next →

STIRRED RECIPES

Where every dish begins with a stir! 🍲✨

PAGES

Home About Contact Privacy Policy Terms & Conditions Cookie Policy GDPR Policy Copyright Policy Disclaimer

CATEGORIES

Appetizers Desserts Salads Breakfast Dinner

Contact

  • Pinterest
  • Mail
Copyright © 2026 Stirred Recipes. All rights reserved.