Skip to content
Stirred Recipes
  • Home
  • Appetizers
  • Desserts
  • Salads
  • Breakfast
  • Dinner
  • Privacy Policy
  • Contact
  • About

Chef Luca

One-Pot Creamy Pumpkin Pasta Cozy and Comforting Dish

August 30, 2025 by Chef Luca
To make One-Pot Creamy Pumpkin Pasta, you need a few key ingredients. Each one adds to the dish's rich flavor and creamy texture. Here’s what you will need: - 12 oz pasta (penne or fusilli work well) - 2 cups pumpkin puree (canned or homemade) - 2 cups vegetable broth (or chicken broth for non-vegetarian) - 1 cup heavy cream (or coconut cream for a dairy-free option) - 1 cup grated Parmesan cheese (or nutritional yeast for a vegan option) - 2 cloves garlic, minced - 1 tsp dried thyme - 1 tsp dried sage - 1/2 tsp nutmeg - Salt and pepper to taste - 2 tablespoons olive oil - Fresh parsley for garnish These ingredients come together to create a dish that is both hearty and comforting. With pumpkin as the star, the flavors blend beautifully. You can easily adjust these ingredients based on your preferences. Enjoy the cooking process and make it your own! First, heat the olive oil in a large pot over medium heat. Once the oil is hot, add the minced garlic. Sauté the garlic for about 1-2 minutes. You want it fragrant but not burnt. Next, stir in the pumpkin puree. Mix it well with the garlic for about one minute. This step enhances the flavors. After that, pour in the vegetable broth and heavy cream. Add the dried thyme, sage, nutmeg, salt, and pepper. Stir until everything is well combined. Now, add your pasta into the pot. Bring the mixture to a gentle boil. Reduce the heat to a simmer and cover the pot. Cook for 12-15 minutes. Stir occasionally until the pasta is al dente and has absorbed most of the liquid. Once the pasta is cooked, remove the pot from heat. Stir in the grated Parmesan cheese. This makes the dish creamy. If the sauce is too thick, add a splash of vegetable broth. Adjust until you reach your desired consistency. To get that smooth, creamy texture, stir the pasta often. This helps the sauce coat each piece well. When the pasta cooks, it releases starch. This starch thickens the sauce and makes it rich. Keep tasting as you cook. You want to balance flavors with salt and pepper. Add more if needed to enhance the taste. You can switch out some ingredients for your needs. Use gluten-free pasta if you want a gluten-free dish. For a dairy-free option, try coconut cream instead of heavy cream. You can also swap Parmesan cheese for nutritional yeast for a vegan touch. Feel free to mix in herbs like rosemary or spices like chili flakes for a twist. Serve your pasta in wide, shallow bowls. This makes it look nice and inviting. For a beautiful finish, sprinkle more Parmesan on top. A drizzle of olive oil adds a glossy look. Finish with fresh parsley to bring color and freshness to the dish. This adds a nice touch to your cozy meal. {{image_2}} For a vegan twist, swap heavy cream for coconut cream. This change gives a rich taste without dairy. You can also use nutritional yeast instead of Parmesan. It adds a cheesy flavor while keeping it plant-based. The creamy texture remains intact, making it just as comforting. Want to make your meal heartier? Add cooked chicken, sausage, or tofu. These proteins blend well with pumpkin, creating a filling dish. Just stir them in after the pasta cooks. This simple step boosts flavor and nutrition. You can change this recipe with seasonal greens. Adding sautéed spinach or kale gives a fresh touch. These greens not only add color but also extra vitamins. For crunch, top with roasted nuts or seeds. They add a delightful texture and enhance the dish's flavor. You can store leftover creamy pumpkin pasta in the refrigerator. Place it in an airtight container. It will keep well for about 3 to 5 days. When you are ready to eat it again, reheat the pasta on the stove or in the microwave. If using the stove, add a splash of broth to keep it creamy. Stir often to heat it evenly. You can freeze this dish if you want to save it for later. Let the pasta cool down first. Then, place it in a freezer-safe container. Seal it tightly to avoid freezer burn. The pasta will stay good for about 2 to 3 months. When you want to eat it, thaw it overnight in the fridge. Reheat the pasta on the stove, adding a little broth if needed to restore creaminess. Yes, you can use fresh pumpkin. Start by roasting or steaming the pumpkin until soft. Then, blend it into a smooth puree. This adds a fresh taste to your dish. Just remember to use about the same amount as canned pumpkin. Penne and fusilli work great. They hold the sauce well. You can also try other short pastas. Just make sure to adjust the cooking time as needed. You can cook the pasta and sauce separately. Combine them just before serving. Keep the sauce in the fridge for up to three days. Reheat gently on the stove, adding a bit of broth to loosen it. Yes, but you need gluten-free pasta. There are many good options now. Just check the package to make sure. The rest of the ingredients are gluten-free. Absolutely! Add crushed red pepper flakes or cayenne pepper. Start with a small amount, then taste. This way, you can control the heat. You could also try adding spicy sausage for more flavor. This blog post covered a tasty creamy pumpkin pasta recipe. You learned about ingredients, including pasta, pumpkin puree, and spices. I shared step-by-step instructions to create the sauce and cook the pasta perfectly. You also discovered useful tips for texture, substitutions, and ways to present the dish beautifully. Overall, this recipe is flexible and easy. Feel free to make it your own. Enjoy experimenting with flavors and share this dish with others!

Are you ready for a warm, cozy meal that’s simple to make? This One-Pot Creamy Pumpkin Pasta is your answer. With just a few easy steps, you’ll whip up a …

Read more

Categories Dinner

Caramel Apple Pie Bars Tasty and Easy Recipe

August 30, 2025 by Chef Luca
To make delicious caramel apple pie bars, you need: - 2 cups all-purpose flour - 1/2 cup granulated sugar - 1/4 teaspoon salt - 1 teaspoon cinnamon - 1/2 cup unsalted butter, melted - 1 large egg - 4 cups apples, peeled, cored, and diced (mix tart and sweet apples) - 1/2 cup brown sugar - 1 tablespoon lemon juice - 1 teaspoon vanilla extract - 1/2 cup caramel sauce (store-bought or homemade) - Extra caramel sauce for drizzling on top You can add some fun twists to your bars: - 1/4 cup chopped walnuts or pecans for crunch - A pinch of nutmeg for extra warmth - Dried cranberries for a tart kick Choosing the best apples is key. Here’s how to pick them: - Mix tart and sweet: Use a blend like Granny Smith for tartness and Fuji for sweetness. - Freshness matters: Look for firm apples without bruises or soft spots. - Seasonal choices: Fall is the best time for fresh apples. They taste great and are crispier. By following these tips, your caramel apple pie bars will shine with flavor! First, preheat your oven to 350°F (175°C). This step is key to getting the perfect bake. Next, take a 9x13 inch baking pan and line it with parchment paper. Leave some paper hanging over the edges. This will help you lift the bars out easily later. In a large mixing bowl, combine 2 cups of all-purpose flour, 1/2 cup of granulated sugar, 1/4 teaspoon of salt, and 1 teaspoon of cinnamon. Mix these dry ingredients well. Pour in 1/2 cup of melted unsalted butter. Then add 1 large egg to the bowl. Stir until a crumbly dough forms. This dough will be the base of your bars. In another bowl, take 4 cups of diced apples. Peel, core, and dice them first. A mix of tart and sweet apples works best for great flavor. Toss the apples with 1/2 cup of brown sugar, 1 tablespoon of lemon juice, and 1 teaspoon of vanilla extract. Make sure the apples are well coated with this mix. Press about two-thirds of the dough firmly into the bottom of your prepared pan. This will form your crust. Spread the apple mixture evenly over the crust. Drizzle half of the caramel sauce over the apples. If you like, sprinkle 1/4 cup of chopped walnuts or pecans on top. Crumble the remaining dough over the apples. Bake in your preheated oven for 30 to 35 minutes. Look for a golden brown top and tender apples. Once baked, take the pan out of the oven and let it cool completely. This step is important! After cooling, drizzle the remaining caramel sauce over the top for added sweetness. Cut the cooled bars into squares and serve. Enjoy your delicious caramel apple pie bars! To make the best crust, start with cold butter. Cut it into small pieces. This keeps the crust flaky and light. Use a fork or your fingers to mix the butter into the flour mixture. You want small crumbs, not a dough. Press two-thirds of the crust into the pan firmly. This step is key for a strong base. You can change the sweetness based on your taste. If you prefer less sweet, cut back on the brown sugar. You can also add more tart apples. This balances the flavors well. Taste the apple mixture before adding caramel. Adjust it until you find what you love. Making homemade caramel sauce is easy and fun! Use sugar, cream, and butter in a pot. Heat them slowly until they melt together. Stir well to avoid lumps. Let it cool before drizzling on your bars. Homemade caramel gives a richer taste than store-bought. Plus, you can customize the sweetness! {{image_2}} You can make these bars even tastier by adding spices. Try using nutmeg or allspice with the cinnamon. Just a pinch will add warmth and depth. You can also add ginger for a spicy kick. Mix these spices into the flour before making the crust for a big flavor boost. While apples are the star, other fruits work well too. Try adding pears for a sweet twist. Cherries can also add a nice tartness. Just keep the total fruit amount the same. This way, you maintain the right texture and sweetness in the bars. You can make these bars gluten-free easily. Use almond flour or a gluten-free flour blend. Just follow the same measurements. For a vegan option, swap the butter with coconut oil and the egg with flaxseed meal mixed with water. This keeps the bars moist and delicious. To keep your caramel apple pie bars fresh, store them in an airtight container. Place parchment paper between layers to avoid sticking. If you have extra caramel sauce, keep it in a separate container. You can also cover the entire dish tightly with plastic wrap. This helps lock in moisture and flavor. When stored correctly, these bars last for about 3 to 5 days at room temperature. For longer storage, keep them in the fridge. They can stay fresh for up to a week in the refrigerator. Just remember to seal them well to avoid drying out. If you want to enjoy warm caramel apple pie bars, reheating is easy. Preheat your oven to 350°F (175°C). Place the bars on a baking sheet and cover them with foil. Heat for about 10-15 minutes, or until warm. You can also use a microwave for quick reheating. Just warm them for 20-30 seconds. Add a drizzle of caramel sauce before serving for extra flavor! Yes, you can use frozen apples. Just thaw them first. Make sure to drain any extra liquid. This helps keep the bars from getting too soggy. I recommend using a thick caramel sauce. Store-bought works well, but homemade is even better. A rich, creamy sauce adds great flavor to your bars. You can prepare the bars a day in advance. Just store them in the fridge after baking. Let them cool fully before wrapping tightly. This keeps them fresh and tasty. Serve them warm with a drizzle of caramel sauce on top. A scoop of vanilla ice cream on the side makes it extra special. Guests will love this sweet treat! Yes, you can freeze the bars! Cut them into squares and wrap them well. Use plastic wrap or an airtight container. They can last up to three months in the freezer. Just thaw them in the fridge before enjoying. You now have a complete guide to making caramel apple pie bars. We explored key ingredients, step-by-step instructions, and clever tips for success. I shared ways to customize your pie bars and variations to keep things fresh. Remember to store them properly for the best taste. With this knowledge, you can create delicious treats that everyone will love. Enjoy your baking and share these bars with friends and family for a sweet moment!

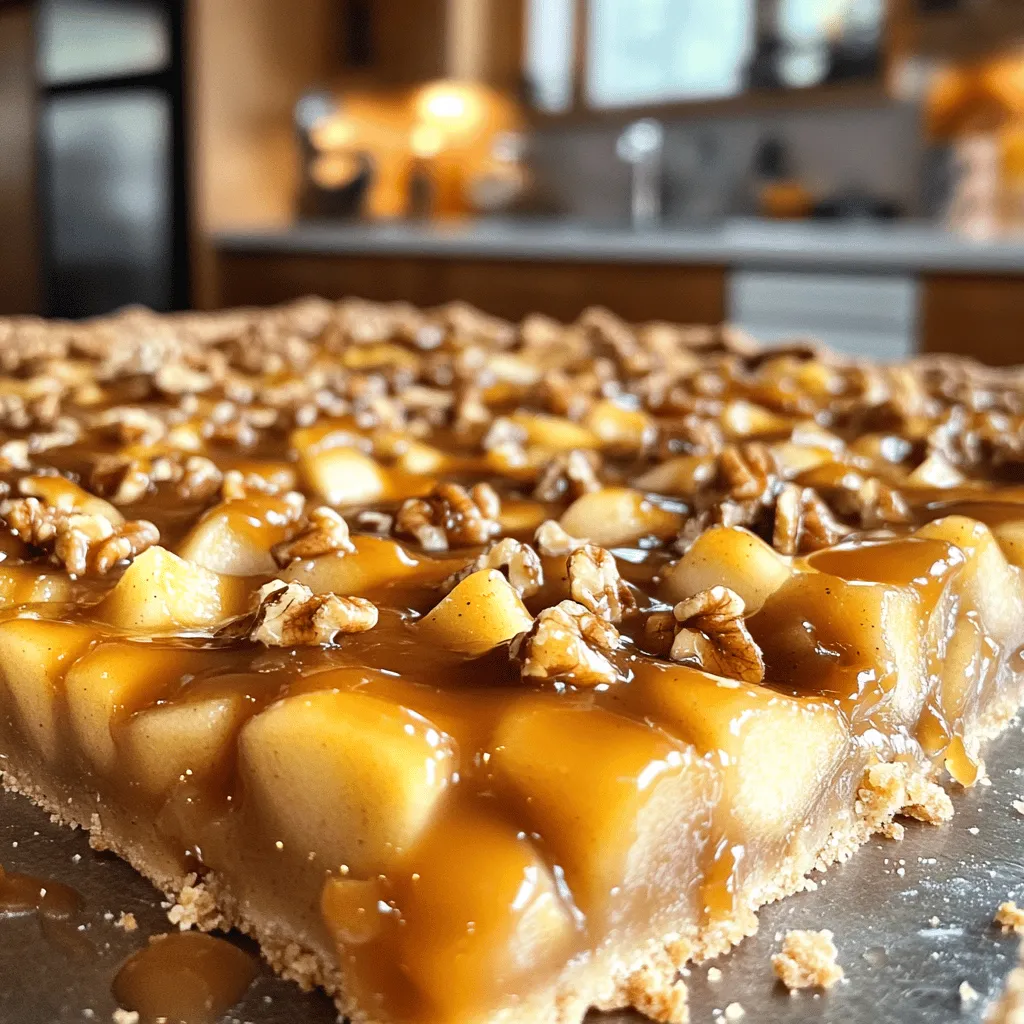
Ready to indulge in a dessert that combines the warmth of apple pie with the sweetness of caramel? In this article, I’ll guide you through my tasty and easy recipe …

Read more

Categories Desserts

Creamy Buffalo Chicken Stuffed Shells Flavorful Delight

August 30, 2025 by Chef Luca
To make creamy buffalo chicken stuffed shells, gather these key items: - 12 jumbo pasta shells - 2 cups shredded cooked chicken - 1 cup cream cheese, softened - 1 cup buffalo sauce (adjust to taste) - 1 cup shredded mozzarella cheese - 1/2 cup ricotta cheese - 1/4 cup green onions, chopped - 1 teaspoon garlic powder - 1 teaspoon onion powder - Salt and pepper to taste - Fresh parsley, for garnish These ingredients blend together to create a rich and spicy filling that packs a punch. If you need to swap some ingredients, here are a few ideas: - Chicken: You can use shredded turkey or a plant-based protein. - Cream Cheese: A dairy-free cream cheese works well for a vegan option. - Buffalo Sauce: Try a homemade sauce or a milder hot sauce if you prefer less heat. - Mozzarella Cheese: Substitute with any melty cheese, such as cheddar or Monterey Jack. - Ricotta Cheese: Cottage cheese can be a great alternative for a lighter touch. These substitutions will still keep your dish flavorful and enjoyable. Each serving of creamy buffalo chicken stuffed shells has essential nutrients. Here’s a rough breakdown: - Calories: 400-500 - Protein: 30g - Fat: 25g - Carbohydrates: 30g - Fiber: 2g - Sodium: Varies based on sauce Remember, these values may change based on the specific brands and portions you use. Enjoy this dish knowing it’s not just tasty but also offers good energy! First, you need to cook the pasta shells. Start by boiling a large pot of salted water. Once it reaches a boil, add 12 jumbo pasta shells. Cook them until they are al dente, as shown on the package. This usually takes about 8-10 minutes. After cooking, drain the shells gently and set them aside to cool. This makes them easier to handle later. Next, let’s create the creamy filling. In a mixing bowl, combine 2 cups of shredded cooked chicken with 1 cup of softened cream cheese. Then, add 1 cup of buffalo sauce. You can adjust the buffalo sauce based on how spicy you want it! Mix in 1/2 cup of ricotta cheese, half of the mozzarella cheese (which is 1/2 cup), and 1/4 cup of chopped green onions. Don’t forget to add 1 teaspoon of garlic powder and 1 teaspoon of onion powder. Season with salt and pepper. Stir until everything is well blended and creamy. Now comes the fun part: stuffing the shells! Take a spoon or a piping bag and carefully fill each cooked shell with the buffalo chicken mixture. Be generous, but don’t overfill. Next, prepare your baking dish. Spread a thin layer of buffalo sauce on the bottom to keep the shells from sticking. Arrange the stuffed shells seam side up in the dish. Pour any extra buffalo sauce over the top and sprinkle with the remaining mozzarella cheese. Bake the dish in a preheated oven at 375°F (190°C). Cover it with aluminum foil and bake for 20 minutes. After that, remove the foil and bake for an additional 10 minutes. The cheese should be bubbly and golden. Once done, let the shells cool slightly. You can then garnish them with fresh parsley and more green onions if you like. Enjoy your creamy buffalo chicken stuffed shells! To cook pasta shells, start with a big pot of salted water. Bring it to a boil. This helps the shells not stick. Once boiling, add the jumbo shells. Cook them until they are al dente. This usually takes about 10 minutes. Stir them gently to avoid sticking. After cooking, drain the shells and rinse them under cold water. This stops the cooking process. Set them aside on a clean towel to dry. The spice level of your stuffed shells depends on the buffalo sauce. If you like it hot, use more sauce. For a milder taste, use less. You can also mix in some ranch dressing. This adds creaminess and tones down the heat. Another fun idea is to add diced jalapeños to the filling. This gives an extra kick without being too spicy. Using the right tools makes cooking easier. Here are some must-haves for this recipe: - Large pot: For boiling the pasta shells. - Mixing bowl: To blend the filling ingredients. - Piping bag: To stuff the shells neatly. - Baking dish: A large one to hold all the shells. - Aluminum foil: To cover the dish while baking. Having these tools will help you create delicious stuffed shells with ease. {{image_2}} You can easily make these stuffed shells without chicken. Use cooked lentils or black beans instead. These options give a hearty texture and add protein. You can also try using sautéed mushrooms and spinach for more flavor. Both ideas create a creamy, satisfying dish that everyone will enjoy. Keep the buffalo sauce and cream cheese in the filling for that classic taste. Want to change up the flavors? You can add chopped bell peppers or jalapeños for a kick. Mix in some ranch seasoning for a creamy twist. If you love cheese, try adding cheddar or pepper jack for extra richness. You can also replace half of the buffalo sauce with barbecue sauce for a sweet and spicy mix. Each variation adds a new layer of flavor to the dish. Serve these stuffed shells with a fresh salad or garlic bread. A simple green salad with a light vinaigrette balances the rich flavors. You can also pair the shells with extra buffalo sauce or ranch dressing for dipping. If you want a creamy side, try serving coleslaw. It adds a crunch and pairs well with the spicy shells. These sides will make your meal complete and delightful. After you enjoy your creamy buffalo chicken stuffed shells, store any leftovers. Place them in an airtight container. Make sure to let them cool down first. Keep them in the fridge for up to three days. This helps keep the flavors fresh and tasty. When you are ready to eat the leftovers, you can reheat them easily. Preheat your oven to 350°F (175°C). Place the stuffed shells in a baking dish. If they seem dry, add a splash of buffalo sauce or water. Cover the dish with foil to keep moisture in. Bake for about 20 minutes. You can also use a microwave. Heat them on medium power for about three to four minutes. Check to ensure they are warm all the way through. If you want to save some for later, freezing works well. First, let the stuffed shells cool completely. Then, place them in a freezer-safe container. I recommend using a layer of parchment paper between layers. This helps prevent sticking. You can freeze them for up to three months. When you’re ready to eat, thaw them in the fridge overnight. Reheat as mentioned earlier for a delicious meal. Yes, you can prepare the stuffed shells a day ahead. After you stuff the shells, place them in the baking dish. Cover the dish with plastic wrap and refrigerate. When you're ready to bake, remove the wrap and bake as directed. This saves time and makes dinner easy. If you want a milder flavor, you can use barbecue sauce instead. For a different kick, try sriracha or a sweet chili sauce. You can also mix hot sauce with ranch dressing for a creamy twist. Adjust the amount to suit your taste. To keep the shells from sticking, follow these tips: - Cook the shells in salted boiling water and stir gently. - Drain them well and rinse with cold water to stop cooking. - Spread a thin layer of buffalo sauce in the baking dish before placing the shells in it. These steps help ensure each shell stays separate and ready to enjoy. This guide covers making delicious stuffed pasta shells from start to finish. You learned about the ingredients, how to cook the shells, and create a creamy filling. I shared tips for perfecting your dish and offered variations for different diets. Storing leftovers and reheating is easy with my tips. In the end, stuffed shells are tasty and easy to love. Enjoy trying out your new skills!

Are you ready for a flavor explosion? My Creamy Buffalo Chicken Stuffed Shells will blow your taste buds away! These cheesy pasta shells packed with spicy buffalo chicken are perfect …

Read more

Categories Dinner

Pumpkin Spice Cottage Cheese Muffins Irresistible Treat

August 30, 2025 by Chef Luca
- 1 cup pumpkin puree (canned or fresh) - 1 cup cottage cheese - 2 large eggs - 1/3 cup vegetable oil (or melted coconut oil) The main ingredients give these muffins their unique taste and great texture. Pumpkin puree adds moisture and flavor. Cottage cheese makes the muffins soft and fluffy. Eggs provide structure and help bind everything together. You can use vegetable oil or melted coconut oil for added richness. - 1 1/2 cups all-purpose flour - 1 teaspoon baking powder - 1/2 teaspoon baking soda - 1 teaspoon pumpkin spice blend The dry ingredients help the muffins rise and give them their light texture. All-purpose flour is the base of the batter. Baking powder and baking soda work together to make the muffins fluffy. The pumpkin spice blend adds warmth and a cozy flavor. - 1/2 cup chopped walnuts - 1/3 cup brown sugar (packed) - 1/4 cup maple syrup (for drizzling, optional) You can add chopped walnuts for a crunchy texture. Brown sugar adds a touch of sweetness and a deeper flavor. Drizzling maple syrup on top gives a sweet finish. These optional ingredients can take your muffins to the next level! - Preheat the oven to 350°F (175°C). - Grease or line a muffin tin with paper liners. - In a large bowl, combine 1 cup of pumpkin puree, 1 cup of cottage cheese, 2 large eggs, and 1/3 cup of vegetable oil. - Whisk the mixture until it is smooth and well combined. - In another bowl, mix together 1 1/2 cups of all-purpose flour, 1 teaspoon of baking powder, 1/2 teaspoon of baking soda, 1 teaspoon of pumpkin spice blend, and 1/4 teaspoon of salt. - Gradually add the dry ingredients to the wet mixture. Stir gently until just combined. - If you like, fold in 1/2 cup of chopped walnuts for extra texture. - Divide the batter evenly among the muffin cups, filling each about 2/3 full. - Bake in the preheated oven for 18-20 minutes. Check with a toothpick; it should come out clean. - Cool the muffins in the pan for about 5 minutes. - Transfer them to a wire rack to cool completely. - For a sweet finish, drizzle with maple syrup before serving. - Avoid overmixing for fluffy muffins. Mix just until the dry and wet blend. - Test doneness with a toothpick. Insert it in the center; it should come out clean. - Use Greek yogurt instead of cottage cheese. It adds creaminess and protein. - Adjust sweetness to taste. Add more or less brown sugar based on your preference. - Add chocolate chips or dried fruit. Both will give a nice burst of flavor. - Experiment with different nut butters. Almond or peanut butter can add richness. {{image_2}} You can easily change the flavor of your muffins. Try making chocolate pumpkin spice muffins. Just add 1/2 cup of chocolate chips to the batter. The rich chocolate will mix well with the pumpkin. This twist adds a sweet surprise in every bite. If you want a nut-free version, skip the walnuts. The muffins will still taste great! They will have a soft texture and rich flavor even without nuts. For those needing gluten-free options, use a gluten-free flour blend instead of all-purpose flour. Most blends work well in this recipe. The muffins will remain moist and tasty. If you're looking for vegan substitutes, replace the eggs with flaxseed meal. Mix 1 tablespoon of flaxseed with 2.5 tablespoons of water. Let it sit for a few minutes to thicken. You can also swap cottage cheese with silken tofu. Blend it until smooth for a creamy texture. Want to make your muffins more festive? Try holiday spiced muffins by adding extra spices. Include a dash of allspice or cloves for warmth. You can also add cranberries or apple pieces for a fun twist. Chop them up and fold them into the batter. These fruits add a fresh flavor and make the muffins even more delightful. To keep your pumpkin spice cottage cheese muffins fresh, store them in an airtight container. This helps lock in moisture and flavor. If you plan to eat them later, you can refrigerate them for up to five days. For longer storage, freeze the muffins. Place them in a freezer-safe bag or container. They can last for about three months in the freezer. When stored at room temperature, these muffins will stay fresh for about two days. If you keep them in the fridge, they last longer, up to five days. Muffins stored in the freezer can be enjoyed later. Just remember to thaw them in the fridge overnight before eating. To enjoy your muffins warm, reheat them in a microwave for about 15-20 seconds. You can also use an oven. Preheat it to 350°F (175°C) and heat the muffins for about 5-10 minutes. This method keeps their texture and flavor intact. Enjoy them warm, and feel free to add a drizzle of maple syrup for a sweet touch! Yes, you can use fresh pumpkin. Fresh pumpkin has a bright flavor. It requires more work than canned pumpkin. You must roast or boil the pumpkin first. Then, mash it until smooth. Canned pumpkin is more convenient. It is ready to use and has a consistent texture. Both options work well in these muffins. You can make these muffins healthier by making a few swaps. Use less brown sugar or replace it with honey. You can also use whole wheat flour instead of all-purpose flour. Substitute applesauce for some of the oil. This will cut down on fat. Add in some flaxseed for extra fiber. These changes keep the muffins tasty while boosting their health benefits. If you don’t have pumpkin spice, you can mix your own. Combine 1 teaspoon of cinnamon, 1/2 teaspoon of nutmeg, and 1/4 teaspoon of ginger. This mix mimics the warm flavors of pumpkin spice. You can also use allspice or cardamom for a different twist. Feel free to get creative and find what you love! To make delicious pumpkin muffins, gather your pumpkin puree, cottage cheese, and eggs. Mix the wet and dry ingredients carefully and bake them for 18-20 minutes. Remember to let your muffins cool before enjoying. Try fun variations like chocolate pumpkin or gluten-free options. Store them in an airtight container to keep them fresh. You can always reheat them for a warm treat. Baking should be fun and easy, so get creative and enjoy these tasty muffins!

Craving a cozy treat this fall? You’re in for a delight! My Pumpkin Spice Cottage Cheese Muffins are an irresistible blend of warm spices and rich pumpkin flavor. With protein-packed …

Read more

Categories Breakfast

Mexican Street Corn Chicken Tacos Flavorful Delight

August 29, 2025 by Chef Luca
- 2 cups cooked chicken, shredded - 2 ears of corn, grilled and kernels removed - 8 small corn tortillas - 1/2 cup mayonnaise - 1 tablespoon lime juice - 1 teaspoon chili powder - 1/2 teaspoon cumin - Salt and pepper to taste - 1/2 cup cotija cheese, crumbled - 1/4 cup chopped fresh cilantro - 1 jalapeño, diced (optional for heat) The main ingredients create a rich base for the tacos. Use cooked chicken that is tender and shredded. Grilling corn adds a nice, smoky flavor. The small corn tortillas hold everything together nicely. The sauce is simple yet packs a punch. Mayonnaise gives it creaminess. Lime juice adds brightness. Chili powder and cumin bring warmth and depth. Adjust salt and pepper to meet your taste. Add toppings for extra flair. Cotija cheese adds a salty bite. Fresh cilantro brings in a burst of freshness. If you like heat, diced jalapeños spice things up. These ingredients blend well together. Each bite of the taco delivers a delightful mix of flavors. Enjoy the burst of taste in every taco you create! First, grab a medium bowl. In it, mix together: - 1/2 cup mayonnaise - 1 tablespoon lime juice - 1 teaspoon chili powder - 1/2 teaspoon cumin - Salt and pepper to taste Stir well until the sauce is smooth. Set it aside for later. Next, take a large skillet and place it over medium heat. Add: - 2 cups cooked chicken, shredded - 2 ears of corn, grilled and kernels removed - Half of the sauce you just made Combine these ingredients. Stir them well. Heat this mixture until it’s warmed through, about 3 to 5 minutes. This step brings out the flavors. Now, it's time for the tortillas. Warm 8 small corn tortillas in a separate dry skillet or over a flame. Heat them for about 30 seconds on each side. This makes them soft and easy to fold. To put it all together, spoon the chicken and corn mixture onto each tortilla. Drizzle the remaining sauce over the filling. Top it off with: - 1/2 cup cotija cheese, crumbled - 1/4 cup chopped fresh cilantro - 1 jalapeño, diced (optional for heat) Enjoy these vibrant and flavorful tacos right away! Don’t forget to serve with lime wedges for that extra zing! To get the best flavor from your corn, start by grilling it. Grill the corn on high heat. This gives it a nice char. The char adds a sweet, smoky taste. Turn the corn every few minutes until you see dark spots. Then, let it cool and remove the kernels. You will love the flavor it brings to your tacos. When you warm the corn tortillas, you must do it right. Heat them in a dry skillet or over a flame. This makes them soft and easy to fold. If they break, they won’t hold your filling well. Warm each side for about 30 seconds. This keeps them pliable and ready for your tasty chicken mix. For a great taco display, use a colorful platter. Arrange the tacos neatly and add lime wedges. Sprinkle some extra cilantro on top for a pop of green. This makes your tacos look fresh and inviting. You can also serve them with extra toppings on the side. Think diced jalapeños or more cotija cheese. This allows everyone to customize their tacos. When it comes to sides, keep it simple. Serve these tacos with a fresh salad or corn chips. A cold drink like agua fresca pairs perfectly too. The fresh flavors balance the rich tacos. It’s a great way to enjoy this meal. Prep your taco components ahead of time. Cook the chicken and grill the corn the day before. Store them in the fridge until you are ready to assemble. You can also mix the sauce ahead of time. This saves you a lot of time during meal prep. When it's time to eat, just warm the chicken and corn. Then, put everything together quickly. It makes dinner stress-free and fun! {{image_2}} You can easily make this dish vegetarian. Just substitute the chicken with black beans or grilled vegetables. Black beans add protein and a nice texture. Grilled veggies like zucchini or bell peppers also give great flavor and color. This way, you can keep the taco fun and tasty without meat. If you like it spicy, you can add more jalapeños. Diced jalapeños on top give a nice kick. You can also try different chili powders like cayenne or chipotle. Each will change the heat level and flavor profile. Adjust it to your taste for a fun twist. Feel free to experiment with spices. Adding smoked paprika can give a unique, deep flavor. Lime zest also brightens the dish with fresh notes. Try mixing these spices into the sauce or the filling. Each change can create a new and exciting taco experience. To store leftover taco filling and tortillas, first, let everything cool down. Place the chicken and corn mixture in an airtight container. You can keep it in the fridge for up to three days. For tortillas, stack them between sheets of parchment paper. Wrap them tightly in foil or plastic wrap. This helps to keep them fresh. Reheat the chicken and corn mixture in a skillet over medium heat. Stir it often to avoid burning. It should take about five minutes to heat through. You can also use the microwave. Just place it in a bowl and cover it with a lid or paper towel. Heat in 30-second bursts until warm. In the fridge, the taco filling lasts for about three days. If you want to keep it longer, freeze it. In the freezer, it can last up to three months. Just make sure to use a freezer-safe container. For tortillas, they can last up to a month in the freezer when wrapped well. If you can’t find cotija cheese, try using feta or queso fresco. Both have a salty taste similar to cotija. Feta is creamier, while queso fresco is milder and crumbles easily. You can also use Parmesan if you want a sharper flavor. Each cheese brings its own twist to the dish, so feel free to experiment! Yes, grilled chicken works well in this recipe! Just chop the grilled chicken into bite-sized pieces. You may want to add it to the skillet with the corn. This keeps the chicken juicy and flavorful. Make sure to mix it with half of the sauce to coat it well. Yes, this recipe can be gluten-free! Use corn tortillas instead of flour tortillas. Many brands offer gluten-free corn tortillas, so check the labels. Always ensure your ingredients are gluten-free to keep the dish safe for those with gluten sensitivities. These tacos are easy and delicious with simple steps and fresh flavors. You learned about the key ingredients, how to make the sauce, and the best ways to serve. You can play with variations like adding grilled vegetables or changing the spice level. Store leftovers properly so they stay fresh. Enjoy these tacos for a fun meal any time! They bring quick joy and great taste to your table.

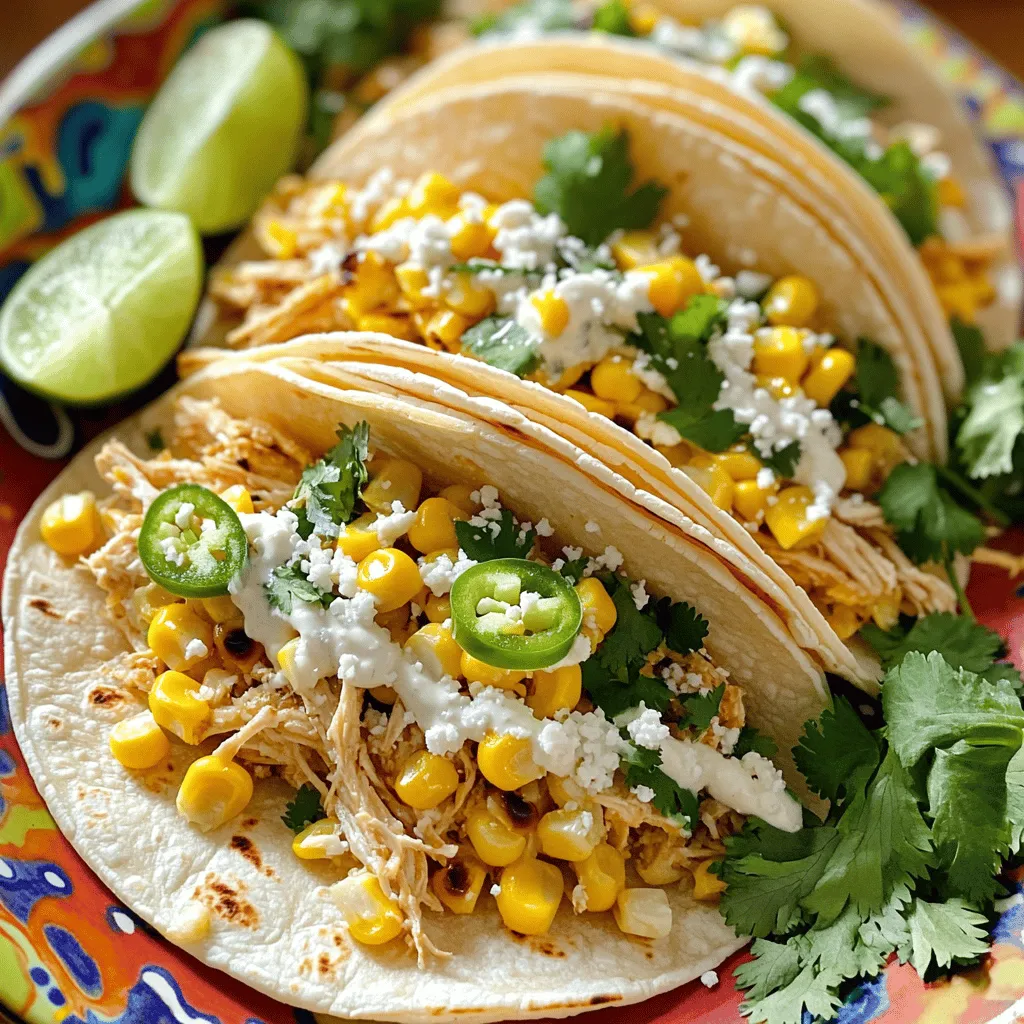
Get ready to savor the bold flavors of Mexican street corn with my Chicken Tacos! This dish combines juicy chicken, sweet corn, and creamy sauce, all wrapped in soft tortillas. …

Read more

Categories Dinner

Cheesy Broccoli Cheddar Soup in Bread Bowls Delight

August 29, 2025 by Chef Luca
- 4 cups broccoli florets - 1 medium onion, diced - 3 cloves garlic, minced - 1 cup carrots, diced - 4 tablespoons unsalted butter - 4 tablespoons all-purpose flour - 4 cups vegetable broth - 2 cups whole milk - 2 cups sharp cheddar cheese, shredded - 1 teaspoon mustard powder - Salt and pepper to taste - 4 large sourdough bread loaves - Extra cheddar cheese for topping - Fresh parsley, chopped for garnish To make Cheesy Broccoli Cheddar Soup in Bread Bowls, you need fresh and simple ingredients. Start with broccoli florets; they add a nice green color and great taste. Use a medium onion and three cloves of minced garlic for a strong base flavor. Diced carrots give the soup sweetness and a nice texture. Next, we need butter. Unsalted butter helps the soup be rich without extra salt. Flour helps thicken the soup. Vegetable broth adds depth and flavor. Whole milk makes the soup creamy, while sharp cheddar cheese provides that classic cheese flavor we love. Mustard powder gives a unique twist, and salt and pepper enhance all the flavors. Lastly, we need sourdough bread loaves. These will serve as bowls for our soup. For the finishing touch, we’ll add extra cheddar cheese on top before baking. And don’t forget fresh parsley; it adds a pop of color and freshness to the dish. Gather these ingredients, and you’ll be ready to create a comforting soup that fills you up! To start, I melt butter in a large pot over medium heat. Then, I add the diced onion. This step takes about 3-4 minutes. I want the onion to become soft and clear. Next, I stir in minced garlic and diced carrots. I cook this mix for 2 more minutes. The aroma fills the kitchen. Now, I create a roux. I sprinkle flour over the softened vegetables. It is important to stir constantly for about 2 minutes. This helps the flour mix well and cook lightly. After that, I gradually whisk in the vegetable broth. I bring this to a gentle simmer and lower the heat. I let it cook for about 10 minutes. Next, I add the broccoli florets to the pot. I simmer it until the broccoli is tender, about 5-7 minutes. Afterward, I pour in the whole milk and stir to blend. I add mustard powder, salt, and pepper to taste. Finally, I slowly mix in shredded cheddar cheese. I keep stirring until it melts and the soup is smooth. While the soup simmers, I preheat the oven to 375°F (190°C). I cut the tops off the sourdough loaves and hollow out the insides carefully. This creates the perfect bowls for my soup. I place these hollowed bread bowls on a baking sheet. I fill each loaf with cheesy broccoli soup and top it with extra cheddar cheese. I bake them for 10-12 minutes. The cheese should be bubbly, and the bread gets a nice crust. To make your soup just right, adjust the thickness with flour or broth. If it's too thick, add more broth slowly. If it’s too thin, mix a bit of flour with water, then stir it in. For seasoning, taste as you go. A little salt and pepper can make a big difference. The best cheese for melting is sharp cheddar. It gives a great flavor and melts smoothly. You can also mix in some Gruyère for a nutty taste. Just remember to use fresh cheese that you shred yourself. Pre-shredded cheese often has additives that prevent it from melting well. To keep your bread crusty, bake the bowls filled with soup. The heat will crisp the outer layer while keeping the inside soft. Avoid filling them too early. If you let them sit too long, the bread will get soggy. If sourdough isn't your thing, try other bread options. A crusty baguette or a soft pretzel roll works great too. Just make sure they can hold the soup without breaking. This way, you enjoy every tasty bite. {{image_2}} You can easily adjust this cheesy broccoli cheddar soup for different diets. - Gluten-free options: Use gluten-free flour instead of all-purpose flour to make the roux. This keeps the soup creamy without the gluten. - Dairy-free substitutes: Replace whole milk with almond milk or oat milk. Use a dairy-free cheese blend to keep the cheesy flavor. Boost the flavor of your soup with simple additions. - Adding spices or herbs: Consider adding a pinch of cayenne pepper for heat. Fresh thyme or dill can add a nice touch too. - Incorporating proteins like chicken or bacon: You can stir in cooked chicken for extra protein. Crumbled bacon on top adds a nice crunch and smoky flavor. Feel free to mix and match these ideas! They make this dish even more fun and tasty. To store your cheesy broccoli cheddar soup, let it cool first. Use an airtight container to keep it fresh. The soup can stay in the fridge for about 3 to 4 days. If you want to keep it longer, freeze it for up to 2 months. For bread bowls, it's best to store them separately from the soup. Wrap each bowl in plastic wrap. This keeps them from getting soggy. Use the bread bowls within 1 to 2 days for the best taste. When reheating your soup, use a pot on the stove. Heat it over medium heat. Stir often until it's hot all the way through. You can also use a microwave. Place the soup in a microwave-safe bowl. Heat it in short bursts, stirring in between. To revive your bread bowls, you can bake them again. Preheat your oven to 350°F (175°C). Place the hollowed bread bowls on a baking sheet for about 5 minutes. This will make them warm and a bit crispy again. Enjoy your delicious soup in freshly warmed bread bowls! Yes, you can use frozen broccoli. It is quick and convenient. Just thaw it first, then add it to the soup when the recipe calls for fresh broccoli. Frozen broccoli cooks faster, so reduce the cooking time by a few minutes. To thicken the soup, try a few methods. First, add more flour during the roux stage. Another option is to blend part of the soup with an immersion blender. You can also add a bit more cheese, which will add flavor and thickness. Pair this soup with crusty bread, a side salad, or some fresh fruit. You can also serve it with a light sandwich, like turkey or ham. These options will complement the rich flavors of the soup well. Yes, you can make the soup ahead of time. Store it in the fridge for up to three days. Just reheat it on the stove over low heat. If you plan to freeze it, leave out the cheese until you reheat. This keeps the cheese smooth and creamy. This blog post showed you how to make cheesy broccoli cheddar soup in tasty bread bowls. You learned about the ingredients, cooking steps, and helpful tips for perfecting your dish. We also explored variations and ways to store leftovers. In the end, this dish is fun to make and share. It warms you up and satisfies your cravings. Enjoy making it your own with different ingredients or flavors. Cooking can be a joyful adventure!

Welcome to your new favorite comfort food: Cheesy Broccoli Cheddar Soup in Bread Bowls! This warm dish offers a creamy and cheesy delight packed with fresh veggies. Picture rich cheddar …

Read more

Categories Dinner

Minute Shrimp Scampi Linguine Quick and Easy Recipe

August 29, 2025 by Chef Luca
For this Minute Shrimp Scampi Linguine, gather these key items: - 8 oz linguine pasta - 1 lb large shrimp, peeled and deveined - 4 cloves garlic, minced - 1/4 cup unsalted butter - 3 tablespoons olive oil - 1 teaspoon red pepper flakes (adjust to taste) - Juice of 1 lemon - Zest of 1 lemon - Salt and pepper to taste These ingredients come together to create a dish that bursts with flavor. The shrimp adds protein, while the garlic and lemon give it a bright taste. You can enhance your dish with these tasty garnishes: - Fresh parsley, chopped Chopped parsley not only adds color but also a fresh flavor. Feel free to add more if you like! Here’s what you need for cooking: - Large pot for boiling water - Large skillet for sautéing - Colander for draining pasta - Tongs for tossing These tools help make cooking easy and fun. Make sure you have everything ready before you start! To start, you need to cook the linguine. Fill a large pot with water and add salt. Bring it to a boil. Once boiling, add the linguine pasta. Cook it according to the package instructions until it is al dente. This usually takes about 8 to 10 minutes. When done, save 1/2 cup of the pasta water. Then, drain the pasta and set it aside. Now, let’s move to the shrimp. Take a large skillet and set it over medium heat. Add 1/4 cup of unsalted butter and 3 tablespoons of olive oil. Heat them until the butter melts. Next, add 4 minced garlic cloves and 1 teaspoon of red pepper flakes. Sauté this mixture for about 1 minute. You want to smell the garlic! Now, add the peeled and deveined shrimp. Season them with salt and pepper. Cook for 2 to 3 minutes on each side. The shrimp will turn pink when they are ready. After the shrimp is cooked, it’s time to combine everything. Add the cooked linguine to the skillet. Pour in the reserved pasta water, lemon juice, and lemon zest. Toss everything together well. Make sure the pasta is coated and hot. Finally, remove the pan from heat. Sprinkle chopped parsley on top for garnish. Adjust seasoning if needed before serving. To make this dish quick, start boiling water for the linguine first. Use a large pot and add salt. This adds flavor to the pasta. While the water heats, prepare your shrimp and garlic. You can also chop the parsley ahead of time. This way, you save time later. Cook shrimp until they turn pink. This takes about 2-3 minutes per side. If they curl up tightly, they are overcooked. Always season with salt and pepper to enhance their natural flavor. Fresh shrimp is best, but frozen shrimp works too. Just thaw it properly beforehand. Add a splash of white wine after cooking the garlic. This boosts the dish’s flavor. You can also mix in some lemon zest and juice for extra brightness. Adjust red pepper flakes to your taste for more heat. Fresh herbs like basil or dill can add a unique twist. {{image_2}} You can swap shrimp for other proteins. Chicken, scallops, or even tofu work well. Just cut them into small pieces. Cook them the same way you cook the shrimp. This keeps the dish easy and quick. Adding vegetables can boost flavor and nutrition. Try spinach, bell peppers, or zucchini. Sauté them along with the garlic. They add color and make your meal more filling. You can add any veggies you like, just keep them cut small. While linguine is great, other pasta types can shine too. Spaghetti, fettuccine, or even penne can work well. Choose your favorite. The key is to ensure it cooks to al dente. This way, it holds up with the sauce and shrimp. To keep your shrimp scampi linguine fresh, store it in an airtight container. This helps lock in flavor. Place the container in the fridge. It will stay good for up to three days. Make sure to cool the dish to room temperature before sealing. When you want to enjoy your leftovers, reheating is easy. You can use a microwave or a skillet. If using a microwave, heat it for one minute. Stir it halfway through to warm evenly. If using a skillet, add a splash of water or olive oil. Heat over low heat until warmed through. This keeps the pasta from drying out. If you want to save some for later, freezing is a good option. Portion the dish into freezer-safe bags. Remove as much air as you can, then seal. You can freeze it for up to three months. When you're ready to eat, thaw it in the fridge overnight. Reheat it as mentioned above. Enjoy your tasty meal anytime! It takes about 20 minutes to make shrimp scampi linguine. The prep time is 10 minutes, and cooking takes another 10. This dish is quick and easy, perfect for a busy day. Yes, you can use frozen shrimp. Just thaw them before cooking. You can place them in cold water for about 15 minutes. This will save you time and still give you tasty shrimp. You can serve shrimp scampi linguine with a fresh salad or garlic bread. A side of steamed veggies can also be a great choice. Pair it with a light white wine for a nice touch. This guide shared key steps to make shrimp scampi linguine. We covered ingredients, cooking methods, and tips. You can customize the dish by changing proteins or adding veggies. Storing leftovers and reheating is easy, too. Enjoy your meal with family and friends. Cooking can be fun, and this dish is sure to impress. Get creative and make it your own. Happy cooking!

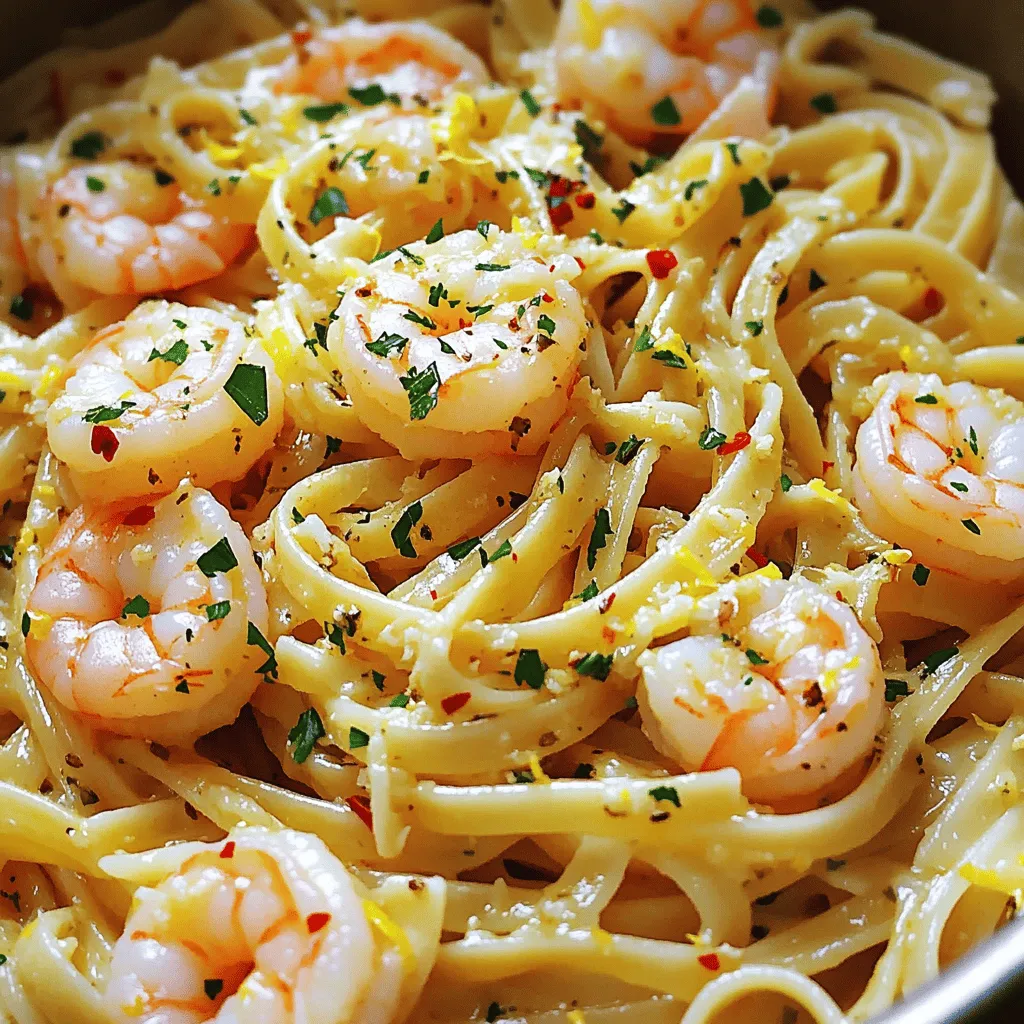
Are you craving a quick and tasty meal? This Minute Shrimp Scampi Linguine is your answer! Packed with flavor and super easy to make, it’s perfect for busy nights. I’ll …

Read more

Categories Dinner

Chocolate Chip Banana Bread Muffins Fresh and Tasty

August 29, 2025 by Chef Luca
- 3 ripe bananas, mashed - 1/3 cup melted coconut oil - 1/2 cup brown sugar - 1/4 cup granulated sugar - 2 large eggs - 1 teaspoon vanilla extract These main ingredients form the base of your muffins. Ripe bananas add natural sweetness and moisture. Coconut oil gives a light, rich flavor. The mix of brown and granulated sugars boosts sweetness and adds depth. Eggs help bind everything together, while vanilla extract enhances the taste. - 1 teaspoon baking soda - 1/4 teaspoon salt - 1 1/2 cups all-purpose flour The dry ingredients ensure your muffins rise and have the right texture. Baking soda acts as a leavening agent, helping the muffins rise. Salt enhances the flavors. All-purpose flour provides structure and balance. - 1/2 cup chocolate chips (dark or milk, your choice) - 1/4 cup chopped walnuts These optional add-ins let you customize your muffins. Chocolate chips bring a sweet, melty touch. You can choose dark or milk chocolate based on your taste. Chopped walnuts add crunch and a nutty flavor. You can mix and match these add-ins to create your perfect muffin! - Preheat your oven to 350°F (175°C). - Prepare a muffin tin by lining it with paper liners or greasing it lightly. - In a large bowl, combine the mashed bananas and melted coconut oil. Mix until smooth. - Add the brown sugar and granulated sugar to the banana mix. Stir until blended. - Beat in the eggs one by one, then add the vanilla extract. Mix well. - Sprinkle baking soda and salt over the mixture. Stir to combine. - Gently fold in the flour until just mixed. Don’t overmix! - Finally, fold in the chocolate chips and walnuts if you like them. - Divide the batter into the muffin cups, filling each about 3/4 full. - Bake in the preheated oven for 18-22 minutes. Check with a toothpick; it should come out clean. - Let the muffins cool in the tin for about 5 minutes. Then transfer them to a wire rack. - How to know when muffins are done Muffins are done when a toothpick comes out clean. Insert the toothpick into the center of a muffin. If it comes out with moist crumbs, that’s fine. If it has wet batter, bake a few more minutes. Keep an eye on them, as ovens can vary. - Avoiding overmixing Overmixing can lead to dense muffins. When you add flour, mix until just combined. It’s okay if there are some small lumps. This helps keep the muffins light and fluffy. - Best ways to serve the muffins Serve these muffins warm for the best taste. You can add a pat of butter or drizzle honey on top. This adds richness and a sweet touch. Dusting with powdered sugar gives a pretty finish, too. - Pairing ideas Enjoy muffins with a cup of coffee or tea. The warmth of the drink pairs well with the chocolate and banana flavors. You can also try them with a glass of milk for a classic combo. - Coconut oil alternatives If you don’t have coconut oil, use canola or vegetable oil. These oils work well and keep the muffins moist. Melted butter is another great option for flavor. - Sugar substitutes You can use honey or maple syrup instead of sugar. Use about half the amount since they are sweeter. This gives a nice twist to the muffins while keeping them tasty. {{image_2}} You can easily make gluten-free chocolate chip banana bread muffins. Just swap the all-purpose flour for a gluten-free blend. Many blends work well, so choose one that you prefer. This keeps the muffins soft and tasty. If you're looking for vegan options, you can replace eggs with flaxseed meal. Mix one tablespoon of flaxseed meal with three tablespoons of water. Let it sit for a few minutes until it thickens. Use it in place of each egg in the recipe. You can also use a plant-based oil instead of coconut oil. Want to spice things up? Adding cinnamon or nutmeg can elevate the flavor. Just sprinkle about half a teaspoon of either spice into your batter. This gives your muffins a warm, cozy taste. You can also try different nuts or types of chocolate. If you like crunch, add chopped pecans or almonds. For a sweeter touch, use white chocolate chips. Mixing flavors can keep your muffins exciting and new. To make mini muffins, use a mini muffin tin instead of a regular one. Fill each cup about halfway with batter. Bake them for about 12-15 minutes instead of the usual 18-22 minutes. Keep an eye on them, so they don't overbake. These bite-sized treats are perfect for snacks or parties! To keep your chocolate chip banana bread muffins fresh, use an airtight container. This helps maintain moisture and flavor. Place the muffins in the container once they cool completely. If you plan to eat them later, freezing is a great option. Wrap each muffin in plastic wrap and then place them in a freezer bag. This way, they stay fresh for up to three months. At room temperature, these muffins last about three days. If you store them in the fridge, they can stay good for a week. However, refrigeration may make them a bit dry. So, if you want to enjoy their soft texture, stick with room temperature storage. For the best taste and texture, reheat the muffins in the oven or a toaster oven. Set the temperature to 350°F (175°C) and heat them for about 5-10 minutes. This warms them up while making the chocolate chips melty again. You can also use a microwave for quicker reheating, but do so for only 10-15 seconds to avoid sogginess. Enjoy your warm muffins! Can I use frozen bananas? Yes, you can use frozen bananas. Just thaw them first. Drain any extra liquid. Mash them well before adding to your mix. This will keep your muffins moist and sweet. How do I know when the muffins are done? Insert a toothpick into the center of a muffin. If it comes out clean, they are done. You can also gently press the top. It should spring back. If it leaves a dent, bake a few more minutes. Why are my muffins dense? Dense muffins often come from overmixing the batter. Mix just until you can’t see the flour. Too many bananas can also make them heavy. Make sure to measure correctly. How to fix overmixing issues? If you mix too much, try using a lighter hand next time. Use a spatula to fold in the flour gently. This helps keep air in the batter, making your muffins fluffy. Caloric content Each muffin has around 150 calories. This varies based on added ingredients like chocolate and nuts. Health benefits of ingredients - Bananas provide potassium and fiber. - Coconut oil adds healthy fats. - Dark chocolate chips contain antioxidants. - Walnuts bring omega-3 fatty acids. These ingredients make your muffins tasty and nutritious! You learned how to make delicious banana bread muffins using simple ingredients. We covered the best mixing and baking techniques, plus tips for storage and serving. You can even create variations to please any palate. Enjoy experimenting with flavors, and remember to ask if something goes wrong. Muffins should taste great every time. With practice, you will master this fun recipe and share it with friends. Happy baking!

If you love the warm, sweet aroma of banana bread and the rich taste of chocolate, you’re in for a treat! I’m excited to share my recipe for Chocolate Chip …

Read more

Categories Desserts

Slow Cooker Honey Garlic Chicken Thighs Delight

August 29, 2025 by Chef Luca
- 4-6 chicken thighs (bone-in, skinless works best) - 1/2 cup honey - 1/4 cup soy sauce (or tamari for gluten-free) - 4 cloves garlic, minced - 1 tablespoon fresh ginger, grated - 1 tablespoon sesame oil The star of this dish is the chicken thighs. They become tender and juicy in the slow cooker. I prefer bone-in, skinless thighs for the best taste. Honey adds sweetness, while soy sauce gives it a savory kick. Garlic and ginger add depth, and sesame oil brings a lovely nutty flavor. - 1 teaspoon sriracha (optional for a kick) - 1 tablespoon cornstarch (for thickening) - 2 green onions, sliced (for garnish) - Sesame seeds (for garnish) You can spice things up with sriracha if you like heat. Cornstarch helps thicken the sauce, making it rich and glossy. Green onions and sesame seeds are perfect for garnish. They add color and crunch. - Salt and pepper - Suggested garnishes Don’t forget to season the chicken with salt and pepper. This simple step enhances the flavors. When serving, a sprinkle of green onions and sesame seeds makes the dish pop. Enjoy the beautiful presentation and delicious flavors! First, I season the chicken thighs. Sprinkle salt and pepper on both sides. This step adds flavor and enhances the dish. I use bone-in, skinless thighs for the best taste and texture. Next, I mix the honey garlic sauce. In a medium bowl, I whisk together: - 1/2 cup honey - 1/4 cup soy sauce (or tamari) - 4 cloves garlic, minced - 1 tablespoon fresh ginger, grated - 1 tablespoon sesame oil - 1 teaspoon sriracha (optional) This sauce is sweet, savory, and full of flavor. It coats the chicken and creates a delicious glaze as it cooks. Now, I layer the ingredients in the slow cooker. I place the seasoned chicken thighs in the pot. Then, I pour the honey garlic mixture over the chicken. It’s important to ensure each piece is well coated. For cooking time, I cover and set the slow cooker on low for 4-6 hours. If I'm in a hurry, I set it on high for 2-3 hours. The chicken will be tender and juicy when done. In the last 30 minutes, I make a cornstarch slurry to thicken the sauce. I mix 1 tablespoon of cornstarch with a little water. Once mixed, I stir this slurry into the slow cooker. This step helps the sauce become thick and rich. When the chicken is cooked, I carefully remove it from the slow cooker. I serve it on a plate, drizzling the honey garlic sauce over the top. To make it look nice, I garnish with sliced green onions and sesame seeds. These toppings add a pop of color and extra flavor. For a complete meal, I suggest serving the chicken on a bed of steamed rice or quinoa, with some veggies on the side. When choosing chicken thighs, I prefer bone-in, skinless pieces. Bone-in thighs add more flavor during cooking. Skinless thighs are easier to eat and soak up the sauce well. You can use boneless thighs too, but they may dry out faster. Always look for fresh, high-quality chicken for the best taste. To make this dish even better, consider adding spices. A pinch of black pepper or paprika adds warmth. Extra garlic gives a stronger taste if you love it. Fresh herbs like cilantro or parsley can brighten the dish. You might also try adding a splash of lime juice for a zesty kick. Experiment to find your favorite combination! Cooking time is key for tender chicken. I recommend cooking on low for 4-6 hours. If you're short on time, high for 2-3 hours works too. Always check that the chicken reaches an internal temperature of 165°F. If the sauce seems thin, use cornstarch to thicken it in the last 30 minutes. This makes the sauce rich and sticky, perfect for coating the chicken. {{image_2}} You can switch chicken thighs for pork or tofu. Pork works well with the sweet sauce. Choose pork chops or tenderloin for a tasty change. For a plant-based option, use firm tofu. Press the tofu to remove extra water. Then, cut it into cubes and marinate in the honey garlic sauce. Both alternatives offer unique flavors and textures. Adding citrus makes the sauce fresh and bright. Try lemon or orange juice for a zesty twist. This cuts through the sweetness and adds depth. You can also use different sweeteners. Maple syrup or agave nectar can replace honey. Each sweetener gives a new flavor and feel to the dish. You can use an Instant Pot for faster cooking. Set it to high pressure for 10 minutes. Release the steam carefully, then thicken the sauce as usual. For those who prefer oven-baking, preheat your oven to 375°F (190°C). Place the chicken in a baking dish, cover with sauce, and bake for 30-40 minutes. Both methods keep the chicken juicy and flavorful. To store leftovers, let the chicken cool down first. Place it in an airtight container. Store it in the fridge for up to three days. Make sure to add some sauce to keep it moist. This keeps the chicken flavorful and juicy for later meals. For freezing, you can pack the chicken in a freezer-safe bag. Remove as much air as possible before sealing. It will stay fresh for about three months. To keep the best taste, try to freeze it without the sauce. You can add the sauce when you reheat it later. To reheat, use the slow cooker, microwave, or oven. If using the slow cooker, set it on low for about an hour. If using the microwave, heat it in short bursts, stirring in between. When using the oven, cover the chicken with foil to trap moisture. This helps keep the chicken from drying out, making it tasty again. Yes, you can use boneless chicken thighs. Boneless thighs cook faster. They also absorb the sauce well, giving great flavor. Bone-in thighs are juicier but take longer to cook. Both options work well, so pick what you prefer! You can store leftovers in the fridge for up to four days. Make sure to put the chicken in an airtight container. If you want to keep it longer, freeze it. Frozen chicken can last up to three months. Just thaw it in the fridge before reheating. Absolutely! You can mix the honey garlic sauce a day ahead. Just store it in the fridge in a sealed container. When you're ready to cook, pour it over the chicken. This saves time and lets the flavors blend more. I love serving this dish with steamed rice. The rice soaks up the tasty sauce. You can also serve it with quinoa for a healthy twist. Add some steamed broccoli or colorful bell peppers for a vibrant plate. These sides make a complete meal. Yes, it can! Use tamari instead of soy sauce. Tamari is a great gluten-free option. Be sure to check labels on other ingredients too. Most are gluten-free, but it's good to confirm. Enjoy your meal worry-free! This blog post covered everything you need to make honey garlic chicken thighs. We talked about key ingredients like chicken thighs, honey, and garlic. You learned how to prepare and cook it in a slow cooker. Plus, I shared tips to pick the best chicken and variations if you want to switch things up. Remember, making this dish is simple and rewarding. You can enjoy leftovers later, too. Try these tips and recipes, and enjoy your meal!

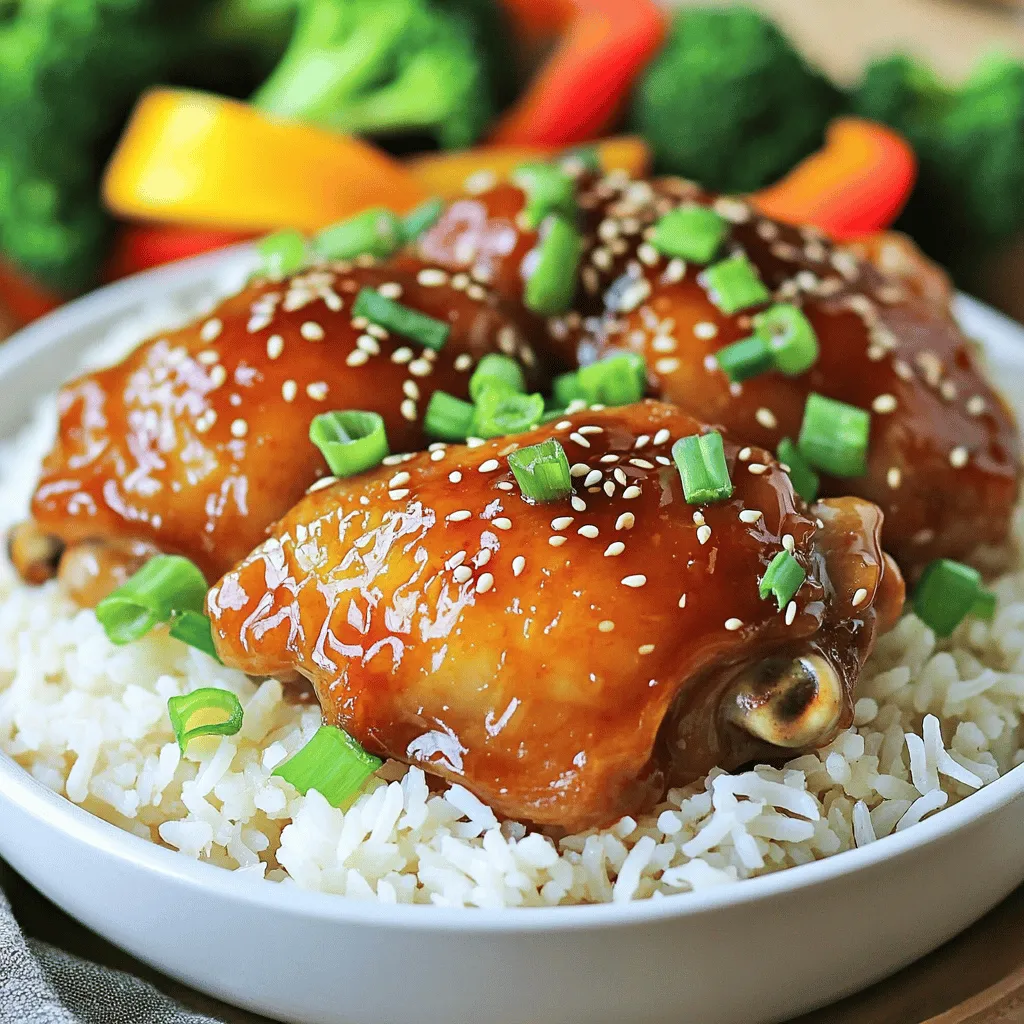
Welcome to my kitchen! Today, we’re diving into an easy and tasty recipe: Slow Cooker Honey Garlic Chicken Thighs. This dish is packed with flavor from tender chicken thighs smothered …

Read more

Categories Dinner

Cinnamon Roll Apple French Toast Bake Easy Delight

August 29, 2025 by Chef Luca
To make this tasty Cinnamon Roll Apple French Toast Bake, you will need the following ingredients: - 1 can (16 oz) refrigerated cinnamon rolls, cut into quarters - 2 cups apples, peeled and diced - 4 large eggs - 1 cup milk - 1 teaspoon vanilla extract - 1 teaspoon ground cinnamon - 1/4 teaspoon nutmeg - 1/4 cup brown sugar I love using Granny Smith or Honeycrisp apples for this bake. These apples add a nice tartness that balances the sweet rolls. Granny Smith apples keep their shape well when baked. Honeycrisp apples bring a lovely sweetness and crunch. You can mix both for extra flavor! You can make this dish your own by adding some optional ingredients: - 1/4 cup chopped pecans for a crunchy texture - 1/4 cup maple syrup for drizzling on top These add-ons elevate the dish and give it a personal touch. Enjoy experimenting with different flavors! First, I preheat my oven to 350°F (175°C). This step is key for even baking. Next, I grab a 9x13 inch baking dish and grease it well. This helps the food not stick. I make sure to coat the bottom and sides. In a medium bowl, I cut the apples into small pieces. I like using Granny Smith or Honeycrisp. These apples add a nice tartness. I add brown sugar and ground cinnamon to the apples. I toss them until they are well coated. In a larger bowl, I crack four eggs and whisk them. I pour in a cup of milk and add vanilla extract, nutmeg, and a pinch of salt. I mix this until it looks smooth. Now, I spread the quartered cinnamon rolls in the baking dish. I make sure they are even. Then, I pour the egg mix over the cinnamon rolls. I want each piece to soak up the goodness. I layer the coated apples on top of the cinnamon rolls. If I want extra crunch, I sprinkle chopped pecans over the apples. Now, I place the dish in the preheated oven. I bake it for 30 to 35 minutes. I check if it's done by inserting a toothpick. If it comes out clean, it's ready! After baking, I let it cool for about 10 minutes. Finally, I drizzle warm maple syrup over the top. This makes it extra tasty! To soak the cinnamon rolls well, start with the egg mixture. Whisk the eggs, milk, vanilla, nutmeg, and a pinch of salt together. Make sure it’s mixed well. When you pour it over the cinnamon rolls, do it slowly. This helps each piece get soaked. Let the rolls sit for a few minutes before baking. This extra time allows them to absorb even more flavor. I love using Granny Smith or Honeycrisp apples. Granny Smith gives a tart bite, which balances the sweet rolls. Honeycrisp is sweet and juicy, adding great flavor. Both types hold their shape well during baking. Always peel and dice your apples to ensure they cook evenly. This step makes them soft and tasty in every bite. To get a golden top, watch your baking time closely. Bake at 350°F for 30-35 minutes. If you want a crispier finish, broil for a minute or two at the end. Just keep an eye on it to avoid burning. You can also sprinkle a bit of brown sugar on top before baking. This adds a sweet crunch that looks and tastes amazing. {{image_2}} You can make this dish dairy-free easily. Use almond milk or oat milk instead of regular milk. Both options work great and keep the dish creamy. You can also use a dairy-free yogurt for an extra rich flavor. Just make sure it is plain to not change the taste. Adding spices and fruits can give your baked dish new life. You might try adding ginger or cardamom for a warm twist. You can also toss in raisins or cranberries for some fruity goodness. If you love nuts, try walnuts or almonds instead of pecans. They add a nice crunch and flavor. To make this dish gluten-free, use gluten-free cinnamon rolls. Many brands offer tasty options that work well. Check the labels to ensure they meet your needs. You can also use gluten-free bread, like a nice gluten-free brioche, for a different texture. This way, everyone can enjoy this yummy treat. To store your Cinnamon Roll Apple French Toast Bake, let it cool first. Once cooled, cover it tightly with plastic wrap or aluminum foil. You can also transfer it to an airtight container. This keeps the dish fresh for up to three days in the fridge. Make sure to place it on a flat surface to prevent spills. When it’s time to enjoy leftovers, preheat your oven to 350°F (175°C). Place the bake in an oven-safe dish and cover it with foil. Heat for about 15-20 minutes, or until warmed through. You can also microwave individual portions for about 30-60 seconds. Just be careful, as it can get hot quickly. If you want to freeze this dish, let it cool completely first. Cut it into portions for easy thawing later. Wrap each piece tightly in plastic wrap and then in foil. Place them in a freezer bag, removing as much air as possible. You can freeze it for up to three months. To reheat, thaw in the fridge overnight and follow the reheating instructions above. Yes, you can make this dish ahead of time. Prepare it the night before. Just cover it and store it in the fridge. When you are ready to bake, take it out. Let it sit at room temperature for 15 minutes. This helps it bake evenly. You can use other types of bread. Consider using brioche or challah. They both soak up the egg mixture well. You can also try using croissants for a flakier texture. Just cut them into small pieces like you would with cinnamon rolls. Check for a golden brown top. Insert a toothpick into the center. If it comes out clean, it’s done. The edges should be firm, and the middle should not jiggle. Let it cool for about 10 minutes before serving. Yes, you can make this dish without eggs. Use a flaxseed meal or chia seed mixture as a binder. Mix 1 tablespoon of flaxseed meal with 2.5 tablespoons of water for each egg. Let it sit for a few minutes until it thickens. This works well to bind the other ingredients together. This blog post covered all you need to know about baking delicious cinnamon rolls. We explored key ingredients, from the best apples to optional add-ons. You learned step-by-step instructions and useful tips for perfecting your dish. With variations like dairy-free and gluten-free options, there’s something for everyone. Proper storage and reheating tips ensure you enjoy leftovers later. Remember, baking is fun! Experiment and make it your own. Enjoy your sweet creation!

Are you ready to elevate your breakfast game? This Cinnamon Roll Apple French Toast Bake is an easy delight that brings together warm cinnamon rolls and juicy apples in every …

Read more

Categories Breakfast
Older posts
Newer posts
← Previous Page1 … Page36 Page37 Page38 … Page122 Next →

STIRRED RECIPES

Where every dish begins with a stir! 🍲✨

PAGES

Home About Contact Privacy Policy Terms & Conditions Cookie Policy GDPR Policy Copyright Policy Disclaimer

CATEGORIES

Appetizers Desserts Salads Breakfast Dinner

Contact

  • Pinterest
  • Mail
Copyright © 2026 Stirred Recipes. All rights reserved.