Skip to content
Stirred Recipes
  • Home
  • Appetizers
  • Desserts
  • Salads
  • Breakfast
  • Dinner
  • Privacy Policy
  • Contact
  • About

Chef Luca

Sheet Pan Honey Garlic Salmon Flavorful Easy Dinner

September 4, 2025 by Chef Luca
- 4 salmon fillets - 1/4 cup honey - 3 tablespoons soy sauce (or tamari for gluten-free) The main stars of this dish are the salmon fillets. They provide rich flavor and healthy fats. Honey adds sweetness, while soy sauce gives a savory touch. You can use tamari if you're gluten-sensitive. - 2 cups broccoli florets - 1 red bell pepper, sliced For added color and nutrition, I love using broccoli and red bell pepper. Broccoli brings a nice crunch, and red bell pepper adds a sweet, juicy bite. - 3 garlic cloves, minced - 1 tablespoon fresh ginger, grated - 1 tablespoon olive oil - 1 teaspoon sesame oil - 1 lemon, zested and juiced Garlic and ginger are key to the flavor. They give warmth and depth to the sauce. Olive oil adds richness, while sesame oil gives a toasted note. The lemon zest and juice brighten everything up and keep it fresh. Each ingredient plays a role in making this dish vibrant and tasty. You can mix and match flavors or add more veggies if you like. First, preheat your oven to 400°F (200°C). This heat helps the salmon cook evenly. Line a large baking sheet with parchment paper. This keeps your dish from sticking and makes cleanup easy. Next, grab a small bowl and whisk together the honey, soy sauce, minced garlic, grated ginger, olive oil, sesame oil, lemon juice, and zest. Mix until everything is well combined. This sauce is the star of the dish! Now it's time to season the salmon. Place the salmon fillets in the center of the prepared baking sheet. Sprinkle some salt and pepper over them. This simple step adds flavor. Arrange the broccoli florets and sliced red bell pepper around the salmon. Make sure the veggies lie flat on the sheet. This helps them roast nicely. Drizzle the honey garlic sauce over the salmon and vegetables. Make sure everything gets a good coating. This sauce will add a sweet and savory taste to your meal. Roast the dish in the preheated oven for about 15 to 20 minutes. Keep an eye on it! The salmon should be cooked through and flake easily with a fork. The veggies need to be tender but not mushy. After cooking, remove the sheet pan from the oven. Sprinkle sesame seeds over the salmon and veggies for a nice crunch. If you like, garnish with fresh cilantro or chopped green onions before serving. Enjoy your meal! To cook perfect salmon, aim for 15 to 20 minutes in a 400°F oven. Check for doneness by gently flaking the salmon with a fork. If it flakes easily, it’s ready! For tender vegetables, cut them into uniform pieces. This helps them cook evenly. Broccoli florets and red bell peppers should be bright and slightly crisp when done. Serving directly from the sheet pan gives a casual, homey feel. It’s easy and fun! If you want a fancier touch, transfer the salmon and veggies to plates. Drizzle any leftover sauce from the pan over each serving. This adds color and flavor. If you want a sweeter sauce, add more honey. For saltiness, increase the soy sauce. You can also try adding a splash of water to thin the sauce if it's too thick. Make extra sauce to serve on the side. It’s great for dipping! This way, everyone can enjoy the rich flavors even more. {{image_2}} You can change the veggies for more variety. Try using asparagus or zucchini instead of broccoli and bell pepper. They both cook well and add a nice twist. If you want to switch proteins, consider chicken or tofu. Both will soak up the honey garlic sauce, giving you a new flavor. Want to spice things up? Add red pepper flakes or a splash of sriracha. This will bring heat to your dish. You can also switch the seasonings. Try teriyaki sauce for a sweet and savory twist. Fresh herbs like cilantro or basil will add brightness and freshness, too. You can grill the salmon if you prefer a smoky taste. Just be sure to keep an eye on it, as grilling cooks faster. If you like slow cooking, use a slow cooker or an instant pot. This method makes the salmon super tender. Just adjust cooking times to ensure perfect results. To keep your honey garlic salmon fresh, use airtight containers. Glass or BPA-free plastic works best. Make sure to cool the salmon and veggies before sealing them. Store them in the fridge for up to three days. This helps keep the flavors strong. When you want to enjoy leftovers, the oven is your best friend. Preheat it to 350°F (175°C). Place the salmon and veggies on a baking sheet. Cover them with foil to keep moisture in. Heat for about 10-15 minutes. You can also use a microwave. Just heat in short bursts, checking often. This way, you keep the tasty flavors intact. If you want to freeze your meal, it’s easy. Place the cooled salmon and veggies in freezer-safe bags. Try to remove as much air as possible. They can stay frozen for up to three months. When you’re ready to eat, thaw in the fridge overnight. Reheat in the oven or microwave as mentioned. This keeps your meal tasty and ready to enjoy! The cooking time for salmon on a sheet pan depends on its thickness. For fillets about one inch thick, it typically takes 15 to 20 minutes at 400°F (200°C). Thicker fillets may need a few extra minutes. Always check for doneness. The salmon should flake easily with a fork when it's ready. Yes, you can use frozen salmon! Just remember to thaw it first. Place the frozen fillets in the fridge overnight or run them under cold water for quicker thawing. Once thawed, follow the same steps as fresh salmon. The honey garlic sauce will still work well, keeping your meal flavorful. For a complete meal, pair your honey garlic salmon with simple sides. Here are some great options: - Steamed rice or quinoa for a base. - Roasted or steamed vegetables like asparagus or carrots. - A light salad with mixed greens and a citrus vinaigrette. - Garlic bread for a tasty touch. These sides will balance the sweet and savory flavors of the salmon. This recipe offers a simple way to make honey garlic salmon with fresh veggies. You combine tasty salmon fillets with colorful broccoli and red bell peppers. The easy cooking steps and helpful tips ensure a delicious meal every time. You can also play with ingredients and cooking methods to fit your taste. In the end, this dish is about enjoying great flavors and healthy eating. Try it, and you’ll see how easy and tasty dinner can be.

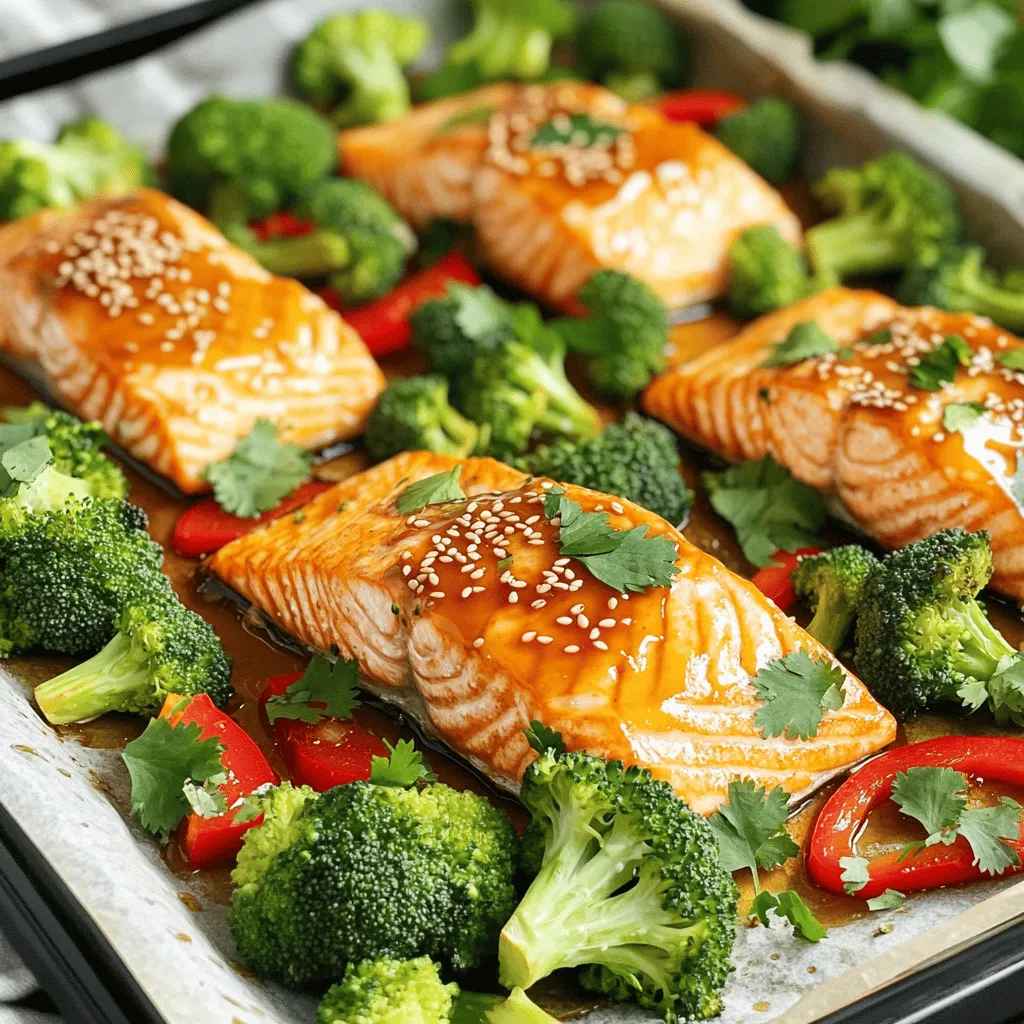
Looking for a quick and tasty dinner? Try my Sheet Pan Honey Garlic Salmon! This dish is packed with flavor and easy to make. With just a few simple ingredients …

Read more

Categories Dinner

Cheesy Jalapeño Cornbread Casserole Savory Delight

September 3, 2025 by Chef Luca
When making Cheesy Jalapeño Cornbread Casserole, you need a few key ingredients. Here’s what you will need: - 1 cup cornmeal - 1 cup milk - 1/2 cup sour cream - 2 large eggs - 1 tablespoon baking powder - 1 teaspoon salt - 1 cup shredded sharp cheddar cheese - 1 cup canned corn, drained - 1-2 fresh jalapeños, diced (seeds removed for less heat) - 1/2 cup green onions, chopped - 1/2 teaspoon black pepper - 1/2 teaspoon garlic powder - 1/2 cup chopped fresh cilantro (optional for garnish) Each ingredient adds flavor and texture to the dish. Cornmeal serves as the base, giving it that classic cornbread taste. The milk and sour cream keep it moist and creamy. Eggs help bind everything together. Baking powder makes it rise. Salt, black pepper, and garlic powder enhance the overall flavor. The sharp cheddar cheese brings a rich, cheesy goodness. Canned corn adds sweetness, while jalapeños give it a spicy kick. Green onions add freshness and color. Finally, cilantro can brighten the dish if you choose to use it. Gather these items, and you're ready to create a savory delight! Start by preheating your oven to 375°F (190°C). Grease a 9x9 inch baking dish. This helps the casserole not stick. In a large bowl, mix together the cornmeal, baking powder, salt, black pepper, and garlic powder. Use a whisk to blend these ingredients well. This step is key for a light and fluffy texture. In a separate bowl, whisk together the milk, sour cream, and eggs. Once mixed, pour this into the dry mixture. Stir gently until just combined. Avoid overmixing to keep it tender. Now, fold in the shredded sharp cheddar cheese, canned corn, diced jalapeños, and chopped green onions. Make sure everything is well-distributed. This adds great flavor and texture to your casserole. Pour the batter into your greased baking dish. Smooth the top with a spatula. Bake for 25-30 minutes. It’s done when the top is golden and a toothpick comes out clean. Let the casserole cool for about 5 minutes before slicing. This helps it hold its shape. If you like, garnish with fresh cilantro before serving. Enjoy this savory delight hot! To get the best texture for your Cheesy Jalapeño Cornbread Casserole, keep a few tips in mind. Use a mix of cornmeal and flour for a lighter texture. If you want it fluffier, add an extra egg. Make sure to mix the wet and dry ingredients gently. Overmixing can make it tough. You want a nice, soft batter. The spice level is key to your dish. If you love heat, keep the seeds in the jalapeños. For a milder version, remove the seeds. You can also add a pinch of cayenne or chili powder. Start small, then taste as you go. This way, you can find the perfect balance for your taste. This casserole is great on its own, but you can add more to it. Serve it with a dollop of sour cream or avocado slices on top. Fresh cilantro adds a nice touch too. Pair it with a fresh salad or some grilled meats for a complete meal. Enjoy it warm for the best flavor! {{image_2}} You can easily make this casserole vegetarian. Skip the meat and keep the jalapeños and cheese. Use extra veggies like bell peppers or zucchini. These add flavor and crunch. You can also swap in veggie broth for the milk if you want. This keeps it rich and tasty while staying meat-free. For a gluten-free dish, switch out cornmeal. Use a gluten-free cornbread mix instead. This will keep the same texture and taste. Make sure to check the labels for any hidden gluten. You can also use almond or coconut flour for a unique twist. While sharp cheddar is classic, feel free to mix it up! Try pepper jack for a spicy kick. Or use mozzarella for a milder flavor. Feta or goat cheese can add a nice tang, too. Choose whatever cheese you love most! Store leftover Cheesy Jalapeño Cornbread Casserole in an airtight container. Place it in the fridge. It will stay fresh for about 3 to 5 days. Make sure it cools down before sealing it. This helps keep the moisture in check. You can freeze the casserole for later use. First, let it cool completely. Cut it into squares for easy serving. Wrap each piece in plastic wrap, then place them in a freezer-safe bag. It will keep well for up to 3 months. When you’re ready to eat, just take out what you need. To reheat the casserole, you have a few options. The oven is best for even heating. Preheat it to 350°F (175°C). Place the casserole in a baking dish and cover it with foil. Heat for about 15-20 minutes. You can also use the microwave. Heat in short bursts of 1 to 2 minutes until warm. Enjoy your delicious leftovers! Yes, you can make this casserole ahead of time. Prepare it up to the baking step. Cover it well and store it in the fridge. When ready, just bake it. This makes meal prep easy! If you want less heat, use bell peppers instead. For a different flavor, try diced green chiles. You can also skip the spice altogether if you prefer. Yes, you can! Use almond milk or any plant-based milk. Replace sour cream with coconut yogurt or a dairy-free option. This way, everyone can enjoy it! The casserole will stay fresh for about 3 to 4 days in the fridge. Make sure to store it in an airtight container. Reheat it well before serving again. This casserole goes great with chili or a fresh salad. You can serve it with grilled chicken or BBQ for a full meal. It's perfect for a potluck or family dinner! This blog post shared how to make a tasty Cheesy Jalapeño Cornbread Casserole. We covered the main ingredients and broke down each step. You learned tips for the best texture and spice levels. We also explored veggie and gluten-free options. Don't forget to check storage info and FAQs for extra help. Enjoy making this dish! It’s easy and fun to tweak for your taste. Happy cooking!

Welcome to a world of flavor with my Cheesy Jalapeño Cornbread Casserole! This dish is an easy way to spice up your meals. It’s cheesy, zesty, and loaded with corn …

Read more

Categories Dinner

One-Pan Lemon Herb Chicken and Veggies Simple Dish

September 3, 2025 by Chef Luca
- 4 boneless, skinless chicken thighs - 2 tablespoons olive oil - 2 lemons (one for juice and one sliced) - 3 cloves garlic, minced - 1 teaspoon dried oregano - 1 teaspoon dried thyme - Salt and pepper to taste - 1 cup cherry tomatoes, halved - 1 zucchini, sliced - 1 bell pepper (any color), diced - Fresh parsley, chopped, for garnish To prepare your ingredients, start with the chicken. Use a kitchen scale if you have one. Aim for about 6 ounces per thigh. For the olive oil, use a tablespoon measuring spoon. It helps to drizzle evenly. When measuring lemon juice, roll the lemons on the counter first. This makes them easier to juice. For garlic, use a knife to mince it finely. Fresh garlic gives great flavor. For herbs, dried oregano and thyme can be measured with a teaspoon. When choosing vegetables, look for bright colors. The zucchini should feel firm. The bell pepper should be smooth. For cherry tomatoes, pick ones that are plump and shiny. Fresh parsley should be vibrant green. These tips help make your dish taste fresh and delicious! 1. Preheating the oven Start by preheating your oven to 400°F (200°C). This step is key for even cooking. 2. Making the marinade In a large bowl, mix together: - 2 tablespoons olive oil - Juice from one lemon - 3 cloves minced garlic - 1 teaspoon dried oregano - 1 teaspoon dried thyme - Salt and pepper to taste Stir well to combine all the flavors. This marinade brings a bright taste to the chicken. Add the chicken thighs to the bowl and coat them evenly. Let them sit for about 15 minutes. This allows the flavors to meld nicely. 3. Arranging chicken and veggies in the skillet Grab a large oven-proof skillet. Place the marinated chicken thighs in the center. Surround the chicken with: - Sliced lemon - 1 cup halved cherry tomatoes - 1 sliced zucchini - 1 diced bell pepper Drizzle a little extra olive oil over the veggies. Season with a pinch of salt and pepper. This adds flavor and helps the veggies cook well. 4. Baking time and temperature Place the skillet in your preheated oven. Bake for 25-30 minutes. Make sure the chicken is cooked through. The internal temperature should reach 165°F (75°C). This ensures the chicken is safe and juicy. 5. Resting the dish before serving Once cooked, take the skillet out of the oven. Let it rest for about 5 minutes. This step keeps the chicken moist. 6. Garnishing tips Before serving, sprinkle fresh chopped parsley on top. This adds a pop of color and freshness. Enjoy your delicious one-pan lemon herb chicken and veggies! To keep chicken moist, marinate it well. I recommend letting it sit in the marinade for at least 15 minutes. This helps the flavors soak in deeply. To check if your chicken is done, use a meat thermometer. The chicken should reach 165°F (75°C). This ensures it is safe to eat and still juicy. For a punch of flavor, try adding fresh herbs like basil or cilantro. You can also sprinkle in spices like paprika or cumin for extra zest. If you want a twist, try different marinades. A yogurt-based marinade can add creaminess. You can also use balsamic vinegar for a tangy taste. I suggest using a large oven-proof skillet. This helps with even cooking and makes for easy serving. You will also need a cutting board and knife for prepping veggies. A meat thermometer is a great tool for checking chicken doneness. {{image_2}} You can mix it up with different vegetables. Try using asparagus, broccoli, or carrots for variety. Each brings its own flavor and texture to the dish. For protein, swap chicken thighs for chicken breasts for a leaner option. If you want a plant-based meal, tofu works great too. Just press it to remove water and cut it into cubes before marinating. You can grill the chicken and veggies for a smoky taste. Just marinate them as usual, then grill until fully cooked. This method adds a nice char. If you prefer a slow cooker, layer the veggies and chicken, then add the marinade. Cook on low for six to eight hours. This method keeps everything tender and flavorful. Making this dish gluten-free is simple. Just ensure your marinade has no gluten-containing ingredients. You can also make it low-carb or keto-friendly. Replace the cherry tomatoes and bell peppers with leafy greens like spinach or kale. They work well and keep the dish light. Adjust the seasoning to fit your taste while staying within your dietary needs. To keep your One-Pan Lemon Herb Chicken and Veggies fresh, follow these tips: - Refrigeration: Place leftovers in an airtight container. This helps prevent drying out. Store them in the fridge within two hours of cooking. - Keeping Fresh: Use the chicken and veggies within three days for the best taste. If you wait longer, they may lose flavor and texture. When reheating, you want to keep the chicken juicy. Here are the best methods: - Oven Method: Preheat your oven to 350°F (175°C). Place the chicken and veggies in a baking dish. Cover with foil to keep moisture in. Heat for about 15-20 minutes. - Microwave Method: Put a few pieces on a plate. Cover with a damp paper towel. Heat for 1-2 minutes, checking if it's warm throughout. Aim for an internal temperature of 165°F (75°C) when reheating. Freezing is a great way to save your leftovers. Here’s how to do it right: - How to Freeze: Allow the dish to cool completely. Portion into freezer-safe bags or containers. Make sure to remove as much air as possible. - Thawing Suggestions: To thaw, place the container in the fridge overnight. If you're in a hurry, use the microwave's defrost setting. Avoid thawing at room temperature, as this can lead to bacteria growth. Can I use bone-in chicken? Yes, you can use bone-in chicken. It may take a bit longer to cook. Make sure the internal temperature hits 165°F (75°C). What vegetables pair best with this dish? Cherry tomatoes, zucchini, and bell peppers work great. You can also try asparagus or broccoli for extra crunch. How long can I marinate the chicken? You can marinate the chicken for up to 2 hours. This helps enhance the flavor and tenderness. If you're short on time, 15 minutes is still great! Can I make this recipe in advance? Yes, you can prep the chicken and veggies ahead of time. Just store them in the fridge. Cook them when you are ready to eat. Calorie count and serving size This dish has about 350 calories per serving. Each recipe serves 4, making it a healthy meal for the family. Health benefits of the ingredients used Chicken thighs offer protein and healthy fats. Olive oil adds healthy fats. Fresh veggies bring vitamins, minerals, and fiber. This blog post explored how to cook delicious, moist chicken thighs with fresh veggies. We covered each ingredient and its measurements, plus step-by-step instructions to make the process easy. I shared tips to enhance flavor and offered variations for different diets. Remember to store and reheat leftovers properly to enjoy them later. With these techniques and ideas, you can create a tasty meal that fits your needs and impresses your guests. Now, it’s time for you to start cooking!

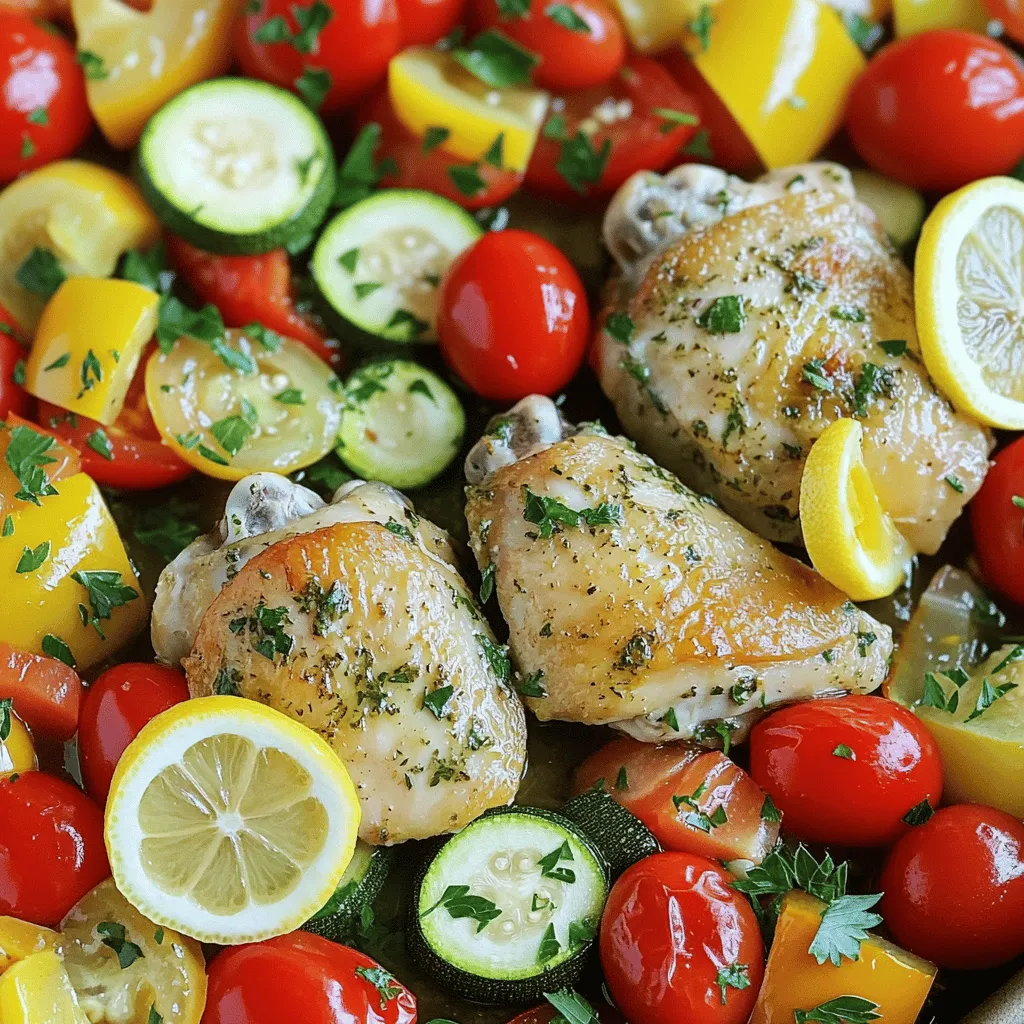
Looking for a quick and tasty dinner? My One-Pan Lemon Herb Chicken and Veggies recipe is both simple and delicious. You’ll find juicy chicken thighs paired with fresh herbs and …

Read more

Categories Dinner

TikTok Baked Feta Pasta Quick and Tasty Dish

September 3, 2025 by Chef Luca
For this dish, you need just a few main items. Here’s what you will need: - 200g feta cheese - 300g pasta (penne or fusilli works well) - 1 cup cherry tomatoes, halved Feta cheese is key. It becomes creamy when baked. Pasta is your base. Choose penne or fusilli for great texture. To boost the flavor, add some spices. Here’s what you can use: - 1/4 cup extra virgin olive oil - 3 cloves garlic, minced - 1 teaspoon dried oregano - Salt and pepper to taste - 1/2 teaspoon red pepper flakes (optional for spice) Extra virgin olive oil adds richness. Garlic gives a nice kick. Oregano adds a classic taste. Adjust salt and pepper to your liking. Red pepper flakes can spice things up. Garnishing makes your dish pop! Use: - Fresh basil leaves for garnish Basil adds color and freshness. It’s a great finishing touch for your pasta. Add it right before serving to keep it vibrant. First, set your oven to 400°F (200°C). This will help the dish cook evenly. Grab a nice baking dish. It should be big enough for the feta and tomatoes. Next, toss in one cup of halved cherry tomatoes. Make sure they spread out nicely. Now, place the block of feta cheese right in the center. This will be the star of the dish! Drizzle 1/4 cup of extra virgin olive oil over the tomatoes and feta. This adds flavor and helps everything cook well. Next, sprinkle three minced garlic cloves, one teaspoon of dried oregano, salt and pepper, and red pepper flakes if you like some heat. Bake the dish for 25 to 30 minutes. Look for the tomatoes to blister and the feta to turn golden and soft. While the feta and tomatoes bake, boil a large pot of salted water. Add 300g of pasta, like penne or fusilli. Cook it according to the package instructions until it’s al dente. This means it should still have a bit of bite. Once it's ready, drain the pasta and set it aside. When the feta and tomatoes are done, take the baking dish out of the oven. Use a fork to mash the feta and mix it with the tomatoes. This creates a creamy sauce full of flavor. Now, add the cooked pasta to the dish. Toss everything together until the pasta is coated in the sauce. Serve it right away! For a nice touch, add fresh basil leaves on top. They bring color and freshness to your meal. Enjoy your TikTok Baked Feta Pasta! To get the best baked feta, choose good feta. Aim for a block that's creamy and fresh. Preheat your oven to 400°F (200°C). This high heat helps the feta turn golden. When you bake it with tomatoes, the flavors mix well. Bake for 25-30 minutes. You'll know it's done when the cheese is soft and the tomatoes are blistered. Use a fork to mash the feta after baking. This makes a creamy sauce. While penne and fusilli are great, you can try other pasta types. Bowtie, spaghetti, or even gluten-free pasta work well. Each shape holds the sauce differently. For a twist, use whole wheat pasta for extra fiber. You can also mix pasta shapes for a fun look. Adjust cooking times based on the pasta you pick. Always check for that perfect al dente texture. Fresh herbs make a big difference in flavor. I love to use basil, as it adds a bright taste. Just tear the leaves and sprinkle them on top before serving. You can also try parsley or thyme for a different flavor. If you want more, mix in fresh herbs when you combine the pasta. This adds color and freshness to your dish. {{image_2}} You can boost this dish by adding more veggies. Try adding spinach, zucchini, or bell peppers. Chop them small and mix them in with the tomatoes. Baking helps them soften and blend well. You can also use frozen peas or broccoli. They add color and taste too. For extra protein, consider adding chicken or shrimp. Cook them first, then mix them in before serving. You can also use canned beans like chickpeas or white beans. They add flavor and make the dish filling. Tofu is a great choice for a plant-based option. Feta is tasty, but you can switch it up. Try goat cheese for a tangy kick. Cream cheese can give a rich, creamy feel. If you like a sharper taste, use cheddar or mozzarella. Each cheese will change the flavor, so feel free to experiment. To keep your baked feta pasta fresh, let it cool first. Place it in an airtight container. Store it in the fridge. It stays good for about 3-4 days. Label the container with the date for easy tracking. When you want to enjoy the leftovers, take the container out of the fridge. You can reheat it in the microwave. Use a microwave-safe dish and cover it loosely. Heat for about 1-2 minutes, stirring halfway. If you prefer, you can reheat it on the stove. Just add a splash of water or olive oil. Heat it on low until warm. This keeps the pasta creamy and tasty. If you want to save it longer, you can freeze it. Place the cooled pasta in a freezer-safe container. It can last for up to 2 months in the freezer. When you’re ready to eat, take it out and let it thaw in the fridge overnight. Reheat as mentioned above for the best taste. You can swap feta cheese for goat cheese. Goat cheese adds a creamy texture and tangy taste. You can also try ricotta or cream cheese for a different flavor. Each cheese brings its own unique touch to the dish. Yes! You can use any pasta you like. Penne and fusilli work well, but spaghetti or rotini are great too. Just make sure to cook the pasta until it is al dente. This keeps it firm and tasty when mixed with the sauce. The spice level depends on the red pepper flakes. If you add half a teaspoon, it gives a mild kick. You can leave them out for no spice at all. Adjust it to your taste, so everyone can enjoy this dish! This recipe highlights the magic of baking feta with pasta. We looked at the ingredients, from feta cheese to fresh garnishes, and detailed every step in the process, ensuring your pasta turns out amazing. I shared tips for perfecting the dish and some fun variations to keep it fresh. Remember, you can store leftovers easily and enjoy them later. With all this info, you're set to impress at your next meal. Trust me, you'll love cooking this dish repeatedly!

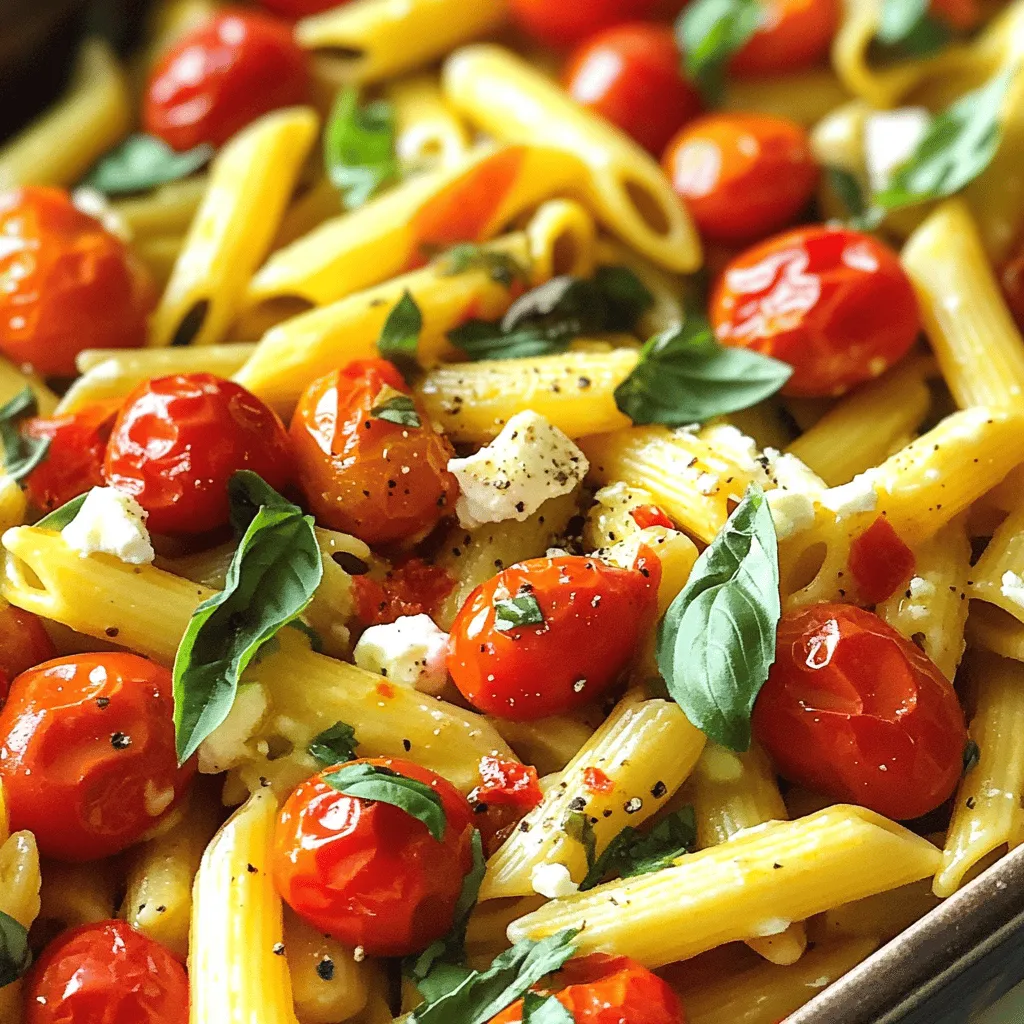
If you’re looking for a quick and tasty dish, you’ve landed in the right spot! TikTok Baked Feta Pasta has taken the food world by storm. It’s simple to make …

Read more

Categories Dinner

Air Fryer Garlic Parmesan Brussels Sprouts Delight

September 3, 2025 by Chef Luca
- 1 pound Brussels sprouts - 3 tablespoons olive oil - 4 cloves garlic - 1/2 cup grated Parmesan cheese - 1 teaspoon garlic powder - 1 teaspoon onion powder - Salt and pepper to taste - 1 tablespoon balsamic vinegar - Fresh parsley for garnish Gathering the right ingredients makes a big difference. For the main part, you'll need one pound of fresh Brussels sprouts. These little gems pack a punch in flavor and nutrition. You also want three tablespoons of olive oil to add richness. Four cloves of minced garlic will give your dish that strong, savory kick. For the flavor enhancers, grab half a cup of grated Parmesan cheese. It melts beautifully and adds a salty depth. Add one teaspoon each of garlic powder and onion powder. These spices boost the garlic flavor and add warmth. Don't forget salt and pepper! They balance the dish and bring everything together. If you want to elevate the flavor, consider one tablespoon of balsamic vinegar. It adds a nice tang when drizzled on top. Fresh parsley also makes a great garnish. It adds color and freshness to your plate. Use these ingredients, and you'll create a delightful dish that shines! First, preheat your air fryer to 375°F (190°C). This step is key for crispiness. While it heats, trim and halve your Brussels sprouts. Make sure they are all about the same size. This helps them cook evenly. In a large bowl, combine the halved Brussels sprouts with 3 tablespoons of olive oil and 4 cloves of minced garlic. Next, add 1 teaspoon of garlic powder, 1 teaspoon of onion powder, and a pinch of salt and pepper. Toss everything well to coat the sprouts evenly. You want each piece to be full of flavor. Now, transfer the seasoned Brussels sprouts into the air fryer basket. Spread them in a single layer. Cook them for 10 minutes. After the first 10 minutes, shake the basket gently to help them cook evenly. Cook for another 5 minutes. Once they are crispy and golden brown, take them out. Sprinkle 1/2 cup of grated Parmesan cheese over them while they are still hot. Toss gently to mix. If you like, drizzle with 1 tablespoon of balsamic vinegar for extra flavor. Finally, garnish with freshly chopped parsley before serving. Enjoy your delicious and easy dish! To get those Brussels sprouts crispy, cook them in a single layer. This method helps hot air flow all around each piece. If they overlap, some sprouts will steam instead of crisp. Shaking the basket is key! After 10 minutes, pull out the basket and shake it well. This step mixes them up and helps them cook evenly. Return the basket and cook for 5 more minutes. Want to kick up the taste? Try adding spices like smoked paprika or cayenne pepper. These spices give a nice kick. You can also sprinkle in some dried Italian herbs for a flavor boost. Using fresh ingredients can greatly enhance your dish. Fresh garlic gives a stronger flavor than dried. However, dried ingredients are still great if fresh ones aren’t available. Make your dish pop with garnishes! A sprinkle of fresh parsley adds color and freshness. You can also drizzle balsamic vinegar for a beautiful finish. Serve the Brussels sprouts in a nice bowl or on a platter. Pair them with roasted meats or a grain salad for a full meal. This adds visual appeal and makes the dish feel special. {{image_2}} You can make Air Fryer Garlic Parmesan Brussels Sprouts even more exciting! Here are two fun ideas: - Spicy Garlic Parmesan: Add red pepper flakes for heat. Start with a pinch and adjust to your taste. The spice pairs well with the garlic and cheese. This twist adds a kick that many will love. - Lemon Herb: Incorporate lemon zest and fresh herbs like thyme or rosemary. The citrus brightens the dish. It adds a fresh note that balances the rich cheese and garlic. If you want to change things up for your diet, here are some great swaps: - Vegan version: Replace Parmesan cheese with nutritional yeast. This gives a cheesy flavor without dairy. Nutritional yeast is also packed with nutrients. - Low-calorie options: Use less oil to cut calories. You can spray the Brussels sprouts lightly. This keeps them crispy while being kinder to your waistline. Not everyone has an air fryer, but you can still enjoy these sprouts! Here are some alternate ways to cook them: - Baking in the oven: Preheat your oven to 400°F (200°C). Spread the seasoned sprouts on a baking sheet. Bake for 20-25 minutes, tossing halfway through. This method will give you a nice crunch too. - Stovetop sautéing: Heat a pan over medium heat and add olive oil. Sauté the Brussels sprouts until golden and tender, about 10-15 minutes. You can add garlic towards the end to avoid burning. This method adds a nice flavor from the pan. To keep your Air Fryer Garlic Parmesan Brussels sprouts fresh, use airtight containers. Glass or plastic containers work well. Let the sprouts cool before sealing them. Store them in the fridge for up to three days. This helps keep their taste and texture. To reheat without losing texture, use the air fryer again. Set it to 350°F (175°C). Heat the sprouts for about 5 minutes. This method makes them crispy again. You can also use a microwave, but they may get soggy. If you do, heat for 1-2 minutes. You can freeze cooked Brussels sprouts if you have leftovers. Place them in a freezer-safe bag or container. Remove as much air as possible. They can stay in the freezer for up to two months. To thaw, place them in the fridge overnight. Reheat them in the air fryer or oven for best results. To maximize crunchiness, follow these tips: - Always preheat your air fryer. This helps the Brussels sprouts start cooking right away. - Cut the Brussels sprouts in half. This increases surface area, leading to more crispiness. - Toss them well with olive oil and seasonings. This ensures they cook evenly. - Cook in a single layer. Overcrowding makes them steam instead of crisp. - Shake the basket halfway. This promotes even cooking and browning. Yes, you can use frozen Brussels sprouts. Here are adaptations needed: - Thaw them first. This helps them cook properly and get crispy. - Increase the cooking time by a few minutes. Frozen sprouts take longer to cook. - Pat them dry. Removing excess moisture helps achieve that nice crunch. These Brussels sprouts pair well with many dishes: - Serve them alongside grilled chicken or fish. - They complement steak perfectly. - Try them with a hearty grain salad for a filling meal. - They also work great as a side for pasta dishes. - Consider pairing them with a tangy dipping sauce for extra flavor. In this post, we explored how to make delicious air fryer garlic Parmesan Brussels sprouts. We covered ingredients, step-by-step instructions, and tips for perfect texture. You learned about variations and how to store leftovers. These tasty sprouts can be a hit at any meal. With simple changes, you can suit any diet. Experiment and find your favorite way to enjoy this dish!

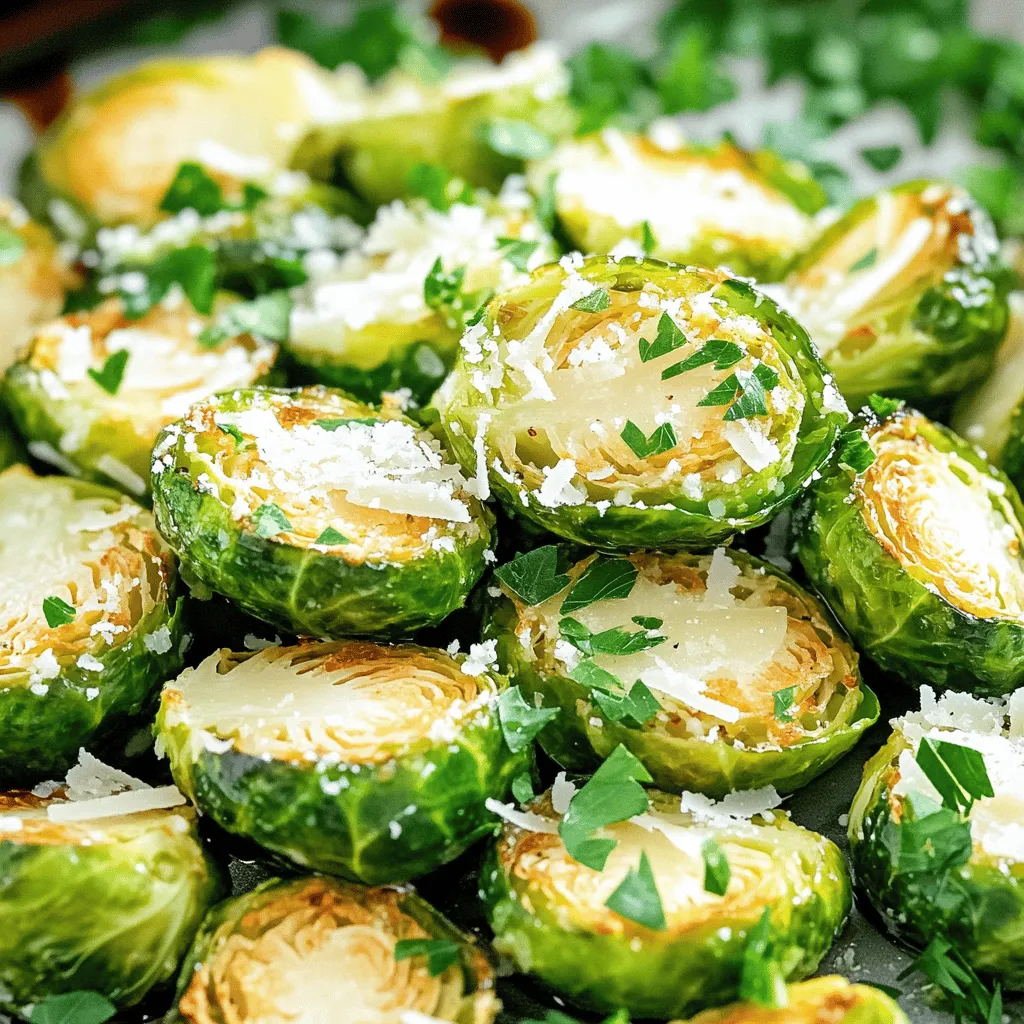
Are you ready to make your meals unforgettable? Air Fryer Garlic Parmesan Brussels Sprouts are the perfect blend of crunch and flavor. With just a few simple ingredients and steps, …

Read more

Categories Appetizers

Mini Apple Hand Pies Flavorful and Simple Recipe

September 3, 2025 by Chef Luca
- 2 cups all-purpose flour - 1/2 teaspoon salt - 1 tablespoon sugar - 1/2 cup unsalted butter, cold and cubed - 6-8 tablespoons ice water - 3 medium apples (e.g., Granny Smith or Honeycrisp), peeled and diced - 1/4 cup brown sugar - 1 teaspoon cinnamon - 1/4 teaspoon nutmeg - 1 tablespoon lemon juice - 1 egg, beaten (for egg wash) - Optional: powdered sugar for dusting To make tasty mini apple hand pies, you need some basic ingredients. First, you need all-purpose flour to make the dough. The salt and sugar add flavor and help balance the taste. Cold butter is key for a flaky crust. The ice water helps bind the dough without making it tough. For the apple filling, you should choose good apples. Granny Smith or Honeycrisp work well because they are tart and sweet. Brown sugar adds a rich flavor, while cinnamon and nutmeg bring warmth and spice. Lemon juice keeps the apples fresh and bright. You also need an egg for the wash, which gives the pies a nice golden color. When you gather your ingredients, make sure everything is fresh. This will make your mini apple hand pies taste even better. Enjoy the process; cooking should be fun! - In a large bowl, mix 2 cups of all-purpose flour, 1/2 teaspoon of salt, and 1 tablespoon of sugar. - Scatter 1/2 cup of cold, cubed unsalted butter over the flour mixture. Use your fingers or a pastry cutter to work the butter into the flour until it looks like coarse crumbs. - Gradually add 6-8 tablespoons of ice water, one tablespoon at a time. Mix until the dough holds together. Take care not to overwork the dough. - Divide the dough into two equal discs. Wrap each one in plastic wrap. - Chill the dough in the fridge for at least 30 minutes. This helps to make the crust flaky. - On a floured surface, roll out one chilled disc to about 1/8 inch thick. Use a 4-inch round cutter or a glass to cut out circles. - For the filling, mix diced apples, 1/4 cup of brown sugar, 1 teaspoon of cinnamon, 1/4 teaspoon of nutmeg, and 1 tablespoon of lemon juice in a medium bowl. - Place about 1 tablespoon of the apple filling in the center of each dough circle. - Brush the edges with a beaten egg for sealing. Fold the circle in half and pinch the edges to seal them. You can also use a fork to crimp the edges for a nice look. - Repeat this process with the second dough disc and the remaining filling. - Place the hand pies on a baking sheet lined with parchment paper. Brush the tops with the rest of the beaten egg and cut small slits in the top for steam. - Bake in a preheated oven at 400°F (200°C) for 20-25 minutes until golden brown. - Let them cool slightly before serving. You can dust them with powdered sugar if you like. To make great dough, avoid overworking it. Mix the butter into the flour until it looks like coarse crumbs. This helps keep the crust flaky. When you add ice water, do it slowly. Use just enough to bring the dough together. A little water goes a long way. You can use different types of apples. Try Granny Smith for tartness or Honeycrisp for sweetness. If you want more flavor, add spices. A pinch of ginger or a splash of vanilla can work wonders. You can also mix in some raisins or nuts for extra texture. Flipping and crimping the edges of the pies is key. This helps seal in the filling and adds a nice look. After you fill and seal the pies, cut small slits on top. This allows steam to escape while baking. For serving, dust with powdered sugar for a sweet finish. Enjoy them warm with a scoop of ice cream! {{image_2}} You can switch up your mini apple hand pies with fun flavors. One great option is caramel apple hand pies. To make them, add a drizzle of caramel sauce to the apple filling. This makes them sweet and gooey. You can also use different fruits. Try mixing apples with berries like blueberries or raspberries. This adds a new twist. The tartness of berries pairs well with the sweet apples. If you're on a gluten-free diet, you can still enjoy these hand pies. Use a gluten-free flour blend instead of all-purpose flour. Make sure the blend includes xanthan gum for texture. For vegan options, swap the butter for a plant-based butter. You can also replace the egg wash with almond milk or a flax egg. This keeps the crust golden and helps seal the pies. These modifications let everyone enjoy the tasty treat! To keep your mini apple hand pies fresh, store them in an airtight container. This way, they stay moist and tasty. If you plan to eat them soon, keep them in the fridge. They stay good for about 3 to 4 days. For longer storage, freezing is best. Wrap each hand pie in plastic wrap. Then, put them in a freezer bag or container. You can freeze them for up to 3 months. When ready to eat, just thaw them in the fridge overnight. When reheating your hand pies, you have two great options: the oven or the microwave. For the oven, preheat it to 350°F (175°C). Place the pies on a baking sheet. Heat for 10 to 15 minutes until warm. This method keeps the crust nice and crisp. If you’re in a hurry, the microwave works too. Place the pie on a microwave-safe plate. Heat it for about 20 to 30 seconds. However, this may make the crust a bit soft. To keep it crisp, you might want to use the oven method instead. To make the dough less sticky, use a bit more flour. When mixing, add flour to your hands and the work surface. This helps keep the dough from sticking. If the dough feels too wet, sprinkle in a little flour while you work with it. Just be careful not to add too much. Overworking the dough can make it tough. Yes, you can use store-bought pie crust. It saves time and makes the process easier. Look for a high-quality crust that is easy to roll out. Some brands even offer whole wheat options. Just follow the package instructions for rolling and baking. You can still add your favorite spices to the filling for flavor. Mini apple hand pies last about 2-3 days at room temperature. Keep them in an airtight container to maintain freshness. If you want them to last longer, you can freeze them. They stay good for up to 3 months in the freezer. Just remember to thaw them before reheating. In this blog post, we explored making mini apple hand pies. We covered each step, from mixing the dough to baking the pies. I shared tips for a flaky crust and fun filling options. Remember, you can modify the recipe to fit your tastes. Whether you choose to add caramel or use a gluten-free option, these hand pies will delight everyone. Keep your pies fresh by following our storage tips, and enjoy them warm for the best flavor. Follow these steps, and you’ll impress your friends and family with your baking skills.

If you’re craving a warm, sweet treat, you’ve come to the right place! Mini Apple Hand Pies are fun to make and perfect for any occasion. With a simple list …

Read more

Categories Desserts

Healthy Pumpkin Muffins Easy and Delicious Recipe

September 2, 2025 by Chef Luca
To make healthy pumpkin muffins, gather these simple ingredients: - 1 cup canned pumpkin puree - 1/2 cup unsweetened applesauce - 1/4 cup honey or maple syrup - 1/2 cup Greek yogurt - 1 teaspoon vanilla extract - 2 cups whole wheat flour - 1 teaspoon baking soda - 1 teaspoon baking powder - 1 teaspoon ground cinnamon - 1/2 teaspoon ground nutmeg - 1/4 teaspoon ground ginger - 1/4 teaspoon salt - 1/2 cup walnuts or pecans, chopped (optional) - 1/4 cup dark chocolate chips (optional) You can swap some traditional ingredients for healthier options: - Use unsweetened applesauce instead of oil for moisture. - Replace honey or maple syrup with stevia for lower sugar. - Choose Greek yogurt instead of sour cream for creaminess and protein. - Whole wheat flour adds fiber; you can use almond flour for gluten-free muffins. These swaps keep muffins tasty and nutritious. These muffins are not only delicious but also nutrient-rich. Each muffin has about: - 120 calories - 3 grams of protein - 2 grams of fiber - Healthy fats from nuts This makes them a great snack or breakfast option. Enjoy the flavors of fall while nourishing your body! First, heat your oven to 350°F (175°C). This step ensures the muffins bake evenly. Next, line a muffin tin with paper liners or lightly grease it. This helps the muffins come out easily after baking. In a large bowl, add one cup of canned pumpkin puree. Then, mix in half a cup of unsweetened applesauce. Next, add a quarter cup of honey or maple syrup for sweetness. Follow with half a cup of Greek yogurt and one teaspoon of vanilla extract. Stir until smooth. This mixture gives the muffins moisture and flavor. In a separate bowl, whisk together two cups of whole wheat flour, one teaspoon of baking soda, and one teaspoon of baking powder. Then, add one teaspoon of ground cinnamon, half a teaspoon of ground nutmeg, a quarter teaspoon of ground ginger, and a quarter teaspoon of salt. Combine these well to ensure even flavor. Gradually add the dry mix to the wet mixture. Stir gently until just combined. Avoid overmixing; it makes the muffins dense. Scoop the batter into the prepared muffin tin, filling each cup about two-thirds full. This allows space for the muffins to rise. Bake in the oven for 18 to 22 minutes. Check for doneness by inserting a toothpick in the center. If it comes out clean, the muffins are ready. Let them cool in the tin for five minutes before moving them to a wire rack. Enjoy the warm scent of pumpkin as they cool! To keep your muffins moist, you need the right balance of wet and dry. Use canned pumpkin puree and applesauce for moisture. Greek yogurt adds creaminess. Don't overmix the batter; this can make muffins dense. Mix just until you see no flour. Bake at the right temperature and check for doneness with a toothpick. If it comes out clean, your muffins are ready! You can easily change this recipe to fit your needs. For gluten-free muffins, swap whole wheat flour for a gluten-free blend. Use almond flour or oat flour for great taste. If you want vegan muffins, replace Greek yogurt with a plant-based yogurt. Use maple syrup instead of honey for sweetness. Each change keeps the muffins tasty and healthy. Serving your muffins can be just as fun as baking! Try placing them on a rustic wooden board. A sprinkle of cinnamon on top makes them look fancy. You can also present them in a basket lined with a cute towel. Pair your muffins with a warm drink like tea or coffee. Adding a dollop of yogurt or a spread of nut butter brings extra flavor! {{image_2}} You can make these muffins gluten-free! Just swap the whole wheat flour for a gluten-free blend. Many blends work well, like almond flour or a store-bought mix. Make sure the blend has a good rise, so you still enjoy fluffy muffins. I love using a blend with xanthan gum. It helps the muffins hold together. Follow the same recipe steps for a tasty treat that fits your needs. Want a vegan option? You can easily make these muffins without any animal products. Replace Greek yogurt with a plant-based yogurt. Use maple syrup instead of honey. This change keeps the muffins sweet and moist. For the eggs, you can use flaxseed meal. Mix one tablespoon of flaxseed with three tablespoons of water. Let it sit for a few minutes until it thickens. Add this to your wet mix for great results! Spice up your muffins with extra flavors! You can add more spices like cloves or cardamom for a warm taste. Just a pinch can change everything. You might also like to add mix-ins. Chopped nuts like walnuts or pecans add a nice crunch. Dark chocolate chips make a sweet surprise in every bite. You could even toss in dried fruit like cranberries for a fruity twist. Experiment and find your favorite combinations! To keep your pumpkin muffins fresh, store them in an airtight container. You can place them on your kitchen counter for up to three days. If you want to keep them longer, the fridge is a good option. Just remember, the fridge can dry them out. Try wrapping them in plastic wrap for extra moisture. Freezing muffins is simple! First, let your muffins cool completely. Then, wrap each muffin in plastic wrap. Place them in a freezer bag or airtight container. This helps prevent freezer burn. You can freeze them for up to three months. Just label the bag with the date, so you remember when you made them! To enjoy your muffins warm, you can reheat them easily. If using a microwave, place one muffin on a plate and microwave for 10-15 seconds. For a crispier texture, use your oven. Preheat it to 350°F (175°C). Place the muffins on a baking sheet and heat for about 5-10 minutes. Enjoy them warm for the best taste! To make these muffins low in sugar, you can swap honey with a sugar substitute. Try using stevia or monk fruit sweetener. These options give sweetness without extra calories. You can also reduce the amount of applesauce for less sugar. Remember, taste may change, so adjust carefully. Pumpkin puree is pure, cooked pumpkin. It has no added sugars or spices. Pumpkin filling is sweetened and spiced. It often contains added sugar and flavors for pies. When baking, always choose pumpkin puree for the best results. Yes, you can make these muffins without eggs. Use 1/4 cup of unsweetened applesauce or mashed banana for each egg. This keeps the muffins moist and tasty. Another option is to use flaxseed meal mixed with water. Mix one tablespoon of flaxseed with three tablespoons of water and let it sit until thick. Pumpkin muffins last about 3-5 days at room temperature. For longer storage, keep them in the fridge for up to a week. You can freeze muffins for up to three months. Just wrap them tightly in plastic wrap or foil. This keeps them fresh and ready to enjoy later. You've learned how to make healthy pumpkin muffins from scratch. We covered key ingredients, step-by-step instructions, and tips for perfect results. I shared tasty variations for different diets and ways to store your muffins for later. Now you can enjoy delicious muffins that fit your health goals. Get creative with flavors and share them with friends or family. Happy baking!

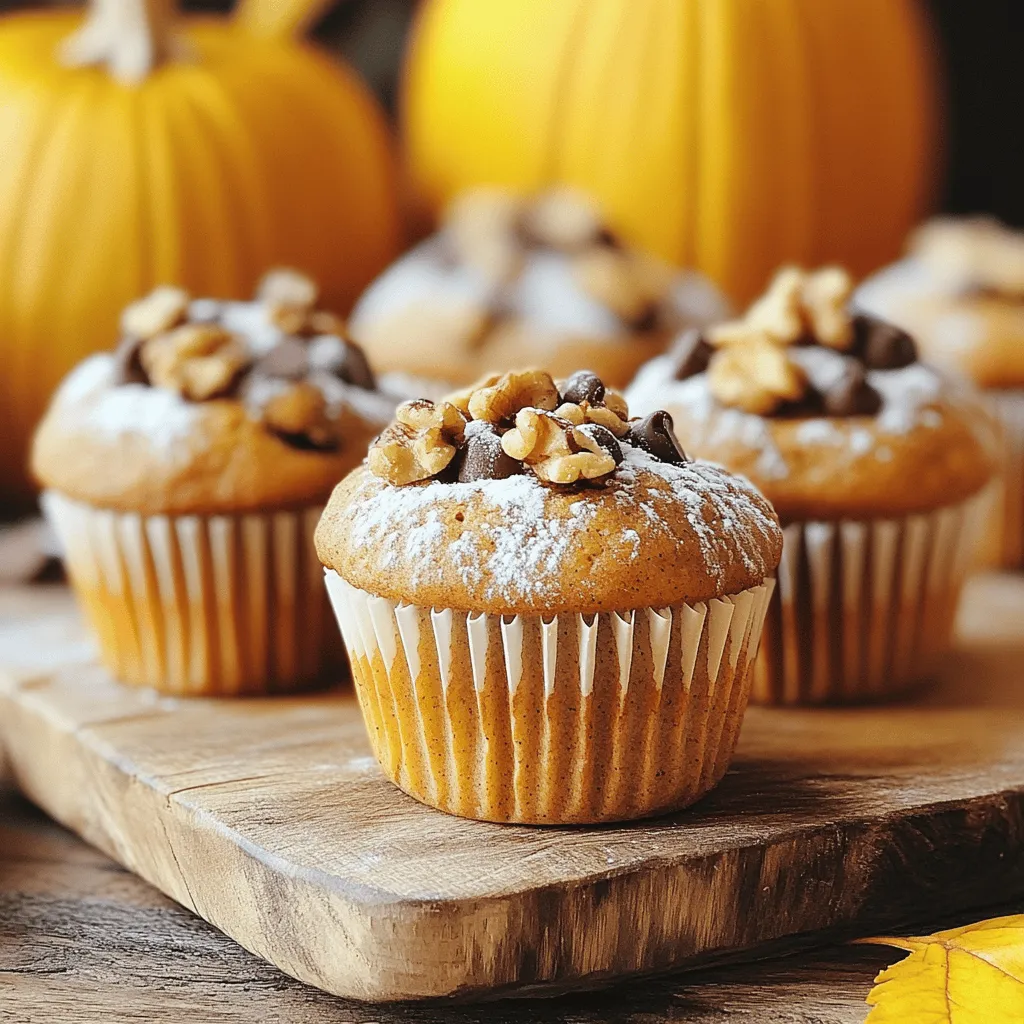
Are you craving a tasty treat that won’t ruin your healthy eating? You’re in luck! These healthy pumpkin muffins are easy to make and packed with flavor. In this article, …

Read more

Categories Desserts

Vegan Pumpkin Pie Cookies Delightful and Easy Recipe

September 2, 2025 by Chef Luca
To make these vegan pumpkin pie cookies, you need a few key ingredients: - 1 cup pumpkin puree - 1/2 cup coconut sugar - 1/4 cup maple syrup - 1/4 cup coconut oil, melted - 1 teaspoon vanilla extract - 1 1/2 cups all-purpose flour (or gluten-free flour) - 1 teaspoon baking soda - 1 teaspoon cinnamon - 1/2 teaspoon nutmeg - 1/4 teaspoon ginger powder - 1/4 teaspoon salt These ingredients create a rich, spiced flavor that feels like fall in every bite. The pumpkin puree keeps the cookies moist and fluffy. You can enhance your cookies with a few extras: - 1/2 cup pecans or walnuts, chopped (optional) - 1/4 cup dairy-free chocolate chips (optional) Adding nuts gives a nice crunch, while chocolate chips offer a sweet surprise. Mix and match these add-ins for your perfect cookie. If you need to swap ingredients, here are some ideas: - Use agave syrup instead of maple syrup. - Replace coconut sugar with brown sugar or cane sugar. - Substitute coconut oil with vegetable oil or vegan butter. - Choose almond flour or oat flour instead of all-purpose flour for a different texture. These swaps help you cater to your taste and pantry items. Always adjust the amounts as needed for the best results. First, get your oven ready. Preheat it to 350°F (175°C). Line a baking sheet with parchment paper. This helps the cookies not stick. In a large bowl, combine the wet ingredients. Add 1 cup of pumpkin puree. Then, mix in 1/2 cup of coconut sugar and 1/4 cup of maple syrup. Pour in 1/4 cup of melted coconut oil. Lastly, add 1 teaspoon of vanilla extract. Whisk everything until it's smooth and well mixed. Now, take another bowl for the dry mix. Add 1 1/2 cups of all-purpose flour, 1 teaspoon of baking soda, 1 teaspoon of cinnamon, 1/2 teaspoon of nutmeg, 1/4 teaspoon of ginger powder, and 1/4 teaspoon of salt. Stir these ingredients together. Slowly add the dry mix to the wet mix. Stir gently until just combined. If you want, fold in 1/2 cup of chopped nuts and 1/4 cup of dairy-free chocolate chips. Scoop tablespoon-sized dough amounts onto the baking sheet. Make sure to leave space between each one. They will spread as they bake. Place the tray in the oven and bake for 12-15 minutes. The edges should turn golden. The centers may look soft, but they'll firm up as they cool. Wait about 5 minutes on the baking sheet before moving them to a wire rack. This helps them cool down completely. To get the right texture, use room temperature ingredients. This helps them blend well. For soft cookies, don’t overmix the dough. Mix until just combined. The dough should be moist but not sticky. If it feels dry, add a splash of plant milk. If you want chewy cookies, add a bit of cornstarch. It gives a nice texture. Baking can be tricky, but I have tips to help. First, always measure your flour correctly. Too much flour can make cookies dry. Use a spoon to fluff up the flour, then spoon it into your measuring cup. Level it off with a knife. Next, watch the baking time. Every oven is different, so check cookies a minute early. They should be golden around the edges. If they look too soft in the middle, that’s okay. They will harden as they cool. To boost flavor, add extra spices like cloves or allspice. You can also mix in lemon zest for a bright twist. For presentation, dust cookies with cinnamon or powdered sugar. Serve them on a colorful plate, and pair with coconut whipped cream. It adds a fun touch and makes your cookies shine! {{image_2}} You can easily make these cookies gluten-free. Simply swap all-purpose flour for gluten-free flour. I like using a blend of almond flour and coconut flour. This mix gives great texture and flavor. Follow the same steps in the recipe. Your cookies will still be soft and tasty! Want to change the flavor? Try adding different spices. You can use cardamom for a warm taste. Or add allspice for a deeper flavor. Just remember, start with a small amount. You can always add more, but you can't take it out! A mix of spices can make your cookies unique each time. Need nut-free cookies? Just leave out the pecans or walnuts. The cookies will still be delicious! If you want some crunch, try sunflower seeds or pumpkin seeds instead. These seeds add a nice texture without the nuts. Enjoy your nut-free version just as much! To keep your vegan pumpkin pie cookies fresh, store them in an airtight container. Place parchment paper between layers to stop sticking. Keep the cookies at room temperature for up to five days. If you want them to last longer, use the fridge. They can stay good for up to a week in the fridge. Freezing is a great way to save cookies for later. First, let the cookies cool completely. Then, place them on a baking sheet in a single layer. Freeze for one hour until firm. After that, transfer them to a zip-top bag or container. Label it with the date. They can stay frozen for up to three months. When you want to enjoy your cookies again, preheat the oven to 350°F (175°C). Place the cookies on a baking sheet. Heat them for about 5-7 minutes. This will make them warm and soft again. You can also use a microwave. Heat them for about 10-15 seconds. Enjoy your tasty treat! Yes, you can use fresh pumpkin. Just cook it first. Cut the pumpkin, remove seeds, and roast it until soft. Then, mash it into a smooth puree. Fresh pumpkin gives a nice, rich flavor. To make these cookies healthier, try using less sugar. You can reduce the coconut sugar or maple syrup. Adding oats can boost fiber too. Swap in whole wheat flour for more nutrients. These cookies last about five days when stored well. Keep them in an airtight container to stay fresh. You can also freeze them for longer storage, up to three months. Yes, you can use other sugars. Brown sugar or cane sugar works well. If you want a low-calorie option, try stevia or monk fruit sweetener. Just check the conversion for sweetness. Yes, you can make these cookies gluten-free. Use gluten-free flour instead of all-purpose flour. Make sure to check that all other ingredients are gluten-free as well for safety. This article covered how to make vegan pumpkin pie cookies from start to finish. We explored the best ingredients and tasty add-ins, plus easy substitutions. I shared step-by-step instructions for mixing, baking, and cooling your cookies. I also gave tips for texture, storage, and fun variations. You can enjoy cookies that fit your diet and taste great. Baking wholesome treats is easy and fun. Try these ideas and make your own delicious cookie experience!

If you love pumpkin and cookies, you’re in for a treat! My Vegan Pumpkin Pie Cookies are easy to make and full of flavor. They bring the taste of fall …

Read more

Categories Desserts

Pumpkin Cinnamon Muffins Delightfully Simple Recipe

September 2, 2025 by Chef Luca
To make pumpkin cinnamon muffins, you will need the following ingredients: - 1 cup pumpkin puree - 1/2 cup granulated sugar - 1/2 cup brown sugar, packed - 1/3 cup vegetable oil - 2 large eggs - 1 teaspoon vanilla extract - 2 cups all-purpose flour - 1 teaspoon baking soda - 1/2 teaspoon baking powder - 1 teaspoon ground cinnamon - 1/2 teaspoon ground nutmeg - 1/4 teaspoon ground ginger - 1/4 teaspoon salt - 1/2 cup chopped walnuts or pecans (optional) - 1/2 cup chocolate chips (optional) For common allergens, you can make some substitutions. Use gluten-free flour instead of all-purpose flour for a gluten-free option. Replace eggs with flax eggs for a vegan choice. If you have nut allergies, skip the nuts altogether. Adding extra flavors can make your muffins even better. Here are some fun options: - Chopped nuts: Walnuts or pecans add a great crunch. - Chocolate chips: For a sweet surprise, toss in some chocolate chips. These add-ins can change the texture and taste of your muffins. Try them to find your favorite mix! 1. Preheat your oven. Set it to 350°F (175°C). This step warms the oven for baking. 2. Prepare the muffin tin. Line it with paper liners or grease it with cooking spray. This keeps muffins from sticking. 3. Mix the wet ingredients. In a large bowl, combine: - 1 cup pumpkin puree - 1/2 cup granulated sugar - 1/2 cup brown sugar - 1/3 cup vegetable oil - 2 large eggs - 1 teaspoon vanilla extract Whisk them together until smooth and creamy. 4. Whisk the dry ingredients. In another bowl, mix together: - 2 cups all-purpose flour - 1 teaspoon baking soda - 1/2 teaspoon baking powder - 1 teaspoon ground cinnamon - 1/2 teaspoon ground nutmeg - 1/4 teaspoon ground ginger - 1/4 teaspoon salt This step blends the flavors and helps muffins rise. 5. Fold in any add-ins. If you like, add: - 1/2 cup chopped walnuts or pecans - 1/2 cup chocolate chips Gently mix these into the batter. This adds texture and flavor. 6. Properly fill the muffin cups. Divide the batter evenly, filling each cup about two-thirds full. This allows space for muffins to rise. 7. Bake and check for doneness. Place the muffin tin in the oven. Bake for 18-20 minutes. Use a toothpick to test doneness. Insert it into the center of a muffin. If it comes out clean, they are done! Let the muffins cool slightly before moving them to a wire rack. Enjoy the warm, fragrant smell as they cool! To make your muffins fluffy, avoid overmixing the batter. When you mix, only stir until the dry ingredients blend with the wet. A few lumps are okay. Overmixing makes the muffins tough. For even baking, fill each muffin cup about two-thirds full. This way, they rise nicely without spilling over. You should also bake them in the center of the oven. This spot offers the best heat and airflow. For presentation, arrange your muffins on a bright platter. A dusting of powdered sugar adds a nice touch. You can also top them with cream cheese frosting for a sweeter bite. Pair your muffins with warm drinks. A cup of coffee or chai tea complements the flavors well. If you prefer something cold, a glass of milk works great too. {{image_2}} You can make your pumpkin cinnamon muffins more exciting. Try adding spices like cloves or allspice. These spices enhance the warm flavors in the muffins. Just add half a teaspoon of either spice to your dry ingredients. You can also switch up the sweeteners. Instead of granulated sugar, use maple syrup. It adds a rich, caramel-like taste. Use about three-quarters of a cup of maple syrup in place of the sugars. Remember to reduce the oil slightly to keep the right batter texture. If you need gluten-free muffins, swap all-purpose flour for a gluten-free blend. Many brands work well in baking. Use a one-to-one ratio for the best results. For vegan muffins, replace the eggs with flax eggs. To make a flax egg, mix one tablespoon of flaxseed meal with two and a half tablespoons of water. Let it sit for about five minutes. You can also use applesauce instead of eggs, using a quarter cup for each egg. These adjustments make the muffins friendly for various diets while keeping them delicious. To keep your pumpkin cinnamon muffins fresh, store them in an airtight container. This helps keep moisture in and prevents them from getting stale. You can also wrap them in plastic wrap for extra protection. - Room temperature: Your muffins will last for about 2 to 3 days. - Refrigerator: If you want them to last longer, store them in the fridge. They can stay fresh for about a week. - Avoid sunlight: Keep them away from direct sunlight, as it can dry them out. Freezing muffins is a great way to save them for later. To freeze your pumpkin cinnamon muffins, let them cool completely first. Then, wrap each muffin tightly in plastic wrap. You can also place them in a freezer bag for added protection. - Freezer time: Your muffins can last up to 3 months in the freezer. - Reheating: To enjoy them again, take a muffin out and let it thaw at room temperature. You can also warm it in the microwave for about 15 to 20 seconds or in the oven at 350°F (175°C) for about 5 to 10 minutes. This will bring back their fresh-baked taste! How long do pumpkin cinnamon muffins last? Pumpkin cinnamon muffins stay fresh for about 3 to 5 days. Store them in an airtight container at room temperature. If you want to keep them longer, you can freeze them. They will last for about 2 to 3 months in the freezer. Just remember to wrap them well in plastic wrap or foil before freezing. Can I use fresh pumpkin instead of puree? Yes, you can use fresh pumpkin instead of puree. To do this, cook the pumpkin until soft. Then, mash it well until smooth. Make sure to drain any extra water. This will help keep the muffins from getting too wet. What to do if muffins are too dense? If your muffins turn out dense, it may be due to overmixing. When you mix the batter, do it gently. Stop as soon as you see no dry flour. You can also check if your baking soda is fresh. Old baking soda may not rise well. How to prevent muffins from sticking to the pan? To keep muffins from sticking, use paper liners or grease the muffin tin well. You can use cooking spray or butter to coat the cups. If you still have trouble, allow the muffins to cool for a few minutes before removing them from the pan. This can help them release easier. In this guide, I covered everything you need for perfect muffins. From essential ingredients to optional add-ins, every detail enhances your baking. I shared vital steps like mixing and baking, plus crucial tips to avoid mistakes and ensure success. Don't forget the storage tips for keeping your muffins fresh. Enjoy experimenting with flavors and making muffins your own. Baking should be fun and simple, and with these tips, you can create delightful treats every time. Happy baking!

Fall is here, and so is the craving for warm, cozy treats! You’ll love these Pumpkin Cinnamon Muffins. They are quick and easy to make, perfect for breakfast or a …

Read more

Categories Desserts

Cowboy Butter Chicken Linguine Tasty and Simple Meal

September 2, 2025 by Chef Luca
- 1 lb boneless, skinless chicken thighs, cut into bite-sized pieces - 8 oz linguine pasta - 1/2 cup unsalted butter, melted - 4 cloves garlic, minced The main ingredients make this dish rich and filling. The chicken thighs provide a tender bite. Linguine pasta soaks up the sauce well, making each bite tasty. Butter adds luxury, and garlic gives great flavor. - 1 teaspoon smoked paprika - 1 teaspoon chili powder - 1 teaspoon dried oregano - Salt and pepper to taste Spices bring life to the dish. Smoked paprika adds warmth, while chili powder gives it a nice kick. Dried oregano gives a hint of earthiness, and salt and pepper balance the flavors. - 1/2 cup cherry tomatoes, halved - 1/4 cup fresh parsley, chopped - 1/4 cup freshly squeezed lemon juice Fresh components brighten the dish. Cherry tomatoes add sweetness and color. Fresh parsley offers a pop of green, and lemon juice gives a zesty finish. These ingredients make the meal feel light and fresh. Start by boiling water in a large pot. Add a pinch of salt to the water. Once it boils, add 8 oz of linguine pasta. Cook it according to the package instructions. The pasta will take about 9-11 minutes to become al dente. Stir it occasionally to prevent sticking. When it's ready, drain the pasta in a colander. Be sure to reserve 1/2 cup of the pasta water before draining. This water helps adjust the sauce later. In a large skillet, melt 1/2 cup of unsalted butter over medium heat. Once the butter is melted, add 4 minced garlic cloves. Sauté the garlic for 1-2 minutes until it smells great. Be careful not to let it brown. Next, stir in 1 teaspoon of smoked paprika, 1 teaspoon of chili powder, and 1 teaspoon of dried oregano. Cook this mixture for another minute. This step helps the spices bloom and release their flavors. Now, increase the heat to medium-high. Add 1 lb of cut chicken thighs to the skillet. Season the chicken with salt and pepper to taste. Cook the chicken pieces for about 6-8 minutes. You want them to be browned and fully cooked. Make sure to stir occasionally for even cooking. Once the chicken is cooked, pour in 1/2 cup of chicken broth and 1/4 cup of lemon juice. Use a spatula to scrape up any bits stuck to the skillet. Let this mixture simmer for 2-3 minutes. Now, fold in the cooked linguine and 1/2 cup of halved cherry tomatoes. Toss everything together well. If the dish feels too thick, add some reserved pasta water a little bit at a time. This helps achieve your desired texture. Finally, mix in 1/4 cup of chopped fresh parsley. Add red pepper flakes if you want some heat. Taste the dish and adjust the seasoning if needed. Enjoy your Cowboy Butter Chicken Linguine! To make Cowboy Butter Chicken Linguine your own, adjust the spices. If you like it spicy, add more chili powder. For a milder flavor, use less. You can also change the smoked paprika amount to suit your taste. Garlic is key in this dish. If you love garlic, add an extra clove. If you prefer a lighter taste, reduce the amount. This simple change can shift the dish from mild to bold. I prefer using a skillet for this recipe. It helps brown the chicken and adds flavor. You can also choose to bake the chicken, but it won't give the same depth. When cooking the chicken, make sure the skillet is hot. This helps to brown the chicken well. Don't overcrowd the pan, or the chicken will steam instead of brown. Serve the Cowboy Butter Chicken Linguine in warm bowls. This keeps the dish hot and inviting. Garnish with extra parsley for a fresh look. A lemon wedge on the side adds color and flavor. If you want heat, add red pepper flakes at the end. This keeps the spice fresh and bright. You can also sprinkle them on each serving, so everyone can choose their spice level. {{image_2}} You can change the main protein in Cowboy Butter Chicken Linguine. If you want to use shrimp, choose large shrimp for a great taste. Cook them until they turn pink and opaque. For beef, use thin strips of flank steak. Sear the beef quickly in the pan to keep it tender. If you prefer a vegetarian dish, mushrooms are a fantastic option. Try using portobello or cremini mushrooms. Sauté them until they are soft. They will soak up the flavors and add a nice texture. The sauce is key to this dish. You can switch the broth for a richer flavor. Beef or vegetable broth works well too. If you want a lighter option, consider using homemade stock. For those who need a dairy-free meal, you can use vegan butter instead of regular butter. This option keeps the dish creamy while being plant-based. You can also try olive oil for a different flavor profile. If you want to avoid gluten, there are great pasta options. Look for gluten-free linguine made from rice or corn. These options cook well and taste great. You can also switch up the noodle type for a fun twist. Try using fettuccine or even zoodles (zucchini noodles). Both will give a fresh look to your dish and change the texture a bit. Store any leftover Cowboy Butter Chicken Linguine in the fridge. Place it in an airtight container. This keeps the dish fresh for up to three days. Make sure to let it cool before sealing. This prevents moisture buildup and soggy pasta. To reheat, use the microwave or stove. If using a microwave, heat in short bursts. Stir in between to warm evenly. This keeps the chicken and pasta moist. If the dish looks dry, add a splash of chicken broth or a little olive oil. This revives the flavors and texture. You can freeze Cowboy Butter Chicken Linguine for up to three months. Use a freezer-safe container or resealable bag. Make sure to remove as much air as possible. When ready to eat, thaw overnight in the fridge. Reheat on the stove or microwave. Add fresh parsley or lemon juice to brighten the flavors. You can use chicken breast instead of thighs. Chicken breast is leaner. If you want a different meat, try shrimp or beef. For a plant-based option, use mushrooms or tofu. Both give a nice texture and flavor. Yes, you can use any pasta you like. Spaghetti or fettuccine work well. For a gluten-free option, try rice noodles or gluten-free pasta. Just remember to adjust cooking times based on the pasta type. To add heat, use more chili powder or smoked paprika. You can also add red pepper flakes. If you want more flavor, try fresh jalapeños or serrano peppers. Adjust according to your taste. Cowboy Butter Chicken Linguine lasts about 3 to 4 days in the fridge. Store it in an airtight container. Make sure to cool it down before refrigerating. This keeps it fresh and safe to eat. Yes, you can prep this dish ahead. Cook the chicken and sauce, then store them separately from the pasta. When you’re ready to eat, heat them up and mix. This saves time on busy days. This blog post covers a delicious meal made with chicken, linguine, and a rich butter sauce. You learned how to cook the pasta, prepare the sauce, and bring it all together. I shared tips to enhance flavors and ideas for different proteins and sauces. Remember, cooking is all about experimenting. Don't hesitate to adjust spices or try new ingredients. With this guide, you can create a tasty dish that suits your taste. Enjoy your cooking adventure!

Craving a meal that delivers big flavor with minimal effort? Let me introduce you to Cowboy Butter Chicken Linguine! This tasty dish combines tender chicken, rich butter, and zesty spices …

Read more

Categories Dinner
Older posts
Newer posts
← Previous Page1 … Page33 Page34 Page35 … Page122 Next →

STIRRED RECIPES

Where every dish begins with a stir! 🍲✨

PAGES

Home About Contact Privacy Policy Terms & Conditions Cookie Policy GDPR Policy Copyright Policy Disclaimer

CATEGORIES

Appetizers Desserts Salads Breakfast Dinner

Contact

  • Pinterest
  • Mail
Copyright © 2026 Stirred Recipes. All rights reserved.