Skip to content
Stirred Recipes
  • Home
  • Appetizers
  • Desserts
  • Salads
  • Breakfast
  • Dinner
  • Privacy Policy
  • Contact
  • About

Chef Luca

Taco Rice Bowl Flavorful and Easy to Make Meal

November 5, 2025 by Chef Luca
To make a tasty taco rice bowl, gather these ingredients: - 1 cup jasmine rice - 1 pound ground turkey (or beef) - 1 packet taco seasoning - 1 cup black beans, drained and rinsed - 1 cup corn kernels (fresh or frozen) - 1 cup diced tomatoes (canned or fresh) - 1 cup shredded lettuce - 1 avocado, diced - ½ cup shredded cheddar cheese - ¼ cup sour cream - 2 tablespoons olive oil - Fresh cilantro for garnish - Lime wedges for serving - Salt and pepper to taste These ingredients work together to create rich flavors in your bowl. You will need a few tools to make this meal: - Saucepan for cooking rice - Skillet for cooking meat - Spoon for mixing - Measuring cups and spoons - Serving bowls for assembly - Fork for fluffing rice These tools help make the cooking process smooth and easy. When you shop for ingredients, keep these tips in mind: - Choose jasmine rice that is free of cracks or broken grains. - Look for ground turkey or beef that is bright and firm. - Pick black beans that are shiny, with no dents on the can. - If using fresh corn, select ears that feel heavy and firm. - For tomatoes, pick ones that are ripe and fragrant. - Select lettuce with crisp leaves and no brown spots. - Choose avocados that yield slightly when pressed but are not too soft. Fresh ingredients make your taco rice bowl taste its best. To start, rinse 1 cup of jasmine rice under cold water. Keep rinsing until the water runs clear. This step helps remove extra starch. Next, bring 2 cups of water to a boil in a saucepan. Add the rinsed rice and cover the pot. Lower the heat to a simmer for about 15 minutes. The rice will absorb all the water. After 15 minutes, remove the pot from heat. Let it sit covered for 5 more minutes. Finally, fluff the rice with a fork. While the rice cooks, heat 2 tablespoons of olive oil in a skillet over medium heat. Add 1 pound of ground turkey or beef to the skillet. Sprinkle in the taco seasoning from the packet. Cook the meat for about 5 to 7 minutes. Break the meat apart with a spoon as it cooks. Make sure it turns a nice brown color. Once the meat is browned, mix in 1 cup of black beans and 1 cup of corn kernels. Stir everything together well. Let it cook for an additional 2 to 3 minutes. The beans and corn should be heated through. Taste your mixture and add salt and pepper as needed. Now it’s time to build your bowl! Start with a generous scoop of fluffy jasmine rice in each serving bowl. Next, add a layer of the seasoned meat mixture on top of the rice. Follow this with 1 cup of diced tomatoes and 1 cup of shredded lettuce. Make sure to spread them evenly. For the finishing touches, layer on diced avocado and sprinkle with ½ cup of shredded cheddar cheese. Then, add a dollop of sour cream on each bowl. Finally, garnish with fresh cilantro. Serve lime wedges on the side. Squeeze lime juice over your bowl before eating for extra flavor! To cook jasmine rice well, start by rinsing it. Rinse it under cold water until the water is clear. This step removes excess starch and prevents stickiness. Next, bring two cups of water to a boil in a saucepan. Once boiling, add one cup of jasmine rice. Cover the pot and lower the heat to a simmer. Let it cook for about 15 minutes. After that, remove it from heat. Let it sit covered for five more minutes. Finally, fluff the rice with a fork. This method gives you fluffy, perfect rice every time. Taco seasoning can be a fun way to change flavors. You can start with a packet of taco seasoning. But feel free to tweak it! Add more chili powder for heat. You might like garlic powder for depth. Cumin adds warmth, while paprika gives color. Taste your meat mixture while cooking. Adjust the seasoning based on your preference. This way, you can make the dish as spicy or mild as you like. A well-presented taco rice bowl is eye-catching. Start with a base of fluffy jasmine rice. Layer the seasoned meat mixture on top. Add bright diced tomatoes and shredded lettuce next. For color and texture, sprinkle diced avocado. A bit of shredded cheddar adds richness. Finish with a dollop of sour cream and fresh cilantro. Serve with lime wedges on the side for extra zest. These steps make your dish not only tasty but also beautiful. Enjoy the process of making it look great! {{image_2}} For a tasty vegetarian taco rice bowl, swap meat for hearty veggies. Use a mix of bell peppers, zucchini, and mushrooms. Sauté these in olive oil before adding taco seasoning. Stir in black beans and corn just like the meat version. This bowl is still full of flavor and fun! To make this bowl vegan, skip the sour cream and cheese. Use avocado and a sprinkle of nutritional yeast for a cheesy flavor. You can also add more beans or use lentils for protein. Top it with fresh salsa or guacamole for added taste and texture. This taco rice bowl is naturally gluten-free when using gluten-free taco seasoning. Ensure all canned ingredients, like beans and tomatoes, are gluten-free. Serve it with jasmine rice, or replace it with quinoa for a nutty flavor. Enjoy a delicious meal without worry! To keep your Taco Rice Bowl fresh, store leftovers in an airtight container. This helps maintain flavors and moisture. Allow the bowl to cool to room temperature before sealing. You can store it in the fridge for up to three days. When you are ready to enjoy your leftovers, gently reheat them. The microwave works well here. Place your portion on a microwave-safe plate. Heat it for about one to two minutes. Stir halfway through to ensure even heating. You can also reheat on the stove. Add a splash of water to keep the rice moist. Heat on low until warm. If you want to save Taco Rice Bowls for later, freezing is a great option. Divide the bowl into single servings. Use freezer-safe containers or bags. Make sure to remove as much air as possible to prevent freezer burn. They can last up to three months in the freezer. To eat, let it thaw overnight in the fridge and reheat as mentioned above. You can use ground chicken or pork as good substitutes. If you want a plant-based option, try lentils or crumbled tofu. These choices still give you a great taste and texture. You can store Taco Rice Bowls in the fridge for up to three days. Make sure to keep them in an airtight container to keep them fresh. Yes, brown rice works well. It takes longer to cook, so adjust your time. Brown rice adds a nice nutty flavor and extra fiber, making your meal healthier. You can add sliced jalapeños for heat. Try fresh salsa or pico de gallo for a bright taste. Other great options include diced red onion, sour cream, or even hot sauce. Fresh herbs like cilantro or chives also make great additions. To spice up your Taco Rice Bowl, add diced jalapeños or chipotle peppers. You can also mix in some hot sauce or cayenne pepper to the ground meat. A sprinkle of chili flakes can also bring the heat. In this blog post, we explored how to create a delicious taco rice bowl. We covered the essential ingredients and tools, plus tips for fresh choices. The step-by-step instructions guide you through cooking jasmine rice and preparing protein. We also offered useful tips for perfect cooking and great presentation. Don’t forget the variations for dietary needs and storage tips for leftovers. Use this knowledge to impress your friends with a tasty meal. Enjoy every bite and make it your own!

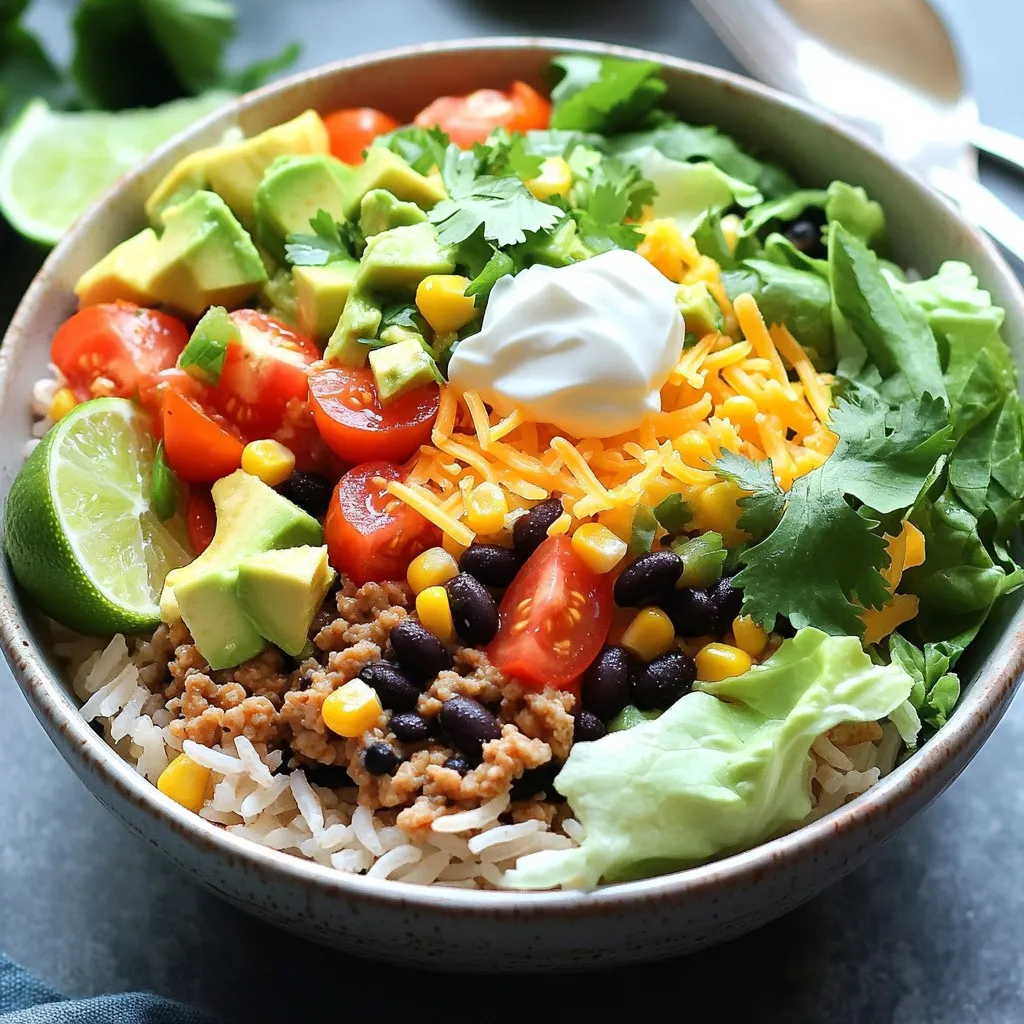
Craving a fun and easy meal? Dive into the world of Taco Rice Bowls! This dish combines rich flavors and fresh ingredients, making it a perfect choice for busy weeknights. …

Read more

Categories Dinner

Frosted Coffee Brownies Indulge in Rich Flavor

November 5, 2025 by Chef Luca
- 1 cup unsalted butter - 2 cups granulated sugar - 4 large eggs - 1 teaspoon vanilla extract - 1 cup all-purpose flour - 1 cup unsweetened cocoa powder - 1 teaspoon baking powder - 1/2 teaspoon salt - 1/4 cup strong brewed coffee (cooled) - 1 cup semi-sweet chocolate chips - 1/2 cup unsalted butter, softened - 2 cups powdered sugar - 1/4 cup brewed coffee (cooled) - 2 tablespoons cocoa powder - 1/2 teaspoon vanilla extract When I create these frosted coffee brownies, I gather my ingredients first. This makes the process smooth and fun. The main star is unsalted butter, which adds richness. Granulated sugar gives sweetness that balances the bitter coffee. I use four large eggs for a moist texture. The vanilla extract brings warmth and depth to the flavor. I always choose all-purpose flour and unsweetened cocoa powder for that perfect brownie base. Baking powder helps the brownies rise just right, while salt enhances all the flavors. Brewed coffee is a key ingredient. It adds a lovely coffee flavor and pairs well with the chocolate. I toss in semi-sweet chocolate chips for extra indulgence. For the frosting, I whip up softened unsalted butter until creamy. Powdered sugar gives it the right sweetness and texture. The cooled brewed coffee adds flavor and moisture, while cocoa powder deepens the chocolate taste. Finally, I mix in a hint of vanilla extract to tie it all together. This combination of ingredients is pure magic! First, preheat your oven to 350°F (175°C). Grease a 9x13-inch baking pan to prevent sticking. Next, melt 1 cup of unsalted butter in a medium saucepan over low heat. Once it’s melted, take it off the heat. Stir in 2 cups of granulated sugar until it’s mixed well. Now, add 4 large eggs one at a time. Mix after each egg to blend them smoothly. Finally, stir in 1 teaspoon of vanilla extract for flavor. In a separate bowl, sift together 1 cup of all-purpose flour, 1 cup of unsweetened cocoa powder, 1 teaspoon of baking powder, and 1/2 teaspoon of salt. This step adds air and helps the brownies rise. Gradually mix these dry ingredients into the wet mixture. Stir gently until just combined. Now, pour in 1/4 cup of cooled brewed coffee and fold in 1 cup of semi-sweet chocolate chips. This gives the brownies a rich flavor. Spread the batter evenly in the prepared pan. Bake for 25-30 minutes. Check for doneness by inserting a toothpick in the center; it should come out with a few moist crumbs. Allow the brownies to cool completely in the pan before frosting them. Oven temperature matters. Preheat to 350°F (175°C) for even baking. Use an oven thermometer if needed. This ensures your brownies bake just right. To check if brownies are done, insert a toothpick in the center. If it comes out with a few moist crumbs, they are ready. Overbaking can lead to dry brownies, so keep an eye on them. For fluffy frosting, start with softened butter. Beat it well until creamy. This helps incorporate air and adds lightness. Next, add powdered sugar slowly. Mix thoroughly to avoid clumps. Adjust sweetness to your taste. If you want a stronger coffee flavor, add more cooled coffee. You can also include a little cocoa powder for extra depth. Slice brownies into squares while they are still in the pan. Use a sharp knife for clean cuts. Wipe the knife with a damp cloth between slices for neat edges. Pair these brownies with a scoop of vanilla ice cream or a dollop of whipped cream. The creaminess balances the rich coffee flavor perfectly. You can also sprinkle some chocolate shavings on top for a fun touch. {{image_2}} You can make your brownies even more exciting with mix-ins. Here are some ideas: - Nuts: Add walnuts or pecans for a crunch. They blend well with the soft brownie. - Chocolate chips: Use dark or white chocolate chips. Each type adds a new flavor twist. Frosting can change the whole taste. Try these alternatives: - Cream cheese frosting: This adds a rich and tangy flavor. It pairs well with coffee. - Ganache topping: Melt chocolate with cream for a smooth finish. This gives a luxurious texture. You can also make these brownies fit special diets. Here’s how: - Gluten-free: Use gluten-free flour alternatives like almond or oat flour. These work well in brownies. - Vegan: Substitute eggs with flaxseed or applesauce. For butter, try coconut oil or vegan butter. These swaps keep the taste delicious. You can keep your frosted coffee brownies at room temperature for a few days. Use an airtight container to keep them fresh. If you want to store them longer, refrigeration works too. Just make sure to wrap them well to avoid drying out. To freeze brownies, cut them into squares first. Place them in a single layer on a baking sheet. Freeze them for about an hour until firm. Then, transfer the squares into an airtight container or a freezer bag. Be sure to label and date the bag. For thawing, take them out and let them sit at room temperature for about 30 minutes. This keeps them soft and tasty. Enjoy your brownies any time! To keep your brownies fresh, store them in an airtight container. Place them at room temperature. This helps maintain their soft texture and rich flavor. If you prefer, you can refrigerate them. Just be aware that cold storage can slightly change their texture. For best results, let them sit at room temperature for a bit before serving. Yes! You can change the coffee flavor to fit your taste. If you want a stronger coffee taste, use a darker brew. For a milder flavor, choose a lighter roast. You can also add coffee extract for extra intensity. Just remember to adjust the amount to avoid overpowering the brownies. Reheating brownies can bring back their warm, gooey goodness. The best method is to use a microwave. Place a brownie on a microwave-safe plate. Heat it for about 10-15 seconds. Check if it’s warm enough. If not, heat for another 5 seconds. You can also use an oven. Preheat it to 350°F (175°C) and bake for about 5-10 minutes. This method helps keep the top crisp while warming the inside. In this post, we explored how to make delicious coffee brownies, from ingredients to storage tips. You learned to mix butter, sugar, eggs, and coffee for batter. We discussed frosting options and ways to customize your treats. Remember, perfect brownies need the right baking time and temperature. Don’t forget to enjoy them with ice cream! With these steps, you’ll create tasty brownies every time. Happy baking and enjoy every bite of your creation!

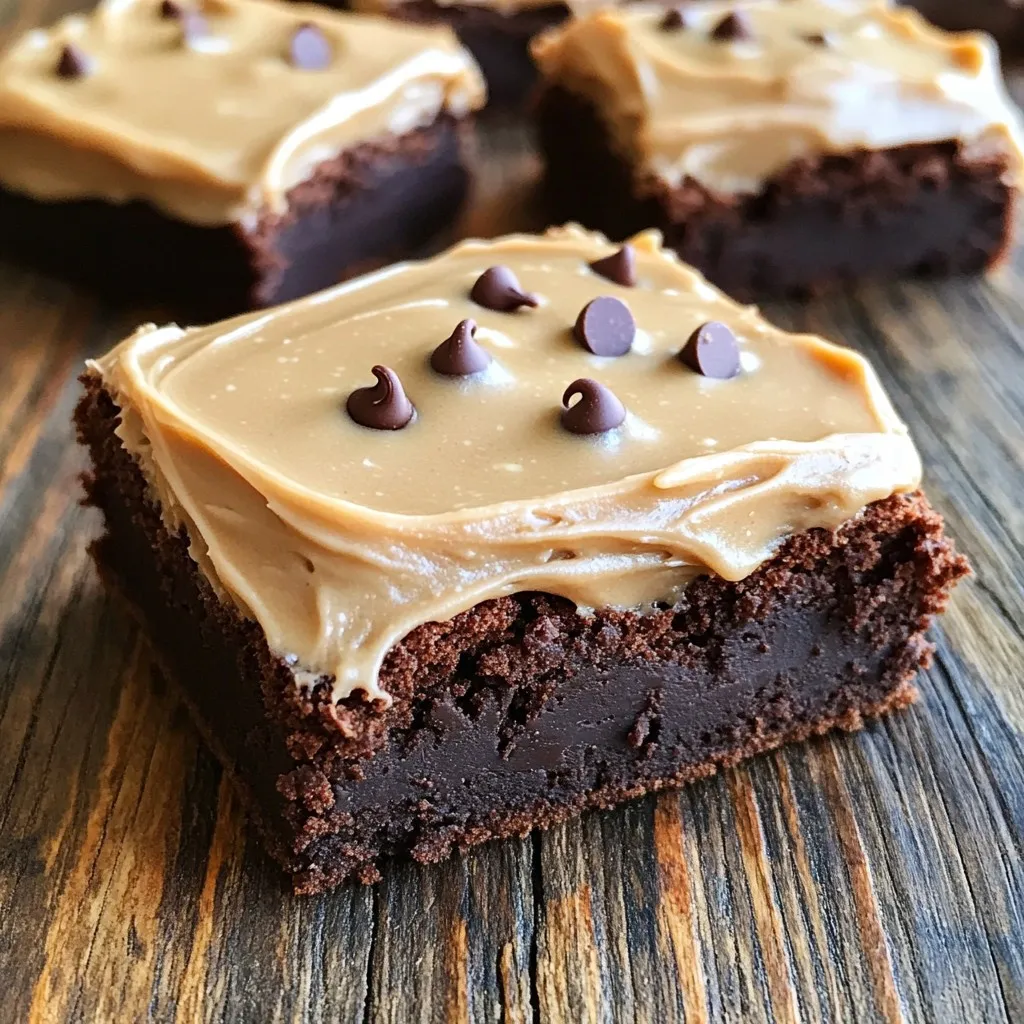
Ready for a sweet treat that combines the rich flavors of coffee and chocolate? These Frosted Coffee Brownies are a delicious way to satisfy your cravings. With simple ingredients and …

Read more

Categories Desserts

Crispy Baked Chicken Tenders Tempting Dinner Idea

November 5, 2025 by Chef Luca
To make crispy baked chicken tenders, gather these key ingredients: - 1 pound chicken tenderloins - 1 cup buttermilk - 1 teaspoon garlic powder - 1 teaspoon paprika - 1/2 teaspoon black pepper - 1/2 teaspoon salt - 1 cup breadcrumbs (I prefer panko for extra crispiness) - 1/2 cup grated Parmesan cheese - 1 teaspoon Italian seasoning - Cooking spray These ingredients work together to create a tender inside and a crunchy outside. You can add your own twist with these optional ingredients: - A pinch of cayenne for heat - Lemon zest for a fresh kick - Dried herbs like oregano or thyme - A splash of hot sauce in the marinade Feel free to get creative! Each option brings its own charm to the dish. Serve these chicken tenders with tasty dips to enhance the experience: - Honey mustard for a sweet touch - Barbecue sauce for a smoky flavor - Ranch dressing for a creamy option - Ketchup for the classic choice Pairing these sauces with your chicken tenders elevates the meal. You can also add sides like fresh veggies or a light salad for a complete dinner. Enjoy! To start, grab a bowl. Mix buttermilk, garlic powder, paprika, black pepper, and salt. Make sure it is well combined. Add the chicken tenderloins. Ensure they are covered by the marinade. Cover the bowl and place it in your fridge. Let the chicken marinate for at least one hour. For even better flavor, marinate overnight. Now, it's time to preheat your oven. Set it to 425°F (220°C). While the oven heats, line a baking sheet with parchment paper. This keeps the chicken from sticking. Lightly spray the parchment with cooking spray. This step helps the chicken tenders crisp nicely. In another bowl, mix breadcrumbs, grated Parmesan cheese, and Italian seasoning. Stir until everything is well blended. Take the marinated chicken out of the fridge. Let the extra marinade drip off each tenderloin. Dredge each one in the breadcrumb mixture. Press the breadcrumbs on to make them stick well. Arrange the breaded chicken on the baking sheet. Make sure they are not touching. Lightly spray the tops with cooking spray. This helps them become golden and crispy. Bake the chicken tenders for 20 to 25 minutes. Flip them halfway through baking for even crispiness. They are done when they are golden brown and the inside reaches 165°F (75°C). Enjoy your crispy baked chicken tenders! To make your chicken tenders super crispy, use panko breadcrumbs. They create a light and airy crust. Lightly spray the tops with cooking spray before baking. This adds extra crunch and helps them brown beautifully. Remember to flip them halfway through baking. This ensures even crispiness on both sides. Marinating your chicken is key to tasty tenders. Use buttermilk for its tenderness and flavor. Mix it with garlic powder, paprika, black pepper, and salt. Let the chicken sit in this mix for at least one hour. If you can, marinate overnight for even better flavor. Make sure every piece is fully submerged for best results. Serve your crispy chicken tenders hot on a nice platter. Pair them with fun dipping sauces like honey mustard or barbecue sauce. You can also add fresh parsley on top for color. For a complete meal, serve them with a side salad or sweet potato fries. This makes a delightful dinner everyone will love. {{image_2}} To make crispy baked chicken tenders gluten-free, swap out the breadcrumbs. Use gluten-free panko or crushed cornflakes instead. Both options keep the crunch you want. Check labels to ensure they are gluten-free. You can easily change the flavors of your chicken tenders. Try adding different spices to the breadcrumb mix. For a spicy kick, use cayenne pepper or chili powder. For a sweeter taste, try adding a bit of brown sugar or cinnamon. You can also use taco seasoning for a fun twist. If you want to skip the oven, an air fryer works great. Preheat your air fryer to 400°F (200°C). Place the breaded chicken in the basket in a single layer. Cook for about 10-12 minutes, flipping halfway. This method gives you crispy tenders with less oil and less time. Enjoy the crunch! To keep your chicken tenders fresh, store them in an airtight container. Make sure they cool down first. This helps keep the tenders crispy. Place a paper towel at the bottom of the container. This absorbs any moisture. Refrigerate them for up to three days. Always check for any signs of spoilage before eating. If you want to save your chicken tenders for later, freezing is a great option. First, let them cool completely. Then, wrap each tender in plastic wrap. After that, place them in a freezer bag. Squeeze out as much air as possible. This keeps the tenders from getting freezer burn. They can last in the freezer for up to three months. When you’re ready to eat, thaw them overnight in the fridge. To reheat your chicken tenders and keep them crispy, use the oven. Preheat it to 375°F (190°C). Place the tenders on a baking sheet. Bake them for about 10-15 minutes. Flip them halfway through to ensure even heating. You can also use an air fryer for a quicker option. Set it to 375°F (190°C) and cook for 5-7 minutes. This method helps restore that delicious crunch! Yes, you can use chicken breast. Just cut the breast into strips. Make sure they are about the same size as tenderloins for even cooking. You may need to adjust the cooking time a bit. Check the internal temperature to ensure it reaches 165°F. This keeps your chicken safe and juicy. Crispy baked chicken tenders last about 3 to 4 days in the fridge. Store them in an airtight container to keep them fresh. If you want to keep them longer, consider freezing. They can last up to 3 months in the freezer. Just remember to reheat them well for the best taste. Chicken tenders pair well with many sides. You can serve them with: - French fries - Coleslaw - Mashed potatoes - Steamed vegetables - Salad - Dipping sauces like honey mustard or barbecue These sides balance the flavors and make your meal fun and tasty. Enjoy your crispy chicken tenders with whatever you like! You learned how to make crispy baked chicken tenders from scratch. We covered key ingredients, marinating, and baking for perfect crispiness. I shared useful tips for flavor and storage. You can even explore gluten-free options and air-fryer methods. In the end, you can enjoy tasty chicken tenders that fit your needs. Happy cooking!

Looking for a dinner idea that’s both easy and delicious? You need to try my Crispy Baked Chicken Tenders! They are juicy on the inside and perfectly crispy on the …

Read more

Categories Appetizers

Garlic Parmesan Pasta Deliciously Simple Recipe

November 5, 2025 by Chef Luca
- 8 oz fettuccine pasta - 3 tablespoons unsalted butter - 4 cloves garlic, minced - 1 cup heavy cream - 1 cup freshly grated Parmesan cheese - 1 teaspoon Italian seasoning - Salt and pepper to taste - Fresh parsley, chopped (for garnish) When picking your pasta, I love using fettuccine. It's thick and captures the sauce well. Unsalted butter gives you control over the salt in your dish. Freshly grated Parmesan melts better than pre-grated. For the garlic, fresh is always best. You want that strong flavor! The heavy cream is key for a rich sauce. If you want a lighter dish, you can swap it out for half-and-half. Just know it won't be as creamy. If you're gluten-free, try using gluten-free pasta. There are many good options available. For a dairy-free version, use a plant-based cream and cheese. Nutritional yeast can also give a cheesy flavor. If you want to cut fat, you can use low-fat cream. Adjust salt if needed, since some low-fat products have added salt. First, boil a large pot of salted water. Add 8 ounces of fettuccine pasta. Cook it according to the package instructions. Aim for al dente, which should take about 8 to 10 minutes. Once cooked, drain the pasta. Remember to save ½ cup of the pasta water for later. In a large skillet, melt 3 tablespoons of unsalted butter over medium heat. Add 4 minced garlic cloves. Sauté the garlic for 1 to 2 minutes. Be careful not to let it burn. Next, pour in 1 cup of heavy cream. Bring it to a gentle simmer. Cook for 3 to 4 minutes while stirring. This helps it thicken slightly. Lower the heat and whisk in 1 cup of freshly grated Parmesan cheese. Stir until it melts into a creamy sauce. Season with 1 teaspoon of Italian seasoning, salt, and pepper to taste. If the sauce is too thick, add some reserved pasta water until it reaches the right consistency. Now, add the cooked fettuccine to the skillet. Toss the pasta to coat it evenly with the garlic Parmesan sauce. Once mixed, remove from heat. Garnish with chopped fresh parsley for a pop of color. Serve the dish warm and enjoy! Garlic can turn bitter if overcooked. To keep its sweet taste, cook it on low heat. Sauté minced garlic for only 1-2 minutes. Watch it closely; once fragrant, it’s ready. Remove it from heat if you smell burning. This will keep your sauce bright and flavorful. To get that perfect creamy texture, start with cold heavy cream. Gradually add it to warm butter and garlic. This helps it blend well. Whisk in the Parmesan cheese slowly until it melts. If the sauce gets too thick, add some reserved pasta water. This keeps it smooth and easy to coat on pasta. Taste is key! Always sample your sauce before serving. If it needs more zing, add more salt, pepper, or Italian seasoning. Fresh parsley adds color and a fresh taste. You can also try red pepper flakes for a bit of heat. Adjust flavors to match your preference and enjoy! {{image_2}} You can easily add protein to your Garlic Parmesan Pasta. Here are some great choices: - Grilled chicken: Slice it and mix it in for a hearty meal. - Shrimp: Sauté shrimp in the garlic butter for a seafood twist. - Bacon: Crisp bacon bits add a nice crunch and flavor. Adding protein makes the dish filling and adds variety. For a vegetarian twist, skip the meat and keep the creamy sauce. To make it vegan: - Use plant-based butter instead of regular butter. - Swap heavy cream for coconut cream or cashew cream. - Choose nutritional yeast instead of Parmesan cheese for a cheesy taste. These changes keep the dish delicious while meeting dietary needs. You can enhance the flavor with simple additions. Consider these ideas: - Red pepper flakes: Add a bit for heat. - Spinach: Toss fresh spinach in for color and nutrients. - Mushrooms: Sauté mushrooms with garlic for an earthy flavor. Experimenting with flavors lets you customize your dish to your liking. To store your leftover garlic Parmesan pasta, let it cool first. Place it in an airtight container. This keeps it fresh for up to three days in the fridge. If you want to keep it longer, freezing is a good option. When you reheat the pasta, do it slowly. You can use a skillet or microwave. If using a skillet, add a splash of water or cream. Stir it until warm. For the microwave, heat in short bursts. Stir between each burst to avoid hot spots. If you want to freeze the pasta, use a freezer-safe container. Make sure to leave some space at the top. The pasta will expand when frozen. It can last up to two months in the freezer. To thaw, move it to the fridge overnight. Then, reheat as mentioned before. To boost flavor, add more garlic. Use six cloves instead of four. You can also mix in cooked bacon or sautéed mushrooms. Fresh herbs like basil or thyme add great taste, too. A squeeze of lemon juice brightens the dish. You might also try a pinch of red pepper flakes for heat. Yes, you can use any pasta shape you like. Penne, spaghetti, or even gluten-free pasta works well. Just remember to adjust the cooking time based on the pasta shape. Follow the package instructions for the best results. Each type brings a unique texture to the dish. Absolutely! Use gluten-free pasta made from rice or corn. The sauce stays the same. Just be sure to check the labels for any allergens. Cook the gluten-free pasta according to the package instructions. The flavor will still shine through, making it a great option for everyone. This blog post covered how to make a tasty Garlic Parmesan Pasta. We went through the important ingredients, cooking steps, and useful tips. You learned how to make the sauce creamy and adjust the flavors. I also shared variations to suit your taste and storage info for leftovers. Cooking is fun and simple. With these steps, you can impress anyone with this dish. Enjoy experimenting in your kitchen!

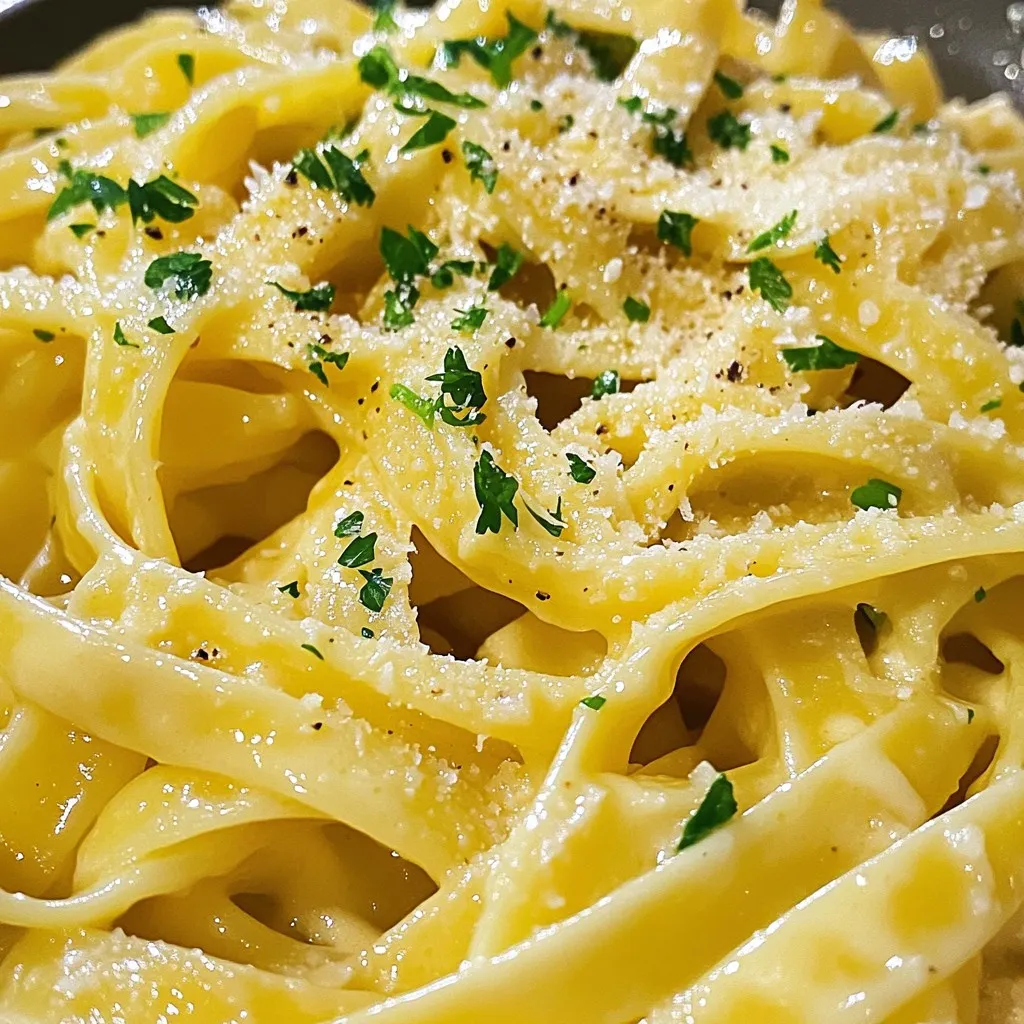
Are you ready to whip up a dish that combines comfort and flavor? My Garlic Parmesan Pasta is the answer! This recipe is simple, quick, and packed with flavor. Whether …

Read more

Categories Dinner

Caramel Apple Cheesecake Bars Delightful Dessert Treat

November 5, 2025 by Chef Luca
- 1 ½ cups graham cracker crumbs - ½ cup unsalted butter, melted - 2 tablespoons sugar - 2 (8 oz) packages cream cheese, softened - 1 cup granulated sugar - 2 large eggs - 1 teaspoon vanilla extract - 2 cups peeled and diced apples (preferably Granny Smith) - 1 teaspoon cinnamon - ½ cup caramel sauce (store-bought or homemade) For this recipe, I prefer Granny Smith apples. Their tartness balances the sweet cream cheese and caramel. You want to peel and dice them into small chunks for the best texture. - ¼ cup chopped pecans (optional) If you like extra crunch, add chopped pecans. They give a great texture and nutty taste. You can also consider other toppings like crushed toffee or chocolate chips. For those with dietary needs, you can make this gluten-free. Just use gluten-free graham crackers for the crust. You can also replace cream cheese with dairy-free options if needed. Start by preheating your oven to 325°F (160°C). Line an 8x8-inch baking pan with parchment paper. Leave some paper hanging over the edges. This helps when you take the bars out later. In a medium bowl, mix 1 ½ cups of graham cracker crumbs, ½ cup of melted unsalted butter, and 2 tablespoons of sugar. Stir until it looks like wet sand. Press this mixture firmly into the bottom of your pan. Bake the crust for 10 minutes. Remove it and let it cool slightly for about 10 minutes. In a large bowl, beat 2 packages of softened cream cheese until it’s smooth. Slowly add 1 cup of granulated sugar. Mix until combined. Add 2 large eggs, one at a time. Mix well after each egg. Finally, stir in 1 teaspoon of vanilla extract. In another bowl, toss 2 cups of peeled and diced Granny Smith apples with 1 teaspoon of cinnamon. Gently fold the apple mixture into the cream cheese mixture. Make sure the apples are evenly mixed in. Pour the cheesecake filling over your cooled crust. Spread it evenly with a spatula. Drizzle ½ cup of caramel sauce on top. Use a toothpick or knife to swirl the caramel into the filling. If you like, sprinkle ¼ cup of chopped pecans on top. Bake the bars for 35-40 minutes. The edges should be set, but the center can still jiggle a bit. When done, take them out and let them cool in the pan for about 1 hour. After that, refrigerate the bars for at least 3 hours to let them fully set. Once chilled, use the overhanging parchment paper to lift the bars out. Cut them into squares and serve cold. You can drizzle extra caramel on top too! When making caramel apple cheesecake bars, some mistakes can spoil your fun. Here are a few to watch out for: - Overmixing: Mixing the cream cheese too much can add air, making your bars puff up. Mix just until smooth. - Baking Time: Don't bake too long. The center should jiggle slightly when you take it out. - Crust Pressure: If you don't press the crust firmly, it can crumble when you cut the bars. If you notice cracks on top, don't worry too much. A drizzle of caramel will hide them well! To get that creamy cheesecake texture, follow these tips: - Room Temperature Ingredients: Always use softened cream cheese. Cold cream cheese can lead to lumps. - Cooling: Let the bars cool in the pan for an hour. After that, refrigerate them for at least three hours. This helps them set perfectly. Using a sharp knife to cut the bars will give you nice clean edges. Adding flavor can take these bars to the next level: - Spices: Consider adding nutmeg or ginger along with cinnamon for a warm taste. - Whipped Cream: Top your bars with whipped cream for a lovely contrast. You could also add caramel drizzle on top for extra sweetness. Feel free to experiment with flavors! Try adding a pinch of salt to your caramel sauce for a delightful twist. {{image_2}} You can swap out apples for other fruits. Pears or berries work great too. If you want a twist, try using caramel sauce with flavors like sea salt or chocolate. You can even add nuts or whipped cream on top for extra crunch and creaminess. For vegan options, use coconut cream instead of cream cheese. Swap eggs for flax eggs or applesauce. Use a dairy-free caramel for topping. If you're gluten-free, replace the graham cracker crumbs with gluten-free cookies or oats. This way, everyone can enjoy the bars! Add pumpkin puree for a fall treat. Spice it up with nutmeg or ginger for warmth. During the holidays, decorate the bars with crushed candy canes or festive sprinkles. You can also serve them warm with a scoop of vanilla ice cream for a cozy dessert. To keep your caramel apple cheesecake bars fresh, refrigerate them in an airtight container. This helps maintain their flavor and texture. You can also cover them with plastic wrap if you don't have a container. If you want to enjoy them later, freezing is a great option. Wrap the bars tightly in plastic wrap and then foil. This protects them from freezer burn. When ready to eat, thaw them in the fridge overnight. In the fridge, these cheesecake bars last about five days. Keep an eye out for any signs of spoilage. If you see mold or notice an off smell, it’s best to throw them away. A change in texture can also indicate spoilage. If the bars become too dry or crumbly, they may no longer taste good. Always make sure to check before enjoying your sweet treat! Yes, you can make these bars ahead of time. You can prepare them up to two days in advance. Store them in the fridge, covered with plastic wrap. This keeps them fresh and tasty. The flavors will also blend nicely as they sit. For this recipe, Granny Smith apples are the best choice. They are tart and hold their shape well. Other good options include Honeycrisp and Fuji apples. Honeycrisp adds sweetness, while Fuji offers a nice crunch. Each apple type brings a unique flavor and texture to the bars. Yes, you can change the crust if you want! Instead of graham crackers, try using digestive biscuits or even a shortbread crust. For a gluten-free option, use gluten-free graham crackers or almond flour. Each crust gives a different taste and texture to your bars. Caramel Apple Cheesecake Bars are easy to make and delicious. We covered essential ingredients, from apples to optional toppings. I shared step-by-step instructions to guide you through baking. Remember to avoid common mistakes for the best texture. If you want variety, consider different fruits and dietary swaps. Store your bars properly to keep them fresh for longer. You can make these ahead and impress others. Enjoy creating this treat; it’s a fun way to mix flavors and share joy. Happy baking!

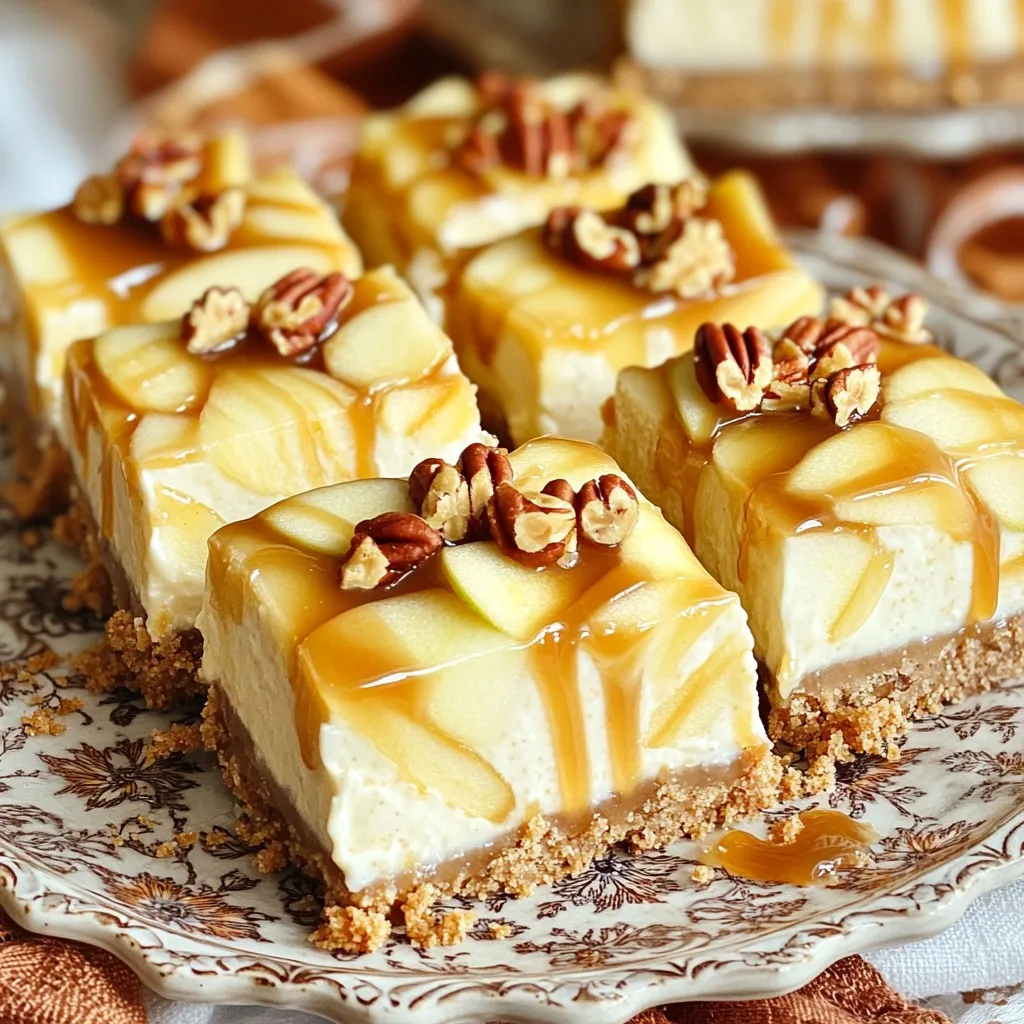
Get ready for a treat that combines creamy cheesecake with the sweet crunch of caramel apples! In this blog post, I will guide you through making delightful Caramel Apple Cheesecake …

Read more

Categories Desserts

Air Fryer Fried Pickles Crispy and Flavorful Snack

November 5, 2025 by Chef Luca
- 1 cup dill pickle slices (fresh or jarred) - 1 cup buttermilk - 1 cup all-purpose flour - 1 teaspoon garlic powder - 1 teaspoon onion powder - 1 teaspoon paprika - ½ teaspoon cayenne pepper (optional, for heat) - 1 cup breadcrumbs (Panko recommended for extra crunch) - Olive oil spray - Salt and pepper to taste To make crispy air fryer fried pickles, start with fresh or jarred dill pickles. The pickles give a great tangy flavor. You will also need buttermilk. It helps the coating stick and adds moisture. Next, gather all-purpose flour for the dry mix. Garlic powder, onion powder, and paprika add flavor. If you like heat, cayenne pepper is a good choice but is optional. Use Panko breadcrumbs for a crunchier texture. Olive oil spray will help them brown nicely in the air fryer. Finally, season with salt and pepper. This mix of ingredients creates a delicious snack that is full of flavor. - Ranch dressing - Spicy mayo Pair your fried pickles with tasty dips. Ranch dressing is a classic choice. It cools the heat and adds creaminess. Spicy mayo is another fun option. It gives a kick and enhances the flavor. You can even try mixing sauces for fun new tastes. Enjoy! To start, you need to drain the pickle slices. This step is important. It helps remove excess moisture. Next, pat the slices dry with paper towels. This will help them get crispy later. After drying, soak the pickle slices in buttermilk. Use a bowl and pour the buttermilk over the slices. Let them sit for about 30 minutes. This soaking adds flavor and helps the coating stick. Now, it’s time to prepare the coating. In one shallow dish, mix the flour, garlic powder, onion powder, paprika, cayenne pepper, salt, and pepper. This will give your pickles a tasty kick. In another dish, place the breadcrumbs. I recommend using Panko breadcrumbs for extra crunch. After mixing the dry ingredients, take a pickle slice. First, coat it in the flour mixture. Shake off the excess flour. Then dip it back into the buttermilk. Finally, roll it in the breadcrumbs. Make sure it’s evenly coated. Repeat this with all the pickle slices. Before cooking, preheat your air fryer to 400°F (200°C). This takes about 5 minutes. Once preheated, arrange the coated pickles in a single layer in the air fryer basket. Don’t overcrowd the basket. Lightly spray the pickles with olive oil. This helps them brown nicely. Cook them for 10 to 12 minutes. Shake the basket halfway through to ensure even cooking. They should turn golden brown and crispy. Once done, take them out and let them cool for a minute. Serve with your favorite dipping sauce! To get crispy pickles, you must dry them well. After draining your pickle slices, use paper towels to pat them dry. Removing moisture helps the coating stick and makes your pickles crispier. When you coat the pickles, make sure to do it evenly. First, dip each pickle slice in the flour mix, then back in the buttermilk. Finally, roll it in the breadcrumbs. This three-step process creates a great layer that keeps the crunch intact. If you want more or less heat, you can modify the cayenne pepper. Start with a small pinch if you prefer less spice. You can also leave it out entirely. Feel free to add more seasonings to fit your taste. Try some garlic powder or even smoked paprika. These extras give your pickles a unique flavor that stands out. Fried pickles are tasty on their own, but you can pair them with creative dips. Ranch dressing is a classic choice. If you like a kick, spicy mayo works great too. You can also serve fried pickles as part of an appetizer platter. They pair well with other finger foods like wings or sliders. This makes your spread fun and varied for guests. {{image_2}} You can use different pickles for your air fryer fried pickles. Dill pickles are sharp and tangy. They make a great choice if you like bold flavors. Bread and butter pickles bring a sweet taste. These are perfect for a milder snack. You can also choose between whole pickles or slices. Whole pickles give you a big crunch. Slices are easier to coat and cook quickly. Pickle slices work best when you want a quick snack. If you want a gluten-free option, try using almond flour or rice flour. These flours still give a nice crunch. You can also use crushed cornflakes for a fun twist. They add a unique flavor and texture. Seasoned breadcrumbs are another great choice. You can mix in spices like Italian herbs or Parmesan. This adds a new layer of flavor to your pickles. Adding cheese can make your fried pickles even better. Try using a bit of shredded cheddar or mozzarella. It melts and creates a tasty surprise inside. Don't forget about herbs! You can sprinkle in some dill, parsley, or even thyme. These add freshness and extra flavor. Experiment with whatever herbs you like for a fun twist! First, let the fried pickles cool down before storing them. This helps keep them crispy. Place them in a container. I recommend using an airtight container. This will keep moisture out and maintain the pickles' crunch. For reheating, I suggest using the air fryer. It keeps the pickles crispy. Preheat the air fryer to 375°F (190°C). Then, heat the pickles for about 5 minutes. You can also use an oven if you prefer. Set it to 350°F (175°C) and reheat for 8-10 minutes. Avoid microwaving them, as this can make them soggy. If you want to freeze fried pickles, place them in a single layer on a baking sheet. Freeze them for about an hour. After that, transfer them to a freezer-safe bag. This will help them keep their shape. When you want to eat them, thaw in the fridge overnight before reheating. To make fried pickles, start by draining and drying the pickle slices. This step is key for crispiness. Next, soak the pickles in buttermilk for about 30 minutes. This adds flavor and helps the coating stick well. Then, mix flour, garlic powder, onion powder, paprika, cayenne, salt, and pepper in one bowl. In another bowl, place breadcrumbs. Coat each pickle slice first in the flour mix, then in buttermilk, and finally in the breadcrumbs. Preheat your air fryer to 400°F. Arrange the coated pickles in a single layer and spray with olive oil. Air fry for 10-12 minutes, shaking the basket halfway. Enjoy crispy fried pickles! Yes, you can use homemade pickles! Using homemade pickles gives you full control over flavor and crunch. You can adjust the spices and herbs as you like. Homemade pickles often taste fresher than store-bought ones. Plus, they can be made to suit your taste, making your fried pickles even more special. Fried pickles taste great with many dipping sauces. Popular options include ranch dressing and spicy mayo. These sauces add creaminess and a kick. You can also try garlic aioli or ketchup for a classic touch. Experiment with your favorite flavors to find the best match! If you want to tone down the heat, skip the cayenne pepper. You can also reduce the amount of paprika. Instead, focus on adding more garlic or onion powder for flavor without the spice. For extra cooling, serve with creamy sauces like ranch. This will balance the heat and make your pickles tasty! Air fryer fried pickles last about 3-4 days when stored in the fridge. Make sure they cool before putting them in an airtight container. This helps keep them fresh. To reheat, use the air fryer or oven to regain their crispiness. Avoid microwaving, as it can make them soggy. Fried pickles in the air fryer are a tasty treat. You learned about the key ingredients, from dill pickle slices to spices. The step-by-step guide showed you how to prepare, coat, and cook them perfectly. Plus, you got tips for making them crispy and delicious. Try out different dipping sauces and variations to find your favorite. Use the storage tips to keep leftovers fresh. Enjoy this crunchy snack at your next gathering or as a fun side dish! Happy cooking!

Craving a crispy snack that packs a punch? Let’s make Air Fryer Fried Pickles! This easy recipe transforms simple dill pickle slices into a crunchy, flavorful treat you can’t resist. …

Read more

Categories Appetizers

Bang Bang Chicken Bowl Flavorful and Quick Recipe

January 9, 2026November 5, 2025 by Chef Luca
- Chicken and Marinade Ingredients - 2 boneless, skinless chicken breasts - Salt and pepper, to taste - 1 teaspoon garlic powder - 1 cup cornstarch - Sauce Ingredients - 1/2 cup mayonnaise - 2 tablespoons sweet chili sauce - 1 tablespoon sriracha (adjust to taste) - 1 tablespoon soy sauce - 1 tablespoon rice vinegar - Toppings and Garnishes - 2 cups cooked jasmine rice - 1 cucumber, thinly sliced - 1 cup shredded carrots - 1/4 cup chopped green onions - Sesame seeds for garnish - Fresh cilantro for garnish When you gather these ingredients, you set the stage for a tasty meal. Each item adds flavor and texture to your Bang Bang Chicken Bowl. The chicken brings protein, while the sauce adds creaminess and spice. Fresh veggies like cucumber and carrots give it crunch. The garnishes make it pop with color and flavor. Enjoy the process of collecting these ingredients; it makes cooking fun! {{ingredient_image_1}} First, season the chicken breasts with salt, pepper, and garlic powder. I let them sit for about 10 minutes. This helps the chicken soak up the flavors. Next, I coat each breast in cornstarch. I use a shallow dish for this. Make sure each piece is fully covered. Then, I shake off the excess cornstarch. This step gives the chicken a nice crunch. I heat a large skillet over medium-high heat. Next, I add a couple of tablespoons of oil. When the oil is hot, I place the coated chicken breasts in the skillet. I cook each side for about 6-7 minutes. The chicken should turn golden brown and be fully cooked. After cooking, I remove it from the skillet. I let it rest for a few minutes before slicing. In a bowl, I whisk together mayonnaise, sweet chili sauce, sriracha, soy sauce, and rice vinegar. I mix until smooth. This sauce gives the dish its name. If you like heat, you can add more sriracha. I often taste and adjust to find the right spice level. For the bowl, I start with a base of jasmine rice. On top of the rice, I add the sliced chicken. Then, I layer in thin cucumber slices and shredded carrots. Finally, I drizzle the Bang Bang sauce over the toppings. This step brings everything together. Garnishes make the dish pop. I sprinkle chopped green onions, sesame seeds, and fresh cilantro on top. This adds flavor and color. A well-garnished bowl looks more appealing, making it fun to eat. - For crispy chicken, coat it well in cornstarch. This helps create a crunchy layer. - Cook the chicken on medium-high heat. This gives a nice golden brown color. - Avoid overcooking by checking the chicken after 6-7 minutes on each side. It should be firm and juicy. - Mix in honey for extra sweetness or lime juice for a zesty kick. - If you like it spicy, add more sriracha or crushed red pepper flakes. - You can swap mayonnaise with Greek yogurt for a lighter sauce. - Serve with a side of steamed broccoli or snap peas for a fresh crunch. - Consider adding avocado for creaminess and extra nutrients. - Top with pickled jalapeños for an added burst of flavor and spice. Pro Tips Marinate for More Flavor: Allow the seasoned chicken to marinate for at least 30 minutes, or even overnight. This enhances the flavor and tenderness of the meat. Perfectly Crispy Coating: For an extra crispy texture, double coat the chicken by dipping it back into the cornstarch after the first coating, then frying it again. Adjusting Spice Levels: If you prefer a milder sauce, start with the recommended sriracha and gradually add more until you reach your desired heat level. Fresh Garnishes: Use freshly chopped herbs and vegetables as garnishes to add a pop of color and freshness to your Bang Bang Chicken Bowl. {{image_2}} You can switch out the chicken for tofu or shrimp. Tofu gives a nice texture and absorbs flavors well. It’s a great vegetarian option. Just press and cube the tofu. For shrimp, use large, peeled shrimp. Cook them just until pink. Both options add a fun twist to your Bang Bang Chicken Bowl. If you want to change the rice, try different grains like quinoa or brown rice. They add unique flavors and textures. For a low-carb choice, use cauliflower rice. You can easily make it by grating cauliflower or buying it pre-riced. It’s light and still delicious! Using seasonal veggies can make your bowl even better. In spring, add peas or asparagus. In summer, use fresh tomatoes or bell peppers. For fall, try roasted squash or sweet potatoes. Top with crunchy radishes or avocado for extra flavor. Don’t be afraid to mix and match! To keep your Bang Bang Chicken Bowl fresh, store it in an airtight container. This helps prevent moisture loss and keeps flavors intact. You can refrigerate it for up to 3 days. After that, the chicken may dry out, and the veggies may lose crunch. For reheating, the best method is to use a skillet. Heat it on medium, add a splash of oil, and warm the chicken for about 3-4 minutes. This method helps maintain its crispness. Avoid using the microwave, as it can make the chicken soggy. You can freeze the chicken and sauce separately. Place them in freezer bags, removing as much air as possible. It’s best to use them within 2 months. When ready to use, thaw them overnight in the fridge. Reheat the chicken in a skillet to keep it crispy. Bang Bang Chicken Bowl is a tasty dish with crispy chicken and fresh veggies. It features a special sauce that adds a burst of flavor. This dish has roots in Asian cuisine and is loved for its mix of textures and tastes. You get the crunch from chicken and the softness of rice. Each bite offers something new. Yes, you can prepare parts of the Bang Bang Chicken Bowl in advance. Cook the chicken and make the sauce a day before. Store them in the fridge. When you’re ready to serve, reheat the chicken. Cook the rice fresh for the best taste. Slice your veggies and garnish right before serving for a crisp bite. The heat level in Bang Bang Chicken Bowl is adjustable. It uses sriracha, which adds spice. If you want it milder, use less sriracha in the sauce. You can also replace it with a sweet chili sauce. For more heat, add more sriracha or chili flakes. It’s all about your taste. You can find Bang Bang Chicken Bowl in many Asian restaurants and cafes. Look for places that serve Asian fusion dishes. Many food delivery apps also have it on their menu. Check local restaurants for their take on this delicious bowl. I covered all you need to know about making a Bang Bang Chicken Bowl. We explored ingredients, cooking steps, tips for crispy chicken, and ways to customize the dish. You can enjoy this bowl with various proteins and veggies, making it fun and unique every time. Use the storage tips to keep leftovers fresh. With these guidelines, you can wow your family and friends with this tasty meal. Dive in and enjoy your cooking journey!

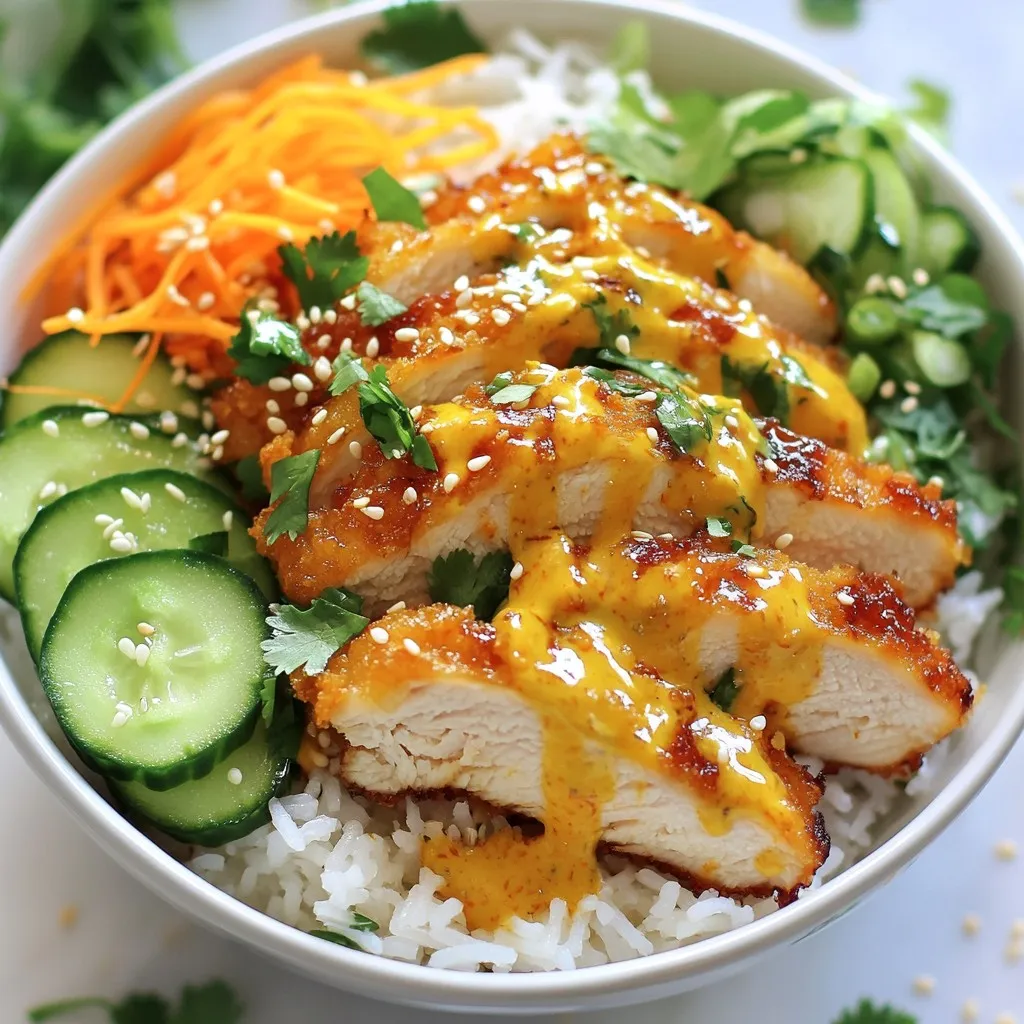
Looking for a quick and tasty meal? The Bang Bang Chicken Bowl is your answer! This flavorful dish combines crispy chicken, a spicy sauce, and fresh toppings for a satisfying …

Read more

Categories Dinner

Garlic Butter Cheeseburger Rollups Irresistible Delight

November 5, 2025 by Chef Luca
- 1 pound ground beef - 1 tablespoon garlic, minced - 6 slices of cheddar cheese Ground beef forms the heart of these rollups. Choose good quality beef for the best flavor. Minced garlic adds a strong, savory kick. Cheddar cheese melts beautifully, binding the flavors together. - 1 teaspoon onion powder - 1 teaspoon paprika - Salt and pepper to taste Onion powder gives a sweet, rich flavor. Paprika adds a hint of smokiness. Salt and pepper enhance all the tastes in this dish. These seasonings balance the richness of the beef and cheese. - 1 can refrigerated crescent roll dough - 4 tablespoons unsalted butter, melted - 1 tablespoon fresh parsley, chopped (for garnish) Crescent roll dough is easy to use and puffs up nicely. It provides a flaky crust that contrasts with the filling. Melted butter brushed on top adds a golden sheen. Fresh parsley not only brightens the dish but also adds a pop of color. First, we need to preheat the oven. Set it to 375°F (190°C). This heat will help the rollups cook evenly. Next, take a large skillet and place it over medium heat. Add 1 pound of ground beef to the skillet. Cook the beef until it turns brown. This usually takes about 5-7 minutes. Use a spatula to break the beef apart while it cooks. Once the beef is browned, it’s time to add flavor. Stir in 1 tablespoon of minced garlic, 1 teaspoon of onion powder, 1 teaspoon of paprika, and a pinch of salt and pepper. Cook this mixture for 2-3 more minutes. You want the garlic to smell nice and fragrant. Then, remove the skillet from the heat. Now, let’s get the crescent roll dough ready. Lay it out on a floured surface. You’ll see seams in the dough. Pinch these seams together to make a solid rectangle. This step helps keep the filling inside the rollups. Next, cut the dough into 6 equal rectangles. Each rectangle will hold a tasty filling. Time to put it all together! Start with a piece of cheese. Place a slice of cheddar cheese on each rectangle of dough. Then, take a generous spoonful of your beef mixture and put it on top of the cheese. Now, roll each rectangle tightly. Start from the wider end and roll towards the pointed end. Place the rollups seam side down on a baking sheet lined with parchment paper. This keeps them from sticking to the pan. It’s baking time! Brush the tops of each rollup with melted butter for a golden finish. Place the baking sheet in the preheated oven. Bake for 15-18 minutes. You want them to turn golden brown and puff up nicely. When they’re done, carefully remove the rollups from the oven. Let them cool slightly. Finally, garnish with chopped fresh parsley before serving. Enjoy this delicious treat! To make perfect rollups, avoid tearing the dough. Start with cold crescent roll dough. Keep it chilled until you're ready to work with it. When you lay it out, make sure to pinch the seams well. This creates a solid rectangle. Cut it carefully into equal rectangles. If you cut too fast, the dough might rip. For the beef mixture, you want a good consistency. Make sure the ground beef is well-cooked and crumbly. Add the minced garlic and spices while it's still hot. This helps the flavors blend well. Let it cool slightly before using. This keeps the dough from getting soggy. You can boost the flavor of your rollups in many ways. Try adding spices like cumin or chili powder for a kick. A bit of Worcestershire sauce can also add depth. If you enjoy herbs, fresh thyme or oregano works well too. For cheese options, cheddar is classic, but you can get creative. Use pepper jack for a spicy twist or mozzarella for a milder taste. Blend different cheeses for fun flavors. Serving is just as fun as cooking. Serve the rollups warm on a big platter. You can drizzle some melted garlic butter over them for extra flavor. For a pop of color, sprinkle chopped parsley on top. When it comes to plating, think outside the box. Arrange them in a circle or stack them high. Add a small bowl of dipping sauce, like ranch or ketchup, on the side. This adds a nice touch to your meal and makes it more inviting. {{image_2}} You can swap the ground beef for turkey or chicken. This makes a lighter rollup. Turkey adds a nice flavor. Chicken gives a great texture. For a veggie twist, use plant-based meat. You can also try black beans or lentils. They work well and taste amazing. Just make sure to cook them with spices. Want some heat? Add diced jalapeños to the beef mix. This gives a spicy kick. You can also try a cheese blend. Pepper jack adds a nice creamy heat. Mix in some mozzarella or gouda for a different taste. Each cheese brings its own flavor to the rollups. Pair your rollups with tasty dips. Ranch or barbecue sauce works great. You can also serve them with a creamy garlic dip. For sides, try crispy fries or a fresh salad. Sweet potato fries add a nice crunch. A side of coleslaw can balance the flavors too. Each side enhances the rollup experience. To keep your Garlic Butter Cheeseburger Rollups fresh, store them in the fridge. First, let them cool down. Then, place them in an airtight container. This will keep moisture out and maintain their flavor. You can also wrap them tightly in plastic wrap if you prefer that method. Freezing these rollups is a great option for later use. Start by letting them cool completely. Then, wrap each rollup in plastic wrap. Place them in a freezer-safe bag or container. This helps prevent freezer burn. When you're ready to eat, thaw them in the fridge overnight. To reheat, use an oven at 350°F (175°C) for about 15 minutes. This will help them stay crispy. In the fridge, these rollups last about 3 to 4 days. Check for any signs of spoilage. If you see mold or if they smell off, it’s best to throw them away. Always trust your senses when it comes to food safety. To make these rollups gluten-free, use gluten-free dough. Many brands offer gluten-free crescent roll dough. You can also use a gluten-free pizza dough or pie crust. Just ensure you follow the package instructions for best results. Yes, you can use pre-cooked beef. Just warm it in a skillet with the garlic and spices. This helps to mix the flavors well. If you have leftover beef, it’s a great way to use it. Chop it finely, then follow the rest of the steps as usual. These rollups pair well with many sides. Consider serving them with a fresh salad. A side of crispy fries or onion rings also works well. For drinks, try a cold soda or lemonade. You could also serve them with a dipping sauce, like ketchup or ranch. We covered how to make Garlic Butter Cheeseburger Rollups, focusing on key ingredients like ground beef, cheddar cheese, and spices. You learned step-by-step instructions for cooking and assembling these tasty treats. I shared tips for perfecting your rollups, various flavor profiles, and smart storage methods. With all this information, you can make these rollups your own and impress everyone at the table. Enjoy creating and sharing these delicious bites!

If you’re craving a tasty treat that’s easy to make and totally satisfying, you’ve come to the right place! Garlic Butter Cheeseburger Rollups are a fun twist on classic burgers, …

Read more

Categories Dinner

Peach Pie Cruffins Irresistible and Tasty Delight

November 5, 2025 by Chef Luca
To start, you need 1 cup of fresh peaches. Choose ripe ones for the best flavor. Peel and dice them into small pieces. Fresh peaches bring a sweet and juicy burst to each cruffin. Next, gather your sugars and spices. You will need 1/2 cup of granulated sugar and 1 tablespoon of lemon juice. The lemon juice brightens the peach flavor. Add 1 teaspoon of cinnamon to warm up the filling. For a hint of depth, use 1/4 teaspoon of nutmeg in the topping mix. For the base, grab 1 package (1 lb) of puff pastry sheets, which should be thawed. This is the star of the recipe. You will also need 1/4 cup of melted butter to brush on the pastry. Create a sweet topping with 1/4 cup of brown sugar and 1/4 cup of all-purpose flour. Finally, use 1 beaten egg for an egg wash, giving the tops a beautiful golden color. Don’t forget some powdered sugar for dusting at the end! This combination of ingredients creates a delightful mix of flavors and textures. Each bite of the Peach Pie Cruffins is a tasty treat that you will love to share. First, turn on your oven to 375°F (190°C). This heat is just right for baking. Next, grab a muffin tin and line it with paper liners. This step helps with easy removal later. In a medium bowl, mix together the diced peaches, granulated sugar, lemon juice, and cinnamon. Toss them gently until all the peaches are coated. Set this bowl aside. The mix will soak in all the flavors. Now, take your thawed puff pastry sheets and place them on a lightly floured surface. Roll out each sheet to smooth out any bumps or creases. Cut each sheet into six long rectangles, each about 2.5 inches by 6 inches. This shape helps form the cruffins well. Take each rectangle and brush it with melted butter. Then, sprinkle a mix of brown sugar, flour, and nutmeg evenly over the butter. At one end of each rectangle, place a spoonful of the peach filling. Roll the pastry tightly from this end to form a cylinder. Twist each rolled pastry gently and place it upright in the muffin tin. Make sure the peach filling shows. Before baking, brush the tops of each cruffin with the beaten egg. This egg wash gives them a shiny, golden look. Place the muffin tin in the oven and bake for 25-30 minutes. You want them to be golden brown and puffed up. Once baked, let the cruffins cool in the pan for a few minutes. Then, move them to a wire rack. Dust the tops with powdered sugar for a sweet touch. Serve them warm on a platter, maybe with peach slices and mint for extra flair. Enjoy your tasty treat! Choose ripe, firm peaches for your cruffins. Look for a sweet scent and a slight give when you press gently. Avoid peaches with blemishes or wrinkles. If you want a sweeter filling, pick yellow peaches. If you like a tart taste, go for white peaches. Perfect peaches make your cruffins shine. Use high-quality puff pastry for the best results. Thaw it slowly in the fridge overnight. This keeps the dough cold and easy to work with. When rolling, dust your surface with flour. Roll it out evenly to avoid tearing. Don’t skip the butter layer; it adds flavor and helps the pastry puff up nicely. Preheat your oven to 375°F (190°C) for even baking. Line your muffin tin to prevent sticking. Brush the tops with an egg wash for a beautiful golden color. Keep an eye on your cruffins as they bake. They should puff up and turn golden brown. Let them cool for a few minutes before dusting with powdered sugar. Enjoy the crunch! {{image_2}} You can swap peaches for other fruits. Try fresh blueberries, strawberries, or apples. Each fruit brings its own flavor. Blueberries add sweetness, while apples give a tart bite. The process stays the same. Just mix the fruit with sugar and spices. Want a fun twist? Change the spices in your cruffins. You can add more cinnamon for warmth. If you like heat, try a pinch of cayenne. For a floral touch, add cardamom. These small changes make your cruffins unique. Mini cruffins are a cute option. Use smaller pieces of puff pastry. Cut each sheet into smaller rectangles. Roll them as you would the larger ones. Bake them for less time, about 15-20 minutes. They make perfect snacks or party treats. You can store your cruffins in an airtight container. Keep them at room temperature for one day. If you need more time, put them in the fridge. They stay fresh for up to three days. Just remember, they taste best when warm. To warm your cruffins, use the oven. Set it to 350°F (175°C). Place the cruffins on a baking sheet. Heat them for about 5-10 minutes. This keeps them flaky and delicious. You can also use a microwave. Heat them for 15-20 seconds. But this might make them a bit soft. If you want to save cruffins for later, freezing works well. Wrap each cruffin in plastic wrap. Then, place them in a freezer bag. They can last up to three months in the freezer. When you're ready to eat, thaw them overnight in the fridge. Reheat in the oven for a tasty treat! Yes, you can use frozen peaches. Just make sure to thaw them first. Drain any extra juice to avoid a soggy filling. Frozen peaches work well, but fresh peaches give the best taste. They also add a lovely texture. You can prepare the peach filling in advance. Store it in the fridge until you're ready to bake. You can also roll the cruffins and place them in the muffin tin. Cover them with plastic wrap and chill overnight. Just add the egg wash and bake them in the morning. These cruffins taste great with a scoop of vanilla ice cream. You can also serve them with whipped cream for a light touch. A drizzle of caramel sauce adds extra sweetness. Fresh mint leaves make a nice garnish too. Peach Pie Cruffins are a tasty treat made from fresh peaches, sugars, and puff pastry. First, we went through the steps to prepare the oven, mix the filling, handle the pastry, and bake them to perfection. I shared tips for selecting peaches and achieving a golden crunch. You can even create fun variations with different fruits. Store leftovers properly for later enjoyment, and try these simple reheating tips. Remember, making cruffins can be fun, and they taste amazing! Enjoy your baking journey!

Get ready to elevate your dessert game with Peach Pie Cruffins! These tasty treats combine the flakiness of puff pastry with the sweet, juicy goodness of fresh peaches. In this …

Read more

Categories Desserts

Savory Spinach and Ricotta Stuffed Shells Delight

November 5, 2025 by Chef Luca
To make delicious spinach and ricotta stuffed shells, you will need: - 20 jumbo pasta shells - 2 cups ricotta cheese - 1 cup fresh spinach, chopped - 1 cup mozzarella cheese, shredded - 1/2 cup Parmesan cheese, grated - 1 egg, beaten - 2 cups marinara sauce - 1 teaspoon garlic powder - 1 teaspoon Italian seasoning - Salt and pepper to taste - Fresh basil leaves for garnish If you don’t have ricotta cheese, try cottage cheese instead. For a dairy-free option, use tofu blended with lemon juice. If fresh spinach is not available, frozen spinach works well. Just make sure to drain it well before using. For the cheeses, you can swap mozzarella for provolone or fontina. If you want a different sauce, any red sauce will do. Adding garnishes makes your dish pop. Use fresh basil leaves for a burst of flavor. You can also sprinkle extra Parmesan cheese on top before serving. If you like a bit of heat, add red pepper flakes. For a touch of color, try chopped parsley. These small touches make a big difference! First, you need to cook the jumbo pasta shells. Boil salted water in a large pot. Add the shells and cook them for 9-10 minutes. You want them al dente, so they hold their shape. Once cooked, drain the shells and let them cool. This makes them easier to handle later. In a large mixing bowl, combine the ricotta cheese and chopped spinach. Add half of the mozzarella and half of the Parmesan cheese to the bowl. Next, crack the egg into the mix and sprinkle in the garlic powder and Italian seasoning. Season with salt and pepper. Mix everything well until it’s smooth and creamy. This filling is rich and full of flavor. Now it’s time to fill the pasta shells. Take a generous spoonful of the ricotta and spinach mixture. Stuff each shell until it’s full and place them in a greased 9x13-inch baking dish. Once all the shells are stuffed, pour the marinara sauce evenly over them. Sprinkle the remaining mozzarella and Parmesan cheese on top. Cover the dish with aluminum foil and bake in your preheated oven for 25 minutes. After that, remove the foil and bake for an extra 10-15 minutes. You want the cheese to be bubbly and golden. Once done, let the dish cool for a few minutes. Top it with fresh basil leaves before serving. Enjoy your savory delight! To keep your shells from sticking, use plenty of water. Add a bit of salt to the boiling water, too. Stir the shells gently while they cook. This helps them stay separate. Once they are done, drain them and rinse with cold water. This cools them down and stops the cooking. A light coat of olive oil can also help. These stuffed shells taste great on their own. Serve them with a fresh salad or garlic bread for a nice meal. You can also add more marinara sauce on top for extra flavor. Sprinkle some fresh basil for a pop of color. If you like spice, add red pepper flakes. They give a nice kick. To get a great cheese topping, use a mix of mozzarella and Parmesan. This gives a nice melt and flavor. Make sure to sprinkle the cheese evenly over the shells. Cover the dish with foil for the first part of baking. This keeps the cheese safe while it melts. Remove the foil for the last few minutes to get a golden top. {{image_2}} You can change the filling to fit your taste. Try using cooked ground meat, like beef or turkey. For a twist, add chopped artichokes or roasted red peppers. You can also mix in different cheeses. Cream cheese or goat cheese can bring new flavors. Combine mushrooms or zucchini for added texture. The options are endless and fun! If you want a vegetarian option, simply skip the meat. You can make a great filling with just ricotta and spinach. For a vegan option, swap ricotta with tofu or cashew cheese. Use nutritional yeast for a cheesy flavor without dairy. Add lemon juice and herbs for a fresh taste. These swaps keep the dish tasty and satisfying. Marinara sauce is classic, but you can try others too. Alfredo sauce adds a creamy touch. Pesto sauce gives a fresh, herbal flavor. You can even mix sauces for a unique taste. A spicy arrabbiata sauce can add some heat. Experimenting with sauces can change the whole dish! To keep your leftover stuffed shells fresh, place them in an airtight container. Make sure to cover the dish well. You can store them in the fridge for up to three days. If you want to enjoy them later, freezing is a great option. To freeze your stuffed shells, let them cool completely first. You can place them in a freezer-safe dish or wrap them tightly in foil. They will last in the freezer for up to three months. When you’re ready to eat them, just thaw them in the fridge overnight before reheating. For reheating, preheat your oven to 350°F (175°C). Place the stuffed shells in a baking dish. Add a little marinara sauce on top to keep them moist. Cover with foil and bake for about 20 minutes. If you want a crispy top, remove the foil for the last 5 minutes. Enjoy your delicious meal! You can use cottage cheese as a tasty substitute. It has a similar texture. Blend it to make it smoother. Cream cheese is another option, but it is richer. Greek yogurt works too, giving a tangy flavor. Yes, you can prepare stuffed shells in advance. After you fill the shells, place them in the baking dish. Cover them tightly with plastic wrap. You can store them in the fridge for one day. For longer storage, freeze the unbaked shells. When ready, bake them straight from the freezer. Just add a few minutes to the baking time. These stuffed shells pair well with a fresh salad. A simple green salad with lemon vinaigrette works great. Garlic bread is another tasty side. You can also serve roasted vegetables for added flavor. A glass of red wine can enhance the meal too. You’ve learned about the key ingredients for Spinach and Ricotta Stuffed Shells and how to prepare them. We explored tasty substitutes and garnishes to enhance your dish. The step-by-step instructions made assembly easy. You now have tips for preventing sticking and achieving the best cheese topping. Don't forget the storage tips to enjoy leftovers later. Experiment with different fillings and sauces to make the recipe your own. Now, it’s time for you to create this delicious meal!

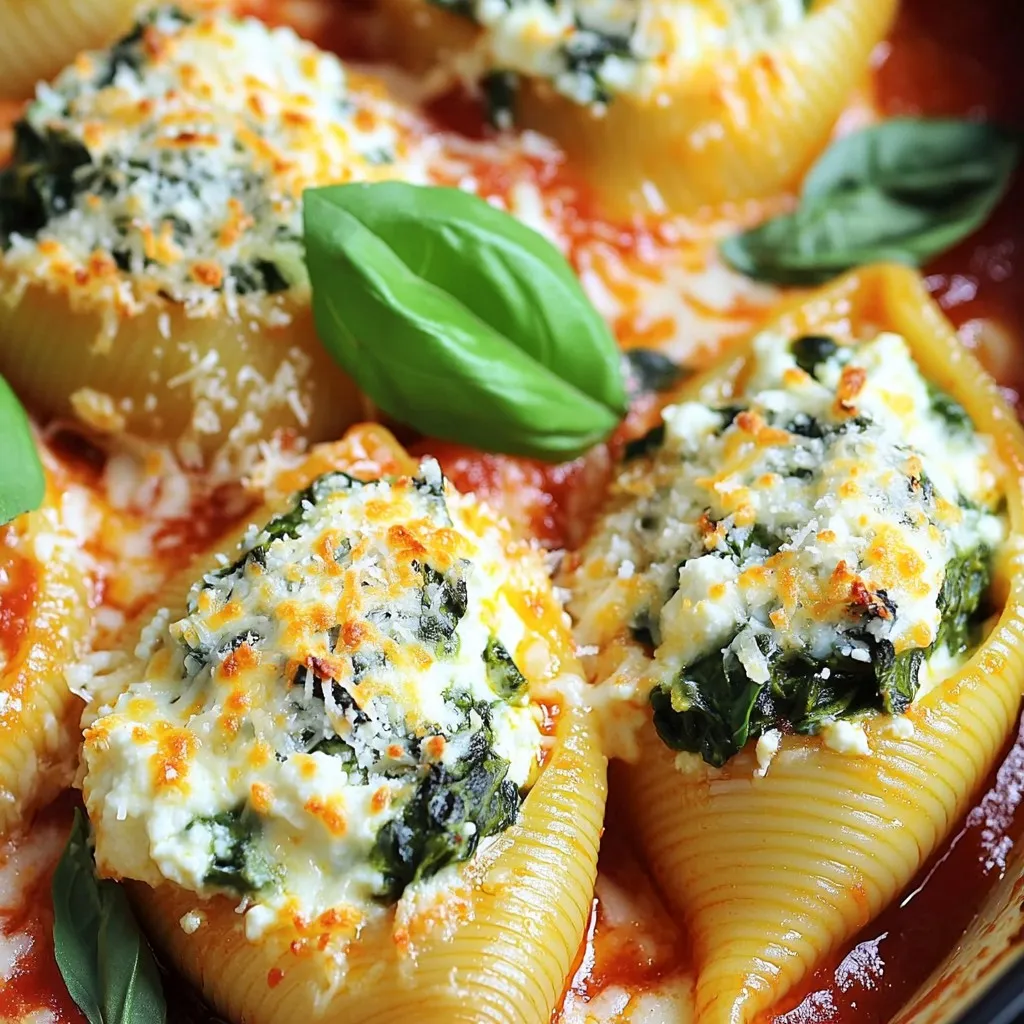
Get ready to indulge in a dish that’s both rich in flavor and easy to make: Spinach and Ricotta Stuffed Shells! Perfect for dinner or a cozy night in, these …

Read more

Categories Dinner
Older posts
Newer posts
← Previous Page1 Page2 Page3 Page4 … Page122 Next →

STIRRED RECIPES

Where every dish begins with a stir! 🍲✨

PAGES

Home About Contact Privacy Policy Terms & Conditions Cookie Policy GDPR Policy Copyright Policy Disclaimer

CATEGORIES

Appetizers Desserts Salads Breakfast Dinner

Contact

  • Pinterest
  • Mail
Copyright © 2026 Stirred Recipes. All rights reserved.