Skip to content
Stirred Recipes
  • Home
  • Appetizers
  • Desserts
  • Salads
  • Breakfast
  • Dinner
  • Privacy Policy
  • Contact
  • About

Chef Luca

TikTok Feta Tomato Pasta Bake Flavorful and Easy Dish

October 13, 2025 by Chef Luca
- 300g pasta (penne or rigatoni) - 200g feta cheese - 500g cherry tomatoes, halved - 3 cloves garlic, minced - 1 medium onion, diced - 2 tablespoons olive oil - 1 teaspoon dried oregano - 1 teaspoon red pepper flakes (optional) - Salt and pepper to taste - Fresh basil leaves for garnish - 100g grated mozzarella cheese When I create this dish, I love using penne or rigatoni pasta. Both shapes catch the sauce well. Feta cheese is key; it melts and adds a creamy texture. Cherry tomatoes burst with flavor when baked. Garlic and onion bring depth and aroma to the dish. Olive oil helps everything cook nicely. Oregano adds a hint of earthiness. If you like spice, red pepper flakes give a nice kick. Always season with salt and pepper to brighten the flavors. Fresh basil makes a lovely garnish and adds freshness. Finally, mozzarella cheese melts beautifully on top, creating a golden crust. - Alternative pasta options: You can swap penne or rigatoni with any pasta you like. Fusilli or farfalle work well too. - Vegan cheese alternatives: If you want a vegan dish, use plant-based feta. Nutritional yeast adds a cheesy flavor without dairy. - Fresh vs. canned tomatoes: Fresh cherry tomatoes taste great, but canned tomatoes work too. Just drain them well before using. These substitutions let you customize the dish to your taste or dietary needs. Don't be afraid to experiment! - Preheat the oven: Set your oven to 200°C (400°F). This helps cook the dish evenly. - Cook the pasta: Boil water in a large pot. Add salt, then cook 300g of pasta for 8-10 minutes. It should be al dente. Drain the pasta and set it aside. - Prepare the tomato and feta mixture: In a large baking dish, add 500g of halved cherry tomatoes, 1 diced onion, and 3 minced garlic cloves. Pour in 2 tablespoons of olive oil, and add 1 teaspoon of dried oregano, red pepper flakes, salt, and pepper. Mix well to combine. - Bake until the tomatoes are blistered: Make a space in the center of the mixture and place 200g of feta cheese there. Drizzle more olive oil over the feta and season it. Bake the dish for 25-30 minutes until the tomatoes are soft and blistered. - Combine pasta with roasted ingredients: When the baking time is up, take the dish out of the oven. Stir the roasted tomatoes and feta until creamy. Add the cooked pasta and mix gently until coated. - Add mozzarella cheese and finish baking: Sprinkle 100g of grated mozzarella over the dish. Return it to the oven for 10-15 minutes, until the cheese melts and bubbles. This simple yet tasty dish brings joy to the table. Enjoy every bite! - How to achieve al dente pasta: Cook your pasta in a large pot of salted boiling water. Follow the package instructions, usually about 8-10 minutes. Taste a piece a minute before the time is up. It should be firm yet tender. - Best practices for roasting tomatoes: Use fresh cherry tomatoes for the best flavor. Halve them and toss with olive oil, salt, and pepper. Spread them evenly in the baking dish. Roast at 200°C (400°F) until they blister, about 25-30 minutes. This brings out their sweetness. - Ideal side dishes to pair: Serve a simple salad with mixed greens and a light vinaigrette. Garlic bread also works great to soak up the sauce. - Complementary wines or beverages: A light white wine, like Sauvignon Blanc, pairs well with this dish. For a non-alcoholic option, try sparkling water with lemon. - Adding herbs and spices: Fresh basil is a must for garnish. You can also add thyme or rosemary for more aroma. A pinch of nutmeg can add warmth and depth. - Tips for adjusting spice levels: If you like heat, add more red pepper flakes. If you prefer mild flavors, skip the flakes or reduce the amount. Always taste as you go! {{image_2}} You can easily change up this dish. Adding fresh spinach or bell peppers brings color and nutrition. Just toss them in with the tomatoes before baking. They add a nice crunch and flavor. For protein, consider chicken or shrimp. Cook the chicken first, then mix it in with the pasta. If you choose shrimp, toss it in at the last minute. The heat from the pasta will cook them perfectly. If you need a gluten-free option, use gluten-free pasta. There are many brands available that taste great. Just follow the package directions for cooking times. For dairy-free needs, swap out the feta and mozzarella with vegan cheese. Nutritional yeast can also add a nice cheesy flavor without the dairy. This dish shines with Mediterranean flavors. Try adding olives or artichokes for a Mediterranean vibe. You can also sprinkle some fresh lemon zest on top before serving for a zesty kick. Incorporating seasonal ingredients keeps the dish fresh. In summer, use fresh basil or zucchini. In winter, try roasted butternut squash or kale. This way, you can enjoy this pasta bake all year round! To store your leftovers, let the pasta bake cool first. Then, transfer it to an airtight container. This keeps it fresh and safe. You can store it in the fridge for up to three days. After that, it may lose taste and texture. For long-term storage, freezing the pasta bake is a great option. Portion it into individual servings before freezing. Use freezer-safe containers or bags to avoid freezer burn. It can last up to three months in the freezer. When you're ready to eat, thaw it overnight in the fridge. To reheat, use an oven for the best results. Preheat your oven to 180°C (350°F). Place the pasta bake in a dish and cover it with foil. Heat for about 20 minutes, or until warm. If you want, add a sprinkle of cheese on top for extra flavor. You can also microwave it, but the oven keeps it creamy and tasty. Adjust the seasonings before serving, as flavors may change over time. TikTok Feta Tomato Pasta Bake is a viral dish that became popular on social media. It features creamy feta cheese and juicy cherry tomatoes, mixed with pasta. The recipe is simple and quick, making it a favorite for busy cooks. People love how easy it is to prepare and how delicious it tastes. The dish's bright flavors and creamy texture make it a hit at any meal. Yes, you can use different types of cheese! If you want a milder taste, try using ricotta or cream cheese. For a sharper flavor, consider goat cheese or aged cheddar. Each cheese will change the dish's taste and creaminess. Just remember that feta gives a unique salty flavor, so choose wisely for a similar taste. To make this dish ahead of time, cook the pasta and prepare the tomato and feta mixture separately. You can mix the two together before baking. Store them in the fridge for up to two days. When ready to eat, just combine them in a baking dish and bake. This saves you time and effort on busy nights. Yes, this recipe is great for meal prep! You can make a big batch and store individual portions. The dish keeps well in the fridge for about three days. Just reheat it in the oven or microwave. For best results, add fresh basil right before serving to keep it vibrant and tasty. This dish features pasta, roasted tomatoes, and feta cheese, creating a tasty meal. You can swap ingredients based on your taste or dietary needs. Just follow the steps to bake and enjoy. Overall, this recipe is fun and easy for anyone to try. With a few tweaks, you can make it your own. Best of all, leftovers store well in the fridge or freezer, so don't worry about extra! Enjoy making this pasta bake your new favorite!

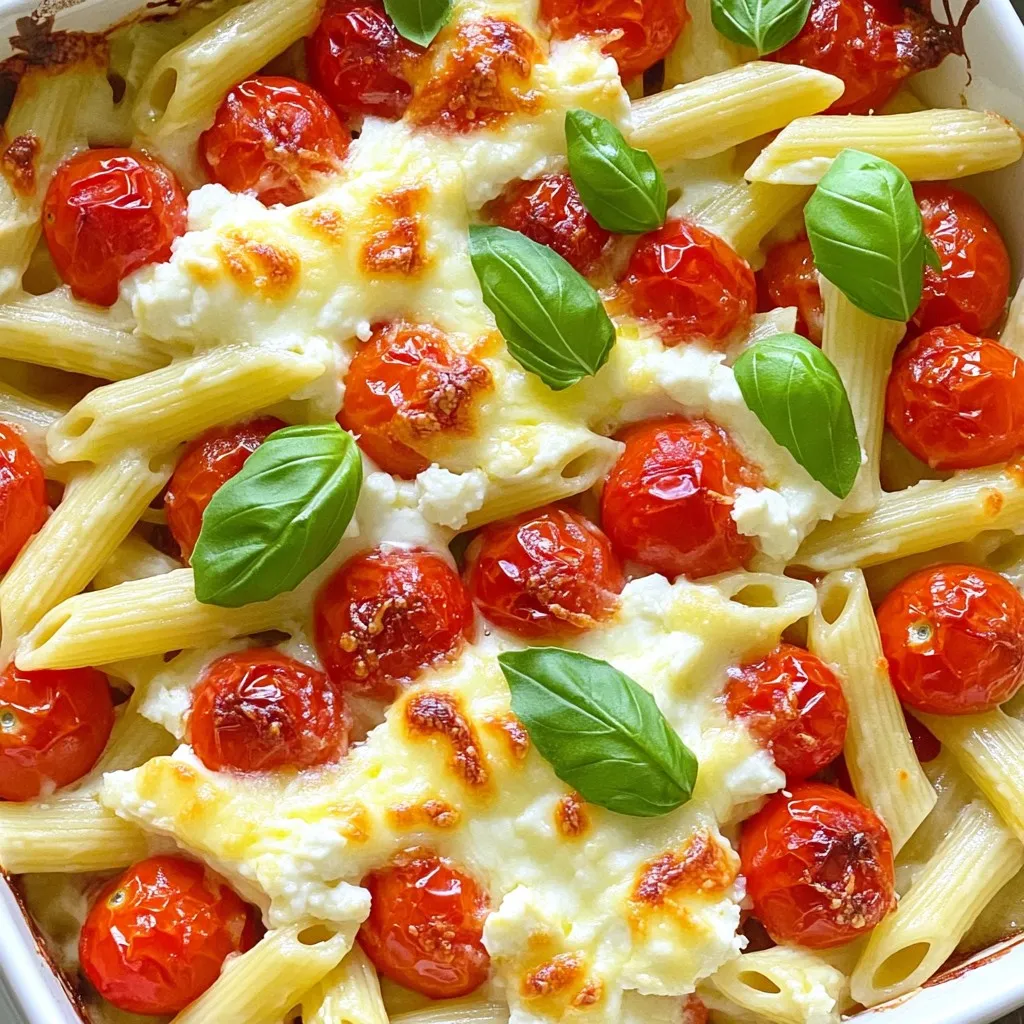
Have you heard about the TikTok Feta Tomato Pasta Bake? This dish took the internet by storm, and for a good reason! It’s not just flavorful, but also super easy …

Read more

Categories Dinner

Mini Oreo Cheesecake Bites Delightful Sweet Treat

October 13, 2025 by Chef Luca
- 1 package (16.6 oz) Oreo cookies - 2 tablespoons unsalted butter - 2 (8 oz) packages cream cheese - 1/2 cup granulated sugar - 1 teaspoon vanilla extract - 2 large eggs - 1 cup heavy cream - 2 tablespoons powdered sugar - Pinch of salt - Chocolate sauce (optional) You need a few key ingredients to make Mini Oreo Cheesecake Bites. First, grab a package of Oreo cookies. You will crush these for the crust. Next, you need unsalted butter to help bind the crust together. For the filling, cream cheese is a must. It gives your bites that rich and creamy taste. You will also add granulated sugar and vanilla extract for sweetness and flavor. Don't forget the eggs; they help set the filling as it bakes. Heavy cream is important too. You will whip it for a light topping. A pinch of salt enhances all the flavors. If you want to dress them up, chocolate sauce can add a nice touch. - Food processor - Mini muffin tin - Mixing bowls - Electric mixer To make this treat, you will need some tools. A food processor is great for crushing the Oreos quickly. A mini muffin tin is key for shaping your cheesecake bites. Make sure to use mixing bowls for combining your ingredients. An electric mixer helps you achieve a smooth filling. These tools make the process simple and fun. - Preheat the oven to 325°F (160°C). - Prepare the muffin tin with liners or non-stick spray. This step makes removal easy. - Crush 12 Oreos in a food processor until they are finely ground. - In a bowl, mix the crushed Oreos with 2 tablespoons of melted butter. It should feel like wet sand. - Press about 1 tablespoon of the Oreo mixture into each muffin cup. Use the back of a spoon to pack it down tightly. This creates a solid base for the cheesecake. - In a large bowl, beat 2 packages of softened cream cheese until smooth. - Add 1/2 cup of granulated sugar and 1 teaspoon of vanilla extract. Mix until well combined. - Add 2 large eggs, one at a time. Mix on low speed. This helps avoid cracks in your cheesecake. - Spoon the cream cheese mixture over the Oreo crusts. Fill each cup to about ¾ full. - Bake in the oven for 15-18 minutes. The edges should be set, but the center can still jiggle slightly. - Remove the bites and let them cool to room temperature. Chill in the fridge for at least 2 hours. - In a separate bowl, whip 1 cup of heavy cream with 2 tablespoons of powdered sugar and a pinch of salt until stiff peaks form. - After chilling, top each cheesecake bite with a dollop of whipped cream and a sprinkle of crushed Oreos. Drizzle with chocolate sauce if you like. Enjoy these delightful treats! How to prevent cracks in cheesecake To keep your cheesecake smooth, avoid overmixing. When you add eggs, mix just until combined. This helps prevent air bubbles that cause cracks. Another tip is to bake at a low temperature. This will help the cheesecake cook evenly. Importance of room temperature ingredients Using room temperature ingredients is key. It helps the cream cheese blend smoothly. Cold ingredients can form lumps. Let your cream cheese and eggs sit out for about 30 minutes before mixing. This small step makes a big difference in texture. Presentation ideas for events Mini Oreo Cheesecake Bites look great on a platter. Use colorful cupcake liners to make them pop. You can also add fresh berries or mint leaves on top for a splash of color. Drizzling chocolate sauce on the plate adds flair too. Ideal accompaniments for Mini Oreo Cheesecake Bites Pair these bites with coffee or milk. They also go well with fruit salad for a fresh touch. For a fun twist, serve them with flavored ice cream. This adds a creamy contrast that many enjoy. {{image_2}} Using different Oreo flavors can make these bites even more fun. You can try mint, peanut butter, or even birthday cake Oreos. Each flavor adds a unique twist to the classic recipe. For seasonal variations, think about using pumpkin spice Oreos in the fall. In the winter, peppermint Oreos can bring festive cheer. These little changes keep your treats exciting and fresh. While whipped cream is a favorite topping, there are many alternatives. You can use crushed Oreos for a crunchy finish. Another fun idea is to top them with sprinkles. For a richer taste, consider drizzling chocolate sauce or caramel over the tops. You can also sprinkle chopped nuts for added crunch. Each topping can change the flavor and look of your Mini Oreo Cheesecake Bites. To keep your Mini Oreo Cheesecake Bites fresh, use an airtight container. A glass container works best. You can stack the bites with parchment paper in between. This helps prevent sticking. - Refrigeration: Store them in the fridge for up to 5 days. - Freezing: You can freeze the bites for up to 2 months. Just make sure they are sealed tight in a freezer bag. I recommend serving these cheesecake bites cold. They taste great straight from the fridge. If you prefer them warm, you can heat them slightly. To warm them, place them in the oven at a low temperature, around 200°F (93°C), for about 5 minutes. This gives them a softer texture without cooking them further. Enjoy the creamy goodness! Yes, you can use low-fat cream cheese. It will change the flavor and texture. The bites may taste a bit less rich. They might not be as creamy. But they will still be tasty. Always remember that cream cheese gives the cheesecake its structure. Mini Oreo Cheesecake Bites last about 5 days in the fridge. Store them in an air-tight container. This keeps them fresh and tasty. For best results, eat them within this time. They will not last as long if left out at room temperature. Yes, you can make these bites ahead of time! Prepare them the day before. After baking, cool them completely. Then, chill them in the fridge. They taste great after sitting overnight. Just add toppings right before serving. This keeps them fresh and pretty. If your bites crack, don’t worry! This can happen. To help avoid this, mix the eggs in gently. Overmixing is a common cause of cracks. If they do crack, you can cover them with whipped cream. This hides the cracks and adds flavor. You learned how to make Mini Oreo Cheesecake Bites step by step. We covered the ingredients, tools, and methods to ensure tasty treats. Remember, using room temperature ingredients prevents cracks and helps with texture. Feel free to experiment with different Oreo flavors and toppings. These bites are great for parties or a fun night in. They store well, so you can make them ahead of time. Enjoy your delicious creation and share it with friends!

Looking for a sweet treat that’s both easy to make and crowd-pleasing? You’re in the right place! These Mini Oreo Cheesecake Bites pack all the creamy, dreamy flavor of classic …

Read more

Categories Desserts

Everything Bagel Cucumber Sushi Rolls Fresh Delight

October 13, 2025 by Chef Luca
- 2 large cucumbers - 1 cup cooked sushi rice - 2 tablespoons rice vinegar - ½ teaspoon sugar - ½ teaspoon salt - 1 avocado, sliced - ½ cup cream cheese, softened - 1 small carrot, julienned - 2 green onions, finely chopped - 2 tablespoons everything bagel seasoning - Soy sauce, for dipping To make Everything Bagel Cucumber Sushi Rolls, you need simple ingredients. First, cucumbers are the main part. Choose large ones for easier handling. Next, you need sushi rice. Cook it according to the package. The right texture is key for good rolls. You also need rice vinegar, sugar, and salt to season the rice. These ingredients make the rice tasty and help it stick. For fillings, grab some avocado, cream cheese, and a small carrot. These add flavor and color. Green onions give a nice crunch and fresh taste. Lastly, don’t forget everything bagel seasoning. It gives that unique flavor we all love. Have soy sauce ready for dipping. With these ingredients, you're set for a fresh delight that looks and tastes amazing. 1. Start by rinsing the sushi rice under cold water. Keep rinsing until the water runs clear. This step removes excess starch. 2. Cook the rice according to the package instructions. I prefer using a rice cooker for perfect results. 3. Once cooked, let the rice cool slightly. In a small bowl, mix 2 tablespoons of rice vinegar, ½ teaspoon of sugar, and ½ teaspoon of salt. Stir until the sugar and salt dissolve. 4. Gently fold this mixture into the warm rice. Make sure it’s well combined. Set the rice aside to cool completely. 1. Take the two large cucumbers and slice them in half lengthwise. 2. Use a spoon to scoop out the seeds. Be careful not to pierce the skin. This hollowing creates the sushi shell. 3. Aim for a nice, even shell for the perfect roll. 1. Begin by spreading a thin layer of softened cream cheese inside each cucumber half. This adds a rich flavor. 2. Next, add a spoonful of sushi rice, pressing it down gently. Make sure it sticks to the cream cheese. 3. Then, place a few slices of avocado, some julienned carrot, and a sprinkle of finely chopped green onions on top of the rice. 4. Carefully roll the cucumber halves together, starting from one end. 5. Use a sharp knife to slice the rolls into bite-sized pieces. This will make them easy to eat. 6. Finally, sprinkle everything bagel seasoning over the tops of the sushi rolls. This adds that amazing flavor we love. 7. Serve your Everything Bagel Cucumber Sushi Rolls on a platter. Don’t forget the soy sauce for dipping! To make great sushi rice, start with high-quality sushi rice. Rinse it well under cold water until the water runs clear. This step removes excess starch. Then, cook the rice according to the package instructions. Once cooked, let it cool a bit. For the best flavor, mix in rice vinegar, sugar, and salt while the rice is still warm. The warmth helps the rice absorb the flavors. Make sure to fold the mixture gently to avoid breaking the rice grains. When selecting cucumbers, look for large and firm ones. They should be dark green and free of blemishes. This ensures a crisp texture. To hollow them out, slice each cucumber in half lengthwise. Use a spoon to scoop out the seeds carefully. Be gentle to avoid breaking the skin. For rolling sushi effectively, start from one end of the cucumber half. Press the filling down lightly as you roll. This keeps everything in place. Use a sharp knife for slicing. A sharp knife prevents squishing the rolls. Slice them into bite-sized pieces for a fun presentation. {{image_2}} You can change up the fillings in your Everything Bagel Cucumber Sushi Rolls. Try adding colorful veggies like bell peppers or radishes. They add crunch and taste. You can also use protein. Smoked salmon or crab are great choices. They pair well with cream cheese and cucumber. This choice adds a hearty element. Let’s explore flavor enhancements. You can try different seasonings. Garlic powder or sesame seeds can add a twist. For dipping sauces, soy sauce works well. But you can mix things up with spicy mayo or wasabi. These options bring exciting flavors to your rolls. If you need diet-friendly options, I have some great ideas. For gluten-free rolls, just ensure your soy sauce is gluten-free. You can also swap out the cream cheese for a vegan alternative. Cashew cream or hummus can work nicely. These swaps keep your rolls tasty and suitable for everyone. To keep your Everything Bagel Cucumber Sushi Rolls fresh, store them in the fridge. Place the rolls in an airtight container. This helps block moisture and air. Aim to eat them within two days for the best taste. After that, the cucumbers may get soggy and lose their crunch. You may not need to heat these rolls, as they are best served cold. If you need to reheat the sushi rice, use a microwave. Place the rice in a bowl and add a bit of water. Heat it for 30 seconds, then stir. Repeat until warm. To keep the cucumbers crisp, avoid reheating them. Instead, enjoy the rolls cold for a refreshing bite. To keep your cucumbers crisp, use fresh ones. First, slice them right before serving. Remove the seeds to lessen moisture. You can also lightly salt the insides and let them sit for 10 minutes. This draws out extra water. Pat them dry with a paper towel before adding cream cheese and rice. This simple trick helps maintain a nice crunch in your Everything Bagel Cucumber Sushi Rolls. Yes, you can prepare these rolls ahead of time, but timing is key. Make the sushi rice and prepare the fillings a few hours before serving. However, I recommend assembling the rolls no more than two hours ahead. Store them in the fridge wrapped in plastic wrap. This helps keep them fresh. Avoid cutting them until you are ready to serve. Everything bagel seasoning is a mix of flavors. It usually includes sesame seeds, poppy seeds, dried garlic, dried onion, and salt. The blend creates a savory and crunchy topping. You can find it in stores or make your own. Just mix the ingredients in equal parts. This seasoning adds a fun twist to the sushi rolls, enhancing the taste of each bite. In this post, we covered everything you need to make delicious cucumber sushi. We started with ingredients like sushi rice and cucumbers, then moved on to step-by-step instructions for preparation and assembly. Tips for perfecting your rice and rolling technique followed, alongside tasty variations and storage advice. Remember, with practice, you’ll create sushi you can be proud of. Enjoy experimenting with fillings and flavors. Your sushi journey is only beginning!

Are you ready to roll into a fresh culinary adventure? Everything Bagel Cucumber Sushi Rolls blend flavors you love into a fun, easy dish. Picture crunchy cucumbers, savory sushi rice, …

Read more

Categories Appetizers

Hot Chocolate Cheesecake Dip Easy and Decadent Treat

October 13, 2025 by Chef Luca
To make this hot chocolate cheesecake dip, gather these tasty items: - 8 oz cream cheese, softened - 1 cup powdered sugar - 1/2 cup sour cream - 1 teaspoon vanilla extract - 1/2 cup cocoa powder - 1/2 cup mini chocolate chips - 1/2 cup marshmallow fluff - Whipped cream, for topping - Mini marshmallows and chocolate shavings, for garnish For the best taste, use fresh cream cheese. It gives a smooth texture. You can also use fresh sour cream for a tangy kick. If you want, store-bought options work too but may change the taste slightly. Look for quality brands for the best flavors. If you need to make changes for dietary needs, here are some ideas: - Use vegan cream cheese for a dairy-free version. - Replace sour cream with coconut yogurt for a non-dairy option. - For a sugar-free dip, use a sugar substitute in place of powdered sugar. - If you want a gluten-free treat, serve with gluten-free dippers. These substitutions help keep your dip enjoyable for everyone. Start with your ingredients ready. You need cream cheese, powdered sugar, sour cream, vanilla, cocoa powder, mini chocolate chips, and marshmallow fluff. This dip is easy and fun to make. You can complete it in about 15 minutes. The chilling time helps flavors blend. 1. First, take a large bowl. Add the softened cream cheese. Use an electric mixer to beat it until smooth. 2. Next, add the powdered sugar slowly. Mix until it's creamy and no lumps remain. 3. Then, stir in the sour cream and vanilla extract. Make sure everything is well mixed. 4. Now, sift the cocoa powder into the bowl. This step prevents clumps. Blend until fully combined. 5. Finally, fold in half of the mini chocolate chips and the marshmallow fluff. Ensure that they are evenly mixed in. Transfer the dip to a serving bowl. Use a spatula to smooth the top. Chill it in the fridge for at least 30 minutes. This time helps the flavors marry together. When you're ready to serve, add a dollop of whipped cream on top. Sprinkle with the rest of the chocolate chips, mini marshmallows, and chocolate shavings for a lovely touch. Enjoy it with graham crackers, pretzels, or fruits! To make your dip smooth, start with softened cream cheese. You can take it out of the fridge an hour before mixing. Use an electric mixer to beat the cream cheese until creamy. Gradually add the powdered sugar. This will help mix well without lumps. Sift in the cocoa powder too. This step prevents clumps and keeps your dip velvety. You can easily adjust the sweetness to your liking. If you prefer a sweeter dip, add a bit more powdered sugar. Start with one tablespoon at a time. Taste as you go to find the right balance. If you like it less sweet, reduce the sugar. You can also try using dark chocolate chips for a richer flavor. This adds a nice contrast to the sweetness. Presentation makes your dip even more fun. Serve it in a shallow bowl to showcase the toppings. Spread whipped cream on top for a fluffy look. Then sprinkle mini marshmallows and chocolate shavings for color. Arrange graham crackers, pretzels, or fruit around the bowl. This gives everyone options for dipping. Use small dessert forks or spoons to make it easy and cute. {{image_2}} You can easily change the flavor of your Hot Chocolate Cheesecake Dip. One fun idea is to add mint. Just mix in a teaspoon of mint extract. This gives your dip a fresh twist. Another option is pumpkin. Add half a cup of pumpkin puree. It makes the dip taste warm and cozy, perfect for fall. You can also use flavored cocoa powder, like caramel or white chocolate, to switch it up. Your dip will taste unique and delicious. Think beyond crackers when serving this dip. You can use fresh fruit like strawberries, bananas, or apples. The sweetness of the fruit pairs well with the rich dip. Try using pretzels for a salty crunch. They make a great contrast with the creamy dip. You can even use graham crackers or mini cookies. Arrange them on a platter for a fun and inviting display. If you have dietary needs, don't worry! You can still enjoy this dip. For a dairy-free version, use vegan cream cheese and coconut whipped cream. If you need a low-sugar option, swap powdered sugar for a sugar substitute like erythritol. You can also skip the mini chocolate chips or use dark chocolate for a healthier choice. These swaps keep the flavor while meeting your needs. After enjoying the hot chocolate cheesecake dip, store leftovers in an airtight container. Place it in the fridge. This dip can stay fresh for up to four days. Make sure to cover it well to keep the flavors intact. You can freeze this dip if you have extra. Place it in a freezer-safe container. Seal it tightly to avoid freezer burn. It will keep for about three months. When ready to enjoy, let it thaw in the fridge overnight before serving. To reheat, gently warm it in the microwave. Heat for short bursts, stirring often. You want it just warm, not hot. If the dip is frozen, let it thaw in the fridge. This keeps the texture smooth and creamy. Then, mix it well before serving to restore its delightful consistency. Yes, you can make this dip a day or two ahead. Just prepare the dip, cover it tightly, and store it in the fridge. This lets the flavors mix and become richer. When you’re ready to serve, add the whipped cream and toppings. This makes it easy for parties or gatherings. If you want a dairy-free option, try using vegan cream cheese. You can also use mascarpone for a richer taste. Greek yogurt is another good choice. It will change the flavor a bit but keeps the dip creamy. Just pick what fits your needs best. This dip stays fresh for about 3 to 5 days in the fridge. Make sure to keep it in an airtight container. If you notice any change in smell or texture, it’s best to toss it. Enjoy it while it’s fresh for the best taste! This blog post covered how to make a delicious Hot Chocolate Cheesecake Dip. We explored key ingredients and their options, along with helpful substitutions to fit dietary needs. I shared step-by-step instructions for perfecting the dip and provided tips to enhance texture and sweetness. We also looked at fun variations and storage tips to keep your dip fresh. In summary, this dip brings joy to any gathering. Enjoy experimenting and sharing this treat with others!

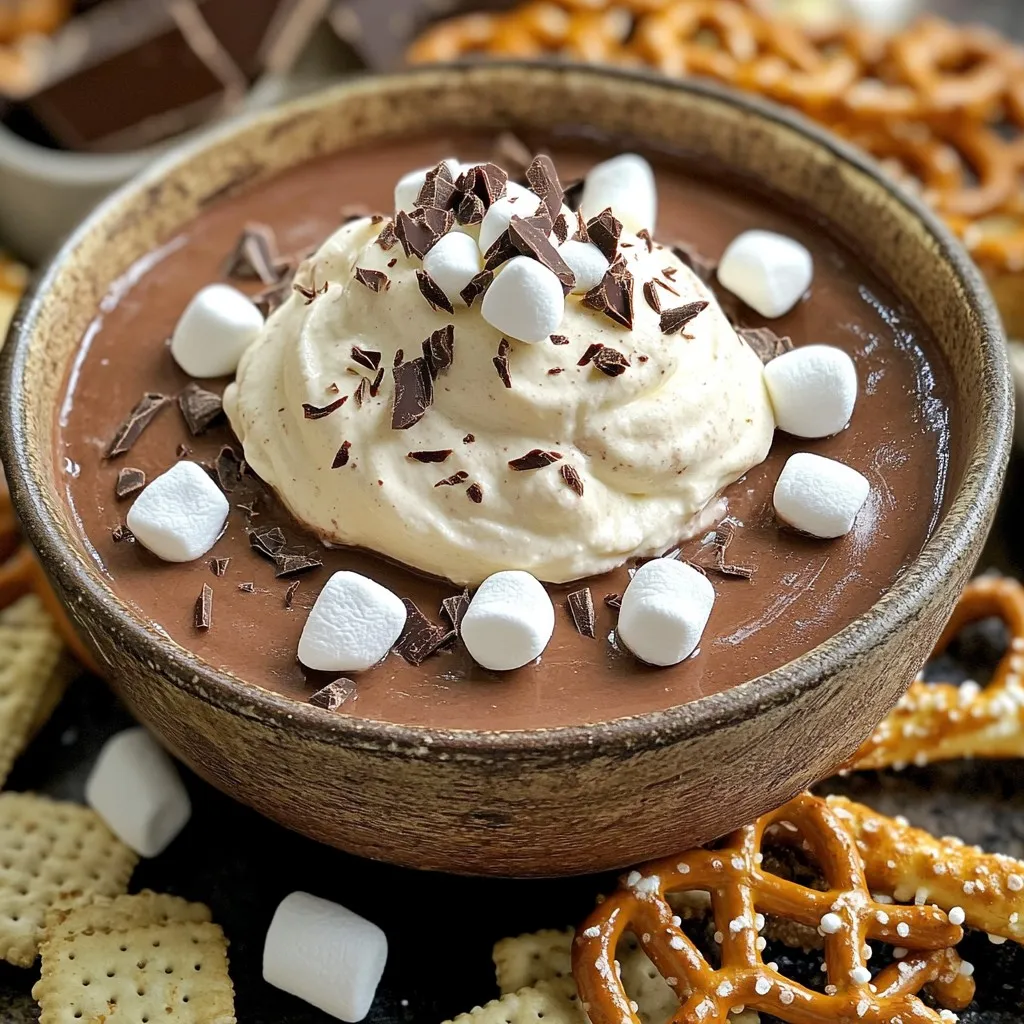
Craving a dessert that’s easy, creamy, and totally indulgent? Look no further than my Hot Chocolate Cheesecake Dip! This fun treat combines the rich flavors of hot chocolate and cheesecake, …

Read more

Categories Desserts

Maple Dijon Roasted Carrots Flavorful Dinner Side

October 11, 2025 by Chef Luca
Here’s what you need to make Maple Dijon Roasted Carrots: - 1 lb baby carrots, peeled - 3 tablespoons pure maple syrup - 2 tablespoons Dijon mustard - 2 tablespoons olive oil - Salt and pepper to taste - 1 teaspoon fresh thyme leaves (or 1/2 teaspoon dried thyme) - 1 tablespoon chopped fresh parsley for garnish These ingredients work together to create a sweet and tangy flavor. The baby carrots bring natural sweetness, while the Dijon mustard adds a nice kick. Maple syrup enhances the sweetness and gives a lovely glaze. Olive oil helps the carrots roast evenly and adds richness. Fresh thyme adds an earthy note, making each bite tasty. Finally, parsley adds color and freshness when you serve the dish. Make sure to use fresh ingredients for the best taste. When you combine these items, you’ll notice how they complement each other. This simple list makes it easy for anyone to enjoy a gourmet side dish right at home. First, you need to preheat your oven to 425°F (220°C). This high heat helps the carrots get tender and caramelized. Next, line a baking sheet with parchment paper. This makes cleanup easy and helps the carrots roast well. In a mixing bowl, whisk together the maple syrup, Dijon mustard, olive oil, salt, pepper, and thyme. Mix until everything blends nicely. This sauce will coat the carrots and add great flavor. Now, add the peeled baby carrots to the bowl. Toss them gently in the maple Dijon mixture until they are fully coated. Spread the coated carrots in a single layer on the prepared baking sheet. Make sure they have enough space to roast evenly. Place the baking sheet in the oven and roast the carrots for 20-25 minutes. Stir them halfway through to ensure even cooking. They should be tender and slightly caramelized when done. Stirring the carrots halfway through cooking is key. This helps them cook evenly. It also gives them a nice color and flavor. You can use a spatula to gently turn them. After about 20 minutes, check for tenderness. You want them to be soft but not mushy. Use a fork to poke a carrot. If it goes in easily, they're done. To boost the flavor, add herbs like rosemary or dill. You can also try spices like cumin or paprika for a twist. These will make your dish even more tasty. When serving, drizzle any leftover glaze from the baking sheet over the carrots. This adds extra flavor and makes them look great on the plate. For a pop of color, sprinkle fresh parsley on top. It brightens up the dish and adds freshness. {{image_2}} You can use different types of carrots for this dish. Rainbow carrots add color and fun. They taste sweet, just like baby carrots. If you choose larger carrots, cut them into sticks or rounds. This helps them cook evenly. The cooking time may change based on the size of the carrots. Larger pieces may need a few more minutes, while smaller ones may cook faster. Always check for tenderness with a fork. You can swap Dijon mustard for whole grain mustard if you want a different taste. Whole grain mustard has a coarser texture and adds a nice crunch. You can also try different sweeteners. Honey or agave syrup works well with this recipe. Each sweetener gives a unique flavor. Feel free to mix and match until you find your favorite combination. Experimenting with flavors makes cooking more fun! After enjoying your maple Dijon roasted carrots, store any leftovers in an airtight container. This helps keep them fresh. Place the container in the fridge within two hours. Roasted carrots can last up to five days when stored correctly. When you’re ready to eat them again, just take them out and follow the reheating instructions. To reheat your roasted carrots without losing their yummy texture, you have a few good options: - Oven: Preheat your oven to 350°F (175°C). Spread the carrots on a baking sheet and heat for about 10-15 minutes. - Microwave: Place the carrots in a microwave-safe dish. Heat them for 1-2 minutes, stirring halfway through. - Skillet: Heat a little olive oil in a pan over medium heat. Add the carrots and cook for about 5 minutes, stirring often. These methods will help keep your carrots tasty and appealing. Enjoy the flavors again! Yes, you can use regular carrots. Just peel and cut them into sticks. Aim for similar sizes to ensure even cooking. This method works well, but adjust the cooking time. Larger pieces may need a bit more time to roast. Test for tenderness with a fork. If you want a substitute, try honey or agave nectar. Both add sweetness and flavor but change the taste a bit. You can also mix brown sugar with water for a syrupy texture. Just keep in mind that this will alter the final flavor profile. Roasted carrots last about 3 to 5 days in the fridge. Store them in an airtight container to keep them fresh. If you notice any off smells or textures, it’s best to toss them. Always check before using leftovers for safety. Yes, you can make this recipe ahead of time. Roast the carrots and let them cool. Then store them in the fridge. When ready to serve, reheat them in the oven at 350°F (175°C) for about 10 minutes. This keeps them nice and warm for your meal. This blog post shared a tasty roasted baby carrot recipe. We explored simple ingredients, step-by-step instructions, and useful tips. You learned how to enhance flavors and tried different carrot types. Storing and reheating leftovers are also covered. Enjoy making these carrots for any meal. They are easy to prep and full of flavor. Try switching up the ingredients to fit your taste. Happy cooking and enjoy those delicious roasted carrots!

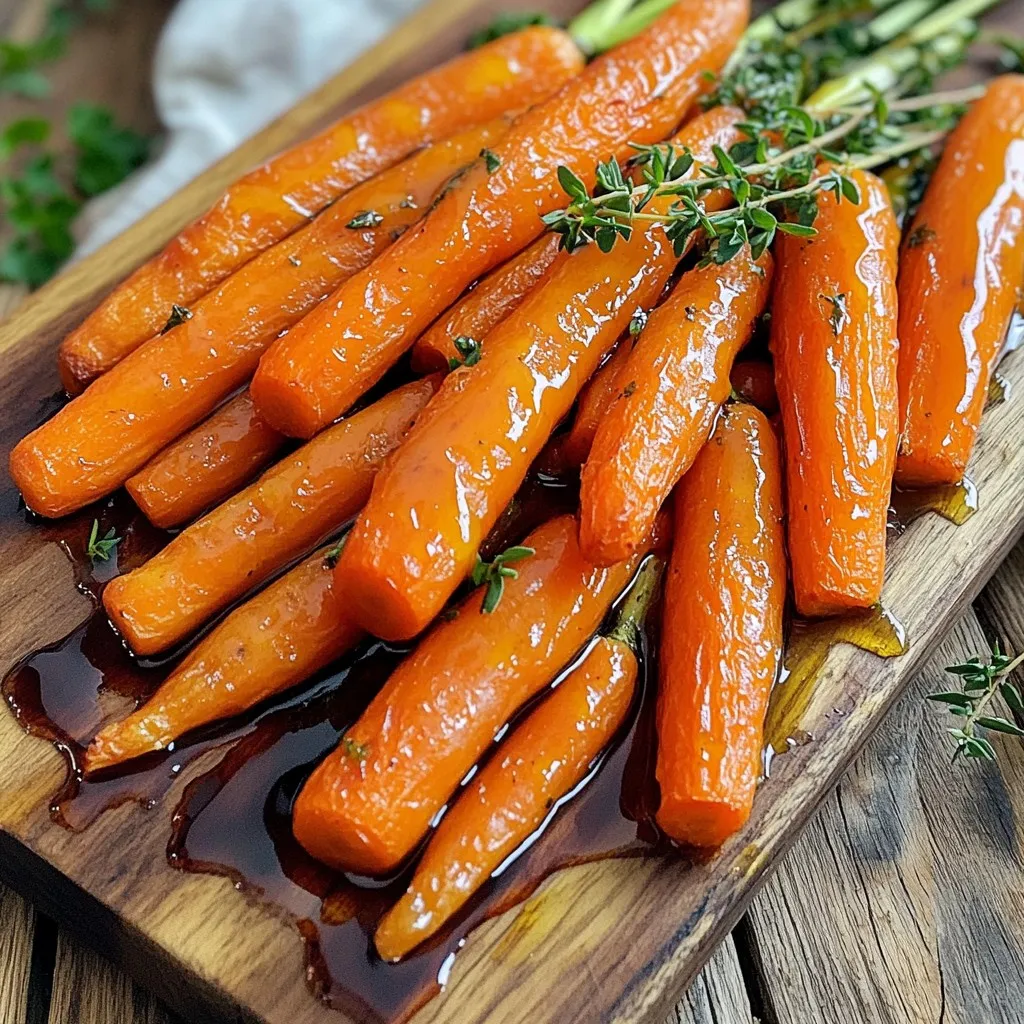
Looking for a tasty and simple side dish? Maple Dijon Roasted Carrots are the answer! These sweet and tangy veggies brighten up any dinner plate. With just a few easy …

Read more

Categories Dinner

Slow Cooker Apple Cinnamon Oatmeal Delight Recipe

October 11, 2025 by Chef Luca
- 2 cups rolled oats - 4 cups almond milk (or any milk of your choice) - 2 large apples, peeled and diced - 1 teaspoon cinnamon - 1/4 teaspoon nutmeg - 1/2 cup brown sugar (or maple syrup for a healthier option) - 1/2 cup raisins or dried cranberries - 1/4 teaspoon salt These ingredients blend well for a tasty and filling breakfast. The oats provide fiber and energy. The apples add sweetness and fruitiness. Cinnamon and nutmeg give warmth and spice to the dish. - Chopped nuts - More diced apples - Drizzle of honey Toppings can make your oatmeal even better. Chopped nuts add crunch. Extra apples boost flavor and freshness. Honey gives a touch of sweetness. You can mix and match these to suit your taste. - Use oat milk or coconut milk instead of almond milk for a different flavor. - Swap brown sugar for honey or agave syrup if you prefer. - Replace raisins with chopped dates or dried apricots for a twist. Feel free to adapt the recipe. Substitutions keep your oatmeal exciting and new. Each change brings a unique taste to your bowl. First, grab your slow cooker. I like to use a large one for this recipe. Make sure it is clean and dry. This helps the oatmeal cook evenly. Now, let’s mix the ingredients. In the slow cooker, add: - 2 cups rolled oats - 4 cups almond milk (or any milk of your choice) - 2 large apples, peeled and diced - 1 teaspoon cinnamon - 1/4 teaspoon nutmeg - 1/2 cup brown sugar (or maple syrup for a healthier option) - 1/2 cup raisins or dried cranberries - 1/4 teaspoon salt Stir everything well. Make sure the oats and apples are mixed in well. This step helps all the flavors come together. Cover the slow cooker. You can cook on low for 6-8 hours. If you’re short on time, use high for 3-4 hours. Stir the mixture a bit if you can. This helps it cook evenly. When it's done, the oatmeal should look creamy and delicious. If you want it thicker, let it sit for 10-15 minutes with the lid on. Enjoy it hot! To make your oatmeal creamy, use almond milk or whole milk. This adds a rich flavor. Stir well when mixing the ingredients. This ensures all the oats soak up the liquid. Cook on low for 6-8 hours for the best texture. If you want it thicker, let it sit covered for 10-15 minutes. The steam helps it become even creamier. Store any leftover oatmeal in an airtight container. Place it in the fridge for up to five days. Make sure it cools down before sealing to avoid moisture. If it gets too thick, add a splash of milk when you reheat it. This keeps it nice and creamy. To reheat, use the microwave or a small pot. For the microwave, heat in 30-second bursts. Stir in between to warm it evenly. On the stovetop, add a little milk and heat over low. Stir often until it reaches your desired warmth. Enjoy your delicious oatmeal just like it was fresh! {{image_2}} If you want a diabetes-friendly version, swap the brown sugar for maple syrup. Maple syrup has a lower glycemic index. You can also reduce the amount to control sugar levels. Using unsweetened almond milk helps keep sugars low. Feel free to change the flavors to your liking. You can add vanilla extract for a sweet twist. For a nutty taste, try adding almond butter. You can also mix in pumpkin puree for a fall flavor. This will create a creamy texture and a rich taste. Seasonal fruits can make this dish shine. In spring, add fresh strawberries or blueberries. In summer, diced peaches work great. In winter, consider adding chopped pears or cranberries. These additions will keep your oatmeal exciting all year long! Each serving of Slow Cooker Apple Cinnamon Oatmeal has about 280 calories. This comes from the oats, milk, and sugar. Here’s how it breaks down: - Rolled oats: 150 calories - Almond milk: 30 calories - Apples: 50 calories - Brown sugar: 70 calories This means you get a warm, filling breakfast. You can adjust the sugar for fewer calories. The ingredients in this oatmeal offer great health perks. Oats are high in fiber. They help digestion and keep you full. Apples add vitamins and antioxidants. They support heart health. Cinnamon may help lower blood sugar levels. Raisins or cranberries add natural sweetness and more fiber. This oatmeal is balanced in macronutrients. Each serving has: - Carbohydrates: about 50 grams - Protein: around 6 grams - Fat: about 5 grams The carbs come from oats and fruits, giving you energy. The protein helps keep you strong. The fat comes mainly from milk, adding creaminess and flavor. This oatmeal is a smart choice for a healthy breakfast! You can use steel-cut oats, but it will change the cooking time. Steel-cut oats need more time to cook. I suggest cooking them for 8-10 hours on low. This will give you a chewy texture. If you want a creamier dish, stick with rolled oats. They cook faster and blend well with the apples. This oatmeal stays fresh for up to five days in the fridge. Make sure to store it in an airtight container. When you're ready to eat, just reheat it on the stove or in the microwave. You can add a splash of milk to help it get creamy again. You can add many things for extra flavor. Consider adding chopped nuts like walnuts or pecans for crunch. A pinch of vanilla extract boosts the taste too. You might also enjoy adding a splash of maple syrup for sweetness. Fresh berries or sliced bananas can make it even more fun. In this blog post, we covered how to make delicious slow-cooked oatmeal. We discussed key ingredients, optional toppings, and substitutions to personalize your dish. I shared step-by-step instructions, helpful tips for creamy results, and ways to store and reheat leftovers. You learned about variations for different diets and the nutritional value. Remember, making oatmeal is simple and fun. Enjoy experimenting with flavors to keep your meals fresh and exciting. Now, you’re ready to create a comforting bowl of oatmeal!

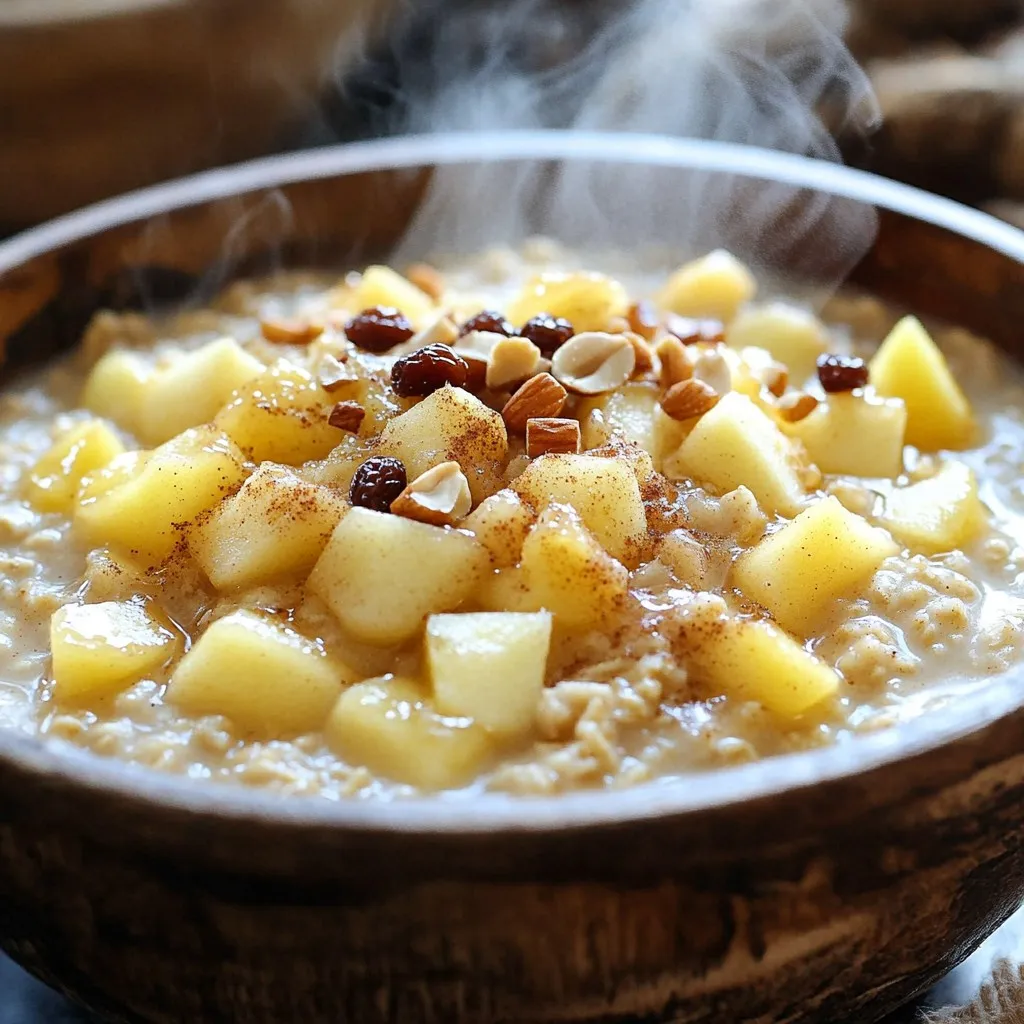
Start your mornings right with my Slow Cooker Apple Cinnamon Oatmeal Delight Recipe! This easy dish combines warm apples and fragrant spices for a cozy breakfast that fills you up. …

Read more

Categories Breakfast

Air Fryer Everything Bagel Zucchini Chips Delight

October 11, 2025 by Chef Luca
- 2 medium zucchinis - 1 tablespoon olive oil - 2 teaspoons everything bagel seasoning - Salt, to taste - Pepper, to taste These ingredients are simple yet powerful. Zucchini is the star here. It’s a great veggie that is low in calories and high in nutrients. When you slice it thinly, you create the perfect base for a crunchy snack. Olive oil helps the seasoning stick and adds a nice flavor. Everything bagel seasoning gives a unique taste. It mixes poppy seeds, sesame seeds, garlic, and onion. This combo makes every bite exciting. Adding salt and pepper allows you to adjust the flavor. You can make it just right for your taste. I love using fresh zucchinis. They give the best crunch and flavor. When you gather these ingredients, you’re ready to start your air fryer journey. Enjoy the process and get ready for a tasty treat! Start by washing the zucchinis under cold water. Trim both ends using a knife. Next, slice the zucchinis into thin rounds. Aim for about 1/8 inch thick. A mandoline works great for even slices, but a sharp knife is fine too. In a large bowl, toss the zucchini slices with one tablespoon of olive oil. Make sure each slice gets a nice coat. Then, sprinkle on two teaspoons of everything bagel seasoning. Add salt and pepper to taste. Gently toss again to mix the seasoning well. Preheat your air fryer to 375°F (190°C). This step is key for crispy chips. Arrange the seasoned zucchini slices in a single layer in the air fryer basket. Depending on your air fryer size, you might need to cook in batches. Air fry the zucchini chips for about 10-12 minutes. Remember to shake the basket halfway through. Check for a golden brown color and crisp texture. When done, take the chips out and let them cool on a wire rack. This cooling step helps them crisp up even more. To get your zucchini chips super crispy, you must watch the cooking time. I suggest checking them after about 8 minutes. Cooking can vary by air fryer, so stay alert. Once they are golden, take them out. Place the chips on a wire rack after frying. This step helps air circulate around them, making them even crisper. Always pick firm and fresh zucchinis. Look for ones that feel heavy for their size. If you choose larger zucchinis, remember they may take longer to cook. Smaller zucchinis usually yield better results. Their texture is less watery, which means crispier chips. While everything bagel seasoning is great, feel free to mix it up. Try adding garlic powder or paprika for a twist. If you love heat, sprinkle a bit of cayenne. You can even use cheese powder for a cheesy flavor. Adjust the seasonings to fit your taste. This way, each batch can be a new adventure! {{image_2}} You can make these zucchini chips even better. Try adding garlic powder or paprika for a new twist. These spices give a nice kick and extra taste. You can also sprinkle some cheese on top. Parmesan works well, adding a savory flavor that pairs great with the bagel seasoning. Don't limit yourself to zucchinis! You can use carrots or sweet potatoes instead. Slice them thin, just like the zucchinis. They will cook well and taste delicious in the air fryer. Each veggie brings its own unique flavor and texture, making your snack time fun and varied. These crunchy chips shine when served with dips. Try tzatziki for a cool taste, or hummus for a creamy texture. Guacamole also makes a great choice for a creamy dip. Pairing these chips with tasty dips will make your snack even more enjoyable! To keep your zucchini chips fresh, store them in an airtight container. This method helps prevent moisture from ruining their crispiness. Place a paper towel at the bottom of the container to absorb any excess moisture. You can keep them at room temperature for up to two days. If you want to enjoy them longer, consider refrigerating them. However, they may lose some crunch in the fridge. If your zucchini chips lose their crispness, don’t worry! You can easily revive them. Preheat your air fryer to 375°F (190°C). Place the chips in the basket in a single layer. Heat for about 3-5 minutes. Keep an eye on them to prevent burning. They should come out crispy and delicious, just like when you first made them. Yes, you can freeze zucchini chips! To freeze them properly, first, let the chips cool completely. Then, place them in a single layer on a baking sheet. Freeze until solid. After that, transfer them to a freezer-safe bag or container. They can last up to three months in the freezer. When you’re ready to eat them, reheat them in the air fryer for that perfect crunch. You will know the zucchini chips are done when they turn golden brown and crispy. Look for a firm texture, not soggy. If you shake the basket halfway through cooking, it helps them cook evenly. Each air fryer is different, so keep an eye on them as they approach the 10-minute mark. Yes, you can make these in an oven. Preheat your oven to 425°F (220°C). Spread the zucchini slices on a baking sheet lined with parchment paper. Bake for about 15-20 minutes, flipping them halfway. Check for that perfect crispiness before taking them out. Everything bagel seasoning is a mix of flavors that many people love. It usually includes sesame seeds, poppy seeds, garlic powder, onion powder, and salt. The blend adds a tasty crunch to many snacks, including these zucchini chips. You can buy it or easily make your own at home. We covered how to make tasty zucchini chips with simple ingredients. Start with fresh zucchinis. Slice them thin and coat with olive oil and seasoning. Air fry for a crisp finish. Remember to watch the cooking time for the best results. Experiment with different spices or try other veggies. Store any leftovers properly for freshness. You can also reheat them to keep their crunch. Enjoy this easy and healthy snack!

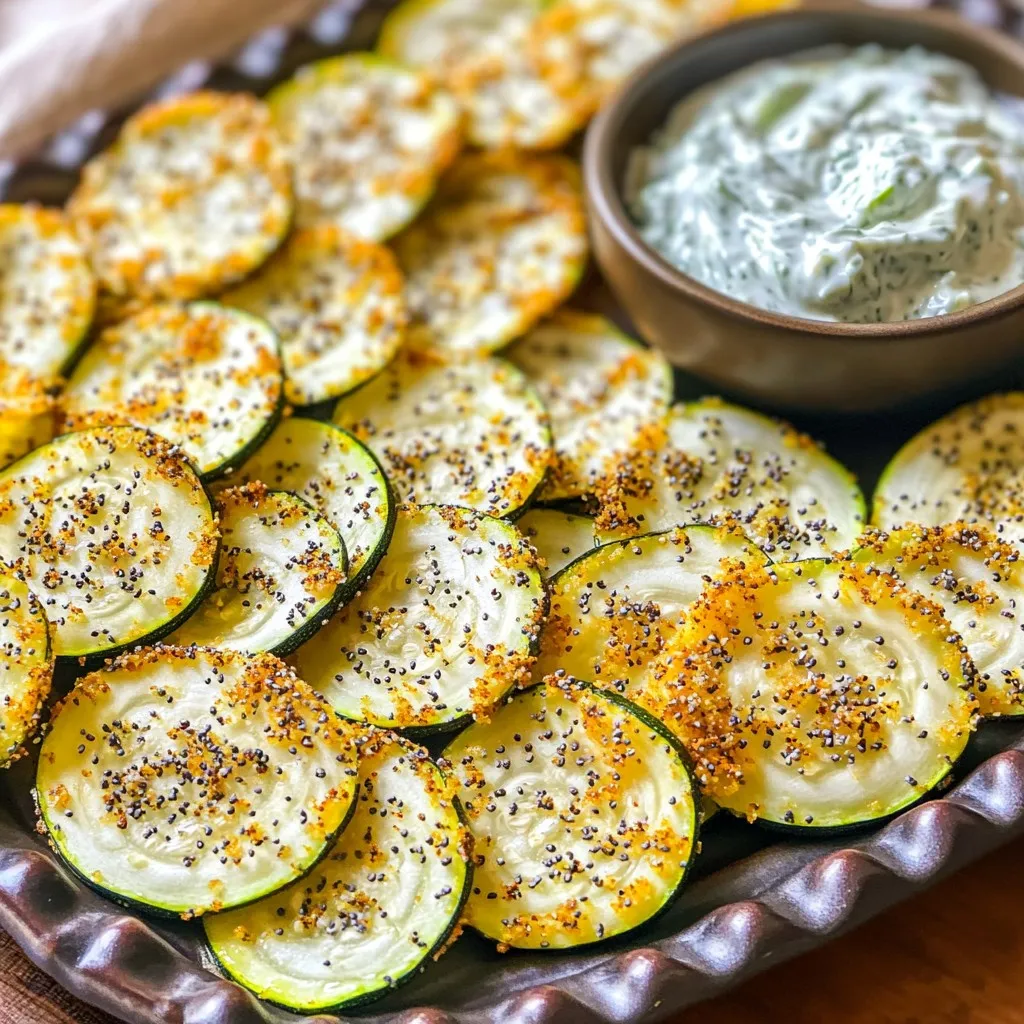
Are you ready to enjoy a crispy, tasty snack that’s good for you? My Air Fryer Everything Bagel Zucchini Chips are just what you need! With just a few simple …

Read more

Categories Appetizers

Creamy Pumpkin Alfredo Pasta Simple and Savory Dish

October 11, 2025 by Chef Luca
To make creamy pumpkin Alfredo pasta, you will need: - 8 oz fettuccine or spaghetti - 1 cup pumpkin puree (canned or fresh) - 1 cup heavy cream - 1 cup grated Parmesan cheese - 2 tablespoons unsalted butter - 2 cloves garlic, minced - 1 teaspoon Italian seasoning - Salt and black pepper to taste These ingredients create a rich and tasty dish. The pumpkin gives a smooth texture and a lovely color. The Parmesan adds a salty kick that balances well with the cream. If you can’t find some ingredients, here are a few substitutes: - Pasta: You can use any pasta shape, like penne or rotini. - Pumpkin Puree: Sweet potato puree works well in place of pumpkin. - Heavy Cream: Use half-and-half for a lighter sauce, or coconut milk for a dairy-free option. - Parmesan Cheese: Grated pecorino or nutritional yeast can work as alternatives. These swaps still give you a great taste. Feel free to mix and match based on what you have. Garnishes make your dish look and taste better. Here are some options: - Chopped fresh parsley for a pop of color and freshness. - Extra grated Parmesan cheese for added flavor. - A pinch of nutmeg brings warmth and depth. Adding these garnishes makes the dish even more inviting. They enhance the overall experience and add a personal touch. First, fill a large pot with water and add salt. Bring it to a boil. Once boiling, add 8 ounces of fettuccine or spaghetti. Cook the pasta until it is al dente, following the package instructions. This usually takes about 8-10 minutes. When done, reserve 1 cup of the pasta water. Drain the pasta and set it aside. In the same pot, melt 2 tablespoons of unsalted butter over medium heat. Once the butter is melted, add 2 cloves of minced garlic. Sauté the garlic for about 1-2 minutes. You want it to smell nice, not brown. Next, stir in 1 cup of pumpkin puree and 1 cup of heavy cream. Add 1 teaspoon of Italian seasoning. Cook this mixture for 3-4 minutes while stirring often. Now it’s time to add cheese! Gradually whisk in 1 cup of grated Parmesan cheese. Keep whisking until the cheese is melted and the sauce is smooth. If the sauce seems too thick, add some of the reserved pasta water, a little at a time, until it reaches the right consistency. Finally, add the cooked pasta to the sauce. Gently toss the pasta until every piece is coated. Season with salt, black pepper, and a pinch of nutmeg if you want a warm flavor. Serve your creamy pumpkin Alfredo pasta hot and enjoy! To make your pasta creamier, focus on the right ingredients. Use heavy cream for the best texture. It adds richness that makes the dish feel special. You can also whisk in more Parmesan cheese. This cheese melts well and makes the sauce smooth. If the sauce feels too thick, slowly add a bit of reserved pasta water. This step helps achieve your desired creaminess without making it too watery. To store your leftovers, let the pasta cool first. Then, place it in an airtight container. This keeps it fresh for up to three days in the fridge. Avoid adding extra sauce when storing, as it can make the pasta soggy. If you plan to eat it later, store the sauce and pasta separately. This method helps keep each component tasty. To enhance the flavors in your dish, start with sautéing garlic in butter. This step builds a solid base for your sauce. Adding nutmeg can also boost the warmth of the pumpkin flavor. It adds a slight sweetness that complements the dish well. Taste as you go. Adjust the salt and pepper to suit your palate. With these tips, you can create a richer and more flavorful pasta every time. {{image_2}} You can make the creamy pumpkin Alfredo pasta meat-free. This dish is already vegetarian since it uses pumpkin and cheese. To add more veggies, try spinach or mushrooms. Just sauté them with the garlic for extra flavor. You’ll enjoy more texture while keeping it simple and tasty. If you need a gluten-free version, switch to gluten-free pasta. Many options are available, like brown rice or chickpea pasta. These work well and taste great. Just follow the package instructions for cooking. The sauce remains the same, so you won’t lose that creamy goodness. For added protein, you can include chicken or sausage. Cook the meat in the pot before adding garlic. This way, it absorbs the flavors. If using chicken, grill or sauté it until golden. For sausage, slice and brown it before mixing. This will create a heartier meal that satisfies your hunger. To store your creamy pumpkin Alfredo pasta, let it cool first. Use an airtight container to keep it fresh. This helps maintain its creamy texture. You can store it in the fridge for up to three days. Make sure to label your container with the date. This way, you’ll know when to enjoy it again. When you’re ready to eat leftover pasta, take it out of the fridge. You can reheat it in a skillet on low heat. Add a splash of water or cream to keep it moist. Stir gently until it’s warmed through. You can also use a microwave. Heat it in short bursts, stirring in between. This helps avoid hot spots. If you want to freeze your creamy pumpkin Alfredo pasta, place it in a freezer-safe container. Leave some space at the top for expansion. It can last up to two months in the freezer. When you’re ready to eat, thaw it in the fridge overnight. Reheat it slowly to keep the texture creamy. Yes, you can use fresh pumpkin. To do this, cut the pumpkin into pieces. Bake or steam it until soft. Then, mash it to make a puree. This fresh puree will bring a bright flavor to your pasta. To make this dish dairy-free, swap heavy cream for coconut cream or almond milk. Use nutritional yeast instead of Parmesan cheese. These swaps keep the creamy texture while making it dairy-free. You can serve this pasta with a fresh salad or garlic bread. A side of roasted veggies pairs well, too. For protein, try grilled chicken or shrimp on top. Enjoy this dish with your favorite wine for a special touch. In this post, we explored the tasty world of creamy pumpkin Alfredo pasta. I shared key ingredients, substitutes, and optional garnishes. You learned step-by-step instructions for cooking, making the sauce, and combining everything. I offered tips to enhance flavor, store leftovers, and variations for different diets. Remember, you can use fresh pumpkin and make it dairy-free too. Enjoy experimenting and delight your taste buds with this warm dish!

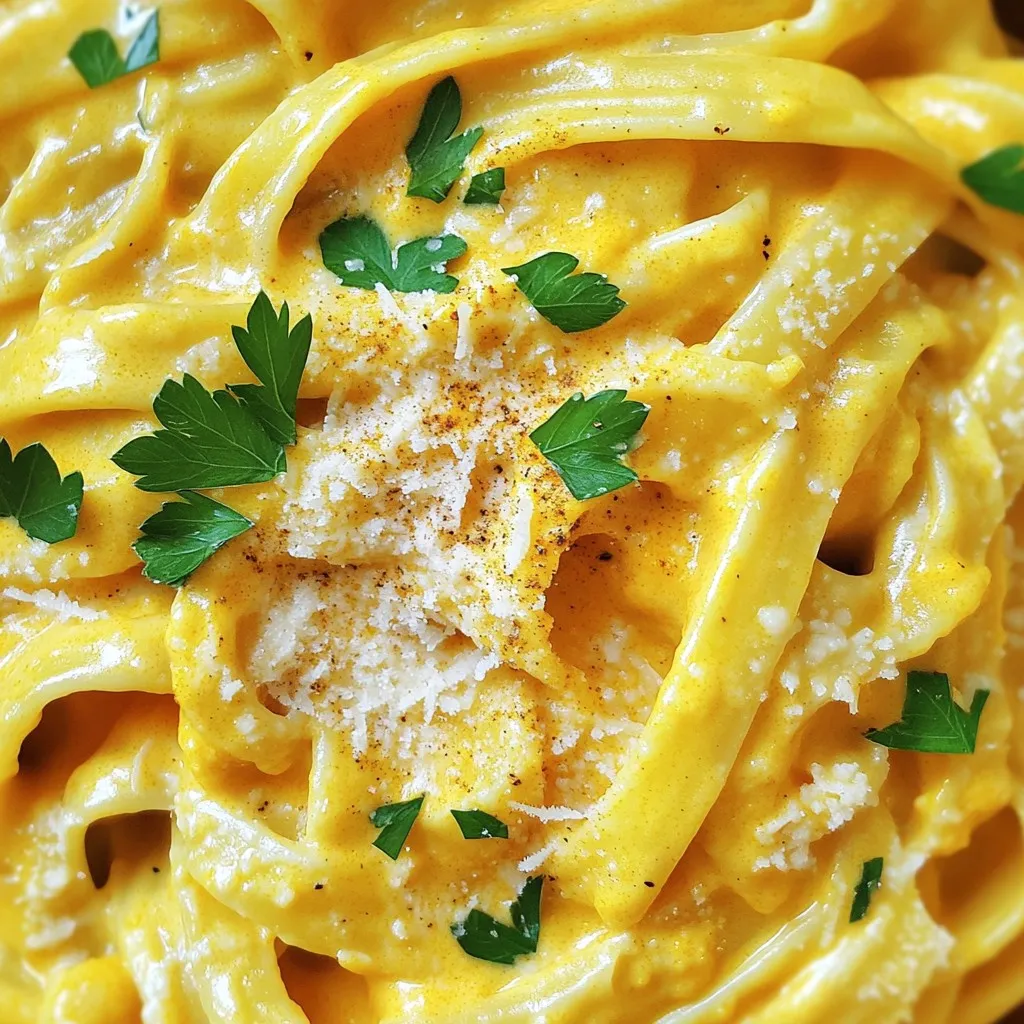
Looking for a cozy meal that bursts with flavor? I’ve got a treat for you: Creamy Pumpkin Alfredo Pasta! This simple and savory dish combines rich pumpkin and velvety sauce …

Read more

Categories Dinner

Snickerdoodle Cookie Bars Tasty and Easy Recipe

October 11, 2025 by Chef Luca
Snickerdoodle cookie bars are tasty and easy to make. Here are the ingredients you need: - 1 cup unsalted butter, softened - 1 cup granulated sugar - 1 cup brown sugar, packed - 2 large eggs - 2 teaspoons vanilla extract - 3 cups all-purpose flour - 2 teaspoons cream of tartar - 1 teaspoon baking soda - 1/2 teaspoon salt - 2 teaspoons ground cinnamon - 1/4 cup granulated sugar (for topping) - 1 teaspoon ground cinnamon (for topping) These ingredients combine to create a rich, sweet flavor. The butter adds creaminess, while the sugars bring sweetness. Eggs help bind everything together. The flour provides the structure, and cream of tartar gives that classic snickerdoodle tang. Don't forget the cinnamon! It adds warmth and spice, making these bars truly delightful. Feel free to gather all your ingredients before you start. This step makes cooking smoother. You will soon enjoy a delicious treat that everyone loves! First, you need to preheat your oven to 350°F (175°C). This step warms the oven, ensuring even baking. While it heats, grease a 9x13 inch baking dish. You can also line the dish with parchment paper. This makes it easy to lift the cookie bars out after baking. In a large bowl, cream together 1 cup of softened butter, 1 cup of granulated sugar, and 1 cup of brown sugar. Mix until it is light and fluffy. Next, add 2 large eggs one at a time. Make sure to mix well after each egg. Then, stir in 2 teaspoons of vanilla extract until everything is combined. In a separate bowl, whisk together 3 cups of all-purpose flour, 2 teaspoons of cream of tartar, 1 teaspoon of baking soda, and 1/2 teaspoon of salt. This step helps to evenly distribute the dry ingredients. Now, fold the dry mixture into the wet mixture. Mix until just combined. Don’t overmix, or your bars may become tough. Spread the cookie dough evenly in the prepared baking dish. Use a spatula to smooth the top. In a small bowl, mix 1/4 cup of granulated sugar with 1 teaspoon of ground cinnamon. Sprinkle this mixture over the dough. Bake in the oven for 20-25 minutes. Check for doneness by inserting a toothpick in the center. It should come out clean when done. Once baked, remove the dish from the oven. Let the cookie bars cool in the pan for about 10-15 minutes. This cooling time helps them set. After that, transfer them to a wire rack to cool completely. Once cool, cut the bars into squares and serve. Enjoy your delicious Snickerdoodle Cookie Bars! To get the right texture, avoid overmixing your dough. Overmixing can make your bars tough. Mix until just combined for a soft and chewy texture. Using room temperature ingredients is key. When butter and eggs are at room temperature, they blend better. This helps create a smooth dough and ensures even baking. To boost flavor, add spices like nutmeg or allspice. These spices pair well with cinnamon and add depth. You can also try different types of sugar. Using brown sugar adds moisture and a rich flavor. Mixing in some coconut sugar will give a caramel note too. One common mistake is overbaking the bars. Keep an eye on them. When the edges are golden, it’s time to pull them out. The center will continue to firm up as they cool. Proper measuring makes a big difference. Use the spoon and level method for flour. This ensures you don’t pack it too tight, which can make bars dense. {{image_2}} You can change up your Snickerdoodle cookie bars in fun ways. Adding nuts or chocolate chips gives them a new twist. Try mixing in 1 cup of chopped walnuts or pecans. If you want chocolate, use 1 cup of chocolate chips. Another idea is to create a maple or pumpkin twist. To make maple bars, add 1/4 cup of maple syrup to the dough. For pumpkin bars, mix in 1 cup of pumpkin puree and reduce the butter by 1/4 cup. These tweaks make the bars unique and tasty. If you have dietary needs, you can still enjoy these bars. For gluten-free options, use a 1:1 gluten-free flour blend. This keeps the texture nice. For vegan substitutions, replace the butter with coconut oil and the eggs with flaxseed meal. Use 1 tablespoon of flaxseed mixed with 2.5 tablespoons of water for each egg. These swaps make your bars fit for everyone. Snickerdoodle cookie bars taste great on their own, but pairing them with ice cream adds a special touch. Vanilla or cinnamon ice cream works best. You can also top them with frosting. A simple cream cheese frosting can elevate the flavor. If you want to save some for later, store them in an airtight container. They stay fresh at room temperature for up to a week. For longer storage, you can freeze them. Just wrap them well to keep them tasty for up to three months. To store leftover snickerdoodle cookie bars, keep them in an airtight container. You can leave them at room temperature for up to three days. If you want them to last longer, the fridge is a good option. Just make sure the container is sealed tight. This will keep them fresh and soft. Freezing these cookie bars is easy! First, let them cool completely. Then, cut them into squares. Wrap each square in plastic wrap or foil. Place them in a freezer-safe bag or container. They can stay in the freezer for up to three months. To thaw, take out as many squares as you want. Leave them at room temperature for a few hours or microwave for a few seconds. When stored right, snickerdoodle cookie bars last about three days at room temperature. In the fridge, they can last up to a week. If frozen, they can stay good for three months. Always check for any signs of spoilage before enjoying. Snickerdoodle cookie bars are thicker and softer than regular cookies. You bake them in a pan, not as individual cookies. This gives them a chewy texture. They also have the classic snickerdoodle flavor from cream of tartar and cinnamon. Yes, you can use whole wheat flour or gluten-free flour. However, this may change the texture. Whole wheat flour makes them denser. Gluten-free flour often needs a binder like xanthan gum. If you switch flours, watch the dough closely. Check them at 20 minutes. The edges will be golden brown. Insert a toothpick in the center. If it comes out clean, they are done. If there’s batter on the toothpick, bake a few more minutes. Yes, you can double the recipe. Use a larger baking dish. A 9x13 inch pan works well for a single batch. For a double batch, use a 12x18 inch pan. Keep an eye on baking time. They may need a few extra minutes. If the bars are dry, try adding a little milk or butter. This can help add moisture. You can also serve them warm with ice cream. This adds creaminess and flavor, balancing the dryness. You now have all the steps to make tasty Snickerdoodle Cookie Bars. We covered the ingredients, instructions, tips, variations, storage, and common questions. Remember to enjoy the baking process and have fun experimenting with flavors. Following these steps will help you create delicious treats every time. Don’t be afraid to share your success with friends and family. Happy baking!

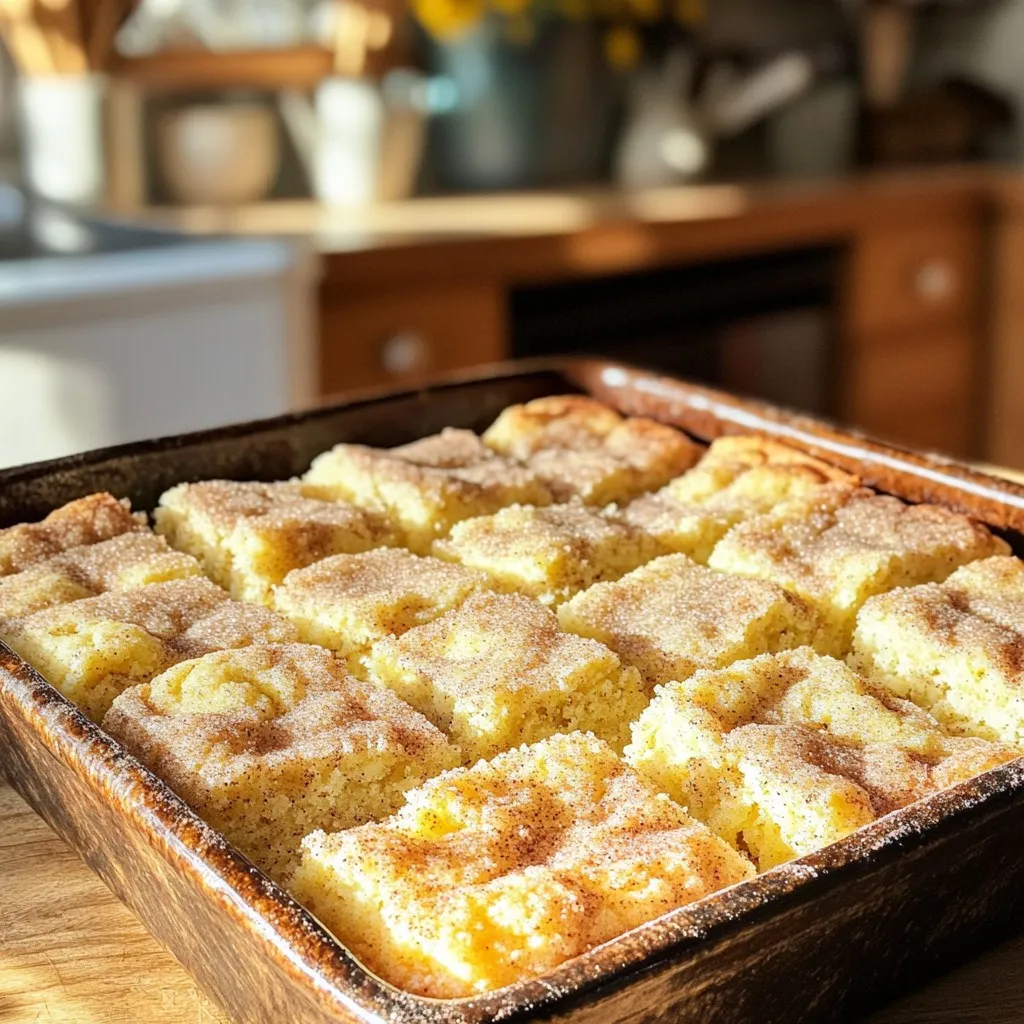
Craving a tasty treat that’s easy to make? Snickerdoodle Cookie Bars are the answer! These delightful bars combine the classic flavor of snickerdoodles with the fun of bar cookies. With …

Read more

Categories Desserts

Sheet-Pan Miso Maple Salmon & Broccoli Delight

October 11, 2025 by Chef Luca
- 4 salmon fillets (about 6 oz each) - 2 cups broccoli florets - 2 tablespoons miso paste (white or yellow) - 3 tablespoons maple syrup - 2 tablespoons soy sauce (or tamari for gluten-free) - 1 tablespoon sesame oil - 1 tablespoon grated fresh ginger - 2 cloves garlic, minced - 1 teaspoon sesame seeds (optional, for garnish) - Salt and pepper, to taste - 2 green onions, sliced for garnish When you gather the ingredients for Sheet-Pan Miso Maple Salmon & Broccoli, you set the stage for a quick and tasty meal. Salmon is rich in omega-3s, which are great for your heart. Broccoli brings fiber and vitamins, making this dish healthy and balanced. Miso paste adds a deep umami flavor that pairs well with the sweetness of maple syrup. The soy sauce or tamari gives it a salty touch, while sesame oil adds richness. Fresh ginger and garlic bring a warm kick that brightens the dish. Don’t forget the sesame seeds and green onions. They add a nice crunch and pop of color. With these ingredients, you create a meal that is not just good for you but also looks great on your plate. Enjoy the process of bringing these flavors together! Set your oven to 400°F (200°C). This temperature helps cook the salmon and broccoli just right. Line a large baking sheet with parchment paper. This step makes cleanup easy and keeps food from sticking. In a small bowl, mix together the miso paste, maple syrup, soy sauce, sesame oil, grated ginger, and minced garlic. Use a whisk to blend everything until smooth. The marinade should be thick but pourable for the best coating. Place the salmon fillets on one side of the prepared baking sheet. Brush half of the miso maple marinade over each fillet. Make sure to cover them well. Lightly sprinkle with salt and pepper to enhance the flavor. In a large bowl, toss the broccoli florets with the remaining marinade. Mix well to ensure each piece is coated evenly. This helps the broccoli absorb the sweet and savory flavors. Spread the marinated broccoli on the other side of the baking sheet. Leave space between the broccoli and the salmon. This space allows for even cooking and helps the broccoli crisp up nicely. Place the baking sheet in the preheated oven. Roast for about 15 to 20 minutes. The salmon should flake easily with a fork, and the broccoli should be tender and slightly crispy at the edges. Remove the sheet pan from the oven. Sprinkle sesame seeds over the salmon and broccoli for a nice touch. Garnish with sliced green onions before serving. This adds color and a fresh flavor to your dish. Cooking salmon well is key to this dish. If your salmon fillets are thicker, you need more time. For fillets about one inch thick, cook for 15-20 minutes. Thicker fillets may need up to 25 minutes. To check doneness, use a fork. Gently flake the salmon. It should come apart easily. If it does, your salmon is ready! Getting the right texture for broccoli is important. You want it to be tender but still a bit crisp. To achieve this, cut the florets into similar sizes. This helps them cook evenly. Toss them well with the marinade. This adds flavor and helps them roast nicely. If you want extra flavor, try adding a squeeze of lemon juice before serving. You can save time by prepping the marinade in advance. Mix the miso paste, maple syrup, soy sauce, sesame oil, ginger, and garlic. Store this in the fridge for up to two days. When you're ready to cook, simply marinate the salmon and broccoli. This makes the cooking process faster and easier! {{image_2}} If you want to swap salmon, you have options. Try using trout, cod, or tilapia. Each fish has its unique taste and texture. - Trout: This fish is rich and buttery. It cooks similarly to salmon. - Cod: A mild and flaky fish. Bake it for a little less time. - Tilapia: A budget-friendly choice. It cooks quickly and soaks up flavors well. When using other fish, adjust the cooking time. Cod may need 12-15 minutes, while tilapia can be done in about 10 minutes. Always check for flakiness with a fork to ensure doneness. Broccoli is great, but many veggies work well too. You can mix in bell peppers, snap peas, or carrots. Each adds its own crunch and flavor. - Bell Peppers: Sweet and colorful, they roast nicely. - Snap Peas: These keep a fresh crunch. Add them in the last 5 minutes. - Carrots: Cut them thin for quick cooking. They add a nice sweetness. Seasonal veggies are fun too. In fall, try Brussels sprouts or butternut squash. In spring, asparagus or zucchini shines well with the dish. Feel free to tweak the sauce to your taste. If you like it sweeter, add more maple syrup. For a kick, try adding chili flakes or sriracha. - Sweeter Version: Increase maple syrup to 4 tablespoons. - Spicier Version: Add 1 teaspoon of chili flakes to the marinade. These changes keep the dish exciting and can fit your mood or season. Enjoy making it your own! To keep your leftover sheet-pan miso maple salmon and broccoli fresh, store them in an airtight container. Place the salmon and broccoli in the fridge within two hours of cooking. This helps prevent bacteria growth. They will stay good for up to three days. If you want to keep them longer, freeze them. When you reheat salmon, you want to keep it moist. The best way is to use the oven. Preheat your oven to 350°F (175°C). Place the salmon and broccoli on a baking sheet. Cover them with foil to trap steam. Heat for about 10-15 minutes. This helps maintain their texture and flavor. You can also use a microwave, but be careful not to overcook. Heat on medium for 1-2 minutes, checking often. To freeze your dish, let it cool completely first. Wrap each salmon fillet and broccoli in plastic wrap, then place them in a freezer bag. Make sure to remove as much air as possible. This prevents freezer burn. You can freeze it for up to three months. When ready to eat, thaw it in the fridge overnight. Reheat as mentioned above to enjoy it again without losing flavor. Cook salmon for about 15 to 20 minutes at 400°F. This time works well for salmon fillets that are about 6 ounces each. You want the salmon to flake easily with a fork when done. If your fillets are thicker or thinner, you may need to adjust the time slightly. Yes, you can use frozen salmon. However, you should thaw it first. Thaw the salmon in the fridge overnight or place it in cold water for about an hour. If you cook it from frozen, add a few extra minutes to the cooking time. Make sure it reaches an internal temperature of 145°F for safety. This dish pairs well with several sides. Here are a few suggestions: - Steamed rice or quinoa - Mixed green salad - Roasted sweet potatoes - Sautéed spinach or green beans These sides complement the flavors of the salmon and broccoli nicely. Yes, this recipe can be gluten-free. Use tamari instead of soy sauce. Check that your miso paste is gluten-free too. This way, you can enjoy the dish without gluten concerns. This blog post walks you through making Miso Maple Salmon with broccoli. We covered the key ingredients, including fresh salmon, savory miso, and sweet maple syrup. Step-by-step, you learned how to prep, marinate, and roast your dish to perfection. Finally, explore variations like different proteins or seasonal veggies to match your taste. Remember, storage tips ensure your leftovers stay fresh and tasty. Enjoy your cooking adventure and savor the delicious results!

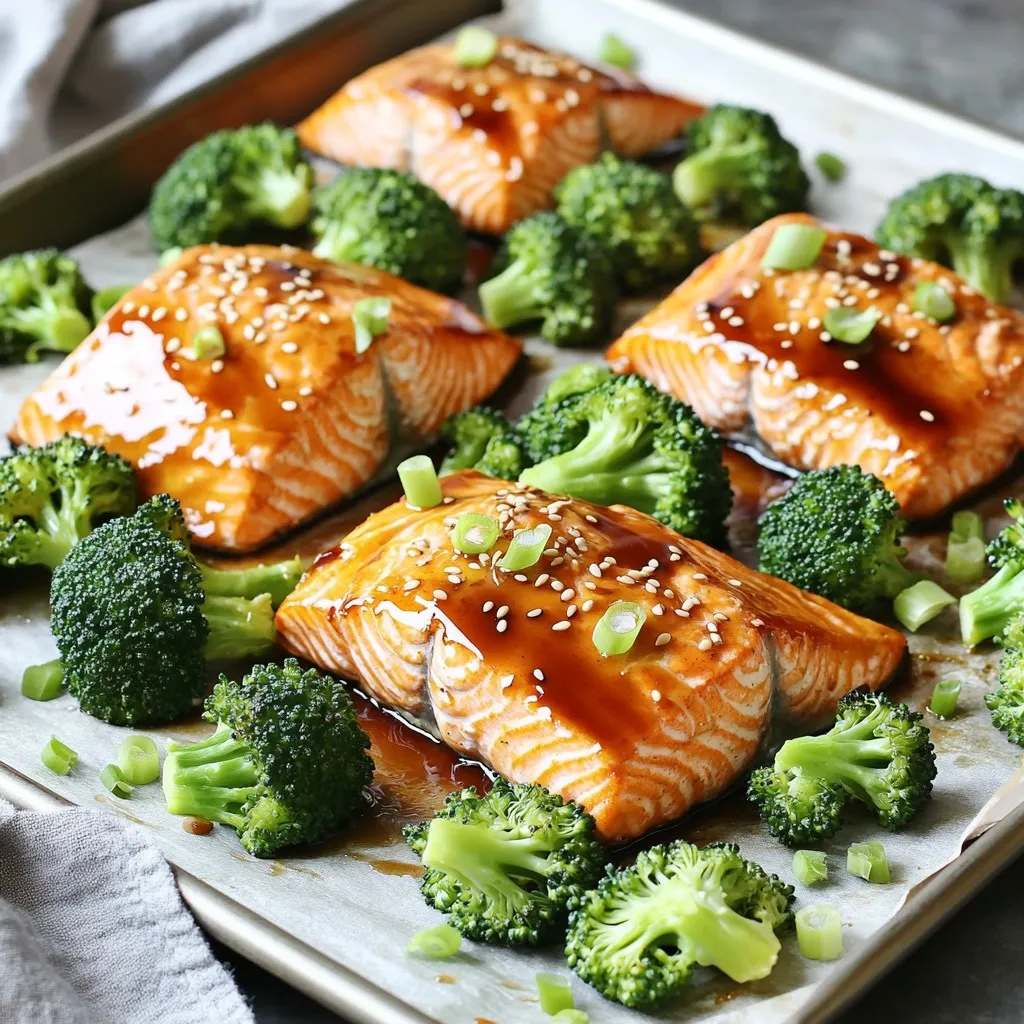
Want a quick and tasty dinner that’s loaded with flavor? Look no further than my Sheet-Pan Miso Maple Salmon & Broccoli Delight! This easy recipe combines tender salmon fillets and …

Read more

Categories Dinner
Older posts
Newer posts
← Previous Page1 … Page12 Page13 Page14 … Page122 Next →

STIRRED RECIPES

Where every dish begins with a stir! 🍲✨

PAGES

Home About Contact Privacy Policy Terms & Conditions Cookie Policy GDPR Policy Copyright Policy Disclaimer

CATEGORIES

Appetizers Desserts Salads Breakfast Dinner

Contact

  • Pinterest
  • Mail
Copyright © 2026 Stirred Recipes. All rights reserved.